
6 Ways to Stiffen a Bouncy Floor
Solid options for reducing joist deflection include added blocking, sistered joists, built-up beams, and more.
Bouncy floors are one of the most vexing problems faced in houses, both new and old. Contributing editor Mike Guertin teams up with structural engineer David Grandpré to detail six common, and not-so-common, ways to stiffen up the floor joists to reduce deflection and keep the china cabinet from wobbling.
Demystifying Floor Deflection
If you haven’t fallen into the basement of your house already, don’t worry; your bouncy floor is probably not an indication of a disaster waiting to happen. Floor deflection is common in older homes because the floor joists often are smaller or are spaced farther apart than the joists in modern homes.
Of course, new homes also can have bouncy floors if the joists are approaching the maximum spanning distance for the building loads they are supporting. Long-span joists may meet framing design criteria and the building code, yet still feel uncomfortable.
Some Deflection in Floors Is Good
A well-designed wood floor feels stiff as you walk on it but still gives slightly under foot, absorbing some of the impact of your steps. Too much bounce, though, can make the china cabinet wobble. You can shore up floor joists and reduce the bounce in a number of ways, but the six methods outlined here represent a mix of common and not-so-common solutions. The best choice depends on access to the joists, obstructions in the floor system, or current remodeling plans; one technique or a combination may be your most practical solution.
It’s important to make these improvements carefully. If existing joists have been weakened due to rot or insect damage, glue and fasteners won’t hold well, and your work may be ineffective. Loose blocking or an underfastened subfloor won’t bring any benefit, so take extra time and care during installation. Also, you can use jacks to relieve the load on joists while the work is being done. Jacks improve the effectiveness of your floor-stiffening work.
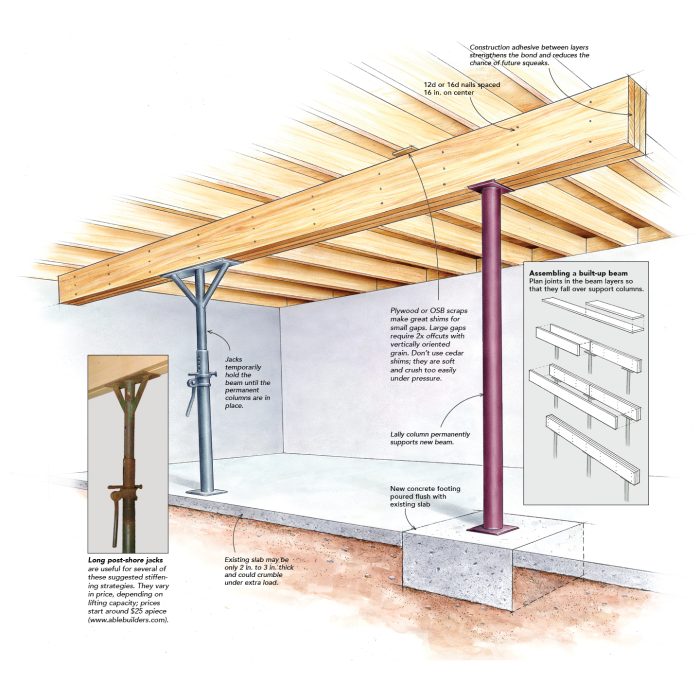
1.) Built-Up Beams Are Rock Solid but Reduce Headroom This solution works best in crawlspaces where you aren’t too concerned about limiting headroom or cluttering the space with columns. If you don’t mind the obstructions or loss of headroom, though, beams and columns certainly can be added in basements, too. DetailsThe important thing to remember when adding a support beam is also to add proper footings to support each column. In most instances, a 2-ft.-square, 1-ft.-deep footing provides adequate support. However, when you’re installing LVL or steel beams with wider column spacing, larger footings may be necessary to support the load. The beam size depends on the load and span of the beam between columns. Also, keep in mind that the closer you space the footings and columns, the more rigid the new beam will be and the stiffer the floor will feel. To make a new footing, cut the slab, dig out the earth beneath, and pour concrete flush with the top of the slab. Next, snap a chalkline across the underside of the joists in the middle of the span to help align the new beam. Use post shore jacks, screw jacks, or hydraulic jacks to lift the new beam into position beneath the joists. Finally, cut and install new columns to fit between the beam and the new footing. |
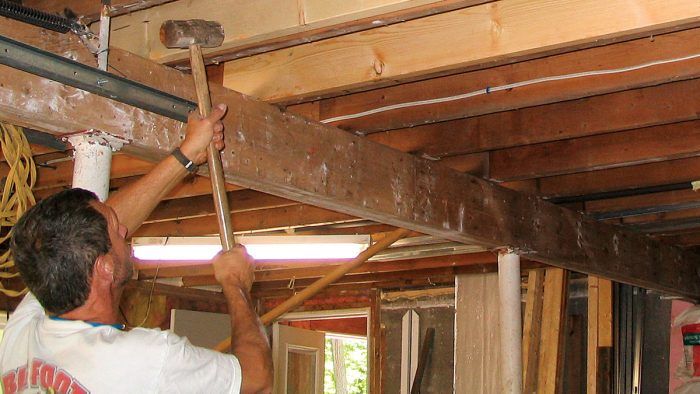
2.) Stiffening the Floor With Sister Joists Is a Tried-And-True MethodAdding a second joist of the same size alongside each existing joist, also known as sistering the joists, stiffens a floor. When headroom permits, sistering with taller joists provides more bang for the buck than sistering with same-size joists. Even though taller joists need to be notched to fit existing mudsills and support beams (photo right), the added depth along the middle of the span provides extra support and further reduces bounce. Engineered lumber—LVLs, for example—also can be used as sister joists and adds more stiffness to a floor than dimensional lumber.  DetailsIf the existing floor joists are bowed downward noticeably, they might need to be jacked up slightly to make installing the new joists easier. To minimize future squeaks, spread construction adhesive onto both the existing joist and the new joist. Position the top of the new joist alongside the top of the existing joist. Use a sledgehammer or a pry bar to force the bottom of the new joist along the mudsill and center support beam of the floor system (or the opposite mudsill on short spans) until it’s flat against the existing joist. Nail the new joist to the existing joist with two rows of 10d to 16d nails spaced 6 in. on center. For additional stiffness, sister joists can be applied to both sides of a joist. |
3.) Flexible Plywood Strips Are Great for Tight QuartersAn alternative to adding full-length sister joists is to apply two layers of plywood to one side of the bouncy joists. Shorter, lighter, more flexible plywood strips often are easier to install in tight quarters than full-size dimensional lumber.  DetailsRip 3⁄4-in. plywood into 8-ft.-long strips equal to the height of the existing joists. Use a combination of construction adhesive and nails or screws to fasten two layers of strips to the existing joist, spanning from the mudsill to the center support beam or opposite mudsill. Place the first 8-ft.-long strip 1 ft. off center from midspan, and fill toward the ends with pieces. Then glue and fasten a second layer of plywood starting with a full strip 2 ft. off center from the first layer. When fastening to joists less than 8 in. tall, drive two rows of 8d nails or 2-in. wood screws 6 in. on center into each layer of plywood. If the joists are taller than 8 in., add a third row of fasteners. This system relies on good workmanship for success. Be generous with adhesive and fasteners; and make sure that the existing joists are solid and not deteriorated. If the connection between the two plywood layers and the existing joists isn’t solid, you don’t maximize the benefit of using this technique. |
4.) Weakened Planks and Second-Floor Bounces Are Best Fixed With a New Layer of PlywoodFloors in older homes often are decked with diagonally laid 1x planks instead of plywood or OSB (oriented strand board). If you’re planning to remodel or just add new flooring to a room, consider adding a layer of 3⁄4-in. plywood subfloor sheathing over the lumber decking. When nailed through the old subfloor and into the joists, the new subfloor can help to reduce floor bounce. This solution also works for problematic second floors, where accessing the joists through the first-floor ceiling isn’t a possibility. When considering this option, think about the transition between old floor heights and new floor heights at doorways. You may need to add thresholds and cut doors. Also consider the loss of headroom. Sheathing also can be applied to the bottom of the floor joists instead of or in addition to being installed on top.  DetailsTo minimize the chance of future squeaks and to help secure the new floor sheathing, start by spreading a generous amount of construction adhesive over the old planks. Lay the new sheets perpendicular to the floor joists, and orient panel ends over joists. Choose ring-shank nails or screws that are long enough to penetrate the joists by 11⁄2 in., and space them every 6 in. on center. Add an additional row of fasteners midway between the joists to pull the layers tightly together. When installing on the underside of the joists, the process is the same. You can apply sheathing to the underside of floor joists only if the bottom edges are at the same level. If the joist level varies by more than 1⁄2 in., you can’t use this method. |
5.) Metal Straps Are Deceptively Effective and Simple to InstallTim Brigham of Koloa, Kauai, Hawaii, suggested the use of continuous steel straps to stiffen joists in “Tips & Techniques” (FHB #89, pp. 30, 32). Wrap the joists from the top of one end, around the bottom at midpoint, and back to the top of the opposite end. When a load is applied to the middle third of the joists, the steel strap transfers the force of the weight to the nails along the length of the joist, particularly along the ends where the joist is more rigid.  DetailsTo begin, lift up the joists with jacks and a temporary beam about 1 ft. from midspan of the joists. Raising the joists slightly (anywhere from 1⁄8 in. to 1⁄2 in., depending on the span and on the conditions) before installing this system helps to ensure that the straps are nice and tight when the jacks are removed. Starting above the mudsill on one side of the joist, sink metal-connector nails through every hole along the first 2 ft. of strap. With the first 2 ft. fastened securely, the strap then should be fastened every 6 in. and folded with crisp bends around the bottom of the joist and onto the opposite side. Nail the strap to the opposite side of the joist the same way as the first side. For additional support, straps can be installed on both sides of the joists and cross-lapped at the center. Once all the joists are strapped, remove the temporary beam. |
6.) Solid Blocking Ties the Floor Together but Takes Time to Install CorrectlyProperly installed solid-wood blocking helps to transfer weight to adjacent joists so that the floor acts as a stronger unified system. If you already have blocking or bridging installed between joists, it may be ineffective because it’s not tight. Metal and wood cross-bridging are both prone to loosening over time as wood expands and contracts. Solid blocking is susceptible to shrinkage, but it typi-cally works better than using the cross-bridging method.  DetailsThis method works best if joists are dry, so it’s a good idea to wait until late winter or early spring when the heating season is coming to an end and the moisture content of the joists likely will be at its lowest. Start by snapping a chalkline at the middle span of the floor running perpendicular to the joists. Using dry dimensional lumber, cut blocks just a whisker longer than the space between joists, and pound them into place so that they are tight. Blocks that aren’t tight will end up causing squeaks. It may be tempting to install this type of blocking in a staggered line because it’s easier to fasten. But solid blocking is meant to work as a system, so keep the blocks in line. If you need to get around pipes or ductwork, use split blocks (a pair of 2x4s, for instance) on top and bottom to maintain the path. Through-nail into the end of each block using three or four 16d spikes or 31⁄2-in.-long wood screws. Pneumatic palm nailers work great for driving nails in these tight situations (photo below). For added support, you also can install two or three rows of blocking spaced equally apart. |
— Mike Guertin; builder, remodeler, and contributing editor to Fine Homebuilding from East Greenwich, Rhode Island. David Grandpré is a registered professional engineer with C.A. Pretzer Associates Inc. in Cranston, Rhode Island. Photos by Mike Guertin, except where noted.
From Fine Homebuilding #184
RELATED STORIES
Fine Homebuilding Recommended Products
Fine Homebuilding receives a commission for items purchased through links on this site, including Amazon Associates and other affiliate advertising programs.

Magoog Tall Stair Gauges

Portable Wall Jack
11" Nail Puller


View Comments
If I may interject here to add a bit of insight to the blocking comment. There is a considerable difference between standard blocking and the installation of an IBS2000 Load Share Connector System. (as shown in the thumbnail pic) . Engineered technical differences in deflection and vibration are documented and substantial when IBS2000 connectors are used along with adequate strapping below and glued and screwed sheathing above. Kenkeknem Smart Build can provide these numbers for comparison with any floor you may have in place.
Thank you gentlemen.
http://www.ibs2000.com
1-778-754-7522
The IBS2000 load system allows joist spans in excess of the usual code spans. The system allows an architect to specify the same joists as used on the rest of the floor and avoids a raised floor on part of the floor plan. The problem however, is that carpenters and other tradesmen don't understand the system. They were installed in my house, but not to specification, and the subsequent HVAC contractors just knocked them out of the way as they would with usual diagonal bracing. I had researched the system and during my inspection I brought it to the attention of the builder who's response was "what's wrong with that". ...and thus began the process of me educating one more individual.
These type of problems are not isolated to the IBS2000 system but occur when any new and unusual building technique is introduced. There are no certifications required except for plumbers and electricians and no on-going educational requirements within the building trades. (I won't go into what I've seen in the field with the Zip system.)
Burb guy (and others),
"Prints? Prints! We don't read no stinkin' prints!"
My experience was along the lines of "Simpson? Who needs them when we have a bunch of 16d nails?" I found my experience reading FH & JLC had deluded me into thinking everyone had the same standards & knowledge I see in the magazines.
There have been several articles lately (https://www.jlconline.com/training-the-trades/how-will-construction-solve-its-skilled-labor-crisis_o?utm_source=newsletter&utm_content=Article&utm_medium=email&utm_campaign=JLC_091519,)
It's clear there's a real lack of respect for the trades in America (less so in Europe) and that we need to correct that. John Gardner said, "A society that respects its plumbers less than its philosophers will soon find that neither its pipes nor its ideas hold water."
BUT, the flip side is that to earn that respect, we have to insist on good workmanship and as you note, tradespeople who view education as a lifelong process. "We've always done it that way." just doesn't make the grade any more.
FWIW, when I clicked on the IBS URL above, it was all in Korean, which I can't read. Try https://ibs2000.business.site/
If you are starting with fairly moist joists (eg a new build), diagonal bracing is actually better than solid blocking, because as the joists shrink, the braces tighten in place (wood has very little shrinkage in the lengthwise direction).
Good, informative comments. Thank you.