7 Common Fireblocking Locations
Builder Mike Guertin outlines fire-safety code requirements and suggests acceptable fireblocking and draftstopping methods and materials.
Synopsis: When concealed spaces—between floor joists or wall studs, for instance—connect to other spaces around them, there’s a risk of fire and gases spreading through a home. The building code explains what fireblocking is meant to do, but it’s up to builders and inspectors to understand where fireblocking is needed, and this is often overlooked. Fireblocking is required in a host of problem areas, with specific guidelines for approved fireblocking materials and their applications. Builder Mike Guertin explains where fireblocking is likely needed and the various acceptable fireblocking and draftstopping methods and materials.
Of all the fire-protection measures that go into a house, fireblocking seems to get the least attention from builders. That’s probably because, unlike visible safeguards like smoke detectors and sprinkler systems, fireblocking can’t be seen in a finished home.
The fact that it’s hidden from view is because of what fireblocking is intended to do: restrict the movement of fire and combustion gases through concealed pathways in wood-framed homes. The key word here is “concealed.” If a fire starts in a space that can’t be seen—say, in wiring between studs that are covered in drywall—it isn’t likely to be noticed nearly as quickly as a fire in a visible space such as a kitchen.
Individually, concealed spaces between studs or floor joists aren’t a problem. But when they connect to others around them—from a wall to a floor above, for example—flames and combustion gases can spread quickly to other parts of a home.
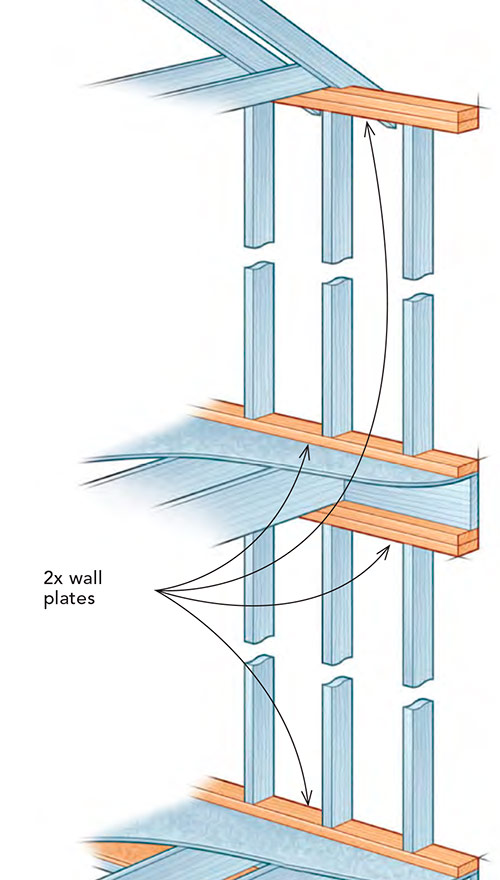
For a basic understanding of how fireblocking cuts off these concealed pathways, it helps to look at modern conventional platform framing, in which vertical wall studs are nailed between horizontal wall plates that cap the studs at both ends. Both the wall plates and the studs are forms of fireblocking—the plates stop or slow flames from moving vertically; the studs prevent or slow lateral spread. In very simple homes, platform framing alone could satisfy most of the code’s fireblocking requirements. But as you add features like stairs, utility chases, and other things that complicate the house’s framing, the pathways that flame and gases can pass through multiply. That’s where additional fireblocking measures come in.
When I said at the beginning that home builders don’t seem to give fireblocking much attention, it’s because it’s missing in almost every house I remodel. While I expect this in homes built before my state instituted a statewide building code, I still find problems in homes built right up to the present. Even without removing drywall, I can guess where the concealed pathways for fire and smoke spread exist just based on common mistakes. In basements, there’s often a problematic gap behind furred-out walls. Soffits are the usual suspects in kitchens and baths. Utility chases also frequently lack adequate fire protection, and can provide an easy path for fire all the way from the basement to the attic.
Other locations aren’t so obvious and can be easy to miss, especially when remodeling. I nearly missed one recently. We furred out a 2×4 interior wall for a walk-in shower to avoid having to use a narrow tile strip along the front edge. I nailed nominal 2×2 strips to each stud, leaving a handful of 1-1⁄2-in.-deep cavities open to the floor-joist system above. Luckily my brother—not thinking about fireblocking—complained that I didn’t give him anything to fasten the top edge of the tile backer to. Since the furring was installed after the framing, plumbing, and electrical inspections, the inspectors would have never caught it.
Thinking about it now, I’ve made lots of fireblocking mistakes over the years. But by understanding the codes’ intent, and what fireblocking is meant to achieve, we can all avoid these errors.
Fireblocking basics
Here’s the opening paragraph of the 2018 International Residential Code’s (IRC’s) section on fireblocking: “R302.11: In combustible construction, fireblocking shall be provided to cut off both vertical and horizontal concealed draft openings and to form an effective fire barrier between stories, and between the top story and the roof space.”
That’s the entirety of the IRC’s general guidance on where to fireblock—what’s known as a performance section. Rather than prescribe what to do where, the performance section describes what fireblocking is meant to do. This section goes on to list a handful of locations that must be fireblocked, but it’s important to understand that the list is not exhaustive; it’s just a rundown of common features that must be fireblocked to meet code. It also doesn’t dictate how fireblocking should be accomplished, but it does list materials that can be used. It’s up to builders and inspectors to understand the code’s intent, identify additional locations where fireblocking is needed, and install suitable materials in a way that meets the requirements of a fireblock.
Know the problem areas
When we remodel homes to improve their energy efficiency, air leakage often tells the story of what’s missing. As we run a blower door and hunt around an attic or basement with a smoke pencil, most of the big leaks we find are spots where fireblocking should be but isn’t. Utility chases without blocks at the basement and attic levels, open kitchen or bathroom soffits, plumbing-trap holes, required framing standoffs around masonry chimneys, and gaps around pipes and wires are frequent culprits.
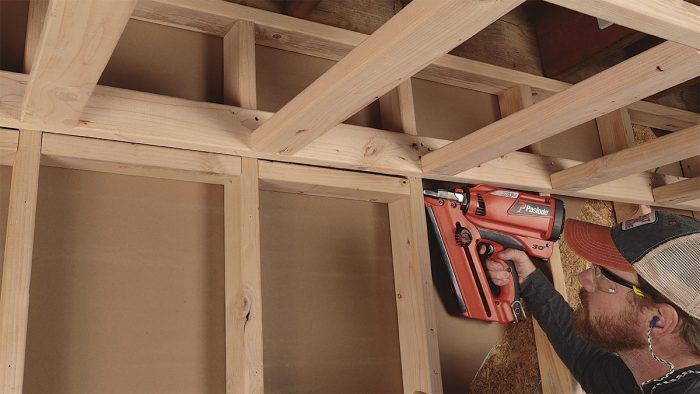
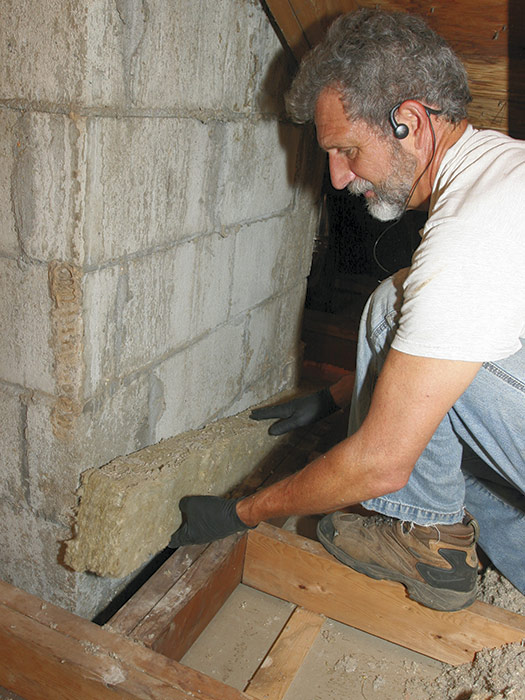
Basements contain a host of known problem areas. These spaces are often full of pipes, wires, and ducts, and, as new homes are usually sold with unfinished basements, the owners typically want to construct walls and ceilings to conceal these mechanicals. If the homeowner does the work themselves or hires an inexperienced remodeler, there’s a lot that can go wrong. There are three common issues in finished basements: First, if there’s a space between the back of the studs and the foundation wall, that gap needs to be fireblocked from the floor to the top of the wall at 10-ft. horizontal intervals. This is typically done with strips of sheathing or drywall attached to the sides of the studs and extending back tight to the foundation wall, or with unfaced batt insulation stuffed into the gap.
Second, if the stud walls are built tight to a layer or more of rigid foam that is in contact with the foundation wall, this needs to be fireblocked every 10 ft. horizontally as well since rigid foam isn’t a fireblocking material (there are inspectors who allow this assembly, but they’re in the minority, and prudent builders would be smart to install fireblocking anyway). Finally, even when remodelers get the horizontal blocking done correctly, they often miss blocking at the top of the wall where the backside of the wall is open to the floor system above.
Soffits around ductwork and pipes also need to be fireblocked to prevent fire from jumping from walls to floors.
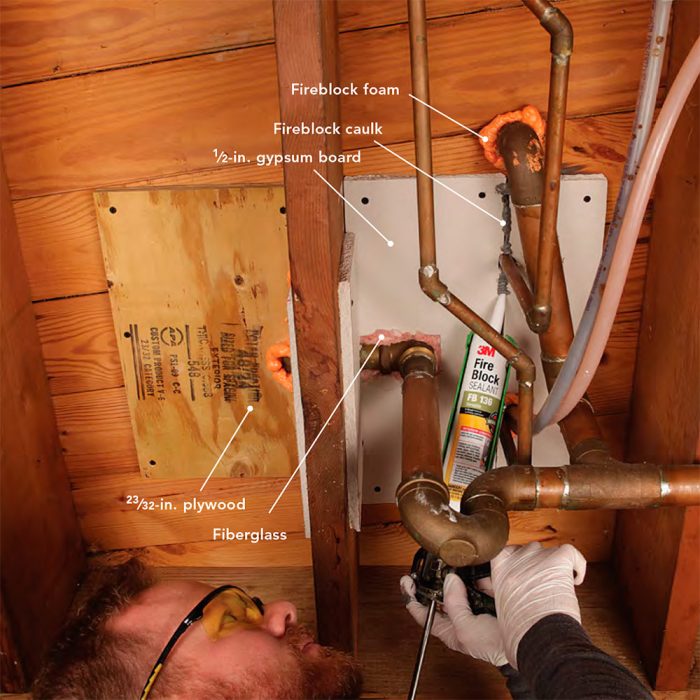
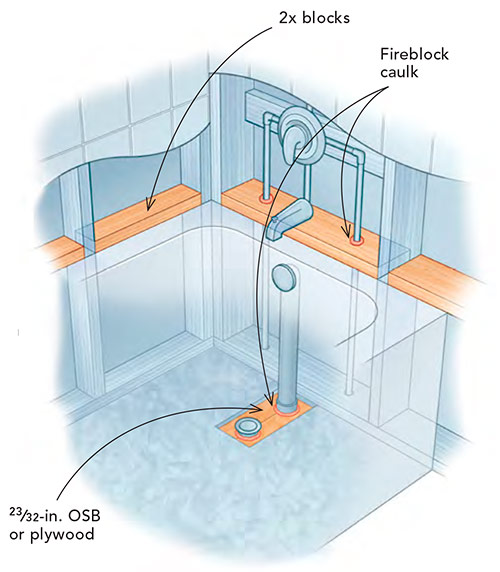
Hidden space around tubs and showers are another gotcha area. Drains for drop-in showers and tubs often get a large cutout in the subfloor for the plumber to run pipes. There are two common ways to fireblock this area. First is to fill the space around the pipe with fireblocking material to prevent fire from spreading from an enclosed floor cavity to the space around a tub or shower and the surrounding wall cavities. Another option provided in the IRC’s commentary is to fireblock around the perimeter of the upper lip of the tub or shower—this doesn’t prevent the fire from jumping from the floor system below to the space around the tub or shower, but it does slow its advance up the walls around them and limit the available air to feed the fire.
When we remodel kitchens, we often find trouble overhead. Usually the existing soffits that the upper cabinets butt against aren’t fireblocked properly. The soffits on exterior walls usually aren’t a technical problem because the wall cavities are typically filled with fiberglass-batt insulation—a fireblocking material. The problem is on the interior walls. An open soffit provides a pathway for fire between wall and ceiling/floor cavities or an attic. It’s easy to block this pathway by installing the drywall prior to installing the soffit, though that means working out of order for many builders. Installing fireblocking blocks during framing works just as well, but because plans often change, it may end up at the wrong height to do its job.
We also often find utility chases and chase walls that are open from the basement or crawlspace all the way up to the attic. Whether a vertical chase is used for plumbing, HVAC ducts, or heating-appliance exhaust pipes, it needs to be fireblocked at each floor level and the attic.
Another area that builders often find confusing is spaces under stairs. Here, the code commentary on understair protection offers the clearest guidance: “The code permits the use of an open space beneath a stair without the need for any additional protection. Additionally, if the space is walled off and there is no access to the area, the code is also not concerned. If, however, the area beneath the stairway is enclosed and is accessed by a door, access panel or other means, the walls, soffits and ceiling of the enclosed space must be protected on the enclosed side with at least 1⁄2-inch gypsum board.”
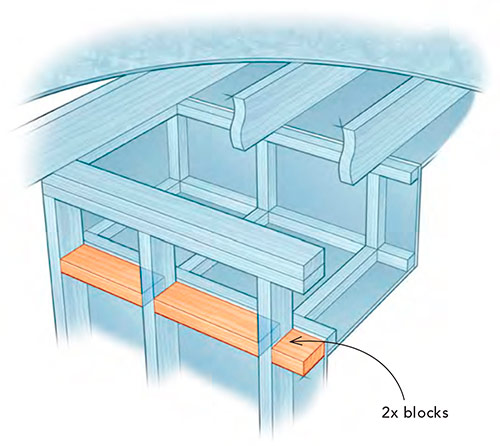
By far the hardest areas to know where to fireblock are those involving complex framing. The more complex a house is, the more missing fireblocking we find. A barrel-vault ceiling framed for dramatic effect may have concealed spaces that need to be blocked from adjacent floor and wall spaces. Framed-down ceilings in hallways, curved stairways, and other features can have hidden pathways behind the finishes. In these complex situations, understanding the intent of fireblocking—to cut off concealed spaces from one another—is the only way to know whether it’s required. There are too many oddball scenarios for the code to list them all.
7 COMMON FIREBLOCKING LOCATIONS
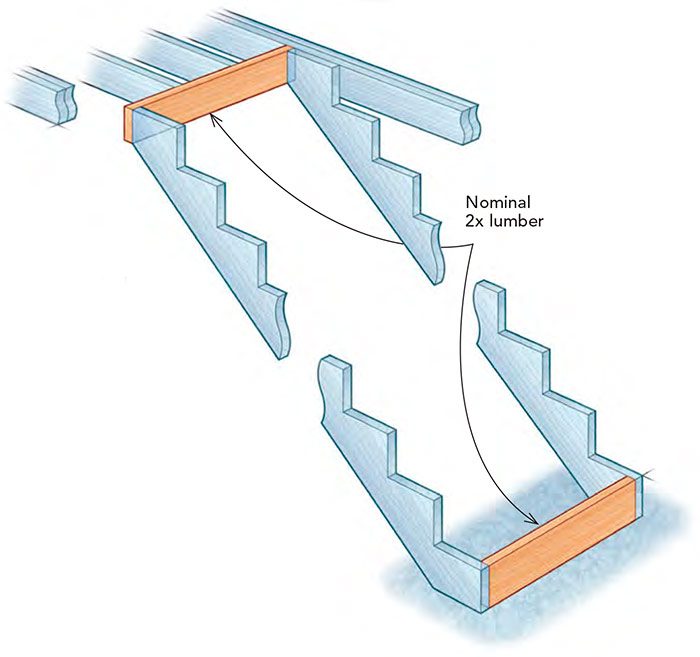
The code doesn’t list every area where fireblocking is required, but it does call out some common features. Where the code doesn’t specifically call out locations, we have to look back at the performance section—the code’s intent. Though not mentioned in the code, kneewalls, drop-in tubs, and stair landings are just some of the familiar features that might require fireblocking depending on how they’re built. There’s often more than one method or material that can work for a given area, and what’s shown here are some standard approaches. Check with your local code official before choosing a way forward; they may have preferences.
Plugging penetrations
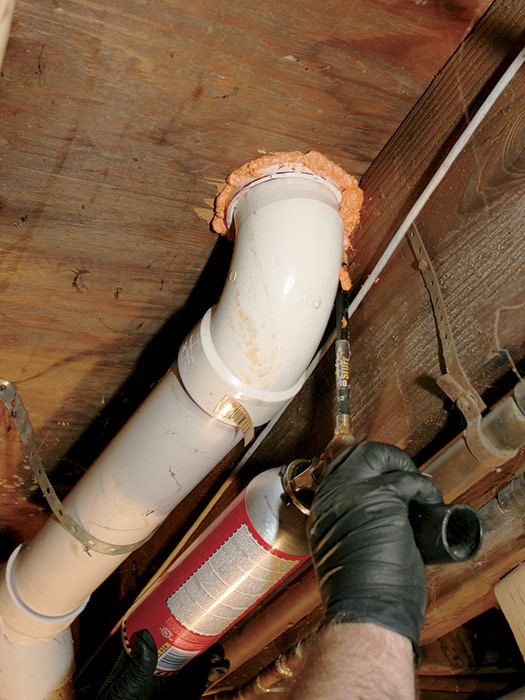
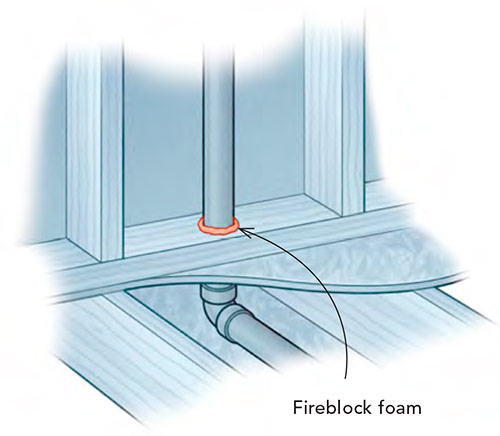
Vents, pipes, ducts, cables, and wires that penetrate through wall plates need to be fireblocked at the floor and ceiling level. These penetrations are usually made by drilling a hole slightly larger than the object that needs to pass through it. The annular space around the penetrating object needs to be filled with an “approved material” (see sidebar, left). This material doesn’t need to be noncombustible, but it does need to resist the free passage of flame and combustion gases. Stuffing mineral wool or fiberglass insulation into these spaces will pass muster in many jurisdictions, but it’s time consuming and the spaces are often difficult to reach. While not specifically listed among the approved materials, the code commentary illustrates the use of an approved caulk, putty, or sealant around such penetrations. Check with the inspector for approval before installing any particular fireblocking product that isn’t on the code’s approved list.
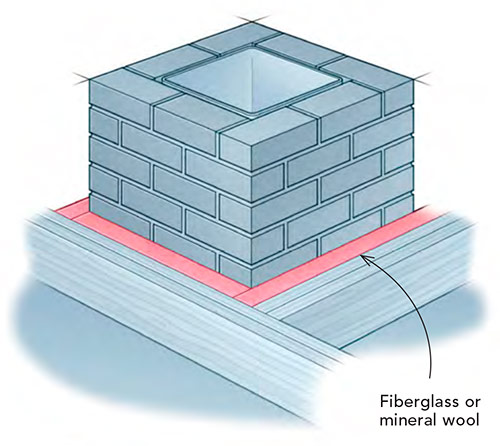
Fuel-fired-appliance vents and chimneys that penetrate floors and ceilings typically require more robust fireblocking methods. While many of the materials used elsewhere aren’t required to be noncombustible, here they are.
With limited exceptions, code requires that chimneys and vents have an air space between them and the combustible floors and ceilings they pass through. To prevent flame and combustion products from racing up alongside vents and chimneys, these air spaces have to be fireblocked with noncombustible material that’s securely fastened in place. Code stipulates that the fireblocking material has to either be self-supporting or placed on strips of metal or metal lath spanning the gap between combustible framing and the chimney or vent.
For masonry chimneys, two of the most common methods I see and use to accomplish this are “L”s fabricated out of 26-ga. or thicker metal, or strips of cement millboard.
While similar methods can be permitted for fuel-fired-appliance vents and factory-built chimneys, it’s more common in these cases to use an off-the-shelf solution. Manufacturers sell fireblocking products that are designed to work with specific vent and chimney pipes—these are usually metal plates or rings that fit around the vent or pipe, and they’re often integrated into the support system, reducing the amount of accessories needed for installation. Often these fireblocking products are part of the manufactured vent or chimney system, and must be used and installed according to the manufacturer’s instructions in order to be considered code compliant.
CODE-APPROVED FIREBLOCKING MATERIALS
The International Residential Code provides a list of acceptable fireblocking materials, but it doesn’t require the use of one over another for most locations that have to be fireblocked. In other words, for any location that requires fireblocking, there are many ways to do it right. The IRC’s “approved materials” list includes:
- Nominal 2-in. lumber
- Double layer of nominal 1-in. lumber with offset lap joints
- 23⁄32-in. or thicker wood structural panels (OSB; plywood) with joints either over framing or backed with a piece of 23⁄32-in. panel
- 3⁄4-in. or thicker particleboard with joints over framing or backed by 3⁄4-in. particleboard
- 1⁄2-in. or thicker gypsum board (drywall)
- 1⁄4-in. or thicker cement-based millboard
- Batts or blankets of mineral wool or glass fiber or other approved materials installed in such a manner as to be securely retained in place (if using unfaced fiberglass batts as a vertical fireblock, the batts must be min. 16 in. tall)
- Cellulose insulation installed as tested in accordance with ASTM E119 or UL 263 for the specific application
What counts as “other approved materials” is largely up to the inspector’s discretion. You’re more likely to get their blessing if you submit the material’s ICC Evaluation Service report indicating that it has been third-party tested and approved for code compliance as fireblocking when installed in a specific manner. Fireblocking spray foam, for example, is not listed in the code, but may be used to fireblock around vents, pipes, wires, and cables with the inspector’s sign-off, but it must be installed according to the instructions or in the manner in which it was tested according to the ICC ES report.
Common installation mistakes
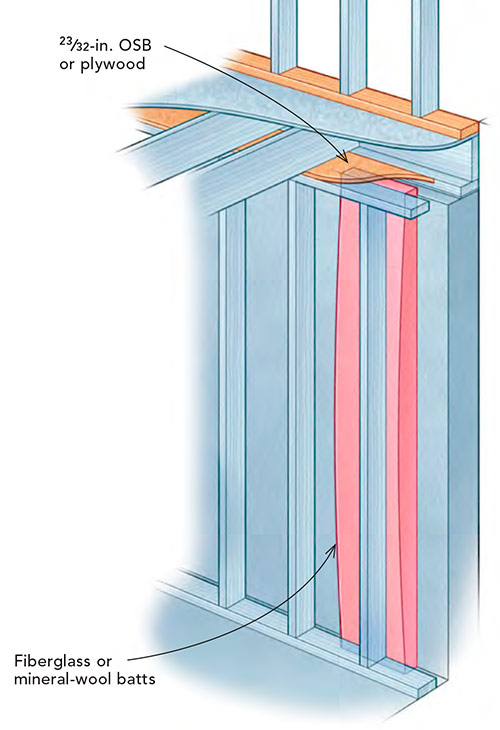
Even though the code lists acceptable fireblocking materials and spells out the intent of fireblocking, people still make mistakes. One of the most common errors I find is the wrong type of sheathing used as fireblocking. Installers will often use what’s on hand—1⁄2-in. or 7⁄16-in. OSB or plywood—rather than the minimum 23⁄32-in. sheathing that’s required. The usual places I see this mistake are at the top of double-stud wall construction (if rated insulation fulfills the fireblocking requirement, this isn’t an issue) and in soffits. Code doesn’t specify that sheathing must be used in these locations, but it does specify the minimum thickness of sheathing if it is used.
Where faced-batt insulation is used as fireblocking, installers often mistakenly use inset stapling—fastening the insulation to the sides of the studs rather than their faces—leaving a gap between the batt’s facing and the drywall. Any batt insulation used as fireblocking needs to fill the gap the full depth and be installed so it can’t fall out, usually with some type of mechanical fastener such as staples or clips. Fireblocking foams and caulks are frequently used to fireblock around penetrating wires and pipes, but they’re typically meant to block only small gaps—usually 1⁄2 in. or less. Avoiding these errors isn’t just a matter of keeping the inspector happy; it also keeps people safe.
DODGE THE DRAFT
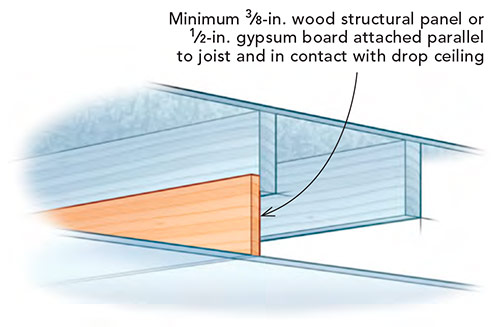
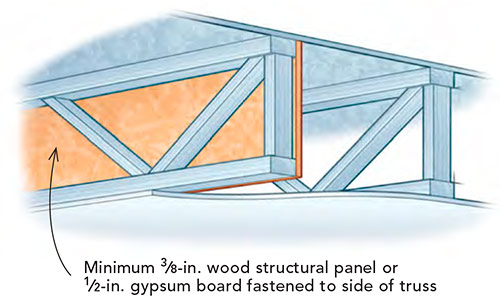
Draftstopping is typically much easier to wrap your head around than fireblocking, as it only involves concealed horizontal spaces. It’s covered in the IRC in section R302.12, “Draftstopping,” and applies to just two conditions where the assembly is enclosed by a floor membrane above and a ceiling membrane below: when a ceiling is suspended under the floor framing, and when floor framing is constructed of truss-type, open-web, or perforated members. Either of these conditions creates large, interconnected areas where fire and combustion gases can move laterally relatively unimpeded. Draftstopping breaks up these spaces into smaller chunks to contain their spread, though the areas of containment are still quite large. According to the IRC, “In combustible construction where there is usable space both above and below the concealed space of a floor-to-ceiling assembly, draftstops shall be installed so that the area of the concealed space does not exceed 1,000 square feet. Draftstopping shall divide the concealed space into approximately equal areas.”
The materials the code calls out for use as draftstopping differ from fireblocking. The IRC only identifies two approved materials: minimum 1⁄2-in. gypsum board, and minimum 3⁄8-in. wood structural panels. Other materials may be used if they create an equivalent barrier. Any of these must be installed parallel to the main floor framing members unless otherwise approved by the building official. When something like a pipe or wire passes through a draftstop, the integrity of the draftstop has to be maintained—typically in the same way penetrations are fireblocked.
Mike Guertin @mike_guertin is editorial advisor. Drawings by Peter Wojcieszek. Photos by Matthew Millham, except where noted.
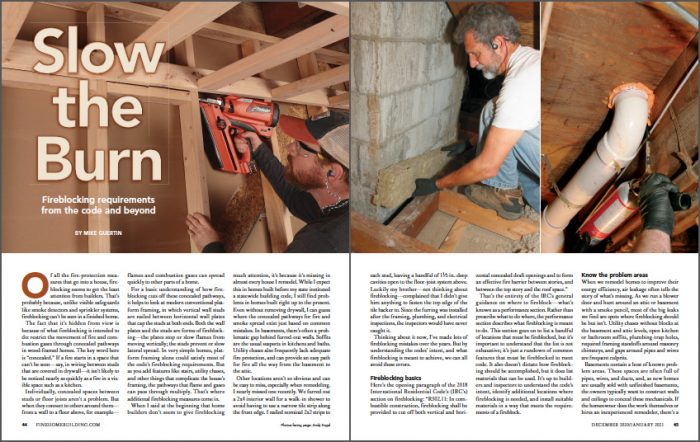
This article originally appeared in issue 296 titled Slow the Burn.
To view the entire article, please click the View PDF button below:
Fine Homebuilding Recommended Products
Fine Homebuilding receives a commission for items purchased through links on this site, including Amazon Associates and other affiliate advertising programs.
Tajima Chalk Rite Chalk Line
Stabila Extendable Plate to Plate Level
11" Nail Puller

