A Better Way to Build Tall Walls
This method of balloon framing makes constructing gable walls both safe and efficient.
Synopsis: Carpenter Tim Uhler describes his method of balloon framing, which he defines as tall walls uninterrupted by a floor system. He explains the advantages of building walls tall, including safety for the workers, who can do more building on the ground; a reduction in the amount of hardware needed; and improved performance because the roof diaphragm is directly attached to the wall system. The article includes a drawing of the anatomy of Uhler’s balloon-framed walls, a detailed explanation of the mathematical calculations needed to lay out gable ends, and a discussion of the machines needed to lift and brace the walls.
Visit the site of almost any new house going up in the United States, and chances are it’s being built using a method known as “platform framing.” Each story goes up independently, starting with a floor system that forms a so-called “platform.” The builders then frame and lift the first-story walls on top of that platform. To add another floor, they simply add another platform, then more walls. There’s a lot to like about the method, which is why most home builders—our company, Pioneer Builders Inc., included—use it. But it’s not the only way to build.
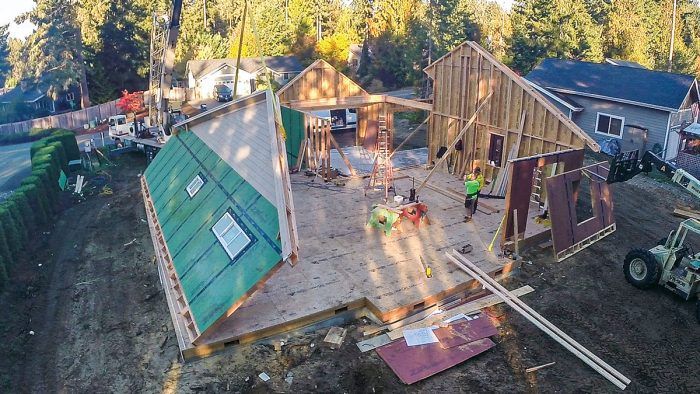
Over the last decade, we’ve been incorporating more and more of what is known as “balloon framing” into our new-house builds. This is the original method of light-frame construction, and its most prominent feature is long studs that run unbroken all the way from the bottom of the house to the roof. While platform framing is generally faster and safer, we find balloon framing is an efficient and safe way to build many of our tall walls—especially gable-end walls (aka rake walls). We can frame and sheathe them flat on the ground, build overhangs and soffits, and even install siding and windows before lifting them into place. This cuts down the amount of time we have to spend on ladders, which reduces the chance of falls and the wear and tear on our bodies. Our methods for building these tall walls has evolved over time into the process shown here, which incorporates the lessons we’ve learned along the way.
Details that make a stronger wall
This isn’t the classic method of balloon framing, with joists nailed to the sides of studs and supported on a ledger let in to the studs. These are simply tall walls uninterrupted by a floor system, and building this way has advantages beyond efficiency and safety. For one, it can reduce the amount of hardware needed to tie walls together. And on rake walls, the roof sheathing gets nailed into the double top plates at the top of the wall, directly attaching the roof diaphragm to the wall system to provide a significant improvement in performance during high-wind events.
Tall walls may need to be designed for wind loads and must be strong enough to be lifted into place. Usually we have a floor and/or ceiling that attaches to these walls to add rigidity, but we also add extra lumber for stiffness both during the lift and during the life of the wall. With single-story gable walls, that simply means doubling the king studs on either side of openings. If the wall is two stories tall, we often drop the stud spacing down to 12 in. on center, triple the kings, and double the end studs—depending on how much additional support the wall will get from floors and partition walls. For king posts, which support the structural ridge for the roof, I like to order full-length glulam columns if the post is over 10 ft. tall. We’ll use 6x6s for shorter king posts, but longer 6x6s tend to have too many defects to work.
Codes require fireblocking at each floor and ceiling. This is handled by the top and bottom plates in platform framing, but has to be installed separately in balloon frames. Nominal 2x material at the same depth as the stud satisfies the code requirement, but I prefer to use 4×6 blocking for this because it stiffens the wall for lifting and it provides larger panel-edge backing for the structural sheathing and additional nailing for floor or ceiling ledgers. I like the tops of these blocks to be flush with the interior partition walls so I can strap the top plates to the blocking.
Our exterior walls are always 2×6, and I order all stud material long enough for the longest stud, and use the cutoffs for windowsills, cripples, and blocking. If more than a couple studs are over 16 ft., I order LSL studs instead of solid lumber. These cost about double the price of Douglas-fir framing lumber, but are perfectly straight and I can order them in lengths up to 40 ft. Regardless of the material, select the straightest lumber for studs, and oppose the crowns when ganging together king studs or columns.
We typically use 4×10 headers in our eave walls, and we use them in gable walls as well because it’s just easier to keep everything consistent. I order 16-ft. 2x6s for all wall plates—I haven’t found any advantage to switching to LSLs in order to keep them continuous on long walls. The sheathing ties everything together really well, and the bottom plate gets nailed 6 in. on center through the floor into the rim when the wall is lifted.
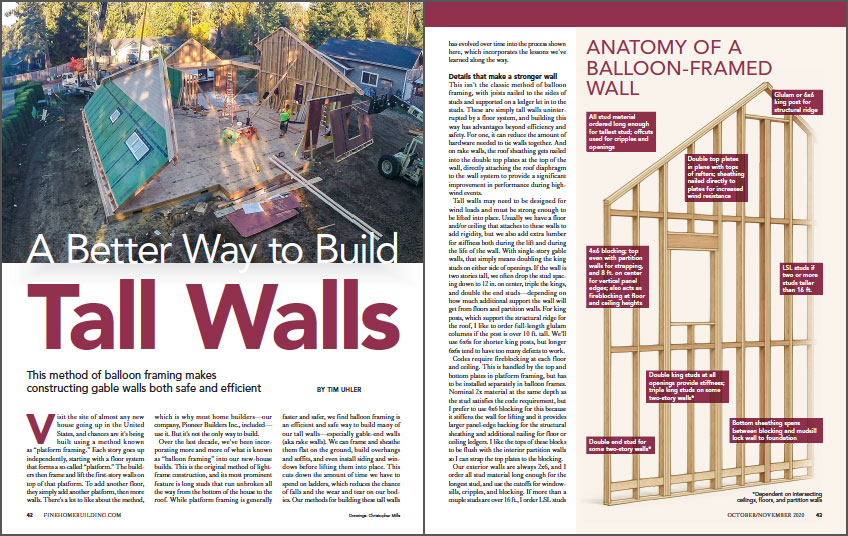
Anatomy of a balloon-framed wall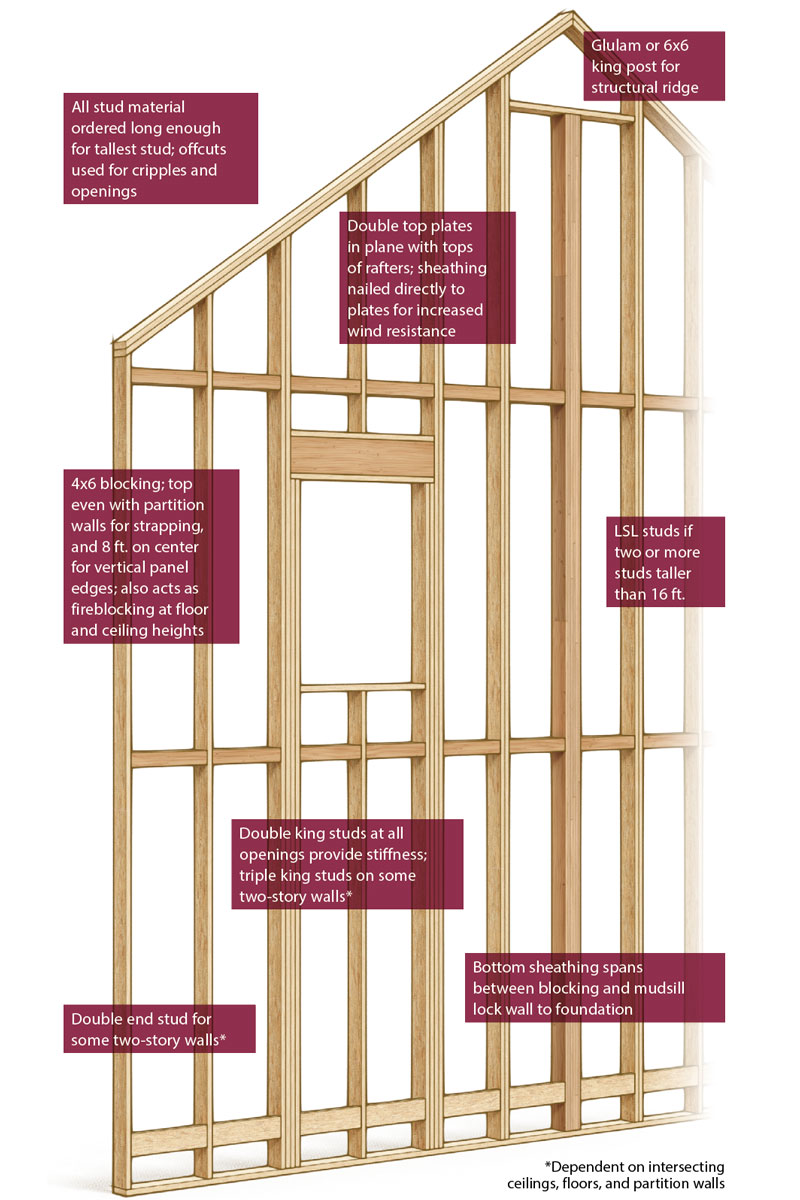

Where math meets reality
Our tall walls usually include a gable end. Though I know math is perfect, I am not and neither is most lumber. So rather than calculate all the stud lengths for gable ends, I prefer to lay out the bottom plate, cut the top plates to the same length as the theoretical rafter length for this section of roof, and then use a story pole for the ends of the wall. The story pole includes all of the layers of the intersecting eave wall—plates, studs, joists, and floor sheathing—to ensure I’m accounting for everything when I calculate the end-stud heights. I want the tops of the double top plates even with the tops of the rafters or roof trusses, so I calculate the length for the end studs to run from the bottom plate to the first top plate (see “Laying Out Gable Ends,” left). A common rule in framing is that everything grows, so I subtract 1⁄8 in. from this stud height—it’s far easier to pad up if we have to than to plane it down. We nail the skeleton together, square it, and then tack it to the floor.
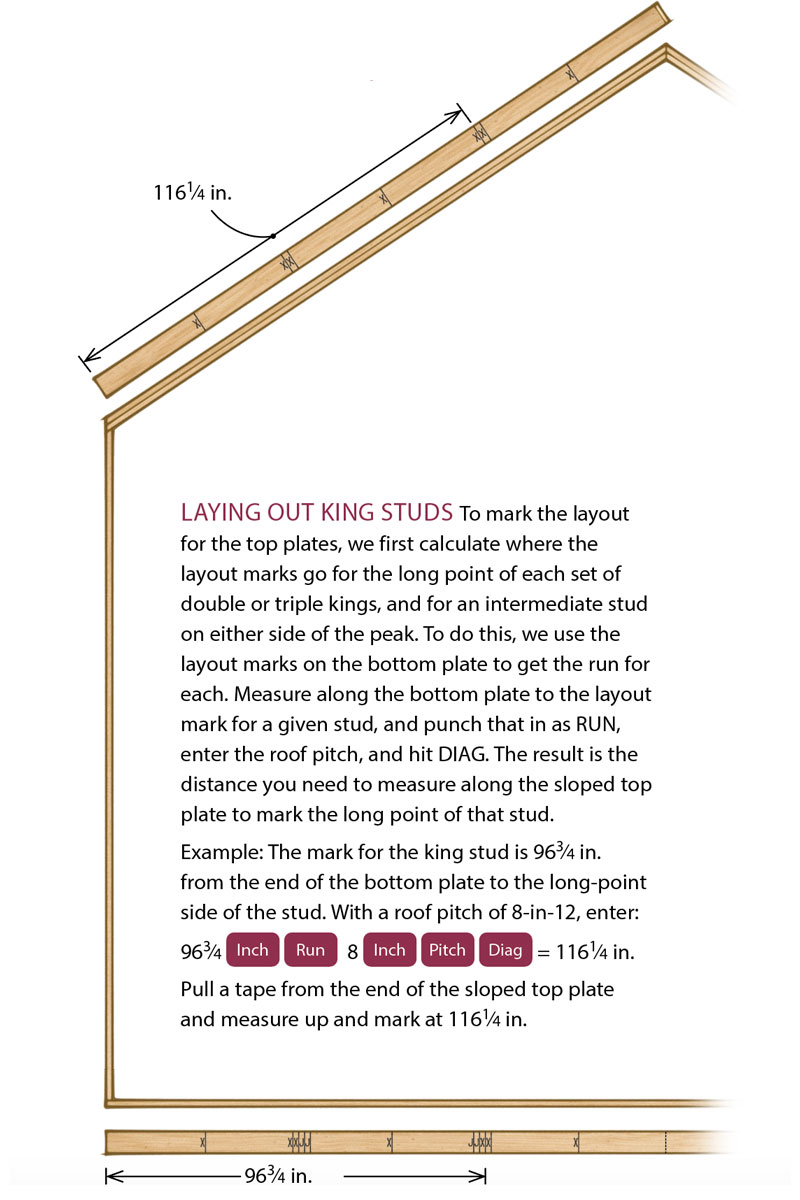
From there we transfer the layout from the bottom plate to the underside of the top plate. One framer measures along the bottom plate to the uphill side of all kings around openings, enters that as RUN in a construction calculator, punches in the roof PITCH, and just clicks the DIAG button to determine how far up the rake to mark. Once all the openings are laid out, we cut and install an intermediate stud—one about halfway between the gable peak and the end of the wall. I’ve found that pulling layout uphill and downhill from this stud minimizes any accumulated error, and by doing this on both sides of a gable it allows us to zero-out any error. Even though the calculator will keep track of rounding, it’s worth taking the time to get this right.
Once the top plates are marked, we measure all of the full-height studs in place by pulling a tape between the layout marks on the bottom plate and sloped top plate.
Laying out gable ends
Calculating Corner studs. We story-pole corner studs to ensure we account for all the layers in the intersective eave wall, and to check our math when calculating end-stud heights. The formula for these studs is simple:
Intersecting eave wall height
+
Height above plate for rafters
–
bottom plate
–
diagonal depth of double top plates
To get the diagonal depth of the double top plates, enter the thickness of the plates (typically 1-1⁄2 in. each) as the run, enter the roof pitch, and hit DIAG.
Example: For an 8-in-12 pitch with a double 2x top plate, enter:

Laying out On-Center Studs
Once an intermediate stud is laid out, we calculate the unit length (the distance between studs along the sloped top plate) between the long points of studs and pull measurements uphill and downhill from the intermediate stud. To get that unit length, simply punch in the on-center spacing of the studs (in our case, usually 24 in.), the roof pitch, and hit DIAG.
We don’t want to simply step these off; to minimize error, we pull a tape uphill and downhill from the intermediate stud’s layout mark. So after hitting DIAG, hit STORE, then M+.
To easily add the distance to subsequent layout marks, hit
Continue hitting = to get the distance from the intermediate stud to each subsequent stud location.
Cut and assemble
Our method works very well for two framers. One is responsible for the majority of cutting and the other assembles the pieces. While the former gets going on studs and window packages, the latter cuts headers and starts nailing the pieces together. We always start with the windows because they take up the most room and have the most pieces.
Once the wall is framed, we snap lines for the fireblocking at ceiling heights. We cut and install all the common-length blocks, then piece in the smaller ones. The whole time, we pull a tape and eyeball things to keep the studs straight.
The entire exterior of each of our homes is sheathed in Zip System structural sheathing in order to resist the lateral loads from earthquakes and to provide the water-resistive barrier. To minimize blocking, we always install panels vertically. Although longer lengths are available, I order 8-ft. sheets for better unit pricing and to minimize waste due to odd floor sizes, such as 14-in. joists. Starting the sheathing and blocking layout from the top of the second-floor wall and working down means I can connect the bottom row of sheathing from the blocking to the mudsill.
We cut all openings and the tops of the rakes with a router and a panel pilot bit, which is fast and clean. After the wall is sheathed and nailed, we tape and roll the seams to ensure the tape adheres for an airtight and watertight assembly. At each end of the wall, we tape the Zip sheathing to the outside face of the stud.
Rig, lift, brace
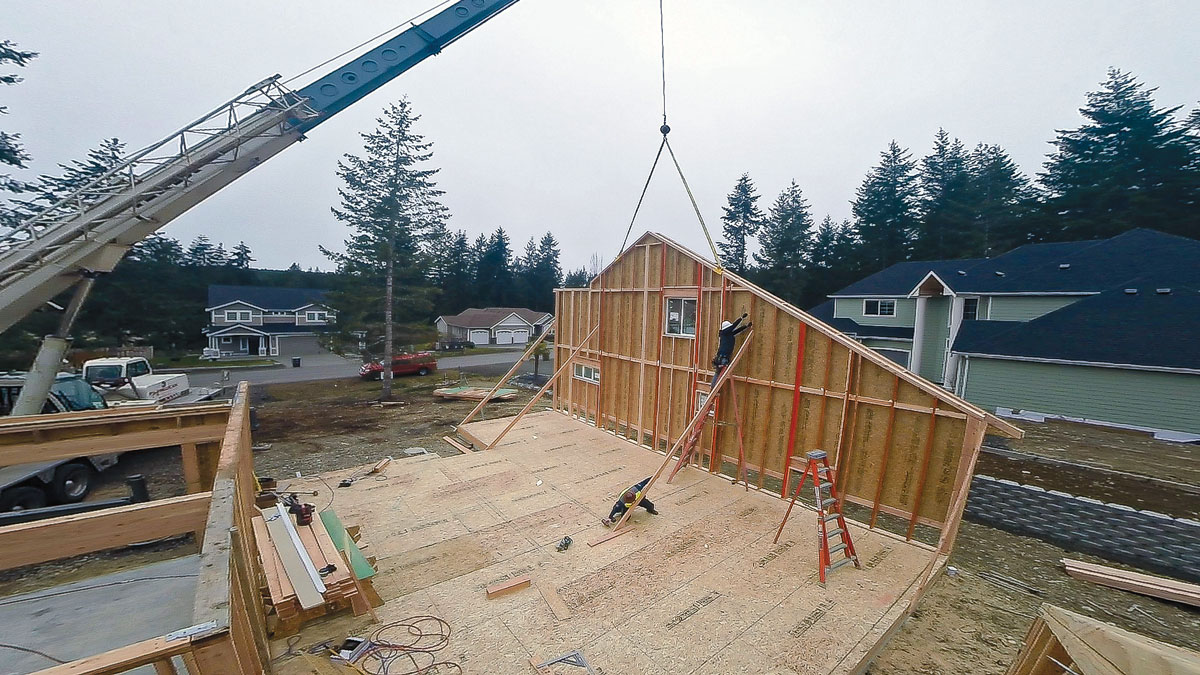
These walls are made to be lifted by machines, not human strength. We can lift most of these walls with our telehandler, but when we don’t have access to position it properly, we hire a crane. I had custom brackets engineered and then fabricated by a certified welder. Made of 3⁄8-in. steel, each is rated to handle more weight than the heaviest wall we have ever lifted. This is a connection you don’t want to fudge—dropping a wall this big could ruin a lot more than your floor system.
Having the hardware and equipment isn’t enough—we are also forklift and rigging certified. I wouldn’t recommend lifting these heavy walls without this training. The load charts on the machine tell us its lifting capacity at any given length and height of the boom.
We don’t do anything but toenail the bottom plate to the floor to prevent kickout. In all these years lifting big walls, we’ve never had the plates come off as we tilt them up—that can be a concern if the machine is off center due to access. The way we lift minimizes the force on the bottom plate; with a telehandler, we start by lifting up, then retract the boom a bit, and repeat until the wall is upright. Once the wall is halfway up, the machine “sees” less load as the weight distribution shifts toward the bottom plate.
Once the wall is up, we use a laser plumb bob to plumb it and brace it with 2x6s fastened with structural screws. It is especially important to use enough braces and place them in a way that they can stay put until the roof is framed and sheathed. We frame all of the intersecting walls ahead of time so they’re ready to drop into place immediately (again, with a machine) to further steady and brace these tall walls.
Take advantage of easy add-ons
With the wall sheathed and still flat on the deck, we can boost efficiency and job-site safety by adding other elements now, rather than later from ladders, lifts, or staging. Whether it’s a gable or an eave, we install nearly all overhangs before lifting the wall. Since the top plates were tacked to the floor straight, our overhangs will be straight. We frame overhangs out of 2x6s with tiebacks every 4 ft. and rely on the 16-ft.-long LP Soffit we use on all our builds to help straighten and stiffen the wall. Then we install the trim.
Setting large windows up high is tough and dangerous, so I also like to install windows before we lift (if they’ve arrived). We typically don’t have windows larger than 6 ft. long, but I’d be comfortable going bigger than that because these walls are stiff enough to squash any worries about the window flexing. We flash the sill, then hang the window with the bottom parallel to the bottom plate and centered in the opening. Then we square the window and fasten it with screws. Later, when the wall is up, we can make minor adjustments if needed and add shims.
If the house is clad in lap siding, we install that as well, because it’s easy to install and keep straight with the wall laid down. I like to start the siding about 6 ft. from the bottom, which leaves room for trades to rough-in their through-wall connections and is low enough for us to side up to from the bottom later without ladders (the last row gets tucked under the existing siding and bottom-nailed). We burn 1-1⁄2 in. below the mudsill, and then mark the top of each course of siding and snap lines. Besides ensuring straight coursing, the lines make it so the installer doesn’t have to use a tape to constantly check coursing. We hold the siding back 1 in. from the corners to allow for the tape from the intersecting wall to overlap by 1 in. After the walls are all up and the siding’s on, we install cornerboards over the siding to make these joints both durable and low maintenance.
These seem like small things, but they add up to a lot of time savings. Overall, it probably takes half the time to add the overhangs, soffit, windows, and siding with the wall laid flat than it would with the wall standing up. And we can do it all without ever having to climb a ladder or strap on a harness.
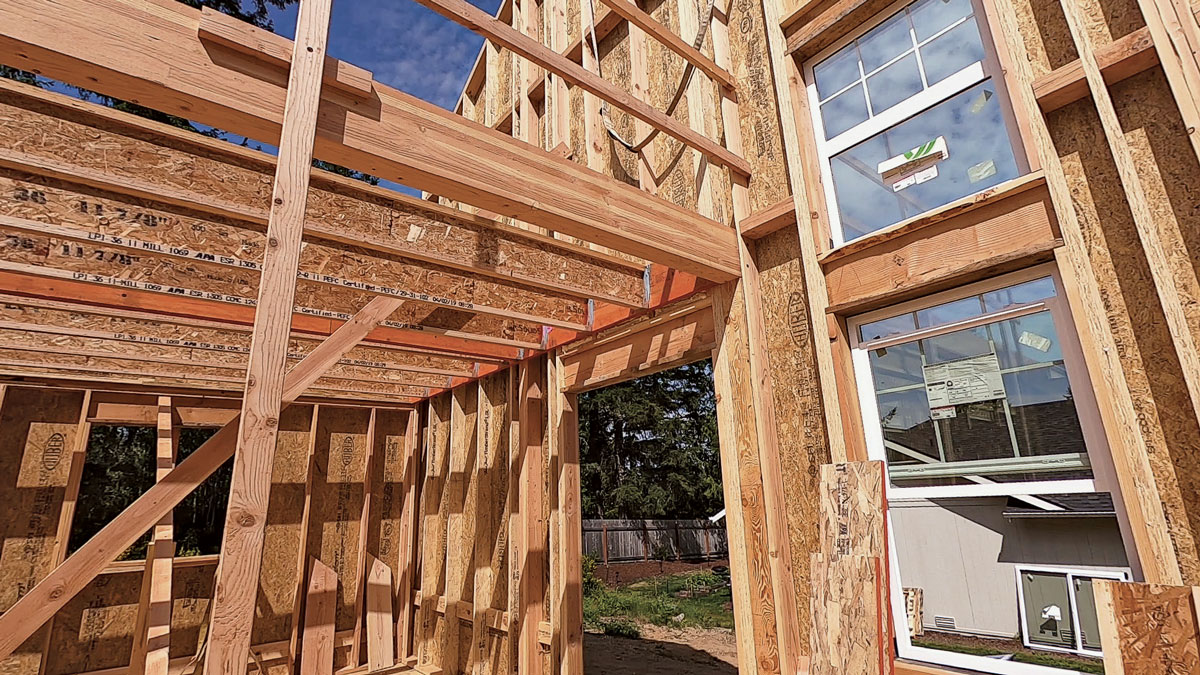
Modern balloon floor framing
When floor framing gets attached to these tall walls, we hang joists off of ledgers that are attached to the wall using structural screws like FastenMaster FlatLok or Simpson Strong-Drive SDWS Timber screws. The engineer specifies the number and spacing of the screws, which are critical details because this attachment connects the floor diaphragm to the wall. When the ledger is installed, it’s easy to check the wall to see how straight it is. Even though it is plumb at the braces, we need to straighten it at the floor system.
Tim Uhler is a lead carpenter with Pioneer Builders in Port Orchard, Wash. Photos by the author.
To view the entire article, please click the View PDF button below.
Fine Homebuilding Recommended Products
Fine Homebuilding receives a commission for items purchased through links on this site, including Amazon Associates and other affiliate advertising programs.
Guardian Fall Protection Pee Vee

Magoog Tall Stair Gauges
Short Blade Chisel


