
How to Reinforce Ceiling Joists to Handle Heavy Loads
Will this loft floor framing be strong enough to store heavy lumber, or should the builder upgrade to something stronger than 2x6 joists?
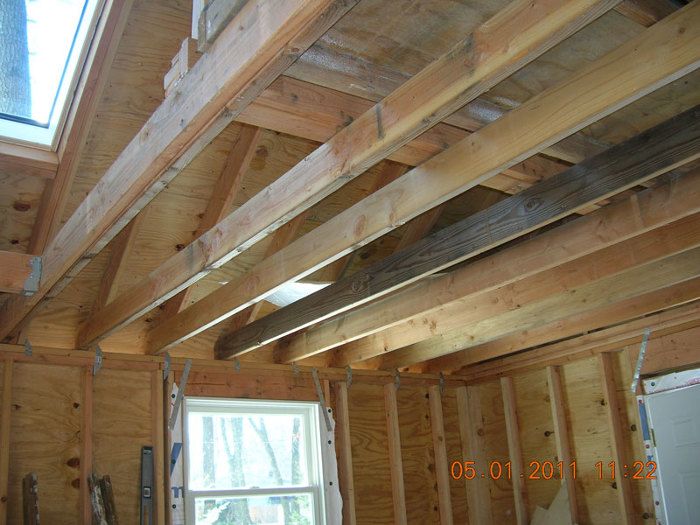
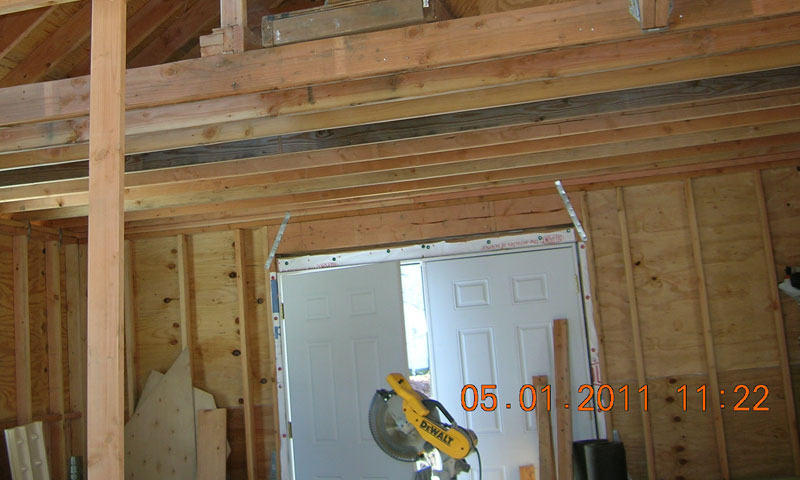
That’s Leo’s delimma, as he explains in this Fine Homebuilding forum post. The recently completed 16- by 24-foot building has 2×4 walls and a roof with a 2×10 ridge and 2×6 rafters.
It was only after the building was up did Leo realize he hadn’t figured in the added weight of the lumber on the ceiling joists.
 “The 16-ft. 2x6s are there to keep the 2×6 rafters from spreading,” he writes. “This is a pretty basic design, designed by an engineer and approved by the town. I only wish I mentioned it earlier that the attic might be used for storage. If I had mentioned it earlier what would I have done differently? I don’t want a beam or posts running down the middle for obvious reasons.”
If he doubled up every other joist, would it be enough to handle the weight of “a lot of hardwood.” His engineer is comfortable with this, but what does everyone else think?
A little sag, but it won’t collapse
The 2×6 joists will sag, no doubt, says DanH. “They will probably not collapse, and the load will probably not compromise the structure. Many a garage has been loaded down for decades the way you suggest, and out-and-out failures are rare, in spite of the rather inferior garage construction techniques used 60-80 years ago.”
But, DanH adds, that assumes Leom uses common sense and doesn’t overload the overhead storage area with wood.
The sag could be reduced or eliminated by installing king posts, or Leom could sister 2x8s to the 2×6 joists to “roughly triple” the load-bearing capacity of the ceiling.
“Since this isn’t a floor, then the allowable deflection tables don’t really apply,” adds Jigs-n-fixtures. “They are mostly there to keep people walking on the floor comfortable, or prevent inflexible flooring like ceramic tile, from being damaged. The structure would be sound with considerably more deflection.”
Even a stack of wood a foot deep would mean a load of 50 lb. per sq. ft. (psf).
Engineer 10 is skeptical.
“Tell your engineer that another engineer says that doubling 2x6s doesn’t work for heavy loads,” he writes. “If he/she still insists that doubling is OK then ask for a signed and sealed letter to this effect.”
Engineer 10 adds that a No. 2 2×6 over a 16-ft. span can carry 10 psf while a 2×8 will carry 20 psf. Sistering the two together means a load-carrying capacity of 30 psf.
“This is based on bending strength only not deflection, therefore a load larger than that will cause collapse,” he writes. “The load can be considered permanent dead load since it will be there for months at a time which makes everything worse because of material fatigue.
“In addition to that the deflection will be so noticeable from below that it will look frightening to a casual observer.”
I-joists would have been a good bet
Calvin suggests that I-joists would have been an alternative to consider at the start of the project. In his own garage, he used I-joists with 2×4 flanges for a 30-ft. clear span.
“No sistering or modification of I-joists to the existing situation,” he says.
There’s a problem with I-joists, Sandcastles points out. Leom is already concerned there isn’t enough room between his double top plate and the roof to wedge in the additional 2x8s, and the minimum I-joist Sandcastles knows of is 9 1/4 in.
“You probably have to even more significantly trim the 9 1/4 I joist, cutting it more than manufacturers will allow,” Sandcastles says.
Also, says Leom, the load rating for an I-joist is 100 psf live load, 20 psf for a dead load, and that doesn’t help his situation much because lumber stored overhead for long periods of time is dead load.
Piffin had this variation on the I-joist option:
“What I would do is to add a 2×4 to the top and bottom of each joist, using glue and structural screws to convert each joist into an I-joist in place,” Piffin writes.
“You could even possibly introduce a good crown to each by holding the bottom chord in place with a slightly long 2×4 post under the center as you install it. Do bottom chords first, then the tops. Leave posts in place until all fasters are in and the glue kicks well.”
Or, use LVLs in a limited area
JAlden wonders whether Leom actually needs storage over the full 24-ft. length of the shop. Would, say, 8 ft of storage be enough for the amount of wood he has?
“If so, go buy 4 pieces of 9 1/4 inch [laminated venner lumber],” JAlden writes. “Last time I bought them they were about 3 bucks a foot so we are talking 200 dollars here.
“Cut the ends at the angle of your roof and see how long you can make them and still get some bearing on your top plates. You may get full bearing if you have some roof overhang to slide one side into. Get as much bearing as you can. Even half of the plate is sufficient.
“Sister these to every other 2×6 and you’ll have 8 feet of beefed up area.”
RELATED LINKS
6 Ways to Stiffen a Bouncy Floor – Bouncy floors are one of the most vexing problems faced in houses, both new and old. Contributing editor Mike Guertin teams up with structural engineer David Grandpré to detail six common, and not-so-common, ways to stiffen up the joists and keep the china cabinet from wobbling.
How to Repair a Butchered Floor Joist – The criticism is often undeserved, but plumbers nonetheless have a reputation for taking a recip saw to studs, joists and rafters when they get in the way of supply and drain lines. Learn how to repair a floor joist, if you ever do run into this problem.
Replace a Rotten Lally – A proper footing and post add floor support that will never fail again.
Stiffening a floor – In this Q. & A., Former associate editor Roe A. Osborn gives advice on hardwood floors and tips on how to stiffen hard wood floors.
Fine Homebuilding Recommended Products
Fine Homebuilding receives a commission for items purchased through links on this site, including Amazon Associates and other affiliate advertising programs.

Handy Heat Gun

8067 All-Weather Flashing Tape

Reliable Crimp Connectors


View Comments
I'm not an engineer but I wonder what extra strength could be gained when sistering the 2X6s with 2X8s if plywood was glued between them. Staggering the joints in the plywood so they all did not line up and were not at dead center.
If the garage has a simple peaked roof, dropping 2x6s free of large knots from the peak and tying them into the center of the ceiling joists would cut the span in half. Half the span means 4 times the load carrying capacity from a strength standpoint, the deflection would be 1/16 that of the full span. This scheme is predicated on achieving serious load carrying connections (well thought out and installed A-35 or L clips should to it) at all joints: tie to roof rafters at peak, tie to ceiling joists, roof rafters to ceiling joists at the eaves. The ceiling joists create a truss to begin with, I'm suggesting adding another member to the truss. In general a truss if much more efficient than beams, but you gotta respect the joints. In this case, you would be creating many trusses which lead to redundancy which leads to a good nights sleep.
Michael
I am a structural engineer, and am amazed articles like this get published, none of what is shown is even close to meeting building code loads. A 16' long 2 x 6 does not have any load capacity for storage. These are simple calculations for an engineer, you should always consult an engineer in lieu of guessing
Must agree with blair633. For a horizontal span, divide the span by the depth, don't go beyond 20 without consulting an engineer. If loads are extreme (storage loads can be extreme), consult an engineer anyway. In this case, 16'/5.5" is 35. Would it break if you walked across it? Probably not as long as the joist didn't have a big knot midspan. Would it break if you loaded it at 100 psf? dunno, but I wouldn't want to stand under it.
In defense of those hesitant to call an engineer, too many engineers fail to do their job. Their job it to make sure that an assembly is 2-3 times stronger than it needs to be. Too often, they make it 6 times stronger than it needs to be. A century ago (back before engineers were terribly involved in construction), the engineer's marketing slogan was, "An engineer can do for a dollar what any fool can do for two." Having been a professional engineer for over a quarter of a century, I see fellow engineers designing things that are back to costing two dollars or worse. Not all engineers, or even most, but enough to give the profession a bad name.
I'd be prone to looking at creating a truss involving the ceiling/floor joists and the roof rafters; perhaps by adding vertical or diagonal leg components from the rafters to the 1/4 point of the ceiling floor span. Involving a competent and experienced structural engineer is a MUST however, because in addition to shear and stress points of the construction lumber, the connections must be designed as to any reinforcement and number of fasteners or bolts, split rings or washers. Adding a 2 x 4 along the bottom chord of the 2 x 6 ceiling/floor joist maybe helpful in stiffening the joist as well. Gluing and screwing a 3/4" attic subfloor and providing solid bridging should also be considered.
I've done this application before. Used what is termed as a spaced beam, which requires 2x6 blocking at various points, (engineer determined) glued each side, patterned nailed with an additional continuous joist on the opposite side. Blocks are sandwiched between the two joists. This would occur at every joist. I've been instructed usually to use 2x6x24" blocks at 4"o.c. where I've stored various amounts of dimensional lumber. Have not had any sag or concerns.
CubanOriley's method is typical, it's not rocket science for the guy to have the engineer come up with something to give him ease of mind.
run a beam under the joist,no post needed, create a beam pocket at one end with double 2x4 cripples and 2x12 double simpson hanger at overhead header. Use 2x12 and 1/2 plywood glued with PL400 and your done.
I agree bonding & screwing a 2x to the bottom of each joist might be sufficient, but you could halve the effective span by hanging the joists along the centerline under the ridge with gusset plates and vertical 2x4's. This would change your stick built roof framing to trusses.
I'm thinking tie the rafters and ceiling joists together to make a funk truss and add some decking in the open centre portion to help spread the load. Use blocking and 5/8 gusset plates to tie every thing together
we should "think out-side the box" with this one..go outside your building and determine where it would be really neat to have an access door (or panel) ABOVE the in question 2x6's..1;this is where you will slide in what ever you need to strenthen the joists from ABOVE ..glue lams,whatever..I would also block the 2x6's below the area where the lam would be placed to give you a good purchase area to tie them(2x6's and lam(s) together)..and 2;now you have a good access area Outside you building to handle longer stock that,as we all know,is not fun to handle with tools and benches in our work space.(I ASSUMED we all know the lam(s) would be supported at each end)..
I'm really the only PERFECT person I KNOW,
PILGRIM,OREGON
To prevent sag in 2x6's and strengthen at same time, you could secure lengths of stainless steel (or galvanized) cable - attach at each end of individual ceiling joists, have cable go over a one or two "spreaders" or strut projecting down from the underside of the ceiling joist maybe 12"-14" or so as not to lose too much headroom (these could be 2x4's fastened to ceiling joist with a plywood gusset sandwich, the longer the 2x4 is, the more mechanical advantage there is), and tension the turnbuckle in each cable assembly so cable taught.
I would guess doing so every third ceiling joist would keep your dead load from making the ceiling joists sag.
Added bonus is you wouldn't be adding more material to the dead weight as you would be by adding more dimensional lumber to the whole equation.
Would look good too.
You could install an UPSET beam down the center in the attic. Bearing the new beam on the end walls, install joist hangers on each of the 2x6 ceiling joist (one on each side of the new beam) to reduce the span and increase the load capacity of the attic space.
YOU could strengthen the clg joist system by adding plywood on top of the clg joists. I think you would get more bang for the buck with the sistering solutions listed above but if the person was thinking he would like sheathing up there anyway, then the sheathing might get him the reduction in deflection he is looking for. Of course it has to be done right, as far as fasteners and glue. and there cannot be any gaps between plywood sheets. Essentially you are adding a top flange to each joist as you would see in the top of an I beam,or better, a T shaped beam. I have seen this done and the T and G is cut off to create a stronger butt joint to better resist compression forces.
It has been proven that sandwiching 3/4 in plywood glued between 2 2x6 will increase the load capacity 10 fold.
I'd like to see the proof...
FWIW, I notice most of the replies are from 2011, so either the problem was ignored, solved or the building fell down. It would be interesting to know the outcome.
Several of the respondents have commented on the bad advice and the obvious lack of understanding of design, statics and strength of materials. I have to agree. My recommendation is to hire a competent engineer and follow their advice. Don't believe anything you see here (except, of course, for my words of wisdom...)
ok blair633,what would you suggest to solve the problem?
I have just purchased a two-story home with lots of attic space. I had a contractor come out to estimate finishing it out. He said that all the ceiling joints would have to be changed out to floor joists which would been extensive and raise the floor. It seems to me that I read somewhere that you can reinforce the ceiling joists in such a way as to give them the strength of floor joists. I want the space to be an area for kids to play and maybe have a couple of beds. Any suggestions?
Thanks
I live in a house which suffered the "minimum" code for flooring. You couldn't play an LP record for the bounce of the relatively short runs that were in code.
I tried the sistering, using construction glue and fasteners and it helped only marginally.
After a lot of on line research, I started seeing the same solution over and over - adding to the bottoms of floor joists, instead of sistering.
The concept, as explained, used strips of metal about 1-1/2" wide, about 1/8" thick and the length of each joist fastened to the bottom of each joist. The theory was, iron does not stretch, so the joists could not bow, if the metal was properly fastened(as CableRigger suggested).
Obviously, the concept works on bridges. However, this approach complicates securing sheet rock. As such, I have to wonder if attaching the strip vertically and at the bottom of the 2x would offer the same improvement.
I settled for adding 2x4's, again using fasteners and construction glue, to the bottoms of my joists. I also added previously missing cross braces, to spread the loads. Now, movement of the floor is minimal and the stereo can be played without having to be suspended from the ceiling.
These joists are really useful and I have been trying to build something similar to them. Having joists in the storage shed would definitely help to create more space for bulkier items as they are able to support a much heavier weight. I have also seen people build an overhead storage compartment in the shed’s ceiling which I think would definitely help to maximize space without using much floor space.
1. a load must be supported at both ends, so using partial reinforcements with no posts is not good.
2. the further away you are from the points of support the greater the effective load is.
3. you want to know when the load is too great before your structure fails.
I have a solution that is a little extra work but is safer:
1. take 2 6x4 as long as your longest stored lumber and cut 2 inch deep grooves in them as wide as your 2x6 is thick every foot or so. install these over your existing horizontal 2x6s 2 feet from the roof edge inside and paralel to the roof ends, crosswise from your existing 2x6.
2. take 2x6 cut them to the length of your inside existing 2x6 minus 4 feet so they will fit into the grooves you cut before in the 4x6s fully, screw them in place but dont glue, so they CAN flex.
3. install a gage in the middle - take a piece of plexiglas, put clear and readable marks on it, and screw it to the midle of the top 2x6 on both sides. this must be long enough so that the low marking is right at the top of the existing horizontal 2x6.now you have a deflaction meter.
4. consult your engineer as to how much deflection is allowed.
5. you can now load you hardwood over the new 2x6s. as the load grows, they will deflect. when your deflaction meter reaches the maximum allowed - stop. you are assured that the structure will not fail because your load is supported close to the edges so the fail point of you top tier will not cause fail in your bottom one.
6. if you want to increase your bearing capacity you can do this - take four 10 ton coil springs from a junk yard, install them over the corners of your building inside where the load bearing is the greatest, and build the entire load bearing platform over an X brace of 4x8s. its going to be a lot of work and a bit of money too but you kill two birds with one stone - you have 4 times the cary load easily, and the load is only half dead because of the springs. you will also know when you exceed your capacity when the springs bottom out, and you will also know how well your load is distributed when some of them close more then the others.
Ur an idiot
Adding blocking throughout and gluing and fastening t+g ply above and below would create a torsion box that would serve very well.
I would start by calculating or getting an engineer to calculate the size joist that would meet the need. For a residential load where I live, I believe the load tables state a minimum of a 2x12 would be needed for a 16' span. However that does not take into consideration the probalby heavier than normal dead load in this case due to the permanent expected storage. Regardless, once you know the size joist needed, here is what I did in my previous garage. It assumes you do not mind losing at least some headroom under the storage area however. For this example, I will assume a 2x12 16' will be used.
I start by fastening a 2x12 ledger board on each side of the storage area. I notched my ledgers to fit around each existing joist so the top of the ledger matched the top of the 2x6. To get the notches in the correct place, I temporarily screwed the ledger right under the existing joists and marked the locations. Although the existing 2x6's should be exactly 24" OC, they are typically not. It takes time, but for me worked well as only had 10' ledgers to deal with. I used construction adhesive on the entire top plate and each stud, along with one lag into each stud. Be sure to keep the lags staggered in the bottom half of the 2x12 ledger (approx between 1.5" and 4.5" from the bottom of the ledger) as you have compromised the top half of the ledger by notching around the 2x6's. Not an issue I was concerned with as the ledgers only span 16" at it's widest point between studs. I nailed and screwed the top half of the ledger making sure to hit the top plate. I did not layout my new joist location ahead of time and regretted it. A couple of joists landed right on my lags. I solved this by using a spade bit and drilling the end of the joist so it fit tight. A better solution is probably to angle in the lags to stay out of the way of the joist where they align but still "catch" the stud behind it fully. Or, layout the new joists and try to keep them from landing on the stud locations.
Now you have two options...
Option 1 (what I did) is to place the new joists in between each existing 2x6 effectively giving you 12" OC joists for a floor above. This requires use of regular single joist hangers and nailing at each end of the new joists. It can be a little tight when nailing the hangers, but a palm air nailer can help. If you have joist hangers where the nails are angle nailed (toe nailed) on the joist ends it is not an issue. I searched a couple different local suppliers until I found these because I did not have an air palm nailer. This allowed me to use some 15/32" osb I had on hand for the floor of the storage area. I wasn't concerned about the osb deflecting much between 12" OC joists.
Option 2 that I seriously considered as it would give probably more strength, is to sister the new 2x12 joists onto the existing 2x6's. I would keep the tops of each joist flush. Use construction adhesive and nail as you would any normal "double" joist or header etc. In addition, I would add another 2x6 under the existing 2x6 and use adhesive to sister onto the 2x12 but also under the existing 2x6. In this situation, I would use double 2x joist hangers at each end of the joists. You will need to shim under the double tall 2x6 as it would nominally be 1/4" less than the 2x12. Shimming transfers the full weight carried by the 2x6's onto the hanger as well as allowing for joist height variations. Since you have a floor on 24" OC joists, I would use 3/4" material above.
A couple of additional thoughts I have if your new joists are LVL beams or wood i-joists. I would probalby place them in between the existing 2x6's. It would be difficult to find a joist hanger that would fit a double joist comprised of a 1 3/4" LVL or i-joist and 1 1/5" 2x6. I suppose you could shim the side of the 2x6 if you wanted so the fit was tight. If using an LVL this may have value as you can glue the double tall 2x6 in a continuous manner to the LVL. If using an i-joist you do not naturally have this option. However you could cut the correct thickness plywood and fill in the side of the i-joist next to the 2x6. This would create a flat surface to adhere and nail on the double tall 2x6 joist. It would also add some stregth too if you glue and nail the plywood filler the entire length of the i-joist. Avoid the temptation to use 2 pieces of plywood filler on each i-joist. This will align each plywood filler joint right in the center of the 16' span. It is better to stagger the joints across all the joists. I have heard, but not read or verified with an engineer, that it is actually better to NOT have the plywood filler seam EVER land right in the middle of the joist. The theory a contractor explained to me is that it creates a hinge point at the weakest part of the joist, right in the center of it's length. He claims two hinge points closer to both load bearing ends is better.
One storage suggestion...When stacking the lumber above always stack from outside edges toward the middle. This puts most of the weight close to the load bearing walls and allows you to walk down the center if you need to.
So now I will confess that I used 2x10's in my job and spanned 20'. I know, I know, I did not size the job correctly as I suggested. However I had to deal with a height constraint as I had garage door tracks under the floor. I will say that over a period of 10 years I only was able to measure 1/2" to 3/4" deflection in the center. This did not affect the operation of my garage doors.
I am astonished at the range of bad advice and the lack of even basic understanding of strength of materials in nearly all of the comments included in the text of this article. The dead load/live load discussion is incorrect in just about every detail and not relevant anyway. What really matters in this case is restraining lateral force at the walls to prevent building collapse, and this is easily done by adding short collar ties higher up on each rafter frame. Stability of the 2x6 joists against excessive deflection can be enhanced simply by adding blocking.
Your Best bet would be I-Beams But "How long is the Span?
Just Remember I Have Doubled 2 by 8's for My forward Single Car Garage for Hardwood Lumber but I Do Not Stack the Lumber very Deep at all. My single Garage hasn't been Used for a car for years. It has a Peaked roof in the Middle half Way back. I Put a Wood Rack over the Garage Door on the Front but I Don't "Store" much Hardwood up there at all.
My son had Muscular Dystrophy and when I Got Divorced and Got MY Kids my Ex, and I Sold our old house. My Parents had Just Remodeled their Kitchen. I Used Old Kitchen Cabinet Bases to Make the Garage my Shop. My Son was in a Power Wheelchair so I Built a New Workbench out of the Old Bases and Built a Wheelchair Ramp in MY Garage.
I Also put an Attic in the back 2/3 of the garage. The Attic has 2 by 8's also, but it has a plywood floor, Hatch, and a Plasterboard Ceiling. I Have a Shopsmith in my Garage but Only use it in the Summer. MY Driveway is Cement so I Buy new wheelsets every 5 years or so.
I Never store Wood OVER my garage door more than a Few Boards deep. Dead Weight is a "No No". I Lean Hardwood Lumber BEHIND a set of Shelves on my outer Garage wall. In my attic, it's just Light Storage. Most of the Hardwood I Want to use" is where I "Can Get" it leaning. It's easier to sort thru.
JLNels talks sense - if you can provide adequate support for the ends of the upset beam. I've got two of these in my house and they tuck right up into the ceiling, supporting floor loads above. Yours will be long, and so taller than a 2x6. It will hang down below the bottom of the 2x6 joists, but just a few inches. Much better than having a 4x12 or something resting against the bottom of the rafters.
The solution is simple...sister on an 18 gauge 1-5/8"x6 steel stud material to act as a joist running plate to plate. Screw the metal joist to the existing wood ceiling joist and to each plate and you have very effectively reduced the load deflection of any stored attic loads for little cost. Steel is so much easier to work with and weighs practically nothing and is STRAIGHT! I have done this many times in rooms and older garages with sagging ceiling joists.
All of you are clueless and wrong and should stop giving advice the only way to beef up this ceiling in the real world and in a cost effective manor is double up ur joists and this part is the most important you have to put solid block bridging in between the joists and a couple rows of it and they have to be cut and installed very tight so it stiffens up the joists as a unit this is framing 101 and simple engineering and this is the easiest and quickest and cheapest solution to fix what is the problem any smart engineer or architect or builder would agree of which none of you who made comments happen to be or are qualified to give advice on this type of situation and yes I am over qualified to comment and fix everything
The 2x6 joist can be considered a really thick single ply I-beam web. It won't take much by way of stiffening by sistering with real plywood, with proper glue and fasteners (lots of staples), to make the span super strong, as in 10x stronger than a solid wood joist. APA and AWC publish design specifications and supplements specifying exactly how to go about it. Cost won't break the bank, and no headroom or storage space will be lost.