
Maximize Insulation in Minimum Headers
Alternative code-approved header designs for better energy performance.
Synopsis: Conventional wood-frame construction is proven to work—but engineers have done the math and shown that we can use less framing and wind up with a building that stands up just as well. Building-code expert Glenn Mathewson explains the code requirements around header insulation and the ways we can maximize energy performance by not overbuilding the structure, including shifting headers up into the floor system (rim-board headers) and replacing traditional headers with box beams to allow more room for insulation and reduce thermal bridging.
Conventional woodframe construction is incredibly entrenched in the idea of, “We’ve always done it this way.” Unlike a lot of newer parts of codes that are based on laboratory testing or engineered design, conventional wood-frame construction is proven empirically. Buildings framed on 16-in. centers with the same big header over every opening have a long track record of remaining upright— all the evidence you need to know it works.
Meanwhile, engineers have done the math and shown that we can use less framing and wind up with a building that stands up just as well as the old ones. These “advanced framing” techniques, such as widening the spacing between studs and right-sizing headers for the loads they have to carry, have been around for decades, but haven’t really caught on in the broader residential construction market. Some builders and designers are reluctant to change when what they’ve been doing works. Others just refuse to believe this newfangled framing could be as good as the old stuff.
Regardless of opinion, building codes have incorporated these engineered-framing concepts. They aren’t mandated, but they are permitted. Builders who don’t care as much about thermal bridging or excessive lumber in their walls can keep doing things the old way. Those with an eye on energy savings and conserving resources can do it the new way. Both ways are “code minimum,” but the outcomes in terms of a home’s energy performance are drastically different.
Probably the easiest and most widely adopted change from conventional framing is how we build headers. These are the beams that span over wall openings— typically windows and doors—and transfer the loads imposed on them down the sides of the openings through jack studs, and eventually down to the foundation. When I was framing homes in the late ’90s, we simply built headers to fit the width of the wall. Two 2×10 plies and a 7/16-in. OSB filler did the job for pretty much every opening in 2×4 walls. This configuration was often specified on the plans by designers as “(2) 2×10 typ.” The “typ” stands for “typical,” and essentially translates to “this is good enough and I don’t feel like evaluating each header individually.”
When minimum R-values began to increase in the 2009 I-codes, which serve as the model for building codes across the U.S., many regions had to increase from 2×4 wall construction to 2×6, simply to provide a bigger cavity for insulation and not for any structural reasons. The industry response was simply to change the “(2)” to a “(3)”—the “typ” now a three-ply header sufficient to fit the wall thickness. The larger header has no structural motivation; it was just the easy thing to do. That a combination of 2x headers and 1/2-in. spacers fills a 3-1/2-in. and 5-1/2-in. wall perfectly seems conveniently meant to be. As attention to energy codes began to increase, however, we saw the industry make voluntary changes to this practice.
It’s no longer the norm to fill out that header just to fill the depth of the wall. If three plies aren’t structurally necessary, then two 2x plies are used in the 2×6 wall. The OSB filler is gone, and the header plies are fastened together and favored to the outside face of the wall studs. We finally separated header size from wall thickness.
Starting in 2012, the International Residential Code (IRC) began requiring any cavities in headers be insulated. It’s important to note this is not to say that headers are required to be insulated or that minimum-size headers must be used. It only says that if you have cavities in your header, they must be insulated to at least R-3 per inch.
Though this appears to be where the industry has settled, the IRC offers so much more choice in design and better-performing options. As you read the rest of this column, it’s critical to realize that two homes “built to minimum code” can have tremendously different thermal performance. Where often “the code” is looked at as restrictive, this is a subject in which the code offers much more choice than is generally utilized. There is still a lot more we can do with headers to increase energy performance. Perhaps it’s time to consider some new conventions in conventional header construction.
Size matters
There’s little value in overbuilding the structure of a home, unless lifestyle of the occupants is being addressed—a large soaking tub or heavy gym equipment might be reasons to thoughtfully overbuild. Most overbuilds are the opposite—they’re overbuilt because they weren’t thought out. The overbuilt “typ” header is for convenience, not performance. Putting one in a non-load-bearing wall, for example, robs the house of insulation potential, since wood doesn’t have near the R-value of insulation of the same volume.
While a bigger-than-necessary header could be useful if snow loads suddenly increased in the future (unlikely), fighting the daily movement of heat in and out of your climate-controlled home is always valuable. While energy prices are likely to continue to increase, the resistance to energy movement through the thermal envelope stays constant. That means the insulation installed today only becomes more valuable, saving you more money as energy prices go up. Unlike splurging on a kitchen range or granite countertops, there’s really only one good time to invest in insulation—when the house is built. And in some cases, insulation is actually cheaper than the wood it’s replacing.
Move it up
There’s a really simple way to allow for a smaller header while hardly changing anything about “how we’ve always done it.” Rather than set the header flush with the top of the opening, move it up tight to the top plate. In this location, with the header additionally fastened through the top plate, the floor or roof rafters are able to provide lateral resistance to the header, increasing the load it can handle. In fact, if you look at the header tables in the code, all of the listed spans are contingent on headers having this lateral support. If the header is lower down with cripples above it, the span rating has to be reduced by multiplying the given span by 0.7. In other words, if the table says a given header can span 4 ft., but the header has cripples above it, its actual span is reduced to 2 ft. 9-5/8 in. (4 ft. x 0.7). Unless you move the header up, you have to upsize it and take the penalty of reduced insulation volume and increased thermal bridging. This is a new revelation for the IRC, which explains this span reduction in a new footnote under the tables for exterior wall girder and header spans in the 2018 edition.
If you read past the headlines, you may find single-ply headers are in many cases just ‘fake news.’
Use single-ply sparingly
Unfortunately, humans are easily captivated by catchy headlines and good marketing. Similarly, the I-codes have some provisions that look great at a glance, but aren’t that big a deal when you get into the details. That’s generally the case with single-ply headers in load-bearing walls, which were first included in a unique table in the 2012 IRC. In 2018, the IRC added new rows to this table, Table R602.7(1), but that’s just the headline. There is more to a header than just its ability to span an opening. It also has to transfer whatever loads it carries to the jack studs below.
The IRC makes load assumptions based on the size of the opening. The wider the opening, the higher the load that gets transferred through the header and to the jack studs. Connected to the king studs, the jacks create a post to transfer the concentrated load from the header to the foundation. When looking at Table R602.7(1) for the relationship of header span to size, there is also a column for the number of jack studs required at each end of the header. As the span gets longer, the number of required jack studs generally increases.
Allowable spans for single-ply headers are very short, but in almost all cases at least two jack studs—and sometimes as many as four—are required on each end. Move down the table column to two-ply headers with similar spans and you only need a single jack stud. For example, a single 2×6 has the same max span as two 2x4s, but it requires twice the number of jack studs. This is not a typo, but it’s counter to the logic of including single-ply headers in the tables—namely to increase insulation volume.
Adding two or more jack studs to remove one short ply of header results in an overall increase in wood volume and a decrease in energy performance. And it’s not just about insulation. Studs create additional thermal bridges straight through the wall. A two-ply header was already short of connecting the inside face of the wall to the outside face, so removing a ply itself has little effect on thermal bridging, while adding additional jacks ramps it up. If you read past the headlines, you may find single-ply headers are in many cases just “fake news.”
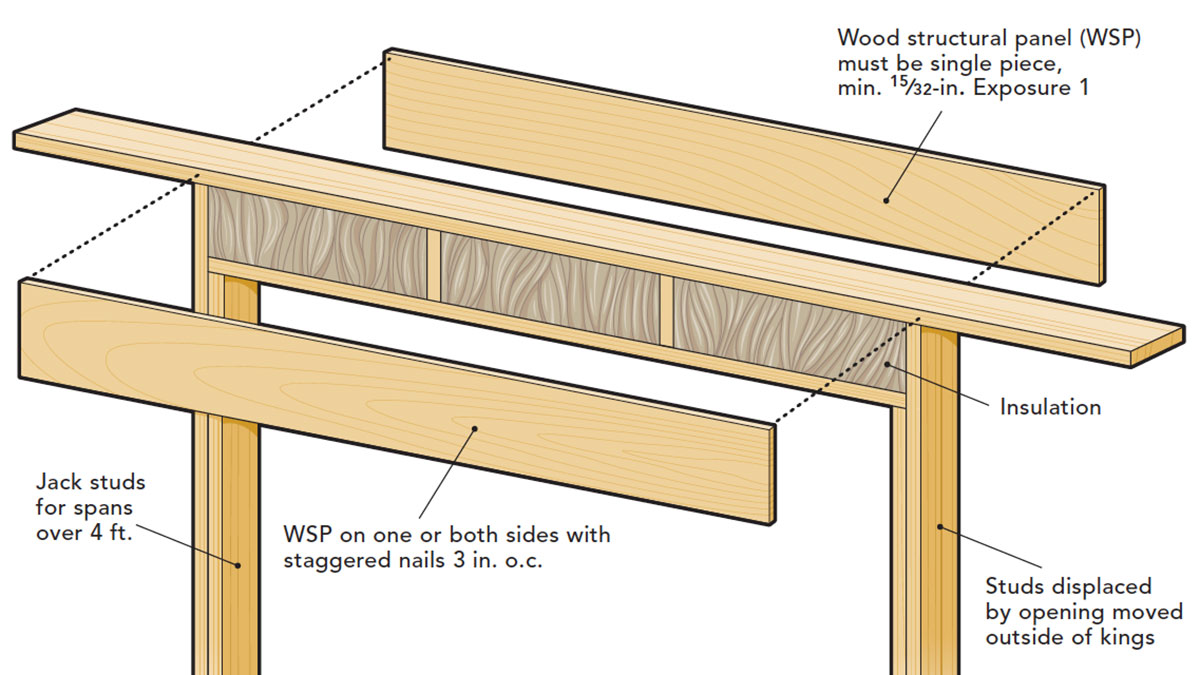
The no-ply header
How about we just remove all the large header plies and, in some cases, all the jack studs? You can do that in a nonbearing wall, and probably should, but I’m still talking about bearing walls. A box-beam header removes all standard header plies and allows the wood structural-panel sheathing to do the work.
Section R602.7.3 and its accompanying table and illustration lay out all the details for box-beam headers, which can be either 9 in. or 15 in. tall. The basic structure includes a 2x on the flat, cripples at regular stud spacing, and a wood structural panel on one or both sides, with its strength axis parallel to the top plate and fastened with nails 3 in. on center. This configuration replaces a lot of wood volume with insulation. If you already wrap your exterior walls in wood structural-panel sheathing, the only added work for a one-sided box-beam header is driving a handful more nails.
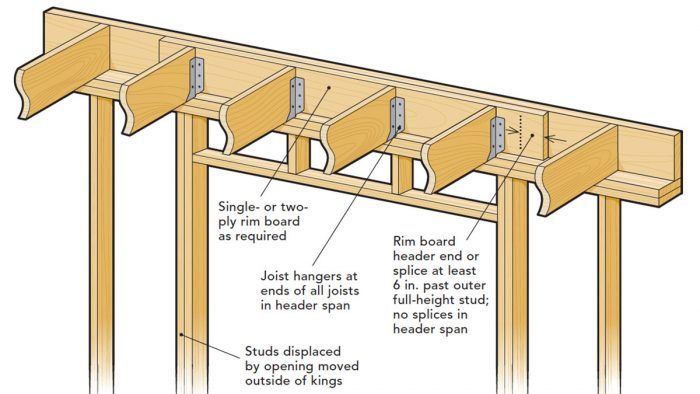
Put it in the floor
Though headers have typically always been in walls, the span table for headers lived much of its life in the floor chapter. That could be because the loads on the header come from the floor or roof above, or maybe it was just misplaced, but it wasn’t until the 2015 edition that the header table moved to the wall chapter. Ironically, in this same edition, a brand new section and figure—R602.7.2, Rim Board Headers—was added to provide prescriptive design for moving the header completely into the floor framing. Now we might be on to something.
When a header is moved into the rim-joist area, the single rim-joist ply becomes one of the header plies—and for small openings, additional plies might not be necessary. Sizing of rim-board headers uses the same table as standard headers. There are some details not to miss in this design, such as using joist hangers to support joists over the opening. The rim-joist header must also extend at least 6 in. beyond the end supports. Instead of jack studs, the full-height studs displaced by the opening are ganged up on either side of it to carry the load on the header. Overall, this method can significantly reduce the amount of lumber needed to frame an opening—especially large ones.
But just as significant is the space it makes available for insulation. While the wall thickness is a limiting factor in how much insulation can be jammed into a standard header, the cavity inboard of the rim joist can span the width of the building. The horizontal thickness, and thus total R-value, can be much more in a floor than in the wall. The number of plies in a rim-board header is no longer as significant of an issue. For high-efficiency, prescriptively designed homes, this may be the best choice.
One takeaway from all of this is that none of these better-energy-performing framing methods is required. If you want to keep building to the minimum the old-fashioned way, you are welcome to. However, you can also build to the minimum in a more thoughtful way—a way that doesn’t feel “minimum” at all. Through education, “the code” can be more than just the restrictive, freedom-limiting burden many designers and contractors view it as. It can also be a tool box.
Glenn Mathewson is a consultant and educator with buildingcodecollege.com.
Drawing: Kate Francis
From Fine Homebuilding #294
Fine Homebuilding Recommended Products
Fine Homebuilding receives a commission for items purchased through links on this site, including Amazon Associates and other affiliate advertising programs.

Portable Wall Jack

Insulation Knife

Staple Gun

View Comments
Thanks Glen, great synopsis.
I’ve heard that balloon framing eliminates the need for headers, but I can’t find anything in the code to confirm this. Is there a prescriptive approach for sizing headers in a balloon framed house, or does this rely on an engineer to calculate?
To use my upcoming project as an example, I’ll be balloon framing a 2-story wall (17’ eave height), stud spacing 24” OC. The 2nd floor diaphragm is supported by posts and does not share any load with the exterior walls. I’ve attached a rough mock-up of window openings and main studs. Thanks!
Adam