FHB Logo Facebook LinkedIn Email Pinterest Twitter X Instagram Tiktok YouTube Plus Icon Close Icon Navigation Search Icon Navigation Search Icon Arrow Down Icon Video Guide Icon Article Guide Icon Modal Close Icon Guide Search Icon Skip to content
Subscribe
Log In
  • How-To
  • Design
  • Tools & Materials
  • Restoration
  • Videos
  • Blogs
  • Forum
  • Magazine
  • Members
  • FHB House
  • Podcast
Log In

Fine Homebuilding Project Guides

Framing

Guide Home
  • Introduction to Framing
  • Framing Tools, Techniques, and Materials
  • Framing Floors
  • Framing Walls
  • Framing Stairs
  • Framing Roofs
  • Efficient Framing Methods
  • Timber Framing
How-To

Three Ways to Lay Out an Elliptical Curve

Ellipses can provide striking, graceful curves on a building, but they can be tricky to build.

By Jud Peake Issue 214
  • X
  • facebook
  • linkedin
  • pinterest
  • email
  • add to favorites Log in or Sign up to save your favorite articles

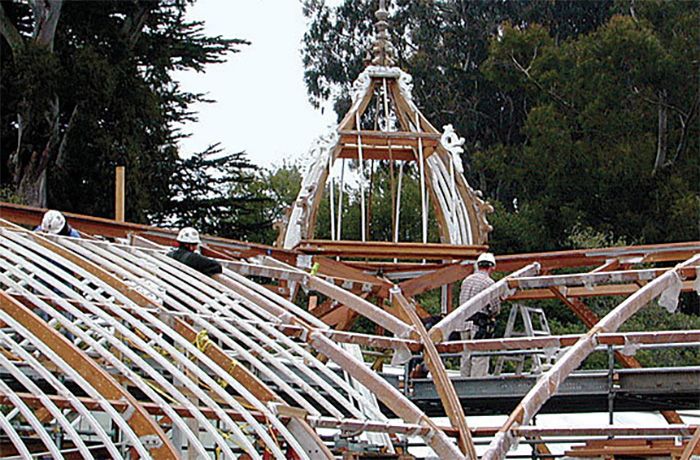
A roof of curves proves the technique: As part of the crew working on the restoration of the Conservatory of Flowers in San Francisco, the author was able to refine his ability to create ellipical rafters.

As defined by Merriam-Webster’s Collegiate Dictionary, an ellipse is “a closed plane curve generated by a point moving in such a way that the sums of its distances from two fixed points [foci] is a constant; a plane section of a right circular cone that is a closed curve.” Got it? Luckily, it’s a lot easier to see an ellipse than to understand its definition. Just cut a dowel to 90° at one end and to 45° at the other. The square cut creates a circle with a uniform radius as wide as it is tall. The 45° cut end reveals an ellipse, wider than it is tall.

This ellipse is an example of the geometry of some larger building components. Because these curves are quantifiable, their rise and run can be determined using the conventions of roof framing. For instance, a cove ceiling with a common section that is a simple 12-in. quarter radius would have a corner strut or hip that is a quarter ellipse with a rise of 12 in. and a run of 17 in.

There are several ways to lay out an ellipse. Here, I’ll describe three using that 12:17 rise:run ratio. The first is the string method, which is the most familiar. Use string that won’t stretch, although longer lengths of string tend to stretch, no matter what. The string length can be found by formula, but sometimes it’s simpler just to pull a string around the two foci and to a known point on the curve, such as, in this example, up 12 in. on the minor axis.

The second technique, which is derived straight from the determined rise and run, is to use a trammel. The trammel rides around the square corner of a piece of plywood or other suitable material. The trammel-drawn curve gives the correct ellipse for a regular hip on a 12-in. radial cove ceiling or curved-rafter roof. To draw a hip on an octagonal roof, the trammel is set up with a 12-in. rise and 13-in. run.

The third is an arithmetic plotting, also known as lofting, which can also be applied to any curve. This method comes in handy when you need to derive a hip or valley from an existing, unquantified curve, or if the ellipse is too big to draw with a trammel. During the restoration of San Francisco’s Conservatory of Flowers, both scenarios were true. We drew a grid of 12-in. squares on the floor and then calculated the shape of the curved common rafters, hips, and valleys. Once the hips and valleys were cut to shape, we cut the backing with a changing double bevel that began as two 45° cuts at the bottom plumb end of the curve and diminished to a single flat edge at the top, level end.

What is an ellipse?

drawings of a circle and an ellipse

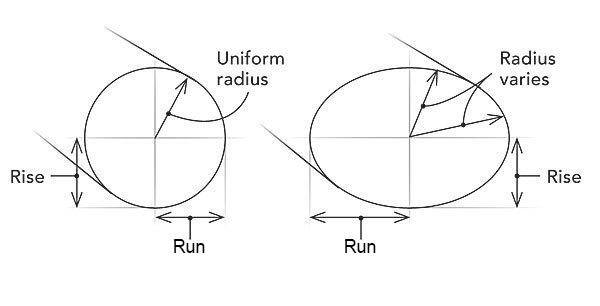
The end of a square-cut dowel is a circle, in which the rise (height) and the run (width) are the same, resulting in a uniform radius. But cut the dowel at 45°, and the end is an ellipse, which is wider than it is high. Its radius is variable.

Use a string

drawing of using a string to lay out an elliptical curve

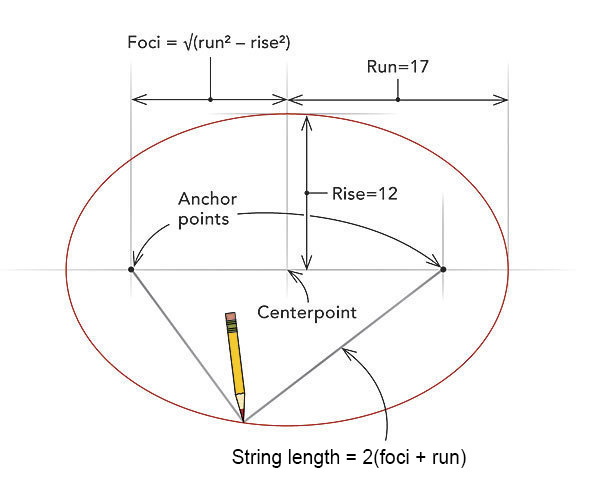
Draw an ellipse with a string, two pins, and a pencil. First, draw a horizontal line and mark a centerpoint. Next, determine the rise and run of the ellipse. The string’s anchor points, called the foci, are located with the following equation: foci= √(run² – rise²). The string length can be calculated this way: string length = 2(foci + run). After finding the centerpoint and foci, attach a nonstretching string of the correct length to nails or screws driven in at the foci. Using the string to restrain the pencil, draw the ellipse.

Use a stick

drawing of using a stick to lay out an elliptical curve

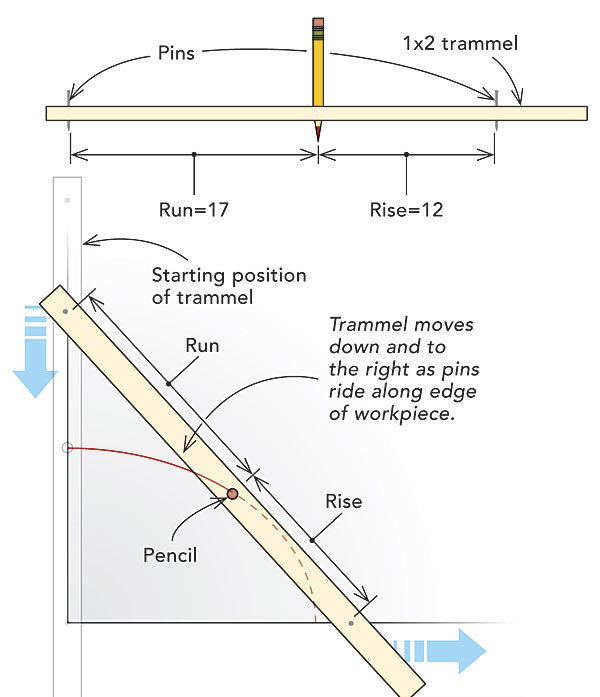
Drill a hole for a pencil in the middle of a 1×2. From the pencil’s centerline, measure the distance of the desired rise (the y coordinate) of the ellipse (for example, 12 in.), and drive a screw or nail through the trammel. In the opposite direction, measure the distance of the run (the x coordinate; 17 in., for example), and set another screw or nail. (For accuracy, the pins should be just outside the measured point.)

To draw the ellipse, align the pins and pencil along the vertical edge of the workpiece. While keeping the pins tight to the plywood edges, move the bottom pin (the rise) to the right as the top pin (the run) descends the vertical.

Use a grid

drawing of using a grid to lay out an elliptical curve

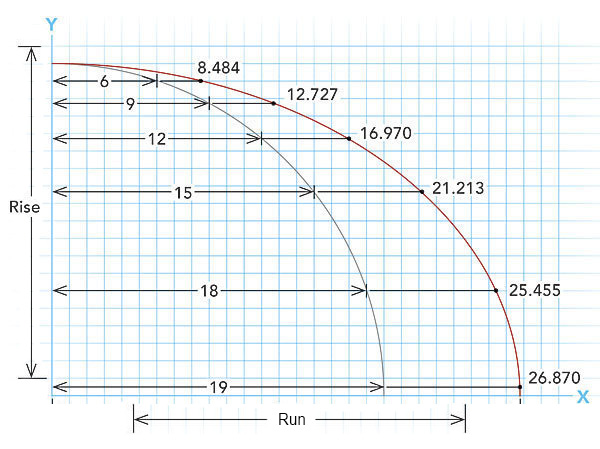
If an ellipse is too big to lay out with a trammel, it can be drawn using an algebraic formula. Begin by drawing a grid on an appropriately sized piece of paper, a sheet of plywood, or the subfloor. If you divide the horizontal axis into 20 parts, you’ll be plenty accurate. To draw the companion hip or valley to a curved common rafter, you’ll want first to draw the common. For the sake of illustration, we’ll use a quarter radius to describe the common, which can be drawn by swinging an arc from the intersection of the x axis and y axis. The elliptical hip or valley is laid out as an extension of the common, in a ratio of 12:17. On the grid, although each unit of rise remains the same, every 12 in. of run gets stretched to 17 in. to describe regular hips or valleys. To elongate the radius into an ellipse, multiply each point on the x axis (which represents the run) by the square root of 2, which is 1.414. The y axis (representingthe rise) stays the same.

After the coordinates are laid out, tack a flexible strip of wood at each point of the stretched grid to describe the elongated curved line. Now the ellipse can be transferred onto the stock.

Top photo: courtesy of Architectural Resources Group Inc. Inset photo: David Wakely. Drawings: Rodney Diaz.

Fine Homebuilding Recommended Products

Fine Homebuilding receives a commission for items purchased through links on this site, including Amazon Associates and other affiliate advertising programs.

Stabila Classic Level Set

Plumb and level are the hallmarks of good craftsmanship, so having a complete set of professional levels on the job is crucial to success.
Buy at Amazon

Tajima Chalk Rite Chalk Line

Snapping a line should be quick, clean, and accurate, and the Tajima certainly doesn’t disappoint. It’s pro-grade and works as advertised.
Buy at Amazon

Short Blade Chisel

We always have a wide chisel on my belt for fit and fitting because it’s often faster to grab the chisel rather than going back to the saw.
Buy at Amazon
Previous: Exploring Octagonal Roof Framing with SketchUp Next: Laying Out and Cutting Common Rafters

Guide

Framing

Chapter

Framing Roofs

Sign up for eletters today and get the latest how-to from Fine Homebuilding, plus special offers.

Signing you up...

This site is protected by reCAPTCHA and the Google Privacy Policy and Terms of Service apply.
See all newsletters
See all newsletters

View Comments

  1. Skooter | Jun 06, 2017 08:56pm | #1

    A video demonstration detailing each ellipse technique would be very helpful.

  2. swdd | Oct 29, 2017 02:08pm | #2

    Wow, that was complicated. How about measuring half the run from the height point back to the run plane, on both sides of the midpoint. That will give you your focal points. No reason to make it confusing.

  3. NilsT | Jul 26, 2022 06:24pm | #3

    Why 12 and 17? Would other ellipses work as well? Is there a structural reason for that particular ellipse?

Log in or create an account to post a comment.

Sign up Log in

Become a member and get full access to FineHomebuilding.com

Framing

Framing

Trusted, in-depth guidance from the pros for framing a durable, code-compliant house

View Project Guide

View All Project Guides »

Become a member and get unlimited site access, including the Framing Project Guide.

Start Free Trial

Introduction to Framing
  • House Framing Concepts, Tips, and More
Framing Tools, Techniques, and Materials
  • Tools
  • Techniques
  • Framing Lumber
  • Steel
Framing Floors
  • Floor Framing
  • Engineered Floors
  • Floor Sheathing
Framing Walls
  • Wall Framing Basics
  • Layout
  • Wall Assembly
  • Raising and Straightening Walls
  • Framing Rough Openings
  • Blocking
Framing Stairs
  • Stair Layout
  • Building Stairs
Framing Roofs
  • Roof-Framing Basics
  • Roof Design
  • Laying Out and Cutting Rafters
  • Framing Valleys
  • Working with Trusses
  • Dormers
  • Special Situations
Efficient Framing Methods
  • Advanced Framing
  • Double-Stud Walls
Timber Framing
  • Timber-Frame Construction
  • Timber-Frame Design

Fine Home Building

Newsletter Sign-up

  • Fine Homebuilding

    Home building tips, offers, and expert advice in your inbox.

  • Green Building Advisor

    Building science and energy efficiency advice, plus special offers, in your inbox.

  • Old House Journal

    Repair, renovation, and restoration tips, plus special offers, in your inbox.

Signing you up...

This site is protected by reCAPTCHA and the Google Privacy Policy and Terms of Service apply.
See all newsletters

Follow

  • Fine Homebuilding

    Dig into cutting-edge approaches and decades of proven solutions with total access to our experts and tradespeople.

    Start Free Trial Now
    • Facebook
    • Instagram
    • X
    • LinkedIn
  • GBA Prime

    Get instant access to the latest developments in green building, research, and reports from the field.

    Start Free Trial Now
    • Facebook
    • YouTube
  • Old House Journal

    Learn how to restore, repair, update, and decorate your home.

    Subscribe Now
    • Facebook
    • Instagram
    • X

Membership & Magazine

  • Online Archive
  • Start Free Trial
  • Magazine Subscription
  • Magazine Renewal
  • Gift a Subscription
  • Customer Support
  • Privacy Preferences
  • About
  • Contact
  • Advertise
  • Careers
  • Terms of Use
  • Site Map
  • Do not sell or share my information
  • Privacy Policy
  • Accessibility
  • California Privacy Rights

© 2025 Active Interest Media. All rights reserved.

Fine Homebuilding receives a commission for items purchased through links on this site, including Amazon Associates and other affiliate advertising programs.

  • Home Group
  • Antique Trader
  • Arts & Crafts Homes
  • Bank Note Reporter
  • Cabin Life
  • Cuisine at Home
  • Fine Gardening
  • Fine Woodworking
  • Green Building Advisor
  • Garden Gate
  • Horticulture
  • Keep Craft Alive
  • Log Home Living
  • Military Trader/Vehicles
  • Numismatic News
  • Numismaster
  • Old Cars Weekly
  • Old House Journal
  • Period Homes
  • Popular Woodworking
  • Script
  • ShopNotes
  • Sports Collectors Digest
  • Threads
  • Timber Home Living
  • Traditional Building
  • Woodsmith
  • World Coin News
  • Writer's Digest
Active Interest Media logo
X
X
This is a dialog window which overlays the main content of the page. The modal window is a 'site map' of the most critical areas of the site. Pressing the Escape (ESC) button will close the modal and bring you back to where you were on the page.

Main Menu

  • How-To
  • Design
  • Tools & Materials
  • Video
  • Blogs
  • Forum
  • Project Guides
  • Reader Projects
  • Magazine
  • Members
  • FHB House

Podcasts

  • FHB Podcast
  • ProTalk

Webinars

  • Upcoming and On-Demand

Podcasts

  • FHB Podcast
  • ProTalk

Webinars

  • Upcoming and On-Demand

Popular Topics

  • Kitchens
  • Business
  • Bedrooms
  • Roofs
  • Architecture and Design
  • Green Building
  • Decks
  • Framing
  • Safety
  • Remodeling
  • Bathrooms
  • Windows
  • Tilework
  • Ceilings
  • HVAC

Magazine

  • Current Issue
  • Past Issues
  • Magazine Index
  • Subscribe
  • Online Archive
  • Author Guidelines

All Access

  • Member Home
  • Start Free Trial
  • Gift Membership

Online Learning

  • Courses
  • Project Guides
  • Reader Projects
  • Podcast

More

  • FHB Ambassadors
  • FHB House
  • Customer Support

Account

  • Log In
  • Join

Newsletter

Get home building tips, offers, and expert advice in your inbox

Signing you up...

This site is protected by reCAPTCHA and the Google Privacy Policy and Terms of Service apply.
See all newsletters
See all newsletters

Follow

  • X
  • YouTube
  • instagram
  • facebook
  • pinterest
  • Tiktok

Join All Access

Become a member and get instant access to thousands of videos, how-tos, tool reviews, and design features.

Start Your Free Trial

Subscribe

FHB Magazine

Start your subscription today and save up to 81%

Subscribe

We hope you’ve enjoyed your free articles. To keep reading, become a member today.

Get complete site access to expert advice, how-to videos, Code Check, and more, plus the print magazine.

Start your FREE trial

Already a member? Log in

Privacy Policy Update

We use cookies, pixels, script and other tracking technologies to analyze and improve our service, to improve and personalize content, and for advertising to you. We also share information about your use of our site with third-party social media, advertising and analytics partners. You can view our Privacy Policy here and our Terms of Use here.

Cookies

Analytics

These cookies help us track site metrics to improve our sites and provide a better user experience.

Advertising/Social Media

These cookies are used to serve advertisements aligned with your interests.

Essential

These cookies are required to provide basic functions like page navigation and access to secure areas of the website.

Delete My Data

Delete all cookies and associated data