Creating a Sealed Crawlspace
Properly designed unvented crawlspaces have a number of advantages compared to vented crawlspaces.

If you live in the eastern half of the United States and want a damp, moldy crawlspace, just make sure that it is vented to the exterior. Within a few short years, the fiberglass batts installed in the crawlspace ceiling will become so damp that they’ll hang down like stalactites. Although some building inspectors may take some convincing, a vented crawlspace is a recipe for mold and moisture. A sealed crawlspace, on the other hand, is treated just like a scaled down version of a basement, and should perform like one.

Here’s why a vented crawlspace can lead to trouble. During the summer months, warm outdoor air holds more moisture than cooler crawlspace air. With a vented crawlspace, when that humid outdoor air enters through the vents, it hits cool surfaces—concrete, water pipes, and air-conditioning ducts—and condensation forms and begins to drip. One remedy that is sometimes attempted is to add a fan to the space, but that just increases the occurrence of condensation. The more you ventilate, the wetter the crawlspace gets. Crawlspace vents also can cause problems during the winter by letting in frigid outdoor air, which can allow pipes to freeze.
Properly designed unvented (sealed) crawlspaces stay drier than vented crawlspaces, the pipes within them are protected from wintertime freeze, and they require less insulation than vented crawlspaces (because the area of the perimeter walls is less than the area of the crawlspace ceiling). They also bring any ducts running through the crawlspace into the conditioned envelope of the house, which usually results in energy savings.
New-construction crawlspaces may require temporary dehumidification to remove construction moisture. Once the home is dried in, it’s a good idea to install a dehumidifier in the crawlspace and run it for three or four months until the interior relative humidity stabilizes. Also, remember that any combustion appliance (for example, a water heater or furnace) in an unvented crawlspace should be a sealed-combustion unit.
Code requirements for unvented crawlspaces
Most building codes permit the construction of unvented crawlspaces. In recent versions of the International Residential Code, requirements for unvented crawlspaces can be found in section R408.3. If an unvented crawlspace has a dirt floor, the code requires exposed earth to be covered with a continuous vapor retarder with taped seams: “The edges of the vapor retarder shall extend at least 6 inches up the stem wall and shall be attached and sealed to the stem wall.”
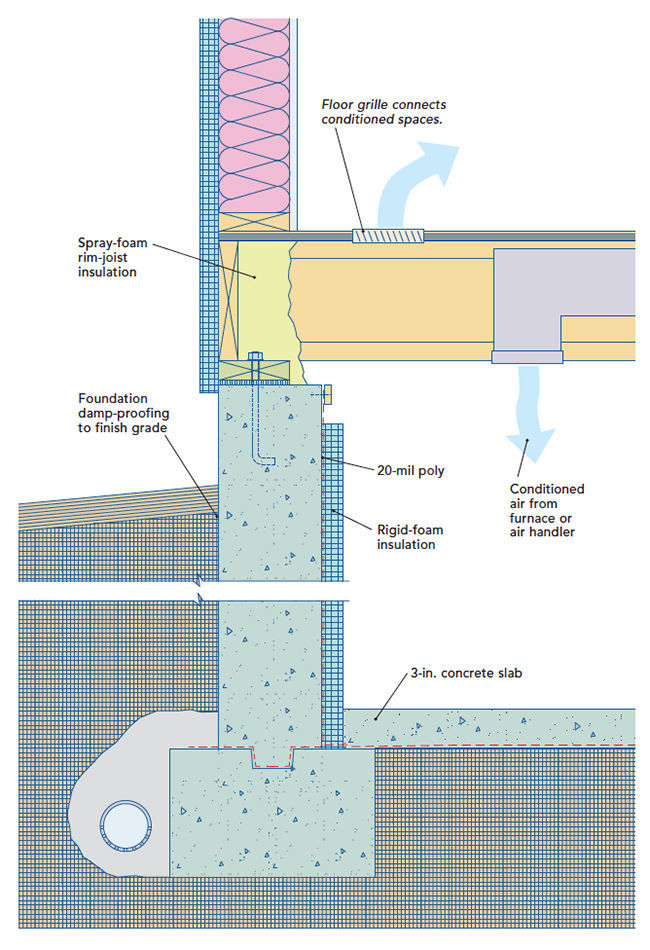
In addition to the requirement of a duct or floor grille connecting the crawlspace to the conditioned space above, the code lists two options for conditioning unvented crawlspaces.
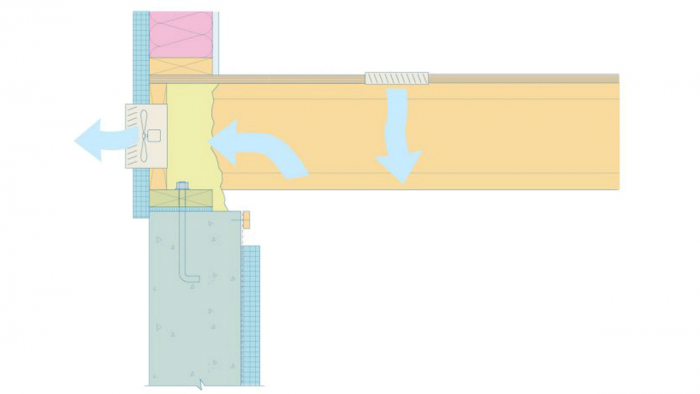
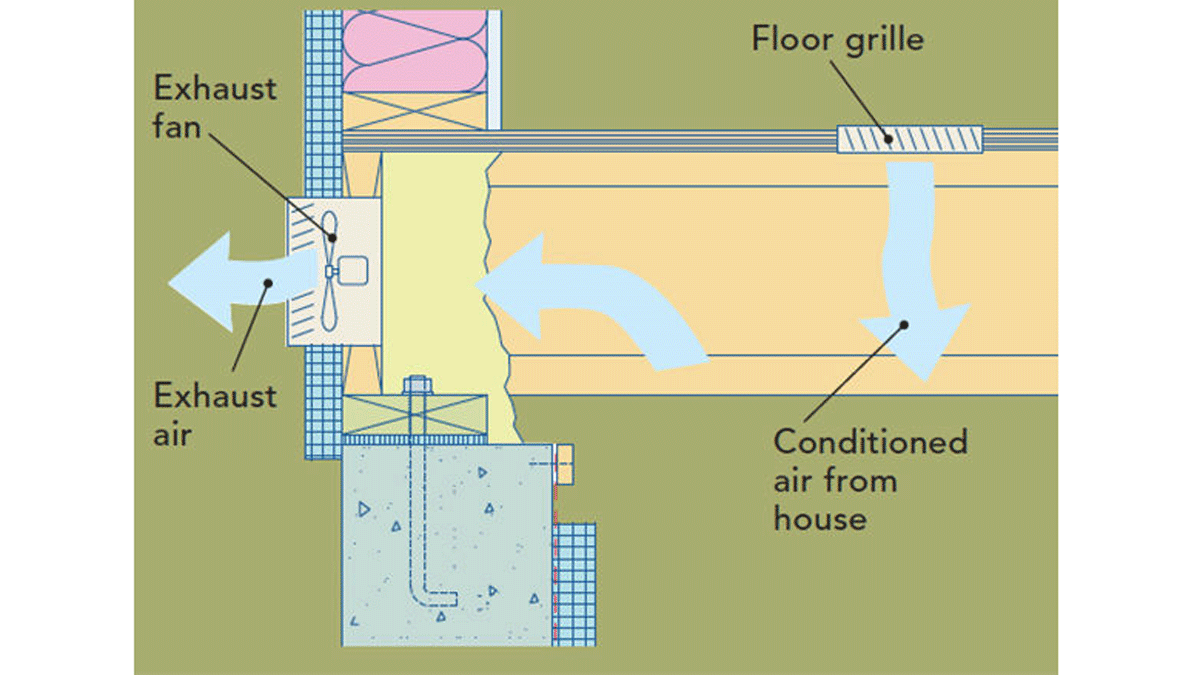
Option 1 (below): Install a continuously operating exhaust fan in the crawlspace that blows through a hole in the rim joist or an exterior wall. Make sure that the fan isn’t too powerful (1 cfm for each 50 sq. ft. of crawlspace floor area), because the makeup air entering the crawlspace is conditioned air from the house.
Option 2 (above, right): Install a forced-air register to deliver supply air from the furnace or air handler to the crawlspace (again, 1 cfm for each 50 sq. ft.). Assuming the house has air-conditioning, this introduction of cool, dry air during the summer keeps the crawlspace dry.

Detailing an unvented crawlspace
If you want to build an unvented crawlspace, follow these recommendations.
• To help keep the crawlspace dry, make sure the exterior grade slopes away from the foundation.
• Remove all rocks and debris from the crawlspace floor, and rake the dirt smooth. In new construction, it’s best for the crawlspace floor to be higher than the exterior grade.
• If the crawlspace is subject to water entry, slope the floor to a sump equipped with a drain or a sump pump.
• Install a durable vapor barrier—for example, a 20-mil pool liner or Tu-Tuf poly—over the floor. Extend it up the crawlspace walls, leaving 3 in. uncovered at the top to create a termite-inspection strip.
• Attach the top of the vapor barrier to the wall with horizontal battens secured with masonry fasteners.
• Seal the seams of the vapor barrier with a compatible tape or mastic. Many builders use duct mastic embedded in fiberglass-mesh tape.
• Install a 2-in.- or 3-in.-thick concrete slab to protect the vapor barrier, or install a sacrificial layer of 6-mil poly on top of the permanent vapor barrier to protect it from damage during installation of mechanicals and insulation.
• If testing shows high radon levels, install a passive radon-collection system below the crawlspace floor.
• Insulate the interior of the walls and rim joists with rigid foam or spray polyurethane foam. Many builders use Thermax, a polyisocyanurate foam that in most jurisdictions does not require a thermal barrier or ignition barrier. (Alternatively, you can insulate the exterior of the walls.) If your crawlspace has stone-and-mortar walls, you must use closed-cell spray polyurethane foam. Install at least as much continuous insulation on the inside or outside as required by the 2012 IRC: R-5 for climate zone 3, R-10 for climate zone 4 (except marine zone 4), and R-15 for marine zone 4 and climate zones 5, 6, 7, and 8. (Insulation requirements for the 2015 and 2018 versions of the IRC are the same.)
• Install an exhaust fan or a forced-air register as required by code (see “Code requirements for unvented crawlspaces,” facing page). Be sure that the fan does not exceed airflow requirements for the size of the crawlspace, since exhaust fans always carry an energy penalty.
Illustrations by Dan Thornton
More on crawlspaces:
Upgrading Crawlspace Insulation – Use a combination of batts, continuous rigid foam, and a vapor barrier to safely insulate this tricky space.
Sealing a Crawlspace – Close the vents and let a heavy-duty vapor barrier keep moisture, mold and radon out of the living space.
Framing a Crawlspace Foundation – These time-saving tips make short work of setting sills, posts, and girders.


View Comments
As a home inspector I get the question on this topic often. This is a great and short piece that sums it up. Nice one
I live in Northern California and am in the process of sealing vents and encapsulating my crawlspace. We currently have no insulation in our crawlspace, so I plan to insulate the walls. When I insulate the walls, I'm considering spraying a continuous layer of closed-cell foam from the top of the rim joist to the bottom of the foundation wall, but I've read that wall insulation should be kept 3" from the top of the foundation wall to allow for termite inspection. How do I insulate the rim joist and allow for termite inspection? Leaving a gap in the insulation seems to defeat the purpose of insulating. Thanks!