
Five Rules for Wall Design
Energy expert Martin Holladay outlines some basic principles to guide designers of high-performance homes.
An architect recently told a friend of mine that he was designing a flash-and-batt wall with the spray foam insulation installed on the interior, and the batt insulation toward the exterior, “because that way the vapor barrier will be on the right side of the assembly.”
Anyone who wants to address this architect’s suggestion will need to unpack the assumptions behind his statement. For example, it’s worth discussing whether walls need vapor barriers. It’s also worth discussing why flash-and-batt walls almost always have the spray foam insulation near the exterior rather than the interior of the wall assembly.
To help people like this architect, my friend suggested that I write an entry-level article on wall design, starting from first principles.
Materials choices are wide
When designing a wall, builders can choose from a wide range of materials. Available insulation materials include rigid foam, spray foam, fiberglass batts, mineral wool, and cellulose. Sheathing options include OSB, plywood, gypsum sheathing, and Zip sheathing (with or without adhered polyisocyanurate insulation).
To put these materials together wisely, a designer needs to understand a few basic principles involving water entry, vapor transmission, and air leakage. Moreover, a designer needs to understand these principles well enough to sense which types of assemblies are risky and which are safe.
To point designers in the right direction, I’ve boiled my advice down to five principles.
#1: Airtightness is always good
Regardless of what type of wall you are building, strive for airtightness. The tighter the wall, the better it will perform.
If you can’t control air flow through your walls, it’s hard to maintain the interior conditions than most homeowners expect. Air leaks cause many problems: they increase heating and cooling costs, of course, but they can also lead to moisture problems. During the winter, exfiltrating air can carry a lot of moisture, and during the summer, infiltrating air can carry a lot of moisture. As it passes through cracks in your walls or ceilings, leaking air can deposit moisture — so strive for airtightness when building.
There are no exceptions to this rule. “A little bit of air leakage” is never a good thing.
Although there are many approaches to air sealing walls, the most common method is to tape the sheathing seams, to seal penetration cracks with caulk, canned foam, or tape, and to install a gasket under the bottom plate. Air sealing efforts should always be verified by a blower-door test. For more information on this topic, see “Questions and Answers About Air Barriers.”
#2: Beware the cult of the vapor-open wall
Some green builders promote the cult of the vapor-open assembly: for some reason, they insist on designing walls that allow vapor to diffuse both outward and inward.
These builders are only half right. It’s true that some vapor-open walls perform fairly well: an example would be a straw-bale wall with vapor-permeable plaster on both sides. (Note, however, that this type of wall only works well if the house has wide roof overhangs, and if the exterior grade is 8 or more inches lower than the bottom of the straw bales.)
Walls that are vapor-open can also fail dramatically, especially if the wall has cold sheathing and air leaks. Merely creating a vapor-open assembly isn’t enough — because the temperature of the sheathing in winter may matter more than the vapor permeance of the wall assembly. For more information on this issue, see “Condensation on Wall Sheathing During Construction.”
In the case of floors, vapor-open assemblies can be disastrous. A slab on grade always requires a layer of polyethylene directly under the concrete. You never want to encourage vapor flow through a slab.
Building science research shows that wall sheathing stays driest when it is covered on the exterior with an adequately thick layer of continuous insulation — for example, rigid foam insulation. If you install a thick layer of foil-faced polyiso on the exterior side of your wall sheathing, the wall won’t be vapor-open — but it will perform exceptionally well.
#3: You don’t need an interior vapor barrier
It’s time to abandon that idea that walls require an interior vapor barrier. They don’t. Building codes require, and building scientists recommend, that some types of cold-climate walls include an interior vapor retarder — but note that a vapor retarder is a less stringent layer than a vapor barrier. Ordinary kraft facing or vapor-retarder paint will fulfill any code requirement for the installation of an interior vapor retarder.
Furthermore, an interior vapor barrier can cause problems on some types of walls, especially walls of air-conditioned homes. Note as well that flash-and-batt walls and walls with exterior rigid foam are designed to dry inward, and therefore should never include an interior vapor barrier.
If you follow a few basic design principles, and if you pay attention to airtightness, you don’t have to worry very much about vapor transmission. But if want to understand vapor transmission and vapor permeance, there is no substitute for study. Once you understand vapor transmission, you’ll learn that there is no truth to the decades-old phrase, “walls need an interior vapor barrier.” In fact, a wall with an adequately thick layer of continuous exterior rigid foam (in other words, what amounts in many cases to an exterior vapor barrier) stays dryer than a conventional wall with no exterior rigid foam — even when the conventional wall includes an interior vapor barrier.
For more information on vapor transmission, see these articles:
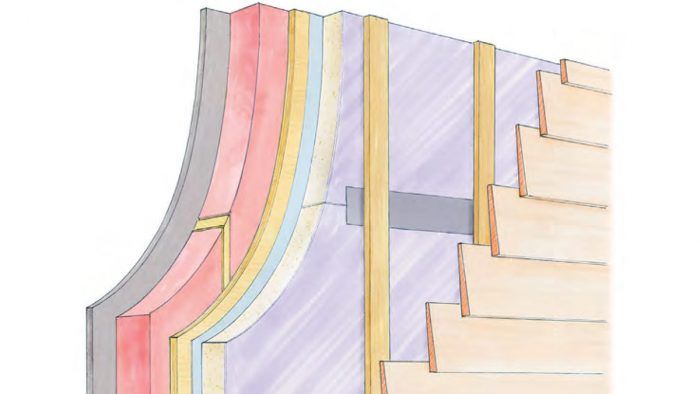
#4: There are two basic approaches to wall design
Wall designs fall into two general categories:
- One approach includes a continuous (or near-continuous) layer of insulation on the exterior side of the wall assembly. In most cases, this layer consists of rigid foam, although it may be a layer of semi-rigid mineral wool or closed-cell spray foam. If this layer is on the exterior side of the wall sheathing, it needs to be thick enough to keep the sheathing warm during the winter — warm enough to avoid problems with moisture accumulation or condensation. If this layer is on the interior side of the wall sheathing, as is the case with a flash-and-batt wall, it needs to be thick enough to ensure that the first condensing surface (in this case, the interior face of the cured spray foam) is above the dew point during most of the winter. For more information on this type of wall, see “Calculating the Minimum Thickness of Rigid Foam Sheathing.”
- The more traditional (but somewhat riskier) approach makes no attempt to keep the wall sheathing warm during the winter. The sheathing on this type of wall will get damp during the coldest part of the winter; however, it should be able to dry outward during the spring, as long as the water-resistive barrier and siding are vapor-permeable. For more information on this type of wall, see “How Risky is Cold OSB Wall Sheathing?”
For an overview article comparing both approaches to wall design, see “How to Design a Wall.”
#5: Moisture in walls usually comes from rain
Most wet-wall problems are water-entry problems. Your chief enemy isn’t condensation — it’s rain.
To avoid water-entry problems, you need:
- Wide roof overhangs on all sides of your house
- Exterior grade that (a) is at least 8 inches lower than the lowest wooden components of your house, and that (b) slopes away from the house in all directions
- A water-resistive barrier
- A rainscreen gap between the siding and the water-resistive barrier
- Good flashing at all wall penetrations
For more information on these issues, see the following articles:
- “Every House Needs Roof Overhangs”
- “All About Wall Rot”
- “All About Weather-Resistive Barriers”
- “All About Rainscreens”
- “All About Flashing”
Backwards flash-and-batt?
Now that I’ve provided five pieces of advice, we can return to the architect’s question about backwards flash-and-batt walls. The main reason that flash-and-batt walls have spray foam toward the exterior and batts toward the interior has nothing to do with vapor barriers; it has to do with buildability. It’s much easier to spray the interior side of the wall sheathing than it is to spray the exterior side of the drywall.
As long as the spray foam insulation is thick enough, everything on the interior side of the spray foam stays warm and toasty during the winter. With a conventional flash-and-batt wall, there are no cold surfaces where condensation can occur, so the wall performs well. For more information, see “Flash-and-Batt Insulation.”
Which type of walls are safest?
All builders want to avoid risky wall assemblies. Unfortunately, there are many mechanisms for failure, ranging from simple water-entry problems to rare problems caused by inward solar vapor drive. It’s usually safer to stick with a tried-and-true approach — for example, a 2×4 wall with a continuous layer of exterior rigid foam, or a double-stud wall with plywood sheathing and a ventilated rainscreen gap — rather than it is to develop an innovative approach like backwards flash-and-batt.
Remember, too, that sloppy installation details — reverse flashing laps or failure to seal air leaks — can doom almost any wall. If you want a high-performance building, there are no shortcuts. You need a sound design and careful execution of all the details.
— Martin Holladay is a retired editor who lives in Vermont. This article originally appeared at Green Building Advisor.
Fine Homebuilding Recommended Products
Fine Homebuilding receives a commission for items purchased through links on this site, including Amazon Associates and other affiliate advertising programs.

Nitrile Work Gloves
Respirator Mask

Insulation Knife

View Comments
I see many people installing ~1" EPS (~R4) onto a 2x6 batt wall in a zone 6 climate (Ontario). It seems like the comment you make about the "tried-and-true approach — for example, a 2×4 wall with a continuous layer of exterior rigid foam" can lead to a lot of high risk walls as it can easily be taken without the context of " it needs to be thick enough to ensure that the first condensing surface is above the dew point during most of the winter". Adding 2" (~R8) of EPS or 3" (~R12) which would be required to do this based on Zone 6 Table N1102.5. This starts to become both cost prohibitive, as well as complicated to build (multiple layers). I just wanted to point this out, as I feel like I see a lot of builders thinking they are OK with 1" of EPS in zone 6, when this seems like it could be very risky. Would this be a valid concern? or is the risk not that high?