5 Ways to Insulate a Flat Roof
Learn several reliable ways to build an energy-efficient low-slope or shallow-pitched unvented roof, which is much easier and less risky than building a vented one.

A vented roof needs intake vents at the attic perimeter and cupolas at the center of the roof to maintain airflow between the sheathing and the top of the insulation. The ceiling must be airtight to prevent condensation on the underside of the sheathing.
Low-slope shed roofs that range in pitch from nearly flat to 4-over-12 are common in the Southwest and in dense urban neighborhoods of the Northeast. These roofs are either framed with deep trusses or framed with rafters that are separate from the ceiling joists. Because of their limited space between the sheathing and the ceiling joists, these roofs are often difficult to insulate properly.
Although some builders insulate a low-slope roof with the same techniques used for a house with a big attic, they should be using a different approach. If the roof is vented, the ceiling must be air-sealed to prevent moisture-laden air from reaching the attic. If the roof is unvented, there are several ways to efficiently insulate the space either from the exterior, from the interior, or from a combination of both.
If there is at least 18 in. (or in a cold climate, at least 24 in.) of room between the top-floor ceiling and the roof sheathing, these cramped attics can be vented and insulated with fluffy insulation such as fiberglass or cellulose. However, the system only works if the builder includes a generously sized cupola in the center of the roof. Ventilation air doesn’t move from the “eaves” to the “ridge” in the same way it does in a steeply sloped roof. Turbine (whirlybird) vents or ridge vents are not recommended for low-slope roofs because they don’t provide enough airflow.
If you want to vent a low-slope roof, here’s what you need to do:
- Specify roof trusses or conventional framing deep enough for 12 in. to 16 in. of insulation, plus room for an air gap of at least 6 in. between the top of the insulation and the roof sheathing.
- Provide soffit, fascia, or wall-mounted vents at the perimeter of the shallow attic that will allow exterior air to connect with the air gap between the top of the insulation and the underside of the roof sheathing. climate, at least 24 in.) of room between the top-floor ceiling and the roof sheathing.
- Near the center of the roof, provide one or more vented cupolas, each measuring at least 2 ft. by 2 ft. by 2 ft., with rectangular vents on all four sides of each cupola. Most building codes require a minimum of 1 sq. ft. of net free vent area (NFVA) for every 300 sq. ft. of attic floor area. Locate between 50% and 60% of the NFVA at the perimeter of the building, and 40% to 50% of the NFVA at the cupolas near the center of the roof.
- Before installing the insulation, make the ceiling as airtight as you can.
Unvented roofs are easier
In many ways, it’s easier to build an unvented low-slope roof, and there are several ways to do it.
If you install a combination of closed-cell foam and vapor-permeable insulation, you also need to be sure that the foam is thick enough to keep the roof sheathing (or the lower surface of the foam insulation) above the dew point during the winter. (Don’t use open-cell foam; it’s vapor permeable.) The International Residential Code specifies the following minimum R-values for the foam layer of these hybrid insulation sandwiches: R-5 in zones 1-3, R-10 in zone 4C, R-15 in zones 4A and 4B, R-20 in zone 5, R-25 in zone 6, R-30 in zone 7, and R-35 in zone 8.
While vented roof assemblies are designed to dry to the exterior, unvented roof assemblies are designed to dry to the interior. That’s why an unvented roof assembly should never include interior polyethylene. If a building inspector insists that you install some type of interior vapor retarder, you can always install a “smart” vapor retarder such as CertainTeed’s MemBrain to satisfy your inspector.
Five ways to insulate an unvented low-slope roof
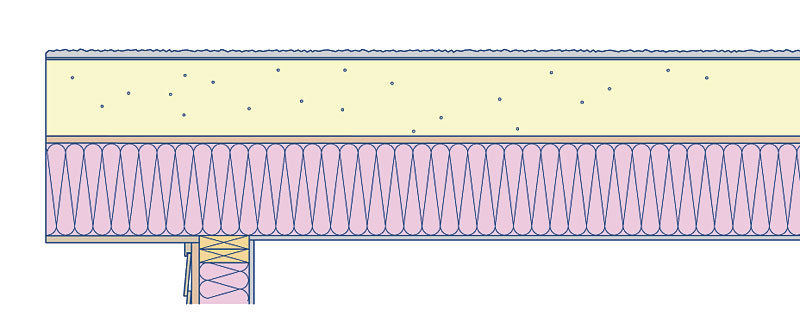
Of the various methods to insulate a shallow roof, applying insulation to the exterior is easier than working in a space with limited access. Whatever method is used, the amounts of insulation must achieve R-values mandated by local codes.
1. Exterior rigid foam
Install a thick layer of rigid-foam insulation (usually 6 in. thick or more) above the roof sheathing.
2. Exterior rigid foam plus interior insulation
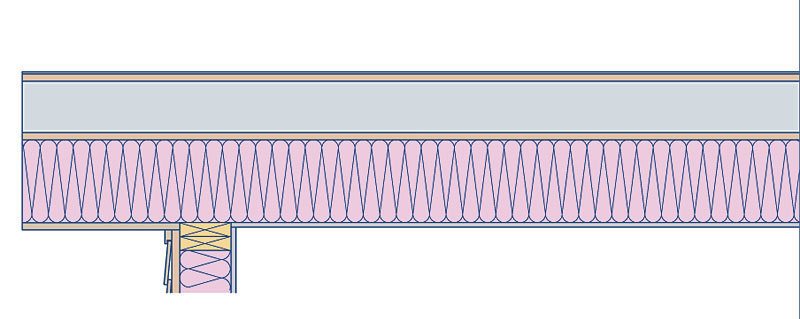
Install a more moderate layer of rigid-foam insulation (2 in. to 4 in. thick) above the roof sheathing, supplemented by a layer of air-permeable insulation (such as blown-in fiberglass or cellulose) below and in direct contact with the roof sheathing.
3. Exterior closed-cell foam
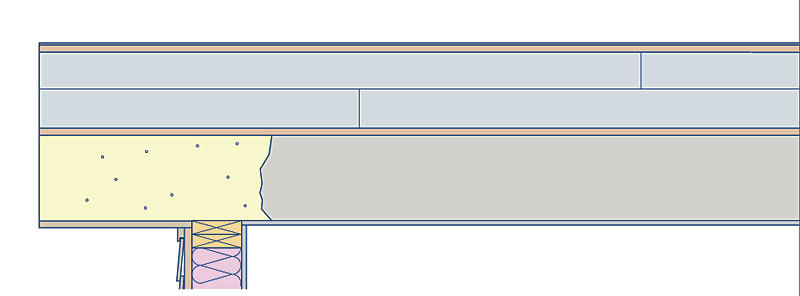
Spray a layer of closed-cell polyurethane foam on top of the roof sheathing, supplemented by a layer of air-permeable insulation below and in direct contact with the roof sheathing.
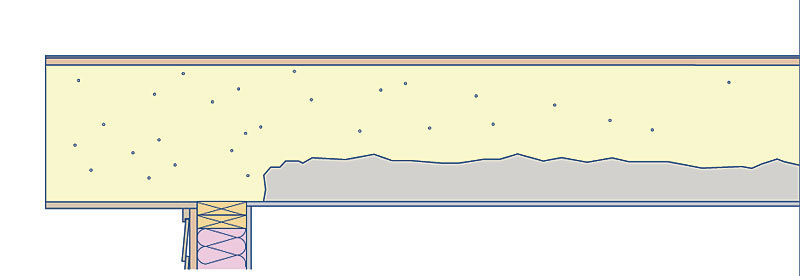
4. Interior closed-cell foam
Spray a thick layer of closed-cell polyurethane foam on the underside of the roof sheathing.
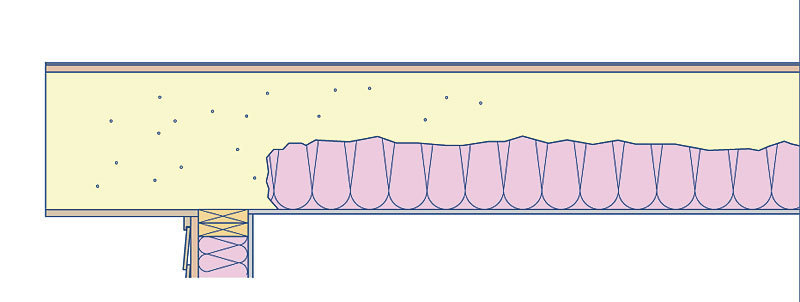
5. Interior closed-cell foam and blown-in fiberglass or cellulose
Spray a more moderate thickness of closed-cell polyurethane foam on the underside of the roof sheathing, supplemented by a layer of air-permeable insulation below and in direct contact with the underside of the cured spray foam.
One pro’s method for insulating a cramped attic
What if you need to insulate an existing unvented low-slope roof, say 3 ft. high at the high side, with very limited attic access? You could rip out the ceiling or tear off the roof, but there is a third method. Bill Hulstrunk is the technical manager at National Fiber, a manufacturer of cellulose insulation. “Our installers crawl in and do as much air-sealing as possible on the side with good access,” Hulstrunk explains. “There is a point where the attic gets too confined and you can’t do any air-sealing. So they’ll dense-pack the side of the attic with limited access, and then they’ll blow in loose-fill cellulose on the side of the attic where there was enough access for air-sealing work. It is always a good idea to have vents on the high-side walls, above the top of the insulation, to provide some connection between the air above the loose-fill insulation and the outside. If they’ve done a good job with the air-sealing, they’ve reduced the amount of moisture that will get up there. But in case there is some moisture that gets through, it’s good to have some way to allow the moisture to make its way to the exterior.”
Because codes don’t permit air-permeable insulation to be installed in contact with the roof sheathing unless the sheathing is covered with a layer of rigid or closed-cell spray foam, not all code authorities accept Hulstrunk’s retrofit insulation method, so check with your local code inspector before attempting this technique.
Drawings: Dan Thornton
From Fine Homebuilding #250
Fine Homebuilding Recommended Products
Fine Homebuilding receives a commission for items purchased through links on this site, including Amazon Associates and other affiliate advertising programs.

Great Stuff Foam Cleaner
Peel & Stick Underlayment
Foam Gun



View Comments
In the above article in the last method for insulating a cramped attic, the objective stated is to insulate an existing unvented low-slope roof. However, towards the middle of the paragraph it states, "It is always a good idea to have vents on the high-side walls". I have this type of roof and attic and am needing an DIY insulation solution. I'd very much like to follow this instruction but I'm confused and unsure if this is an unvented solution, a vented solution, or an unvented to vented solution. Any clarity would be appreciated.