Insulating Behind Kneewalls
Those cramped attics behind kneewalls should be included in your home's conditioned space.
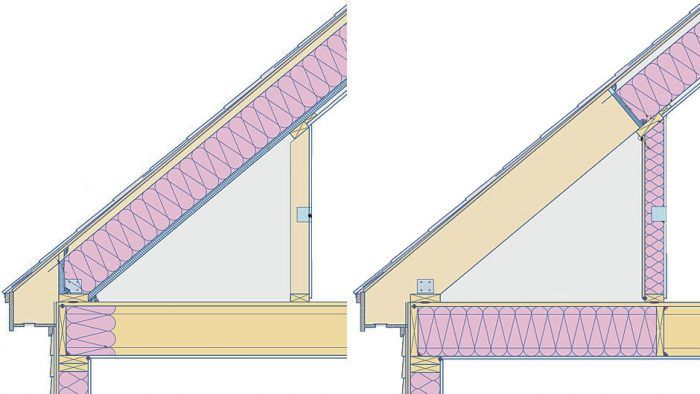
A kneewall is sometimes defined as “a short wall under a sloped ceiling.” A typical kneewall is between 3 and 5 feet high. In most cases, a room with a kneewall has a sloped ceiling that extends from the top of the kneewall to normal ceiling height—about 8 feet off the floor. At that point the sloped ceiling usually transitions to a horizontal ceiling.
This description applies to the top floor of many one-and-a-half-story homes (like Cape Cod homes) or to a typical bonus room above a garage. Kneewalls can also be found on the top floor of some three-story or four-story buildings.
The illustration below shows the various components I’m talking about. (Note that the word “kneewall” refers to the short wall—not to the cramped attic behind the kneewall.)

Insulation challenges
If you are insulating a house with kneewalls, you face an important decision: Should the triangular attics behind the kneewalls be included in the home’s conditioned space, or should they be excluded?
For a variety of reasons, the best approach is to include these triangular attics within the home’s conditioned space. Bringing the triangular attic into the home’s conditioned space makes the task of air sealing much simpler, and is the only acceptable method to use if the triangular attic includes ducts or plumbing pipes.
If you go this route, you’ll need to insulate along the sloped roof assembly, all the way from the area above the top plate of the exterior wall (at the floor of the attic) up to the “top attic” above the horizontal ceiling (see the illustration below). Ideally, the roof insulation should extend above the horizontal layer of insulation between the ceiling joists.
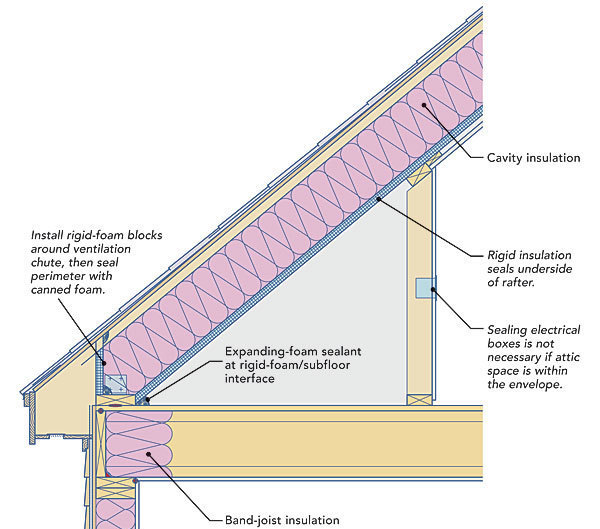
There are several possible ways to insulate along the sloped roofline:
- Assuming that a vented approach is possible—generally, a vented approach requires that the insulated roof have no hips, valleys, skylights, or dormers—you can install ventilation baffles to create ventilation channels directly under the roof sheathing, and then fill the rafter bays with the insulation material of your choice. For this approach to work, you’ll need soffit vents at the bottom and a ridge vent on top. Note that if the rafters are 2x4s or 2x6s, the rafters won’t been deep enough to reach minimum R-value requirements specified by building codes. (The International Residential Code requires at least R-30 in climate zone 1, R-38 in zones 2 and 3, and R-49 in zones 4 and higher.) If the rafters are too shallow, you may have to add extra framing to allow for thicker insulation, or install a continuous layer of rigid foam on the interior side of the rafters.
- If you can’t vent the rafter bays, you’ll need to use an unvented approach. Unvented insulated roof assemblies require either (a) an adequately thick layer of rigid foam on the exterior side of the roof sheathing, or (b) an adequately thick layer of closed-cell spray foam on the interior side of the roof sheathing. For more information on unvented insulated roof assemblies, see “How to Build an Insulated Cathedral Ceiling.”
If you’re creating a vented roof assembly with air-permeable insulation (fiberglass, cellulose, or mineral wool), the insulation should be protected by a durable air barrier on both sides of the insulation. The top-side air barrier is usually the panel or baffle forming the bottom of the ventilation chute, while the bottom-side air barrier can be drywall, OSB, ThermoPly, or rigid foam. To ensure a tight air barrier, the seams of these panels should be sealed. It’s also important to caulk the joint between these panels and the kneewall top plate.
If you decide to bring the triangular attic inside the home’s thermal envelope, you don’t have to perform any air-sealing work at electrical boxes in the kneewall, nor will you need to install weatherstripping on access doors. That saves a lot of fussy work.
Excluding the triangular attic from the conditioned space
Unfortunately, many builders ignore the above advice, and instead try to exclude the triangular attic behind the kneewall from the home’s conditioned space. While this approach is possible in theory, it rarely succeeds, because the method provides so many opportunities for air leaks and hidden air pathways that defeat insulation effectiveness.
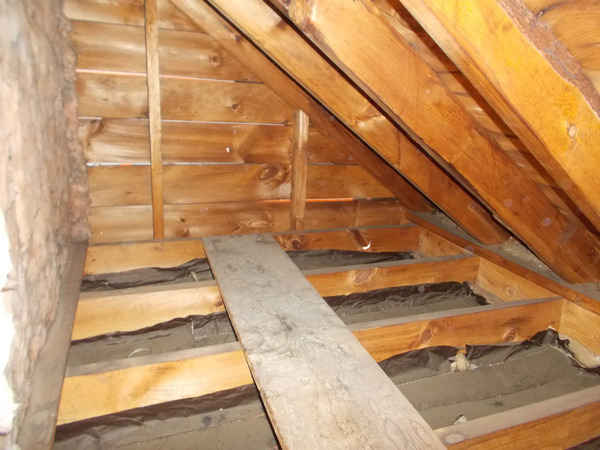
If you crawl through an access door into the triangular attic behind a kneewall in an older house, you may find a disturbing sight. Typically, you’ll see sloppily installed fiberglass batts between the kneewall studs, without any type of air barrier on the attic side. The floor joists of the triangular attic are probably open—without any subflooring—and the floor joists may be filled with thin fiberglass batts or cellulose.
This type of quick-and-dirty approach to insulating the attic performs poorly, because the air barrier is poorly defined. Ideally, there would be a tight air barrier at the ceiling under the attic floor, and this air barrier would extend vertically from the ceiling below to the kneewall, and then would continue along the sloped ceiling of the conditioned space on the second floor.
Without a well-defined air barrier, outdoor air from the soffit vents can flow freely through the insulation or above the insulation. Without an air barrier on the back of the kneewall, the fiberglass batts eventually fall out of the stud bays and flop over onto the floor (see Image #3 in the Image Gallery at the top of the page). Whether they flop over or not, though, cold air can enter the living space through unsealed electrical boxes or cracks around access doors in the kneewall.
Moreover, most builders forget to add blocking between the floor joists under the kneewall, so cold air has an easy path into the uninsulated joist bays that separate the first floor from the second floor. A leaky kneewall also can provide a pathway for escaping warm air to heat up the roof sheathing, which can contribute to ice dams.

If you want to insulate the kneewall and the attic floor behind the kneewall—thereby excluding the triangular attic from the home’s conditioned space—you need to pay meticulous attention to the associated air sealing details. These details are demanding and fussy, and must often be performed in a cramped, dark workspace.
Establishing an air barrier
If you plan to insulate a kneewall and the attic floor behind the kneewall, protect the kneewall insulation with an attic-side air barrier. The best material for this purpose is rigid foam; acceptable alternatives include OSB, ThermoPly, or drywall (see Image #1 in the Gallery at the top of the page.) It’s also possible to use housewrap, but housewrap is less effective, less durable, and leakier. Seal all panel seams with caulk or a high-quality tape. If you install rigid foam on the back side of the kneewalls, remember that thick foam is more likely to keep stud bays warm and free of condensation than thin foam. It’s also important to seal the perimeter of this air barrier, especially at the seams where the floor meets the wall and the wall meets the roof.
An insulated kneewall should be air-sealed as if it were an exterior wall. This means that all penetrations (including electrical boxes and duct penetrations) should be made as airtight as possible.
Access doors need to be detailed like exterior doors. These doors need to include thick insulation (for example, several layers of rigid foam glued to the back of the door), a tight threshold, good weatherstripping, and a latch that pulls the door tightly shut.
You’ll need to install blocking under the bottom plate of the kneewall (between the floor joists) and above the top plate of the kneewall (between the rafters). Each joist bay and each rafter bay needs to be blocked. If the roof is vented, the rafter blocking should extend to the ventilation baffles; if the roof is not vented, this blocking should extend all the way to the roof sheathing. Most builders use rigid foam as blocking, although it’s also possible to use solid lumber. In either case, it’s essential to seal the perimeter of each piece of blocking with caulk or canned foam.
After you install both types of blocking—between the joists and between the rafters—the kneewall and the attic floor can be insulated.
Working in the devil’s triangle
A new construction project has many obvious advantages over a retrofit project. If you’re building a new home that includes kneewalls, it makes sense to insulate along the sloped roofline before the kneewalls are framed.
With an existing home, the necessary air sealing work and insulation work is much more challenging than it is with new construction. Weatherization workers who insulate older homes refer to an attic behind a kneewall as “the devil’s triangle.” These tight environments aren’t conducive to high-quality work. In some cases, these areas are so tight that it’s hard to crawl in there, much less swing a hammer. Even when a worker can enter with a tool belt, a staple gun, and a cordless drill, it probably will be hard to get full-size sheets of drywall or OSB into position.
If a spray-foam contractor is willing to take on the job, count your blessings, but check with your local building official to find out whether the foam needs to be protected by a layer of drywall.
If you have no choice but to crawl into a tight space to install sheet goods such as drywall or foil-faced foam, one trick is to score the facing on one side of each sheet so that it can be folded in half to fit through a tight opening.
If you have to insulate a triangular attic that is too small to crawl into, it may be necessary to fill the entire space with dense-packed cellulose. Because this technique doesn’t allow for roof ventilation, it is somewhat controversial, and may violate building codes—so it’s essential that you check with your local building official before trying this approach. In spite of these hurdles, this approach has been used successfully for years by weatherization contractors in New England. According to Bill Hulstrunk, technical manager at National Fiber, “We do it only if the area is so small that we can’t get a body in there. In other words, the kneewall has to be 18 inches high or less. The first time the tube is inserted, it sits on the bottom of the floor. Then after a while, you pull out the tube and reinsert it higher up to top everything off.”
If you need to retrofit insulation into a sloped roof assembly in an older house, there are two possible approaches. Either:
- Install an adequately thick layer of rigid foam on the exterior side of the roof sheathing. This approach requires the installation of a second layer of roof sheathing above the rigid foam, as well as new roofing—so it’s an expensive approach.
- Demolish the plaster or drywall ceiling, to gain full access to the rafter bays.
In some cases, it may be possible to slide insulation batts between the rafters, working from the attic above. For more information on this approach, see “Sliding Insulation Between Rafters From Above.”
Final advice
Attics behind kneewalls are tricky to insulate and air-seal. If you are designing a new house, I advise you to avoid designs that include kneewalls. If you want to include living space on the second floor of your house, it’s best to create a full-height second floor with 8-foot walls, and then put the roof rafters or raised-heel roof trusses on top of the 8-foot walls. This approach avoids all of the headaches and energy penalties associated with kneewalls.
This article originally appeared in Green Building Advisor.
Fine Homebuilding Recommended Products
Fine Homebuilding receives a commission for items purchased through links on this site, including Amazon Associates and other affiliate advertising programs.

Loctite Foamboard Adhesive
Staple Gun
Nitrile Work Gloves


