FHB Logo Facebook LinkedIn Email Pinterest Twitter X Instagram Tiktok YouTube Plus Icon Close Icon Navigation Search Icon Navigation Search Icon Arrow Down Icon Video Guide Icon Article Guide Icon Modal Close Icon Guide Search Icon Skip to content
Subscribe
Log In
  • How-To
  • Design
  • Tools & Materials
  • Restoration
  • Videos
  • Blogs
  • Forum
  • Magazine
  • Members
  • FHB House
  • Podcast
Log In

Fine Homebuilding Project Guides

Insulation

Guide Home
  • Energy Efficiency
  • Air-Sealing
  • Choosing Insulation
  • Installing Insulation
  • Water Management
How-To

Insulating Tight Spaces at the Eaves

There are no easy solutions to this all-too-common problem in older houses.

By Martin Holladay
  • X
  • facebook
  • linkedin
  • pinterest
  • email
  • add to favorites Log in or Sign up to save your favorite articles

In most of the U.S. — everywhere but Climate Zone 1 — building codes require the installation of ceiling insulation rated at R-38 or R-49. Achieving these R-values with cellulose or fiberglass requires at least 11 inches of insulation for R-38, or 14 inches for R-49.

These R-value targets are fairly easy to meet for a new house, as long as the designer and builder plan ahead. (For more on new homes, see “Raised-Heel Trusses Make Better Enclosures.”) But owners of older homes — homes built before thick ceiling insulation was code-mandated — often discover that the attic lacks enough room near the eaves to accommodate minimum amounts of insulation. In many cases, the vertical distance between the top plates of the exterior walls and the underside of the roof sheathing is only 6 or 7 inches.

This problem can occur in homes with almost any roof configuration, including those with an attic above a horizontal ceiling as well as those with a cathedral ceiling framed with 2×6 or 2×8 rafters.

“It’s good enough”

It’s common for owners of older homes to post questions on GBA about installing attic insulation. A typical question might read, “When I visited my attic, I found that the attic floor has only 6 inches of insulation. I want to add enough insulation to achieve R-49, but there isn’t enough space between the top plates of the exterior walls and the roof sheathing. What should I do?”

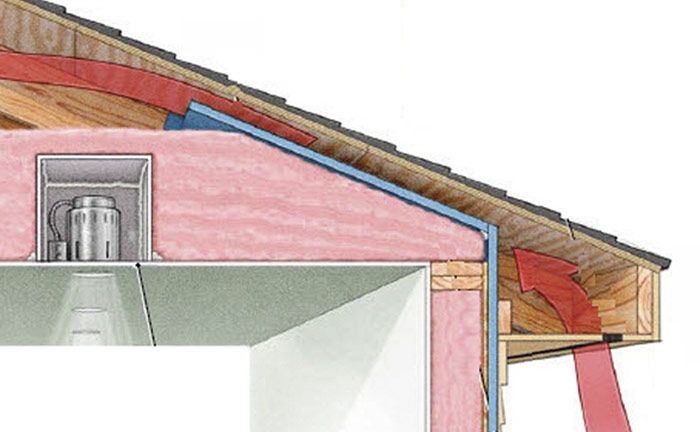
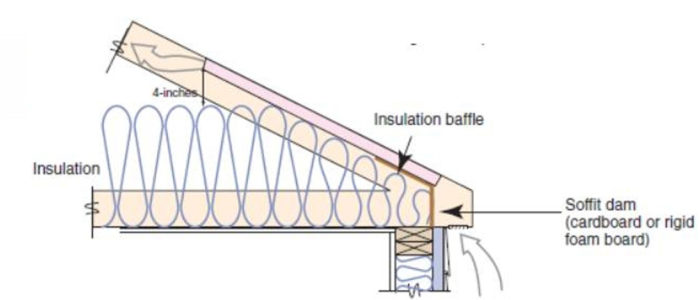
For decades, the typical “solution” to this problem was to install ventilation baffles near the eaves — connecting the air space above the soffit vents with the attic — and then to install as much fluffy insulation (usually fiberglass or cellulose) as there was room for between the top plate of the exterior wall and the ventilation baffle. In other words, call it “good enough” and move on.

Insulating Tight Spaces at the Eaves
Insulating Tight Spaces at the Eaves. [Image credit: Building America Solutions Center]
In relatively warm climates without much snowfall, the downside to the “good enough” approach is higher-than-usual energy bills. In colder climates with snowy winters, homeowners adopting the “good enough” approach will also suffer higher-than-usual energy bills — as well as several more serious downsides. Thin insulation at the eaves leads to cold ceilings in the winter, leading to possible mold growth (especially in bathrooms). Even worse: thin insulation at the eaves contributes to ice dams that can damage sheathing and interior finishes. If you are interested in preventing ice dams, the area near the eaves is the worst possible place to skimp on insulation. This location is precisely where thick insulation matters most. (For more on this issue, see “How To Fix Ice Dams.”)

The bottom line: You definitely want a full R-38 or R-49 at your eaves. If you have an old house, this is bad news — because achieving that result is expensive.

Rigid foam above the roof sheathing

The answer to the question, “What’s the best way to solve this problem in an older house?”, is simple: The best approach is to install an adequately thick layer of rigid foam above the roof sheathing, followed by a second layer of roof sheathing and new roofing. (For more information on this approach, see “How to Install Rigid Foam On Top of Roof Sheathing.”) Builders adopting this approach can either install all of the needed R-value as rigid foam above the roof sheathing, or they can supplement the rigid foam with additional fluffy insulation installed on the underside of the roof sheathing.

This approach fixes the heat loss problem at the eaves very nicely. It also converts the vented unconditioned attic into an unvented conditioned attic, which has several possible side benefits. (For example, this approach can either provide conditioned space for use as a bedroom or home office, or it can create a good environment for attic air handlers or ducts).

If you decide to go this route, remember to seal all of the soffit vents and ridge vents, and to insulate any gable walls.

The major drawback to this approach, of course, is the high cost of the work. If you end up installing rigid foam above your roof sheathing, you also need to install a second layer of roof sheathing above the rigid foam, followed by new roofing. The cost of this work can add up to tens of thousands of dollars.

Lower the ceiling

In a few rare cases, an older home will have very high ceilings. If your house has 9-foot horizontal ceilings, you may be able to install new ceiling joists to create an 8-foot ceiling, leaving enough room between the two ceilings for plenty of ceiling insulation.

This is an excellent solution, but it’s very unusual to find a house with high enough horizontal ceilings for this approach to be implemented.

If we’re talking about a sloped (cathedral) ceiling, there’s a much greater chance that the “lower the ceiling” approach will work. In many cases, installing a continuous layer of interior rigid foam and new drywall can dramatically improve the thermal performance of a poorly insulated cathedral ceiling — especially if the work is accompanied by air sealing improvements.

Halfway measures

There are several other possible ways to address this problem, but all other approaches are less effective than adding rigid foam above the roof sheathing.

Here is a brief look at other possible approaches:

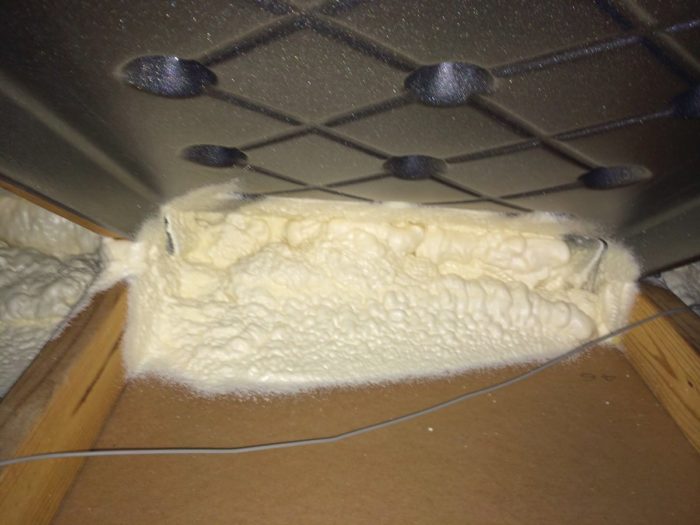
Install a ventilation baffle and closed-cell spray foam. Closed-cell spray foam provides an excellent air barrier as well as a higher R-value per inch than any commonly available insulation, so this approach is better than just stuffing some fiberglass batts near the eaves. A good installation requires wind-washing dams as well as ventilation baffles. For more information on ventilation baffle options, see “Site-Built Ventilation Baffles for Roofs.”

Spray-foam-at-tight-eaves-Nate-Adams
[Photo credit: Nate Adams]
Install a ventilation baffle made of rigid foam, and then use the cut-and-cobble method. Most types of rigid foam have a higher R-value per inch than fiberglass or cellulose, so some homeowners use the cut-and-cobble method in the tight space near eaves. (For more information on the cut-and-cobble method, see “Cut-and-Cobble Insulation.”) This approach is less effective than the use of closed-cell spray foam, but is somewhat better than the use of fiberglass batts.

On the ceiling below the problematic area, install “cornice molding” made of rigid foam. Several GBA readers have made this suggestion over the years, unaware that researchers in 2008 experimented with this approach and found it wanting. To read why this approach doesn’t work, see “Interior insulated cornice for use under low-heel roof trusses?”

The trouble with all of these halfway measures is that the ceiling area near the eaves is still poorly insulated and subject to possible mold accumulation and ice dams. If you are forced by circumstances to adopt one of these halfway measures, the risk of ice dams can be reduced by diligent air-sealing efforts, especially near the eaves.

A hard-to-fix problem

The “tight space at the eaves” problem isn’t easily fixed. In cold climates, tens of thousands of houses with insufficient room at the eaves for adequate insulation suffer horrendous ice-dam problems during snowy winters, and these problems lead to very expensive repair bills.

If you’re planning to buy a home, my advice is to inspect the attic with a strong flashlight. Reject any home with tight space at the eaves, unless you’re ready to accept the very high cost of covering the existing roof sheathing with rigid foam or nailbase.


This article originally appeared on GreenBuildingAdvisor.com.

Fine Homebuilding Recommended Products

Fine Homebuilding receives a commission for items purchased through links on this site, including Amazon Associates and other affiliate advertising programs.

Foam Gun

We like using a professional foam-dispensing gun as opposed to straw cans because it allows you to easily control bead size and reuse the can.
Buy at Amazon

Nitrile Work Gloves

Do yourself a favor and protect your hands while you work. These lightweight, breathable work gloves will keep your hands safe while cutting and fitting.
Buy at Amazon

Insulation Knife

If you like insulating with mineral wool, this knife makes cuts that are clean, neat, and easy — it's much better than a utility knife which can be slow and messy.
Buy at Amazon
Previous: Choosing the Right Thickness of Exterior Foam Next: Five Cathedral Ceilings That Work

Guide

Insulation

Chapter

Installing Insulation

Sign up for eletters today and get the latest how-to from Fine Homebuilding, plus special offers.

Signing you up...

This site is protected by reCAPTCHA and the Google Privacy Policy and Terms of Service apply.
See all newsletters
See all newsletters

View Comments

  1. Fred27609 | Mar 30, 2021 01:44pm | #1

    A very thorough article on this topic. Thank you.

  2. ddiez | Feb 23, 2023 10:32am | #2

    An economical option if replacing the roof could be attaching 2x4 "battens" edgewise onto the existing rafters to add an extra 3.5-4.5" of height, where the exact amount depends on the roof's slope. (see sketch)

    An even less expensive option is to rip the 2x4s so that they taper from 3.5" to 0" over a span of 8', and then only installing these at the eaves with the taper going up the roof. This would affect the slope near the eaves and cause a "hard" change in slope where the taper ended 8 feet up, but that change in slope would be minor (3.5%), so perhaps other roof install details wouldn't be substantially impacted. On a home with a simple roof design, I'd bet the extra installed cost of the "eaves only" option would be under $4k, and I'd bet the extra installed cost would be around $1k if the sheathing at the eaves was already in need of replacement.

    Disclaimer: I'm not sure if there's any compromise of the rafters' structural integrity by attaching these battens. I'd guess not, because we nail sheathing into the rafters every 6" already, but I have not run this by an engineer to get an exact recommendation on attachment details.

Log in or create an account to post a comment.

Sign up Log in

Become a member and get full access to FineHomebuilding.com

Insulation

Insulation

Trusted, comprehensive guidance from the pros for a home that is healthy, comfortable, and energy efficient

View Project Guide

View All Project Guides »

Become a member and get unlimited site access, including the Insulation Project Guide.

Start Free Trial

Energy Efficiency
  • Understanding Energy and Houses
  • Building Energy-Efficient Homes
Air-Sealing
  • Air-Sealing Basics
  • Air-Sealing Tools and Materials
  • Foundations and Floors
  • Walls, Windows, and Doors
  • Attics and Roofs
Choosing Insulation
  • Insulation Basics
  • Material Choices
Installing Insulation
  • Insulating Attics and Roofs
  • Insulating Walls
  • Insulating Floors, Footings, and Slabs
  • Insulating Foundation Walls
Water Management
  • Water-Management Principles
  • Materials
  • Installation Methods

Fine Home Building

Newsletter Sign-up

  • Fine Homebuilding

    Home building tips, offers, and expert advice in your inbox.

  • Green Building Advisor

    Building science and energy efficiency advice, plus special offers, in your inbox.

  • Old House Journal

    Repair, renovation, and restoration tips, plus special offers, in your inbox.

Signing you up...

This site is protected by reCAPTCHA and the Google Privacy Policy and Terms of Service apply.
See all newsletters

Follow

  • Fine Homebuilding

    Dig into cutting-edge approaches and decades of proven solutions with total access to our experts and tradespeople.

    Start Free Trial Now
    • Facebook
    • Instagram
    • X
    • LinkedIn
  • GBA Prime

    Get instant access to the latest developments in green building, research, and reports from the field.

    Start Free Trial Now
    • Facebook
    • YouTube
  • Old House Journal

    Learn how to restore, repair, update, and decorate your home.

    Subscribe Now
    • Facebook
    • Instagram
    • X

Membership & Magazine

  • Online Archive
  • Start Free Trial
  • Magazine Subscription
  • Magazine Renewal
  • Gift a Subscription
  • Customer Support
  • Privacy Preferences
  • About
  • Contact
  • Advertise
  • Careers
  • Terms of Use
  • Site Map
  • Do not sell or share my information
  • Privacy Policy
  • Accessibility
  • California Privacy Rights

© 2025 Active Interest Media. All rights reserved.

Fine Homebuilding receives a commission for items purchased through links on this site, including Amazon Associates and other affiliate advertising programs.

  • Home Group
  • Antique Trader
  • Arts & Crafts Homes
  • Bank Note Reporter
  • Cabin Life
  • Cuisine at Home
  • Fine Gardening
  • Fine Woodworking
  • Green Building Advisor
  • Garden Gate
  • Horticulture
  • Keep Craft Alive
  • Log Home Living
  • Military Trader/Vehicles
  • Numismatic News
  • Numismaster
  • Old Cars Weekly
  • Old House Journal
  • Period Homes
  • Popular Woodworking
  • Script
  • ShopNotes
  • Sports Collectors Digest
  • Threads
  • Timber Home Living
  • Traditional Building
  • Woodsmith
  • World Coin News
  • Writer's Digest
Active Interest Media logo
X
X
This is a dialog window which overlays the main content of the page. The modal window is a 'site map' of the most critical areas of the site. Pressing the Escape (ESC) button will close the modal and bring you back to where you were on the page.

Main Menu

  • How-To
  • Design
  • Tools & Materials
  • Video
  • Blogs
  • Forum
  • Project Guides
  • Reader Projects
  • Magazine
  • Members
  • FHB House

Podcasts

  • FHB Podcast
  • ProTalk

Webinars

  • Upcoming and On-Demand

Podcasts

  • FHB Podcast
  • ProTalk

Webinars

  • Upcoming and On-Demand

Popular Topics

  • Kitchens
  • Business
  • Bedrooms
  • Roofs
  • Architecture and Design
  • Green Building
  • Decks
  • Framing
  • Safety
  • Remodeling
  • Bathrooms
  • Windows
  • Tilework
  • Ceilings
  • HVAC

Magazine

  • Current Issue
  • Past Issues
  • Magazine Index
  • Subscribe
  • Online Archive
  • Author Guidelines

All Access

  • Member Home
  • Start Free Trial
  • Gift Membership

Online Learning

  • Courses
  • Project Guides
  • Reader Projects
  • Podcast

More

  • FHB Ambassadors
  • FHB House
  • Customer Support

Account

  • Log In
  • Join

Newsletter

Get home building tips, offers, and expert advice in your inbox

Signing you up...

This site is protected by reCAPTCHA and the Google Privacy Policy and Terms of Service apply.
See all newsletters
See all newsletters

Follow

  • X
  • YouTube
  • instagram
  • facebook
  • pinterest
  • Tiktok

Join All Access

Become a member and get instant access to thousands of videos, how-tos, tool reviews, and design features.

Start Your Free Trial

Subscribe

FHB Magazine

Start your subscription today and save up to 70%

Subscribe

You have 1 free article remaining.

Get complete site access, including thousands of videos, how-to tips, tool reviews, and design features.

Start your FREE trial

Already a member? Log in

We hope you’ve enjoyed your free articles. To keep reading, become a member today.

Get complete site access to expert advice, how-to videos, Code Check, and more, plus the print magazine.

Start your FREE trial

Already a member? Log in

Privacy Policy Update

We use cookies, pixels, script and other tracking technologies to analyze and improve our service, to improve and personalize content, and for advertising to you. We also share information about your use of our site with third-party social media, advertising and analytics partners. You can view our Privacy Policy here and our Terms of Use here.

Cookies

Analytics

These cookies help us track site metrics to improve our sites and provide a better user experience.

Advertising/Social Media

These cookies are used to serve advertisements aligned with your interests.

Essential

These cookies are required to provide basic functions like page navigation and access to secure areas of the website.

Delete My Data

Delete all cookies and associated data