FHB Logo Facebook LinkedIn Email Pinterest Twitter X Instagram Tiktok YouTube Plus Icon Close Icon Navigation Search Icon Navigation Search Icon Arrow Down Icon Video Guide Icon Article Guide Icon Modal Close Icon Guide Search Icon Skip to content
Subscribe
Log In
  • How-To
  • Design
  • Tools & Materials
  • Restoration
  • Videos
  • Blogs
  • Forum
  • Magazine
  • Members
  • FHB House
  • Podcast
Log In

Fine Homebuilding Project Guides

Insulation

Guide Home
  • Energy Efficiency
  • Air-Sealing
  • Choosing Insulation
  • Installing Insulation
  • Water Management
How-To

Sliding Insulation between Rafters from Above

If you need to insulate the sloped ceiling of a Cape Cod home, you may be able to slip in baffles and insulation from the third-floor attic.

By Martin Holladay
  • X
  • facebook
  • linkedin
  • pinterest
  • email
  • add to favorites Log in or Sign up to save your favorite articles

It’s harder to weatherize an old Cape Cod house than it is to weatherize other types of houses. The second floor of a Cape Cod house has sloped ceilings, typically interrupted by 4-foot-high kneewalls. In most cases, a Cape also includes a horizontal ceiling in the center of the second floor, with a cramped third-floor attic above the horizontal ceiling.

If you live in an old, uninsulated Cape, you know how hard it is to come up with a good way to insulate your home’s sloped ceilings. Among several possible methods, these approaches are typically recommended:

  • It’s possible to install continuous insulation (usually, rigid foam insulation) above the existing roof sheathing. Of course, this means that you’ll also have to install a second layer of roof sheathing above the rigid foam, as well as new roofing.
  • It’s possible to demolish the drywall or plaster ceiling on the sloped portion of the ceiling, so that the insulation installers can gain access to the rafter bays.

These approaches work, but they are expensive and potentially disruptive. What about a third approach—namely, trying to slide ventilation baffles and insulation into the rafter bays from the third-floor attic? Is that even possible?

The answer is “maybe.”

Caveats

Before we provide tips on how it may be possible to slide insulation down the rafter bays from the attic above, let’s list the factors that may make this work difficult or impossible:

  • The work won’t be possible if the third-floor attic is too cramped. You’ll need room to store insulation and enough height to maneuver your body comfortably. If the attic isn’t big enough, this approach won’t work.
  • The work won’t be possible if the attic access hatch is too small or inconveniently located. Of course, if you decide to enlarge the existing attic hatch, you may be able to proceed.
  • The work won’t be easy if there are hundreds of protruding roofing nails that make the underside of the roof sheathing look like a pincushion. The longer the roofing nails, and the greater the number of roofing nails, the harder this approach will be.
  • The work won’t be possible if the sloped ceiling is very long — only if the length of the sloped ceiling is perhaps 6 feet or less.
  • The work requires a certain amount of skill. If your hands are deft; if you have a good feel for how materials need to be adjusted to slide and wiggle down a tight opening; if you’re good at rigging up improvised solutions when there are setbacks — then you’ll probably be able to do this job. If you’re a little awkward and uncertain, it probably won’t work.

What type of ventilation baffle?

Before you attempt this approach to insulating a sloped ceiling, you have to decide on what type of ventilation baffle to use, and what type of insulation to use.

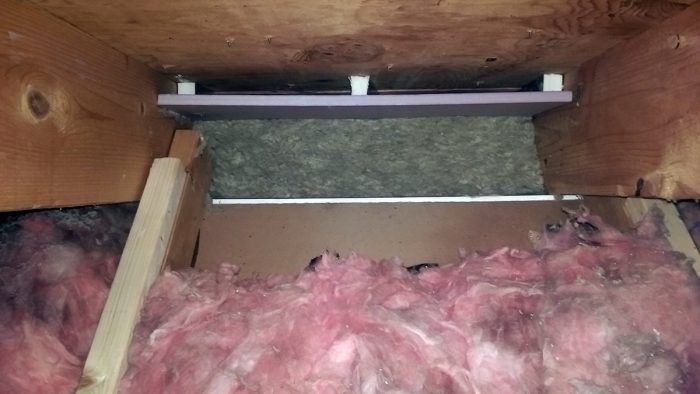
Ideally, your insulation baffle will be long enough to reach from the top of the sloped ceiling section to the bottom, so that you don’t have to try to insert two or three baffles in each rafter bay. (It would be hard to insert the bottom-most baffle in place if it wasn’t long enough to reach all the way to the upper attic.)

If you decide to use a commercially available baffle like SmartBaffle or AccuVent  or Provent, first determine whether the products are long enough. (SmartBaffle is 37 inches long, and Accuvent baffles can be ordered in a variety of lengths up to 50 inches long.)  It may be possible to overlap and tape two baffles together, end-to-end, but I’m not sure whether the resulting assembly would be easy to slide into place.

Some weatherization workers find that a commercial baffle made of plastic is easier to slip past roofing nails than a site-built baffle made of rigid foam.

If you need a long baffle, it may be easier to use site-built baffles. (For more information on this topic, see “Site-Built Ventilation Baffles for Roofs.”) These can be built out of thin plywood or rigid foam; in either case, you’ll need to include glued-on “legs” that establish the depth of the ventilation air space. It’s advisable to make these site-build baffles a little narrower than the rafter bay, to make them easy to slide in place.

What type of insulation?

Once you’ve managed to slide your ventilation baffles into place—avoiding the protruding roofing nails as much as possible—you can use a long pole or 2×4 to push the baffle into place against the underside of the roof sheathing, hoping that it stays there while you figure out how to insulate the area under the baffle. If necessary, you may be able to wedge or pin the baffles in place, at least temporarily, or you can apply glue to the legs of the baffles before sliding them in place.

If you intend to insulate the rafter bays with batts, you’ll probably find it easier to use mineral wool batts rather than fiberglass batts (because mineral wool batts are stiffer, and therefore easier to slide in place).

If you intend to insulate the rafter bays with dense-packed cellulose, you’ll need:

  • A cellulose blower that is powerful enough for dense packing;
  • Blocking at both ends of the rafter bay (above the kneewall top plate at the bottom of the sloped ceiling, as well as at the top of the sloped ceiling, somewhere in the third-floor attic).

If you’ve got these things, you can cut a hole in the blocking, insert your hose, and begin dense packing. For more information on dense-packed cellulose, see “How to Install Cellulose Insulation.”


Originally published on greenbuildingadvisor.com.

Fine Homebuilding Recommended Products

Fine Homebuilding receives a commission for items purchased through links on this site, including Amazon Associates and other affiliate advertising programs.

Great Stuff Foam Cleaner

It’s important to clean and maintain a professional foam-dispensing gun, and this product fits the bill. It has a spray applicator for general cleaning, plus it screws onto the dispensing gun so you can clean the inside.
Buy at Amazon

Respirator Mask

A full-face respirator prevents fog up and is more comfortable than constantly replacing particle makes that get fouled or sweaty and is ideal for the pro installer.
Buy at Amazon

Utility Knife

This utility knife is well-made and comes in handy when cutting rigid foam insulation. You can extend the snap blade to cut through a 2-inch foam board.
Buy at Amazon
Previous: How To Prevent Spray-Foam Problems Next: Insulating Scissors Trusses

Guide

Insulation

Chapter

Installing Insulation

Sign up for eletters today and get the latest how-to from Fine Homebuilding, plus special offers.

Signing you up...

This site is protected by reCAPTCHA and the Google Privacy Policy and Terms of Service apply.
See all newsletters
See all newsletters

Log in or create an account to post a comment.

Sign up Log in

Become a member and get full access to FineHomebuilding.com

Insulation

Insulation

Trusted, comprehensive guidance from the pros for a home that is healthy, comfortable, and energy efficient

View Project Guide

View All Project Guides »

Become a member and get unlimited site access, including the Insulation Project Guide.

Start Free Trial

Energy Efficiency
  • Understanding Energy and Houses
  • Building Energy-Efficient Homes
Air-Sealing
  • Air-Sealing Basics
  • Air-Sealing Tools and Materials
  • Foundations and Floors
  • Walls, Windows, and Doors
  • Attics and Roofs
Choosing Insulation
  • Insulation Basics
  • Material Choices
Installing Insulation
  • Insulating Attics and Roofs
  • Insulating Walls
  • Insulating Floors, Footings, and Slabs
  • Insulating Foundation Walls
Water Management
  • Water-Management Principles
  • Materials
  • Installation Methods

Fine Home Building

Newsletter Sign-up

  • Fine Homebuilding

    Home building tips, offers, and expert advice in your inbox.

  • Green Building Advisor

    Building science and energy efficiency advice, plus special offers, in your inbox.

  • Old House Journal

    Repair, renovation, and restoration tips, plus special offers, in your inbox.

Signing you up...

This site is protected by reCAPTCHA and the Google Privacy Policy and Terms of Service apply.
See all newsletters

Follow

  • Fine Homebuilding

    Dig into cutting-edge approaches and decades of proven solutions with total access to our experts and tradespeople.

    Start Free Trial Now
    • Facebook
    • Instagram
    • X
    • LinkedIn
  • GBA Prime

    Get instant access to the latest developments in green building, research, and reports from the field.

    Start Free Trial Now
    • Facebook
    • YouTube
  • Old House Journal

    Learn how to restore, repair, update, and decorate your home.

    Subscribe Now
    • Facebook
    • Instagram
    • X

Membership & Magazine

  • Online Archive
  • Start Free Trial
  • Magazine Subscription
  • Magazine Renewal
  • Gift a Subscription
  • Customer Support
  • Privacy Preferences
  • About
  • Contact
  • Advertise
  • Careers
  • Terms of Use
  • Site Map
  • Do not sell or share my information
  • Privacy Policy
  • Accessibility
  • California Privacy Rights

© 2025 Active Interest Media. All rights reserved.

Fine Homebuilding receives a commission for items purchased through links on this site, including Amazon Associates and other affiliate advertising programs.

  • Home Group
  • Antique Trader
  • Arts & Crafts Homes
  • Bank Note Reporter
  • Cabin Life
  • Cuisine at Home
  • Fine Gardening
  • Fine Woodworking
  • Green Building Advisor
  • Garden Gate
  • Horticulture
  • Keep Craft Alive
  • Log Home Living
  • Military Trader/Vehicles
  • Numismatic News
  • Numismaster
  • Old Cars Weekly
  • Old House Journal
  • Period Homes
  • Popular Woodworking
  • Script
  • ShopNotes
  • Sports Collectors Digest
  • Threads
  • Timber Home Living
  • Traditional Building
  • Woodsmith
  • World Coin News
  • Writer's Digest
Active Interest Media logo
X
X
This is a dialog window which overlays the main content of the page. The modal window is a 'site map' of the most critical areas of the site. Pressing the Escape (ESC) button will close the modal and bring you back to where you were on the page.

Main Menu

  • How-To
  • Design
  • Tools & Materials
  • Video
  • Blogs
  • Forum
  • Project Guides
  • Reader Projects
  • Magazine
  • Members
  • FHB House

Podcasts

  • FHB Podcast
  • ProTalk

Webinars

  • Upcoming and On-Demand

Podcasts

  • FHB Podcast
  • ProTalk

Webinars

  • Upcoming and On-Demand

Popular Topics

  • Kitchens
  • Business
  • Bedrooms
  • Roofs
  • Architecture and Design
  • Green Building
  • Decks
  • Framing
  • Safety
  • Remodeling
  • Bathrooms
  • Windows
  • Tilework
  • Ceilings
  • HVAC

Magazine

  • Current Issue
  • Past Issues
  • Magazine Index
  • Subscribe
  • Online Archive
  • Author Guidelines

All Access

  • Member Home
  • Start Free Trial
  • Gift Membership

Online Learning

  • Courses
  • Project Guides
  • Reader Projects
  • Podcast

More

  • FHB Ambassadors
  • FHB House
  • Customer Support

Account

  • Log In
  • Join

Newsletter

Get home building tips, offers, and expert advice in your inbox

Signing you up...

This site is protected by reCAPTCHA and the Google Privacy Policy and Terms of Service apply.
See all newsletters
See all newsletters

Follow

  • X
  • YouTube
  • instagram
  • facebook
  • pinterest
  • Tiktok

Join All Access

Become a member and get instant access to thousands of videos, how-tos, tool reviews, and design features.

Start Your Free Trial

Subscribe

FHB Magazine

Start your subscription today and save up to 81%

Subscribe

You have 1 free article remaining.

Get complete site access, including thousands of videos, how-to tips, tool reviews, and design features.

Start your FREE trial

Already a member? Log in

We hope you’ve enjoyed your free articles. To keep reading, become a member today.

Get complete site access to expert advice, how-to videos, Code Check, and more, plus the print magazine.

Start your FREE trial

Already a member? Log in

Privacy Policy Update

We use cookies, pixels, script and other tracking technologies to analyze and improve our service, to improve and personalize content, and for advertising to you. We also share information about your use of our site with third-party social media, advertising and analytics partners. You can view our Privacy Policy here and our Terms of Use here.

Cookies

Analytics

These cookies help us track site metrics to improve our sites and provide a better user experience.

Advertising/Social Media

These cookies are used to serve advertisements aligned with your interests.

Essential

These cookies are required to provide basic functions like page navigation and access to secure areas of the website.

Delete My Data

Delete all cookies and associated data