Using a Blower-Door Test and Interpreting the Results
Energy rater Randy Williams gives an introduction to the technology and calculations for measuring a home’s energy performance.
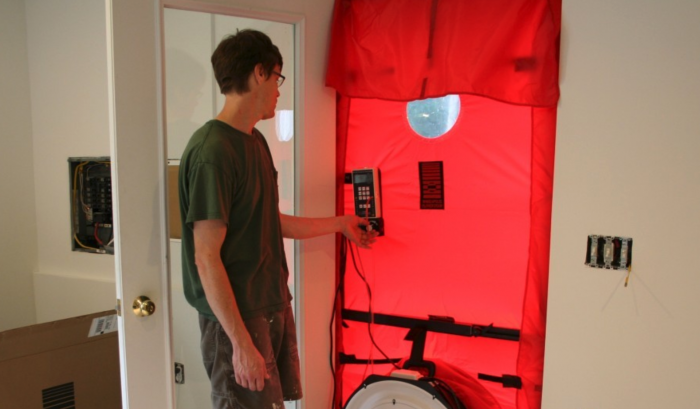
I’ve talked about blower-door testing several times on Green Building Advisor and on my blog, Northern Built. This discussion will dive deeper into when testing should be done, the different testing options, and interpreting the results.
I typically perform four tests: One for code compliance, one during construction, one for contractor diagnostics, and one for homeowner diagnostics. Sometimes I’ll do a fifth test to help identify air leaks.
Code-compliance testing is the most common type of test I conduct. The building code from the 2018 IRC, which applies only to new construction, states:
The building or dwelling unit shall be tested and verified as having an air-leakage rate of not exceeding 5 air changes per hour in climate zones 1 and 2, and 3 air changes per hour in climate zones 3 through 8. Testing shall be conducted in accordance with RESNET/ICC 380, ASTM E779 or ASTM E1827 and reported at a pressure of 0.2-inch w.g. (50 pascals.) Where required by the building official, testing shall be conducted by an approved third party. A written report of the results of the test shall be signed by the party conducting the test and provided to the building official. Testing shall be performed at any time after creation of all penetrations of the building thermal envelope.
This code requires all new residential construction pass an air-leakage test of less than 5 or 3 air changes per hour (depending on your climate zone) at 50 pascals. This is a pass/fail test, and is typically performed at the end of construction after all HVAC equipment and plumbing fixtures have been installed. (Plumbing traps should be duct-taped or filled with water prior to running the test—if left open, air will be pulled through the system from the roof vent.) This is the least expensive of all the blower-door tests I conduct; I’m not looking for air leakage locations, performing zonal or pressure-pan testing, or taking thermal imaging photographs—I’m just getting a number to satisfy the code requirement.
I perform the second type of test during the build. The timing of this test depends on the contractor’s or homeowner’s goals, the building’s complexity, and whether or not the building is trying to achieve a certification, such as Passive House. This type of testing requires not only the air change per hour number and/or surface area leakage rate, but also hunting down air leaks. Sealing air leaks is almost always easier before finishes are installed. This test can take time, so it costs more than the simple code-compliant test.
The third type of test is for contractor diagnostics, and I recommend it be done before any remodeling work gets underway. The dynamics of a home can easily be changed during remodeling, and some of those changes can adversely impact the building’s shell and performance. Knowing how “tight” a home is before remodeling may provide additional opportunities for thermal or air-leakage improvements. Unseen problems that may add to the cost of a project can also be identified at this stage. A second test should be performed at the end of the project to see how the work impacted the home. (Indoor air quality and combustion appliances are particularly susceptible.)
The final type is homeowner diagnostic testing, which is typically performed as part of an energy audit. A full energy audit is conducted when a homeowner is concerned about home performance, energy costs, or comfort levels. Often, a blower-door test will identify problem areas. The TECTITE software I use provides homeowners with an estimate cost of the air leakage. Then they can make decisions based on the energy auditor’s recommendations.
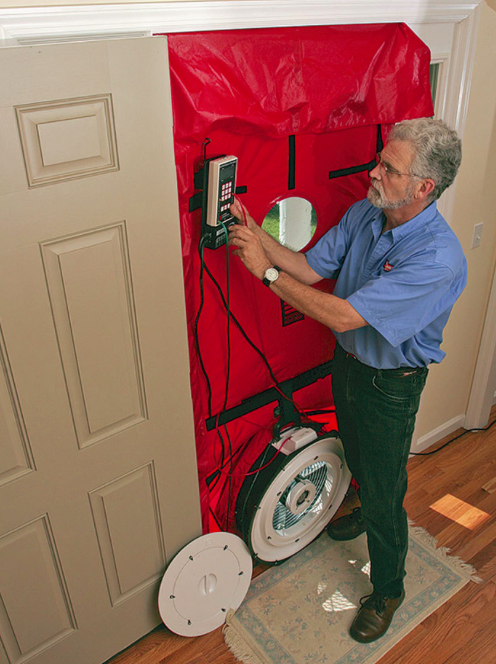 How it works
There are four main components of a blower door: an expandable metal frame designed to fit tightly in an exterior door or large window; a nylon panel that attaches to the frame and makes the assembly airtight; a calibrated fan installed in the nylon panel and used to push air out or into the structure; and a monometer or pressure gauge used to measure the pressure in pascals and the airflow in CFMs. I use a laptop computer to control the test and record the results.
The test is conducted by either pressurizing or depressurizing the structure to a specific pressure, typically 50 pascals. A pascal can be hard to visualize. One pascal is defined as one newton per square meter or one kilogram per square meter or one joule per cubic meter. Not much help there! In my opinion, the best way to describe 50 pascals is as the equivalent of a 20-mph wind blowing on all sides of a structure at the same time.
I almost always depressurize the home. There are only three reasons I would perform a pressurized test. First, if I feel depressurizing will damage a component of the structure. For example, if I were testing with only polyethylene sheeting or some other fragile product acting as the air barrier attached to the interior side of the framing—in that case, a depressurization test may pull the material from the framing. The second reason to pressurize is to pinpoint a leakage area using a theatrical fog machine. This method is used to pinpoint holes in the air barrier that are not evident by other means. Lastly, I will use a pressurization test to check air tightness of windows or the seal of an exhaust damper, such as a dryer or bath fan vent. Pressurizing will force those dampers open. Testing a home using both negative and positive pressures can provide a more accurate result. (Side note: I do not test homes where vermiculite insulation is present, as testing can cause the asbestos fibers to become airborne—a risk I’m not willing to take.)
Assembling the equipment is the most time-consuming bit; the actual test takes about 10 minutes. I have performed a few different test standards, including the Canadian General Standard Board (CGSB), the RESNET multipoint test, as well as the RESNET repeated single-point test. All of the tests can be automated with a laptop computer. It’s also an option to use smart monometers or pressure gauges from the two North American blower door manufacturers—Minneapolis Blower Door and Retrotec. The CGSB is a multipoint test that starts at 50 pascals and reduces to 15 pascals in 5 pascal increments recording 100 data points per pascal increment. I find this to be a very accurate and repeatable test, but it is not recognized by the latest building code as a test standard. The RESNET multipoint test starts at 60 pascals and reduces to 18 pascals in 8 different building pressures. Both tests start and finish with a building baseline pressure reading. The single-point tests at 50 pascals but conducts the test several times with a baseline reading between each test. (I plan to write a near-future post about test standards, so stay tuned for that.)
A few notes on testing
Testing in windy conditions complicates the procedure. The wind can “bounce” the interior pressures or have an effect on the outside reference pressure tube, making it harder for the software to stabilize in order to take the pressure readings. Sometimes this influences the accuracy. Testing in very cold weather can also be difficult. The software asks for the outdoor and indoor temperatures in order to account for their affect on the test results. An additional consideration is the fact that allowing cold air into the building can quickly reduce the indoor temperature. It’s important to perform the test quickly in these conditions. Also, because high elevations can influence results, the RESNET tests require elevations that are above sea level.
Necessary information. To provide a customer with a precise blower-door test, I need accurate information about the home. The volume, floor area, surface area, climate zone, wind shielding, and indoor and outdoor temperatures (and sometimes elevation) are required. I also note the number of bedrooms and number of occupants, which are used to calculate ventilation requirements. I find out the type and efficiency of the heating and cooling equipment, along with cost of the energy, which helps me estimate the cost of the air leakage.
Set up. The home has to be prepared for testing. All windows and exterior doors need to be closed and locked for the best air-seal. Locking the doors also prevents people from entering or exiting the building during the test. On a few occasions, I had someone unexpectedly enter, and the sudden pressure change pulled the blower door assembly out of the door frame with the fan operating at a high speed. All interior doors need to be opened, including closet and basement doors. (If the basement is inside the building envelope, consider it conditioned). Heating, cooling, and ventilation fans need to be turned off. Ensure no gas-burning appliances can fire during the test; they can backdraft carbon monoxide. Most importantly, there can be no fires in any wood-burning appliances, sealed or not. I also require all ashes be cold—removing ash before testing is even better.
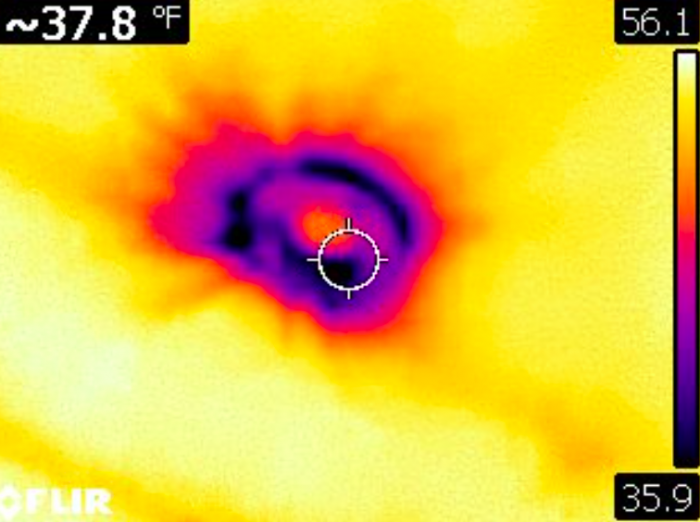
Additional testing. After I complete the basic test, which supplies me with the cubic feet per minute at 50 pascals number, I have the option to conduct additional tests. The blower door can be set to maintain the 50 pascals pressure within the home. If there is at least a 10° temperature difference between the inside and outside, a thermal imaging camera can help find air leaks. I might also conduct a zonal pressure test, which measures pressure differences in rooms or spaces in the house. For instance, I can close the door to a bedroom and measure the difference in pressure between the bedroom and the area outside the bedroom. This information tells me if I need to look for an air leak source within the room or area being tested. A similar zonal pressure test uses what is called a pressure pan. This sealed box can detect leakage around duct boots used for heating and cooling, as well as electrical outlets, small light fixtures, or other small penetrations in the walls, ceilings, or floors.
Interpreting the results
CFM50. This number represents the cubic feet of air moving across the fan per minute at the test pressure of 50 pascals. It is the most important information the blower door supplies. This number is necessary to calculate the ACH50 and CFM50/sq. ft. I have seen CFM numbers as low as 100CFM (a very tight home) and as high as over 5000 (very leaky). The CFM number alone does not qualify good or bad results; the home’s volume and surface area need to be considered too.
ACH50. As noted, this refers to air changes per hour at 50 pascals. Think of the house’s volume—the ACH50 number indicates the number of times all the air inside the home is exchanged with outside air. A home testing 3ACH50 will exchange all its inside air with outside air 3 times per hour at the test pressure of 50 pascals. I use this number as a metric for the next step. Code requires new houses be under 3 or 5 ACH50, depending on location. In my climate, I like to see older homes under 5ACH50. Homes with results over 5 are candidates for improvement, which will increase comfort and reduce energy costs. The best test result I’ve seen was .33ACH50; the worst was just over 15ACH50.
CFM50/sq. ft. Air leakage happens through surfaces, yet we are testing and reporting the findings as a volume calculation. Many testing professionals and building scientists prefer the information shown as feet per minute per square foot of surface area, or CFM50/sq. ft. A test of 3ACH50 will be the rough equivalent of .25CFM50/sq. ft. This information is included with the test report, if the surface area of the building is calculated. Green Building Advisor has several articles on CFM50/sq. ft., including Martin Holladay’s “Is It Time to Move Away From ACH@50 Pascals?”.
Let’s use a fictional blower-door test as an example of how much information CFM50 can supply. I’ve calculated a home’s volume at 15,000 cubic feet, 4600 square feet of surface area, and the blower door measures 1000 CFM at the test pressure of 50 pascals. These values are used to calculate ACH50 and CFM50/sq. ft.
For the ACH50 number, the formula is CFM50 x 60 minutes per hour / volume. In our example, 1000 CFM x 60 minutes per hour/15,000 cubic feet give us 4 air changes per hour at 50 pascals or 4ACH50. Does this home pass a code-compliant blower-door test? It depends on the location. In my area, climate zone 7, this home fails.
Now let’s calculate the cubic feet per minute at 50 pascals per square foot of surface area (CFM50/sq. ft.). The home’s surface area is 4600 square feet. This includes all six sides of the structure—roof, walls, and floors, although there is some discussion around whether the floor should be counted in all situations. To keep the numbers consistent, I believe it should be. Using the fictional test, 1000 CFM50/4600 square feet of surface area = .217 CFM50/sq. ft. (Most of us are familiar with ACH50; it will take time to get comfortable with the CFM50/sq. ft. calculation.)
Estimated annual infiltration. The air changes per hour natural, ACHnat, is an estimate of how much air leakage is occurring naturally within the structure. Testing a building at 50 pascals is subjecting the building to pressures it doesn’t typically see. Some of the leakage that is present at the elevated pressures will not leak under normal conditions. The software I use calculates an estimated natural infiltration rate, which can be unreliable. A home that tests to the code minimum of 3ACH50 will have a rough natural air-leakage rate of .2 air changes per hour naturally, or .2ACHnat. This home will exchange its entire volume of air every 5 hours, or roughly 5 times per day. That is considered “tight.”
Estimated design infiltration. The software also calculates design infiltration, which is used to calculate heating, cooling, and ventilation equipment for the building.
Leakage area. The software can estimate the cumulative size of all the air leaks within the building, which is helpful for visualizing the total size of all the air leaks.
Cost estimates. The final report also includes how much the leakage is costing in energy usage. This information is valuable for understanding the return on investment for any improvements made.
The best advice I have for builders and homeowners who are building a new home is to set an air-tightness goal and test to ensure the goal is reached. Make sure the HVAC contractor knows the performance objectives. For anyone planning on remodeling or upgrading their home, I recommend a pre- and post-work test. Changes in building tightness will impact the home’s performance, so it’s wise to get ahead of undesirable consequences.
_________________________________________________________________________
-Randy Williams is a builder and energy rater based in Grand Rapids, Minnesota. Photo courtesy of Fine Homebuilding. Originally published on GreenBuildingAdvisor.com.
Fine Homebuilding Recommended Products
Fine Homebuilding receives a commission for items purchased through links on this site, including Amazon Associates and other affiliate advertising programs.
Great Stuff Foam Cleaner
Utility Knife
Respirator Mask

