
DIY Kitchen Demolition
Put down that sledgehammer. A careful, methodical approach gets better results.
Most people think that the demolition is the easy part of remodeling a kitchen. Simply show up with your muscles and sledgehammers and go to town. But to me, demo days are some of the most critical on any job. Proper demolition makes for a safer site and lays the foundation for an easier install, saving time and money. These benefits can be a huge selling point to potential clients. For a homeowner doing the job themselves, the potential savings from doing it right can be even greater. But no matter who is doing the work, attention to detail is crucial.
The setup and execution for this kitchen demolition were fairly simple, and followed the same principles that any demolition should: Protect the home and its occupants, have a plan, work methodically, stay organized, and keep the space clean.
First, do no harm
My first step in any demo is to locate all utility shutoffs and the circuit-breaker panel, and make sure I know as much about the hidden utilities as possible. There is nothing worse than hitting a water line and having to scramble to locate the main shutoff. Every employee and subcontractor on site should know where these utilities are. If building plans for the house exist, study them to figure out the locations of mechanical runs and other issues you may have to contend with. If you don’t have plans, spending some time in the basement, crawlspace, and attic can turn up useful clues as to where hazards might be hiding.
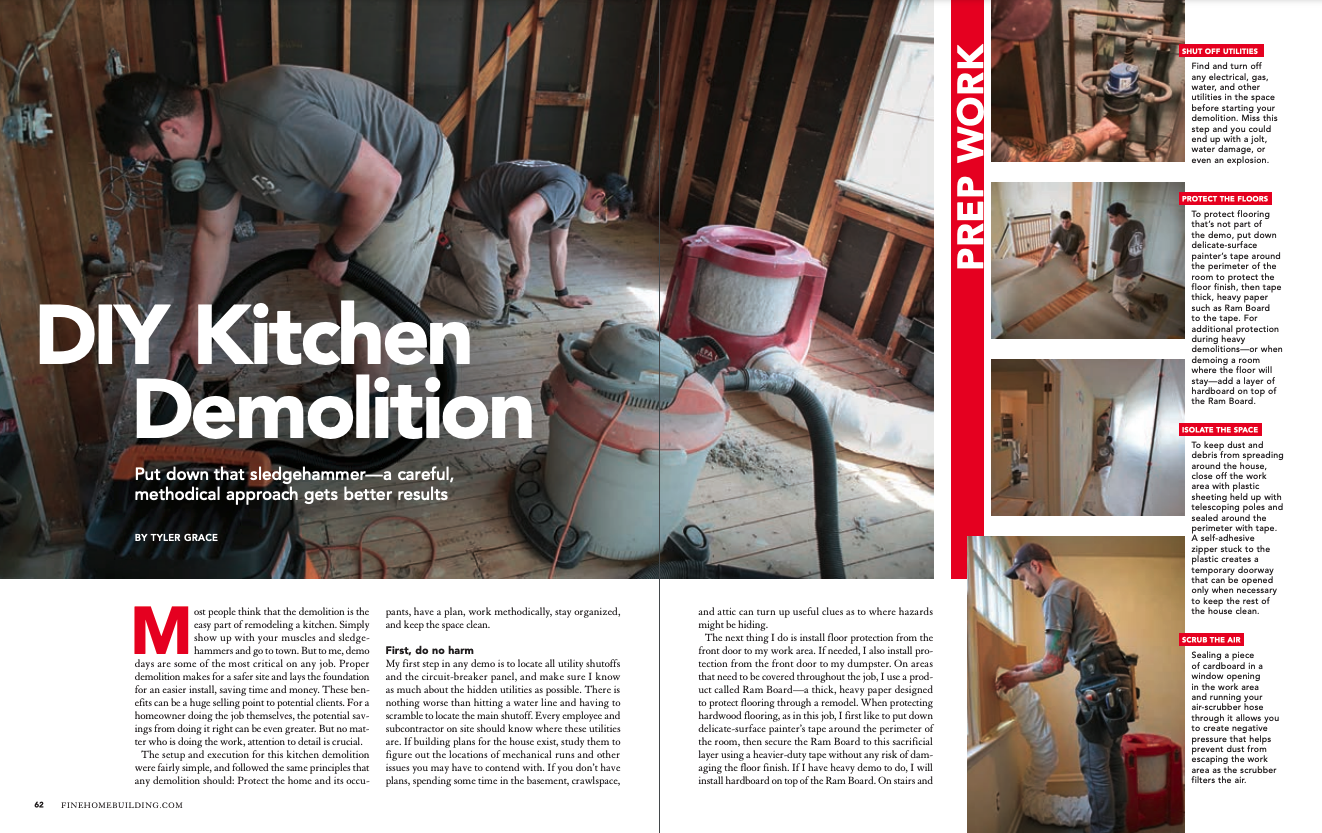
The next thing I do is install floor protection from the front door to my work area. If needed, I also install protection from the front door to my dumpster. On areas that need to be covered throughout the job, I use a product called Ram Board—a thick, heavy paper designed to protect flooring through a remodel. When protecting hardwood flooring, as in this job, I first like to put down delicate-surface painter’s tape around the perimeter of the room, then secure the Ram Board to this sacrificial layer using a heavier-duty tape without any risk of damaging the floor finish. If I have heavy demo to do, I will install hardboard on top of the Ram Board. On stairs and areas leading to my work site, I use Econo Runner, a non-slip, non-porous padded floor-protection sheeting that can be pulled up at the end of each day and reused.
After all of the floors are protected, I install cardboard on any door jambs, railings, newel posts, and other fixed features that could be damaged while removing debris from the house.
I follow that up by adding dust barriers to close off the work area. This starts with taping any doorways or windows to prevent air infiltration or the transmission of dust from my work area to other parts of the house. I then use spring-loaded ZipWall poles and plastic sheeting to create a temporary barrier to isolate my work area. The plastic gets taped to the ceiling, the adjacent walls, and the floor so the space is completely sealed off. To access the work area, I use ZipWall self-adhesive zippers. You just stick the zipper to the plastic and slit the plastic down the center of the zipper, and you’re left with a zip-sealable entryway.
I then install and seal a piece of cardboard on a window inside the work area through which I run the duct for my BuildClean air scrubber. The scrubber runs throughout the job, creating negative air pressure in the space to keep dust from escaping into other parts of the house. I like to have trash cans inside the work site to hold smaller debris and make it easier to carry out of the house. Larger debris can be broken into smaller pieces and removed in the cans, wrapped in drop cloths and removed, or carried out of the house in one piece by two people. This prevents dust and small bits and pieces from trailing behind. If the debris is especially messy, I have gone as far as lining my trash cans with trash bags that I can seal up while moving through the home to the dumpster. I also try to collect as much debris in my work area as possible prior to opening the dust wall and bringing the material outside. Every time the dust wall is opened is an opportunity for airborne dust to escape into the home. Keep it closed until you absolutely must open it.
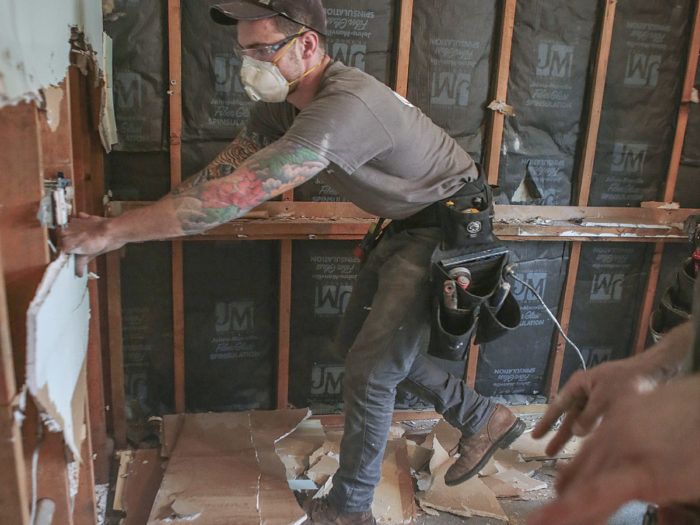
It’s a good idea to protect your body and lungs during the demolition process. At minimum, you should use a high-quality disposable dust mask to protect your lungs from airborne dust and debris. A good pair of gloves can save your hands from cuts and scrapes, and it isn’t a bad idea to wear pants and heavy boots. Last but not least, use safety glasses to protect your eyes. It’s better to be safe than sorry.
If this all sounds like it’s adding up to an expense you’d rather cut from the budget—whether as the builder bidding on a job or a homeowner hiring a contractor, or even if you’re doing the work yourself—consider that the place you’re working is where a family eats, sleeps, and breathes. Site protection should be a requirement, not an option.
Appliances, fixtures, and cabinets come first
Once our work-site isolation and protection is in place, we start the demolition process. After turning off any circuits and closing shutoffs to areas that will be taken apart, I generally start by removing appliances, as well as electrical and plumbing fixtures. You’ll probably have to do some plumbing and electrical work as you go in order to pull appliances and prevent damage to components that will be used later. I like to disassemble copper joints by melting the solder, which makes it easy to cap off the lines quickly. Any appliances or fixtures that will be reused are moved to a safe location, and screws or small miscellaneous parts are put in resealable sandwich bags and taped to the item they belong to so they won’t get lost.
After those items are out, I start removing the countertops and cabinetry. I cut wood or laminate countertops with a reciprocating or circular saw, then pry the counter sections out with flat bars and crowbars. Stone or solid-surface tops are removed by cutting the silicone around the perimeter and underneath, breaking them into smaller pieces if need be, and prying them out with flat bars and crowbars. Fasteners holding cabinets in place are backed out, then the cabinets are pried free from the wall and each other. Not all cabinets are built the same, so the method of demolition may require additional cutting or frame removal. However they’re built, breaking the cabinets down before taking them out of the house makes them easier to move and allows them to be stacked flat, which takes up less space in the dumpster.
Walls, floors, and ceilings are messier
Next, we remove the drywall or plaster from the walls. Plaster usually has to be busted up with a hammer, the lathe removed with a hammer or flat bar, and the nails pulled using a hammer, pry bar, or end-cutting pliers. For drywall, carefully punch small holes with a hammer and pull it off by hand to minimize the mess.
After opening the walls, I remove and bag any cavity insulation prior to addressing any minor plumbing or electrical terminations. I label and temporarily cap any electrical circuits or fixtures that I remove or pull from the wall studs so the electrician knows what is what. I do the same for the plumbing. If there is anything major that needs to be removed or relocated, I will get professionals in ASAP to do so, so that I can proceed with the demolition.
Clean, continue the demo, then clean again
The floor demo comes next, at which point I will usually sweep everything up so that the space is safe and relatively clean, to prevent injuries. Depending on the flooring material, you can use various tools, but I find that a shingle shovel works best. It has spiked teeth and an angled pivot point on the bottom of the blade for getting under and prying up the plywood underlayment or tile. You can also cut the underlayment into smaller sections prior to removal if you wish. Be careful to set the blade depth of your circular saw just deep enough to get through the underlayment, not the subfloor. If any subfloor needs to come out to repair rot or relocate utilities, we do that after the next step—the ceiling demo.
If there is blown-in insulation above the ceiling, this part of the demo can be quite a mess. On this job I scooped out and relocated as much of the insulation as possible within the attic prior to removing the drywall to avoid having two feet of insulation on the floor and in the air. After the drywall is removed, I remove any nails, staples, screws, and other unwanted fasteners and protrusions from the walls, floor, and ceiling.
I will also vacuum out joist bays, stud cavities, flooring, and other places where dust and debris have collected. Once everything is out of the space, we go through and do a final cleaning with a HEPA vacuum to guarantee an extremely clean site. After the work area is tidied up, I clean my way out of the house and remove any floor protection outside of the work area.
If I can, I’ll leave the air scrubber running for a night after the demo is complete to remove all of the airborne dust from the space. Getting the workspace to this level of cleanliness means I won’t have to wear a dust mask throughout the remainder of the job.
If possible, I leave up the temporary plastic walls and floor protection for the duration of the project. Once the job is complete, I break down the walls, roll up the floor protection, and throw it all in the dumpster. After a final cleaning and walk-through, I hand the job off to the customer.
Tyler Grace is an FHB Ambassador and owner of TRG Home Concepts in Haddon Heights, N.J. (trghomeconcepts.com). Photos by Brian McAward.
Read more of Tyler Grace’s demolition tips here:
From Fine Homebuilding #271
To view the entire article, please click the View PDF button below.

View Comments
Spot-on. Excellent. Thank you.