FHB Logo Facebook LinkedIn Email Pinterest Twitter X Instagram Tiktok YouTube Plus Icon Close Icon Navigation Search Icon Navigation Search Icon Arrow Down Icon Video Guide Icon Article Guide Icon Modal Close Icon Guide Search Icon Skip to content
Subscribe
Log In
  • How-To
  • Design
  • Tools & Materials
  • Restoration
  • Videos
  • Blogs
  • Forum
  • Magazine
  • Members
  • FHB House
  • Podcast
Log In

Fine Homebuilding Project Guides

Kitchens

Guide Home
  • Kitchen Planning & Design
  • Featured Kitchen Projects
  • Cabinets, Built-Ins, & Pantries
  • Kitchen Islands
  • Countertops & Flooring
  • Appliances, Fixtures, & Lighting
Ask the Experts

Tip-Proof Kitchen Island on a Concrete Floor

To secure an island on legs to a concrete floor, anchor a cleat to the floor and attach the cabinets to the cleat.

By Danny Castle Issue 311 - November 2022
  • X
  • facebook
  • linkedin
  • pinterest
  • email
  • add to favorites Log in or Sign up to save your favorite articles
Anchor it down. One way to secure a kitchen island on adjustable legs is to install a cleat on the floor that runs the length of the island and then fasten the island to the cleat. If the floor is concrete and not wood, use pressure-treated cleats held down with concrete fasteners.

I have to install a kitchen island made up of three 3-ft. base cabinets that are supported by adjustable legs. The island is going to have a granite countertop that hangs over 12 in. on the back side, so it needs to be fastened securely to the floor or the whole island will tip over. This is a slab-on-grade home, so the floor is concrete. What’s the best way to secure an island on legs to a concrete floor?

—Todd Vuglar via email

Danny Castle, of Castle Cabinetry, replies: For base cabinets attached to a wall or for islands without large overhangs, some of our customers simply screw right through the plastic foot and into the floor. However, this method won’t work with all types of legs, requires a 90° drill attachment, and is much more difficult to accomplish on floors made of concrete. What we recommend in a case like yours is to attach boards to the floor to create a cleat, and then to attach the cabinets to the cleat.

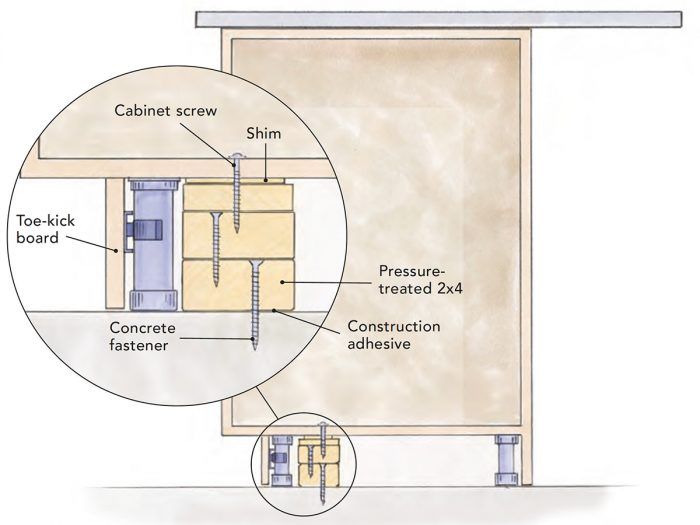
The process is similar for both a wood and concrete floor, except on concrete you’ll need to secure the cleats with concrete fasteners along with a little construction adhesive for added insurance, and make sure the bottom cleat board is pressure-treated. Once the cabinets that make up the island are in place and level, measure and cut a 2×4 slightly shorter than the length of the island and slide it underneath. If the feet and top brackets of the legs are the same size, pull the 2×4 up tight to the back of the feet, and mark the location of the front edge and each end of the 2×4 on the floor. If the top brackets are wider than the feet, you will need to hold the 2×4 back far enough so that when it gets built up the brackets won’t be in the way. Before removing the 2×4, measure the shortest distance between the top of the 2×4 and the bottom of the cabinets; this will let you know the thickness of the board or boards you need to add on top of the 2×4.

Move the island out of the way and secure the 2×4 to the floor. Next, fasten a board or boards on top of the 2×4 to create a cleat at a height of about 1/4 in. shorter than the lowest part of the island. That will allow room for you to install shims between the cleat and island when you fasten the two together. You want to avoid creating a cleat that’s too tall, which will lift part of the island off the ground and throw everything out of level. You also don’t want to close a gap between the cleat and island when driving in your screws, which could distort a cabinet and lead to misaligned doors or poorly performing drawers.

Once the cleat is built up to the proper height, move the island back into place and slide shims snugly between the cleat and island, and then secure the island to the cleat with cabinet screws. Install at least two screws into each box. If the boxes have drawers, the screws won’t be seen; if the boxes have doors, you could cover the screws with caps or countersink and hide them with dowels.

If you’re working alone and won’t be able to easily move the island with the base cabinets fastened together, you could attach and level cleat boards at the exact height you need, set the cabinets right on the cleat, and then spin down the front legs to the floor. In either scenario the front legs are not really adding much support, but you’ll still need them in place to install the toe kick.

Not all adjustable legs are the same size. When working with legs that have very large feet or top brackets, you may want to cut individual 2×4 cleats to fit between the legs rather than sit behind them. This will allow you to install them closer to the front of the cabinets, which will better counteract the opposing force of the overhang. Make sure that if you go this route, you don’t install them so far forward that they interfere with the toe kick.

Drawings: Dan Thornton

From Fine Homebuilding #311


RELATED STORIES

  • How to Build a Kitchen Island
  • Where Kitchen Islands Go Wrong
  • 13 Ways to Make a Kitchen Island Better
Previous: A New Old Way to Vent a Kitchen Island

Guide

Kitchens

Chapter

Kitchen Islands

Sign up for eletters today and get the latest how-to from Fine Homebuilding, plus special offers.

Signing you up...

This site is protected by reCAPTCHA and the Google Privacy Policy and Terms of Service apply.
See all newsletters
See all newsletters

Log in or create an account to post a comment.

Sign up Log in

Become a member and get full access to FineHomebuilding.com

Kitchens

Kitchens

A complete resource for designing, building, or remodeling the kitchen of your dreams

View Project Guide

View All Project Guides »

Become a member and get unlimited site access, including the Kitchens Project Guide.

Start Free Trial

Kitchen Planning & Design
Featured Kitchen Projects
  • Kitchen Remodels
Cabinets, Built-Ins, & Pantries
  • Choosing Kitchen Cabinets
  • Installing Kitchen Cabinets
  • Cabinet Hardware
  • Breakfast Nooks
  • Pantries
Kitchen Islands
Countertops & Flooring
  • Countertops 101
  • Concrete Countertops
  • Kitchen Flooring
Appliances, Fixtures, & Lighting
  • Appliances
  • Range Hoods
  • Sinks & Faucets
  • Kitchen Lighting

Fine Home Building

Newsletter Sign-up

  • Fine Homebuilding

    Home building tips, offers, and expert advice in your inbox.

  • Green Building Advisor

    Building science and energy efficiency advice, plus special offers, in your inbox.

  • Old House Journal

    Repair, renovation, and restoration tips, plus special offers, in your inbox.

Signing you up...

This site is protected by reCAPTCHA and the Google Privacy Policy and Terms of Service apply.
See all newsletters

Follow

  • Fine Homebuilding

    Dig into cutting-edge approaches and decades of proven solutions with total access to our experts and tradespeople.

    Start Free Trial Now
    • Facebook
    • Instagram
    • X
    • LinkedIn
  • GBA Prime

    Get instant access to the latest developments in green building, research, and reports from the field.

    Start Free Trial Now
    • Facebook
    • YouTube
  • Old House Journal

    Learn how to restore, repair, update, and decorate your home.

    Subscribe Now
    • Facebook
    • Instagram
    • X

Membership & Magazine

  • Online Archive
  • Start Free Trial
  • Magazine Subscription
  • Magazine Renewal
  • Gift a Subscription
  • Customer Support
  • Privacy Preferences
  • About
  • Contact
  • Advertise
  • Careers
  • Terms of Use
  • Site Map
  • Do not sell or share my information
  • Privacy Policy
  • Accessibility
  • California Privacy Rights

© 2025 Active Interest Media. All rights reserved.

Fine Homebuilding receives a commission for items purchased through links on this site, including Amazon Associates and other affiliate advertising programs.

  • Home Group
  • Antique Trader
  • Arts & Crafts Homes
  • Bank Note Reporter
  • Cabin Life
  • Cuisine at Home
  • Fine Gardening
  • Fine Woodworking
  • Green Building Advisor
  • Garden Gate
  • Horticulture
  • Keep Craft Alive
  • Log Home Living
  • Military Trader/Vehicles
  • Numismatic News
  • Numismaster
  • Old Cars Weekly
  • Old House Journal
  • Period Homes
  • Popular Woodworking
  • Script
  • ShopNotes
  • Sports Collectors Digest
  • Threads
  • Timber Home Living
  • Traditional Building
  • Woodsmith
  • World Coin News
  • Writer's Digest
Active Interest Media logo
X
X
This is a dialog window which overlays the main content of the page. The modal window is a 'site map' of the most critical areas of the site. Pressing the Escape (ESC) button will close the modal and bring you back to where you were on the page.

Main Menu

  • How-To
  • Design
  • Tools & Materials
  • Video
  • Blogs
  • Forum
  • Project Guides
  • Reader Projects
  • Magazine
  • Members
  • FHB House

Podcasts

  • FHB Podcast
  • ProTalk

Webinars

  • Upcoming and On-Demand

Podcasts

  • FHB Podcast
  • ProTalk

Webinars

  • Upcoming and On-Demand

Popular Topics

  • Kitchens
  • Business
  • Bedrooms
  • Roofs
  • Architecture and Design
  • Green Building
  • Decks
  • Framing
  • Safety
  • Remodeling
  • Bathrooms
  • Windows
  • Tilework
  • Ceilings
  • HVAC

Magazine

  • Current Issue
  • Past Issues
  • Magazine Index
  • Subscribe
  • Online Archive
  • Author Guidelines

All Access

  • Member Home
  • Start Free Trial
  • Gift Membership

Online Learning

  • Courses
  • Project Guides
  • Reader Projects
  • Podcast

More

  • FHB Ambassadors
  • FHB House
  • Customer Support

Account

  • Log In
  • Join

Newsletter

Get home building tips, offers, and expert advice in your inbox

Signing you up...

This site is protected by reCAPTCHA and the Google Privacy Policy and Terms of Service apply.
See all newsletters
See all newsletters

Follow

  • X
  • YouTube
  • instagram
  • facebook
  • pinterest
  • Tiktok

Join All Access

Become a member and get instant access to thousands of videos, how-tos, tool reviews, and design features.

Start Your Free Trial

Subscribe

FHB Magazine

Start your subscription today and save up to 70%

Subscribe

You have 1 free article remaining.

Get complete site access, including thousands of videos, how-to tips, tool reviews, and design features.

Start your FREE trial

Already a member? Log in

We hope you’ve enjoyed your free articles. To keep reading, become a member today.

Get complete site access to expert advice, how-to videos, Code Check, and more, plus the print magazine.

Start your FREE trial

Already a member? Log in

Privacy Policy Update

We use cookies, pixels, script and other tracking technologies to analyze and improve our service, to improve and personalize content, and for advertising to you. We also share information about your use of our site with third-party social media, advertising and analytics partners. You can view our Privacy Policy here and our Terms of Use here.

Cookies

Analytics

These cookies help us track site metrics to improve our sites and provide a better user experience.

Advertising/Social Media

These cookies are used to serve advertisements aligned with your interests.

Essential

These cookies are required to provide basic functions like page navigation and access to secure areas of the website.

Delete My Data

Delete all cookies and associated data