FHB Logo Facebook LinkedIn Email Pinterest Twitter X Instagram Tiktok YouTube Plus Icon Close Icon Navigation Search Icon Navigation Search Icon Arrow Down Icon Video Guide Icon Article Guide Icon Modal Close Icon Guide Search Icon Skip to content
Subscribe
Log In
  • How-To
  • Design
  • Tools & Materials
  • Restoration
  • Videos
  • Blogs
  • Forum
  • Magazine
  • Members
  • FHB House
  • Podcast
Log In

Fine Homebuilding Project Guides

Painting

Guide Home
  • Intro to Painting
  • Tools & Materials
  • Prep Work
  • Painting Walls, Ceilings, and Trim
  • Wallpaper
  • Windows and Doors
  • Spray Painting Interiors
  • Exterior Painting
How-To

Finishing Secrets for Furniture-Grade Trim

Whether you’re staining a door, built-in cabinetry, or the millwork in between, follow these steps for a flawless finish.

By Tim Leahy Issue 201
  • X
  • facebook
  • linkedin
  • pinterest
  • email
  • add to favorites Log in or Sign up to save your favorite articles

Synopsis: Finishing expert Tim Leahy has spent more than 10 years working as a foreman on a crew that restores historic mansions and homes in Newport, R.I. For Leahy, the best results for finishing furniture-grade trim mean more than just applying the stain; meticulous prep work is the only way to start. First, sand all surfaces with a sequence of progressively finer sandpapers. Next, apply the stain in a two-step process: brushing it on, then wiping it down with a clean rag. Third, fill in the grain to accent the grain and to smooth the surface of open-grain woods. Finally, create a topcoat by brushing or spraying on three to four coats of finish. This article includes a sidebar about the secret of repairing blemishes.


As far as work in the trades is concerned, I’m a lucky guy. For the past 12 years, I’ve spent my days as a finish foreman with a company that remodels and restores historic mansions and builds new homes in Newport, R.I. Our carpenters install custom-milled trim, cabinetry, doors, and windows. Then my crew and I go in and finish them. Given all that—and the ocean views—it’s a sweet deal.

There’s no doubt that the craftsmanship that precedes us sets the stage for us to do our best work. But delivering flawless finishes is no easy task. Staining and clear-coating the mahogany mantelpiece featured here—and the paneled library that it’s in—took three of us two weeks to complete. Yes, we were methodical and took great care when applying the stain and the final clear coats. but nothing got more of our attention than the prep we did before popping the lid off the first can of stain.

Sand every inch

sanding trim

On one of our recent jobs, someone accidentally dripped water on an oak floor that my crew and I had just prepared for stain. unfortunately, that someone never told us what had happened. When we applied the stain, there—in deep, dark splotches—was the evidence. The water had raised the grain, creating an uneven surface. Unlike a layer of paint, which hides the wood, stain highlights it. Unfortunately, stain also highlights watermarks, fingerprints, dried glue, and swirl marks left by power sanders. To get consistent results with stain, you can’t just sand the blemishes; you need to sand the entire project evenly.

Sanding everything evens the porosity of the wood. Let me explain: When wood is run through a planer or shaper, its outer fibers are compressed, which leaves it with a glazed or glossy appearance. If stain is applied directly over those compressed fibers, it doesn’t penetrate the wood the way it’s meant to. Sanding opens the fibers evenly, allowing stain to soak into the wood.

The amount of sanding you should do depends on the quality of the wood. If you are staining molding or cabinetry made at a high-quality woodshop or in your own shop, chances are you’ll need to sand the surface only lightly. Wood from big-box stores and moldings or cabinetry that has been exposed to temperature and humidity changes will likely need more work. In either case, using the proper grit sequence is important.

Because of the high quality of wood we work with, we typically use a two- or three step sanding sequence. We thoroughly inspect all the wood first for the problem areas mentioned above, as well as for planer snipe. We do this by holding a light at a 45° angle close to the wood so that the light rakes across the surface. Don’t use halogen work lights; they create too much glare. An aluminum clip-on work light with a 150w bulb works best.

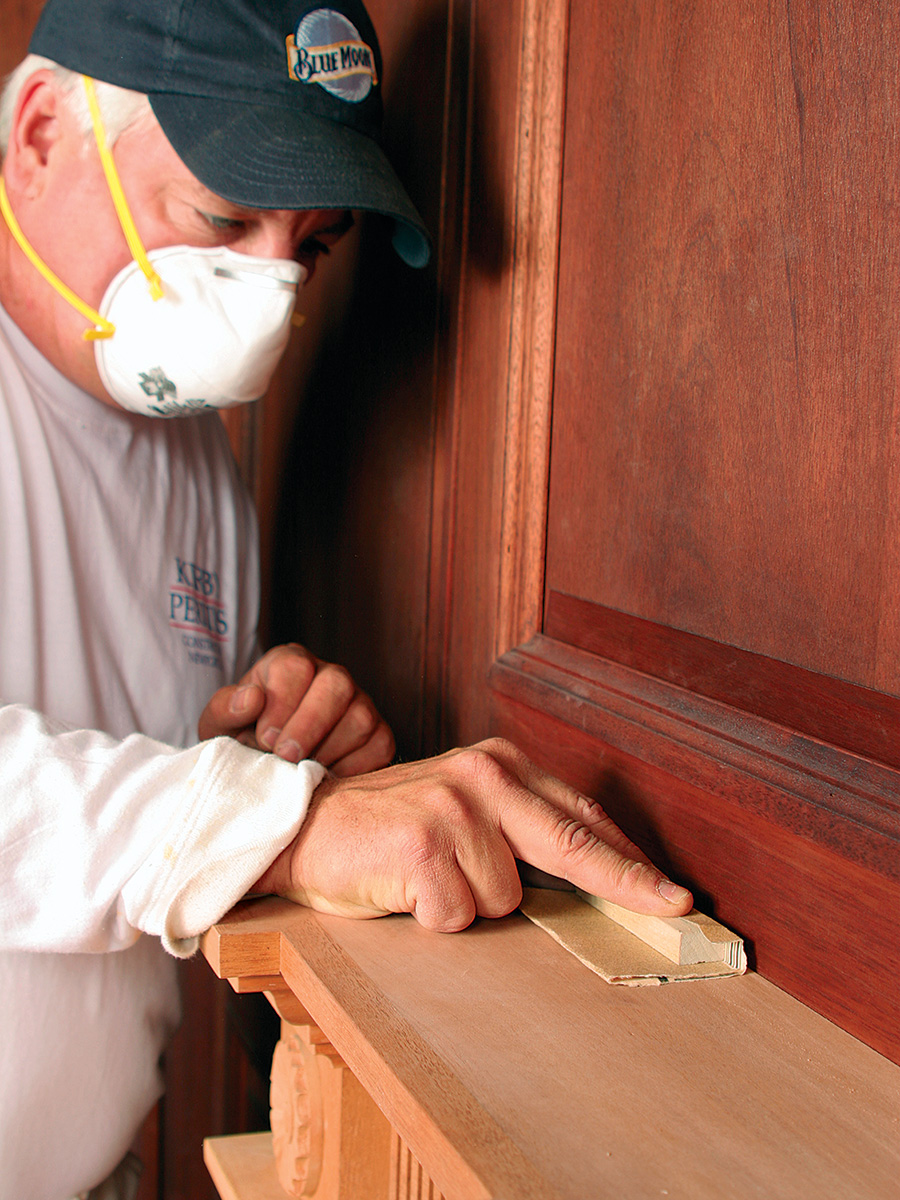
We remove the illuminated trouble spots by sanding along the grain with 120-grit sandpaper. We also lightly sand sharp corners and edges at this point because they splinter easily and don’t take finish well.

Once the imperfections are removed, we sand the entire surface with 120-grit paper. Then we sand with 150-grit paper, still working with the grain. We maintain even pressure as we sand, making sure that we don’t bear down with our fingertips. Doing so could leave sanding marks and stripes.


For more photos and the secret to dealing with blemishes, click the View PDF button below. 

View PDF
Previous: Cut In Stain at the Ceiling Next: Painting Walls With Glazes

Guide

Painting

Chapter

Painting Walls, Ceilings, and Trim

Sign up for eletters today and get the latest how-to from Fine Homebuilding, plus special offers.

Signing you up...

This site is protected by reCAPTCHA and the Google Privacy Policy and Terms of Service apply.
See all newsletters
See all newsletters

View Comments

  1. user-183982 | Aug 24, 2020 03:45pm | #1

    If the historic paint needs to be stripped off completely for staining and is thicker that one layer, use an infrared heat stripper for the bulk of the paint and then wet sand. This keeps the toxic lead dust controlled.

Log in or create an account to post a comment.

Sign up Log in

Become a member and get full access to FineHomebuilding.com

Painting

Painting

Everything you need to know to get the perfect finish, from choosing the right paint to applying the final coat

View Project Guide

View All Project Guides »

Become a member and get unlimited site access, including the Painting Project Guide.

Start Free Trial

Intro to Painting
  • Painting Basics
  • Painting Inspiration
Tools & Materials
  • Paint
  • Brushes and Rollers
  • Caulks and Sealants
  • Spray Equipment
  • Prep and Cleanup
Prep Work
  • Getting Ready For Painting and Finishing
Painting Walls, Ceilings, and Trim
  • Painting Interior Surfaces
Wallpaper
  • How to Prep and Install Wallpaper
  • Removing Wallpaper
  • Wallcovering Choices
Windows and Doors
  • Painting Windows and Doors
  • Video Series: Finishing an Exterior Door
Spray Painting Interiors
  • How To Spray Walls, Trim, Cabinets, and More
Exterior Painting
  • Exterior Paint Prep
  • Exterior Painting Techniques

Fine Home Building

Newsletter Sign-up

  • Fine Homebuilding

    Home building tips, offers, and expert advice in your inbox.

  • Green Building Advisor

    Building science and energy efficiency advice, plus special offers, in your inbox.

  • Old House Journal

    Repair, renovation, and restoration tips, plus special offers, in your inbox.

Signing you up...

This site is protected by reCAPTCHA and the Google Privacy Policy and Terms of Service apply.
See all newsletters

Follow

  • Fine Homebuilding

    Dig into cutting-edge approaches and decades of proven solutions with total access to our experts and tradespeople.

    Start Free Trial Now
    • Facebook
    • Instagram
    • X
    • LinkedIn
  • GBA Prime

    Get instant access to the latest developments in green building, research, and reports from the field.

    Start Free Trial Now
    • Facebook
    • YouTube
  • Old House Journal

    Learn how to restore, repair, update, and decorate your home.

    Subscribe Now
    • Facebook
    • Instagram
    • X

Membership & Magazine

  • Online Archive
  • Start Free Trial
  • Magazine Subscription
  • Magazine Renewal
  • Gift a Subscription
  • Customer Support
  • Privacy Preferences
  • About
  • Contact
  • Advertise
  • Careers
  • Terms of Use
  • Site Map
  • Do not sell or share my information
  • Privacy Policy
  • Accessibility
  • California Privacy Rights

© 2025 Active Interest Media. All rights reserved.

Fine Homebuilding receives a commission for items purchased through links on this site, including Amazon Associates and other affiliate advertising programs.

  • Home Group
  • Antique Trader
  • Arts & Crafts Homes
  • Bank Note Reporter
  • Cabin Life
  • Cuisine at Home
  • Fine Gardening
  • Fine Woodworking
  • Green Building Advisor
  • Garden Gate
  • Horticulture
  • Keep Craft Alive
  • Log Home Living
  • Military Trader/Vehicles
  • Numismatic News
  • Numismaster
  • Old Cars Weekly
  • Old House Journal
  • Period Homes
  • Popular Woodworking
  • Script
  • ShopNotes
  • Sports Collectors Digest
  • Threads
  • Timber Home Living
  • Traditional Building
  • Woodsmith
  • World Coin News
  • Writer's Digest
Active Interest Media logo
X
X
This is a dialog window which overlays the main content of the page. The modal window is a 'site map' of the most critical areas of the site. Pressing the Escape (ESC) button will close the modal and bring you back to where you were on the page.

Main Menu

  • How-To
  • Design
  • Tools & Materials
  • Video
  • Blogs
  • Forum
  • Project Guides
  • Reader Projects
  • Magazine
  • Members
  • FHB House

Podcasts

  • FHB Podcast
  • ProTalk

Webinars

  • Upcoming and On-Demand

Podcasts

  • FHB Podcast
  • ProTalk

Webinars

  • Upcoming and On-Demand

Popular Topics

  • Kitchens
  • Business
  • Bedrooms
  • Roofs
  • Architecture and Design
  • Green Building
  • Decks
  • Framing
  • Safety
  • Remodeling
  • Bathrooms
  • Windows
  • Tilework
  • Ceilings
  • HVAC

Magazine

  • Current Issue
  • Past Issues
  • Magazine Index
  • Subscribe
  • Online Archive
  • Author Guidelines

All Access

  • Member Home
  • Start Free Trial
  • Gift Membership

Online Learning

  • Courses
  • Project Guides
  • Reader Projects
  • Podcast

More

  • FHB Ambassadors
  • FHB House
  • Customer Support

Account

  • Log In
  • Join

Newsletter

Get home building tips, offers, and expert advice in your inbox

Signing you up...

This site is protected by reCAPTCHA and the Google Privacy Policy and Terms of Service apply.
See all newsletters
See all newsletters

Follow

  • X
  • YouTube
  • instagram
  • facebook
  • pinterest
  • Tiktok

Join All Access

Become a member and get instant access to thousands of videos, how-tos, tool reviews, and design features.

Start Your Free Trial

Subscribe

FHB Magazine

Start your subscription today and save up to 81%

Subscribe

We hope you’ve enjoyed your free articles. To keep reading, become a member today.

Get complete site access to expert advice, how-to videos, Code Check, and more, plus the print magazine.

Start your FREE trial

Already a member? Log in

Privacy Policy Update

We use cookies, pixels, script and other tracking technologies to analyze and improve our service, to improve and personalize content, and for advertising to you. We also share information about your use of our site with third-party social media, advertising and analytics partners. You can view our Privacy Policy here and our Terms of Use here.

Cookies

Analytics

These cookies help us track site metrics to improve our sites and provide a better user experience.

Advertising/Social Media

These cookies are used to serve advertisements aligned with your interests.

Essential

These cookies are required to provide basic functions like page navigation and access to secure areas of the website.

Delete My Data

Delete all cookies and associated data