FHB Logo Facebook LinkedIn Email Pinterest Twitter X Instagram Tiktok YouTube Plus Icon Close Icon Navigation Search Icon Navigation Search Icon Arrow Down Icon Video Guide Icon Article Guide Icon Modal Close Icon Guide Search Icon Skip to content
Subscribe
Log In
  • How-To
  • Design
  • Tools & Materials
  • Restoration
  • Videos
  • Blogs
  • Forum
  • Magazine
  • Members
  • FHB House
  • Podcast
Log In

Fine Homebuilding Project Guides

Plumbing

Guide Home
  • Plumbing Basics
  • Bathrooms
  • Kitchens
  • Roughing In
  • Water Heaters, Washers, and More
  • Maintenance and Repair
How-To

Fixing Toilet Fill-Valve and Flush-Valve Problems

Some toilet valves can be repaired, others must be replaced; here's how.

By Steve Cory
  • X
  • facebook
  • linkedin
  • pinterest
  • email
  • add to favorites Log in or Sign up to save your favorite articles

Repairing a Valve

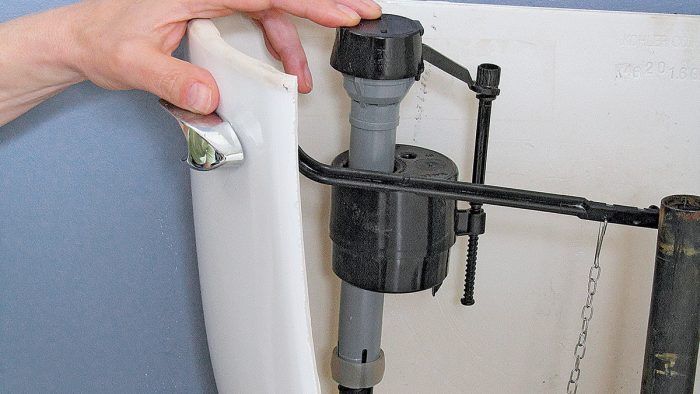
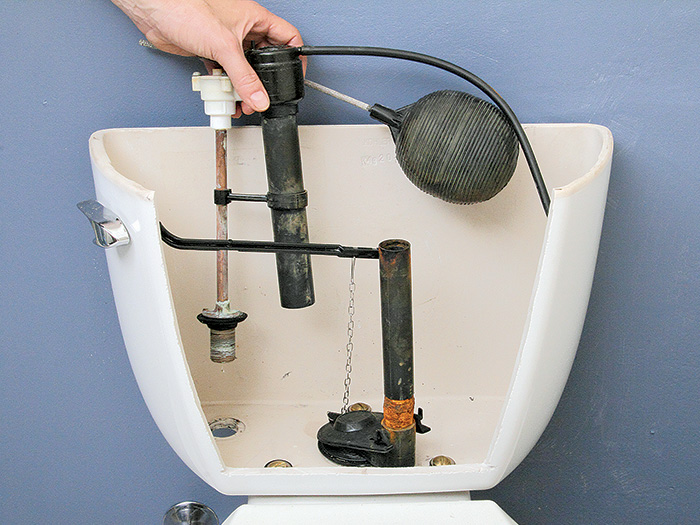
Usually, if a valve leaks or gets clogged and sluggish, the best solution is to replace it, because valves are inexpensive. However, it may be worth your while to repair a valve like the one shown here, because it will save you the trouble of draining the tank. You may or may not need to replace the rubber parts. Your valve may not look like this one, but the steps are pretty much the same.

Remove the hold-down screws
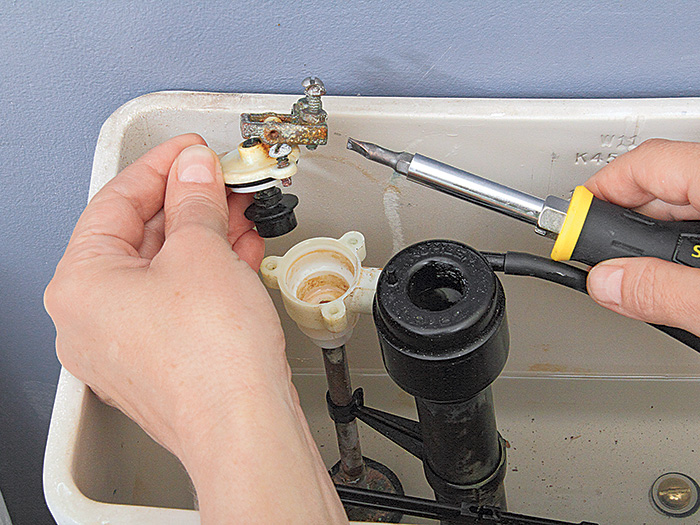
REMOVE AND INSPECT. Shut off water at the stop valve and flush the toilet. Remove the hold-down screws and pull out the valve’s top.
Check the rubber parts
Check the rubber parts; if any are damaged, replace them or replace the valve.


CLEAN AND LUBRICATE
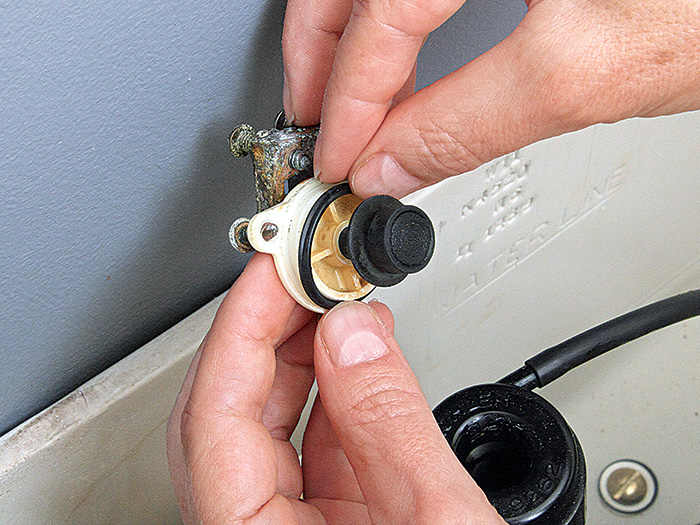
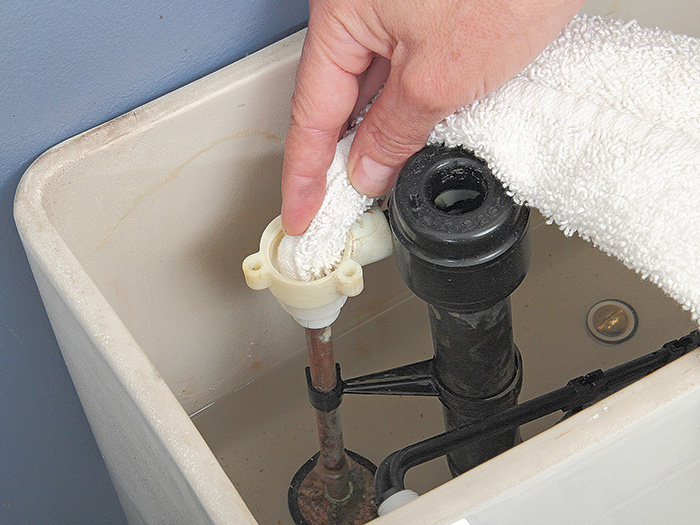
CLEAN AND LUBRICATE. Use a lint-free, damp cloth to clean out any debris and mineral buildup. Apply some plumber’s grease to the parts, and reassemble the valve.


Installing a Fill Valve

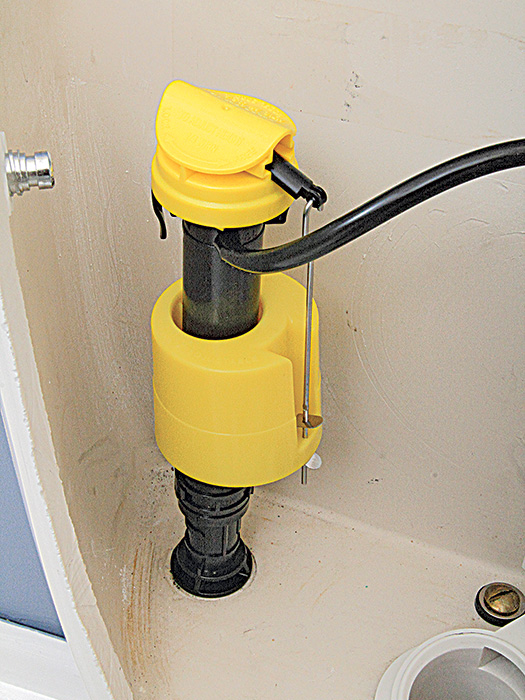
Replacing a fill valve is one of the most common toilet repairs, because it takes less than an hour, costs less than $10, and can make your toilet run like new. Here we show one of the most common types of valves, called a float cup, but other types can be installed in much the same way.


Other Fill Valves

These fill valves install in much the same way as shown in the following instructions, with the “critical level” mark 1 in. below the top of the overflow tube. The white-topped vertical column valve (below left) has a float inside its body. It can be easily adjusted for height after installation. The yellow-and-black unit (right) operates much the same way as the one shown in the instructions.

vertical column valve Other Fill Valves


Unscrew the supply tube
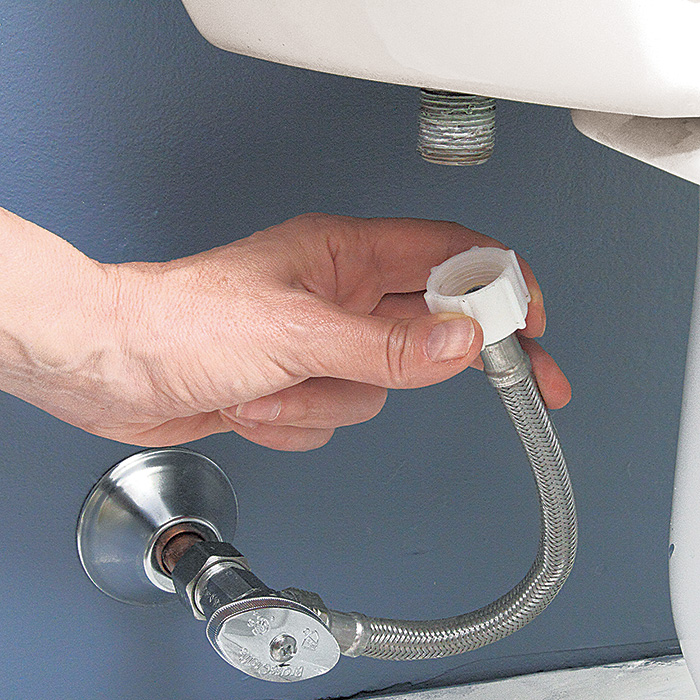
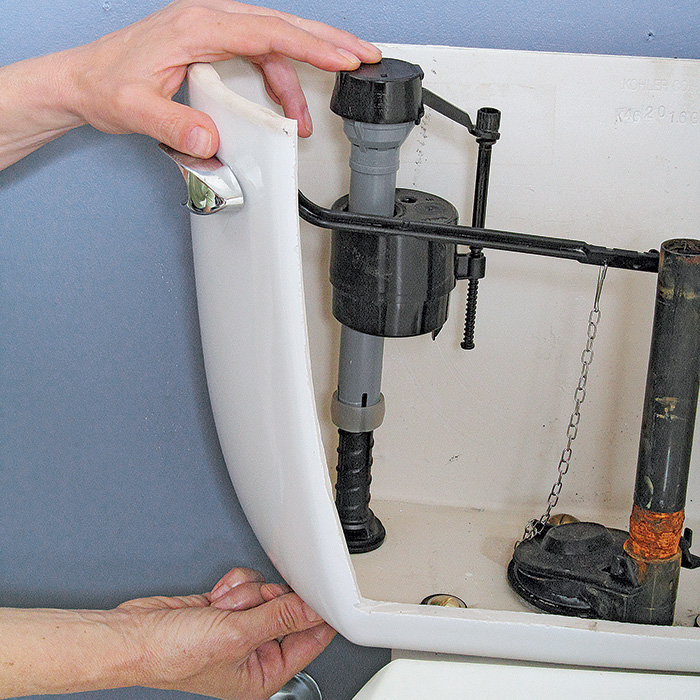
1. SHUT OFF THE WATER AND REMOVE THE NUT. Shut off the water at the stop valve and flush the toilet to remove most of the water from the tank. Sponge away the rest of the water. Unscrew the supply tube.
remove the nut
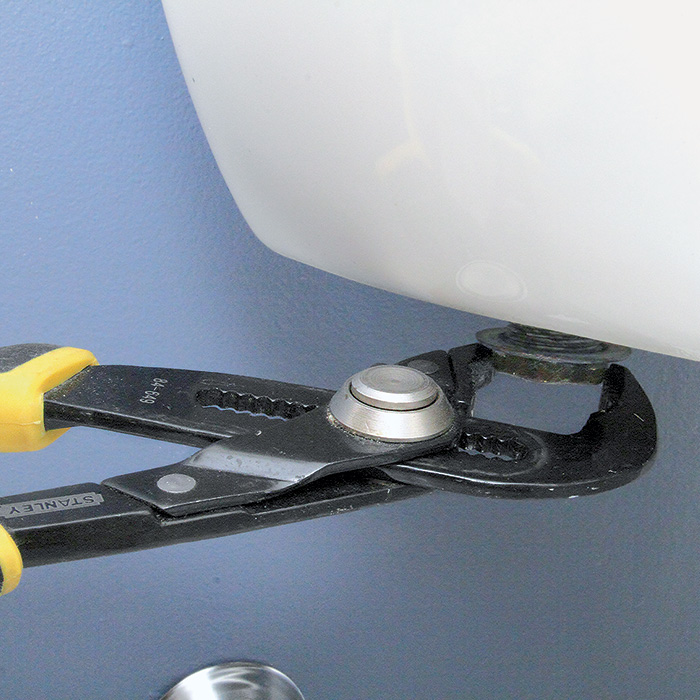
Use a wrench or slip-joint pliers to remove the nut that holds the old fill tube in place; it is located under the tank.


REMOVE THE OLD VALVE
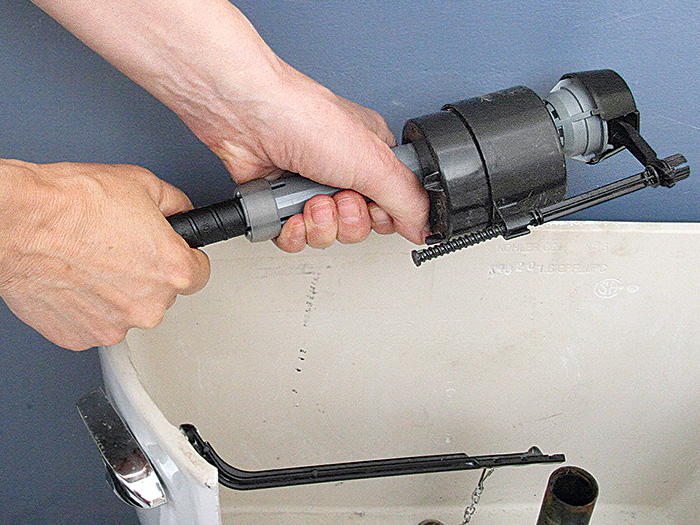
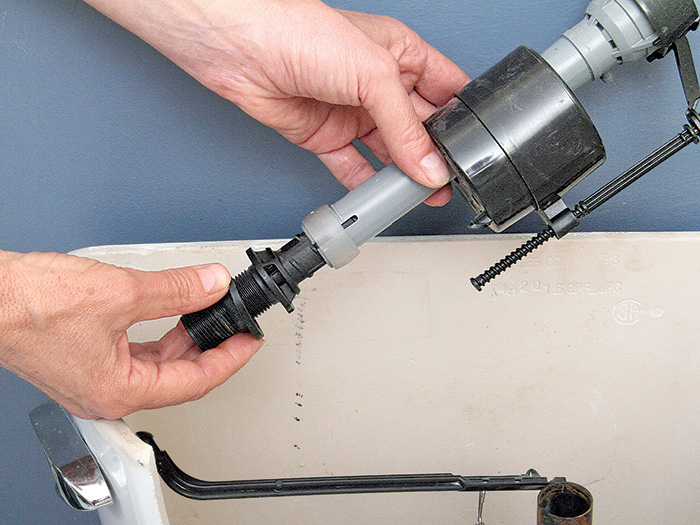
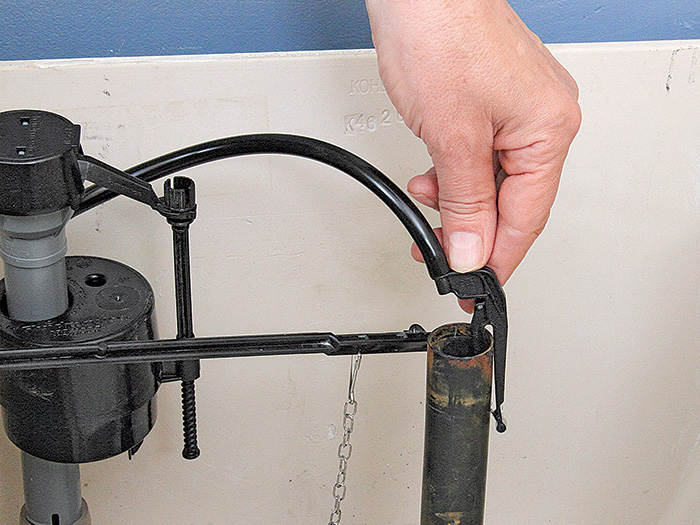
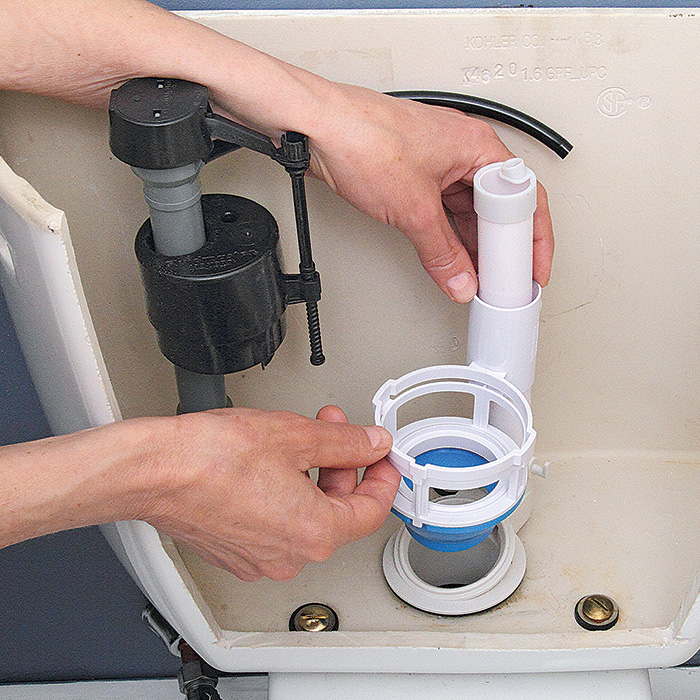
2. REMOVE THE OLD VALVE. Disconnect the water inlet (a thin rubber tube) from the overflow tube; it is usually attached via a clip that you just pull off. Lift the old fill valve assembly up and out. (Yours may look different from this, and may have only one tube rather than a tube plus a water inlet, but it probably removes in the same way.)


CHECK THE OVERFLOW HEIGHT
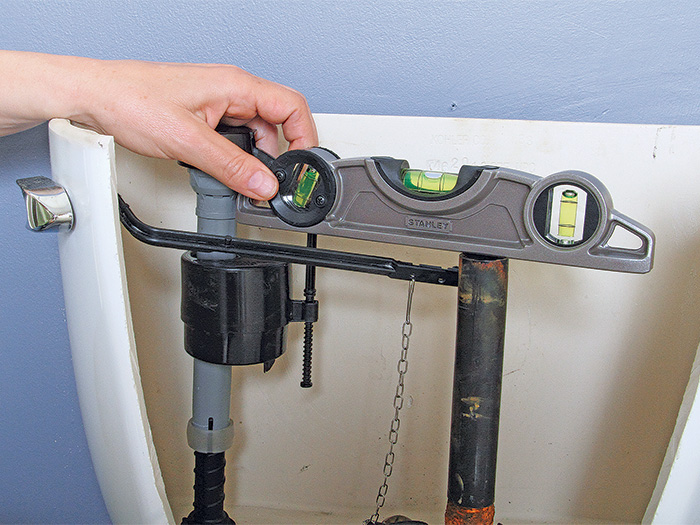
3. CHECK THE OVERFLOW HEIGHT. Use a small level to see that the top of the overflow tube is about 1 in. below the handle’s hole.


check that the critical level mark
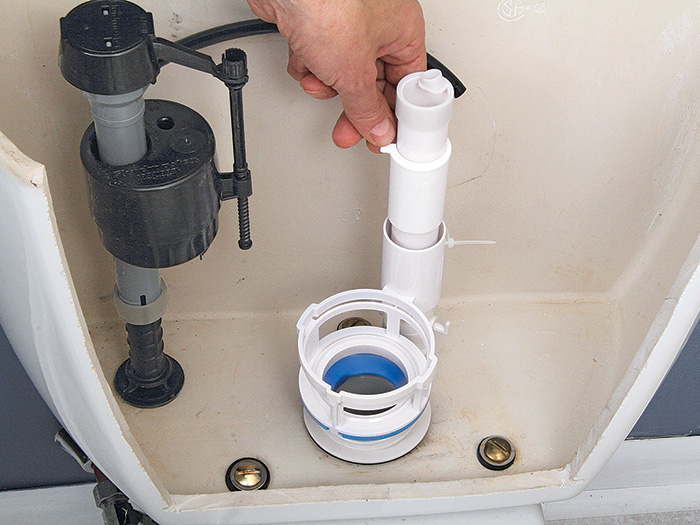
4. ADJUST THE HEIGHT OF THE FLOAT. Set the new fill valve in the hole, but do not attach it yet. Use a level to check that the critical level mark (usually “CL”) on the float is 1 in. below the top of the overflow tube. This will ensure that water rises to 1⁄2 in. below the top of the overflow tube.
twist the valve’s shank
If the float needs to be adjusted, twist the valve’s shank to move it up or down.


a rubber washer
5. MOUNT THE VALVE. Once the cup height is secure, slip a rubber washer, positioned as shown, onto the valve’s threads.
Slip the valve into the hole
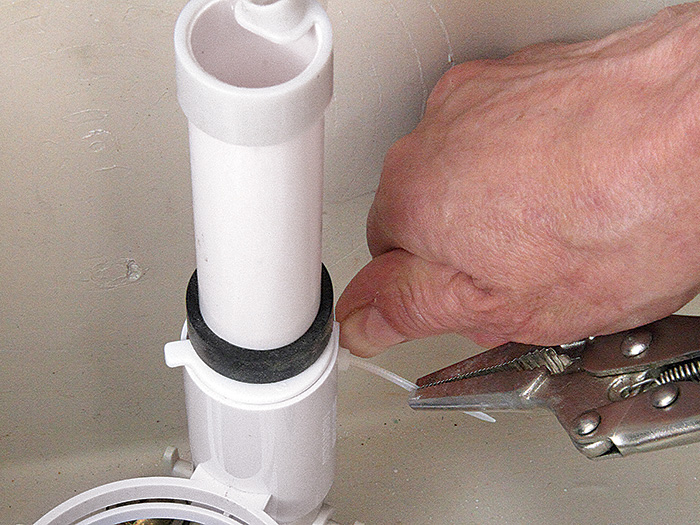
Slip the valve into the hole in the tank and tighten the mounting nut under the tank.


Clip the water inlet
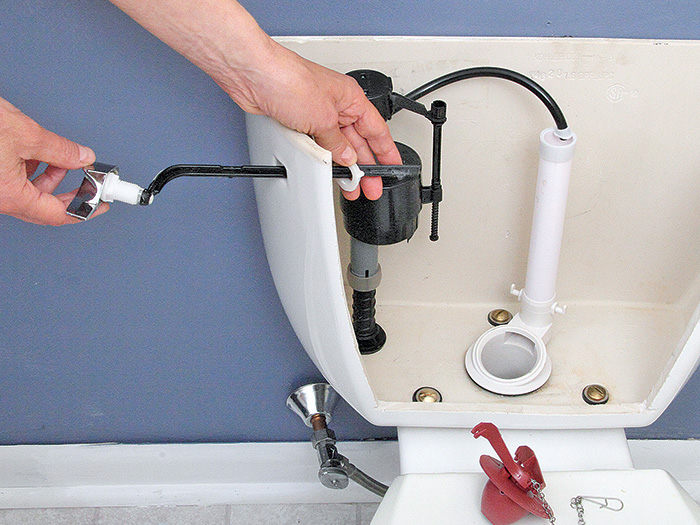
6. HOOK UP THE WATER SUPPLY. Clip the water inlet so it will shoot into the overflow tube.
give it another quarter turn with pliers
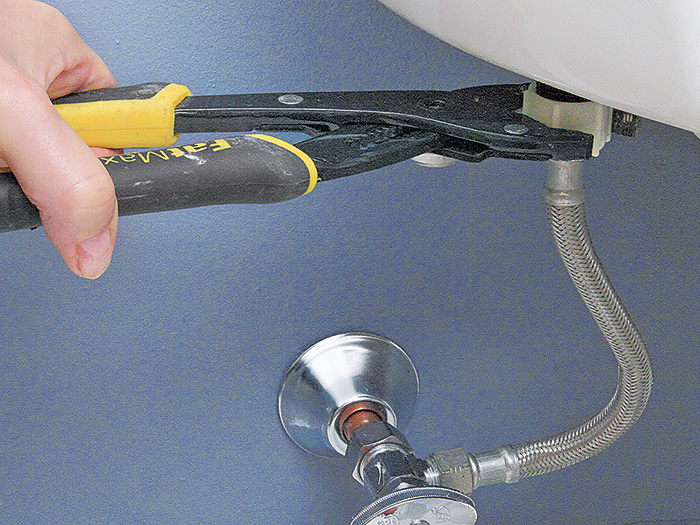
Attach the supply tube under the tank: Hand-tightening may be tight enough, but you can give it another quarter turn with pliers to be sure. Turn on the water, and test to make sure the water rises to the right level and that the unit flushes smoothly.
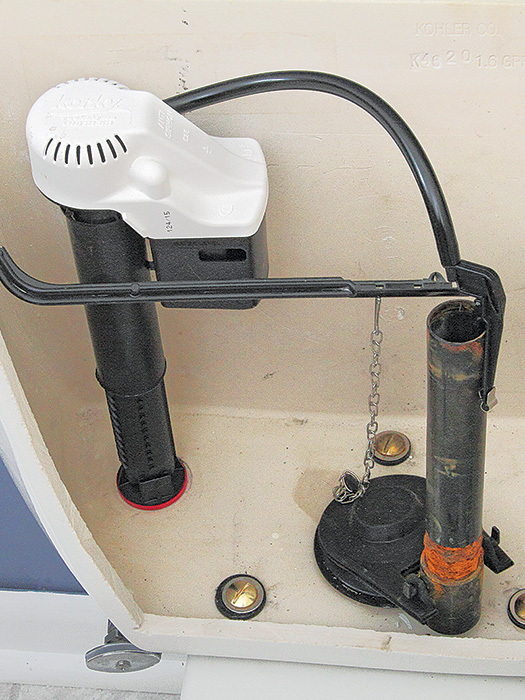
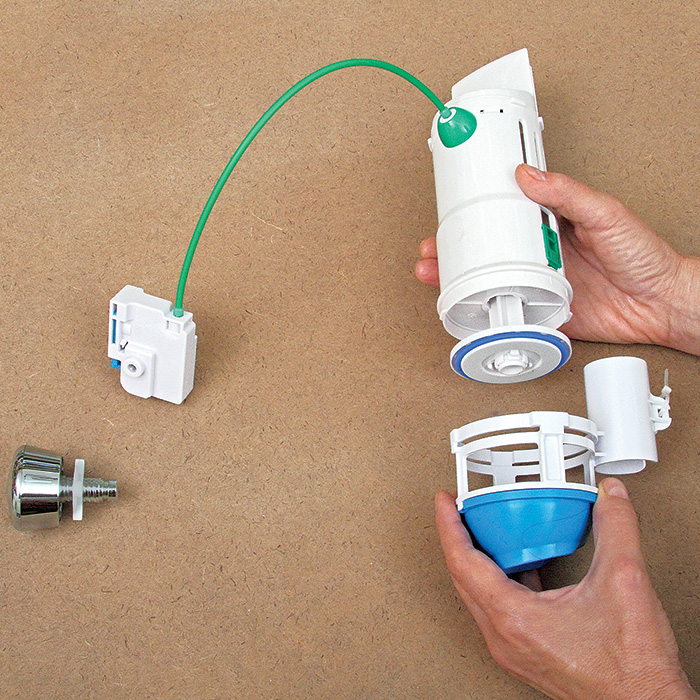
Dual-Flush Valve

A dual-flush toilet saves water by offering two flush levels: a small flush of about 1 gal. for liquid only and a more forceful flush of 1.2 gal. to 1.6 gal. for solids. You can replace your existing toilet with one that has a dual-flush feature, or you can save money and effort by retrofitting your current toilet with a dual-flush valve. These valves are now widely available at hardware stores and home centers.


TIP: The unit shown here is installed at the overflow tube only. Some kits also include a replacement for your fill valve.


REMOVE the HANDLE AND FLAPPER
1. REMOVE the HANDLE AND FLAPPER. Shut off the water, flush, and sponge out the remaining water from the tank. Remove the existing handle and flapper.


Disassemble the new valve
2. DISASSEMBLE AND BEGIN INSTALLATION. Disassemble the new valve and slide its lower part down over the overflow tube.


rubber flange that fits into the flush valve seat
It has a rubber flange that fits into the flush valve seat at the bottom of the overflow tube.


slip a plastic cam lock down
3. TIGHTEN THE VALVE. To hold the lower part of the valve in place, slip a plastic cam lock down onto it.
tighten the zip tie
Then slide down a rubber washer and tighten the zip tie.


ATTACH THE REST OF THE VALVE
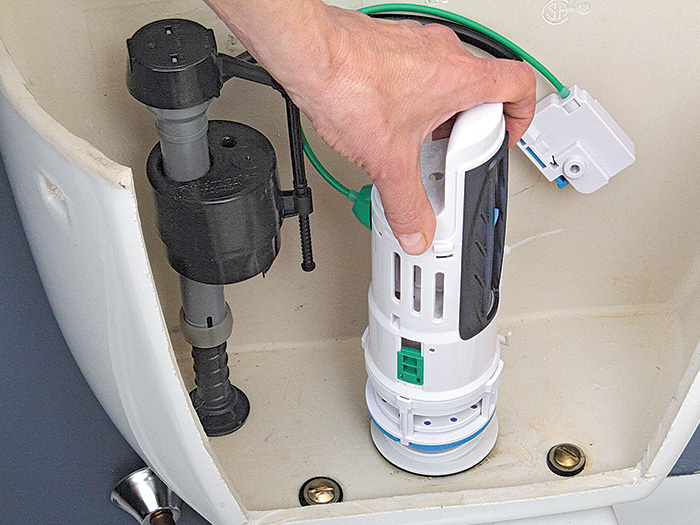
4. ATTACH THE REST OF THE VALVE. Reassemble the new valve: Place its main body on top, press down, and rotate until it clicks into place.


INSTALL THE NEW BUTTON
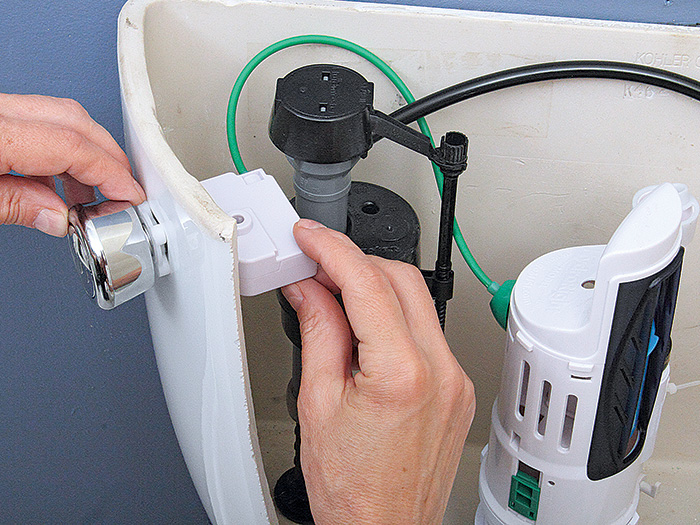
5. INSTALL THE NEW BUTTON. Attach the new handle (or in our case, control button) into the handle’s hole, and tighten a plastic nut (counterclockwise) to secure it. Thread the control wire around so it doesn’t interfere with the fill valve’s water inlet, and slip the control unit onto the handle, pressing until it clicks into place.


ADJUST FLUSH FORCES
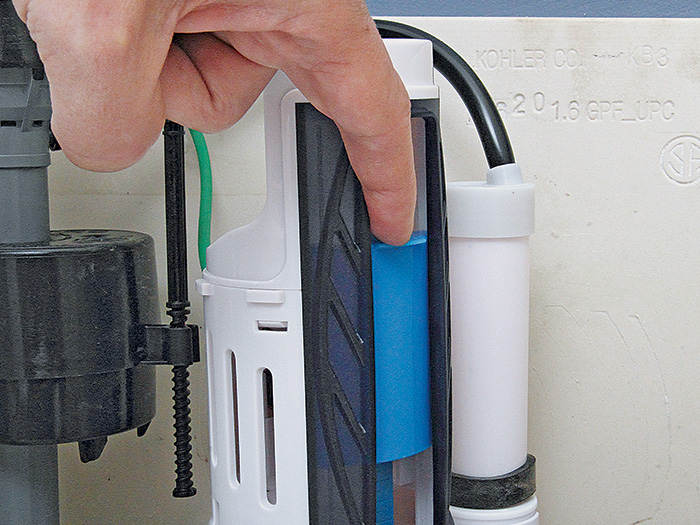
6. ADJUST FLUSH FORCES. Clip the water inlet into the top of the fill valve. Test the flushes. If you want flushes to be stronger, or to use less water, you can make the adjustments for both types of flushes by simple moving an adjustment bar up or down.


TWO BUTTON FLUSHING
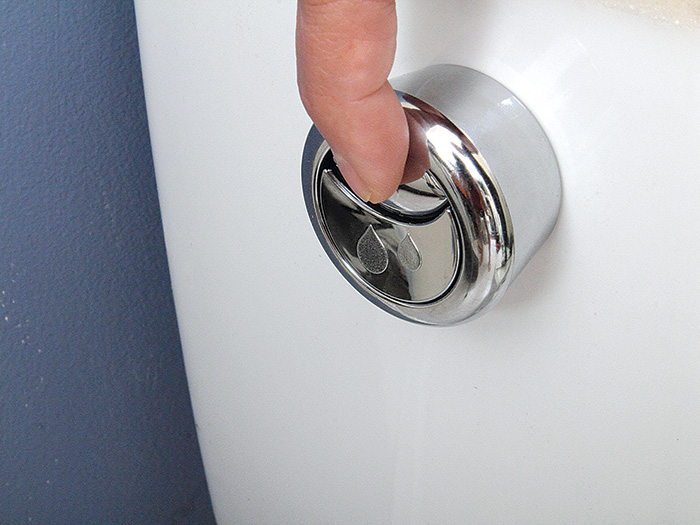
TWO BUTTONS. The new control has two buttons, one for a weak flush and one for a more powerful flush.


TIP: If the existing flush valve seat is not compatible with the dual-flush valve, you will need to replace it with one that is compatible.


Excerpted from Plumbing (The Taunton Press, 2016) by Steve Cory.

Previous: How to Fix a Running Toilet Next: Replacing the Toilet-Tank Gasket and Overflow Pipe

Guide

Plumbing

Chapter

Maintenance and Repair

Sign up for eletters today and get the latest how-to from Fine Homebuilding, plus special offers.

Signing you up...

This site is protected by reCAPTCHA and the Google Privacy Policy and Terms of Service apply.
See all newsletters
See all newsletters

Log in or create an account to post a comment.

Sign up Log in

Become a member and get full access to FineHomebuilding.com

Plumbing

Plumbing

Trusted, comprehensive guidance from the pros for tackling any plumbing project

View Project Guide

View All Project Guides »

Become a member and get unlimited site access, including the Plumbing Project Guide.

Start Free Trial

Plumbing Basics
  • Plumbing Systems
  • Materials
  • Plumbing Tools
Bathrooms
  • Sinks
  • Showers & Tubs
  • Toilets
Kitchens
  • Kitchen Sinks
  • Water Filtration
  • Appliances
Roughing In
  • Layout
  • Installation
  • Copper Pipe
  • PEX Tubing
  • PVC Drainpipe
Water Heaters, Washers, and More
  • Water Heaters
  • Whole-House Filters
  • Sump Pumps
  • Washers
  • Sprinkler Systems
Maintenance and Repair
  • Sinks
  • Toilets
  • Showers & Tubs
  • Systems

Fine Home Building

Newsletter Sign-up

  • Fine Homebuilding

    Home building tips, offers, and expert advice in your inbox.

  • Green Building Advisor

    Building science and energy efficiency advice, plus special offers, in your inbox.

  • Old House Journal

    Repair, renovation, and restoration tips, plus special offers, in your inbox.

Signing you up...

This site is protected by reCAPTCHA and the Google Privacy Policy and Terms of Service apply.
See all newsletters

Follow

  • Fine Homebuilding

    Dig into cutting-edge approaches and decades of proven solutions with total access to our experts and tradespeople.

    Start Free Trial Now
    • Facebook
    • Instagram
    • X
    • LinkedIn
  • GBA Prime

    Get instant access to the latest developments in green building, research, and reports from the field.

    Start Free Trial Now
    • Facebook
    • YouTube
  • Old House Journal

    Learn how to restore, repair, update, and decorate your home.

    Subscribe Now
    • Facebook
    • Instagram
    • X

Membership & Magazine

  • Online Archive
  • Start Free Trial
  • Magazine Subscription
  • Magazine Renewal
  • Gift a Subscription
  • Customer Support
  • Privacy Preferences
  • About
  • Contact
  • Advertise
  • Careers
  • Terms of Use
  • Site Map
  • Do not sell or share my information
  • Privacy Policy
  • Accessibility
  • California Privacy Rights

© 2025 Active Interest Media. All rights reserved.

Fine Homebuilding receives a commission for items purchased through links on this site, including Amazon Associates and other affiliate advertising programs.

  • Home Group
  • Antique Trader
  • Arts & Crafts Homes
  • Bank Note Reporter
  • Cabin Life
  • Cuisine at Home
  • Fine Gardening
  • Fine Woodworking
  • Green Building Advisor
  • Garden Gate
  • Horticulture
  • Keep Craft Alive
  • Log Home Living
  • Military Trader/Vehicles
  • Numismatic News
  • Numismaster
  • Old Cars Weekly
  • Old House Journal
  • Period Homes
  • Popular Woodworking
  • Script
  • ShopNotes
  • Sports Collectors Digest
  • Threads
  • Timber Home Living
  • Traditional Building
  • Woodsmith
  • World Coin News
  • Writer's Digest
Active Interest Media logo
X
X
This is a dialog window which overlays the main content of the page. The modal window is a 'site map' of the most critical areas of the site. Pressing the Escape (ESC) button will close the modal and bring you back to where you were on the page.

Main Menu

  • How-To
  • Design
  • Tools & Materials
  • Video
  • Blogs
  • Forum
  • Project Guides
  • Reader Projects
  • Magazine
  • Members
  • FHB House

Podcasts

  • FHB Podcast
  • ProTalk

Webinars

  • Upcoming and On-Demand

Podcasts

  • FHB Podcast
  • ProTalk

Webinars

  • Upcoming and On-Demand

Popular Topics

  • Kitchens
  • Business
  • Bedrooms
  • Roofs
  • Architecture and Design
  • Green Building
  • Decks
  • Framing
  • Safety
  • Remodeling
  • Bathrooms
  • Windows
  • Tilework
  • Ceilings
  • HVAC

Magazine

  • Current Issue
  • Past Issues
  • Magazine Index
  • Subscribe
  • Online Archive
  • Author Guidelines

All Access

  • Member Home
  • Start Free Trial
  • Gift Membership

Online Learning

  • Courses
  • Project Guides
  • Reader Projects
  • Podcast

More

  • FHB Ambassadors
  • FHB House
  • Customer Support

Account

  • Log In
  • Join

Newsletter

Get home building tips, offers, and expert advice in your inbox

Signing you up...

This site is protected by reCAPTCHA and the Google Privacy Policy and Terms of Service apply.
See all newsletters
See all newsletters

Follow

  • X
  • YouTube
  • instagram
  • facebook
  • pinterest
  • Tiktok

Join All Access

Become a member and get instant access to thousands of videos, how-tos, tool reviews, and design features.

Start Your Free Trial

Subscribe

FHB Magazine

Start your subscription today and save up to 70%

Subscribe

You have 1 free article remaining.

Get complete site access, including thousands of videos, how-to tips, tool reviews, and design features.

Start your FREE trial

Already a member? Log in

We hope you’ve enjoyed your free articles. To keep reading, become a member today.

Get complete site access to expert advice, how-to videos, Code Check, and more, plus the print magazine.

Start your FREE trial

Already a member? Log in

Privacy Policy Update

We use cookies, pixels, script and other tracking technologies to analyze and improve our service, to improve and personalize content, and for advertising to you. We also share information about your use of our site with third-party social media, advertising and analytics partners. You can view our Privacy Policy here and our Terms of Use here.

Cookies

Analytics

These cookies help us track site metrics to improve our sites and provide a better user experience.

Advertising/Social Media

These cookies are used to serve advertisements aligned with your interests.

Essential

These cookies are required to provide basic functions like page navigation and access to secure areas of the website.

Delete My Data

Delete all cookies and associated data