FHB Logo Facebook LinkedIn Email Pinterest Twitter X Instagram Tiktok YouTube Plus Icon Close Icon Navigation Search Icon Navigation Search Icon Arrow Down Icon Video Guide Icon Article Guide Icon Modal Close Icon Guide Search Icon Skip to content
Subscribe
Log In
  • How-To
  • Design
  • Tools & Materials
  • Restoration
  • Videos
  • Blogs
  • Forum
  • Magazine
  • Members
  • FHB House
  • Podcast
Log In

Fine Homebuilding Project Guides

Plumbing

Guide Home
  • Plumbing Basics
  • Bathrooms
  • Kitchens
  • Roughing In
  • Water Heaters, Washers, and More
  • Maintenance and Repair
How-To

How to Install a Tankless Water Heater

Pluses of an on-demand water heater include endless hot water and a compact design, but the ­installation means a lot of pipes in a small space.

By Tom Cardillo Issue 276 - July 2018
  • X
  • facebook
  • linkedin
  • pinterest
  • email
  • add to favorites Log in or Sign up to save your favorite articles
This tankless water heater has hose clamps for connecting the combustion-air and flue-gas piping to the top of the water heater.

Synopsis: Plumbing and heating contractor Tom Cardillo explains the process of installing an on-demand water heater, from sizing, to mounting and venting, to making all of the plumbing connections. The article includes the necessary wall-panel dimensions for mounting the heater, the different-diameter gas lines that may be needed depending on the heater’s size, and the length and diameter of the necessary vent and combustion-air piping. A sidebar includes a description of a condensate neutralizer and when it is needed to increase an on-demand water heater’s efficiency and to keep pipes safe from acidic water.


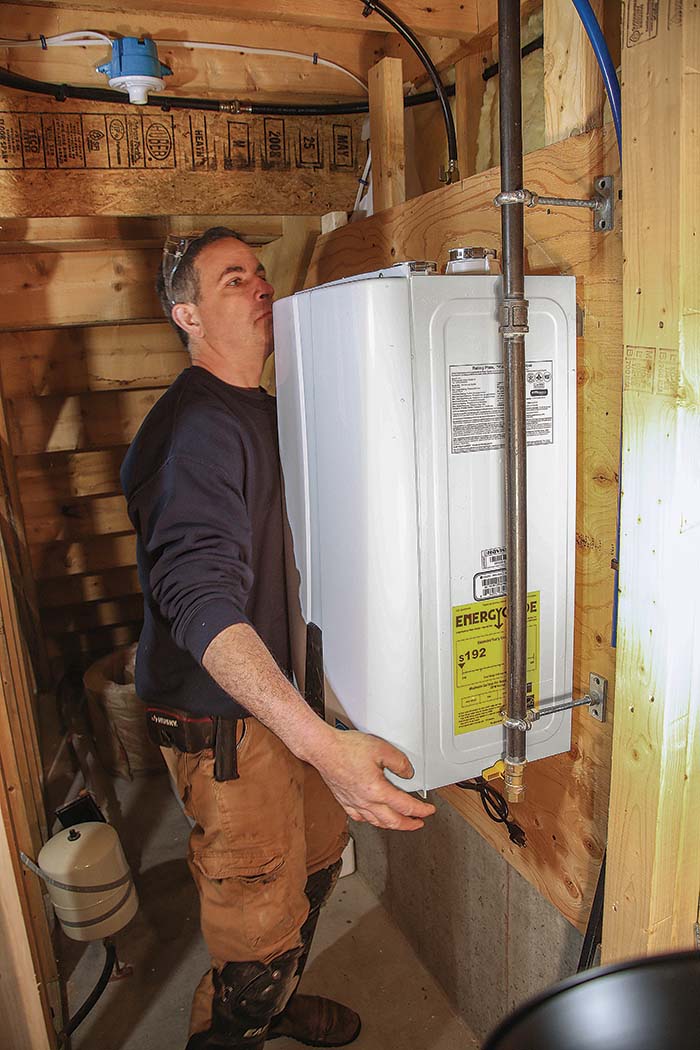
Promising endless hot water and taking up less space than a tank-type heater, a tankless water heater has a lot to like. Every year I install several for clients who are hoping for more hot water and savings on their energy bill. Unfortunately, switching from a tank-type water heater to an on-demand unit is not just a direct swap. You’ll need sufficient wall space for mounting the wall-hung heater, a different flue arrangement, and possibly a larger gas line. The installation means a lot of pipes in a small space, so it’s important to think through the layout, and work from the biggest pipes to the smallest.

How much heater do you need?

Before any installation, you have to size the water heater. My preference is to size the unit so there will be enough hot water, even if all of the hot-water fixtures and appliances are in use at the same time. To do this, I consider both the number of hot-water fixtures in the house and the temperature of the incoming water. Here in Rhode Island, we may have 40°F (or colder) incoming water during the winter. The Department of Energy suggests you should set your water heater at 120°F, so the temperature rise needed is 80° (40°+80°=120°).

The number of gallons per minute (GPM) that on-demand water heaters can produce goes down with a greater temperature rise, so you have to get a larger heater in colder climates than you would in warmer areas. Many manufacturers have size calculators on their websites that make it easier to match the right model to your particular situation. The water heater in this installation is a 19,000-Btu to 199,000-Btu model, which is normal for a house with three bathrooms.

A typical installation

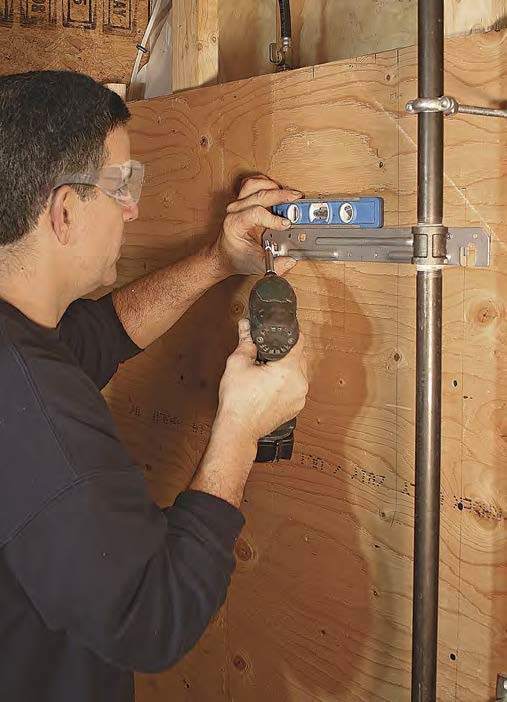
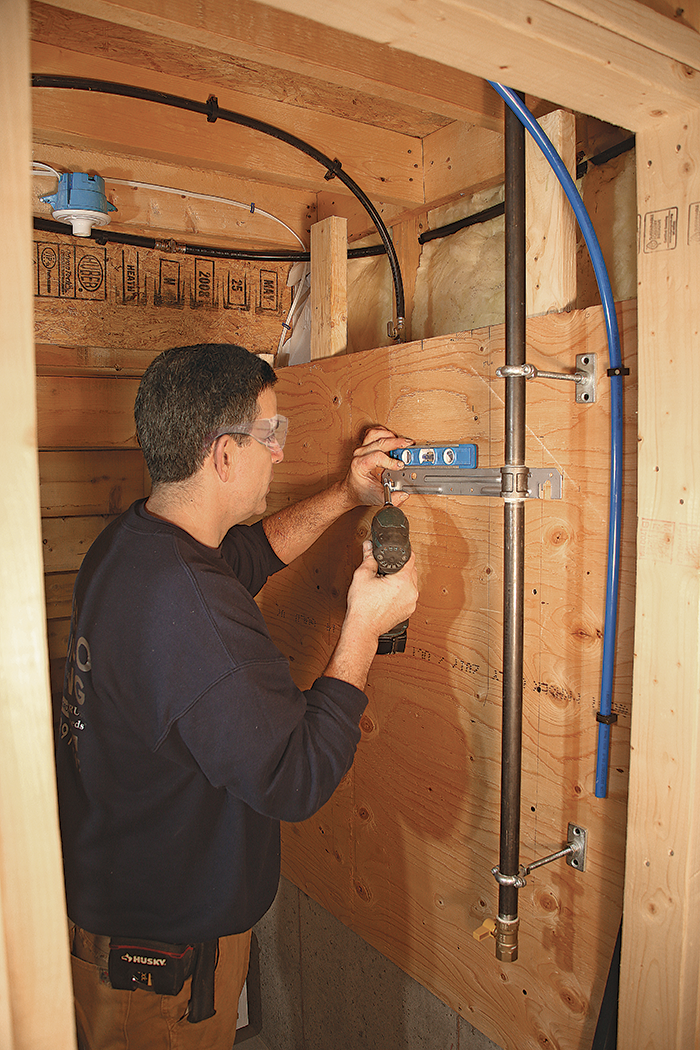
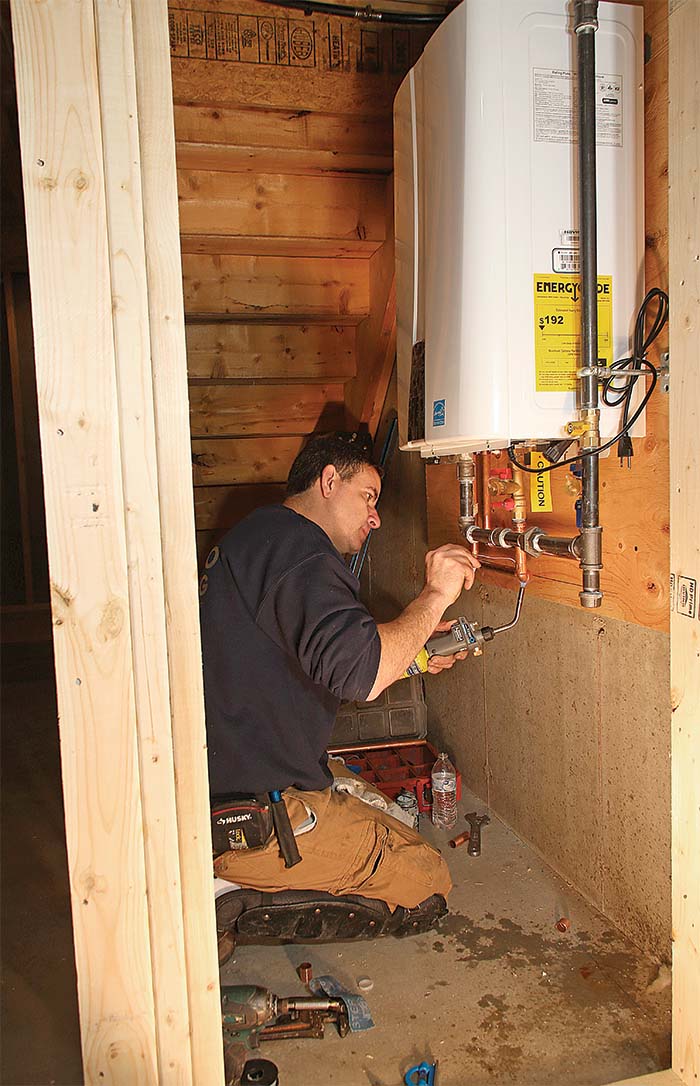
Tankless water heaters are fairly straightforward to install, but don’t assume you can do the job yourself. Doing your own installation may void your warranty, so first check with the manufacturer. Because these heaters are wall-mounted, you need a 3⁄4-in.-thick panel to mount them on. I center a 4-ft. by 4-ft. panel on the wall vertically, which leaves about 2 ft. above the panel for running the vent and combustion air pipes to the outside.

Depending on the size of the heater, the length of the piping, and the temperature rise, you may need a 3⁄4-in. gas line for the heater’s burner. This can add several hundred dollars to the cost of switching from a tank-type heater, which commonly has a 1⁄2-in. gas line. Early tankless on-demand heaters didn’t always need an electrical connection, but almost all modern ones need a nearby receptacle for the electronic controls and the heater’s internal blower. The electrical demands are low, so the Navien NPE model I generally install doesn’t require a dedicated circuit, but depending on the proximity to the nearest outlet, you may have to add a receptacle.

Finally, condensing tankless heaters need a way to deal with the condensate produced by the heater’s burner. If there isn’t a floor drain nearby, you have to pump the condensate. Adding a condensate pump increases the cost of the installation. I prefer pumps by Mars, which are quieter and longer-lasting than other brands I’ve tried. Also, the condensate produced by the burner is acidic, so you should use a condensate neutralizer to protect metal drain pipes (see sidebar p. 71).

Plan for venting

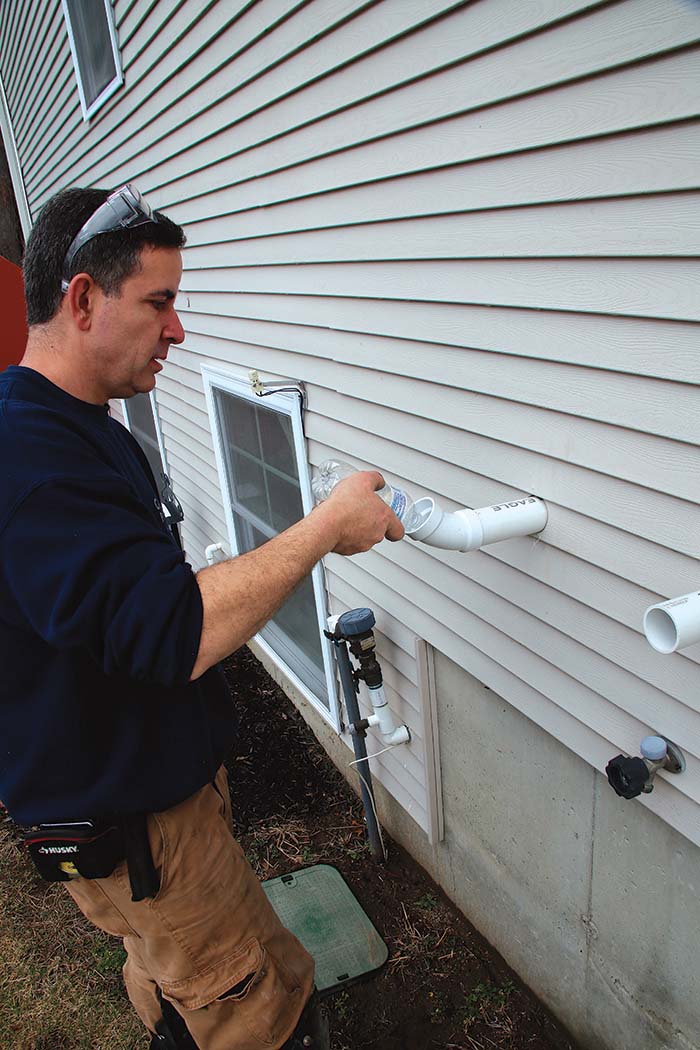
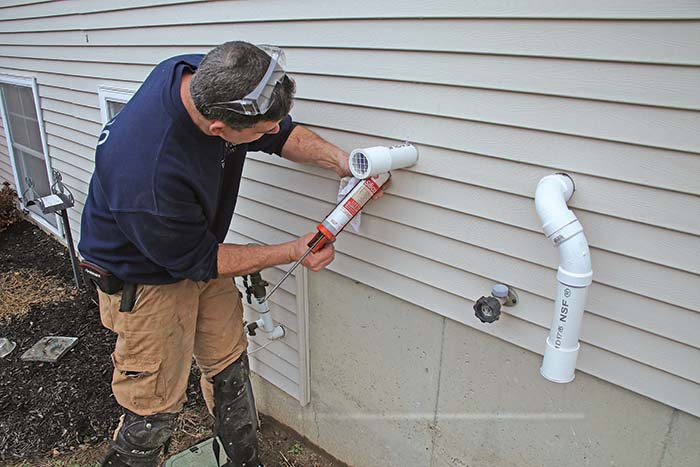
Modern condensing on-demand water heaters are designed to squeeze every possible Btu from the combustion process, so the exhaust gasses are cool compared to an atmospherically vented tank-type water heater or a non-condensing tankless model. Venting systems vary—some models use a single proprietary pipe for handling intake (combustion air) and exhaust (venting fumes), others use two separate proprietary pipes. The heater shown here is a two-pipe setup that uses solid-core PVC pipe. 

The diameter of the vent pipe depends on the length of the run and the number of elbows, so you have to check the manufacturer’s specs and plan the pipe routing before determining the size of the vent and combustion-air piping you’ll need. Generally speaking, the straighter and shorter the run, the smaller the pipe diameter required. When planning the route for the flue pipe, keep in mind that indirect vent setups you need to keep the pipe outlet at least 12 in. away from any operable door or window and at least 12 in. above grade. If your area experiences heavy snow, you have to move the intake and combustion piping higher so it doesn’t get buried in a blizzard. These codes can vary by region in the U.S. and are more stringent in Canada, so check with local code enforcement before moving forward with an installation.

Installing an on-demand water heater like the one shown here costs between $2800 and $3500, depending on the complexity of the job. My customers, who have two small children, really like how their new on-demand water heater keeps up with evening bath time, even while they’re simultaneously running the dishwasher and washing clothes.


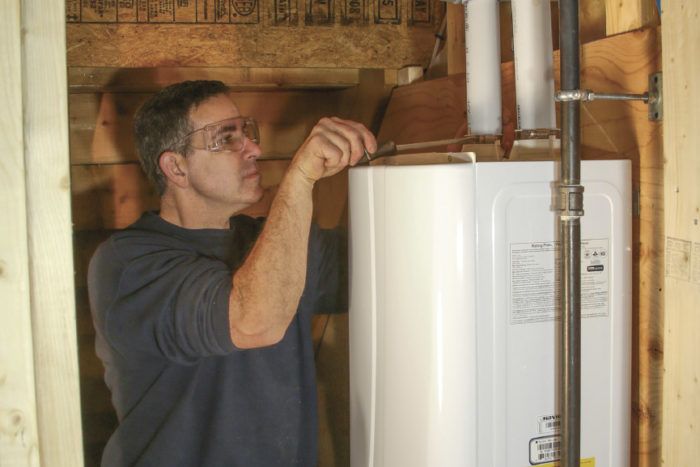
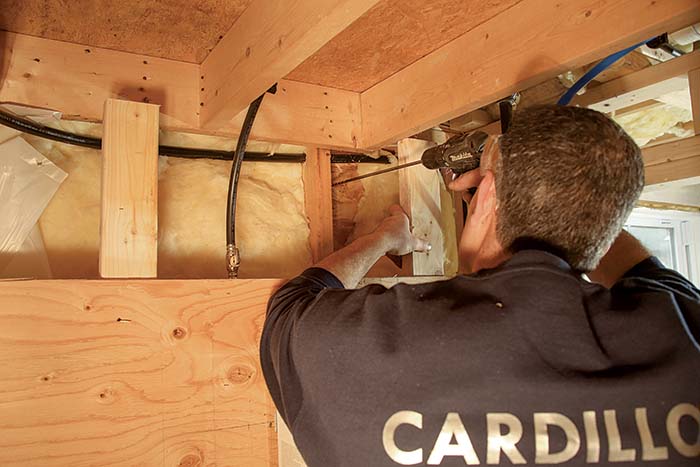
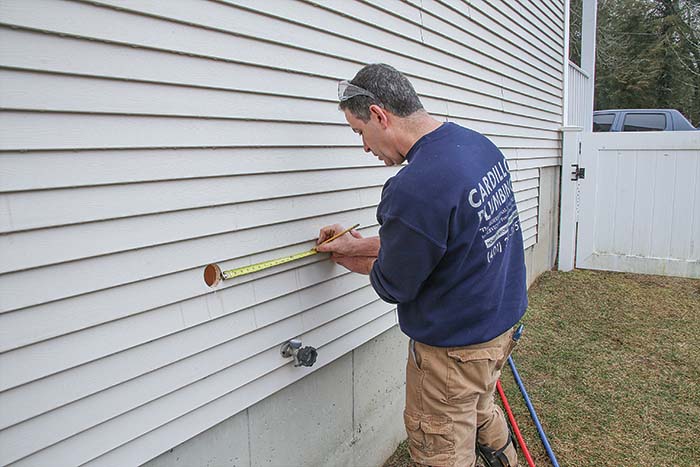
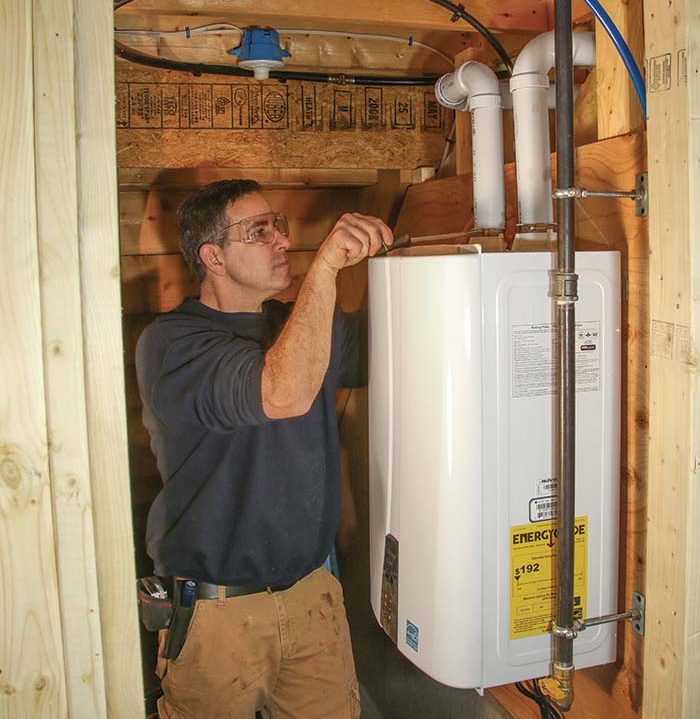
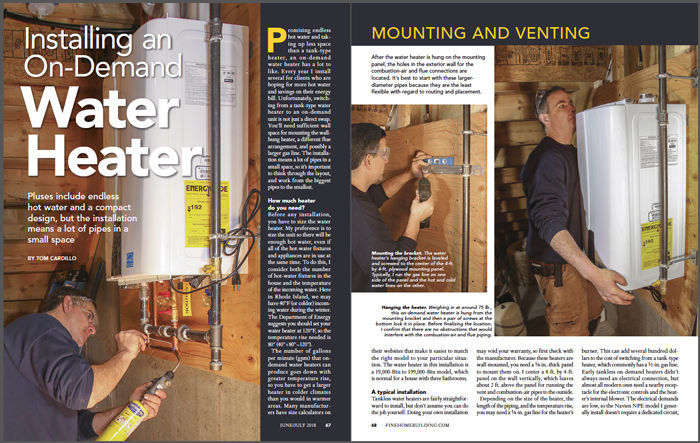
Mounting and Venting

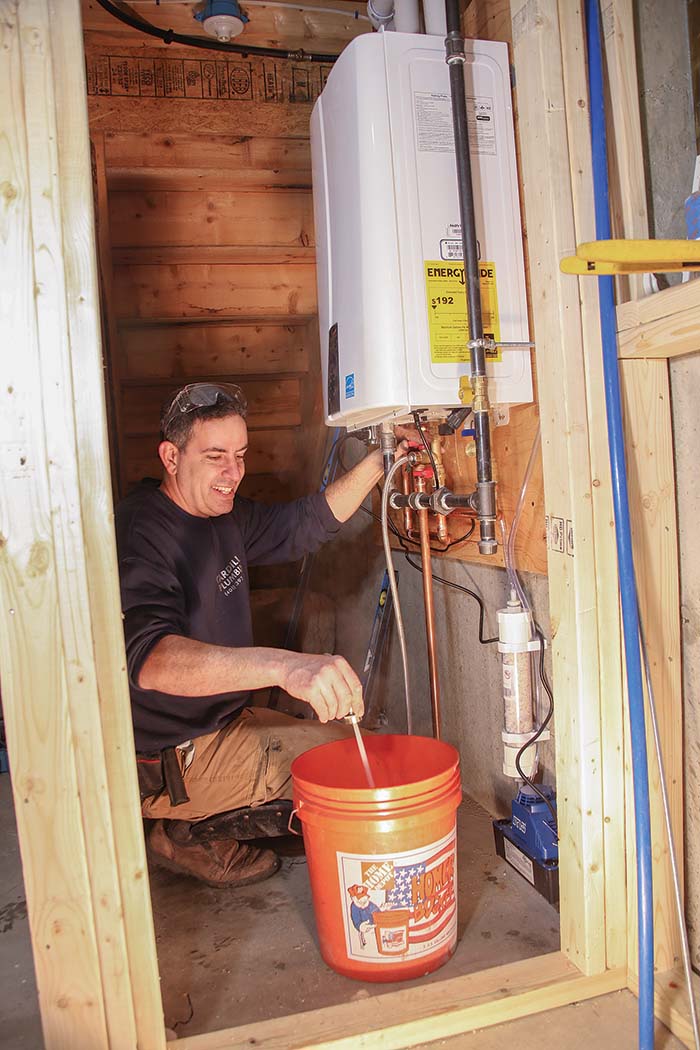
After the water heater is hung on the mounting panel, the holes in the exterior wall for the combustion-air and flue connections are located. It’s best to start with these larger-diameter pipes because they are the least flexible with regard to routing and placement.

Mounting the bracket.
Mounting the bracket. The water heater’s hanging bracket is leveled and screwed to the center of the 4-ft. by 4-ft. plywood mounting panel. Typically, I run the gas line on one side of the panel and the hot and cold water lines on the other.
Hanging the heater.
Hanging the heater. Weighing in at around 75 lb., this on-demand water heater is hung from the mounting bracket and then a pair of screws at the bottom lock it in place. Before finalizing the location, I confirm that there are no obstructions that would interfere with the combustion-air and flue piping.

Marking the pipe locations.
Marking the pipe locations. A pilot hole for the combustion-air pipe made with a 1⁄4-in.-dia., 12-in.-long bit transfers the interior location to the exterior. Once the small pilot hole is made, the larger holes can be drilled from the exterior using a hole saw.

Drilling the holes.
Drilling the holes. The first hole helps locate the second hole for combustion air.  Some water-heater makers offer a vent-termination kit that allows you to drill one larger hole for both pipes.

Cutting straight.
Cutting straight. Instead of a handsaw or a reciprocating saw, I prefer to use a 10-in. miter saw. The miter saw makes precise, perfectly straight cuts in seconds and it can easily trim a fraction of an inch when necessary.

Dry fit comes first.
Dry fit comes first. Once all the PVC pipe and fittings for the combustion-air and flue-gas piping have been fully dry fit, the connections are marked for easy reassembly. Then the parts are disassembled and glued together with PVC cement. I do one pipe at a time and then repeat the assembly process for the second pipe.

Tightening the clamps.
Tightening the clamps. This tankless water heater has hose clamps for connecting the combustion air and flue-gas piping to the top of the water heater. This style of connection allows the unit to be more easily removed in the future, if necessary.

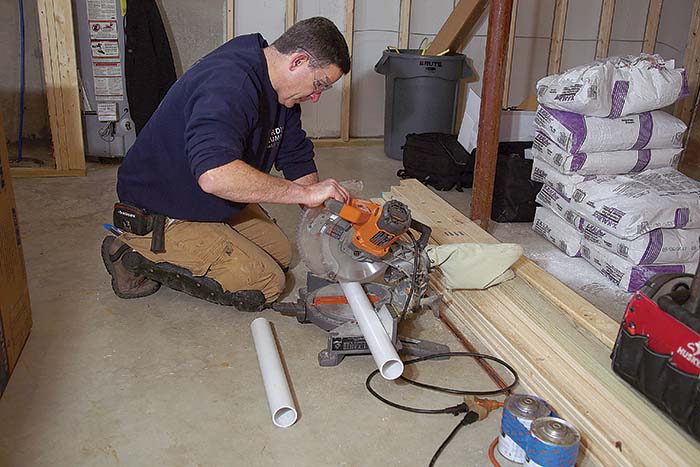
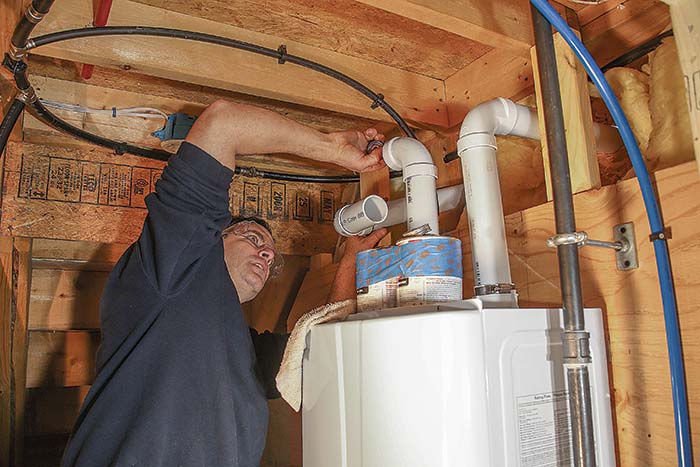
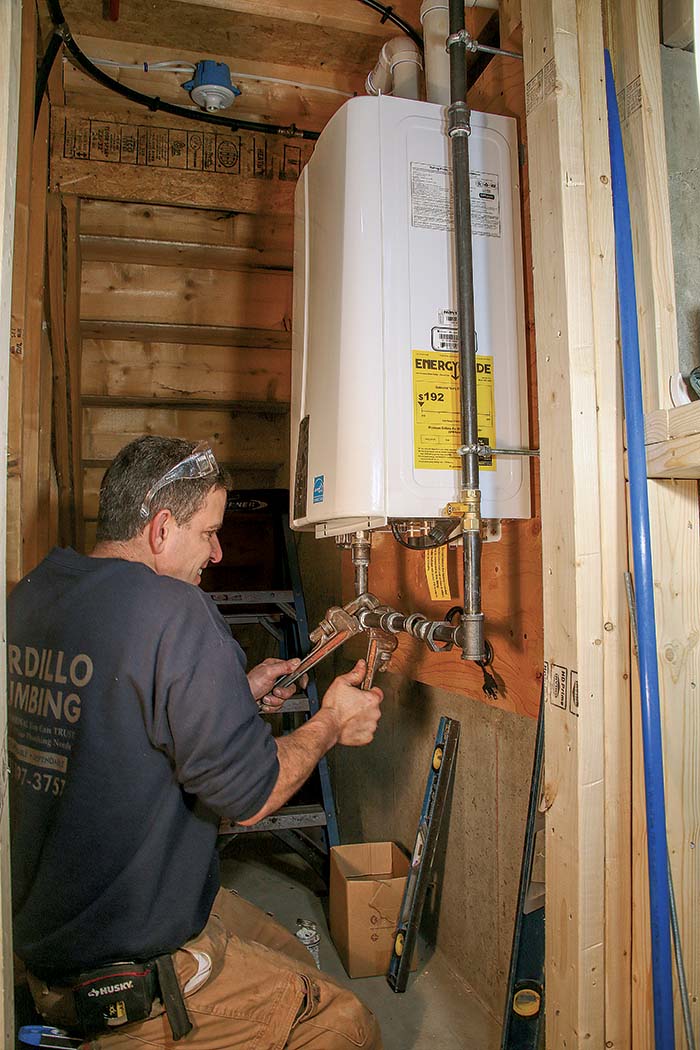
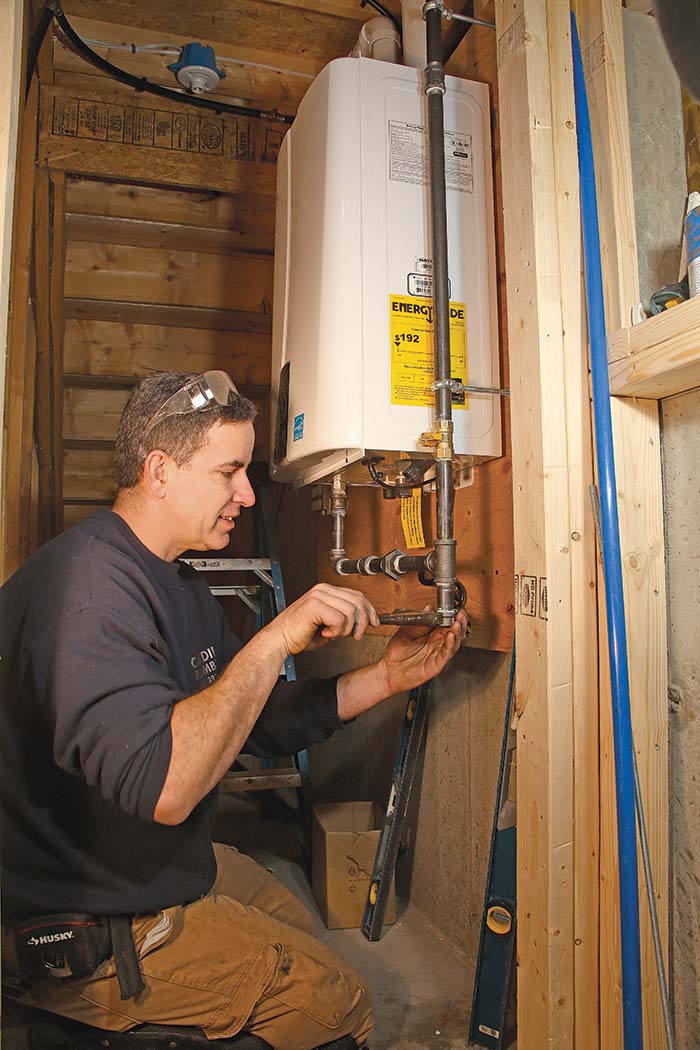
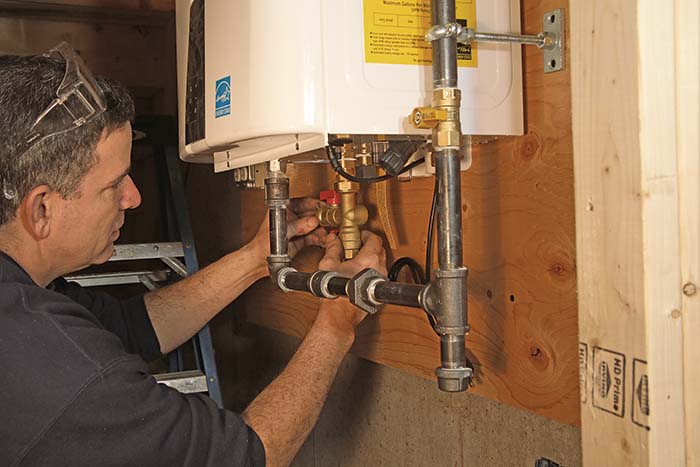
Connections, from big to small

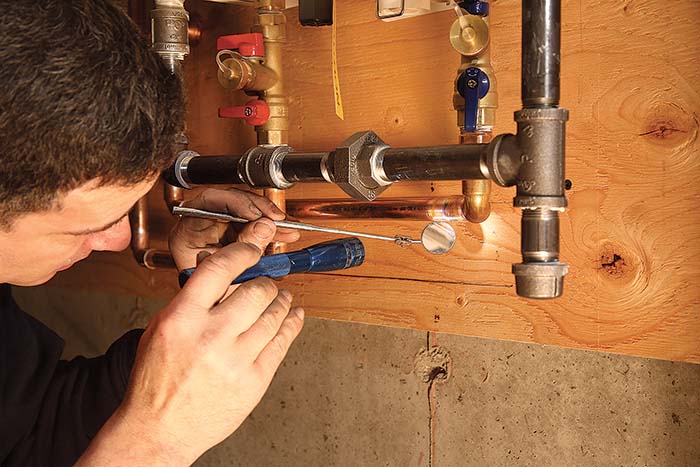
Once the PVC combustion air and flue piping are roughed in, the gas line is run next, followed by the cold- and hot-water piping. The gas piping in this installation is steel, but you can also use corrugated stainless-steel tubing (CSST). The water lines are 3⁄4-in. L–type copper, but PEX is also acceptable.

Gas connection.
Gas connection. The water heater’s gas inlet is connected to the gas supply with a coupling, a short length of pipe, a 90° elbow, and a union. The union allows you to join two pipes running from opposite directions and allows the heater to be more easily removed.

Sediment trap for debris.
Sediment trap for debris. Many local codes require a drip leg, or sediment trap, close to the heater’s gas inlet and downstream of the shutoff. The gas flow must change direction at the trap, allowing debris to fall out of the gas stream into the trap.
Service valves to start.
Service valves to start. Service valves on both the hot and cold sides of the water heater include shutoffs and hose connections. The valves and hose connections allow the unit to be descaled.
Water-pipe connections
Water-pipe connections. The hot and cold sides of the water heater are connected to the house’s domestic water system with 3⁄4-in. copper tubing. I always check the solder joints on all sides to ensure there won’t be leaks when the water is turned on.

Water-pipe connections

Installing the relief valve
Installing the relief valve. Like conventional units, tankless water heaters require temperature and pressure (T&P) relief valves to relieve pressure in the case of a malfunction. Some have dedicated T&P outlets; this one screw onto the hot service valve.


filling the trap
Filling the trap. There’s a condensate trap within the heater that on some units must be filled with water before starting the unit. A small amount of water is poured into the flue-gas piping and then the combustion-air and flue-gas piping is fitted with elbows and screens to keep out rain and pests.
sealing pipe
The deal is sealed. With the exterior pipe connections complete, the gap between the pipes and the siding is filled with silicone sealant.


condensate pump
Time to test. The condensate pump, the condensate neutralizer, and all the piping connections are complete, so it’s time to plug in the water heater for a test. Unlike a tank-type heater, an on-demand water heater should start making hot water almost immediately.

                                                                                        From Fine Homebuilding #276

To view the entire article, please click the View PDF button below.

View PDF
Previous: How a Tankless Water Heater Works Next: Tankless Water Heater Installation Quirks and Tips

Guide

Plumbing

Chapter

Water Heaters, Washers, and More

Sign up for eletters today and get the latest how-to from Fine Homebuilding, plus special offers.

Signing you up...

This site is protected by reCAPTCHA and the Google Privacy Policy and Terms of Service apply.
See all newsletters
See all newsletters

Log in or create an account to post a comment.

Sign up Log in

Become a member and get full access to FineHomebuilding.com

Plumbing

Plumbing

Trusted, comprehensive guidance from the pros for tackling any plumbing project

View Project Guide

View All Project Guides »

Become a member and get unlimited site access, including the Plumbing Project Guide.

Start Free Trial

Plumbing Basics
  • Plumbing Systems
  • Materials
  • Plumbing Tools
Bathrooms
  • Sinks
  • Showers & Tubs
  • Toilets
Kitchens
  • Kitchen Sinks
  • Water Filtration
  • Appliances
Roughing In
  • Layout
  • Installation
  • Copper Pipe
  • PEX Tubing
  • PVC Drainpipe
Water Heaters, Washers, and More
  • Water Heaters
  • Whole-House Filters
  • Sump Pumps
  • Washers
  • Sprinkler Systems
Maintenance and Repair
  • Sinks
  • Toilets
  • Showers & Tubs
  • Systems

Fine Home Building

Newsletter Sign-up

  • Fine Homebuilding

    Home building tips, offers, and expert advice in your inbox.

  • Green Building Advisor

    Building science and energy efficiency advice, plus special offers, in your inbox.

  • Old House Journal

    Repair, renovation, and restoration tips, plus special offers, in your inbox.

Signing you up...

This site is protected by reCAPTCHA and the Google Privacy Policy and Terms of Service apply.
See all newsletters

Follow

  • Fine Homebuilding

    Dig into cutting-edge approaches and decades of proven solutions with total access to our experts and tradespeople.

    Start Free Trial Now
    • Facebook
    • Instagram
    • X
    • LinkedIn
  • GBA Prime

    Get instant access to the latest developments in green building, research, and reports from the field.

    Start Free Trial Now
    • Facebook
    • YouTube
  • Old House Journal

    Learn how to restore, repair, update, and decorate your home.

    Subscribe Now
    • Facebook
    • Instagram
    • X

Membership & Magazine

  • Online Archive
  • Start Free Trial
  • Magazine Subscription
  • Magazine Renewal
  • Gift a Subscription
  • Customer Support
  • Privacy Preferences
  • About
  • Contact
  • Advertise
  • Careers
  • Terms of Use
  • Site Map
  • Do not sell or share my information
  • Privacy Policy
  • Accessibility
  • California Privacy Rights

© 2025 Active Interest Media. All rights reserved.

Fine Homebuilding receives a commission for items purchased through links on this site, including Amazon Associates and other affiliate advertising programs.

  • Home Group
  • Antique Trader
  • Arts & Crafts Homes
  • Bank Note Reporter
  • Cabin Life
  • Cuisine at Home
  • Fine Gardening
  • Fine Woodworking
  • Green Building Advisor
  • Garden Gate
  • Horticulture
  • Keep Craft Alive
  • Log Home Living
  • Military Trader/Vehicles
  • Numismatic News
  • Numismaster
  • Old Cars Weekly
  • Old House Journal
  • Period Homes
  • Popular Woodworking
  • Script
  • ShopNotes
  • Sports Collectors Digest
  • Threads
  • Timber Home Living
  • Traditional Building
  • Woodsmith
  • World Coin News
  • Writer's Digest
Active Interest Media logo
X
X
This is a dialog window which overlays the main content of the page. The modal window is a 'site map' of the most critical areas of the site. Pressing the Escape (ESC) button will close the modal and bring you back to where you were on the page.

Main Menu

  • How-To
  • Design
  • Tools & Materials
  • Video
  • Blogs
  • Forum
  • Project Guides
  • Reader Projects
  • Magazine
  • Members
  • FHB House

Podcasts

  • FHB Podcast
  • ProTalk

Webinars

  • Upcoming and On-Demand

Podcasts

  • FHB Podcast
  • ProTalk

Webinars

  • Upcoming and On-Demand

Popular Topics

  • Kitchens
  • Business
  • Bedrooms
  • Roofs
  • Architecture and Design
  • Green Building
  • Decks
  • Framing
  • Safety
  • Remodeling
  • Bathrooms
  • Windows
  • Tilework
  • Ceilings
  • HVAC

Magazine

  • Current Issue
  • Past Issues
  • Magazine Index
  • Subscribe
  • Online Archive
  • Author Guidelines

All Access

  • Member Home
  • Start Free Trial
  • Gift Membership

Online Learning

  • Courses
  • Project Guides
  • Reader Projects
  • Podcast

More

  • FHB Ambassadors
  • FHB House
  • Customer Support

Account

  • Log In
  • Join

Newsletter

Get home building tips, offers, and expert advice in your inbox

Signing you up...

This site is protected by reCAPTCHA and the Google Privacy Policy and Terms of Service apply.
See all newsletters
See all newsletters

Follow

  • X
  • YouTube
  • instagram
  • facebook
  • pinterest
  • Tiktok

Join All Access

Become a member and get instant access to thousands of videos, how-tos, tool reviews, and design features.

Start Your Free Trial

Subscribe

FHB Magazine

Start your subscription today and save up to 81%

Subscribe

You have 1 free article remaining.

Get complete site access, including thousands of videos, how-to tips, tool reviews, and design features.

Start your FREE trial

Already a member? Log in

We hope you’ve enjoyed your free articles. To keep reading, become a member today.

Get complete site access to expert advice, how-to videos, Code Check, and more, plus the print magazine.

Start your FREE trial

Already a member? Log in

Privacy Policy Update

We use cookies, pixels, script and other tracking technologies to analyze and improve our service, to improve and personalize content, and for advertising to you. We also share information about your use of our site with third-party social media, advertising and analytics partners. You can view our Privacy Policy here and our Terms of Use here.

Cookies

Analytics

These cookies help us track site metrics to improve our sites and provide a better user experience.

Advertising/Social Media

These cookies are used to serve advertisements aligned with your interests.

Essential

These cookies are required to provide basic functions like page navigation and access to secure areas of the website.

Delete My Data

Delete all cookies and associated data