Shutoff Valve That Won’t Shut Off
Take the opportunity to upgrade to a frostproof hose bib and eliminate the need for that shutoff.

I bought a 50s-era house in upstate New York that has a hose bib mounted to the foundation outside, and a shutoff valve in the basement. When I set about preparing the house for winter, I realized the shutoff is busted. No matter how much I crank, it won’t shut off. I know I have to do something to remedy the situation or my copper pipes might burst and flood the basement. I’d like to fix it myself, but my plumbing experience is, well, nonexistent. Do I have any options?
—Todd Evans, via email
Matthew Millham: If you want to kick the can down the road a bit, you can cut the copper supply line to the existing hose bib and terminate it with a push-fit end-cap fitting (as the name implies, the fitting connects to the pipe by simply pushing it on). This will isolate the rest of the plumbing system from the outside and prevent a frost-induced flood—but it won’t help when you want to water your spring flowers or wash the dog.
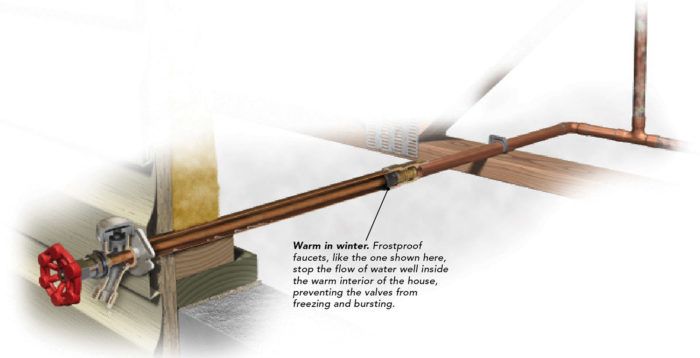
A better option is to take this opportunity to upgrade to a frostproof hose bib and eliminate the need for that shutoff. Frostproof hose bibs are designed to control the flow of water with a valve well inside the warmth of the house’s interior, where it is safe from the freezing temperatures that led to your problem in the first place.
To do the work, you’ll need a new frostproof hose bib, a copper-tubing cutter, a reamer or something else to deburr the copper after you cut it, and silicone caulk. It doesn’t sound like you have a plumbing torch or have experience with soldering, but that’s ok—hose bibs are also available with push-fit connectors.
Once you’ve got those things, find the main water-shutoff valve and close it. With any luck, that one still works. Then get a bucket, open the drain plug on the broken shutoff valve or somewhere else downstream of it, and catch the water that drains out.
Cut the hose bib’s supply line close to the foundation wall, then go outside and remove the old hose bib from the wall. Insert the new hose bib through the same hole (you might need a helper to hold the supply line out of the way so you don’t bump into it), but don’t fasten it. Go back inside, make sure the hose bib is in as far as it will go, and mark its end on the copper supply line. Don’t cut at that mark—you need to leave a little extra pipe so that it goes all the way into the fitting on the end of the hose bib. How much extra depends on the brand of the fitting and the size of the supply line. SharkBite is one of the more common brands of push fittings, and a 1/2-in. supply line goes nearly 1 in. into the fitting before it’s seated. Determine the length you need for a proper connection from the manufacturer, and mark it on the pipe (this line should be closer to the foundation wall than the original mark).
Cut the pipe square at your new mark and deburr it. A reamer works best for deburring, but you can use emery cloth or sandpaper as long as you’re careful not to scuff the pipe’s interior or exterior surfaces. Everything must be smooth to get a good seal and to prevent damage to the fitting.
Depending on how much play you have in the plumbing, you might at this point be able to connect the hose bib to the supply line with the push fitting, and then go outside to finish it off. If there’s little to no play, go back outside, put a bead of silicone caulk around the edge of the hole for a good seal, insert the bib, and have a helper connect the fitting to the supply line. Then fasten the bib to the wall with screws, open the shutoff, and test the new hose bib. (Note: The bib must pitch to the outside to drain, and be disconnected from the hose in winter, or water can remain in the bib and freeze.)


