FHB Logo Facebook LinkedIn Email Pinterest Twitter X Instagram Tiktok YouTube Plus Icon Close Icon Navigation Search Icon Navigation Search Icon Arrow Down Icon Video Guide Icon Article Guide Icon Modal Close Icon Guide Search Icon Skip to content
Subscribe
Log In
  • How-To
  • Design
  • Tools & Materials
  • Restoration
  • Videos
  • Blogs
  • Forum
  • Magazine
  • Members
  • FHB House
  • Podcast
Log In

Fine Homebuilding Project Guides

Roofing

Guide Home
  • Tools and Materials
  • Roof Replacement and Reroofing
  • Roof Ventilation
  • Waterproofing
  • Installing Asphalt Shingles
  • Installing Other Types of Roofs
  • Roof Maintenance and Repair
How-To

Low-Risk Reroof

Roofing contractor Stephen Hazlett shares his reliable methods for protecting a house and managing job-site workflow to execute a high-quality roof replacement job.

By Stephen Hazlett Issue 188
  • X
  • facebook
  • linkedin
  • pinterest
  • email
  • add to favorites Log in or Sign up to save your favorite articles
Carry waste to the truck. If the driveway can accommodate a dump truck, carry shingles to it rather than pushing them off the roof onto a tarp. A crew member can switch between tearoff and cleanup.

Synopsis: Replacing the roof on an occupied home can be a scary prospect. Exposing the roof sheathing to the elements is risky, especially if all the shingles are off the roof and a summer storm brews up suddenly. Roofing contractor Stephen Hazlett has a better way to manage reroofing jobs. By tearing off only what can be reroofed in a day, Hazlett doesn’t have to rely on the thin promise of a tarp to keep a home safe overnight in the event of inclement weather. Hazlett’s methodical system involves checking weather reports and managing the workflow with an efficient crew. This article includes a sidebar about the proper way to repair and replace chimney flashing.


Protect the outside and the inside of the house, and tear off only what you can reroof in a day
I am a roofing contractor by trade and a problem solver by nature. The biggest problem I solve every day is how to tear the roof safely off an occupied home and install a new roof while protecting the interior, the siding, the landscaping, the windows and doors, and the neighbors’ property. I don’t have a secret, esoteric process for quick, safe, foolproof tearoffs, but planning and meticulous efficiency come as close as possible. I carry a big tarp behind the seat of my truck to cover the house with, but thankfully, I’ve never had to use it.

On second thought, maybe there is a secret to this type of work: Don’t tear off more than you can reroof quickly, and keep a big tarp handy.

The most important tool is information

When planning a roof replacement, a lot of information should be gathered in advance: roof pitch, type of decking, number of existing layers of roofing, the history of roof leaks, and the way leaks were resolved.

Writing the proposal is the next step in planning the workflow. I break down the project into a logical progression: what my crew and I can accomplish each day. In doing this, I take into account ladder and scaffolding placements, access for dump and delivery trucks, and electrical-outlet locations. The most-important things I look for are where the old roof debris is going to land and how I can avoid damaging the siding, the landscaping, the awnings, and the lawn.

When I measure roof area, I confirm the thickness of the roof decking so that I’ll have patch stock on hand. In my area, many of the homes built in the ’20s were sheathed in #2 southern yellow pine. This 3/4-in.-thick decking tends to hold up better than the 38-in. or 1/2-in. plywood sheathing used in houses built in the ’60s, ’70s, and ’80s.

Some roofing contractors prefer to have materials delivered to the rooftop after the old roofing has been torn off, but I have materials delivered at least a day before work starts. We enjoy the peace of mind that comes from knowing we have everything we need on site before the first shingle is torn off.

Because every project we do involves an occupied home, weather always is a concern. The morning a reroof is scheduled to begin, I start tracking the weather at 5:30 a.m. I make a “go” or a “no-go” decision by 7 a.m., based on the size and complexity of the roof, the size of the crew, and the rain’s estimated time of arrival.

If the job is a go, I notify the crew between 7 a.m. and 7:15 a.m., and we are on site by 8. If I decide the project is a no-go, I notify the homeowner that the project has been postponed.

Sweating the details keeps the job running smoothly

Protect sidewalls. When neighbors are close, tarps and plywood shield walls in the shingle landing zone. Keep panels close to vertical, or they’ll damage the house when heavy piles of shingles hit them.

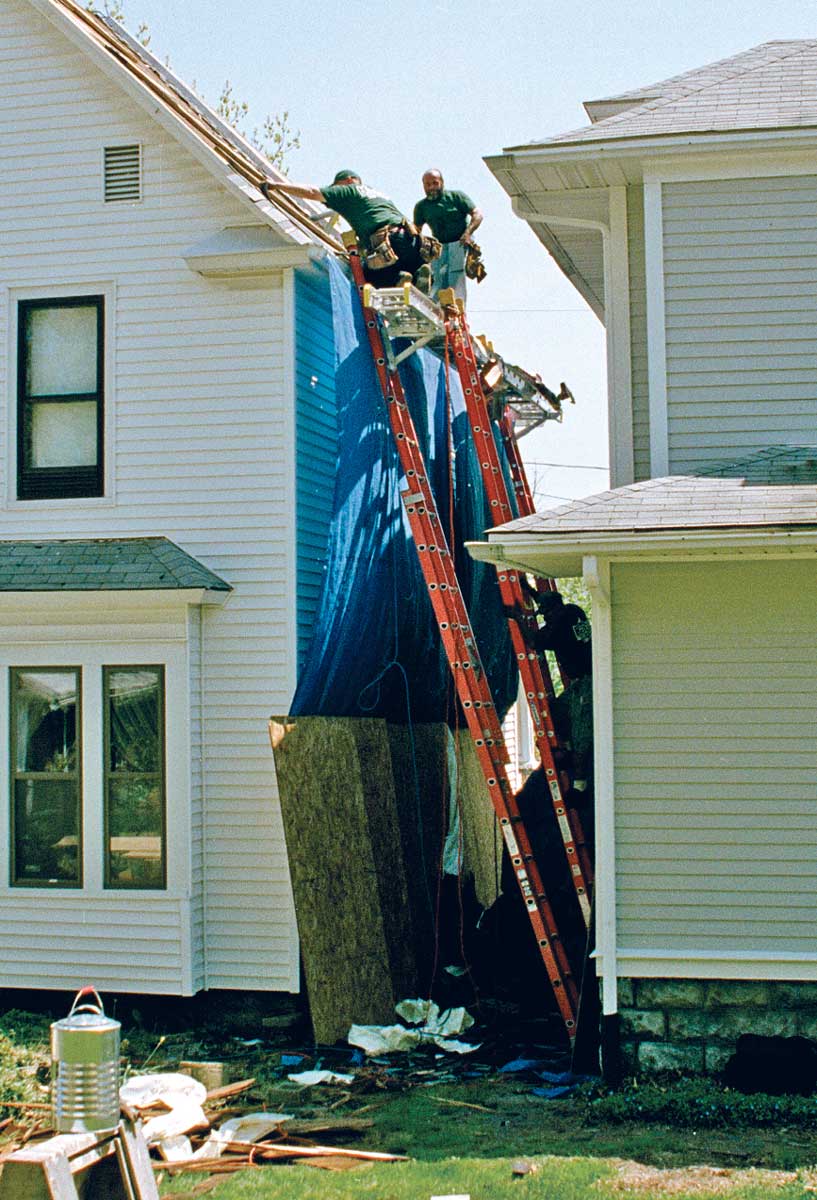
Be prepared at the start

  • Have materials delivered a day early. This ensures an early start if weather permits.
  • Know the thickness of the roof sheathing, and have plenty of patch stock on hand for the inevitable repairs.
  • Begin tracking the weather early. By 7 a.m., you’ll be able to make a fairly safe guess as to whether the reroof is a go or a no-go. 
Carry waste to the truck. If the driveway can accommodate a dump truck, carry shingles to it rather than pushing them off the roof onto a tarp. A crew member can switch between tearoff and cleanup.

Different sites call for different strategies

  • Each house requires a different level of protection. Simple jobs might need no more than ground tarps. Houses with close neighbors might need plywood and tarps to protect walls.
  • Plan for debris removal. A ground-tarp landing zone, a dump truck parked in the driveway, or subcontracted waste removal are common ways to handle this.
  • Keep an extralarge tarp in the truck. A roofer’s badge of honor is the roof-size tarp that’s still in the wrapper behind the seat of his pickup truck. Tip: Don’t take the tarp out of the wrapper unless you really need to cover the roof; you’ll never get the tarp back into the package.
Cleanup is the last step. A large ground tarp catches most of the debris, but it’s a good idea to sweep the lawn with a rolling magnet to pick up errant nails.

Manage the Workflow 

  • Buy doughnuts for the crew. Roofers love doughnuts, and these carbs go a long way if rainclouds start moving in and you need everyone to work through lunch.
  • Only unbutton what can be buttoned up in a day. If the weather is unsettled, break the job down into what can be reshingled before and after lunch.
  • Keep ahead of the tasks. As one task is completed, another is usually ready to begin. By thinking ahead and shifting personnel strategically, you can optimize workflow with less wasted time. If you’re racing the weather, this mode can be a big time-saver.

Protect the house with plywood and tarps 

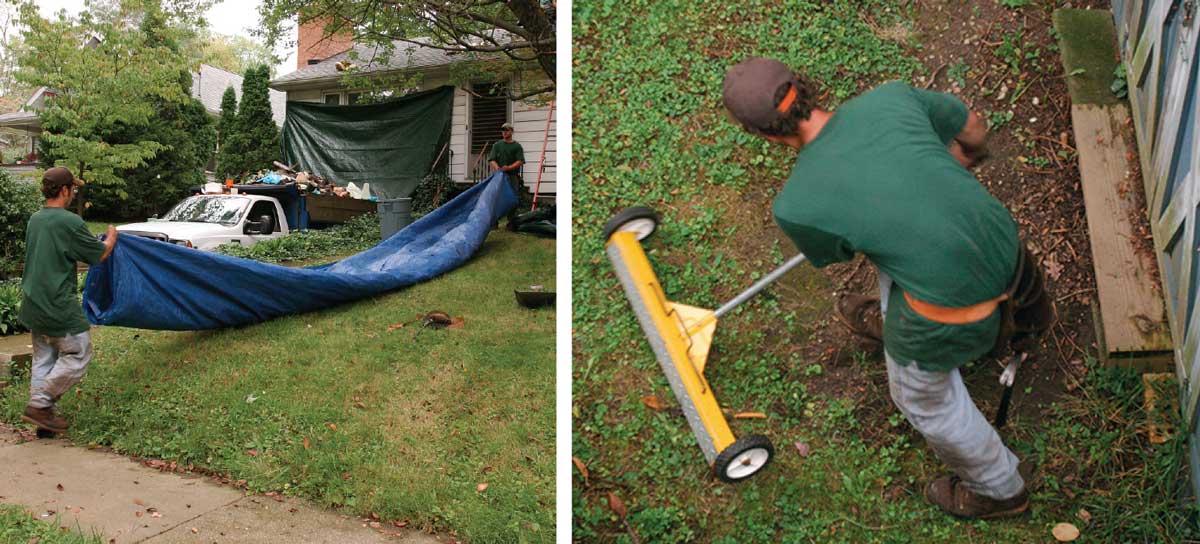
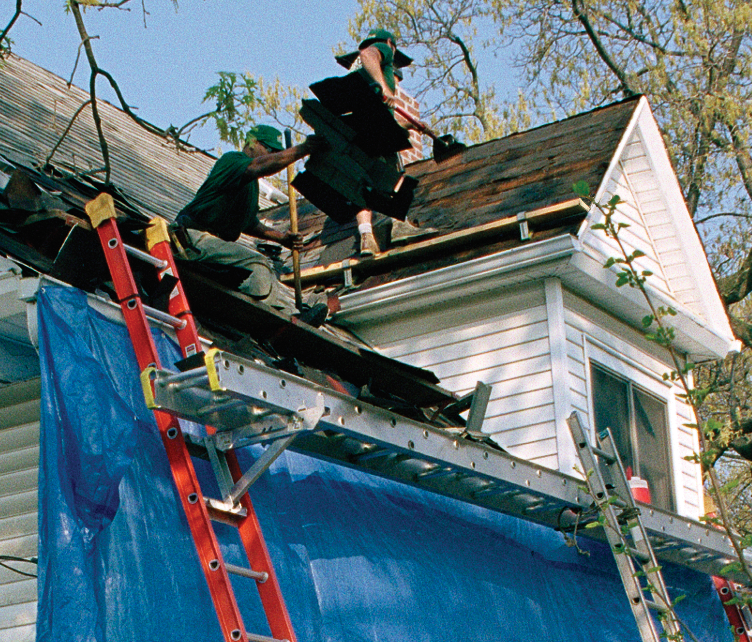
Once we arrive on site, we are in constant motion. Everything has been planned, so there is no need to waste time. The first things off the truck each morning are usually an assortment of large ground tarps. The ground tarps are spread out beneath the work area. Anything thrown off the roof lands on them. We have an assortment of sizes from 30 ft. by 40 ft. to narrow runners that fit between garages and fences, and in other tight spots.

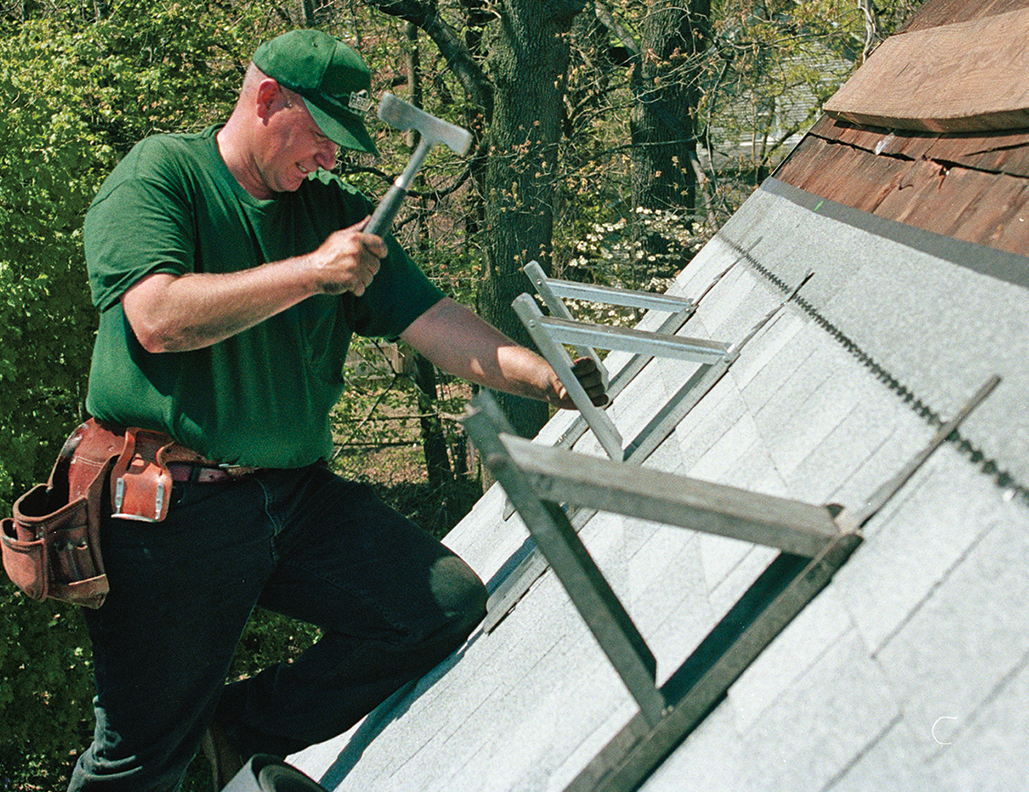
Delicate shrubs and flowers often are covered with sawhorses, empty trash barrels, or sheets of oriented strand board (OSB), along with more tarps. Some houses need no more protection than ground tarps and shrub shields, but a couple of additional steps might be useful. We often use bungee cords to hang a large tarp along the lower edge of a roof and down to the ground. This allows the gutters to catch nails and small debris, and the tarp often can be used as a chute to direct larger roof debris to a specific location. We sometimes install roof jacks and planks along the lower roof edge to catch debris and to protect awnings or a swimming pool. This is also a good strategy when houses are extremely close to each other. In that case, all debris is tossed carefully to a specific safe landing area.

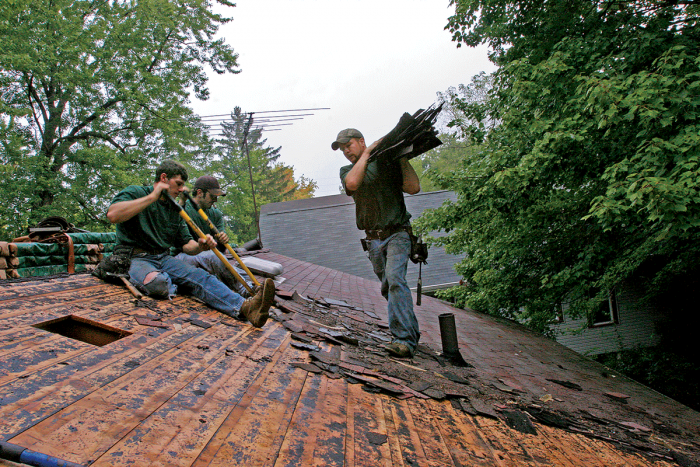
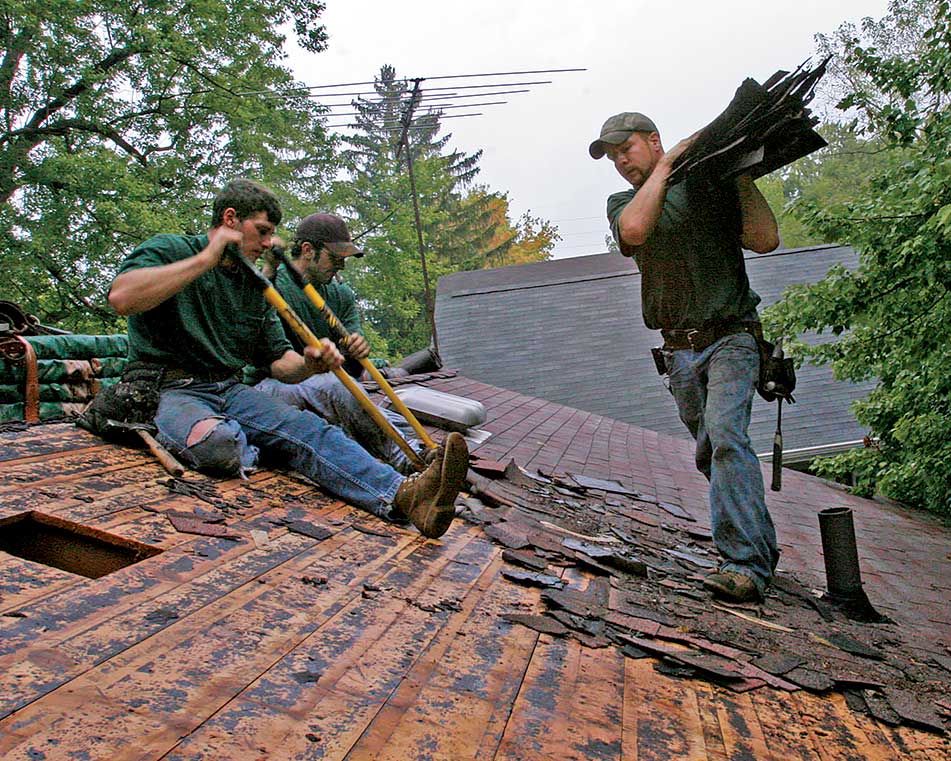
Tear off a little at a time

Our main tearoff tool is the Shing-Go shovel, which we call a shingle eater. We can remove 99% of the shingles from the roof with shingle eaters; for the rest, we use an assortment of pry bars, flat bars, and tin snips (for stubborn flashing). Shingle eaters can damage siding easily, so we stay about a foot away from sidewalls. I generally use my Estwing Roofer’s Bar to clear out the wall flashing and the adjacent shingles. This bar works better for me than the common flat bars that most roofers use.

Smart roofers choose their tools wisely

Shing-Go shovel, made by AJC ($50; www.ajctools.com)

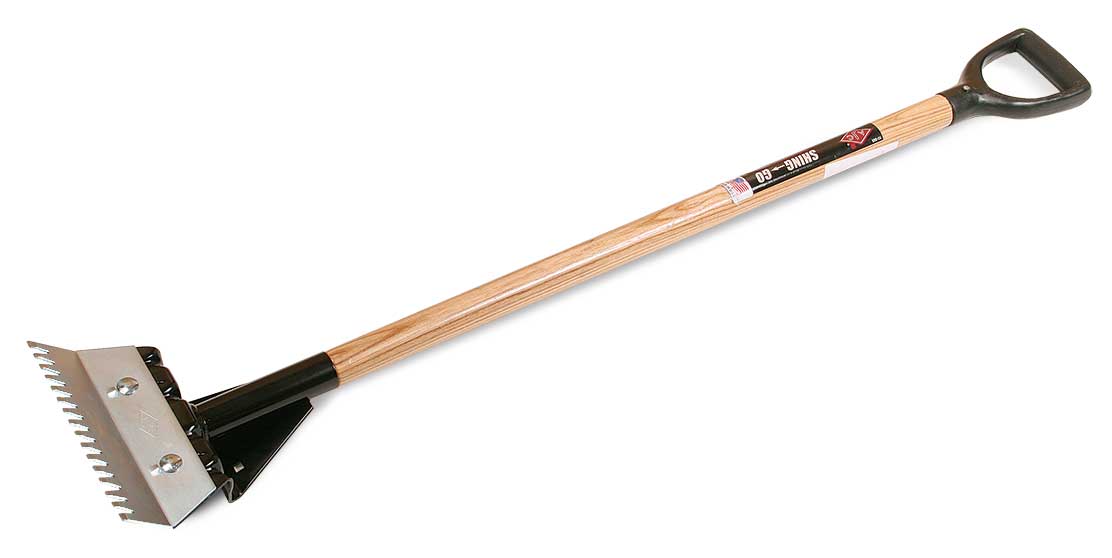
This heavy-duty pry bar is notched to pull nails while prying shingles off the roof deck. Nicknamed a “shingle eater,” the manufacturer calls it a Shing-Go shovel.

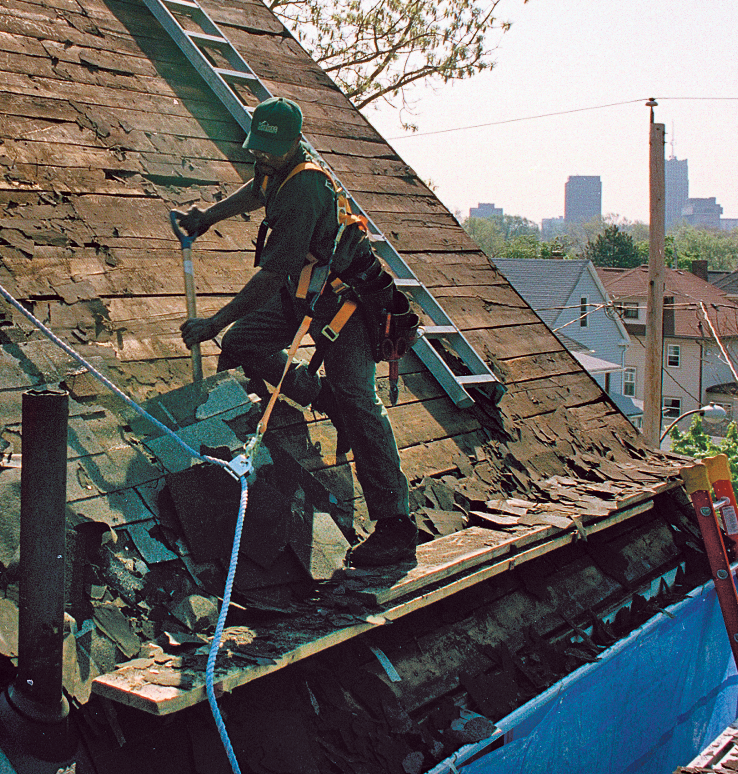
We prefer to start from the ridge and work our way down the roof, each worker tearing off a swath (we call it a rack) about 5 ft. wide. A race always is going on to see who can tear off their rack first. A crew of three workers usually tears off an area about 15 ft. wide from the ridge to the gutter in one pass, then moves down the ridge and tears off the next 15-ft.-wide section.

The trick to using a shingle eater is to get it under shingles and not pull it back out. The teeth on the blade of the tool allow you to hook each roofing nail and pull it out with a levering action. I have found that it is less strenuous and more productive to sit on the roof and tear off shingles to my left or below me (I am right-handed). This position is safer because it keeps my center of gravity low. It also allows me to employ my body weight favorably in a rocking motion while pulling down on the handle and levering the shingles and nails off the decking. Inexperienced crew members who bend over and push the shingle eater with their arms and shoulders simply can’t keep up with my pace. 

Plywood decking allows a much faster tearoff because there are far fewer board edges to catch the teeth of the shingle eater. I find that 1×8 decking is difficult to work with; sometimes I have to tear off sideways along the length of each deck board to avoid catching an edge every few inches. Tearing off along the length of each board also puts less torque on the decking and causes fewer split boards. 

With experienced roofers, tear-off can go surprisingly quickly, often within an hour. If I am working solo, I might tear off the old roof until about 10 a.m. before I start reroofing. Remember, there is a finished, occupied home underneath the roof.

Clean, repair, and dry in the roof

Once the old roofing is torn off, we use a plastic lawn rake to clear off loose shingle pieces; then we sweep down the roof deck to remove the loose debris and shingle grit that can make footing hazardous. Next, we cut out rotten wood and replace it with new solid material. Anyone not needed to replace decking pulls out nails left by the shingle eaters. After the wood replacement is finished, we nail off the entire roof deck with 8d nails in a nail gun and then sweep off the roof deck one last time.

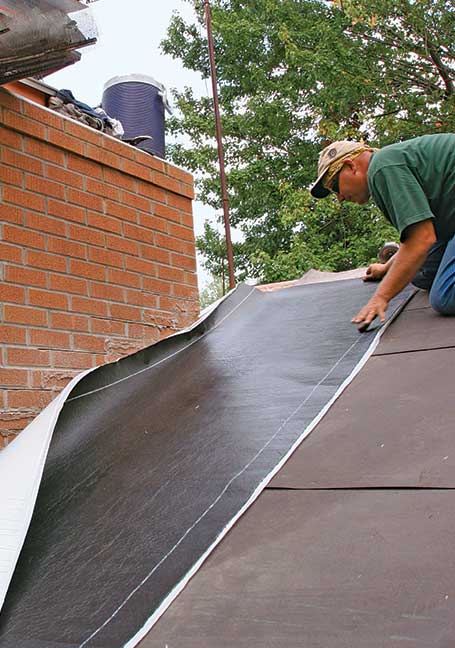
With a clean, solid, safe roof deck, the tearoff is complete, and we can begin the new-roof installation. We install drip edge around the perimeter of the roof. Then we install peel-and-stick membrane along the lower edge of the roof. We install at least one 3-ft.-high course along the bottom edge. If a single course doesn’t extend high enough up the roof to correspond with a point at least 12 in. inside the wall, then we might need to install a second course. Check local codes for this detail because unexpectedly doubling the peel-and-stick membrane on a large job can take several hundred dollars out of your pocket. I also put peel-and-stick membrane in valleys and around chimneys. 

I use #30 builder’s felt to dry in any roof decking not covered with the peel-and-stick membrane. After the whole roof is dried in, we usually snap a chalkline, marking every other shingle course. If three-tab shingles are being used, we snap a couple of vertical lines to maintain a 6-in. shingle offset. We like to rack three-tab shingles straight up the roof on smaller or steep roofs and stairstep larger or easy-to-walk roof areas. No vertical chalklines are necessary for dimensional shingles, only a few horizontal course lines. 

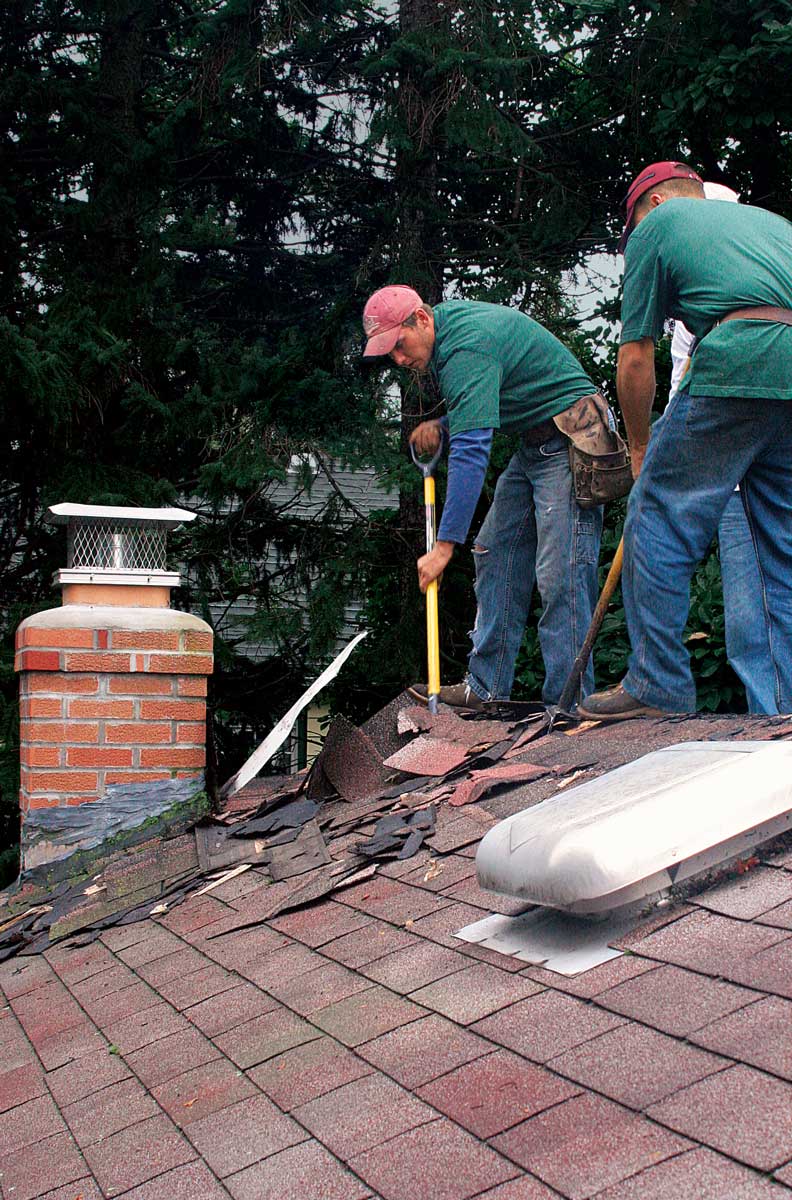
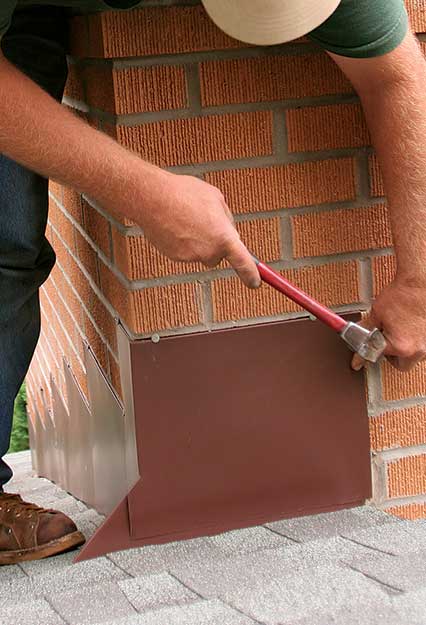
Lunchtime is anywhere from 10:30 a.m. to 1 p.m., depending on progress and the weather outlook. I like to have all chalklines snapped before lunch so that when we return, we can begin installing new shingles immediately. I frequently use lunchtime as a chance to grind out the mortar joints in the chimney for reflashing. Doing this work at lunch means that I won’t spew dust and grit on my coworkers.
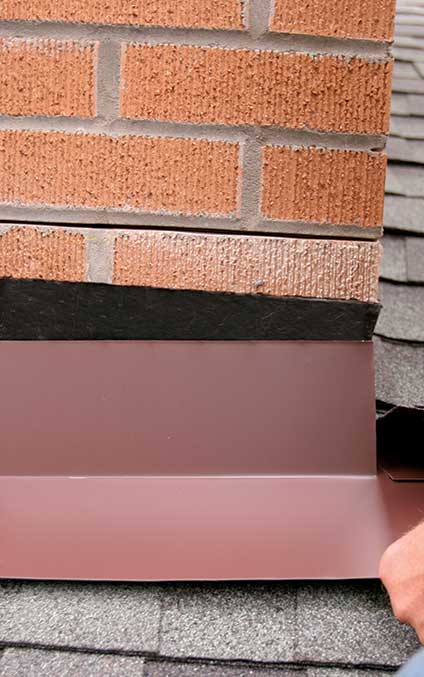
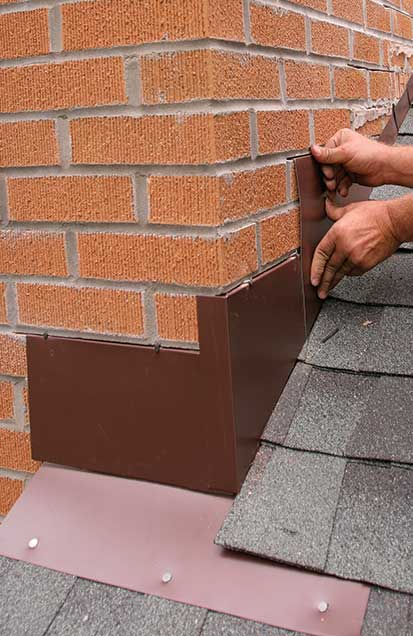
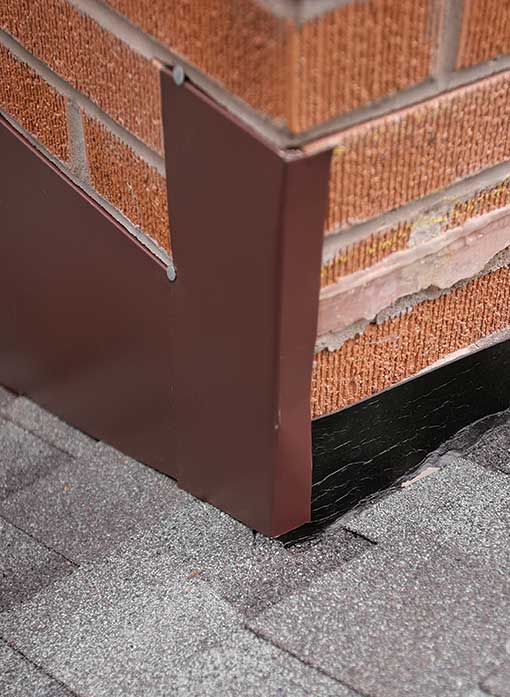
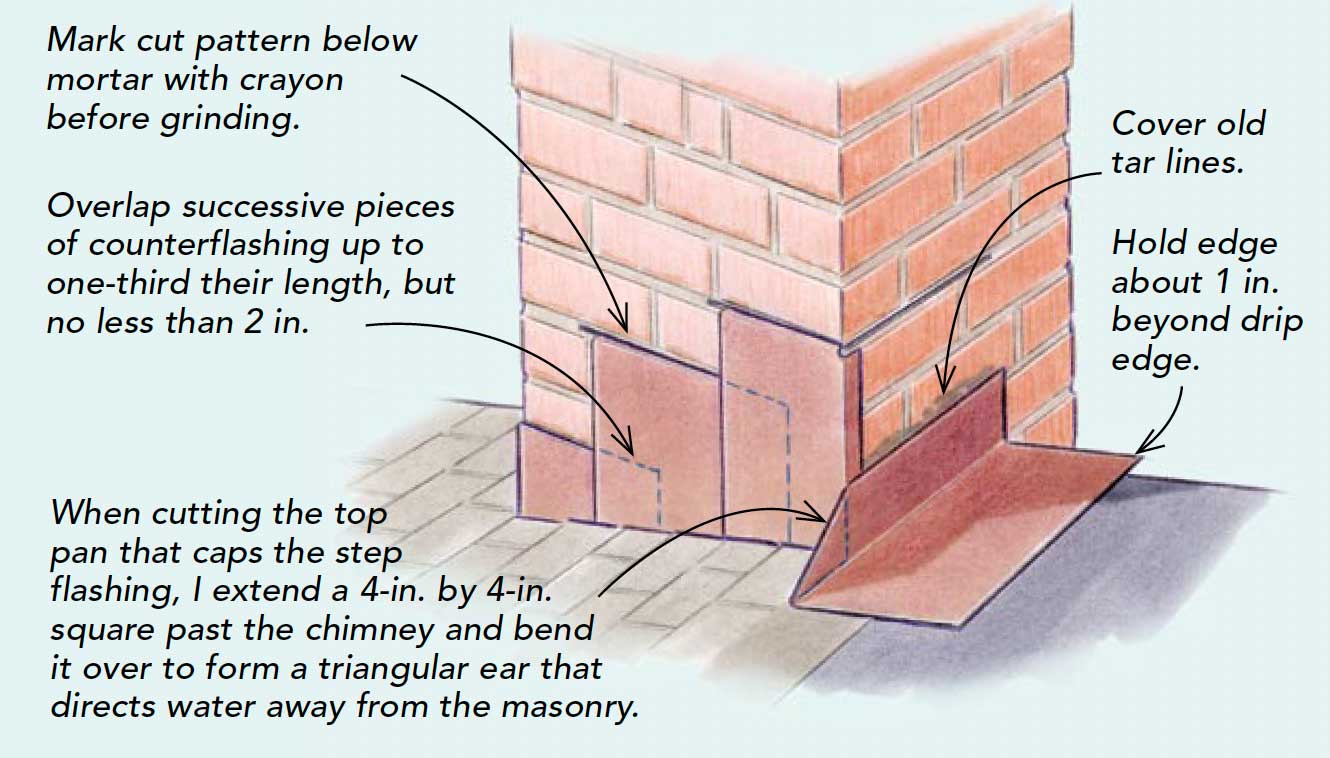
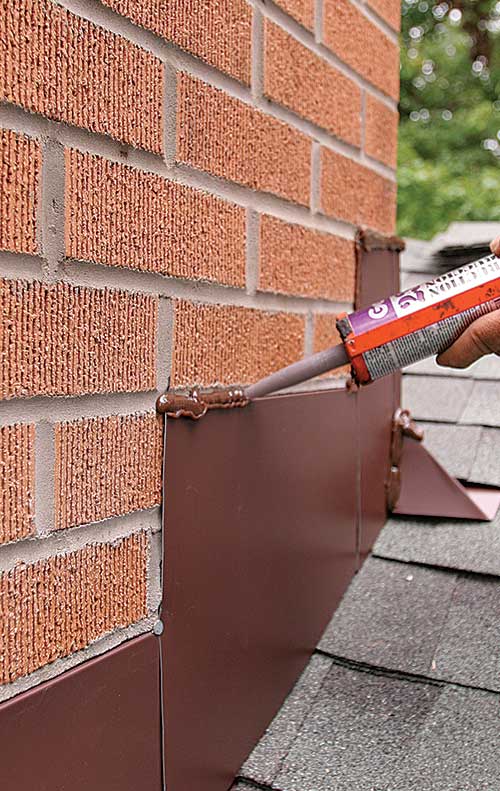
Chimney flashing matters

This roof was replaced at least a couple of times with no attention paid to the chimney flashing. Obviously, there is a history of leaks—just look at the black tar buildup. Rather than fix the flashing the right way during a reroof, someone took the easy (expensive in the long run) way out. Worse, this chimney was replaced recently, and the mason didn’t insert counterflashing into the mortar. The leaks rotted the decking around the chimney and required substantial replacement. The step flashing installed between the shingles and the chimney should be covered by counterflashing set into the mortar as the chimney is built. In retrofit situations, however, this isn’t possible. The next-best thing is to grind deeply into the mortar and insert counterflashing.

1. A little bad flashing can cause a lot of damage. This roofer cuts the patch stock in place after nailing one end of the board. His sawblade is set to the depth of the patch stock.

Start with a plan. I use a crayon to mark just below the mortar joints before I start grinding them out. I try to insert counterflashing above any old tar lines to give the best possible look.
2. Start with a plan. I use a crayon to mark just below the mortar joints before I start grinding them out. I try to insert counterflashing above any old tar lines to give the best possible look.

2. Extra protection. Use roofing membrane along the side, top, and bottom of the chimney. I fold it up the chimney wall as a final line of defense against windblown rain. Cut back the felt about 18 in. so that the membrane can stick to the roof.
3. Extra protection. Use roofing membrane along the side, top, and bottom of the chimney. I fold it up the chimney wall as a final line of defense against windblown rain. Cut back the felt about 18 in. so that the membrane can stick to the roof.

3. Step flashing first. After the peel-and-stick membrane is in place, I shingle and step-flash the roof. This front-apron flashing piece extends over the lower shingles and under the first piece of step flashing.
4. Step flashing first. After the peel-and-stick membrane is in place, I shingle and step-flash the roof. This front-apron flashing piece extends over the lower shingles and under the first piece of step flashing.

5. Counterflashing covers step flashing. The front piece covers the chimney’s apron flashing, and the bottom corner piece folds around the face of the chimney. Successive pieces overlap each other.

6. Ready for the rear pan. The counterflashing shown at left covers the last piece of step flashing and folds around the top corner. The pan piece (shown in drawing) comes next.

7. The final piece. The top piece of counterflashing covers the top pan, which has a triangular ear that extends past the chimney (drawing below). The counterflashing should turn the corner and have its top edges tucked into the masonry.
chimney diagram

8. Seal the joints. I like Geocel (www.geocelusa .com) sealant because of its excellent longevity. Forced into the horizontal saw kerf, the sealant most likely will outlast the roof shingles. I also daub the exposed nails in the front apron.
8. Seal the joints. I like Geocel (www.geocelusa. com) sealant because of its excellent longevity. Forced into the horizontal saw kerf, the sealant most likely will outlast the roof shingles. I also daub the exposed nails in the front apron.


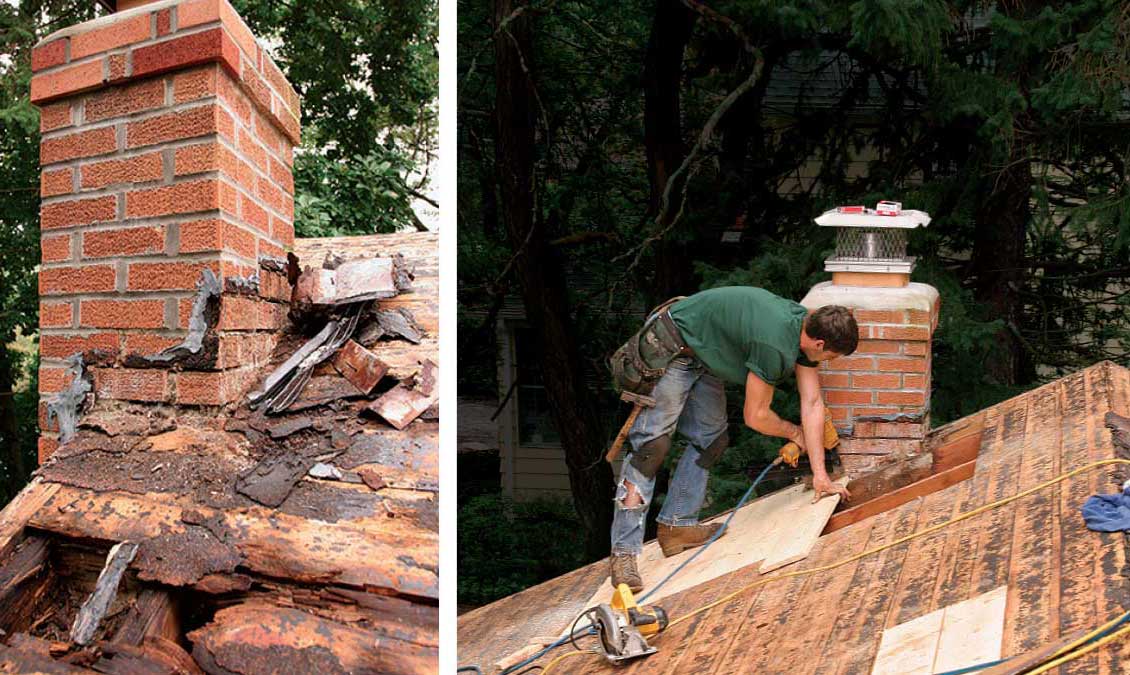
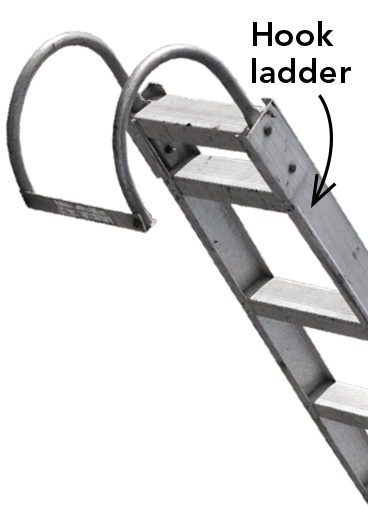
Steep roofs can complicate  your strategy

hook ladder
When tearing off a steep roof, we use a combination of the following methods so that we can navigate the roof area safely.

  • Tear off and reroof in gutter-to-ridge swaths before moving sideways. This minimizes scaffold and roof-jack setups.  
  • Work from hook ladders. This method is safe, but it might be cumbersome and unproductive to use more than a couple of hook ladders on a roof at the same time. Hook ladders often limit effective crew size.
  • Use scaffolding on the roof. We set up slater’s jacks and 2x12s along the lower edge of the roof and a second course about midway to the top. If you own as many jacks and planks as we do, you can cover the entire roof area. This method is the safest and fastest for large crews.
  • Use a harness and rope. Coupled with a roof ladder and a 2×12 set in roof jacks along the bottom eave, this can be an effective one- or two-person setup.

Slater’s roof jacks are extrawide. This allows them to hold up to a 2x12 plank rather than a 2x10 typical of other roof brackets ($33 each at www.slate roofcentral.com).
Slater’s roof jacks are extrawide. This allows them to hold up to a 2×12 plank rather than a 2×10 typical of other roof brackets ($33 each at www.slateroofcentral.com).

Catch the shingles. Roof jacks with a 2x12 catch the shingles while a scaffold below provides a place to stand and toss shingles into the landing zone.
Catch the shingles. Roof jacks with a 2×12 catch the shingles while a scaffold below provides a place to stand and toss shingles into the landing zone.

A safe setup makes the job go more quickly. Tied off to the ridge, this roofer has the extra peace of mind that a misstep won’t be fatal. The roof ladder provides safe footing while tearing off from top to bottom.

Stephen Hazlett owns Hazlett Roofing & Renovation in Akron, Ohio. Photos by Daniel S. Morrison, except where noted. Drawing: Dan Thornton Product photo: Krysta S. Doerfler.

Fine Homebuilding #188

Fine Homebuilding Recommended Products

Fine Homebuilding receives a commission for items purchased through links on this site, including Amazon Associates and other affiliate advertising programs.

Flashing Boot

Adequately seal vulnerable vent penetrations through the roof with this galvanized flashing and flexible rubber collar.
Buy at Amazon

Ladder Stand Off

Stability is key when working off a ladder or accessing the roof, and this lightweight aluminum stand-off makes any extension ladder safer and more comfortable to use.
Buy at Amazon

Roof Jacks

All-steel construction makes these roof brackets durable and long lasting, and their adjustability allows you to create a flat, safe standing surface on most any pitched roof.
Buy at Amazon
View PDF
Previous: Prep a Wood-Shingle Roof for Reroofing Next: Reroofing Over Zip System Sheathing

Guide

Roofing

Chapter

Roof Replacement and Reroofing

Sign up for eletters today and get the latest how-to from Fine Homebuilding, plus special offers.

Signing you up...

This site is protected by reCAPTCHA and the Google Privacy Policy and Terms of Service apply.
See all newsletters
See all newsletters

Log in or create an account to post a comment.

Sign up Log in

Become a member and get full access to FineHomebuilding.com

Roofing

Roofing

A complete resource that includes the best materials and the right techniques to build a sturdy, leak-free, attractive roof on any house

View Project Guide

View All Project Guides »

Become a member and get unlimited site access, including the Roofing Project Guide.

Start Free Trial

Tools and Materials
  • Roof Coverings
  • Roofing Materials
  • Power Tools
  • Handy Helpers
  • Staging and Ladders
  • Safety Equipment
Roof Replacement and Reroofing
  • Preparing the Old Roof
  • Sheathing
  • Installing the New Roof
Roof Ventilation
  • Venting Basics
  • Installation
Waterproofing
  • Underlayment
  • Drip Edge
  • Flashing Adjoining Walls
  • Dormer and Skylight Flashing
  • Chimney Flashing
  • Vent Flashing
  • Gutters
Installing Asphalt Shingles
  • Calculating Shingles
  • Layout
  • Installation
  • Valleys
Installing Other Types of Roofs
  • Cedar Shingles
  • Metal
  • Low-Slope Roofs
  • Slate and Tile
Roof Maintenance and Repair
  • Assessing the Problem
  • Repairing Asphalt-Shingle Roofs
  • Other Roofing Repairs

Fine Home Building

Newsletter Sign-up

  • Fine Homebuilding

    Home building tips, offers, and expert advice in your inbox.

  • Green Building Advisor

    Building science and energy efficiency advice, plus special offers, in your inbox.

  • Old House Journal

    Repair, renovation, and restoration tips, plus special offers, in your inbox.

Signing you up...

This site is protected by reCAPTCHA and the Google Privacy Policy and Terms of Service apply.
See all newsletters

Follow

  • Fine Homebuilding

    Dig into cutting-edge approaches and decades of proven solutions with total access to our experts and tradespeople.

    Start Free Trial Now
    • Facebook
    • Instagram
    • X
    • LinkedIn
  • GBA Prime

    Get instant access to the latest developments in green building, research, and reports from the field.

    Start Free Trial Now
    • Facebook
    • YouTube
  • Old House Journal

    Learn how to restore, repair, update, and decorate your home.

    Subscribe Now
    • Facebook
    • Instagram
    • X

Membership & Magazine

  • Online Archive
  • Start Free Trial
  • Magazine Subscription
  • Magazine Renewal
  • Gift a Subscription
  • Customer Support
  • Privacy Preferences
  • About
  • Contact
  • Advertise
  • Careers
  • Terms of Use
  • Site Map
  • Do not sell or share my information
  • Privacy Policy
  • Accessibility
  • California Privacy Rights

© 2025 Active Interest Media. All rights reserved.

Fine Homebuilding receives a commission for items purchased through links on this site, including Amazon Associates and other affiliate advertising programs.

  • Home Group
  • Antique Trader
  • Arts & Crafts Homes
  • Bank Note Reporter
  • Cabin Life
  • Cuisine at Home
  • Fine Gardening
  • Fine Woodworking
  • Green Building Advisor
  • Garden Gate
  • Horticulture
  • Keep Craft Alive
  • Log Home Living
  • Military Trader/Vehicles
  • Numismatic News
  • Numismaster
  • Old Cars Weekly
  • Old House Journal
  • Period Homes
  • Popular Woodworking
  • Script
  • ShopNotes
  • Sports Collectors Digest
  • Threads
  • Timber Home Living
  • Traditional Building
  • Woodsmith
  • World Coin News
  • Writer's Digest
Active Interest Media logo
X
X
This is a dialog window which overlays the main content of the page. The modal window is a 'site map' of the most critical areas of the site. Pressing the Escape (ESC) button will close the modal and bring you back to where you were on the page.

Main Menu

  • How-To
  • Design
  • Tools & Materials
  • Video
  • Blogs
  • Forum
  • Project Guides
  • Reader Projects
  • Magazine
  • Members
  • FHB House

Podcasts

  • FHB Podcast
  • ProTalk

Webinars

  • Upcoming and On-Demand

Podcasts

  • FHB Podcast
  • ProTalk

Webinars

  • Upcoming and On-Demand

Popular Topics

  • Kitchens
  • Business
  • Bedrooms
  • Roofs
  • Architecture and Design
  • Green Building
  • Decks
  • Framing
  • Safety
  • Remodeling
  • Bathrooms
  • Windows
  • Tilework
  • Ceilings
  • HVAC

Magazine

  • Current Issue
  • Past Issues
  • Magazine Index
  • Subscribe
  • Online Archive
  • Author Guidelines

All Access

  • Member Home
  • Start Free Trial
  • Gift Membership

Online Learning

  • Courses
  • Project Guides
  • Reader Projects
  • Podcast

More

  • FHB Ambassadors
  • FHB House
  • Customer Support

Account

  • Log In
  • Join

Newsletter

Get home building tips, offers, and expert advice in your inbox

Signing you up...

This site is protected by reCAPTCHA and the Google Privacy Policy and Terms of Service apply.
See all newsletters
See all newsletters

Follow

  • X
  • YouTube
  • instagram
  • facebook
  • pinterest
  • Tiktok

Join All Access

Become a member and get instant access to thousands of videos, how-tos, tool reviews, and design features.

Start Your Free Trial

Subscribe

FHB Magazine

Start your subscription today and save up to 81%

Subscribe

We hope you’ve enjoyed your free articles. To keep reading, become a member today.

Get complete site access to expert advice, how-to videos, Code Check, and more, plus the print magazine.

Start your FREE trial

Already a member? Log in

Privacy Policy Update

We use cookies, pixels, script and other tracking technologies to analyze and improve our service, to improve and personalize content, and for advertising to you. We also share information about your use of our site with third-party social media, advertising and analytics partners. You can view our Privacy Policy here and our Terms of Use here.

Cookies

Analytics

These cookies help us track site metrics to improve our sites and provide a better user experience.

Advertising/Social Media

These cookies are used to serve advertisements aligned with your interests.

Essential

These cookies are required to provide basic functions like page navigation and access to secure areas of the website.

Delete My Data

Delete all cookies and associated data