FHB Logo Facebook LinkedIn Email Pinterest Twitter X Instagram Tiktok YouTube Plus Icon Close Icon Navigation Search Icon Navigation Search Icon Arrow Down Icon Video Guide Icon Article Guide Icon Modal Close Icon Guide Search Icon Skip to content
Subscribe
Log In
  • How-To
  • Design
  • Tools & Materials
  • Restoration
  • Videos
  • Blogs
  • Forum
  • Magazine
  • Members
  • FHB House
  • Podcast
Log In

Fine Homebuilding Project Guides

Roofing

Guide Home
  • Tools and Materials
  • Roof Replacement and Reroofing
  • Roof Ventilation
  • Waterproofing
  • Installing Asphalt Shingles
  • Installing Other Types of Roofs
  • Roof Maintenance and Repair
How-To

Weatherproofing Dormers

Use peel-and-stick bow-ties to flash a dormer.

By Rick Arnold Issue 186
  • X
  • facebook
  • linkedin
  • pinterest
  • email
  • add to favorites Log in or Sign up to save your favorite articles

Peel-and-stick membranes allow a level of protection and redundancy when flashing a dormer that wasn’t available before the introduction of modern waterproofing materials. The process involves some forethought, mainly because a portion of it has to be done before you’re finished framing.

For example, the first pieces of membrane have to be installed after the wing walls are in place, but before the roof is framed. That’s because the rafters’ overhang makes it almost impossible to get the membrane in place at the critical juncture where the top of the cheek meets the main roof. I like to use Grace’s Roof Detail Membrane because it comes in a convenient 18-inch width and there are ripcords embedded beneath the release sheet which can be used to separate it into more manageable sections making it easy to peel only the paper you want to remove at a given time.

Steps for installing watertight dormers

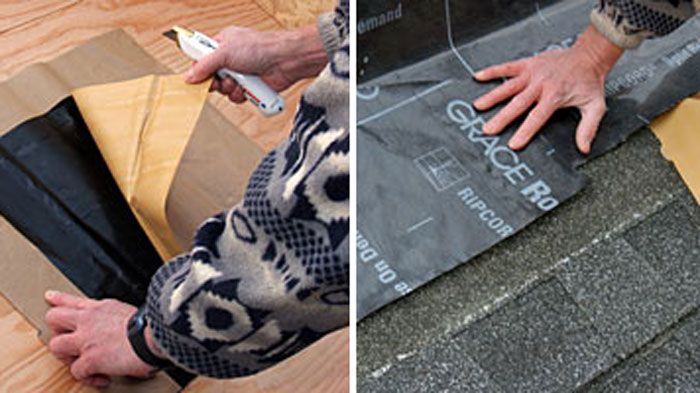
After cutting an 18-in. square of peel and stick membrane, use a new blade and carefully score the release paper backing to leave an L-shaped,  2-in.-wide, strip of  paper on two edges of the membrane.


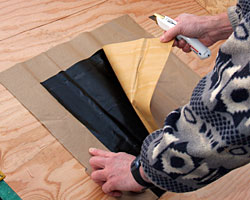
Press the membrane into place at the top of the wing wall so that it overlaps the top plate and the roof sheathing. The strips of release paper should be on the bottom edge and the edge on the roof sheathing. Leaving the paper on the membrane for now makes it possible to slide the other membrane and other roofing materials (felt underlayment, roof shingles) underneath the edges of this first piece later on.


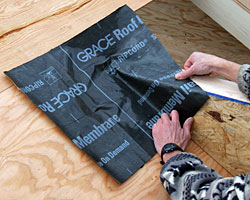
After completing the rest of the dormer framing, cut a piece of flashing about a foot and a half longer than the front wall of the dormer, so that it can overhang each corner of the front wall by about 8-10 inches.

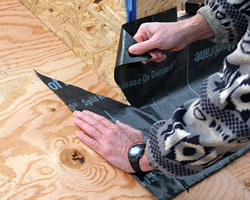
Remove the release sheet from the top half of the length of membrane and press it onto the front wall of the dormer making sure to work it tightly into the inside corner to prevent any voids. Remove about half of the remaining release sheet lengthwise from the lower section and press the exposed membrane on to the sheathing  leaving the paper on the bottom half. Slice the membrane at approximately 45 degrees so you can fold it onto the wing wall. Leave the release sheet on the bottom half of membrane so roof shingles can slide under it later.


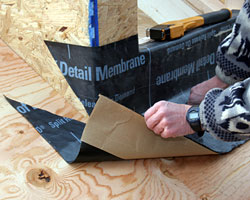
From an approximately 10-inch long scrap of membrane, cut a piece shaped like a bow-tie.


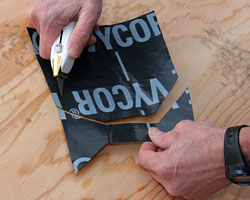
Remove the release paper and stretch the membrane around the corner where the wing wall meets the dormer’s front wall. This helps seal the weak spot created by cutting the membrane at the outside corner.


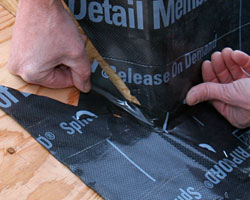
Cut a length of membrane approximately 10 inches longer than the length of the wing-wall cheek, and use multiple pieces if the wall is longer than 5 or 6 feet. Make sure to apply multiple sheets from the bottom up to avoid reverse lapping. Fold lengthwise and remove paper from one half of the length. Slide the membrane up the roof along the wing wall placing it so that the half with the release paper is on the roof.


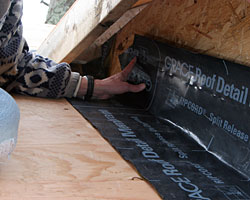
Reach under the roof overhang and lift up the edge of the first piece of membrane and slide the cheek piece under the first piece of membrane. Remove the paper from the first piece and press onto cheek membrane piece.


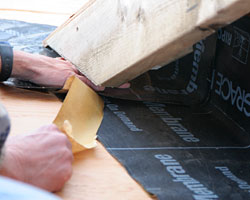
Remove the paper from the first piece and press onto the cheek membrane piece.


Then remove the inner half of the paper from that part of the membrane that’s on the roof and press in place, again working the inside corner to prevent voids. Leave the last paper strip in place for now.


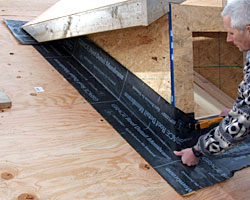
At the bottom end of the wing wall membrane piece, slice the membrane at approximately 45 degrees at the bottom of the cheek so you can fold it onto the front wall (similar to what you did with the front wall membrane piece).


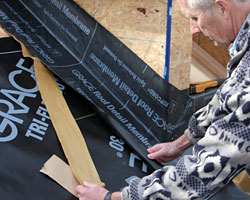
When its time to install the roofing, there are a couple things to remember to assure a water tight dormer. When you cover the roof with felt or a similar underlayment — I prefer using synthetic underlayment — lift the front-wall and cheek membrane pieces and slide the underlayment under the membrane. Once the underlayment is beneath the membrane along the cheek, remove the remaining release sheet and press the membrane to the felt
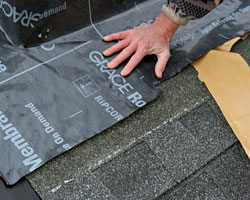
.

But don’t remove the paper from the front-wall paper strip until the upper half of the asphalt shingles is slid underneath the membrane. This provides a direct path to the outside of the roof covering for any water that finds its way through. Once the roof is complete, I flash the dormer with metal flashing as usual. The membrane is only a backup and should not replace the primary flashing system.

To learn how Rick Arnold builds and installs this traditional style of dormer, read his article Doghouse Dormers.

— Photos by Roe A. Osborn

Fine Homebuilding Recommended Products

Fine Homebuilding receives a commission for items purchased through links on this site, including Amazon Associates and other affiliate advertising programs.

Shingle Ripper

This tool makes tearing off shingles easier and faster, providing powerful leverage that allows you to work comfortably. Its beveled teeth and wide blade make it easy to remove nails and push shingles off the roof.
Buy at Amazon

Protective Eyewear

Eye protection is a must, and these are designed for comfort so you can can wear them all day long without pain or fatigue.
Buy at Amazon

Leather Tool Rig

This is tool rig is heavy duty, professional, and well-thought-out for tool storage — plus it can help reduce fatigue throughout the day.
Buy at Amazon
Previous: Four Steps to Flash a Dormer Next: Leak-Free Skylights

Guide

Roofing

Chapter

Waterproofing

Sign up for eletters today and get the latest how-to from Fine Homebuilding, plus special offers.

Signing you up...

This site is protected by reCAPTCHA and the Google Privacy Policy and Terms of Service apply.
See all newsletters
See all newsletters

View Comments

  1. georgeshort7 | Jan 26, 2017 07:39am | #1

    Great effort

Log in or create an account to post a comment.

Sign up Log in

Become a member and get full access to FineHomebuilding.com

Roofing

Roofing

A complete resource that includes the best materials and the right techniques to build a sturdy, leak-free, attractive roof on any house

View Project Guide

View All Project Guides »

Become a member and get unlimited site access, including the Roofing Project Guide.

Start Free Trial

Tools and Materials
  • Roof Coverings
  • Roofing Materials
  • Power Tools
  • Handy Helpers
  • Staging and Ladders
  • Safety Equipment
Roof Replacement and Reroofing
  • Preparing the Old Roof
  • Sheathing
  • Installing the New Roof
Roof Ventilation
  • Venting Basics
  • Installation
Waterproofing
  • Underlayment
  • Drip Edge
  • Flashing Adjoining Walls
  • Dormer and Skylight Flashing
  • Chimney Flashing
  • Vent Flashing
  • Gutters
Installing Asphalt Shingles
  • Calculating Shingles
  • Layout
  • Installation
  • Valleys
Installing Other Types of Roofs
  • Cedar Shingles
  • Metal
  • Low-Slope Roofs
  • Slate and Tile
Roof Maintenance and Repair
  • Assessing the Problem
  • Repairing Asphalt-Shingle Roofs
  • Other Roofing Repairs

Fine Home Building

Newsletter Sign-up

  • Fine Homebuilding

    Home building tips, offers, and expert advice in your inbox.

  • Green Building Advisor

    Building science and energy efficiency advice, plus special offers, in your inbox.

  • Old House Journal

    Repair, renovation, and restoration tips, plus special offers, in your inbox.

Signing you up...

This site is protected by reCAPTCHA and the Google Privacy Policy and Terms of Service apply.
See all newsletters

Follow

  • Fine Homebuilding

    Dig into cutting-edge approaches and decades of proven solutions with total access to our experts and tradespeople.

    Start Free Trial Now
    • Facebook
    • Instagram
    • X
    • LinkedIn
  • GBA Prime

    Get instant access to the latest developments in green building, research, and reports from the field.

    Start Free Trial Now
    • Facebook
    • YouTube
  • Old House Journal

    Learn how to restore, repair, update, and decorate your home.

    Subscribe Now
    • Facebook
    • Instagram
    • X

Membership & Magazine

  • Online Archive
  • Start Free Trial
  • Magazine Subscription
  • Magazine Renewal
  • Gift a Subscription
  • Customer Support
  • Privacy Preferences
  • About
  • Contact
  • Advertise
  • Careers
  • Terms of Use
  • Site Map
  • Do not sell or share my information
  • Privacy Policy
  • Accessibility
  • California Privacy Rights

© 2025 Active Interest Media. All rights reserved.

Fine Homebuilding receives a commission for items purchased through links on this site, including Amazon Associates and other affiliate advertising programs.

  • Home Group
  • Antique Trader
  • Arts & Crafts Homes
  • Bank Note Reporter
  • Cabin Life
  • Cuisine at Home
  • Fine Gardening
  • Fine Woodworking
  • Green Building Advisor
  • Garden Gate
  • Horticulture
  • Keep Craft Alive
  • Log Home Living
  • Military Trader/Vehicles
  • Numismatic News
  • Numismaster
  • Old Cars Weekly
  • Old House Journal
  • Period Homes
  • Popular Woodworking
  • Script
  • ShopNotes
  • Sports Collectors Digest
  • Threads
  • Timber Home Living
  • Traditional Building
  • Woodsmith
  • World Coin News
  • Writer's Digest
Active Interest Media logo
X
X
This is a dialog window which overlays the main content of the page. The modal window is a 'site map' of the most critical areas of the site. Pressing the Escape (ESC) button will close the modal and bring you back to where you were on the page.

Main Menu

  • How-To
  • Design
  • Tools & Materials
  • Video
  • Blogs
  • Forum
  • Project Guides
  • Reader Projects
  • Magazine
  • Members
  • FHB House

Podcasts

  • FHB Podcast
  • ProTalk

Webinars

  • Upcoming and On-Demand

Podcasts

  • FHB Podcast
  • ProTalk

Webinars

  • Upcoming and On-Demand

Popular Topics

  • Kitchens
  • Business
  • Bedrooms
  • Roofs
  • Architecture and Design
  • Green Building
  • Decks
  • Framing
  • Safety
  • Remodeling
  • Bathrooms
  • Windows
  • Tilework
  • Ceilings
  • HVAC

Magazine

  • Current Issue
  • Past Issues
  • Magazine Index
  • Subscribe
  • Online Archive
  • Author Guidelines

All Access

  • Member Home
  • Start Free Trial
  • Gift Membership

Online Learning

  • Courses
  • Project Guides
  • Reader Projects
  • Podcast

More

  • FHB Ambassadors
  • FHB House
  • Customer Support

Account

  • Log In
  • Join

Newsletter

Get home building tips, offers, and expert advice in your inbox

Signing you up...

This site is protected by reCAPTCHA and the Google Privacy Policy and Terms of Service apply.
See all newsletters
See all newsletters

Follow

  • X
  • YouTube
  • instagram
  • facebook
  • pinterest
  • Tiktok

Join All Access

Become a member and get instant access to thousands of videos, how-tos, tool reviews, and design features.

Start Your Free Trial

Subscribe

FHB Magazine

Start your subscription today and save up to 81%

Subscribe

We hope you’ve enjoyed your free articles. To keep reading, become a member today.

Get complete site access to expert advice, how-to videos, Code Check, and more, plus the print magazine.

Start your FREE trial

Already a member? Log in

Privacy Policy Update

We use cookies, pixels, script and other tracking technologies to analyze and improve our service, to improve and personalize content, and for advertising to you. We also share information about your use of our site with third-party social media, advertising and analytics partners. You can view our Privacy Policy here and our Terms of Use here.

Cookies

Analytics

These cookies help us track site metrics to improve our sites and provide a better user experience.

Advertising/Social Media

These cookies are used to serve advertisements aligned with your interests.

Essential

These cookies are required to provide basic functions like page navigation and access to secure areas of the website.

Delete My Data

Delete all cookies and associated data