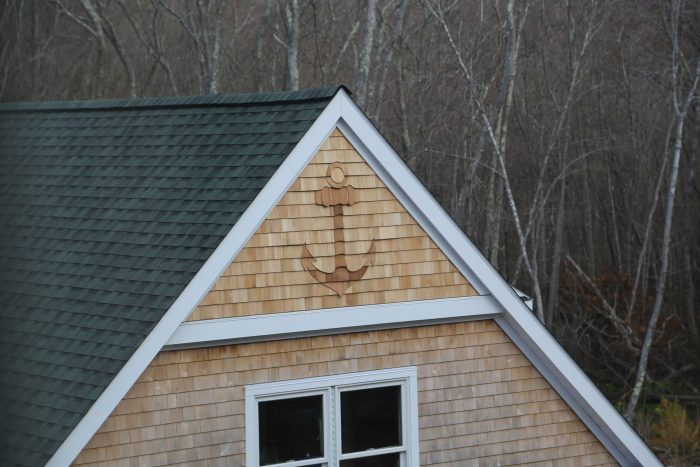
How to Make an Anchor Shingle Design
Making a template and collating the shingles together on your benchtop is a lot easier than working out the woven shingle design up on the wall.

Weaving shingle designs into cedar sidewall shingles can be done up on the wall while installing the field shingles but an easier way is on a benchtop. Gravity works in your favor and you can have all your shop tools in short reach. This anchor is of moderate complexity and took me about 6 hours to plan and lay out. Onsite installation only took 30 minutes.
Making a design template
For most designs less than 8 ft x 8 ft I make a cardboard template. Large appliance boxes saved from jobsites are my primary source for large pieces. You need to know the shingle course layout for the area where a design will go since course exposures may vary. Transfer the story pole layout onto cardboard a couple little wider and taller than the overall anticipated design size and draw horizontal course lines across.
Find a design subject photo and using an LCD projector cast the image onto the cardboard. Make sure the keystone adjustment is set accurately so there is no distortion. Adjust the focal size of the image using the LCD lens or by moving the projector closer to further way from the cardboard until the image size embraces the courses that will cross the design. Then sketch the silouttee of the image on the cardboard and any special design features that you want to highlight in the shingles. Cut out the image from the cardboard panel and you’re ready to cut shingles.
You’ll use the template to mark each shingle course that crosses the design.
Build a lightweight panel
You’ll need a panel to tack staple the shingles to while working on a bench and moving the finished design around until it’s time to install. I make a panel out of 1/4 in. plywood fastened to frame made of 1x2s that’s at least a foot wider and taller than the design. Even though a panel may be big, it’s light and stiff.
Collating shingles together
A design is made from dozens or even hundreds of individual shingles. It is hard to keep track of them individually when transferring them from design panel to a wall. I like to collate the shingles in each course together by gluing cardboard drywall shims to groups. Two strips works best – one near the top thin edge of the shingles and another a couple inches above the exposure line. The shims will stay on the shingles permanently. I bond each drywall shim strip with 2 adhesives. A bead if construction adhesive and fast-acting thick cyanoacrylate . The cyano adhesive could be used alone but would be expensive to cover the drywall shim with it. So I just apply a tiny bead of it to act as a clamp while the construction adhesive cures. To apply even pressure on the drywall shim when laying it over the top of the shingles I use a straight 1x board with a strip of 3/8 in. self-adhering gasket foam. The foam adjusts to the unevenness of the shingle surface so the adhesive bonds.
I place each course of shingles making sure the 1-1/2 in. min. joint offset between shingles in successive courses is maintained, apply the adhesives, bond the drywall shims, and then make any cuts using a jigsaw.
The video shows each course as it was cut, layered and aligned with the design. The first time doing a new design is trial and error and you may end up casting aside a couple courses of shingles that didn’t achieve the desired effect. That’s another benefit of cutting a design in a shop; it’s easy to redo since the shingles are only tacked to the panel.
Make a copy and save the template: The most important thing to do before installing a design onto the wall is making a copy. You can use strips of 1/4 in. (or thinner) plywood ripped to the width of the shingle height or use some low-grade shingles. Cut a duplicate of each shingle course and backing material strips. Then if you want to use the design again you can skip a lot of the time consuming head-scratching and just make a copy. Or even if you want to make a larger or smaller version of the design, you’ll save time by reviewing the copy and how you created the design details.
See Weaving a Vine Design into Sidewall Shingles for more on shingle designs and techniques for creating them.
www.mikeguertin.com IG: @mike_guertin


View Comments
Good job!
Really nice. Do you have a shot of it installed?
Excellent work you done here!