Building Craftsman-Style Brackets
Add custom decorative brackets where your roof needs a little support.

Synopsis: When contributing editor Gary M. Katz was building his shop, he decided that the building needed some decorative Craftsman-style brackets as eave supports. To make the brackets, Katz went into the shop, made templates, and produced the parts with a system of templates and jigs. Using that system, Katz could cut all the dadoes with a router and template, and all the braces could be cut with a miter saw and notched on a tablesaw. After the brackets were dry-fit, they were stained and then assembled in place. Doing large amounts of work in the shop saved Katz a great deal of time; the joinery needed only a slight amount of trimming to account for minor discrepancies in material thickness as it was being assembled. This article includes two technical illustrations. One shows how the bracket pieces come together. The second shows how they are attached to the building. Additionally, a sidebar details how the brackets are assembled in place.
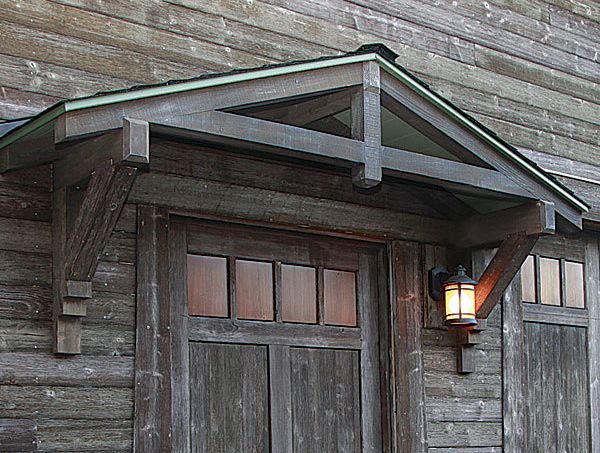
I’ve always been taken with the Craftsman style. I especially like the pillowed look of the style’s multistep brackets: big, sturdy pieces of decorative joinery used to support deep eave overhangs and small roofs. When I designed my new shop and guest cabin, I wanted to include lots of them as eave supports. Most of the brackets I’ve seen have a diagonal brace that’s mortised into the upper beam and lower post, and the mortises are cut at the same angle as the brace. I didn’t want to do all that chiseling and sawing for 20 brackets. Instead, I designed my brackets so that all the dadoes could be cut with a router and a template and all the braces could be cut on a miter saw and notched on a tablesaw. The brackets shown here support a small gable roof that shelters an exterior door on my shop.
Make templates first
The siding I used on my house and shop is reclaimed beetle-kill pine that’s milled and prefinished by Teton West, a lumber company in Wyoming, so I bought 4×6 beam stock for the brackets and exterior trim from them, too. The only thing I had to do is rip the stock down to the right size. I used a 1-in.-wide carbide blade on my bandsaw to make perfectly straight cuts.
With my contractor, Scott Wells, I started the job by making a full-scale drawing of the brackets on 1⁄4-in. hardboard. We then cut out templates for each of the three components: brace, post, and beam.
Cutting the parts
With the stock milled, the next step was to cut the miters for the braces on the miter saw, then to nip off the long point of each miter so that it would be square and perpendicular to the post and beams. We cut the chamfers on the tablesaw with a stop attached to the miter fence.
Next, we used a tablesaw with a dado blade to cut the notches in both ends of each brace. For repetitive work, there’s nothing better than making jigs out of your miter-gauge fences. We used the template to dial in the jig and the depth of the dado cut.
We also made a template with two stops, one for the beams and one for the posts, to plunge-rout the dadoes that receive the braces. We used the bandsaw to cut the pillowed steps in the legs.
The time invested in making templates, jigs, and stops really paid off. We were able to cut all the pieces and assemble 20 brackets in no time and didn’t make any mistakes. The joinery needed only a slight amount of trimming for minor discrepancies in material thickness.
To make the installation easier for the structural brackets that would support the small gable roofs, we added steel braces to the tops of the arms. Covered by the roof, the brackets didn’t need additional flashing. Beam ends that project past the roof are chamfered to drain water.
For more photos and details, click the View PDF button below:


