FHB Logo Facebook LinkedIn Email Pinterest Twitter X Instagram Tiktok YouTube Plus Icon Close Icon Navigation Search Icon Navigation Search Icon Arrow Down Icon Video Guide Icon Article Guide Icon Modal Close Icon Guide Search Icon Skip to content
Subscribe
Log In
  • How-To
  • Design
  • Tools & Materials
  • Restoration
  • Videos
  • Blogs
  • Forum
  • Magazine
  • Members
  • FHB House
  • Podcast
Log In

Fine Homebuilding Project Guides

Siding & Exterior Trim

Guide Home
  • Choosing Siding
  • Installing Siding
  • Choosing Exterior Trim
  • Installing Exterior Trim
  • Repairing Siding & Trim
Job Site Diaries

Installing Cedar Shingles with Woven and Flared Corners

Remodeler Nick Schiffer shares how he installs this unique cedar-shingle siding detail over a rainscreen.

By Nick Schiffer
  • X
  • facebook
  • linkedin
  • pinterest
  • email
  • add to favorites Log in or Sign up to save your favorite articles

One of our recent projects called for WC (white cedar) shingles with woven and flared corners and while we were familiar with how to install these corners. It was a first to install them while also using a rainscreen.

cedar shingles sheathing prep
Sheathing preparation.

Sheathing Prep

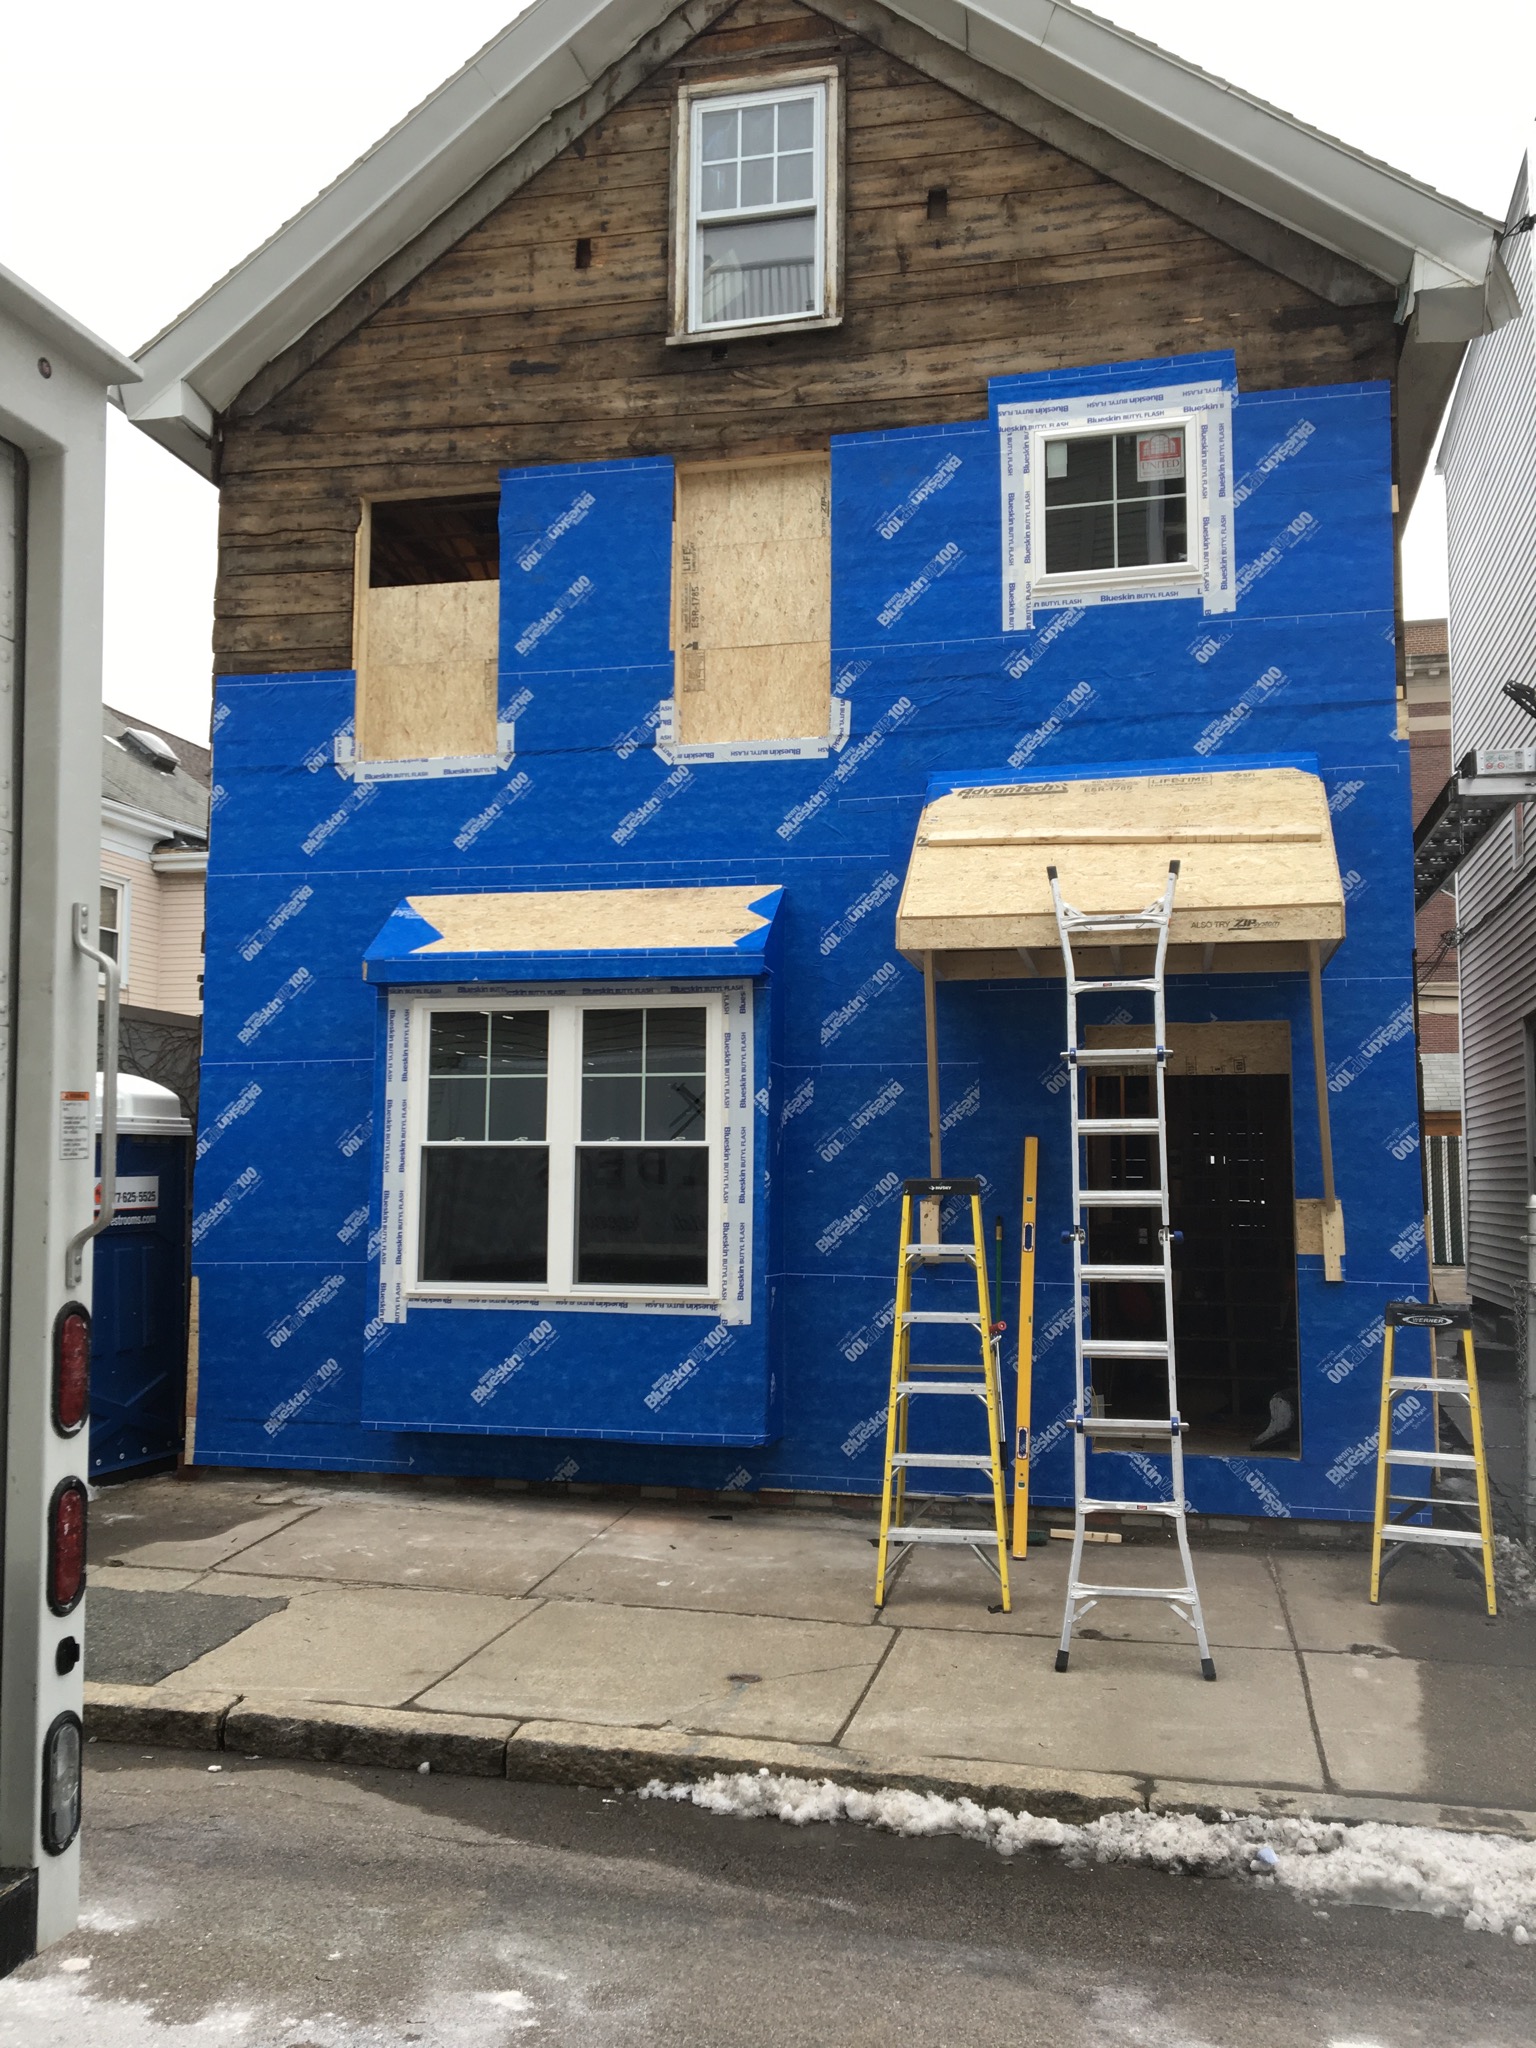
Lets first chat on how we prepped this 115 year old house. Like any renovation we moved windows and doors, fixed rotted and broken sheathing and added architectural elements to the facade. So, we began with patching the old board sheathing and wrapped the whole house with Henry VP100 Blueskin, a peel and stick “house wrap.” We then installed Obdyke Home Slicker rainscreen in preparation for the shingles.

The Flare

plywood pieces installed for flare
Plywood pieces installed to add flare

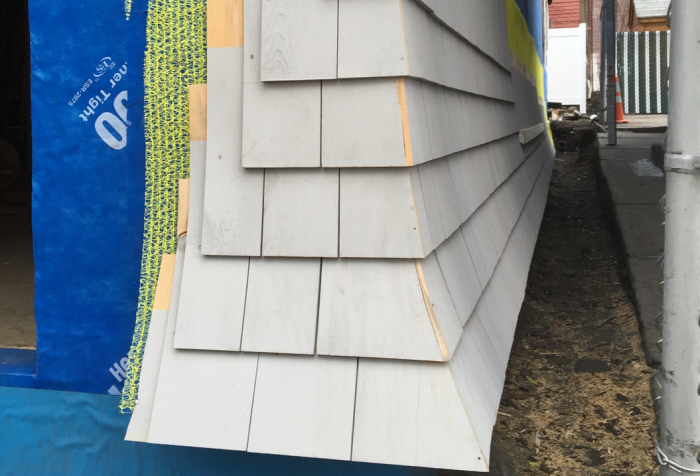
First off, why the flare? Well because it looks awesome… but also this house is located in the city and deals with tremendous grade issues with the abutting homes. And with the foundation being well below grade our goal was actually to create a faux foundation wall to help prevent water from penetrating the sheathing.

So below the flare we actually installed Henrys below grade sheet flashing which is wrapped up and under the plywood. This area will later receive a stone or brick “foundation” wall. So we needed the flare to cover the top of what will soon be this faux foundation wall. An odd, but important detail on this home.

We made a few mockups and came up with this design, keeping the construction simple. The very bottom is a 2×4 with a 20-degree bevel on it, screwed to a vertical 2×4. Installed around the entire home and mitered in the corners to keep things tight.

plywood pieces installed on house
Installed plywood.

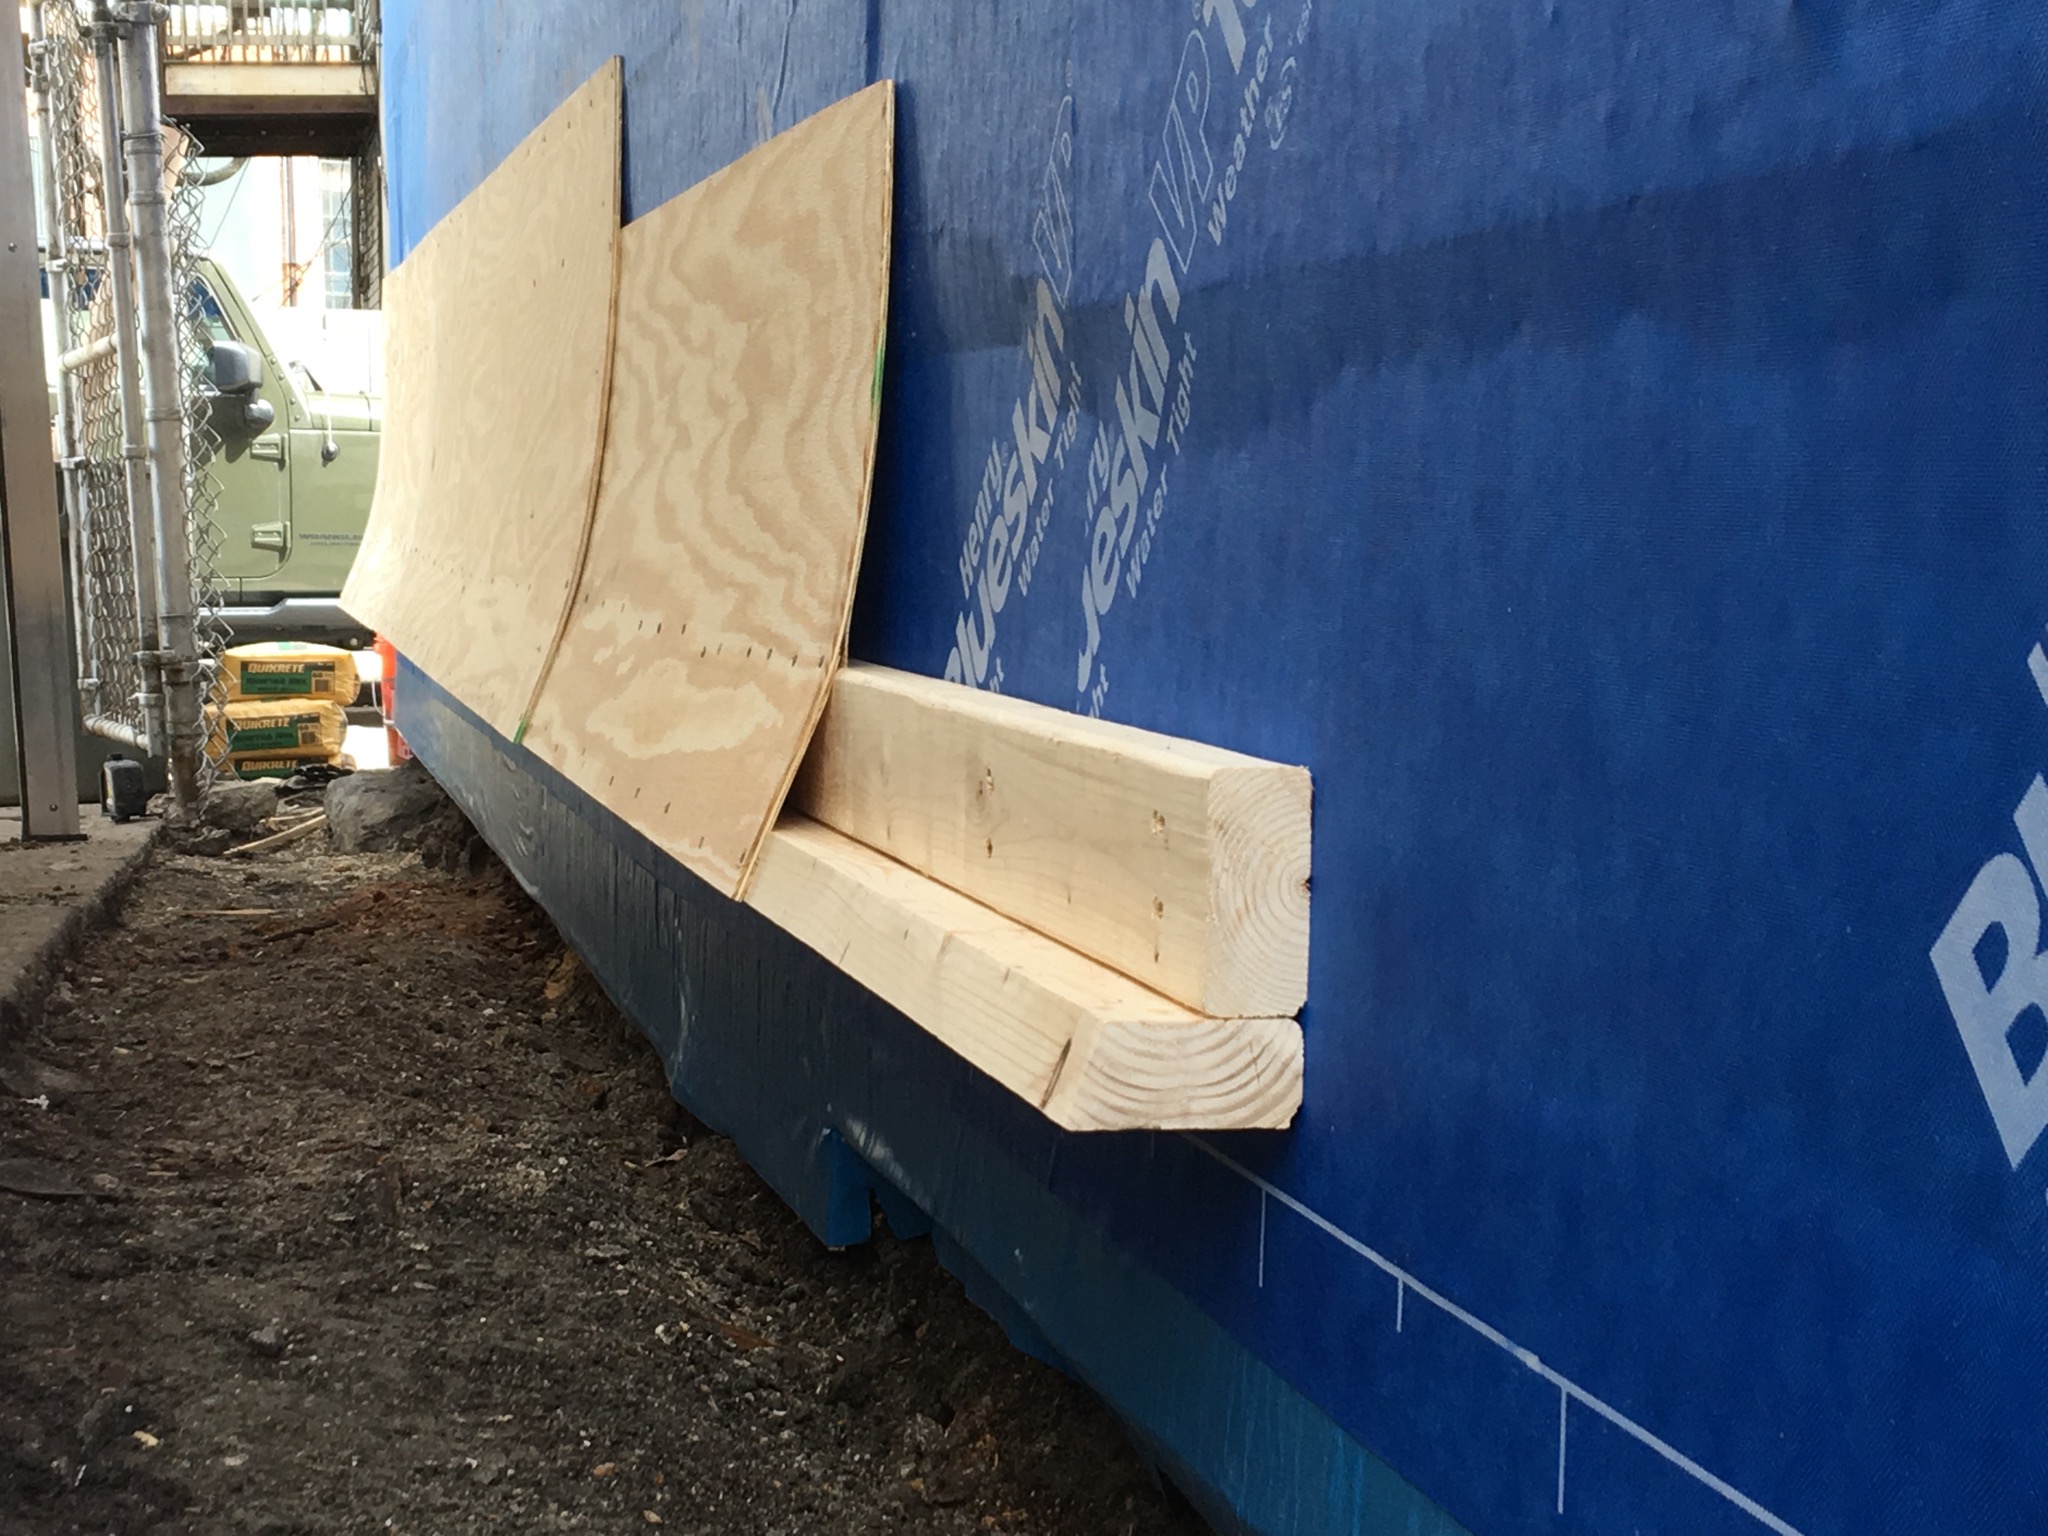
Next we installed (2) layers of 1/4″ plywood. (1) 18″ tall and (1) 24″ tall. We actually tried installing these both ways, the 18″ first and then the 24″  first. We found that the 18″ first allows for a smoother transition. The corners we cut with jig saw in place and used a router to flush them up with each wall.

We doubled up here and installed the Henry VP100 over the flare as well and topped it off  with the rainscreen. Well, except the corners.
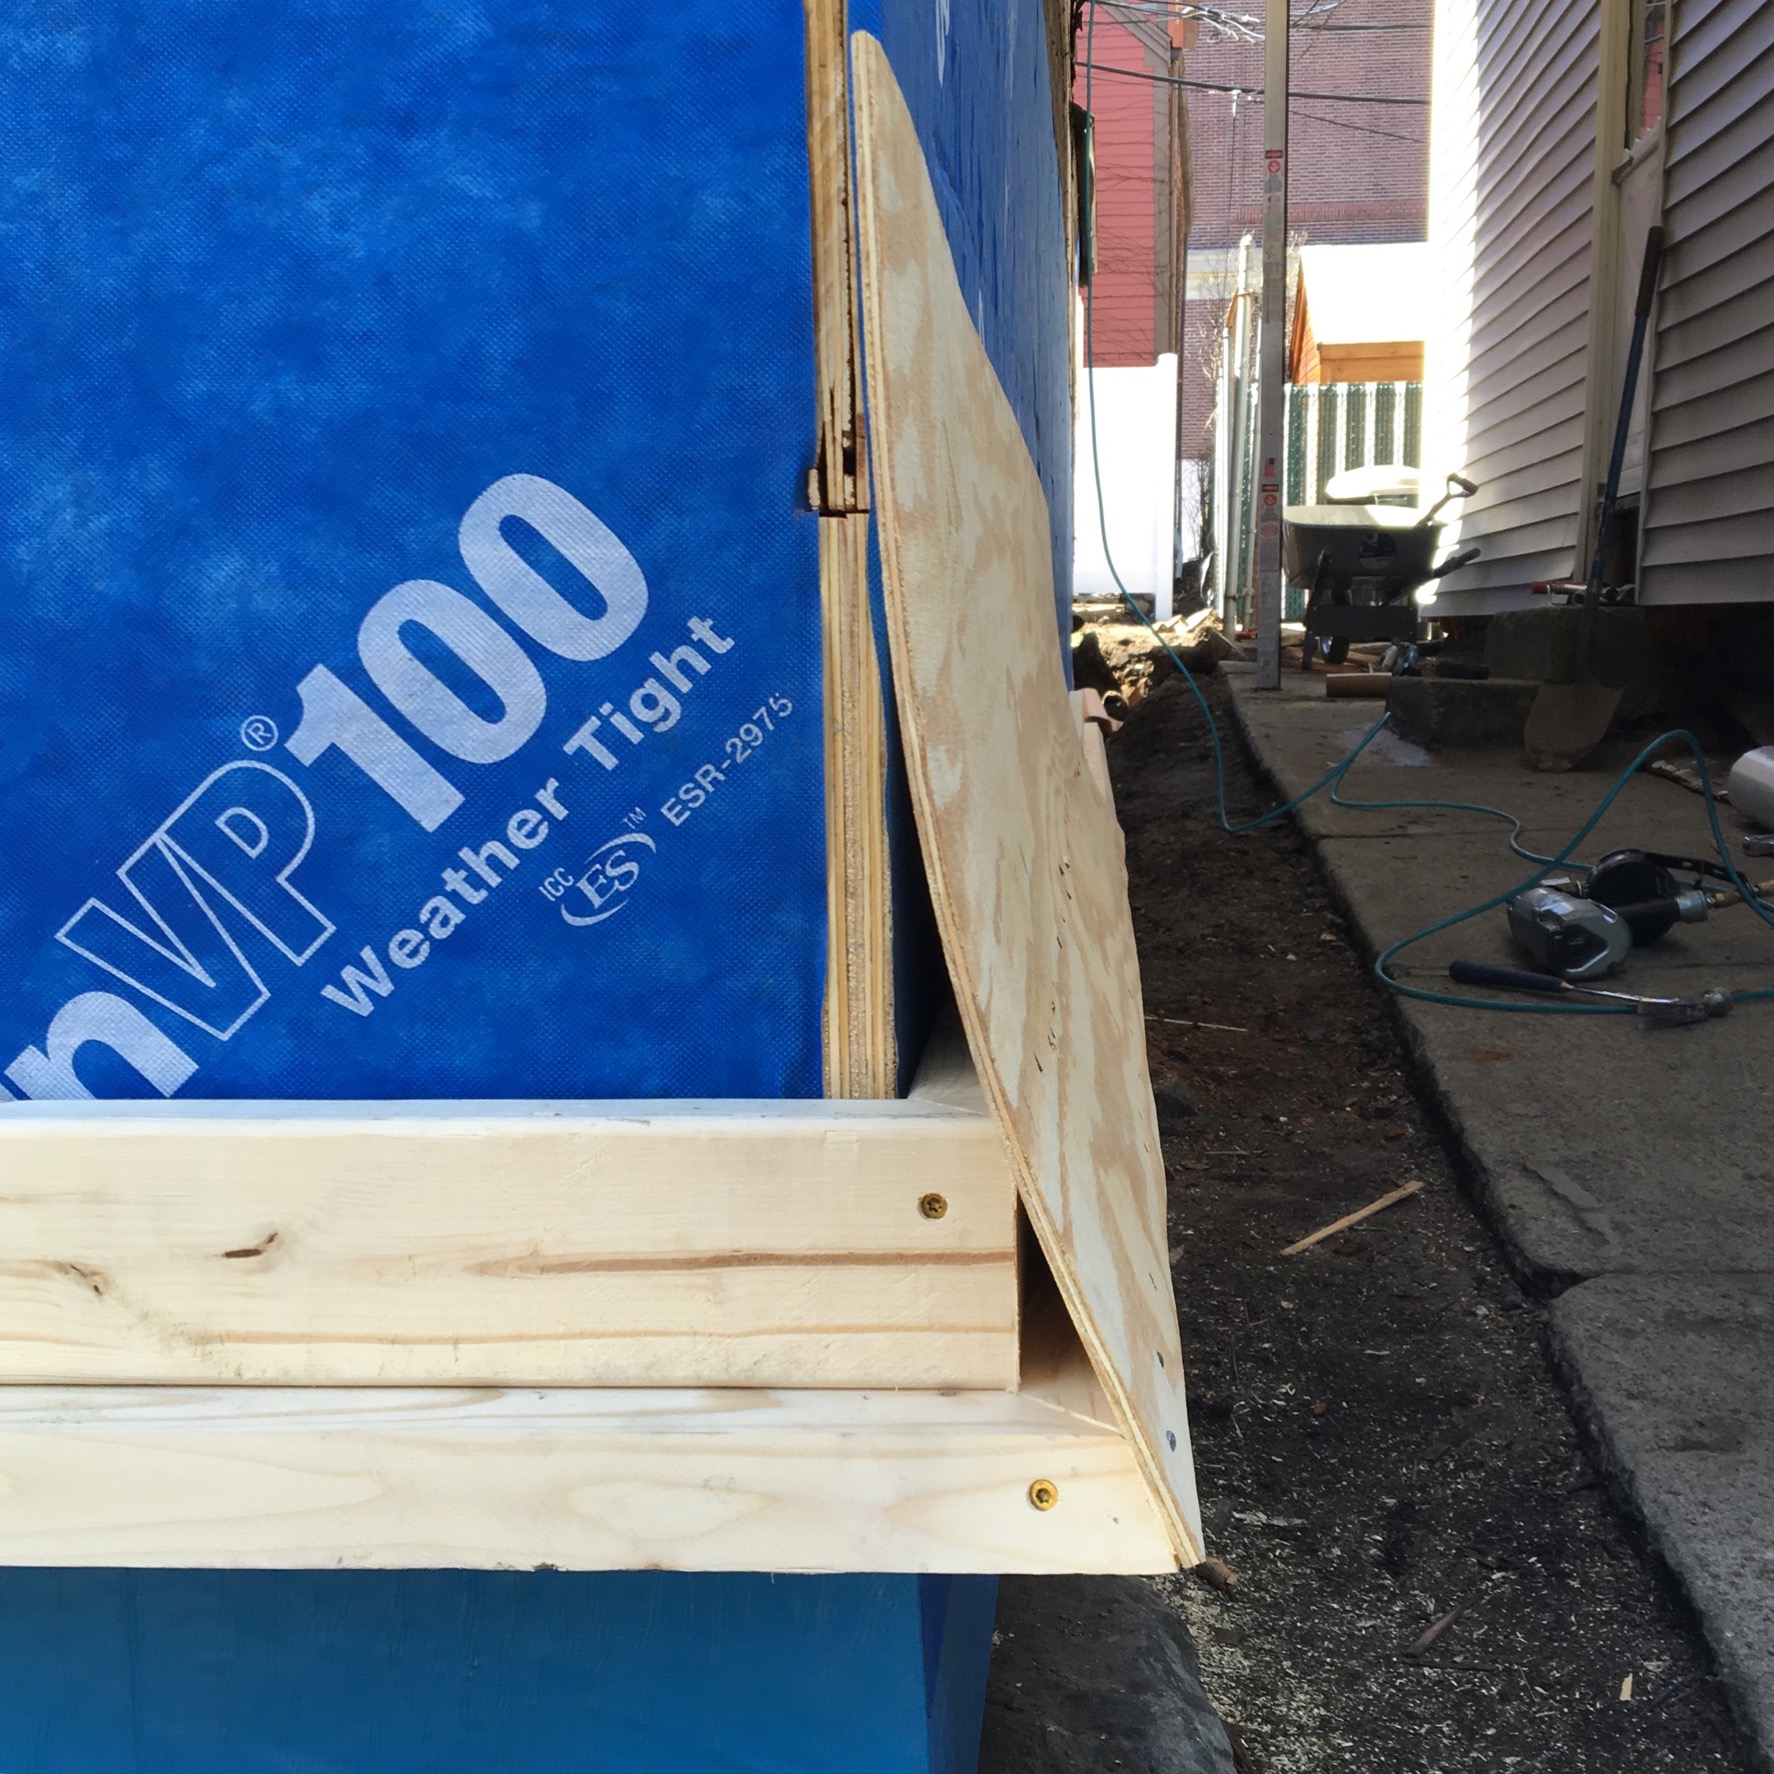
The Corners

corner installation of cedar shingles
Corner installation of cedar shingles.

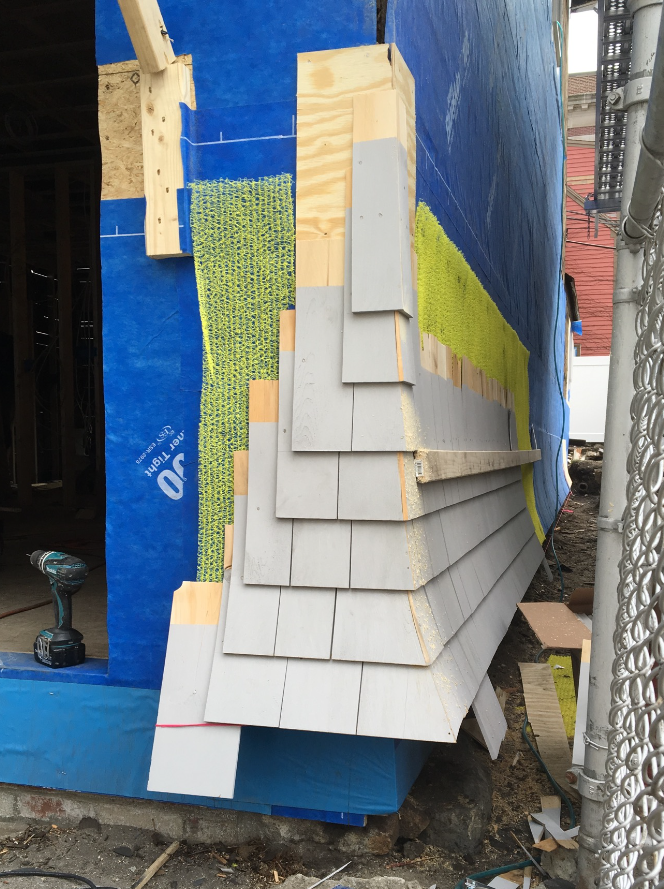
We tried, and tried and tried to install the corner shingles on top of the rain screen down at the flare. But went through a box of unsuccessful attempts. We opted to install 6″ of 1/4″ plywood up the entire corner. The 1/4″ mated up well against the 6mm rainscreen. This additional layer of plywood allowed a solid surface to to nail our flared and woven shingles against. It also allowed a nice smooth surface to run our trim router against to make the first cut on each woven corner. How do we cut the shingles? First shingle runs long, 1/4″ or so, take your trim router with 1/4″ flush trim bit and run the bearing along the plywood corner. Start the opposite shingle the same way, run it long and then run the router against the previously installed shingle. (See Router-scribed shingles)  Make sure you alternate your overlap on each course. Finally we take a small ring shank nail, pre-drill a hole 1″ up from the bottom of the shingle in the very corner and nail the two shingles together. This will help prevent them opening up over time.

Installation Wrap-up

cedar shingles installation wrap up
The corners went up first, and then the shingles between them.

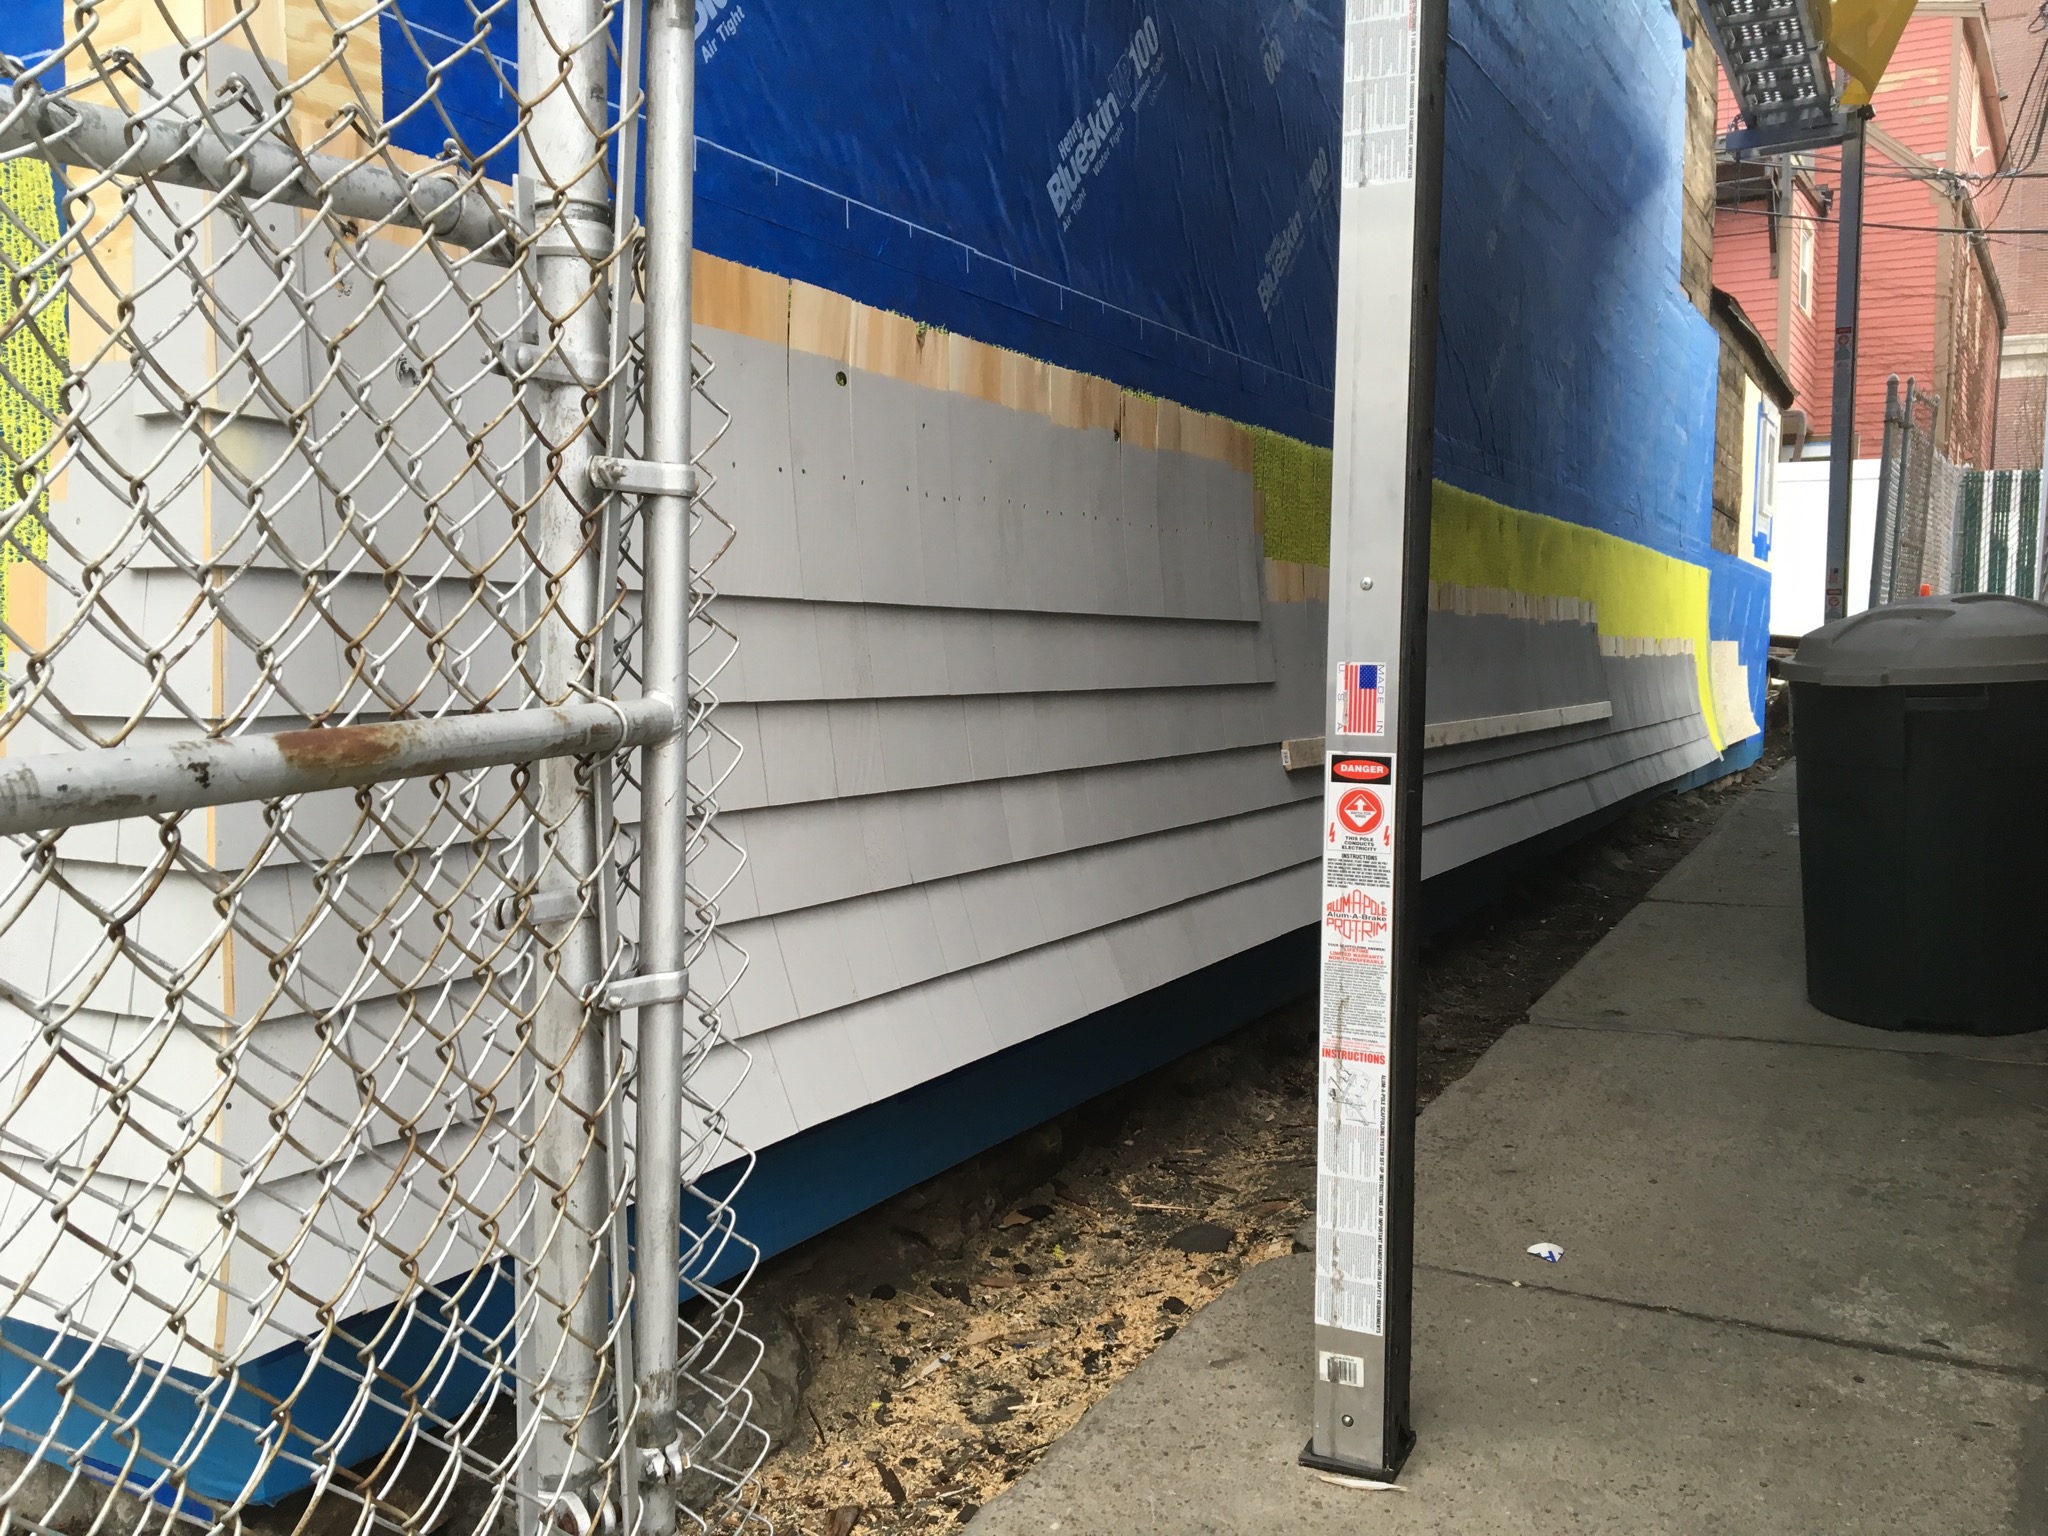
We ran the corners all the way up, and then fell back and ran the shingles between them.

For that stubborn flare, we soaked the shingles that would be installed on the first three courses to help “mold to” the curve as they were installed.

Final thought… the flare was intense, almost too intense. I think the next time we do it, we would flare the same amount out, but transition it up more than 18″/24″. We lost a lot of good shingles because that second course was just too tight of a curve.


Fine Homebuilding Recommended Products

Fine Homebuilding receives a commission for items purchased through links on this site, including Amazon Associates and other affiliate advertising programs.

Reliable Crimp Connectors

These reliable, high-quality connectors from Wirefy work on 10-22-gauge wire have heat-shrink insulation to keep out water and road salt.
Buy at Amazon

Affordable IR Camera

This camera is super useful for tracking down air leaks in buildings. The one-hand pistol grip arrangement frees your other hand for steadying yourself while maneuvering tricky job sites.
Buy at Amazon

Handy Heat Gun

This heat gun is great for drying joint compound, primer and paint when patching drywall and plaster walls. Plus it can soften adhesive, get a very cold small engine to start, and shrink heat-shrink tubing.
Buy at Amazon
Previous: Weave a Shingle Corner Next: Sidewall Shingles With a Flare

Guide

Siding & Exterior Trim

Chapter

Installing Siding

Sign up for eletters today and get the latest how-to from Fine Homebuilding, plus special offers.

Signing you up...

This site is protected by reCAPTCHA and the Google Privacy Policy and Terms of Service apply.
See all newsletters
See all newsletters

View Comments

  1. TOPnailGUNbob | Jul 07, 2016 11:48am | #1

    Great read!

  2. macsmac | Jun 11, 2017 04:55pm | #2

    Many thanks for sharing your experience and knowledge. I'm about to start a very similar renovation. Can you offer any more insight to working with the particular rainscreen product? Is it spongy when fastening? Staples vs nails?

  3. Jeff in Michigan | Mar 22, 2018 05:54pm | #3

    Very helpful! How did you build the faux foundation? I'm trying to figure out how to build one on my cottage (it has a block foundation, but I'll need to space the stone veneer out from the block, and run it up an over the lower portion of the existing stick built wall).

  4. mg11 | Feb 22, 2022 09:37pm | #4

    How do you install downspouts to not hide the woven corners on a straight (not flared) application? Thanks

Log in or create an account to post a comment.

Sign up Log in

Become a member and get full access to FineHomebuilding.com

Siding & Exterior Trim

Siding & Exterior Trim

Trusted, comprehensive guidance from the pros for choosing, installing, and repairing siding and exterior trim

View Project Guide

View All Project Guides »

Become a member and get unlimited site access, including the Siding & Exterior Trim Project Guide.

Start Free Trial

Choosing Siding
  • Materials
  • Design Options
Installing Siding
  • Siding Basics
  • Lap Siding
  • Shingle Siding
  • Board & Batten
  • Fiber Cement and Composite Siding
  • Vinyl Siding
  • Masonry Claddings
Choosing Exterior Trim
  • Trim Materials
  • Trim Design
Installing Exterior Trim
  • Trim Basics
  • Roof Eaves Trim
  • Corner Boards
  • Corbels & Brackets
  • Window & Door Trim
Repairing Siding & Trim
  • Trim Repairs
  • Siding Repairs

Fine Home Building

Newsletter Sign-up

  • Fine Homebuilding

    Home building tips, offers, and expert advice in your inbox.

  • Green Building Advisor

    Building science and energy efficiency advice, plus special offers, in your inbox.

  • Old House Journal

    Repair, renovation, and restoration tips, plus special offers, in your inbox.

Signing you up...

This site is protected by reCAPTCHA and the Google Privacy Policy and Terms of Service apply.
See all newsletters

Follow

  • Fine Homebuilding

    Dig into cutting-edge approaches and decades of proven solutions with total access to our experts and tradespeople.

    Start Free Trial Now
    • Facebook
    • Instagram
    • X
    • LinkedIn
  • GBA Prime

    Get instant access to the latest developments in green building, research, and reports from the field.

    Start Free Trial Now
    • Facebook
    • YouTube
  • Old House Journal

    Learn how to restore, repair, update, and decorate your home.

    Subscribe Now
    • Facebook
    • Instagram
    • X

Membership & Magazine

  • Online Archive
  • Start Free Trial
  • Magazine Subscription
  • Magazine Renewal
  • Gift a Subscription
  • Customer Support
  • Privacy Preferences
  • About
  • Contact
  • Advertise
  • Careers
  • Terms of Use
  • Site Map
  • Do not sell or share my information
  • Privacy Policy
  • Accessibility
  • California Privacy Rights

© 2025 Active Interest Media. All rights reserved.

Fine Homebuilding receives a commission for items purchased through links on this site, including Amazon Associates and other affiliate advertising programs.

  • Home Group
  • Antique Trader
  • Arts & Crafts Homes
  • Bank Note Reporter
  • Cabin Life
  • Cuisine at Home
  • Fine Gardening
  • Fine Woodworking
  • Green Building Advisor
  • Garden Gate
  • Horticulture
  • Keep Craft Alive
  • Log Home Living
  • Military Trader/Vehicles
  • Numismatic News
  • Numismaster
  • Old Cars Weekly
  • Old House Journal
  • Period Homes
  • Popular Woodworking
  • Script
  • ShopNotes
  • Sports Collectors Digest
  • Threads
  • Timber Home Living
  • Traditional Building
  • Woodsmith
  • World Coin News
  • Writer's Digest
Active Interest Media logo
X
X
This is a dialog window which overlays the main content of the page. The modal window is a 'site map' of the most critical areas of the site. Pressing the Escape (ESC) button will close the modal and bring you back to where you were on the page.

Main Menu

  • How-To
  • Design
  • Tools & Materials
  • Video
  • Blogs
  • Forum
  • Project Guides
  • Reader Projects
  • Magazine
  • Members
  • FHB House

Podcasts

  • FHB Podcast
  • ProTalk

Webinars

  • Upcoming and On-Demand

Podcasts

  • FHB Podcast
  • ProTalk

Webinars

  • Upcoming and On-Demand

Popular Topics

  • Kitchens
  • Business
  • Bedrooms
  • Roofs
  • Architecture and Design
  • Green Building
  • Decks
  • Framing
  • Safety
  • Remodeling
  • Bathrooms
  • Windows
  • Tilework
  • Ceilings
  • HVAC

Magazine

  • Current Issue
  • Past Issues
  • Magazine Index
  • Subscribe
  • Online Archive
  • Author Guidelines

All Access

  • Member Home
  • Start Free Trial
  • Gift Membership

Online Learning

  • Courses
  • Project Guides
  • Reader Projects
  • Podcast

More

  • FHB Ambassadors
  • FHB House
  • Customer Support

Account

  • Log In
  • Join

Newsletter

Get home building tips, offers, and expert advice in your inbox

Signing you up...

This site is protected by reCAPTCHA and the Google Privacy Policy and Terms of Service apply.
See all newsletters
See all newsletters

Follow

  • X
  • YouTube
  • instagram
  • facebook
  • pinterest
  • Tiktok

Join All Access

Become a member and get instant access to thousands of videos, how-tos, tool reviews, and design features.

Start Your Free Trial

Subscribe

FHB Magazine

Start your subscription today and save up to 81%

Subscribe

We hope you’ve enjoyed your free articles. To keep reading, become a member today.

Get complete site access to expert advice, how-to videos, Code Check, and more, plus the print magazine.

Start your FREE trial

Already a member? Log in

Privacy Policy Update

We use cookies, pixels, script and other tracking technologies to analyze and improve our service, to improve and personalize content, and for advertising to you. We also share information about your use of our site with third-party social media, advertising and analytics partners. You can view our Privacy Policy here and our Terms of Use here.

Cookies

Analytics

These cookies help us track site metrics to improve our sites and provide a better user experience.

Advertising/Social Media

These cookies are used to serve advertisements aligned with your interests.

Essential

These cookies are required to provide basic functions like page navigation and access to secure areas of the website.

Delete My Data

Delete all cookies and associated data