Install the Starter Strips and the Trim for Vinyl Siding
These trim details are designed to hide or interlock with the ends and edges of vinyl siding; get them right and the next steps will go smoothly.

Note: This book excerpt contains timeless tips for installing siding, but the photos fail to depict comprehensive water management details. Before you begin any siding job, be sure to install a proper water-resistive barrier (WRB) and use good flashing details on all windows, doors, and other penetrations.
The most important thing to keep in mind as you’re installing vinyl siding is that it expands and contracts significantly with temperature changes. All siding components and installation details are designed to cope with this temperature-induced movement. Review the installation information discussed throughout this chapter. Make sure you comply with the manufacturer’s instructions that come with the siding. It’s also smart to check with builders in your area for any local wisdom. This is the best way to avoid the bulges, buckles, and tears that can result from incorrect installation. Most vinyl siding should not be nailed firmly against sheathing. The installation slots in the siding, starter strips, and other vinyl components are there for a reason. Keep the nail heads proud of the vinyl so that the vinyl can move.
The tools you need to install vinyl siding are mostly tools you probably already own, but there are a few others you’ll need to either buy or make.
Starter Strips
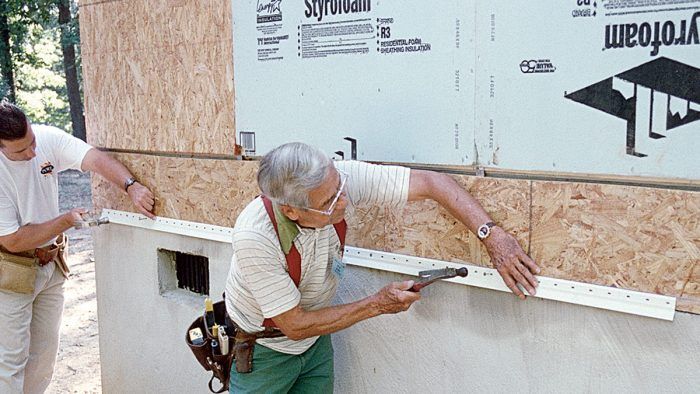
The installation of vinyl siding begins with different trim elements: starter strips, inside corners, outside corners, J-channel, and so on. The various trim details are designed to hide or interlock with siding ends and edges. As with other homebuilding phases, if you get started right, the next steps follow more smoothly. The critical first step is to put on a straight and level starter strip right above the top of the concrete foundation wall or slab. This strip can usually be installed by nailing through the sheathing and into the bottom of the mudsill or sole plate. The strip’s bottom edge can then extend about 1 in. over the concrete.
With a house that is covered with housewrap, it is not always easy to see where to nail the starter strip. One way to establish the exact height of the strip is to measure down from the underside of the joist chords on the roof trusses and mark the proper height at various points around the house. This will ensure that the starter strip is level and equidistant from the top plates. Connect these points with a chalkline all around the house. On long walls, keep the line from sagging in the middle by having someone hold the line to a height mark near the middle of the wall, then snap the chalkline from the center to both corners.
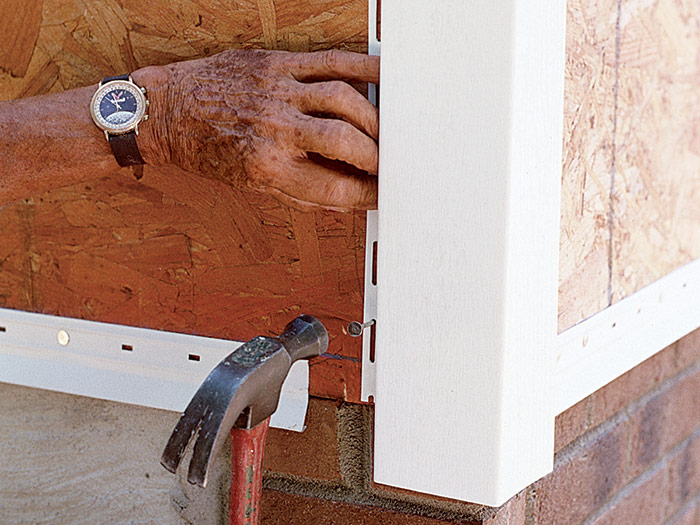
To secure the starter strip, drive nails in the center of the installation slots, spacing them every 12 in. to 14 in. Leave at least 1⁄4 in. to 1⁄2 in. of expansion room between sections of starter strip as you install it around the building, and drive your first nail in each piece no less than 4 in. from an end. Remember: The strip must be able to move beneath the nail heads. At a wall’s outside corner, the starter strip must be 1 in. or more from the vinyl corner trim, as shown in the photo. Keep the strip 11⁄2 in. to 2 in. from the inside corners.

| TIP: Don’t nail it—hang it. If you remember that most vinyl siding is hung rather than nailed, you’ll avoid the common error of driving nails tightly against the siding. |
Corner Trim, J-channel, and Undersill Trim
The corner trim pieces, which receive the ends of the vinyl siding panels, must be installed straight and plumb or they won’t look attractive. Hold a short, cutoff piece of vinyl corner post against the sheathed corner of the house and mark the edge of the flange on both sides of the corner at the top and bottom of the wall. Snap a chalkline between the marks. Set a corner post 1⁄4 in. to 1⁄2 in. down from the soffit, and drive a 11⁄2-in.-long nail at the top of a slot on both sides of the corner. The corner post hangs from these nails, allowing the vinyl to move. Hold the posts directly on the chalklines and drive nails about every 12 in. in both flanges, down to the bottom of the wall. Keep each nail in the center of its slot. The corner posts should extend 1⁄2 in. to 1 in. below the starter strip.
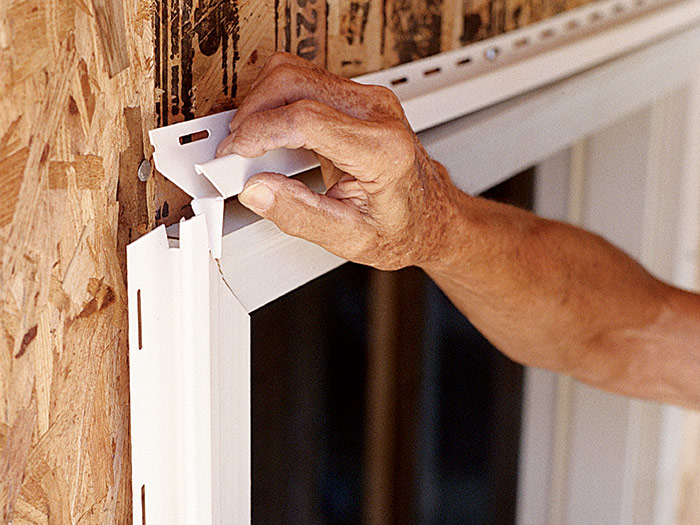
Most doors and windows have factory-made siding channels. If yours do not, install J-channel along the top and sides of the window to hide the ends of the siding. You can use a miter or a square cut at the top corners. Either way, at the ends of the top piece, leave 1-in.-long drain tabs that can be folded down over the window sides. This helps channel water down around the window (see the photo).

Excerpted from Habitat for Humanity: How to Build a House, by Larry Haun
Available at Amazon.com and in the Taunton Store.


