The Efficient Way to Trim Exterior Windows
The key to durable trim and a safer and faster job is to assemble the trim first and install it later.

Synopsis: Trimming exterior windows can be an ordeal, unless you learn the lessons that Seattle builder Mike Vacirca presents in this article. Vacirca’s process for exterior windows begins by assembling the trim first, then installing it as one piece. He starts by measuring every window to be sure he has correct dimensions. Vacirca then mills the windowsills, and is sure to keep the casing square during assembly. Finally, he installs the unit, nailing in the casing but screwing in the sill.
I can no longer call myself a trim carpenter because these days, I do a little bit of everything. I was a trim carpenter for most of the past 15 years, though, and a boat builder before that, so I feel comfortable saying that I know a thing or two about trimming out a window, and about how water affects wood.
Every time I dropped a piece of window trim from scaffolding 30 ft. in the air, I found myself remembering another career past, the days I spent working in a cabinet shop, where work is easy to control and weather isn’t a concern. Finally, I came to my senses when I was presented with 27 windows to trim for one house. That job helped me to develop a method for installing exterior trim that’s easier on my body, that is safer and faster, and that also yields more durable results. To make this process as efficient as possible, I even prime, putty, and paint the casings before installation.
Cutlists and stations add efficiency
When I worked in the cabinet shop, I organized my projects with cutlists and made shop drawings that showed how everything was going to be built before a saw ever touched wood. The process I created for assembling window trim in the shop starts with that premise. As with the cabinet work, I organize the shop into efficient workstations to build the trim. I want the workflow to move so that the pieces are cut and the assembly happens in such a way that a few folks can work at the same time and not get in each other’s way. The process, however, begins on site.
When the windows arrive, I grab a tape measure, get a notebook, and make a list of all the windows. I measure each to determine the finished height and width so that I can make a cutlist. I add 1⁄8 in. to each dimension to allow for caulk and to be sure the casing units will install easily by just slipping over the windows. Finally, I break everything into a formula. To keep track of which window is which, I use the lettered labels attached to them at the factory. Once the casing unit is built, I mark the respective letter on its back.
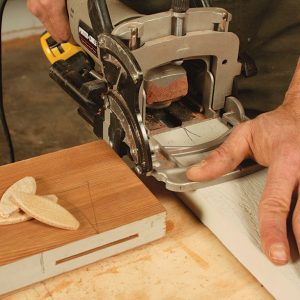
I install painted trim, so I build everything with primed stock. I cut all the pieces first, then assemble each unit with biscuits, glue, and screws to ensure that joints won’t open over time. Once all the units are built, and the nail and screw holes are filled, I prime any exposed wood and give everything a first coat of finish paint.
Get the proportions right
The windows on the project featured here are a mixture of Marvin (www.marvin.com) double hung, casement, and fixed units. All of the windows have aluminium-clad exteriors and primed wood interiors, and they are installed with a nailing flange. The nailing flange is set 1 in. back from the face of the unit, which in turn ends up 1 in. proud of the unsided building.
Because one of the functions of the trim is to protect the window, I like to use at least 5/4-in. stock. Likewise, if there is going to be a reveal between the two components in this assembly, I prefer that the trim be proud of the window. Leaving the window proud of the trim looks cheap.
Getting the trim width correct can be a bit trickier. Stock dimensions (31⁄2-in. and 51⁄2-in. boards) rarely create pleasing proportions. The right width typically depends on the size, the shape, and the style of the house and windows.
The windows on this house called for a Craftsman-style trim design, which I created using various reveals. By bumping the head casing up to 11⁄2 in. thick and by having it extend past the legs by 1⁄2 in. on each side, I was able to do two things. First, the thicker head casing provided additional protection to the window. Second, the 1⁄4-in. reveal between the head and legs added a subtle shadowline to create an interesting look. Both the head and the leg stocks are factory-primed finger-jointed cedar. It’s stable and weather resistant, and it takes paint well. I eased the edges for a softer look and a more durable finish.
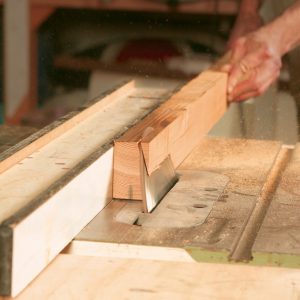
I milled the sill from durable Douglas fir. The sill’s shape is all about function. The top is pitched to shed water, and the bottom is kerfed to prevent water from wicking up behind the trim.
I made the sill run past the casing by 1⁄4 in. on each side as well. I plugged the head and the sill reveals into my formula, so I was able to cut everything first and assemble the pieces later.
I’ve used this process on four projects now with four different window-trim styles, and the results have been uniformly awesome. The trim units go up quickly and painlessly, and the painter I work with loves making just one trip to fill nail and screw holes and to caulk, and one trip for a final (second) coat. I don’t have to worry as much about the weather, and my body is thankful for the additional rest.
Mill the sill
Use a stable material like clear vertical-grain Douglas fir (shown here). Shape the stock, add a drip edge, then prime with a high-quality exterior primer.
Keep the casing square during assembly
Biscuit the legs to the head, and glue and nail the sill to the legs. Use an exterior glue such as Titebond III (www.titebond.com). Dry-fit the pieces before assembly. One bar clamp is enough to hold things together as the glue dries. Use a framing square to check the assembly throughout the process.
Nail the casing; screw the sill
The unit slips over the window, then is attached to the house with finish nails and screws. The legs and head are caulked between the casing and the window; later, the head casing is flashed into the housewrap.
Photos courtesy of Chris Ermides.
RELATED LINKS


