Site-Built Shower Pans
Code expert Glenn Mathewson explains the details required by code and modern plumbing standards when fabricating a shower pan.

Synopsis: Code expert Glenn Mathewson explains the details required by code and modern plumbing standards when fabricating a shower pan, including the two-part drain assembly, the subbase material and slope, the curb height, and the liner application.
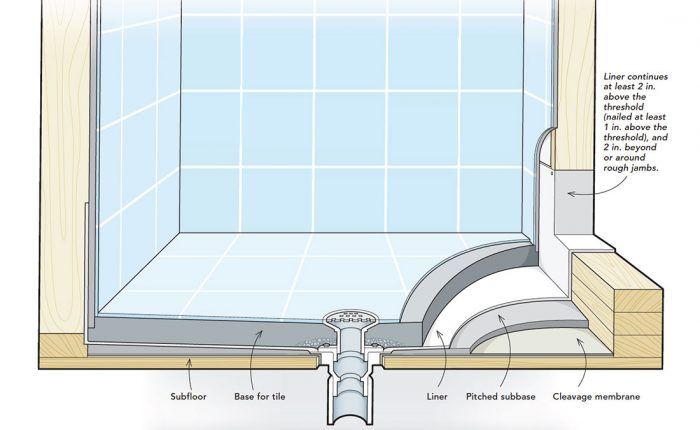
Click here to enlarge illustration.
Field-fabricated shower pans (or “receptors,” as the code refers to them) have been acknowledged by plumbing codes at least as far back as the 1955 Uniform Plumbing code. Built in place from various parts and pieces, site-built shower pans allow for an endless variety of shower-floor arrangements, including curbless, roll-in showers.
While the 1955 code permitted site-built pans only in special cases where the installation of a premade pan was demonstrably impractical, such pans are now common and have their own provision in section P2709 of the IRc. A major perk of site-built shower pans is that they allow the installation of custom tile, stone, or other aggregate floor surfaces. The downside of these finishes is that they aren’t themselves waterproof.
Because of this, hand-fabricating shower pans can increase the chance of failure, and code provisions generally address two hazards: leaks and sanitation. A minor leak may only be discovered after the nearby walls or floor below are heavily damaged (code is not concerned with a visible escape of water pouring out onto your bathroom floor, but rather a sneaky invisible leak). And if the pan isn’t properly sloped to carry water to the drain, water standing in the pan can become a petri dish of bacteria and possibly a slipping hazard.
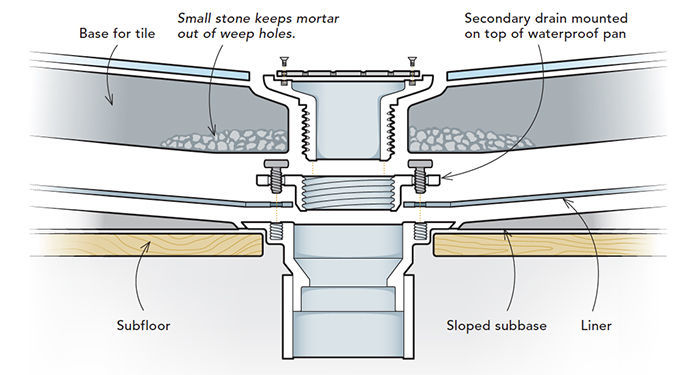
There are many resources available regarding the techniques and skills required to assemble a quality site-built shower pan, but they often fall short in explaining the details required by modern plumbing standards. The first step in a site-built shower pan installation— and the first signal to the inspector of what’s to come—is the two-part drain assembly. Like all drains, the intent is for bulk water to drain through the visible drain opening. But these drains go a step further. Long showers, slow drains, or minor cracks or shrinkage in the grout can allow some water to sneak through the shower floor’s surface. A secondary drain, mounted on the waterproof pan under the shower’s finished floor, drains this water away.
When an inspector shows up to do the rough-plumbing inspection and sees a two-part drain in place, it triggers a future inspection that not every house receives: a shower-liner inspection, detailed in section P2503.6 of the IRc. It also prompts the verification of solid blocking in the walls surrounding the shower for backing and attaching the liner. This blocking or backing often isn’t easily visible once the liner is installed. The liner itself must be recessed into its backing “so as not to occupy the space required for the wall covering.” In other words, the face of the liner should be flush with the face of the studs so the wall covering can be installed flat to the wall. A surprise to many, this means the blocking and studs may need to be shaved down by the thickness of the liner material to accommodate it.

Before the liner is installed, a solid subbase must be installed to create a smooth and uniform slope to the drain. The subbase must slope 1/4 in. per ft. toward the drain from all portions of the pan. Modern shower styles use offset drains or linear drains for a sleek look that keeps the drain out from underfoot when showering. Whatever the drain’s shape and location, the sloped subbase is critical to moving bulk water from the shower floor, and the sneaky water that gets through it, toward the drain.
Shower curbs, which prevent bulk water from running out of the shower, are not required, but there are provisions for their installation when they’re included (and where they are incorporated, they’re typically roughed in before the subbase). Curbs must be at least 2 in. higher than the drain, but not more than 9 in. higher. Because they act as dams that can raise water level in the shower area, the top of an included curb becomes the benchmark for the height of waterproofing. For curbless showers without such a dam, the floor-level threshold at the opening serves the same purpose. It is where visible water will escape and limit the rise of water up the walls.
After the sloped subbase is in, the liner can be installed. The code offers a number of choices for this application, from the time-tested but relatively outdated use of lead sheets and hot-mopped layers of asphalt felt to the common plastic liners used today. Alternative, proprietary products are also popular and can be approved locally. Whatever the product, the liner must extend at least 2 in. beyond and around rough jambs at the opening and at least 2 in. above the finished threshold, whether it’s at the floor level or on a raised curb. Perforations or nails cannot penetrate the liner less than 1 in. above the finished threshold.
With the liner installed and visible, the next step is the leak test. The drain must be sealed so the pan can be filled with water to a depth of at least 2 in., measured at the threshold. Where there’s no curb at the threshold, as in a curbless design, a temporary curb must be constructed for the leak test. This is often just a piece of lumber laid in place with an additional length of liner draped over it. This can be tricky to set up and should be planned for ahead of time when building a curbless shower.
Though few enjoy being tested, leak tests should be low-stress occasions because the installer has the answer key. There are no special qualifications necessary to observe a wet floor, so the inspector should have little to do other than nod at a full pan and a dry floor. If the liner doesn’t leak for the 15-minute duration of the test, it passes. If it leaks, it fails. It’s important to not make a mess when filling the pan for the test, as a dry floor is necessary to ensure there are no leaks.
The question of whether the code requires a similar liner over shower seats often comes up, but the IRC offers no guidance here. common sense would dictate that the same minimum 1/4-in-12 slope is critical to keep bulk water moving. The finished floors of showers can slope up to 1/2-in- 12; anything steeper could be a slip hazard. For a seat designed for sitting, that hazard could be argued as “bather beware” if he chooses to stand on it. But remember, the code is a minimum standard and not a measure of fine home building. It would always be wise to waterproof the seat in some manner.
From Fine Homebuilding #284


