FHB Logo Facebook LinkedIn Email Pinterest Twitter X Instagram Tiktok YouTube Plus Icon Close Icon Navigation Search Icon Navigation Search Icon Arrow Down Icon Video Guide Icon Article Guide Icon Modal Close Icon Guide Search Icon Skip to content
Subscribe
Log In
  • How-To
  • Design
  • Tools & Materials
  • Restoration
  • Videos
  • Blogs
  • Forum
  • Magazine
  • Members
  • FHB House
  • Podcast
Log In

Fine Homebuilding Project Guides

Tiling

Guide Home
  • Selecting Tile
  • Tools & Techniques
  • Installation Materials
  • Preparation
  • Tiling Floors
  • Tiling Walls & Backsplashes
  • Tiling Showers
  • Grouting, Sealing & Caulking
  • Maintenance & Repair
Job Site Diaries

7 Steps to Float a Dry-Pack Shower Pan

Learn how to properly mix dry-pack mortar, form the screeds, and pull the mortar to ensure a consistent pitch or perfectly flat substrate.

By Tyler Grace
  • X
  • facebook
  • linkedin
  • pinterest
  • email
  • add to favorites Log in or Sign up to save your favorite articles

As a remodeling contractor, I do my best to have a firm grasp of all  construction trades. When I began working in the industry, I believed that certain traditional methods were to be practiced only by aged craftsmen with years of experience. As I learned to set tile, one of my biggest anxieties was teaching myself how to work with dry-pack mortar. Whether it was to flatten a floor or to pitch a shower pan, it seemed to be very complicated – the way you had to mix the mortar, forming the screeds, pulling the mortar, and ensuring a consistent pitch and perfectly flat substrate. Long story short, I learned that with proper knowledge and patience it’s a great technique to add to your arsenal, and it is actually somewhat fun. It’s important to get this detail right since it affects the long-term durability of the shower. No matter what the building inspector says, it’s not a good idea to install a pan liner and then a single, sloped mortar bed over it. Water that gets into the mortar bed won’t be able to drain out. Install the liner over a pre-sloped bed, as I explain here.

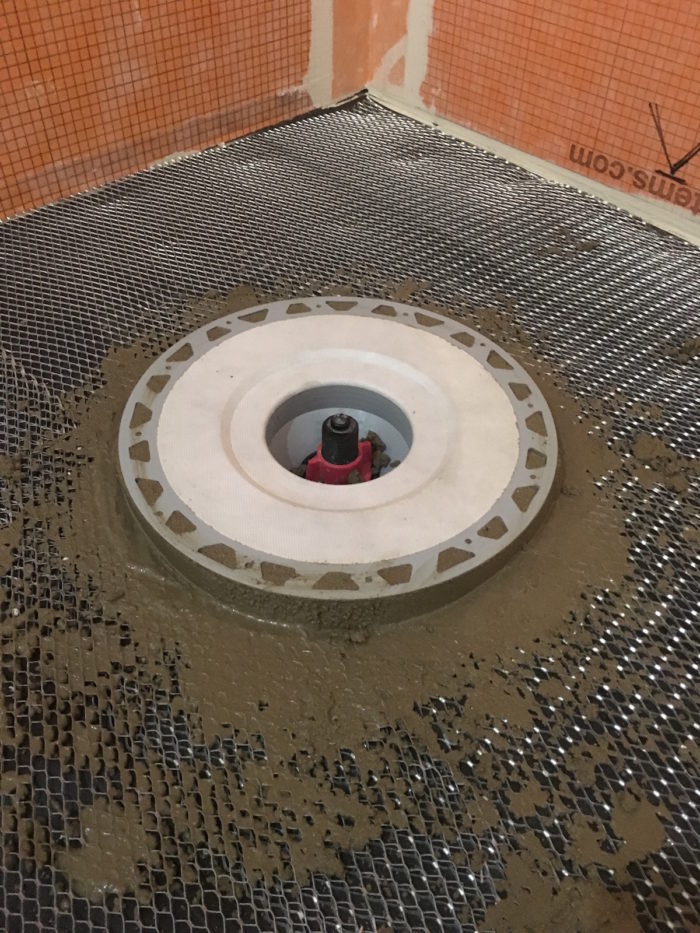
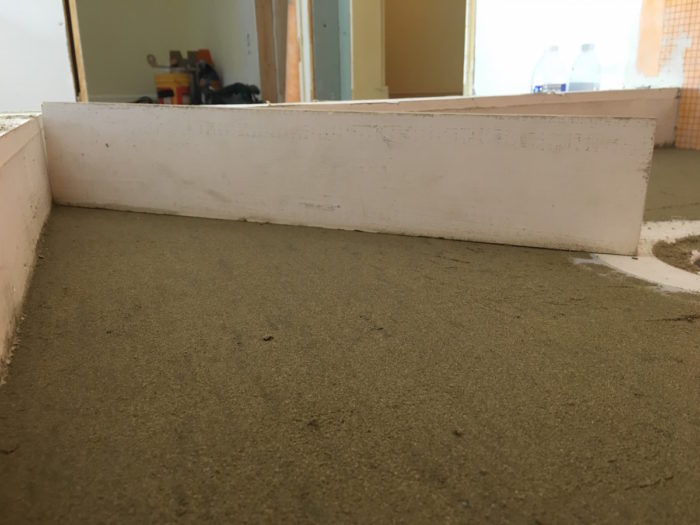
Step 1: Reinforce the shower pan. I used an unbonded mortar bed, so I have a tar paper slip sheet on the subfloor with wire mesh stapled to the top of it.

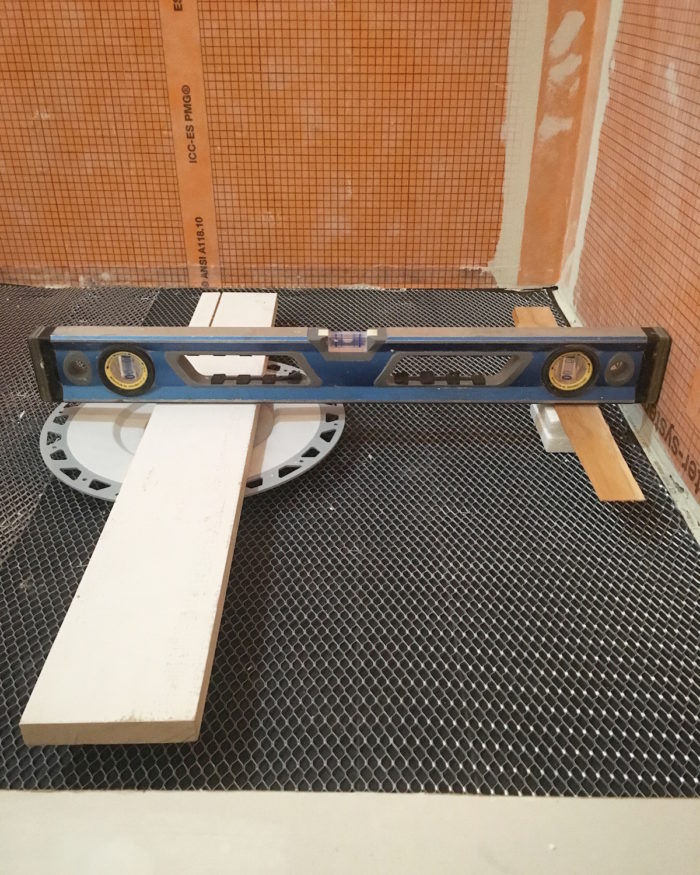
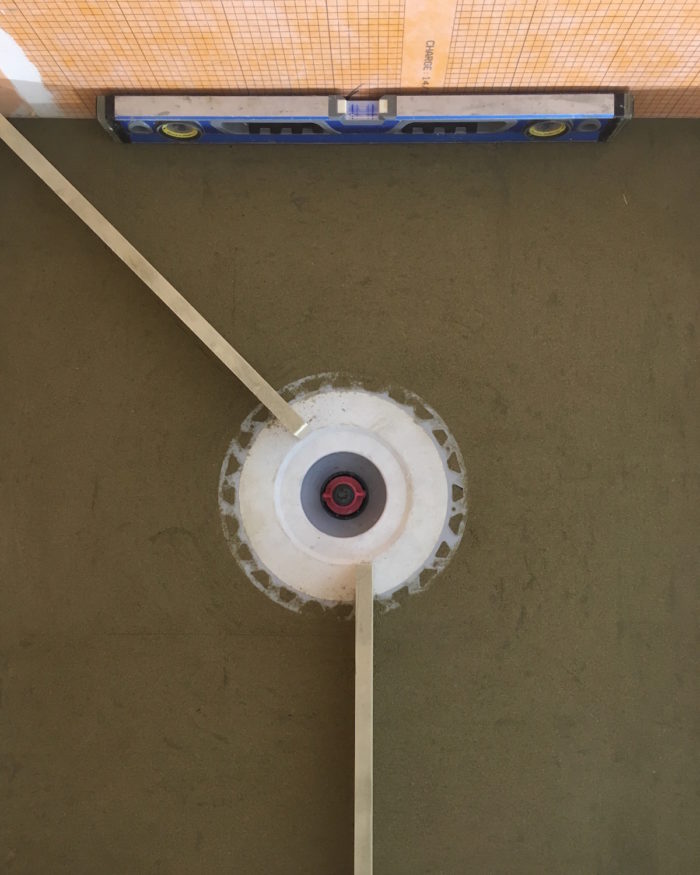
Step 2:  Determine the drain height, and the height of the perimeter screeds relative to the drain (in my case, the drain system dictated the drain height above the subfloor). Generally, you want 1/4 in. of pitch per linear foot for the water to drain. In this case, the farthest point  from the drain was a corner 36 in. away, so I made the pitch 3/4 in. above the top of the drain all the way around the pan. This means some areas of the pan will have a pitch greater than 1/4 in. per foot, but that is okay.

determine the drain height, and the height of your perimeter screeds relative to the drain

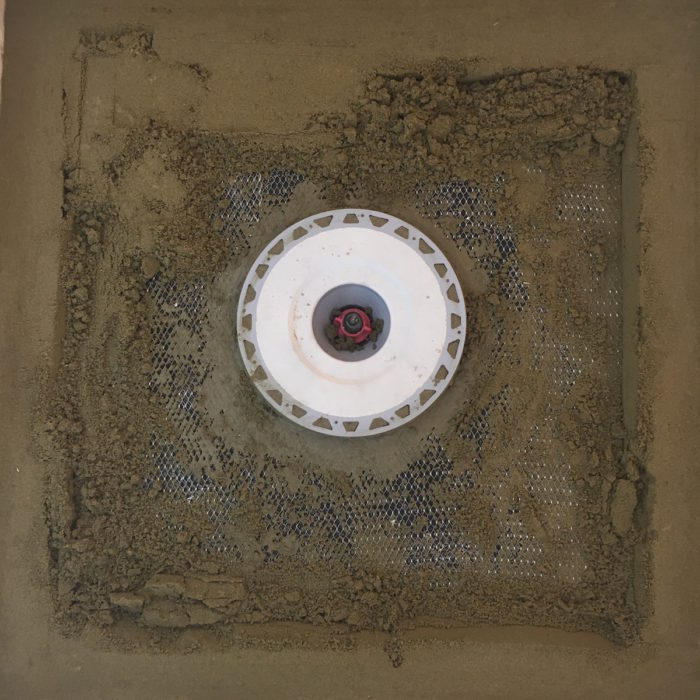
Step 3: Support the flange of the drain with loose mortar. Loose mortar is essentially the same thing as dry-pack only with more water. Once that is jammed under the flange, and the flange is level, the next step is to mix the dry-pack mortar. As a side note, 3/4 in. would be the thinnest I would ever install dry-pack, I usually aim for the thinnest areas to be roughly 1 1/4 in. thick and try not to go greater 2 in. thick.

support the flange of the drain with loose mortar

I have always mixed my own dry-pack mortar with sand and cement. Many others use premixed mortar with the proportions already sorted out, but it has been just as easy for me to make my own, and I like the way that it pulls, so why change now?

The ratio that I prefer is 5:1, sand to cement. Add all of the dry ingredients to the mixing container and mix them prior to adding any water. Once they are thoroughly blended, start adding water by saturating a sponge and squeezing it over the fix. You will not have to add a lot of water at all. Honestly, there is no exact amount that can be specified – it depends on how wet the sand is when you start. You basically want to wet the cement particles and activate the cement, but not make the mix so wet that it shrinks once the water evaporates. Even a little bit too much water makes the mix stick to itself, and this makes it much more difficult to float and get smooth.

mix dry-pack mortar with sand and cement

wet the cement particles and activate the cement

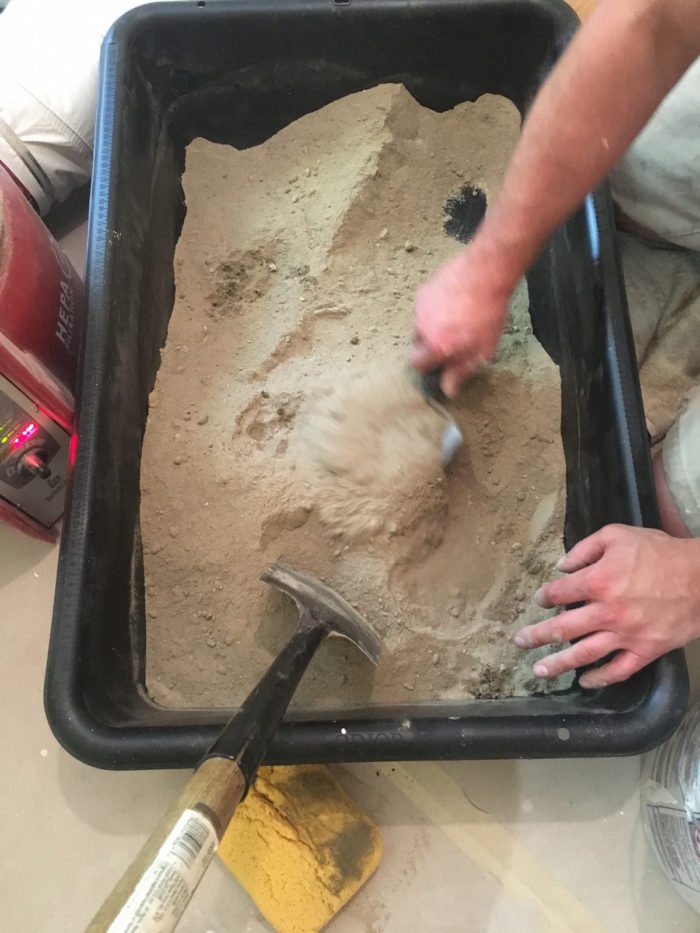
Essentially you want your dry-pack to be the same consistency as sandcastle sand: not too wet, not too dry. If you put some in you hand and squeeze it into a ball in your fist, you should be able to toss it in the air and catch it without it breaking.

you want your dry-pack to be the same consistency as sandcastle sand

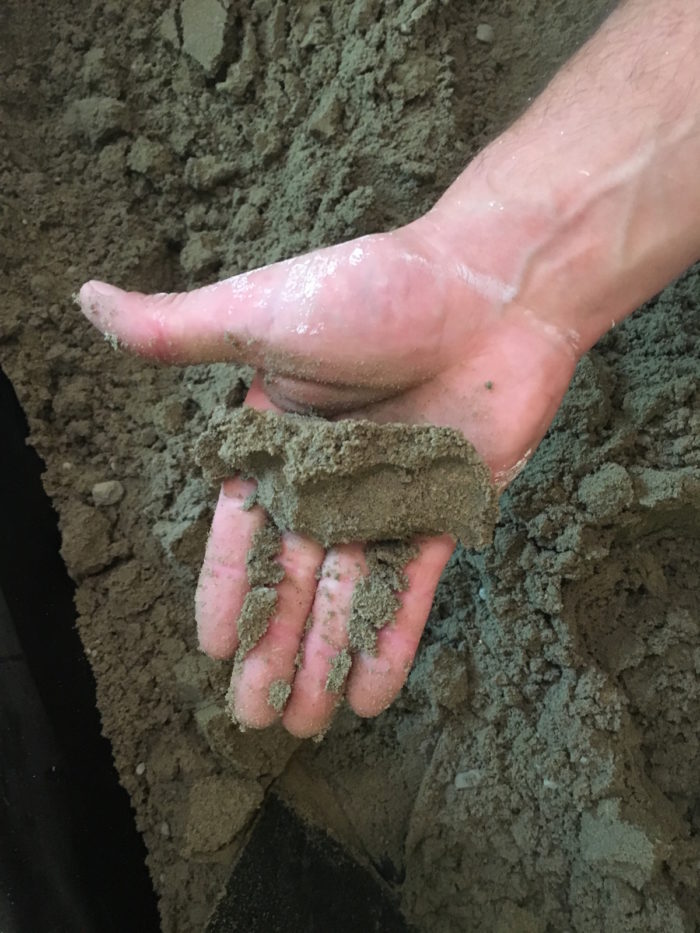
If you poke the same sand ball with your finger it should break apart.

If you poke the same "sand ball" with your finger it should break apart

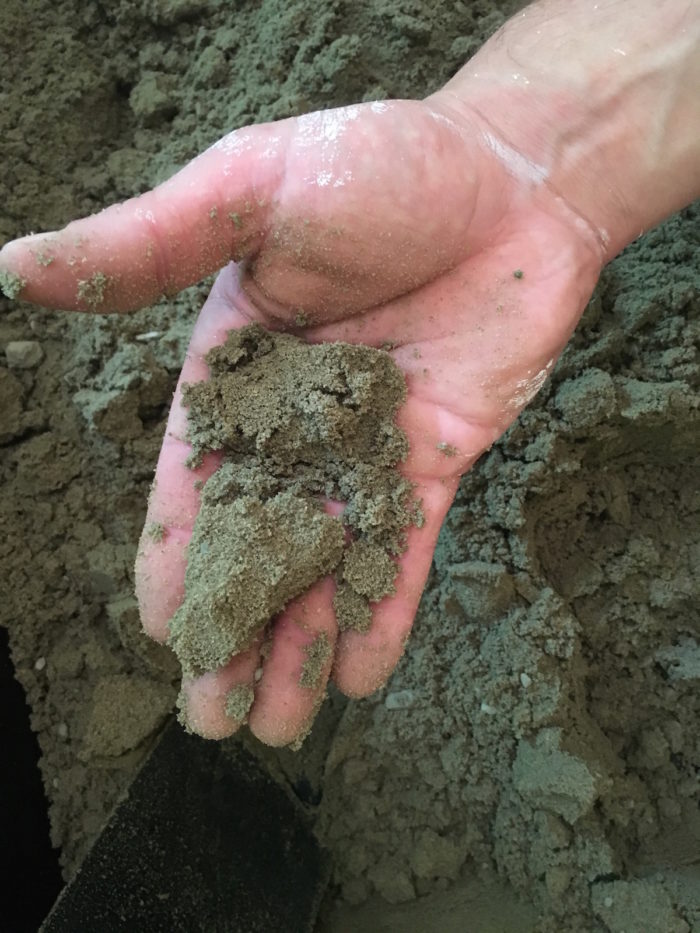
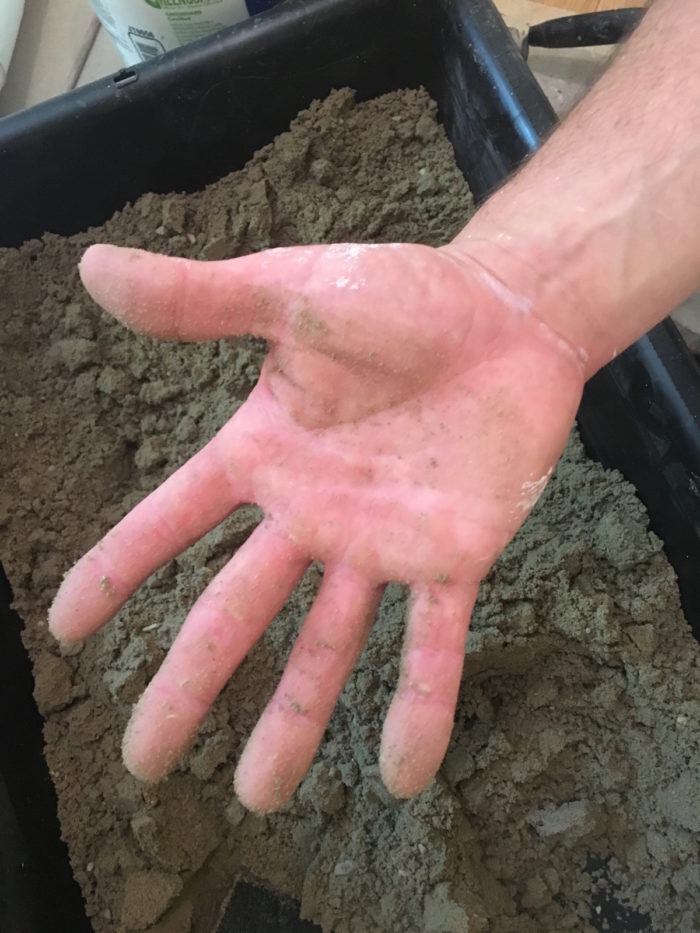
Once you drop the mortar out of you hand, your hand should be relatively clean and not wet. The pictures should help you gauge the right consistency.

Once you drop the mortar out of you hand, your hand should be relatively clean and not wet

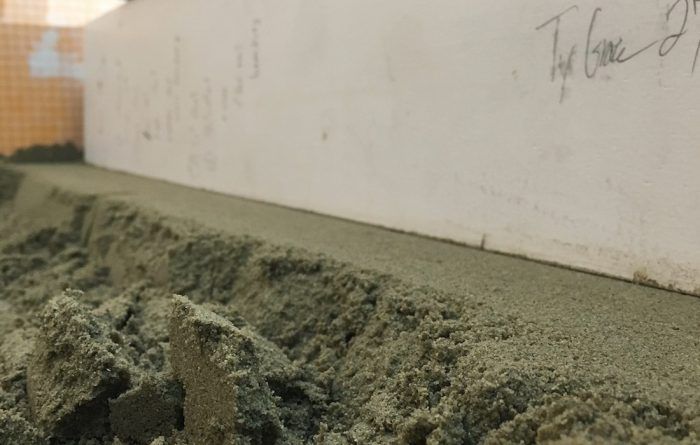
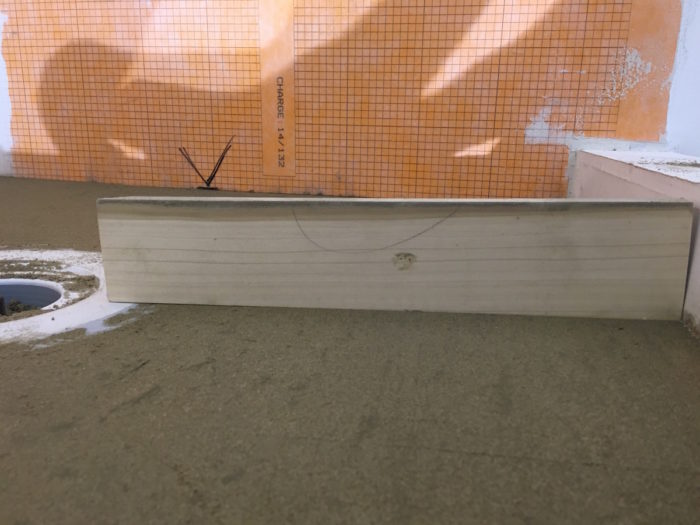
Step 5: Form screeds with the dry-pack around the perimeter of the pan. I start my screeds at the initial mark I made that was 3/4 in. above the drain. I then build the screeds with the dry-pack, compacting it by slapping it with my steel float. Next, I use a straight board to make the screeds level. I generally start against the wall with the board, put the level on top of the board, and bang it into the dry-pack so that I have a perfectly level depression. I then pull the rest of the excess mortar on the screed to the same height as my depression.

form screeds with the dry-pack around the perimeter of the pan

the screeds should all connect, be perfectly flat, and perfectly level for shower pan

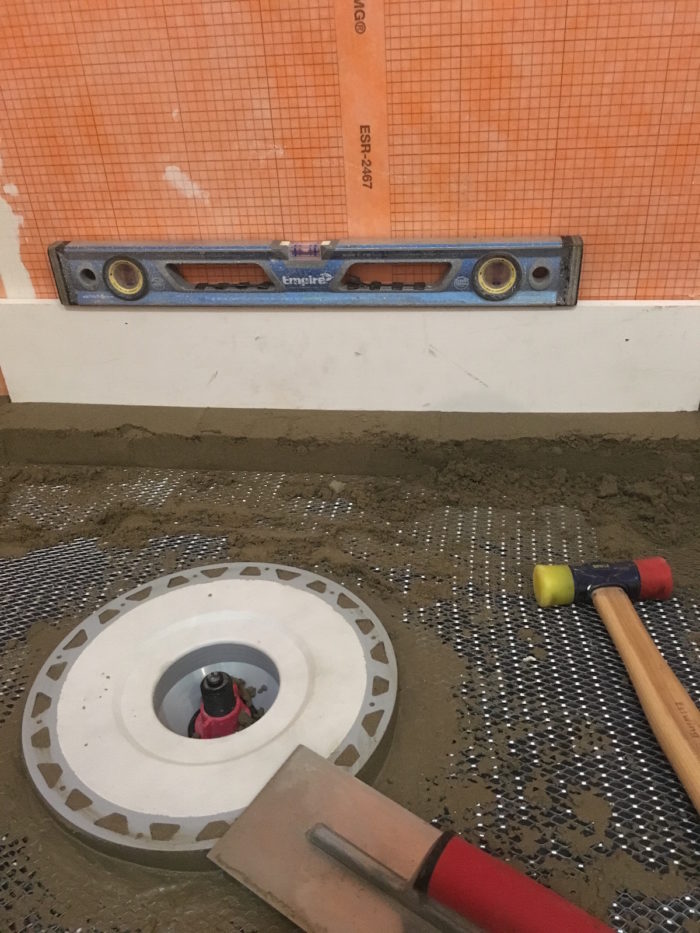
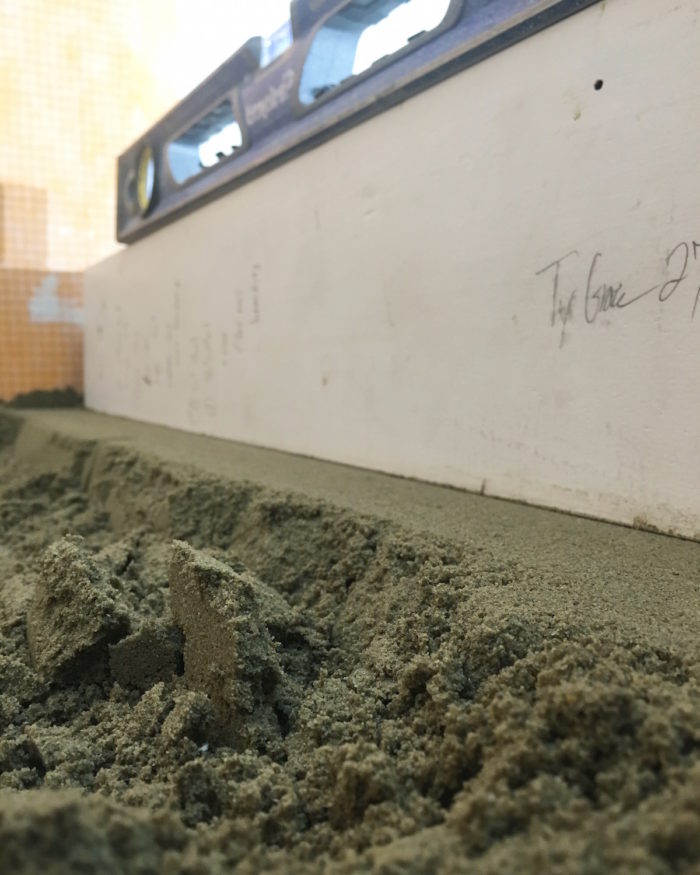
Continue this process and complete the screeds around the perimeter of the shower. By the time you finish your last wall, the screeds should all connect, be perfectly flat, and perfectly level.

fill in the inside of your screeds for shower pan

Step 6: Fill in the pan inside the screeds. Start shoveling in your dry-pack, spreading it out to get a general sense of how much more or less you need in different areas. You want to leave the dry-pack high at this point so that once you compact it with your steel trowel, it will not be  below the height of the perimeter screeds. Once you have the proper amount necessary, start beating it down and compressing all of the sand particles with your steel trowel. Any low spots should be raked out and more mortar should be thrown into it to ensure it bonds to the existing dry-pack. You should then compact it again.

start screeding the inside area of the shower pan using your perimeter screeds and the drain as a gauge to how much mortar needs to be removed

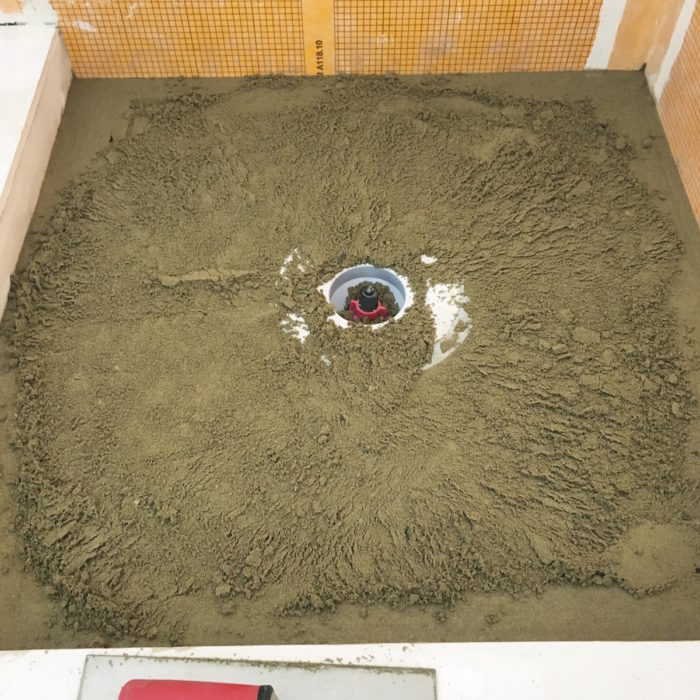
Once you have the correct amount of dry-pack you can start screeding the inside area of the pan using your perimeter screeds and the drain as a gauge to how much mortar needs to be removed. I usually have a few different size screeds cut at this point so you can constantly switch to the correct size without banging into walls.

take a wood float and rub the top of the dry-pack to smooth out any imperfections for shower pan

flatten out the mortar so that there are no high spots

Once you are all screeded, take a wood float and smooth out the top of the dry-pack, removing any any imperfections and flattening out the mortar so that there are no high spots. After rubbing it with a wood float remove any excess mortar that is on top of the pan and slick it down with a steel trowel. This will bring up a tiny bit of water (unnoticeable) and seal the sand and cement to make a very thin smooth crust on the top layer of the dry-pack. It embeds any loose sand/cement particles. Now it is time to clean up and admire your work of art.

shower pan

More on Showers

5 Handsome Choices for Capping Your Shower Drain – There’s something for everyone in this new line of decorative drain covers.

How to Install a Tile Shower Floor – This article explains three methods of installation of a tile shower floor. All of the methods work, but the one you choose will be dictated by how much labor you’re willing to put in (or pay for), and how custom you want the job to be.

Installing a Leakproof Shower Pan – A thick mortar bed over a vinyl membrane makes a sturdy base for tile, but it pays to test for leaks.

Linear Drains for Custom Showers – These sleek drains open shower-design possibilities, but at a cost.

Previous: Site-Built Shower Pans Next: Installing a Dry-Pack Shower Pan

Guide

Tiling

Chapter

Tiling Showers

Sign up for eletters today and get the latest how-to from Fine Homebuilding, plus special offers.

Signing you up...

This site is protected by reCAPTCHA and the Google Privacy Policy and Terms of Service apply.
See all newsletters
See all newsletters

View Comments

  1. user-5256713 | Sep 05, 2016 08:03pm | #1

    This is just what I'm looking for Thanks

  2. NickWard | Jun 09, 2017 09:26pm | #2

    How much working time do I typically have with drypack mortar? Nice article by the way

  3. schrockbike | Jun 24, 2017 10:33am | #3

    So, in top of this goes the liner membrane and another layer of drypack, right?

  4. dkrb | Nov 22, 2017 11:45pm | #4

    We had a shower installed by a handyman who put portland sand mix under an acrylic shower. It pops and creaks very loudly under our feet, especially around the drain. Is there a way to fix that? Thanks

Log in or create an account to post a comment.

Sign up Log in

Become a member and get full access to FineHomebuilding.com

Tiling

Tiling

Trusted, comprehensive guidance from the pros for a great-looking tile job in any room of the house

View Project Guide

View All Project Guides »

Become a member and get unlimited site access, including the Tiling Project Guide.

Start Free Trial

Selecting Tile
  • The Basics
  • Tile Options
Tools & Techniques
  • Job-Preparation Tools
  • Cutting Tiles
  • Setting & Grouting Tools
Installation Materials
  • Membranes & Substrates
  • Adhesives & Mortars
  • Grout
  • Sealers & Caulk
  • Spacers, Hardware & Trim
Preparation
  • The Prep Job
  • Repairs & Surface Prep
  • Installing Backerboard
Tiling Floors
  • Layout & Installation
  • Setting Specialty Tiles
Tiling Walls & Backsplashes
  • Preparation
  • Backsplashes
  • Walls
Tiling Showers
  • Tile Shower Basics
  • Waterproofing
  • Shower Pans
  • Shower Drains
  • Shower Niches
  • Video Series: Tile a Shower
  • Video Series: Tile a Barrier-Free Bathroom
Grouting, Sealing & Caulking
  • Grouting
  • Caulking
  • Sealing
Maintenance & Repair
  • Maintenance
  • Tile Repair
  • Grout Repair

Fine Home Building

Newsletter Sign-up

  • Fine Homebuilding

    Home building tips, offers, and expert advice in your inbox.

  • Green Building Advisor

    Building science and energy efficiency advice, plus special offers, in your inbox.

  • Old House Journal

    Repair, renovation, and restoration tips, plus special offers, in your inbox.

Signing you up...

This site is protected by reCAPTCHA and the Google Privacy Policy and Terms of Service apply.
See all newsletters

Follow

  • Fine Homebuilding

    Dig into cutting-edge approaches and decades of proven solutions with total access to our experts and tradespeople.

    Start Free Trial Now
    • Facebook
    • Instagram
    • X
    • LinkedIn
  • GBA Prime

    Get instant access to the latest developments in green building, research, and reports from the field.

    Start Free Trial Now
    • Facebook
    • YouTube
  • Old House Journal

    Learn how to restore, repair, update, and decorate your home.

    Subscribe Now
    • Facebook
    • Instagram
    • X

Membership & Magazine

  • Online Archive
  • Start Free Trial
  • Magazine Subscription
  • Magazine Renewal
  • Gift a Subscription
  • Customer Support
  • Privacy Preferences
  • About
  • Contact
  • Advertise
  • Careers
  • Terms of Use
  • Site Map
  • Do not sell or share my information
  • Privacy Policy
  • Accessibility
  • California Privacy Rights

© 2025 Active Interest Media. All rights reserved.

Fine Homebuilding receives a commission for items purchased through links on this site, including Amazon Associates and other affiliate advertising programs.

  • Home Group
  • Antique Trader
  • Arts & Crafts Homes
  • Bank Note Reporter
  • Cabin Life
  • Cuisine at Home
  • Fine Gardening
  • Fine Woodworking
  • Green Building Advisor
  • Garden Gate
  • Horticulture
  • Keep Craft Alive
  • Log Home Living
  • Military Trader/Vehicles
  • Numismatic News
  • Numismaster
  • Old Cars Weekly
  • Old House Journal
  • Period Homes
  • Popular Woodworking
  • Script
  • ShopNotes
  • Sports Collectors Digest
  • Threads
  • Timber Home Living
  • Traditional Building
  • Woodsmith
  • World Coin News
  • Writer's Digest
Active Interest Media logo
X
X
This is a dialog window which overlays the main content of the page. The modal window is a 'site map' of the most critical areas of the site. Pressing the Escape (ESC) button will close the modal and bring you back to where you were on the page.

Main Menu

  • How-To
  • Design
  • Tools & Materials
  • Video
  • Blogs
  • Forum
  • Project Guides
  • Reader Projects
  • Magazine
  • Members
  • FHB House

Podcasts

  • FHB Podcast
  • ProTalk

Webinars

  • Upcoming and On-Demand

Podcasts

  • FHB Podcast
  • ProTalk

Webinars

  • Upcoming and On-Demand

Popular Topics

  • Kitchens
  • Business
  • Bedrooms
  • Roofs
  • Architecture and Design
  • Green Building
  • Decks
  • Framing
  • Safety
  • Remodeling
  • Bathrooms
  • Windows
  • Tilework
  • Ceilings
  • HVAC

Magazine

  • Current Issue
  • Past Issues
  • Magazine Index
  • Subscribe
  • Online Archive
  • Author Guidelines

All Access

  • Member Home
  • Start Free Trial
  • Gift Membership

Online Learning

  • Courses
  • Project Guides
  • Reader Projects
  • Podcast

More

  • FHB Ambassadors
  • FHB House
  • Customer Support

Account

  • Log In
  • Join

Newsletter

Get home building tips, offers, and expert advice in your inbox

Signing you up...

This site is protected by reCAPTCHA and the Google Privacy Policy and Terms of Service apply.
See all newsletters
See all newsletters

Follow

  • X
  • YouTube
  • instagram
  • facebook
  • pinterest
  • Tiktok

Join All Access

Become a member and get instant access to thousands of videos, how-tos, tool reviews, and design features.

Start Your Free Trial

Subscribe

FHB Magazine

Start your subscription today and save up to 81%

Subscribe

You have 1 free article remaining.

Get complete site access, including thousands of videos, how-to tips, tool reviews, and design features.

Start your FREE trial

Already a member? Log in

We hope you’ve enjoyed your free articles. To keep reading, become a member today.

Get complete site access to expert advice, how-to videos, Code Check, and more, plus the print magazine.

Start your FREE trial

Already a member? Log in

Privacy Policy Update

We use cookies, pixels, script and other tracking technologies to analyze and improve our service, to improve and personalize content, and for advertising to you. We also share information about your use of our site with third-party social media, advertising and analytics partners. You can view our Privacy Policy here and our Terms of Use here.

Cookies

Analytics

These cookies help us track site metrics to improve our sites and provide a better user experience.

Advertising/Social Media

These cookies are used to serve advertisements aligned with your interests.

Essential

These cookies are required to provide basic functions like page navigation and access to secure areas of the website.

Delete My Data

Delete all cookies and associated data