FHB Logo Facebook LinkedIn Email Pinterest Twitter X Instagram Tiktok YouTube Plus Icon Close Icon Navigation Search Icon Navigation Search Icon Arrow Down Icon Video Guide Icon Article Guide Icon Modal Close Icon Guide Search Icon Skip to content
Subscribe
Log In
  • How-To
  • Design
  • Tools & Materials
  • Restoration
  • Videos
  • Blogs
  • Forum
  • Magazine
  • Members
  • FHB House
  • Podcast
Log In

Fine Homebuilding Project Guides

Tiling

Guide Home
  • Selecting Tile
  • Tools & Techniques
  • Installation Materials
  • Preparation
  • Tiling Floors
  • Tiling Walls & Backsplashes
  • Tiling Showers
  • Grouting, Sealing & Caulking
  • Maintenance & Repair
How-To

Glass-Block Shower on a Curve

This shower-stall alternative lets in the light, offers privacy, and makes a small space feel roomy.

By Tom Meehan Issue 200
  • X
  • facebook
  • linkedin
  • pinterest
  • email
  • add to favorites Log in or Sign up to save your favorite articles

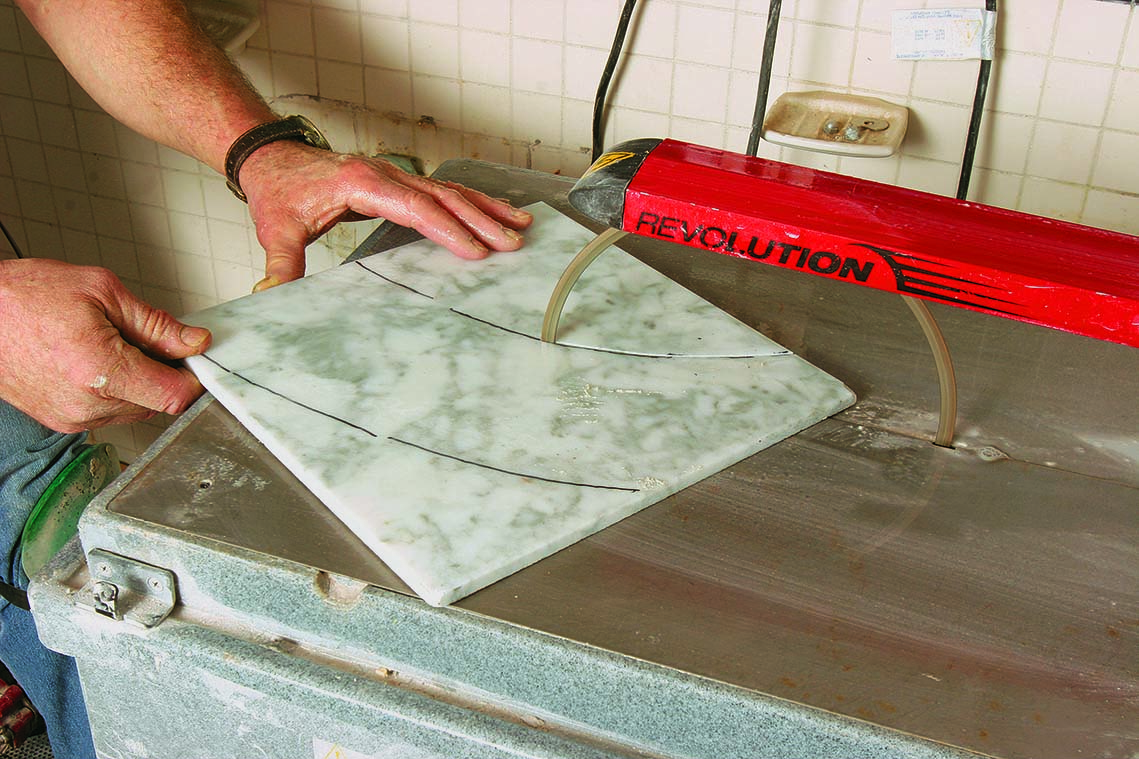
Magazine extra: Watch Tom demonstrate how he easily makes curves in tile with a ring-blade tile saw. Don’t own a specialty saw? Watch Tom turn the curve with identical results using his standard wet saw, a grinder, and nippers.  

It wasn’t long ago that shower stalls were made to serve one purpose: getting you clean. Color choice was the only real aesthetic concern; size and shape were considered matters of utility and efficiency.

Now, people think of showering as an important part of the day, both physically and mentally. The small dungeons of the past are being replaced with functional works of art. To this end, I think that glass block blows away most other shower options.

Glass-block showers are a great way to let in some light and to provide a sense of openness and freedom, even in a small bathroom. Glass blocks offer tremendous design flexibility, yet the subtle visual distortion of glass affords full privacy. No more dungeons.

New accessories make for an easier installation

glass-block shower
Waterproofed and pitched for drainage. Before tiling the concrete-block curb, I set a waterproofing membrane in a layer of thinset. Because the curb will be visible, I cap it with marble pitched slightly toward the inside of the shower for proper drainage. To help get the marble overhang right, I tile the sides of the curb before capping it.

If you wanted a glass-block shower a decade ago, I would have told you to find a mason— and for good reason. Unless you have experience, glass blocks are hard to keep straight and plumb. The best that beginners could hope to accomplish was a couple of courses at a time, and they would likely still struggle to keep the work in line until the mortar set up.

With just one change in design from a basic wall supported on all four sides—whether it’s the addition of a curved surface, a wall that stops short of the ceiling, or one that is unsupported on one end—the project becomes more complicated. Some projects, such as the shower that’s featured here, combine all these complications and then some.

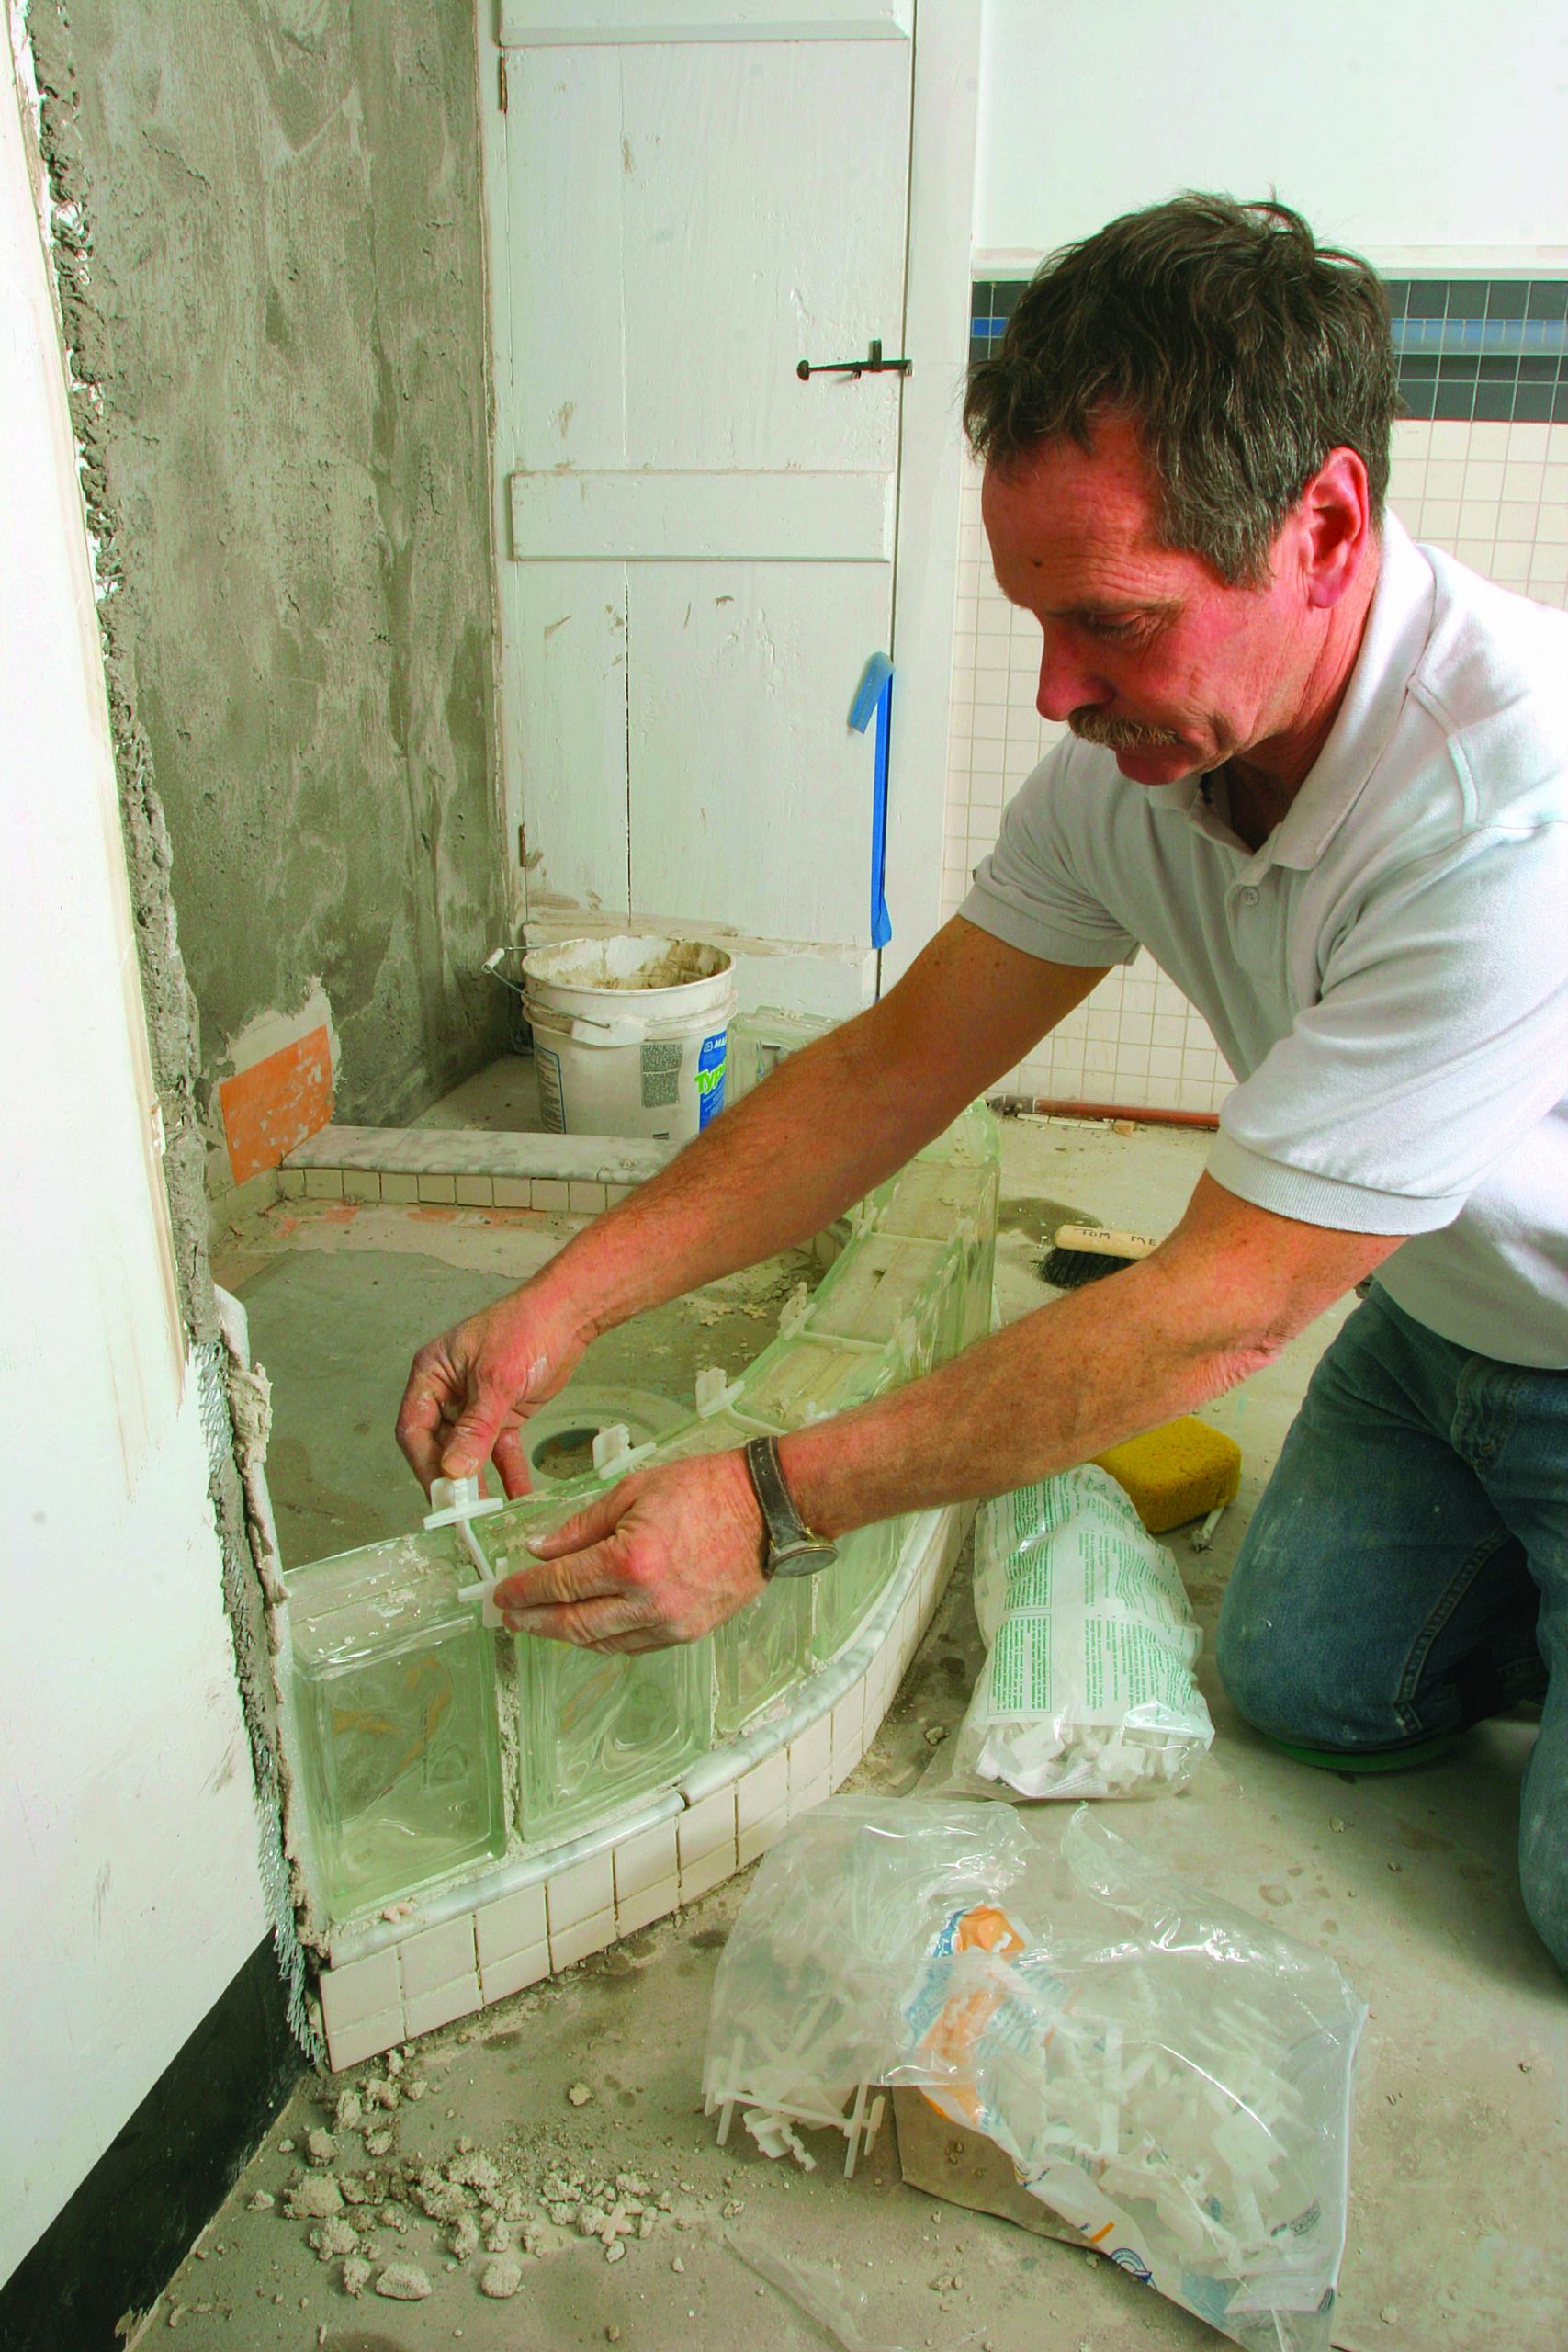
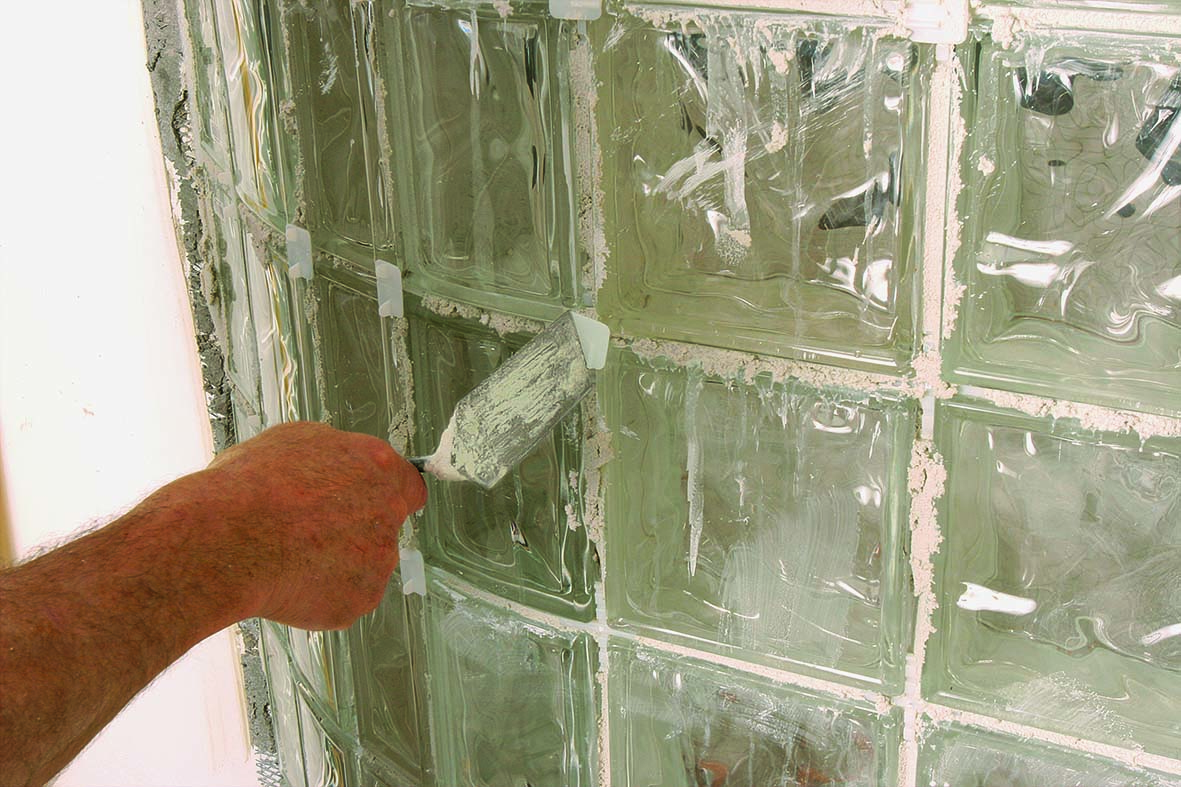
Now, though, glass-block manufacturers like Pittsburgh Corning are taking a bit of the fear out of the process by offering helpful installation accessories. The cornerstone of these accessories is the glass-block spacer. These pieces of plastic lock each block in place as it is installed, and are left in place and covered by grout. More work can be done at one time, and the blocks don’t shift or slip out of place as easily.

Don’t get me wrong: Glass-block installations still take patience and careful attention to detail. But I hope these installation accessories combined with my hard-learned installation tricks will help to ease what was once a much steeper learning curve.

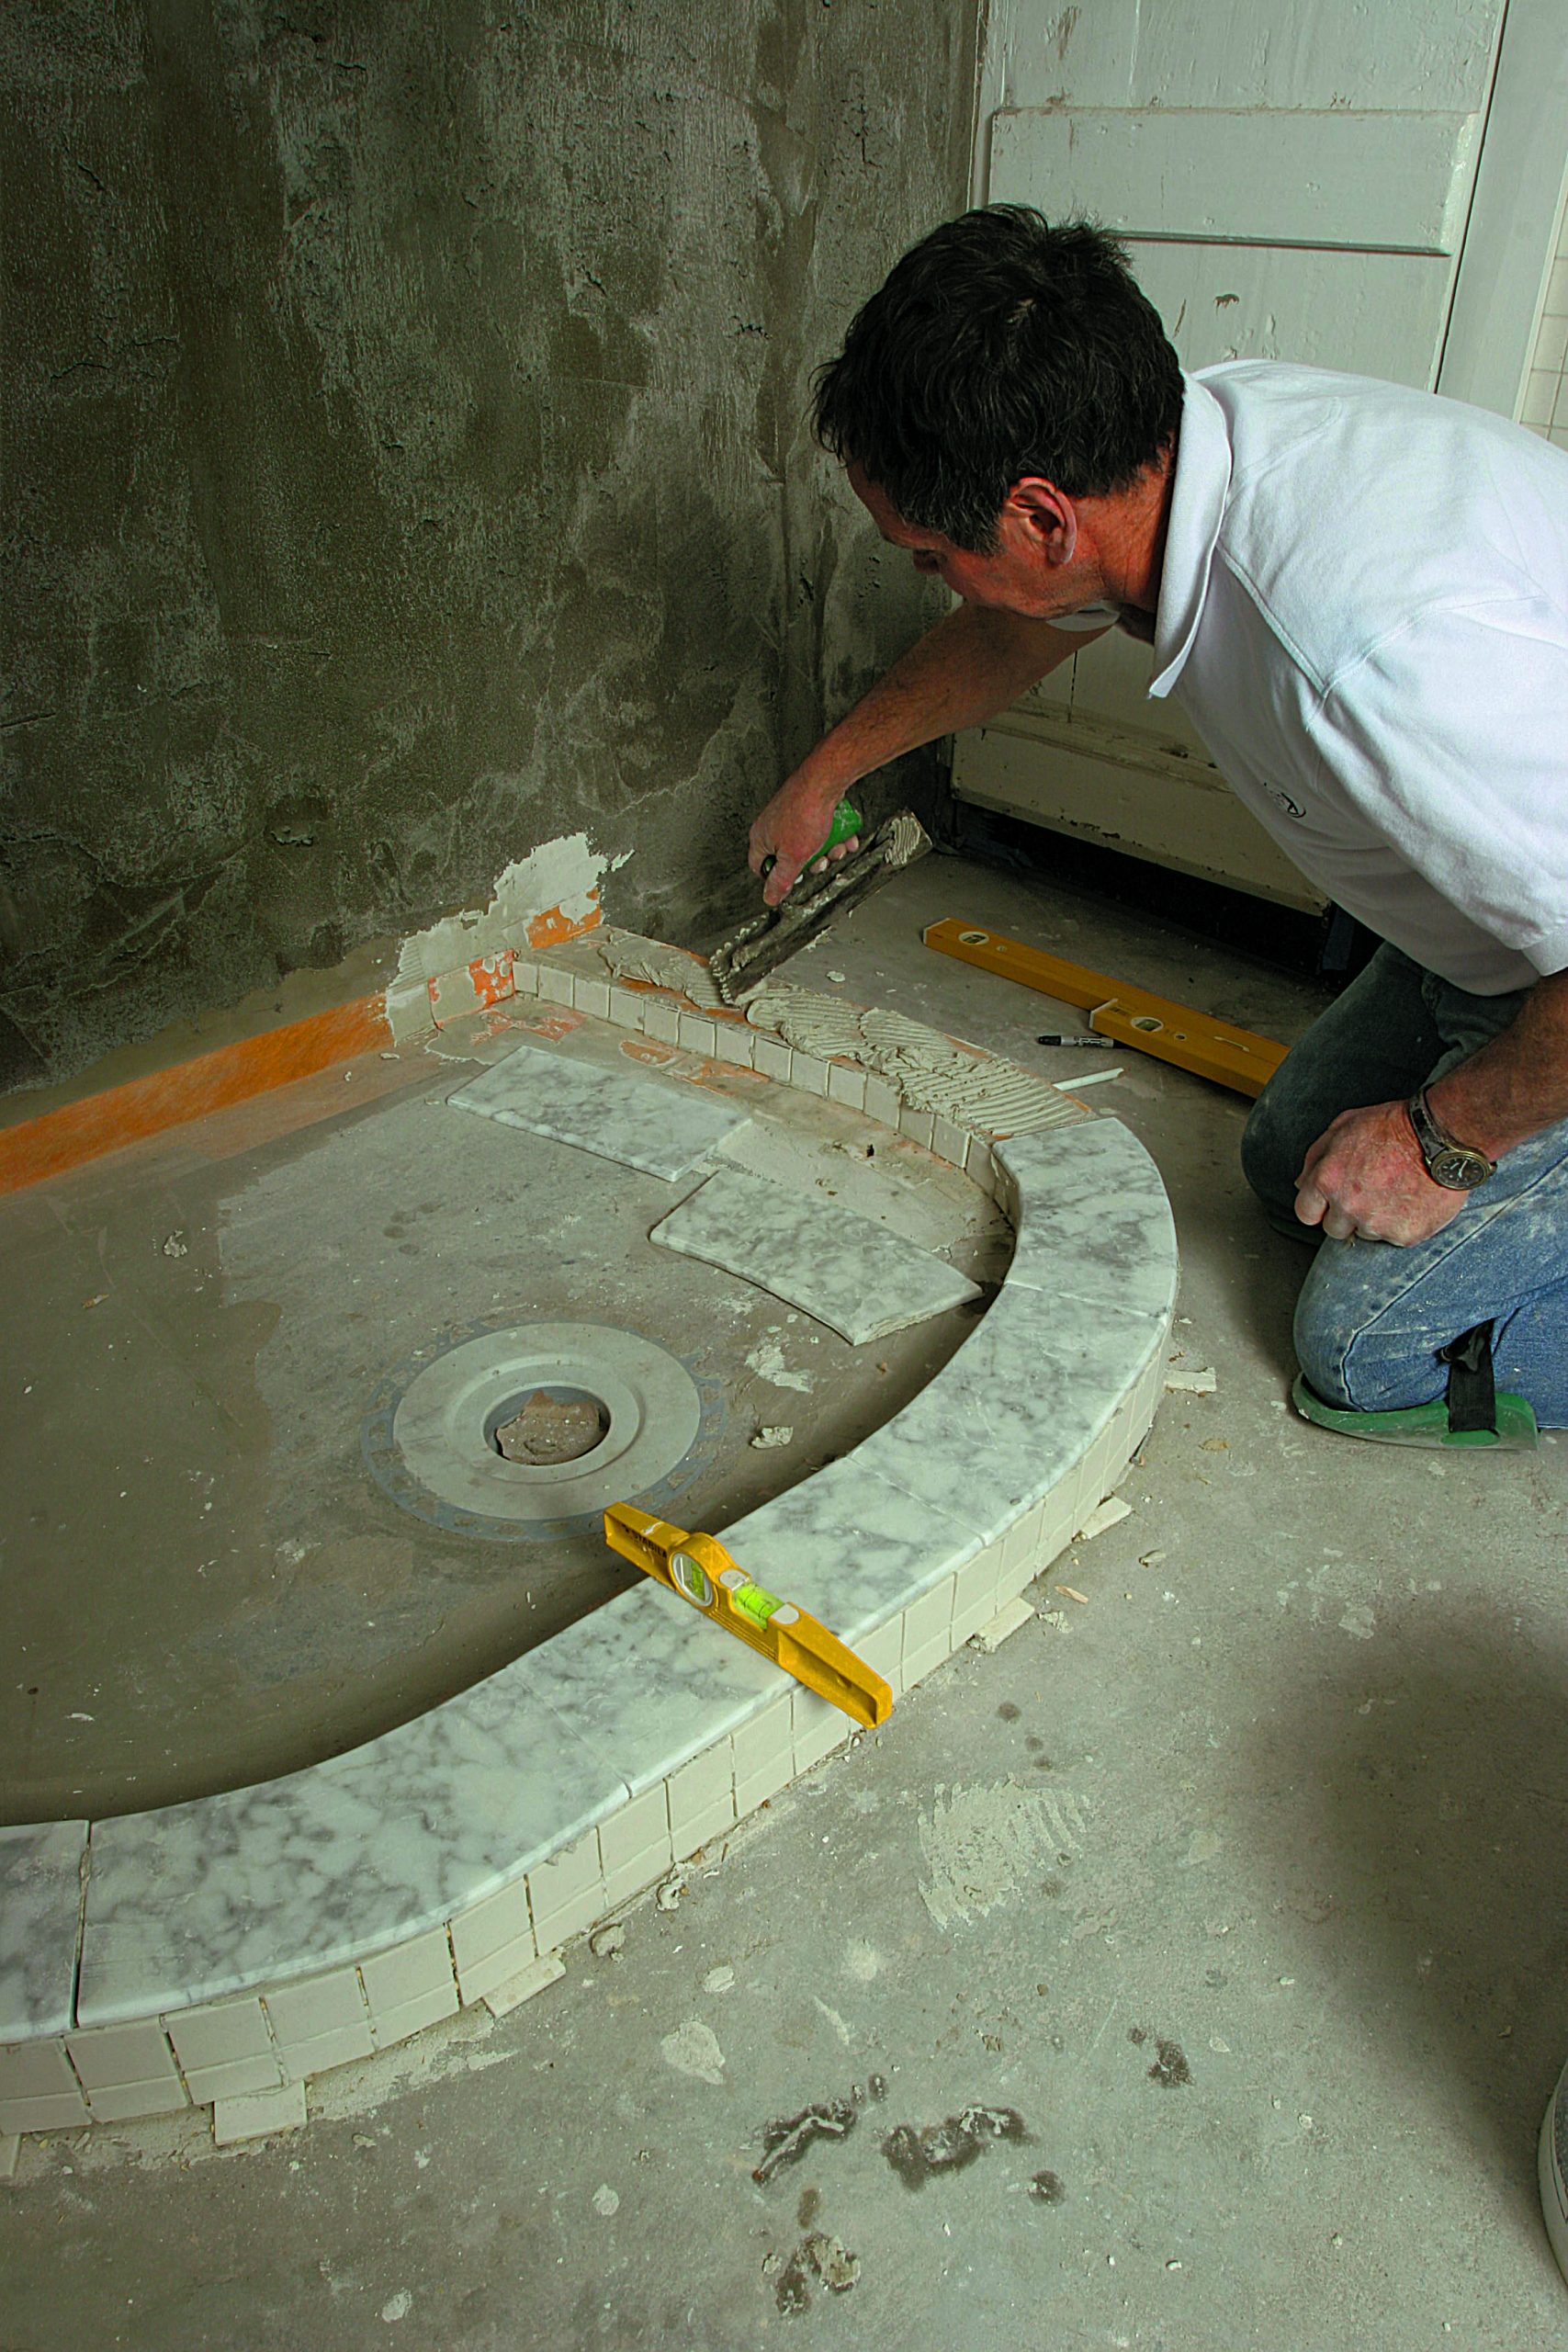
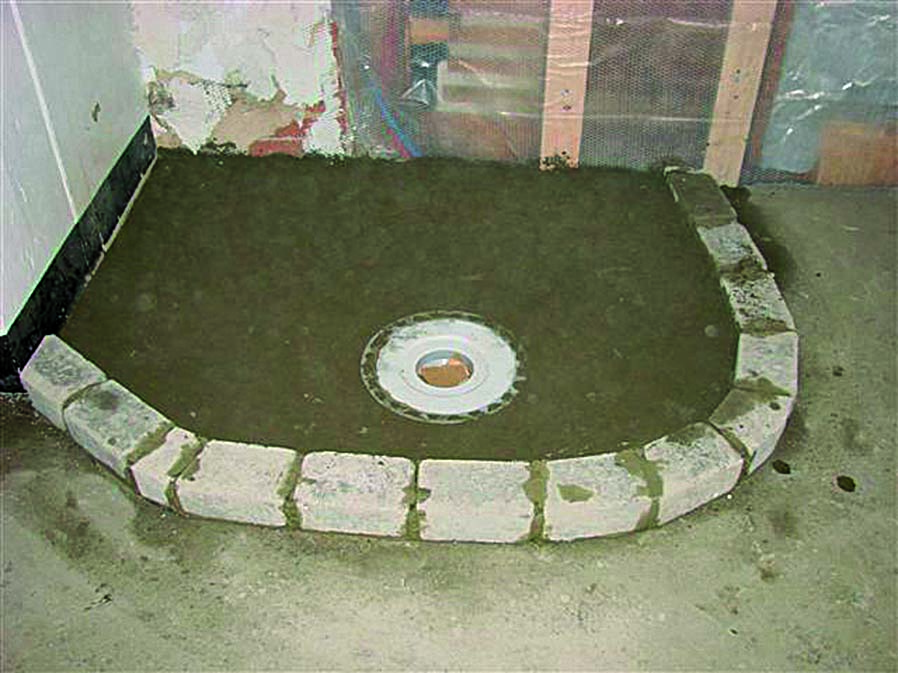
Build the curb with concrete blocks

A straight shower curb can be built by doubling up 2x4s and nailing them to the floor, but curves are more work. For curves, I arrange a row of glass blocks on the floor into the desired shape, trace around them, cut concrete landscape blocks to fit the shape, and set them in thinset. next, I float a mortar bed for the shower floor and cover the curb with a waterproof membrane. Square shower pans can be waterproofed with a one-piece vinyl membrane like Chloraloy (www.noblecompany.com), but I like the Kerdi system (www.schluter.com) for curved pans because the membrane can be cut into wedges and overlapped where needed to get around tight curves.

shower foundation
Finish the foundation. Once the concrete blocks and mortar bed have set up, the curb is waterproofed. I like to wrap the curb in preparation for the 2-in. tiles used to cover the sides and the marble caps that go on top. Because the Kerdi membrane is easily damaged, I don’t set it on the shower floor until I’m done installing the glass blocks.

cut the curves for the shower tile
Cut the curves. I cut the curved cap pieces on a Gemini Revolution tile saw (www.geminisaw.com) because its 10-in.-dia. ring-shaped diamond blade allows me to follow a tighter inside or outside curve than I could cut with a standard wet saw. A standard wet saw can also be used, but you have to make a series of straight cuts up to the curved line, then remove the waste with tile nippers.

prep curb to hold glass-block shower
Prep the curb to hold the blocks. After the marble cap has been installed and has set up for a day, I dry-lay the glass blocks in place to make sure they line up properly. Once I’m happy with the layout, I trace the out-line of the blocks with a pencil. Don’t use a permanent marker here because the marks could be visible once the glass is installed. After the layout is traced onto the marble cap, I scarify the cap with a diamond blade in an angle grinder. This allows the thinset to lock into the surface of the marble cap.

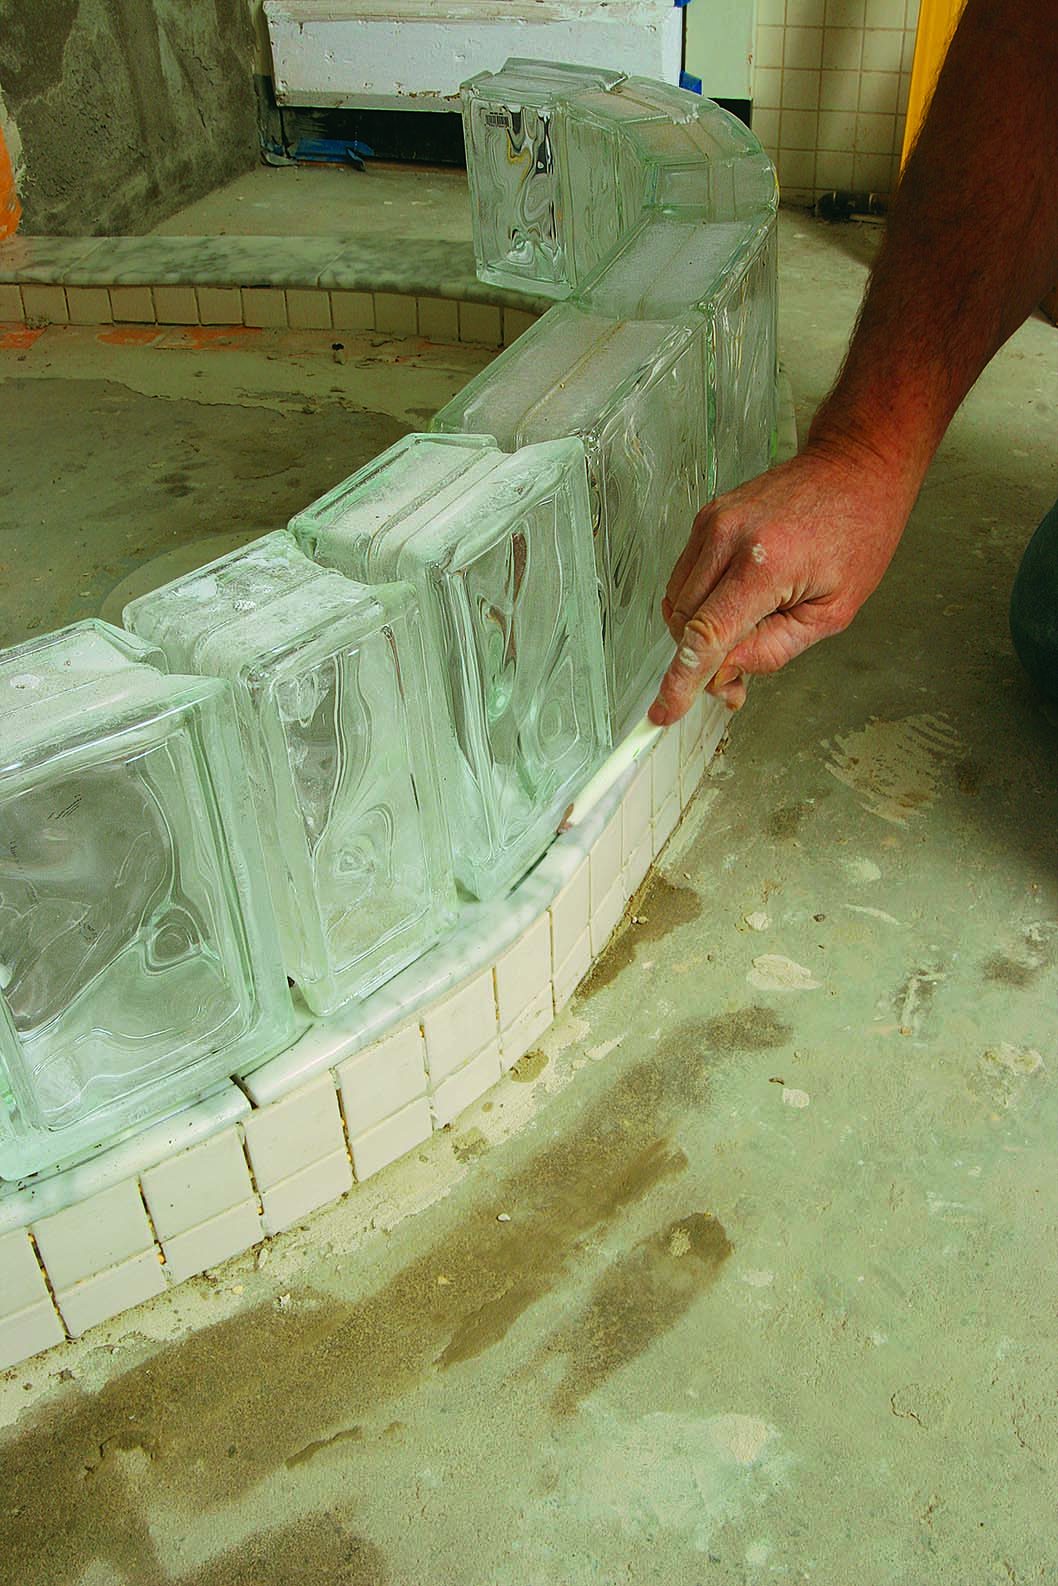
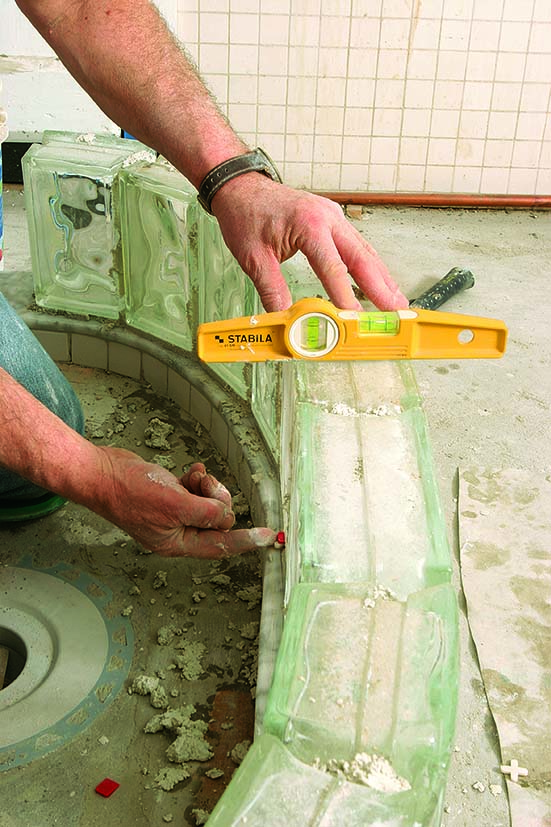
Take extra time to set the first course

The first course of glass blocks sets the stage for the entire installation. Take as much time as necessary to get the blocks strongly adhered and perfectly level in both directions before moving on.

sturdy and level for glass-block
Sturdy and level. I skim-coat the curb with thinset, then set the first course of blocks on a thick bed of glass-block mortar. The thinset and mortar lock together as they dry. Check each block for level, and shim with tile spacers where necessary. It’s better to use too much mortar and have it squeeze out than to use too little and risk voids.

glass-block shower spacers
Use glass-block spacers. They establish a consistent 1⁄4-in. grout joint and lock the blocks in place. There are two different spacers for this project. One is for straight runs; the other is for curves. Be careful, though. Both spacers look similar, and they are easy to install upside down accidentally.

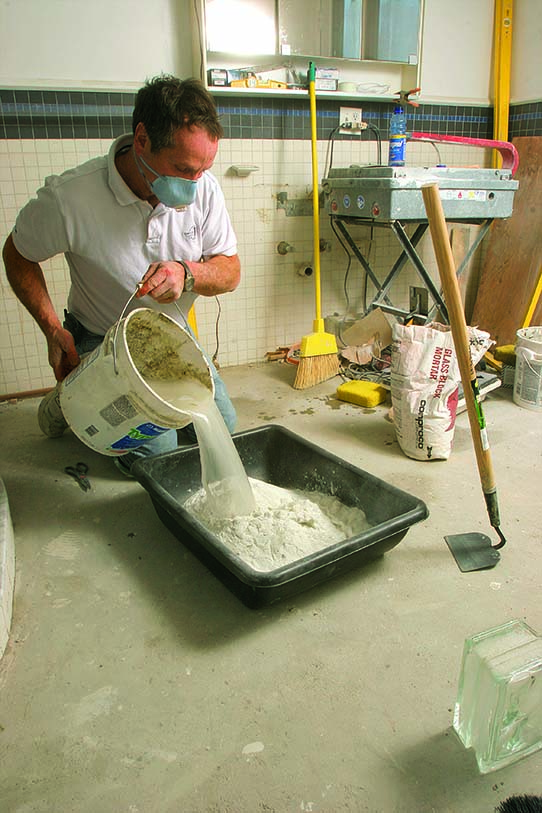
Mix the mortar stiff

mix the mortar for glass-block
Glass blocks must be installed using a special glass-block mortar; don’t be tempted to use any other products in a pinch. The lime in this powdered mortar mix is hazardous to your health if inhaled, so wear a respirator. I start with a 50-lb. bag of glass-block mortar in a small plastic mortar tub; then I slowly add water as I work the mortar with a small mixing hoe. The mortar should be fairly stiff; too loose, and the blocks will slide. To be on the safe side, I like to get the mortar close to the right consistency, then dribble a little water at a time into the tub using a grouting sponge.


Reinforce as you rise

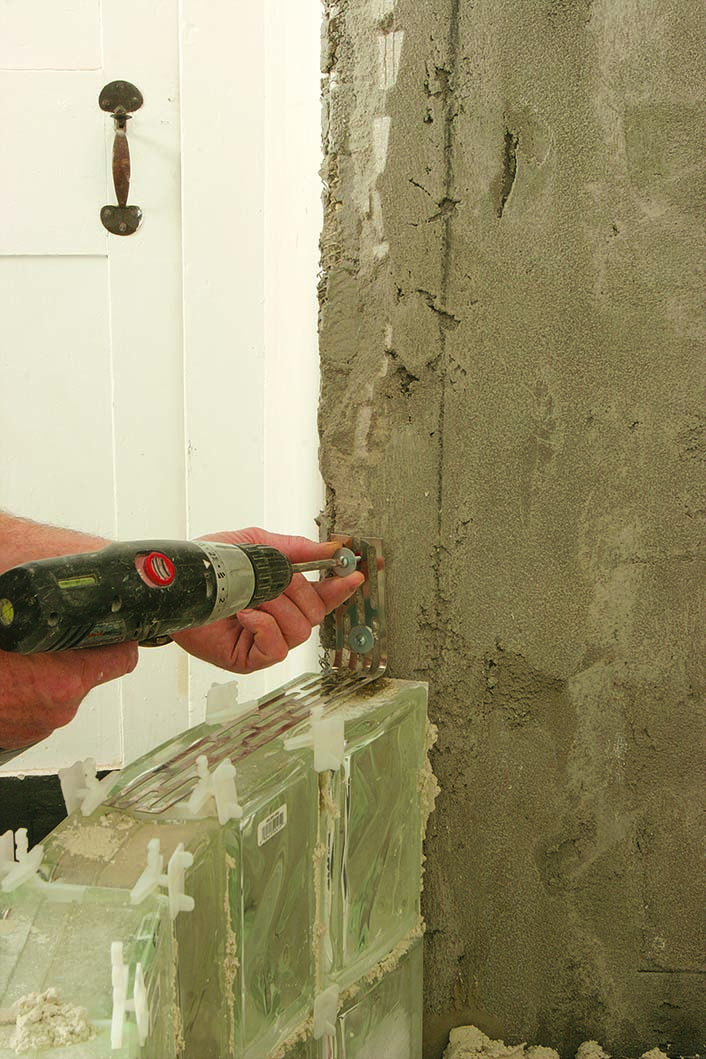
For this job, I had an entry opening on one end of the shower wall, and the glass blocks also stopped short of the ceiling. Without using the manufacturer’s panel anchors, rebar, and block spacers, the wall would have been pretty shaky. Take the time to reinforce the wall where recommended.

panel anchors for glass-block reinforcement
Panel anchors. Sixteen-in.-long stainless-steel panel anchors tie the glass blocks to the walls. The anchors must be bent into an L-shape—the short leg should be about 4 in. long—and installed every 2 vertical ft.

expansion strips
Expansion strips. Wherever glass blocks will abut a wall, a ceil-ing, or a header, a 1⁄1⁄14⁄4⁄-in. poly expansion strip must be installed. Lap the strip over the stainless-steel panel anchor. There’s no need for expansion strips under the first course.

reinforcement strips for glass-block shower
Joint reinforcement. I place panel-reinforcement strips in a bed of glass-block mortar at the same horizontal joints that require panel anchors. For curved walls, I cut the strips in half, bend them to the desired radius, and lay the halves side by side.

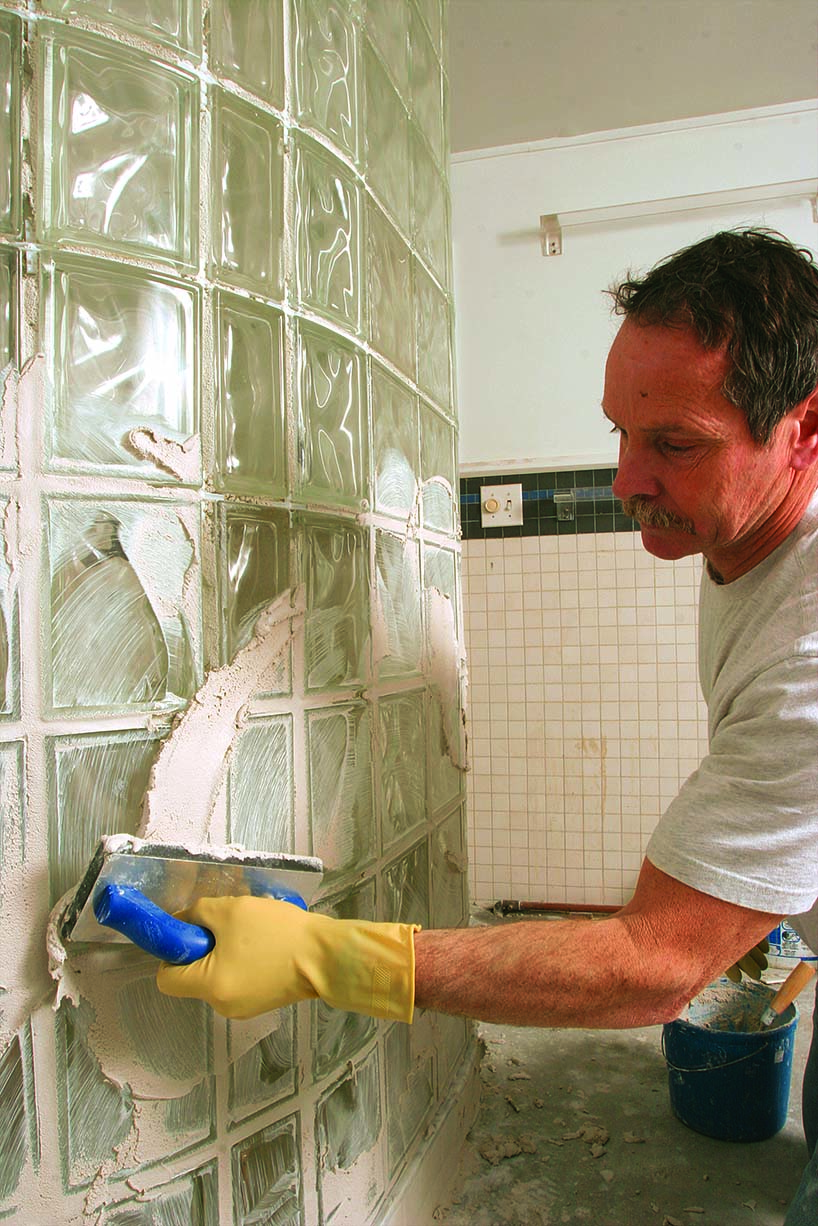
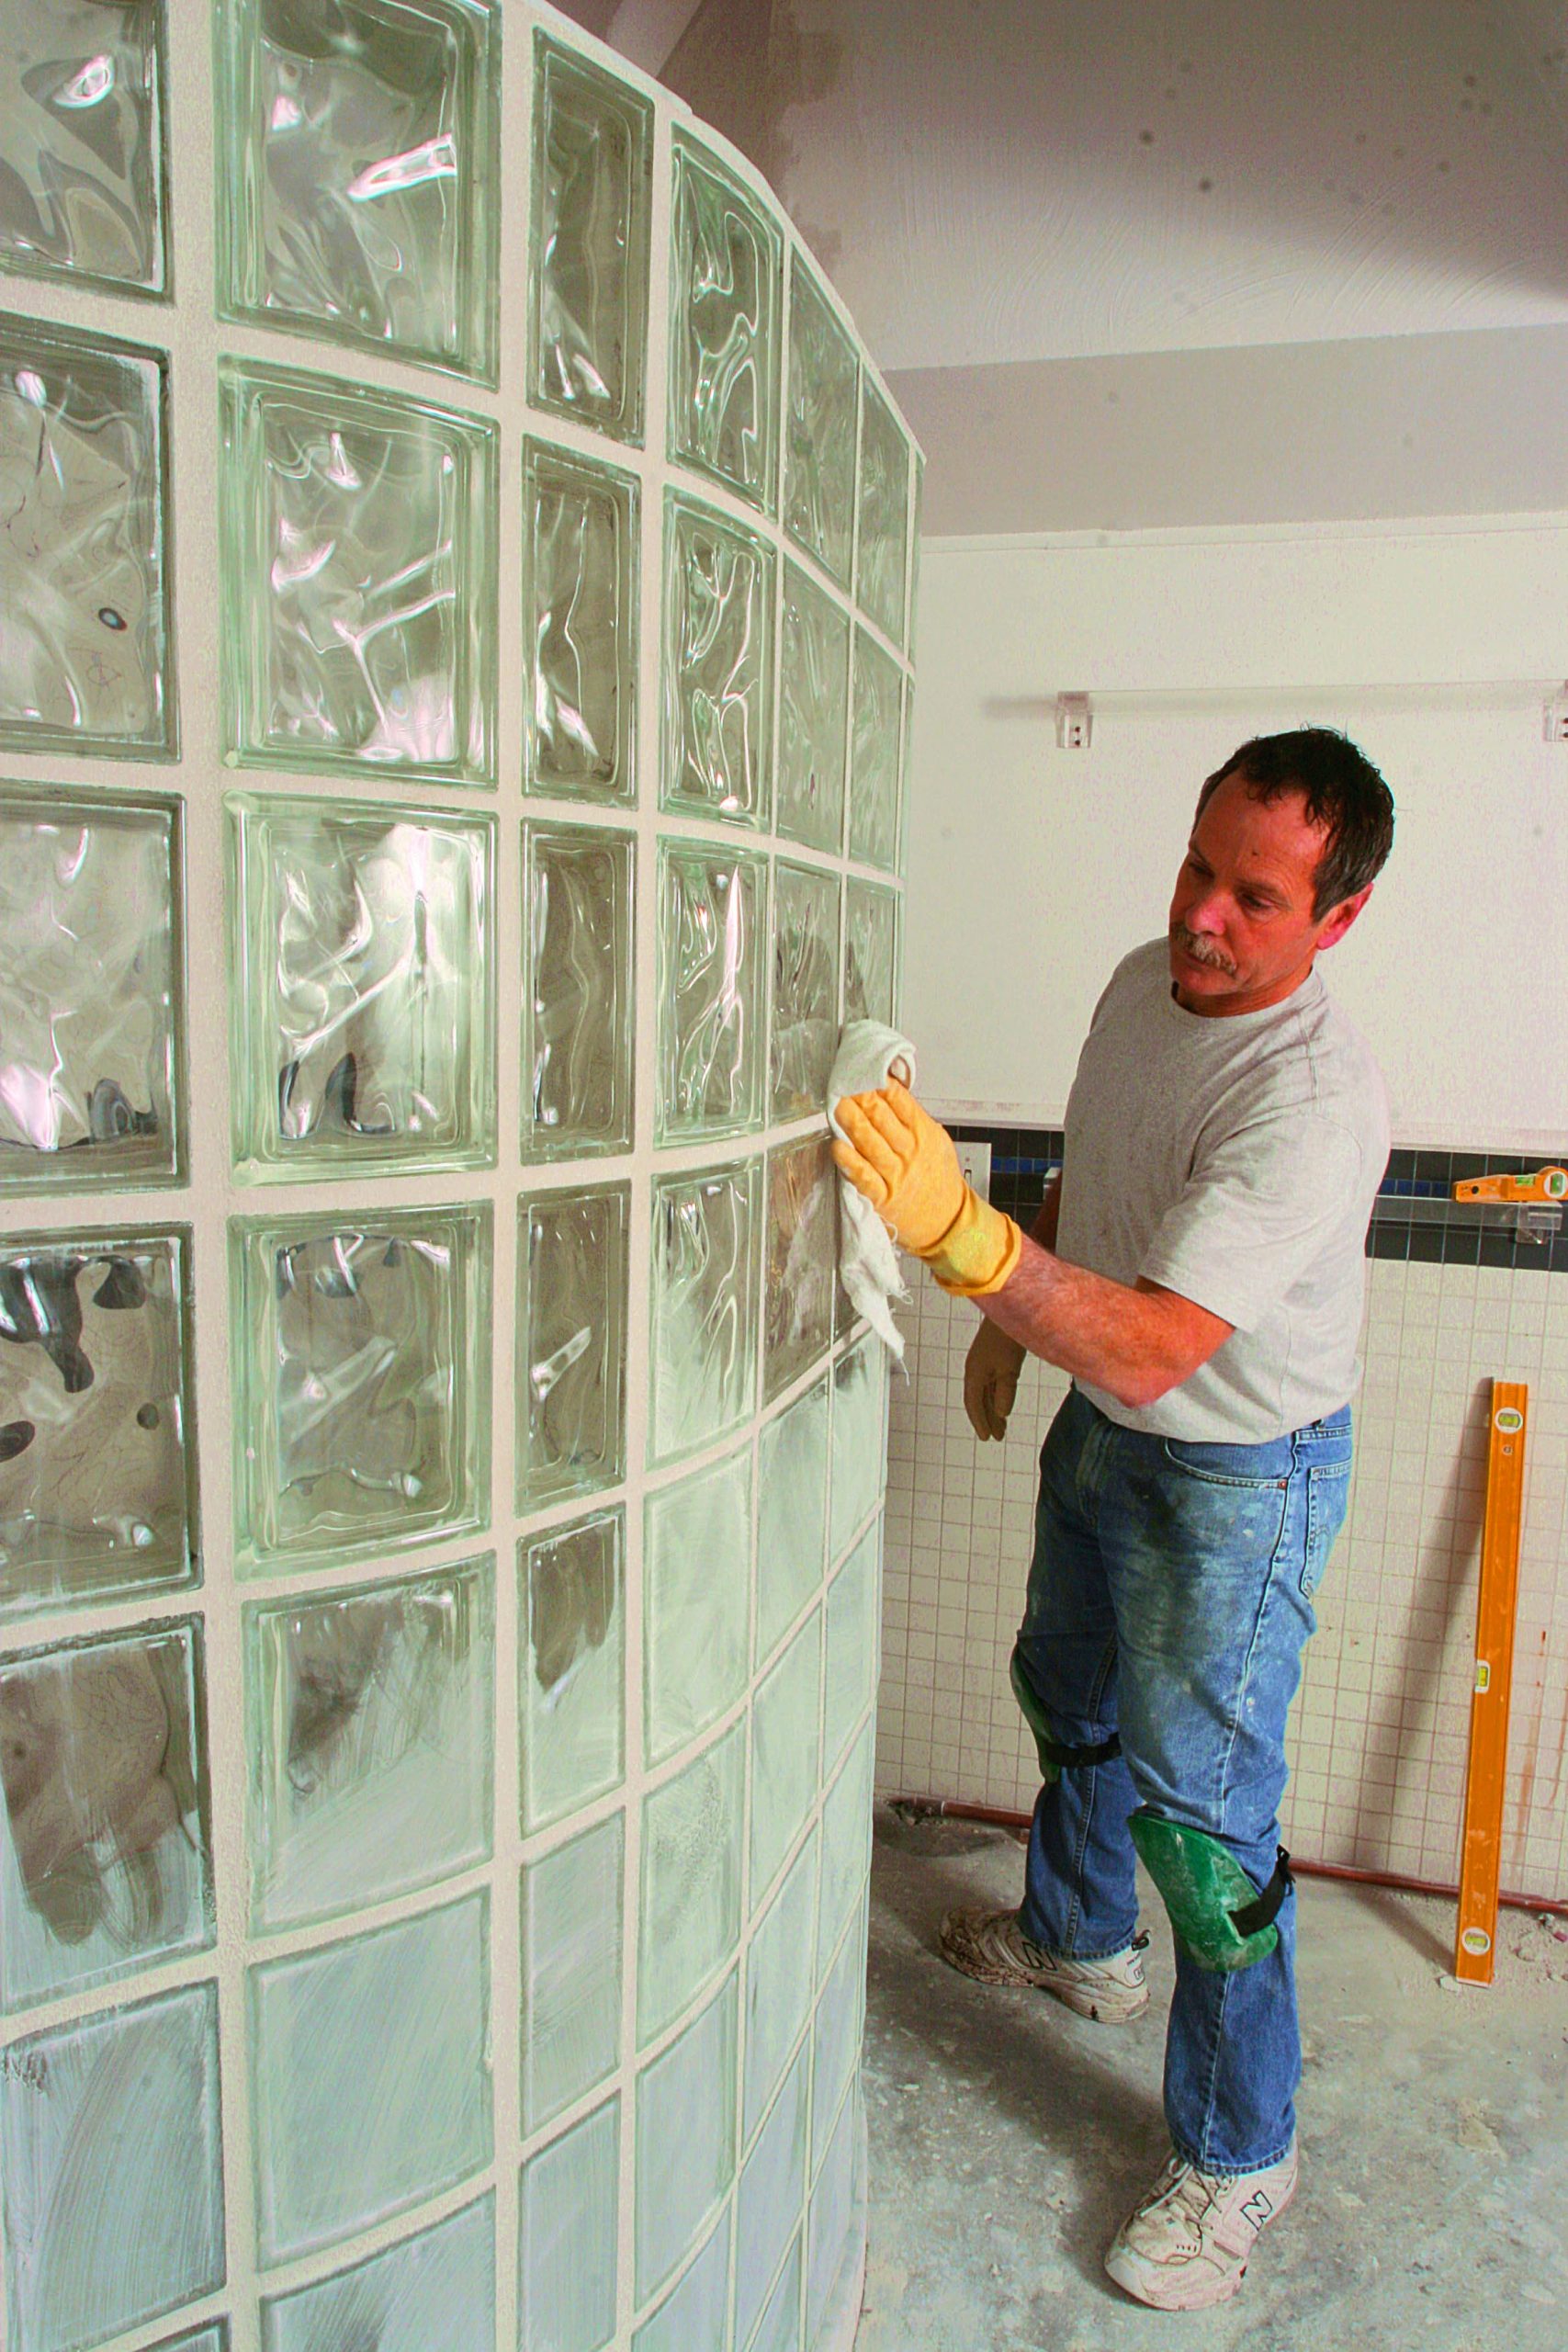
Clean, grout, and clean again

The final stages of a glass-block installation are always the most gratifying. Remove excess mortar, pack the joints with grout, and clean the glass to a glistening shine.

twist off glass-block spacer tabs and clean
Twist off the tabs and clean. The spacer tabs can be taken off after the blocks have set up a bit, usually about two or three hours. Don’t wait until the cement cures, though. The excess mortar behind the tabs must be cleaned off before it hardens completely.

sanded grout
Always use sanded grout. The strongest choice for finishing large joints is sanded grout. Pack the grout into the joints, and scrape off the excess before wiping the entire surface with a sponge and cool, clean water.

clean the shower
Remove the haze. After the grout has firmed up a bit, remove the grout haze by firmly buffing the blocks with a cotton cloth.

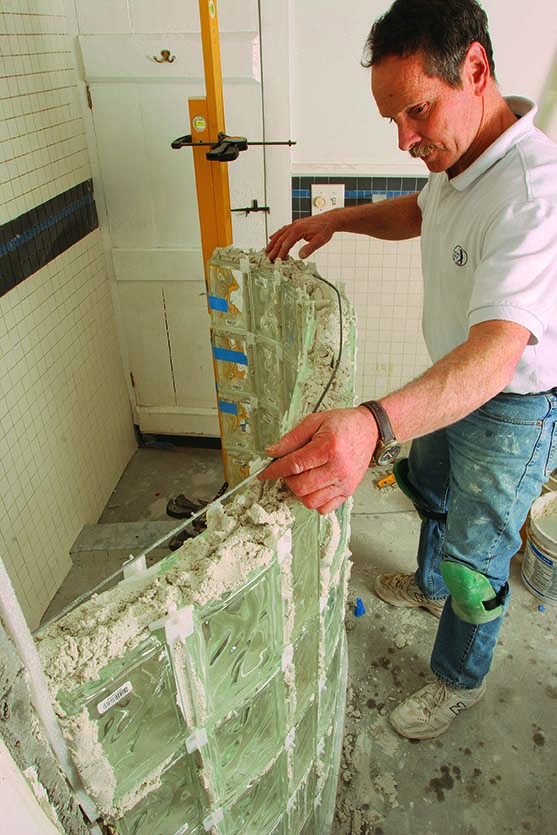
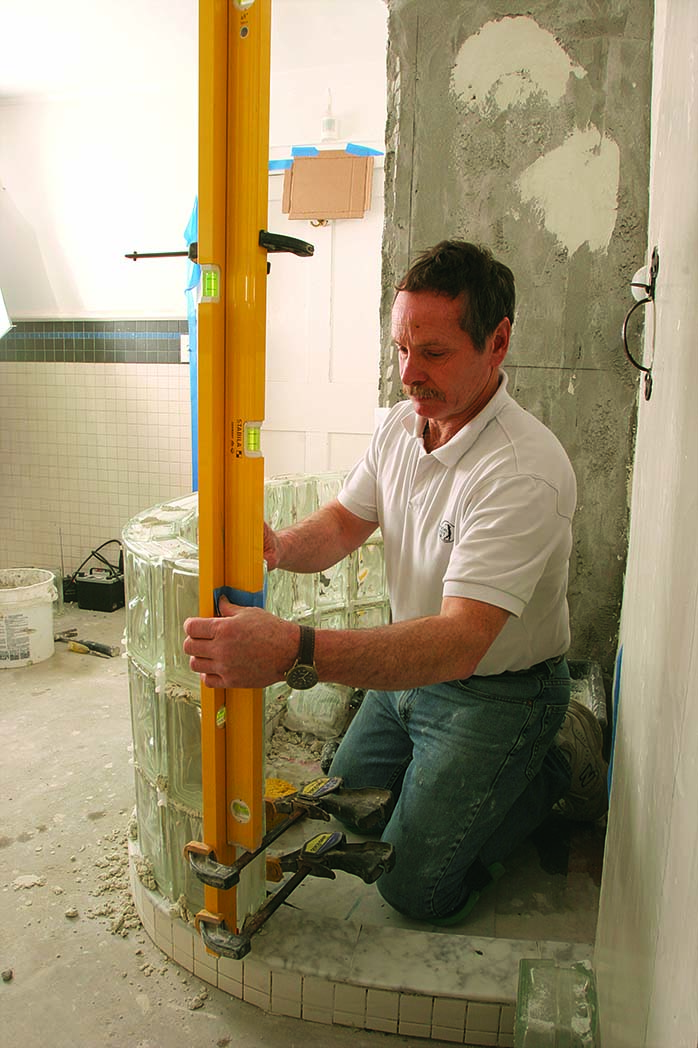
A pair of levels keeps things in line

Glass blocks around door openings often shift during assembly. To keep things in line, I clamp a long level to the face of the glass blocks, then clamp a short level to the long level so that I can check for plumb in two directions as I work. As new blocks are placed, I fasten them to the levels with painter’s tape to keep them from shifting.

level

From Fine Homebuilding #200

For more photos and step by step instructions on how to install a glass-block shower, click the View PDF button below. 

View PDF
Previous: A Sloping Floor for a Barrier-Free Bath Next: Do Subway Tiles Need to Be Spaced?

Guide

Tiling

Chapter

Tiling Showers

Sign up for eletters today and get the latest how-to from Fine Homebuilding, plus special offers.

Signing you up...

This site is protected by reCAPTCHA and the Google Privacy Policy and Terms of Service apply.
See all newsletters
See all newsletters

Log in or create an account to post a comment.

Sign up Log in

Become a member and get full access to FineHomebuilding.com

Tiling

Tiling

Trusted, comprehensive guidance from the pros for a great-looking tile job in any room of the house

View Project Guide

View All Project Guides »

Become a member and get unlimited site access, including the Tiling Project Guide.

Start Free Trial

Selecting Tile
  • The Basics
  • Tile Options
Tools & Techniques
  • Job-Preparation Tools
  • Cutting Tiles
  • Setting & Grouting Tools
Installation Materials
  • Membranes & Substrates
  • Adhesives & Mortars
  • Grout
  • Sealers & Caulk
  • Spacers, Hardware & Trim
Preparation
  • The Prep Job
  • Repairs & Surface Prep
  • Installing Backerboard
Tiling Floors
  • Layout & Installation
  • Setting Specialty Tiles
Tiling Walls & Backsplashes
  • Preparation
  • Backsplashes
  • Walls
Tiling Showers
  • Tile Shower Basics
  • Waterproofing
  • Shower Pans
  • Shower Drains
  • Shower Niches
  • Video Series: Tile a Shower
  • Video Series: Tile a Barrier-Free Bathroom
Grouting, Sealing & Caulking
  • Grouting
  • Caulking
  • Sealing
Maintenance & Repair
  • Maintenance
  • Tile Repair
  • Grout Repair

Fine Home Building

Newsletter Sign-up

  • Fine Homebuilding

    Home building tips, offers, and expert advice in your inbox.

  • Green Building Advisor

    Building science and energy efficiency advice, plus special offers, in your inbox.

  • Old House Journal

    Repair, renovation, and restoration tips, plus special offers, in your inbox.

Signing you up...

This site is protected by reCAPTCHA and the Google Privacy Policy and Terms of Service apply.
See all newsletters

Follow

  • Fine Homebuilding

    Dig into cutting-edge approaches and decades of proven solutions with total access to our experts and tradespeople.

    Start Free Trial Now
    • Facebook
    • Instagram
    • X
    • LinkedIn
  • GBA Prime

    Get instant access to the latest developments in green building, research, and reports from the field.

    Start Free Trial Now
    • Facebook
    • YouTube
  • Old House Journal

    Learn how to restore, repair, update, and decorate your home.

    Subscribe Now
    • Facebook
    • Instagram
    • X

Membership & Magazine

  • Online Archive
  • Start Free Trial
  • Magazine Subscription
  • Magazine Renewal
  • Gift a Subscription
  • Customer Support
  • Privacy Preferences
  • About
  • Contact
  • Advertise
  • Careers
  • Terms of Use
  • Site Map
  • Do not sell or share my information
  • Privacy Policy
  • Accessibility
  • California Privacy Rights

© 2025 Active Interest Media. All rights reserved.

Fine Homebuilding receives a commission for items purchased through links on this site, including Amazon Associates and other affiliate advertising programs.

  • Home Group
  • Antique Trader
  • Arts & Crafts Homes
  • Bank Note Reporter
  • Cabin Life
  • Cuisine at Home
  • Fine Gardening
  • Fine Woodworking
  • Green Building Advisor
  • Garden Gate
  • Horticulture
  • Keep Craft Alive
  • Log Home Living
  • Military Trader/Vehicles
  • Numismatic News
  • Numismaster
  • Old Cars Weekly
  • Old House Journal
  • Period Homes
  • Popular Woodworking
  • Script
  • ShopNotes
  • Sports Collectors Digest
  • Threads
  • Timber Home Living
  • Traditional Building
  • Woodsmith
  • World Coin News
  • Writer's Digest
Active Interest Media logo
X
X
This is a dialog window which overlays the main content of the page. The modal window is a 'site map' of the most critical areas of the site. Pressing the Escape (ESC) button will close the modal and bring you back to where you were on the page.

Main Menu

  • How-To
  • Design
  • Tools & Materials
  • Video
  • Blogs
  • Forum
  • Project Guides
  • Reader Projects
  • Magazine
  • Members
  • FHB House

Podcasts

  • FHB Podcast
  • ProTalk

Webinars

  • Upcoming and On-Demand

Podcasts

  • FHB Podcast
  • ProTalk

Webinars

  • Upcoming and On-Demand

Popular Topics

  • Kitchens
  • Business
  • Bedrooms
  • Roofs
  • Architecture and Design
  • Green Building
  • Decks
  • Framing
  • Safety
  • Remodeling
  • Bathrooms
  • Windows
  • Tilework
  • Ceilings
  • HVAC

Magazine

  • Current Issue
  • Past Issues
  • Magazine Index
  • Subscribe
  • Online Archive
  • Author Guidelines

All Access

  • Member Home
  • Start Free Trial
  • Gift Membership

Online Learning

  • Courses
  • Project Guides
  • Reader Projects
  • Podcast

More

  • FHB Ambassadors
  • FHB House
  • Customer Support

Account

  • Log In
  • Join

Newsletter

Get home building tips, offers, and expert advice in your inbox

Signing you up...

This site is protected by reCAPTCHA and the Google Privacy Policy and Terms of Service apply.
See all newsletters
See all newsletters

Follow

  • X
  • YouTube
  • instagram
  • facebook
  • pinterest
  • Tiktok

Join All Access

Become a member and get instant access to thousands of videos, how-tos, tool reviews, and design features.

Start Your Free Trial

Subscribe

FHB Magazine

Start your subscription today and save up to 70%

Subscribe

You have 1 free article remaining.

Get complete site access, including thousands of videos, how-to tips, tool reviews, and design features.

Start your FREE trial

Already a member? Log in

We hope you’ve enjoyed your free articles. To keep reading, become a member today.

Get complete site access to expert advice, how-to videos, Code Check, and more, plus the print magazine.

Start your FREE trial

Already a member? Log in

Privacy Policy Update

We use cookies, pixels, script and other tracking technologies to analyze and improve our service, to improve and personalize content, and for advertising to you. We also share information about your use of our site with third-party social media, advertising and analytics partners. You can view our Privacy Policy here and our Terms of Use here.

Cookies

Analytics

These cookies help us track site metrics to improve our sites and provide a better user experience.

Advertising/Social Media

These cookies are used to serve advertisements aligned with your interests.

Essential

These cookies are required to provide basic functions like page navigation and access to secure areas of the website.

Delete My Data

Delete all cookies and associated data