FHB Logo Facebook LinkedIn Email Pinterest Twitter X Instagram Tiktok YouTube Plus Icon Close Icon Navigation Search Icon Navigation Search Icon Arrow Down Icon Video Guide Icon Article Guide Icon Modal Close Icon Guide Search Icon Skip to content
Subscribe
Log In
  • How-To
  • Design
  • Tools & Materials
  • Restoration
  • Videos
  • Blogs
  • Forum
  • Magazine
  • Members
  • FHB House
  • Podcast
Log In

Fine Homebuilding Project Guides

Tiling

Guide Home
  • Selecting Tile
  • Tools & Techniques
  • Installation Materials
  • Preparation
  • Tiling Floors
  • Tiling Walls & Backsplashes
  • Tiling Showers
  • Grouting, Sealing & Caulking
  • Maintenance & Repair
How-To

How to Cut Tile With a Wet Saw

Learn how to make curved, L-shaped, and inside cuts in tile with this essential power tool.

By Robin Nicholas, Michael Schweit
  • X
  • facebook
  • linkedin
  • pinterest
  • email
  • add to favorites Log in or Sign up to save your favorite articles

For many simple tile jobs, a cutting board and a pair of nippers are adequate for most cuts. But some tiles, such as glass and some kinds of stone, just won’t cut cleanly on a cutting board. Furthermore, there are many cuts, including curved cuts, L-shaped cuts, and inside cuts, that a cutting board can’t handle.

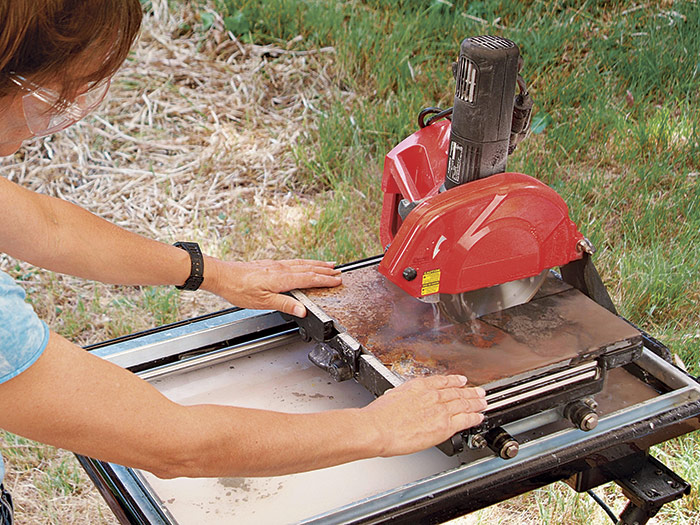
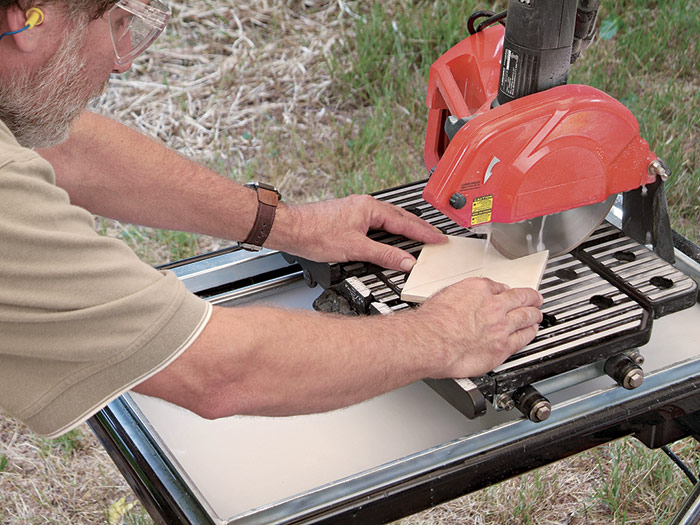
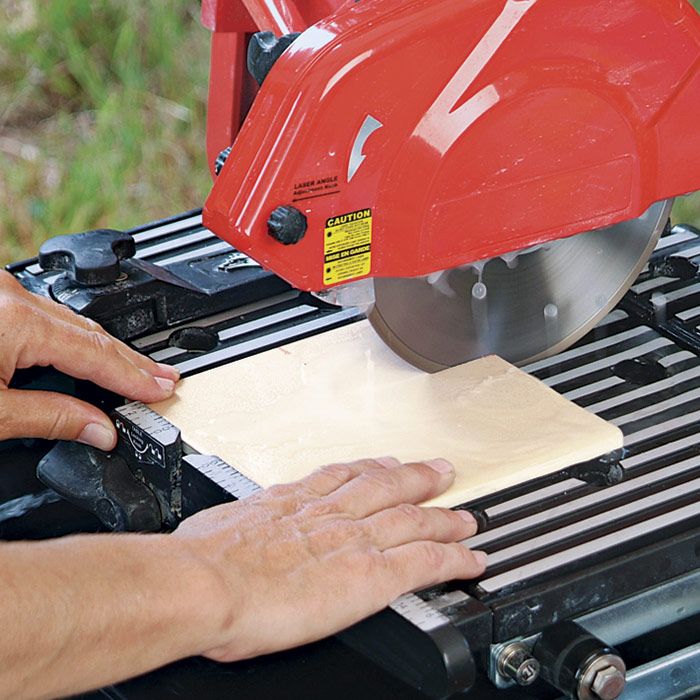
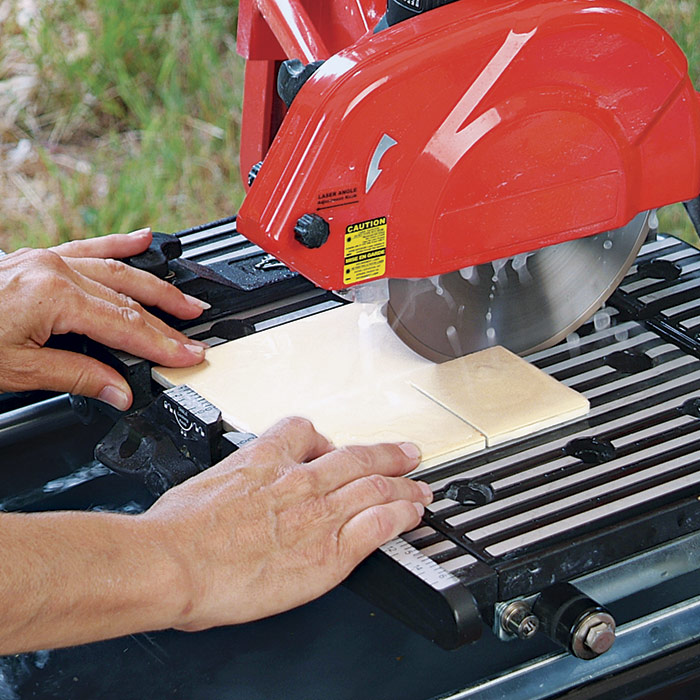
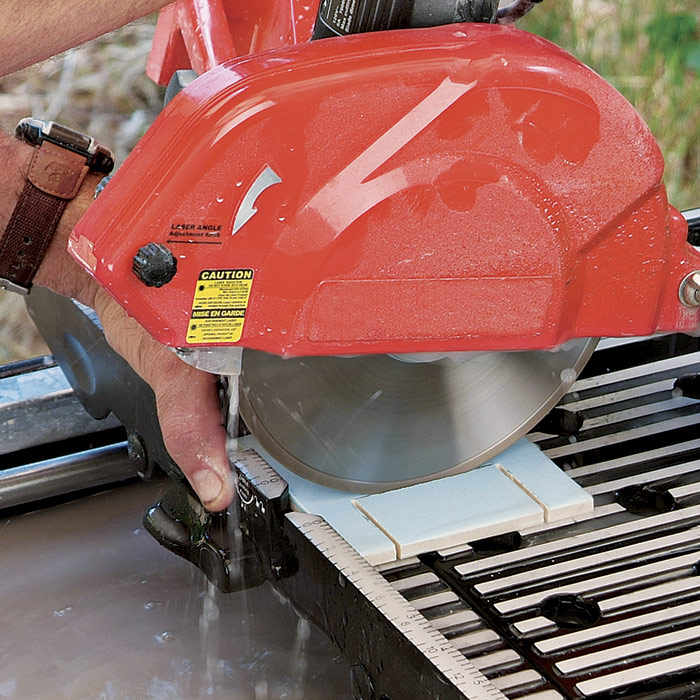
For these jobs, only a powered wet saw will do. Although they’re messy and noisy (always wear ear protection when running a wet saw), the diamond-impregnated blade cuts tiles cleaner and leaves smoother edges than you’ll get from any other type of cutter. Follow the manufacturer’s instructions for your particular model and always feed the tile smoothly into the blade A.

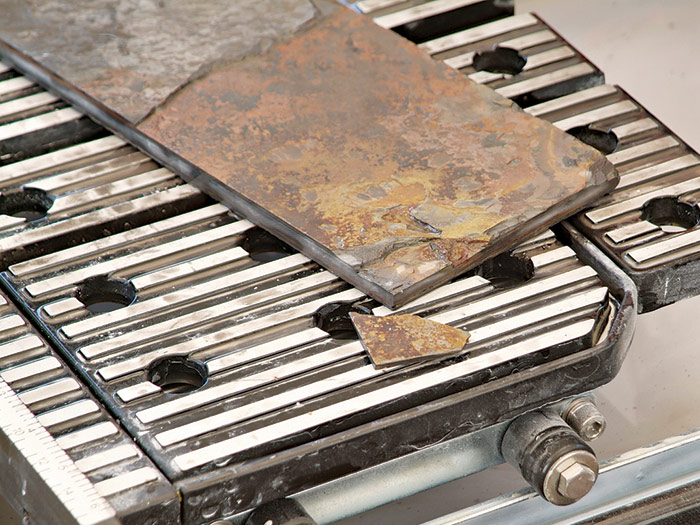
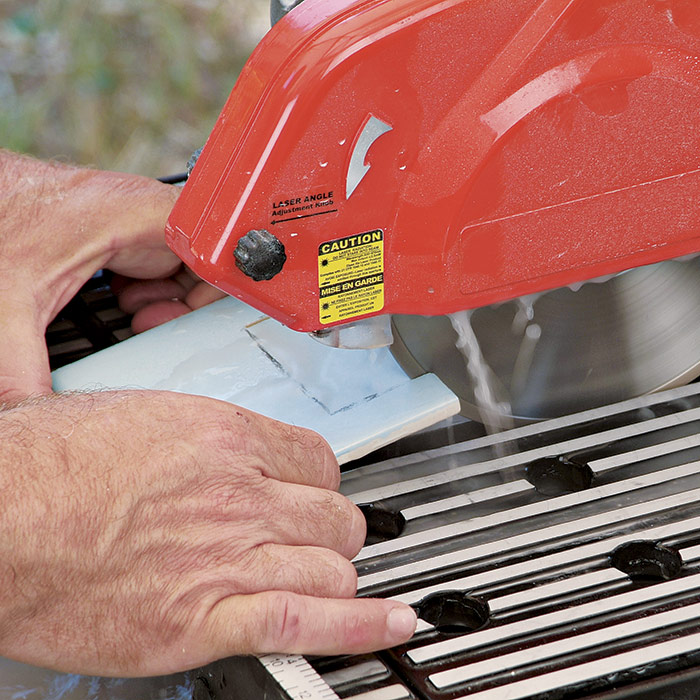
Some kinds of stone tile—especially slate—tend to spall (shed layers) or flake off small pieces when cut B. This is natural, and there’s little you can do to avoid it. Save these tiles for filler pieces or use them in less visible locations.

Feed the tile smoothly through the saw.
A) Feed the tile smoothly through the saw.

flake off when cut
B) Some stone tiles, like this slate, shed layers or flake off when cut.

Miter cuts

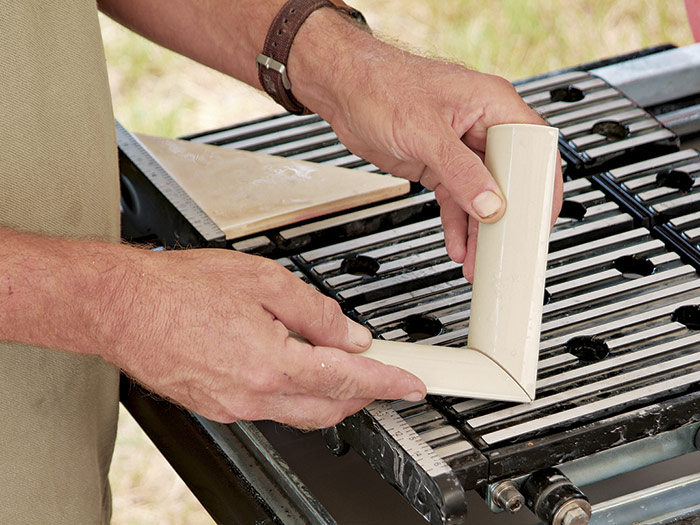
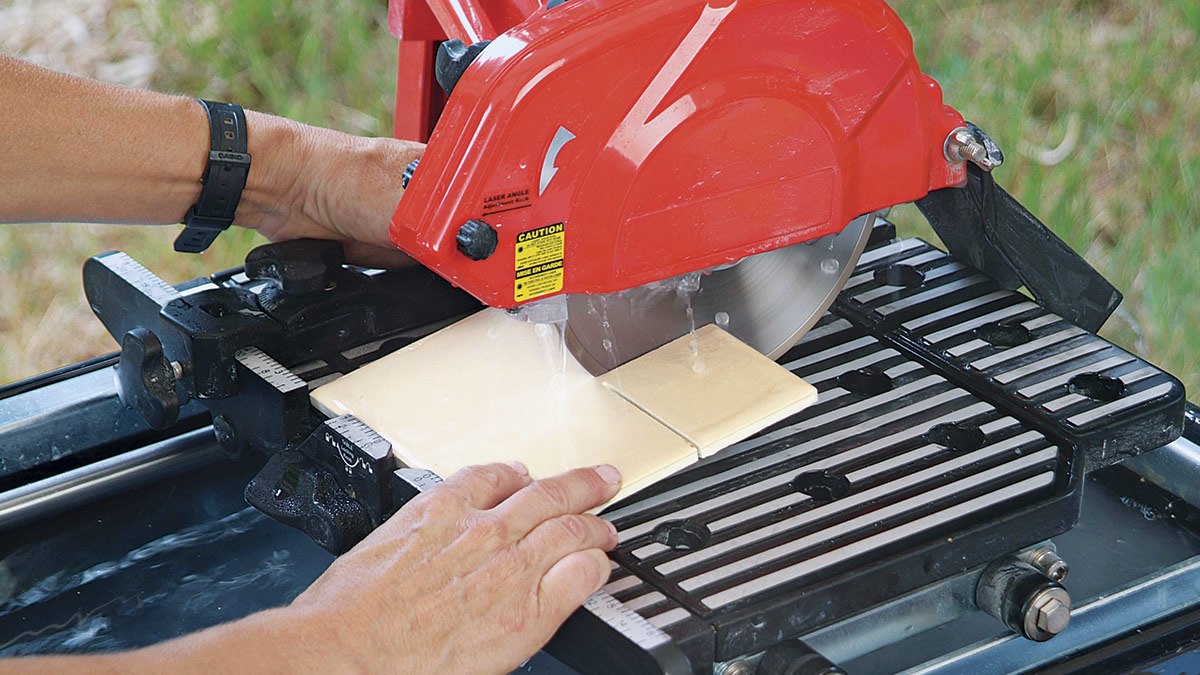
A wet saw makes short work of making miter cuts at the ends of either flat tiles or shaped trim tiles, including quarter-rounds used to trim around a sink C, and liners used to create a frame around a tile mural D.

Mitered quarter-rounds
C) Mitered quarter-rounds should have an even grout joint when they are set. These two line up perfectly.

mitered flat
D) Some decorative tiles are mitered flat on the tray, especially if being used to frame a mirror or other element.

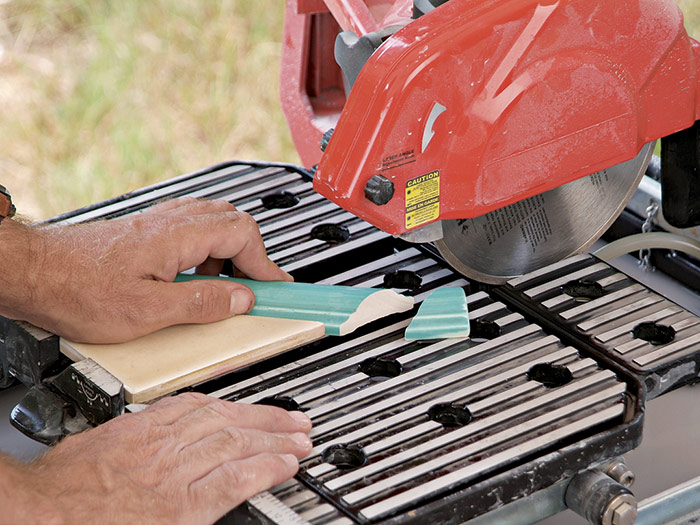
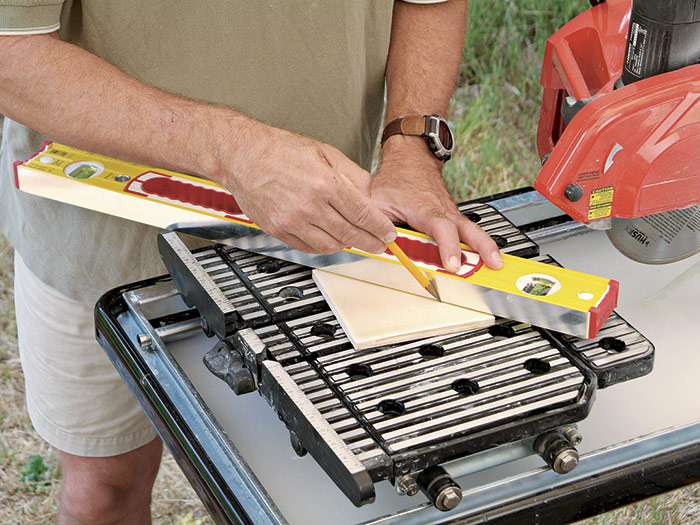
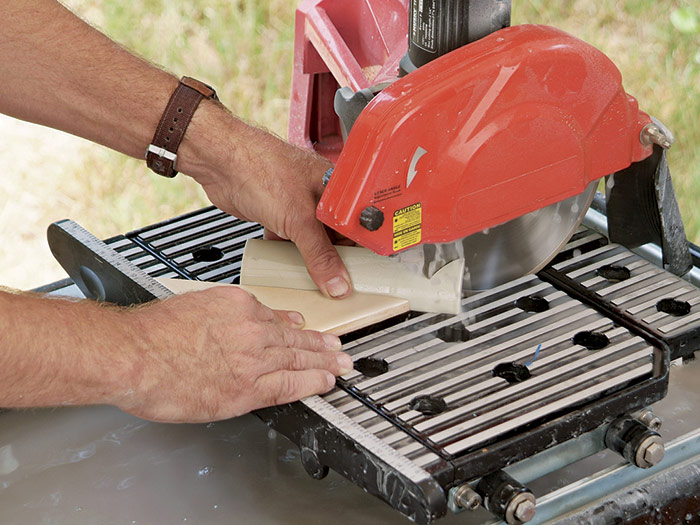
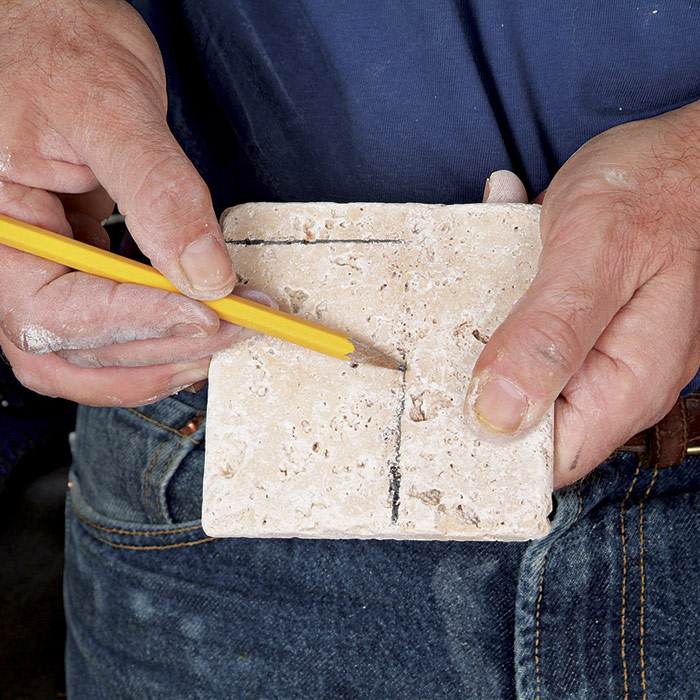
You can use your saw’s miter guide to position the tile for a 45° cut, but we prefer to use a cut field tile as a jig for these cuts. To make a jig tile, mark a regular square field tile diagonally point to point E, and cut it in half F . Set this jig tile against the saw’s fence and use it to position the workpiece for a miter cut G. When mitering quarter- rounds, do not place them flat on the saw’s sliding tray. Instead, support them on edge, so they’re cut in the same position in which they’ll be installed H.

diagonal guide
E) To make a diagonal guide (45°) or two diagonal cut pieces, draw a pencil line on the tile from corner to corner.

cut through the tile
F) Line up the tile point up with the blade and cut through the tile, following your pencil mark.

cut your piece to length
G) First cut your piece to length, then use the tile guide to cut the miter, starting at the back edge of the tile.

orient the tile
H) When mitering a quarter-round, you must orient the tile into the position it will lay when it is set. Do not place it flat on the saw tray.


TRADE SECRET: Water is necessary to cool your tile saw’s blade and wash debris away from the cut area. If the water stops, check the pump for a clogged impeller or the flow holes around the blade guard for lodged debris.


Cutting Curves

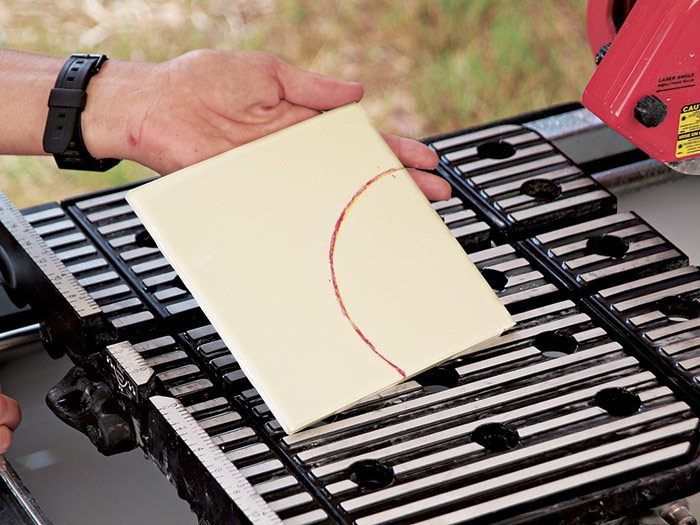
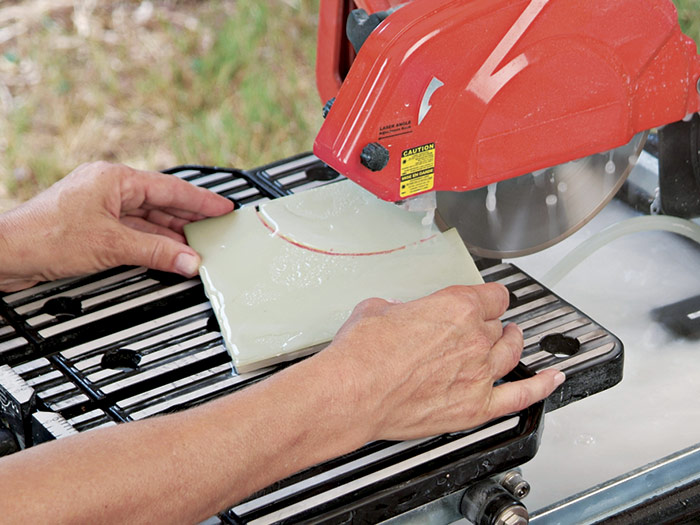
Curved cuts are usually needed around toilet flanges and other pipes. Because the cut edges of the tile are covered by either the toilet’s base or an escutcheon plate, complete accuracy is not necessary. Mark the curve on the tile 1.

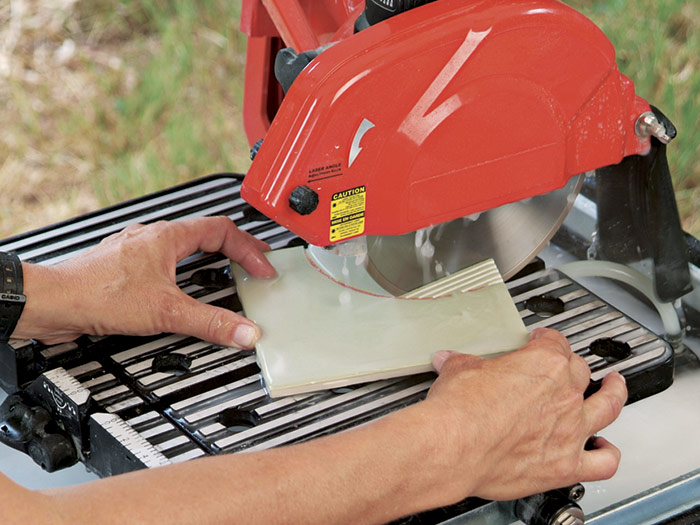
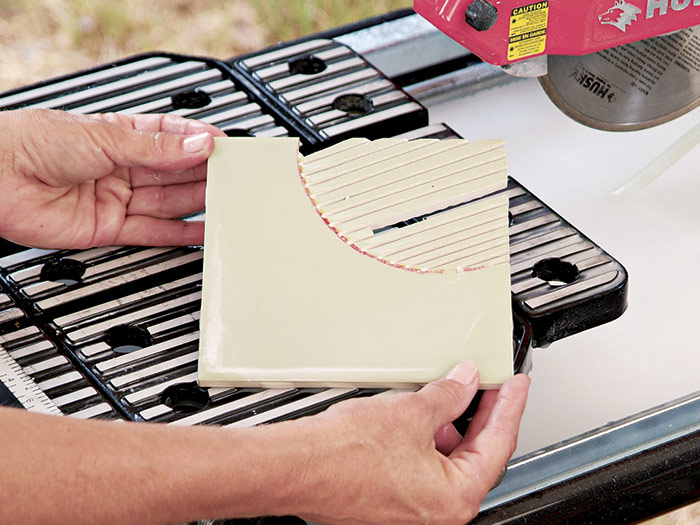
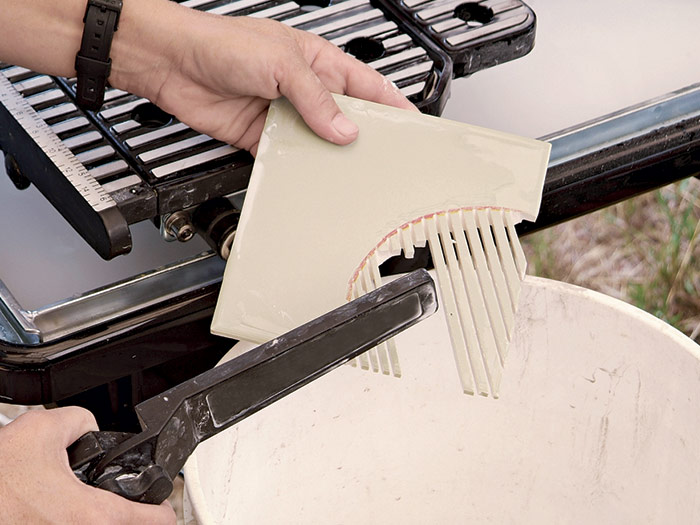
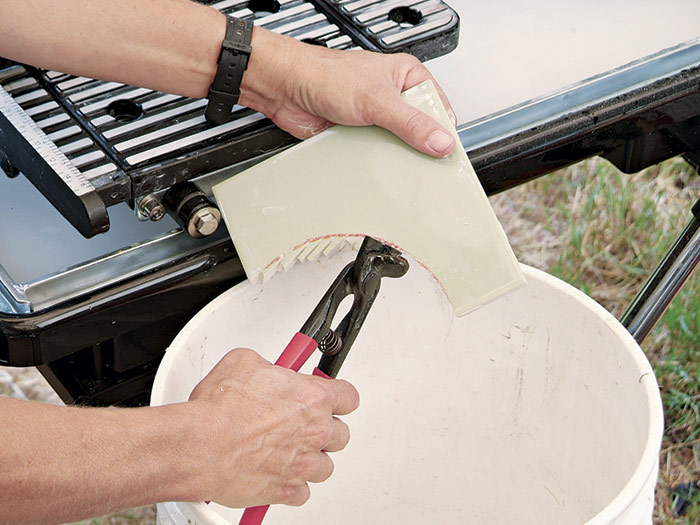
First, cut into your tile at each end of the curve on the wet saw 2. Next, make a series of parallel cuts into the waste area, up to the curved line. With softer tiles, you can cut wider strips; for denser tiles, like porcelain, you’ll want to make many closely spaced cuts to reduce the risk of the whole tile breaking 3. The waste strips may fall out as you cut, which is good 4. Once the parallel cuts are finished, use tile nippers (or a hammer) to carefully tap out the remaining waste strips from the tile 5. Finally, use tile nippers to nibble off tile up to the line of cut and clean up the rest of the curve 6.

Mark the curve
1) Mark the tile to show the radius you need to cut.

Cut into each corner
2) Cut into each corner of the curve to start.

Cut a number of slices into the tile
3) Cut a number of slices into the tile, stopping at the cutting line.

make a clean curve
4) Some slices may fall out as you cut. The more slices you cut, the easier it is to make a clean curve.

Tap out the slices
5) Tap out the slices. You’ll be left with a rough edge that you’ll trim with tile nippers.

clean up the edge
6) Use the nippers to clean up the edge and smooth out the curve.

L-Shaped Cuts

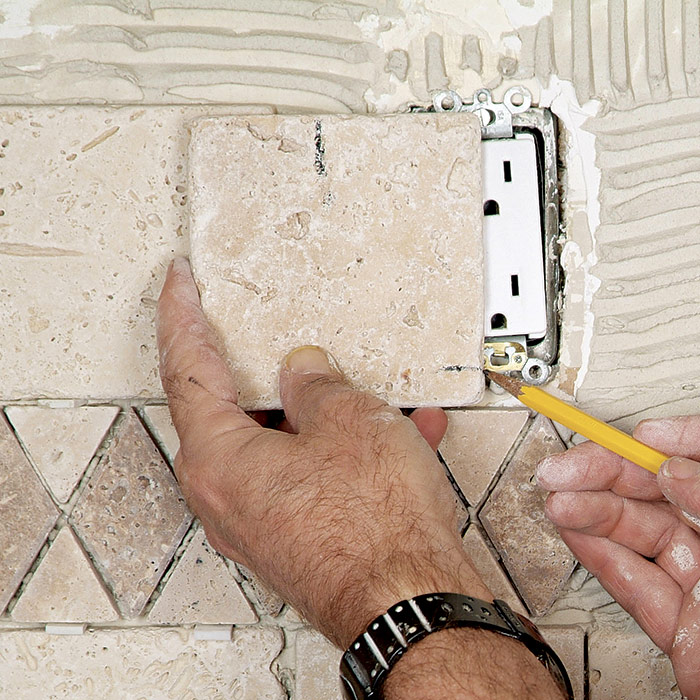
Shaped cuts are often required when fitting tiles around electrical boxes on backsplashes, for example. Both L- and U-shaped cuts are easily done on a wet saw.

For an L-shaped piece, first, mark out the cut on the face of the tile 1. Continue the lines so that you can clearly see where you will be cutting 2. Now place the tile flat on the saw and against the back stop of the saw tray. Feed the tile into the spinning blade, stopping just short of where the lines meet 3. Carefully back out the tile. Now cut along the second line until the two cuts almost meet 4. Lift the front edge of the tile carefully and cut all the way into first one corner, then the other until the waste piece falls out 5.

Line the tile up
1) Line the tile up with the row of set tiles at each point.

Continue the vertical and horizontal cut marks
2) Continue the vertical and horizontal cut marks from the edge of the tile.

Cut just to the point at which the lines intersect
3) Cut just to the point at which the lines intersect, not beyond.

Turn the tile
4) Turn the tile and follow the second line until you meet up with the first cut.
 lift the tile up
5) As you near the point at which the lines meet, lift the tile up and into the blade to get a clean corner.


WHAT CAN GO WRONG: When you mark the cut lines for an electrical box, leave room for the screw holes.


U-Shaped Cuts

U-shapes are made like L-cuts, except three cuts are needed. After marking out the cutting lines, cut the two parallel lines of the U 1. Make the third cut by plunging the sawblade into the face of the tile (most saws have a knob that allows the saw head to be raised and lowered) 2. Lower the blade slowly to make the cut, and don’t cut past the two side cuts. To remove the waste to complete the shape, make a number of parallel cuts close together 3, then break them out with tile nippers or pliers.
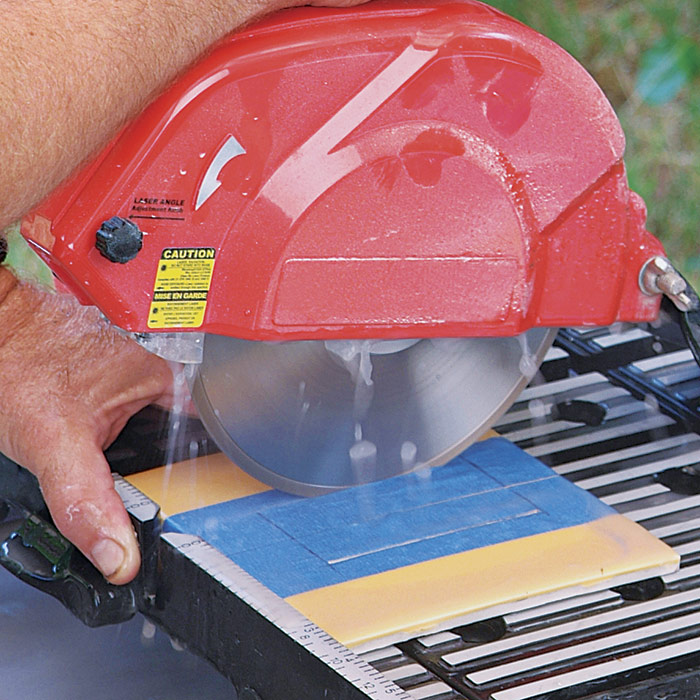
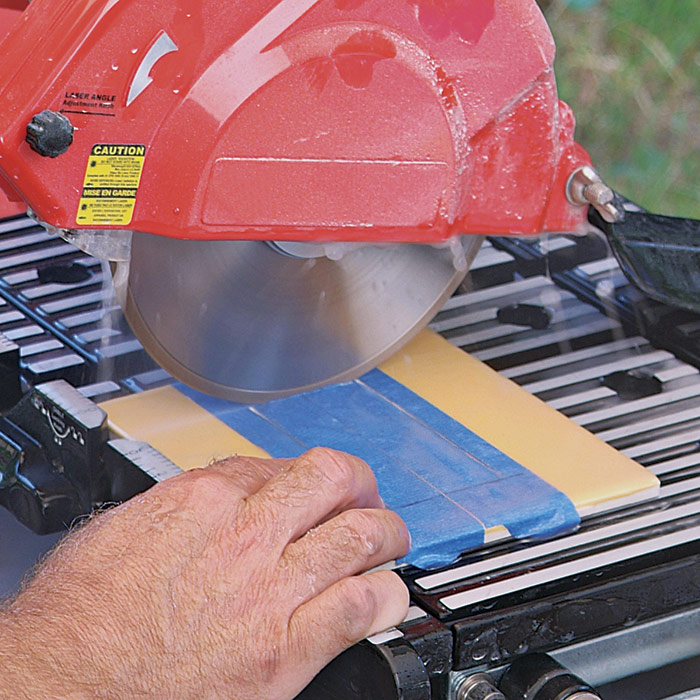
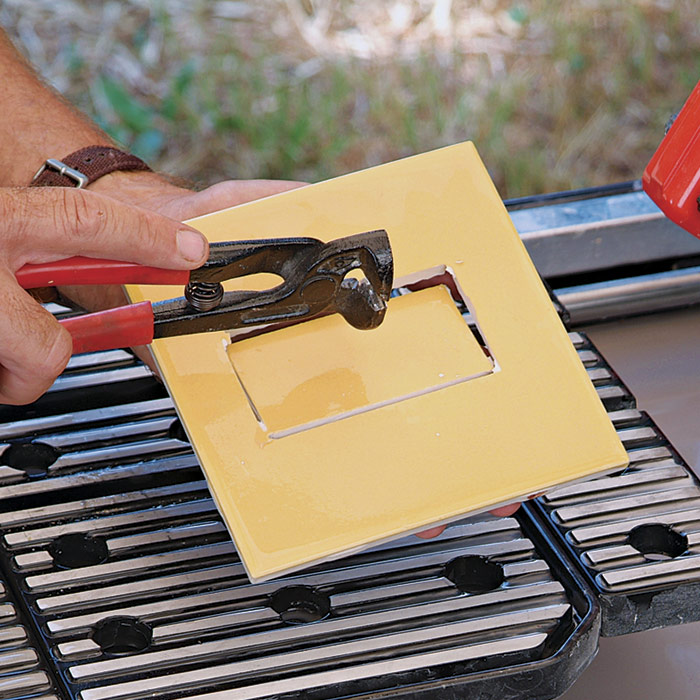
Lift the tile up
1) Lift the tile up into the sawblade on each side to make easy, controlled, accurate cuts.

midsection of the U-cut
2) For the midsection of the U-cut, you’ll need to raise the cutting head to lift the blade, then lower it onto the tile.

Trim out the middle
3) Trim out the middle portion of the shape by making parallel cuts between the outside cuts.

Small Internal Cuts

Sometimes cuts need to be made in the middle of a tile, say for an electrical outlet or switch box. When a tile will completely surround an electrical outlet, the center of the tile will need to be removed by a series of plunge cuts.

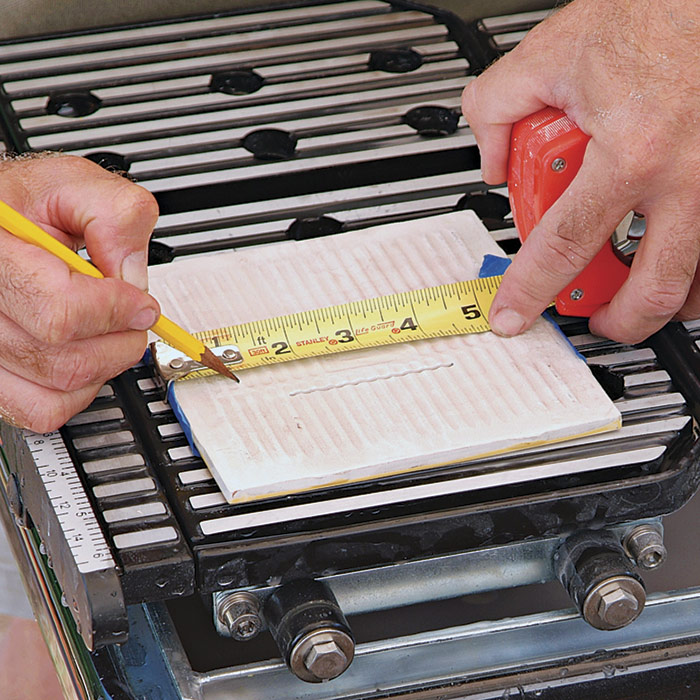
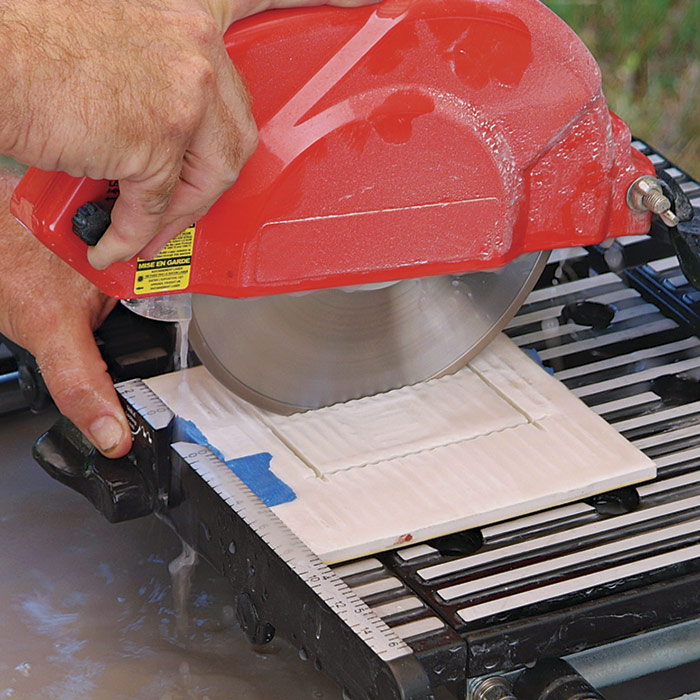
On the outside surface of the tile, cover the area to be cut with blue painter’s tape so that you can see your marks. Measure the distance from the edge of the tile to where the cutout should fall and mark the outline carefully. Raise the cutting head of the saw, then lower the blade onto the tile on each of the four marked lines, then plunge-cut along each line, taking care not to cut too deep into the corners 1, 2. If the sides of the cut area are short, and/or the tile is thick, the sawblade won’t penetrate the tile. In this case, transfer your cutting lines onto the back 3 and recut the tile, cutting slightly beyond the corners 4. Knock the waste piece out, leaving the face with a clean cut 5.
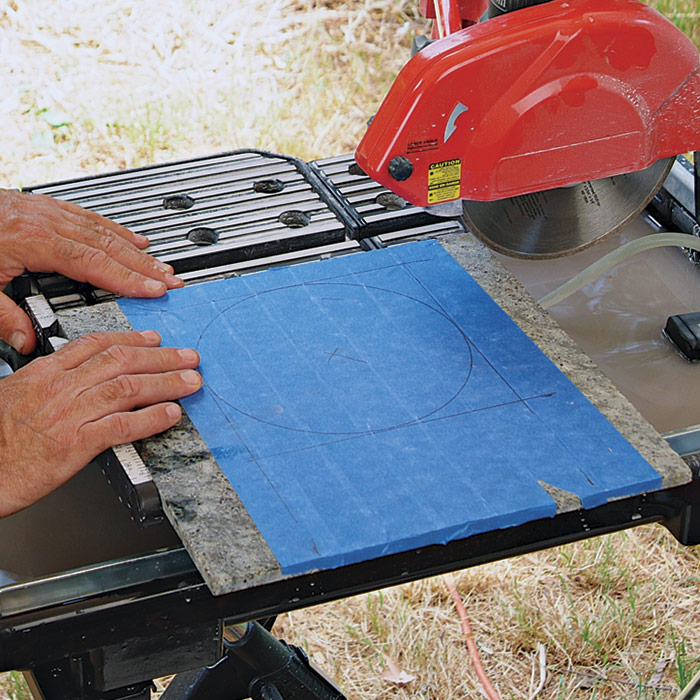
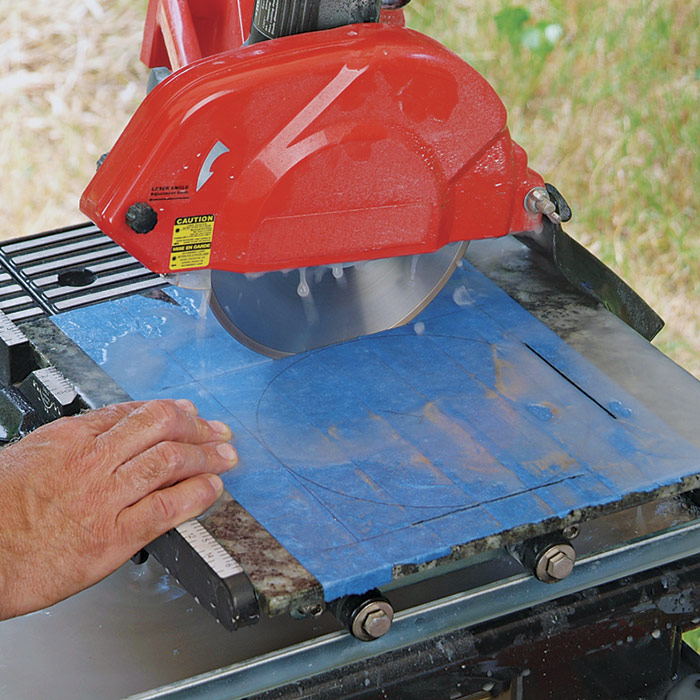
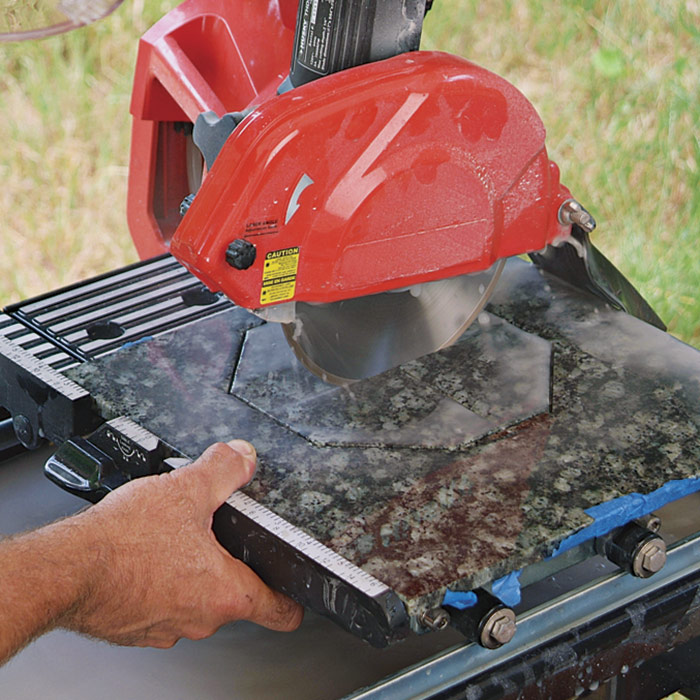
Plunge-cut
1) Plunge-cut to each side of the marked outline.

Flip the tile
2) Flip the tile and cut those sides.

transfer the layout
3) If the cut doesn’t penetrate the tile, transfer the layout lines to the back.

Plunge-cut on all four lines
4) Plunge-cut on all four lines on the back of the tile.

Tap the center of the tile
5) Tap the center of the tile cut carefully until the piece pops out.

Large Internal Cuts

To make a large internal cut for toilet flanges or large pipe, mark the circle on the back of the tile 1. Plunge-cut four slots parallel to the edges of the upside down tile, using the edge of the circle as a guide 2. Now cut four slots at 45° angles to the cuts you just made, extending the cuts slightly beyond where the corners meet 3.

Mark out the area to be cut
1) Mark out the area to be cut as an octagon.

Plunge-cut along the circle
2) Plunge-cut along the circle, parallel to the edges of the tile. Do not cut too deep.

make four connecting cuts
3) Rotate the tile 45° and make four connecting cuts alongside the circle.

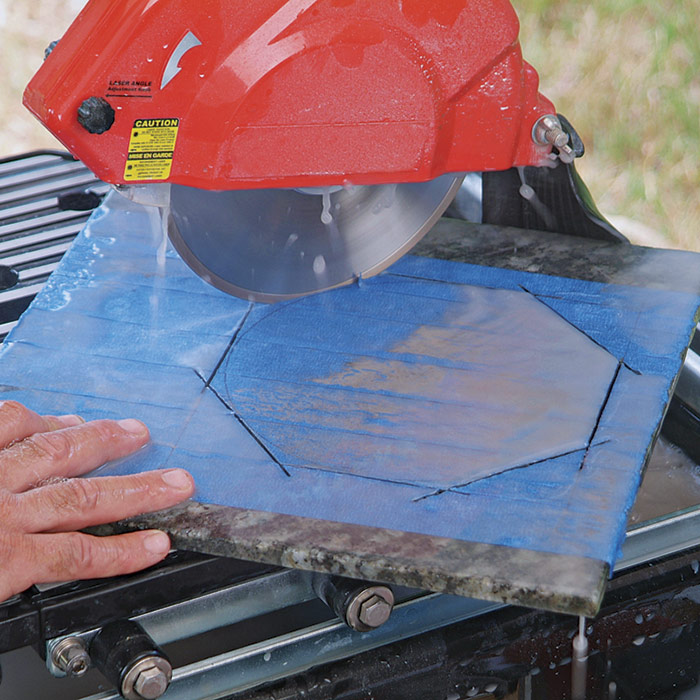
Turn the tile face up. You’ll see your previous cut lines. Plunge the blade into each cut slot, extending the cuts until they meet at the corners 4. Overrun the lines slightly as it will make it easier to knock out the center cut. Plunge-cut an X into the middle of the octagon 5, then knock out the center waste by rapping it with a tile nipper 6.

Flip the tile over
4) Flip the tile over. Cut to each of the lines until the cuts connect.

Cut an X in the middle
5) Cut an X in the middle of the octagon, dividing the cutout into quarters.

Tap around the edges
6) Tap around the edges of the center cut, and the pieces will drop out.


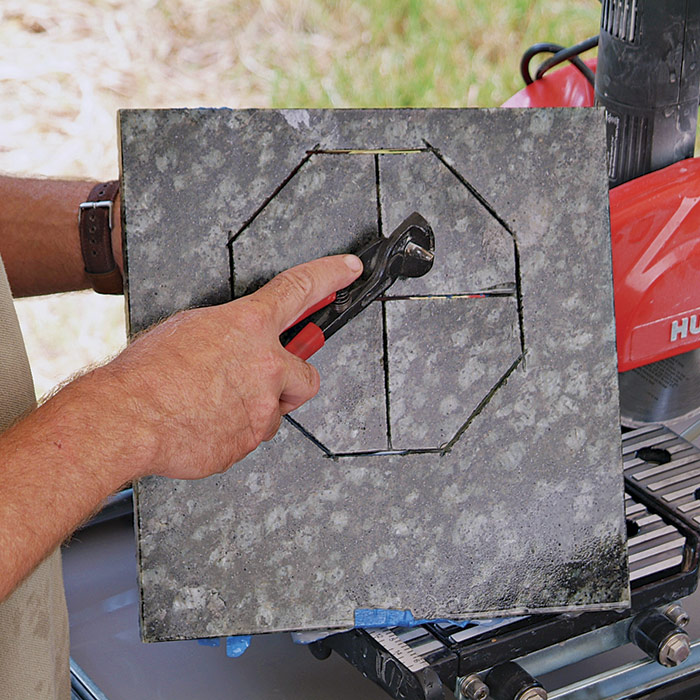
WHAT CAN GO WRONG: Don’t cut too deeply or your cut marks may not be covered by the flange after installation.


Tiling Complete, 2nd EditionExcerpted from Tiling Complete, 2nd Edition by Robin Nicholas and Michael Schweit.

Available at Amazon.com.

Previous: Cutting Tile on a Manual Tile Cutter Next: Cutting Ceramic Tile with a Tile Saw

Guide

Tiling

Chapter

Tools & Techniques

Sign up for eletters today and get the latest how-to from Fine Homebuilding, plus special offers.

Signing you up...

This site is protected by reCAPTCHA and the Google Privacy Policy and Terms of Service apply.
See all newsletters
See all newsletters

Log in or create an account to post a comment.

Sign up Log in

Become a member and get full access to FineHomebuilding.com

Tiling

Tiling

Trusted, comprehensive guidance from the pros for a great-looking tile job in any room of the house

View Project Guide

View All Project Guides »

Become a member and get unlimited site access, including the Tiling Project Guide.

Start Free Trial

Selecting Tile
  • The Basics
  • Tile Options
Tools & Techniques
  • Job-Preparation Tools
  • Cutting Tiles
  • Setting & Grouting Tools
Installation Materials
  • Membranes & Substrates
  • Adhesives & Mortars
  • Grout
  • Sealers & Caulk
  • Spacers, Hardware & Trim
Preparation
  • The Prep Job
  • Repairs & Surface Prep
  • Installing Backerboard
Tiling Floors
  • Layout & Installation
  • Setting Specialty Tiles
Tiling Walls & Backsplashes
  • Preparation
  • Backsplashes
  • Walls
Tiling Showers
  • Tile Shower Basics
  • Waterproofing
  • Shower Pans
  • Shower Drains
  • Shower Niches
  • Video Series: Tile a Shower
  • Video Series: Tile a Barrier-Free Bathroom
Grouting, Sealing & Caulking
  • Grouting
  • Caulking
  • Sealing
Maintenance & Repair
  • Maintenance
  • Tile Repair
  • Grout Repair

Fine Home Building

Newsletter Sign-up

  • Fine Homebuilding

    Home building tips, offers, and expert advice in your inbox.

  • Green Building Advisor

    Building science and energy efficiency advice, plus special offers, in your inbox.

  • Old House Journal

    Repair, renovation, and restoration tips, plus special offers, in your inbox.

Signing you up...

This site is protected by reCAPTCHA and the Google Privacy Policy and Terms of Service apply.
See all newsletters

Follow

  • Fine Homebuilding

    Dig into cutting-edge approaches and decades of proven solutions with total access to our experts and tradespeople.

    Start Free Trial Now
    • Facebook
    • Instagram
    • X
    • LinkedIn
  • GBA Prime

    Get instant access to the latest developments in green building, research, and reports from the field.

    Start Free Trial Now
    • Facebook
    • YouTube
  • Old House Journal

    Learn how to restore, repair, update, and decorate your home.

    Subscribe Now
    • Facebook
    • Instagram
    • X

Membership & Magazine

  • Online Archive
  • Start Free Trial
  • Magazine Subscription
  • Magazine Renewal
  • Gift a Subscription
  • Customer Support
  • Privacy Preferences
  • About
  • Contact
  • Advertise
  • Careers
  • Terms of Use
  • Site Map
  • Do not sell or share my information
  • Privacy Policy
  • Accessibility
  • California Privacy Rights

© 2025 Active Interest Media. All rights reserved.

Fine Homebuilding receives a commission for items purchased through links on this site, including Amazon Associates and other affiliate advertising programs.

  • Home Group
  • Antique Trader
  • Arts & Crafts Homes
  • Bank Note Reporter
  • Cabin Life
  • Cuisine at Home
  • Fine Gardening
  • Fine Woodworking
  • Green Building Advisor
  • Garden Gate
  • Horticulture
  • Keep Craft Alive
  • Log Home Living
  • Military Trader/Vehicles
  • Numismatic News
  • Numismaster
  • Old Cars Weekly
  • Old House Journal
  • Period Homes
  • Popular Woodworking
  • Script
  • ShopNotes
  • Sports Collectors Digest
  • Threads
  • Timber Home Living
  • Traditional Building
  • Woodsmith
  • World Coin News
  • Writer's Digest
Active Interest Media logo
X
X
This is a dialog window which overlays the main content of the page. The modal window is a 'site map' of the most critical areas of the site. Pressing the Escape (ESC) button will close the modal and bring you back to where you were on the page.

Main Menu

  • How-To
  • Design
  • Tools & Materials
  • Video
  • Blogs
  • Forum
  • Project Guides
  • Reader Projects
  • Magazine
  • Members
  • FHB House

Podcasts

  • FHB Podcast
  • ProTalk

Webinars

  • Upcoming and On-Demand

Podcasts

  • FHB Podcast
  • ProTalk

Webinars

  • Upcoming and On-Demand

Popular Topics

  • Kitchens
  • Business
  • Bedrooms
  • Roofs
  • Architecture and Design
  • Green Building
  • Decks
  • Framing
  • Safety
  • Remodeling
  • Bathrooms
  • Windows
  • Tilework
  • Ceilings
  • HVAC

Magazine

  • Current Issue
  • Past Issues
  • Magazine Index
  • Subscribe
  • Online Archive
  • Author Guidelines

All Access

  • Member Home
  • Start Free Trial
  • Gift Membership

Online Learning

  • Courses
  • Project Guides
  • Reader Projects
  • Podcast

More

  • FHB Ambassadors
  • FHB House
  • Customer Support

Account

  • Log In
  • Join

Newsletter

Get home building tips, offers, and expert advice in your inbox

Signing you up...

This site is protected by reCAPTCHA and the Google Privacy Policy and Terms of Service apply.
See all newsletters
See all newsletters

Follow

  • X
  • YouTube
  • instagram
  • facebook
  • pinterest
  • Tiktok

Join All Access

Become a member and get instant access to thousands of videos, how-tos, tool reviews, and design features.

Start Your Free Trial

Subscribe

FHB Magazine

Start your subscription today and save up to 81%

Subscribe

We hope you’ve enjoyed your free articles. To keep reading, become a member today.

Get complete site access to expert advice, how-to videos, Code Check, and more, plus the print magazine.

Start your FREE trial

Already a member? Log in

Privacy Policy Update

We use cookies, pixels, script and other tracking technologies to analyze and improve our service, to improve and personalize content, and for advertising to you. We also share information about your use of our site with third-party social media, advertising and analytics partners. You can view our Privacy Policy here and our Terms of Use here.

Cookies

Analytics

These cookies help us track site metrics to improve our sites and provide a better user experience.

Advertising/Social Media

These cookies are used to serve advertisements aligned with your interests.

Essential

These cookies are required to provide basic functions like page navigation and access to secure areas of the website.

Delete My Data

Delete all cookies and associated data