
Installing a Leakproof Shower Pan
A thick mortar bed over a vinyl membrane makes a sturdy base for tile, but it pays to test for leaks.
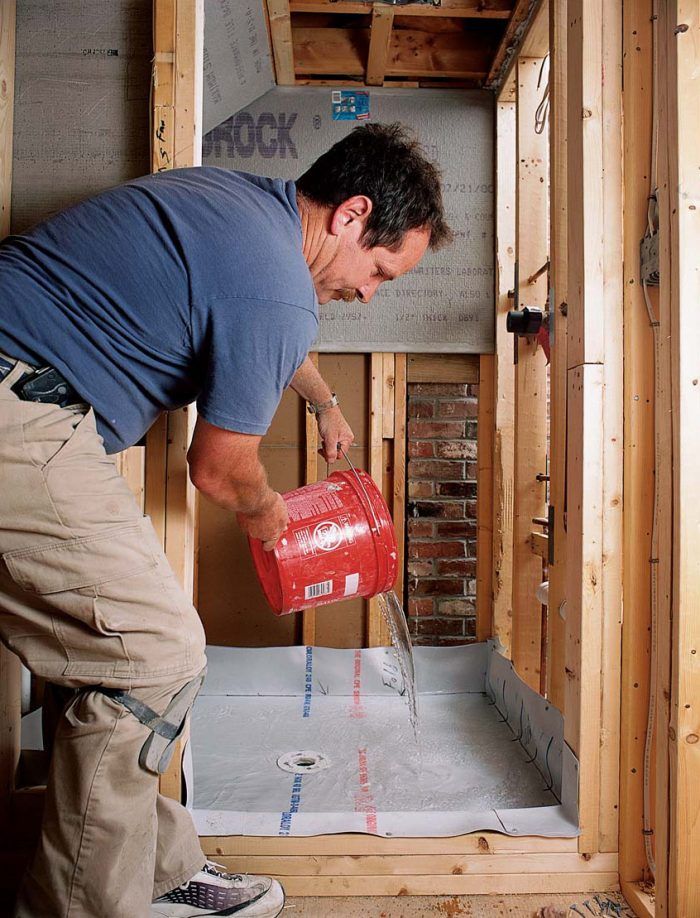
The ultimate test. After the membrane is installed, the author plugs the drain and pours gallons of water into the shower. Better to find leaks now than after the tile is in.
In the past ten years, I have installed well over a thousand shower pans. Of all those pans, only two have leaked. One pan belonged to my father-in-law, and the other belonged to my dentist. My father-in-law is a conservative man who likes to have all his ducks in a row. My dentist was well aware that I had two root canals coming up in the near future. Needless to say, I made sure that fixing these two jobs was at the top of my list.
After a lot of work, I found that faulty drain-assembly fittings were responsible for the leaks in both cases (honest). In the process of rebuilding the pans, I discovered a simple test that would have saved me all that misery. But more on that later; first, let’s start building the pan.
Pitch the floor under the membrane
Before I install the pan, I clean the subfloor in the shower area thoroughly. I look for anything that might punch or wear a hole in the membrane in the future. I set any nail heads in the lower 6 in. to 8 in. of the framing, and I put an extra flap of membrane over any nail plate installed to protect the plumbing.
When I’m building a shower pan, my first concern is that the subfloor is structurally sound. If it’s not, I add a layer of 1/2-in. plywood before the plumber sets the drain assembly. I also do an extra step that I think makes a huge improvement over a standard installation. I like to pitch the shower floor to the drain area before I put the membrane material down. A pitched mud base allows any water that may reach the membrane to drain through the weep holes in the drain assembly.

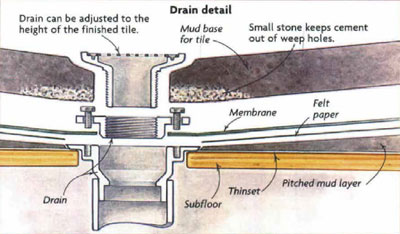
To create this pitch, I float a layer of mud over the shower floor. The mud, a mixture of 1 part portland cement to 3 or 4 parts sand, is just wet enough that it holds together if you grab a handful. To bond the mud layer to the plywood subfloor, I first apply a layer of latex-modified thinset to the subfloor.
The mud mix is spread on top of the thinset, leaving a pitch of 1/4 in. per ft. from the outside perimeter of the shower to the drain. I pack the mud with a wooden float and smooth it with a flat steel trowel. This mud layer dries overnight.
The next day, I cover the mud with a layer of 15-lb. felt paper, cutting the paper tightly around the drain. The felt paper protects the membrane from any mud grit that could abrade it. The felt paper also isolates the finished shower pan from any movement that might occur in the subfloor.
 |
Thinset begins the shower pan. After the subfloor has been swept clean, a layer of latex-modified thinset is applied to bond the layer of mud that follows. |
 |
To build up the pitch on the pan floor, a fairly dry mix of 1 part portland cement to 3 or 4 parts sand is used to form the mud base. |
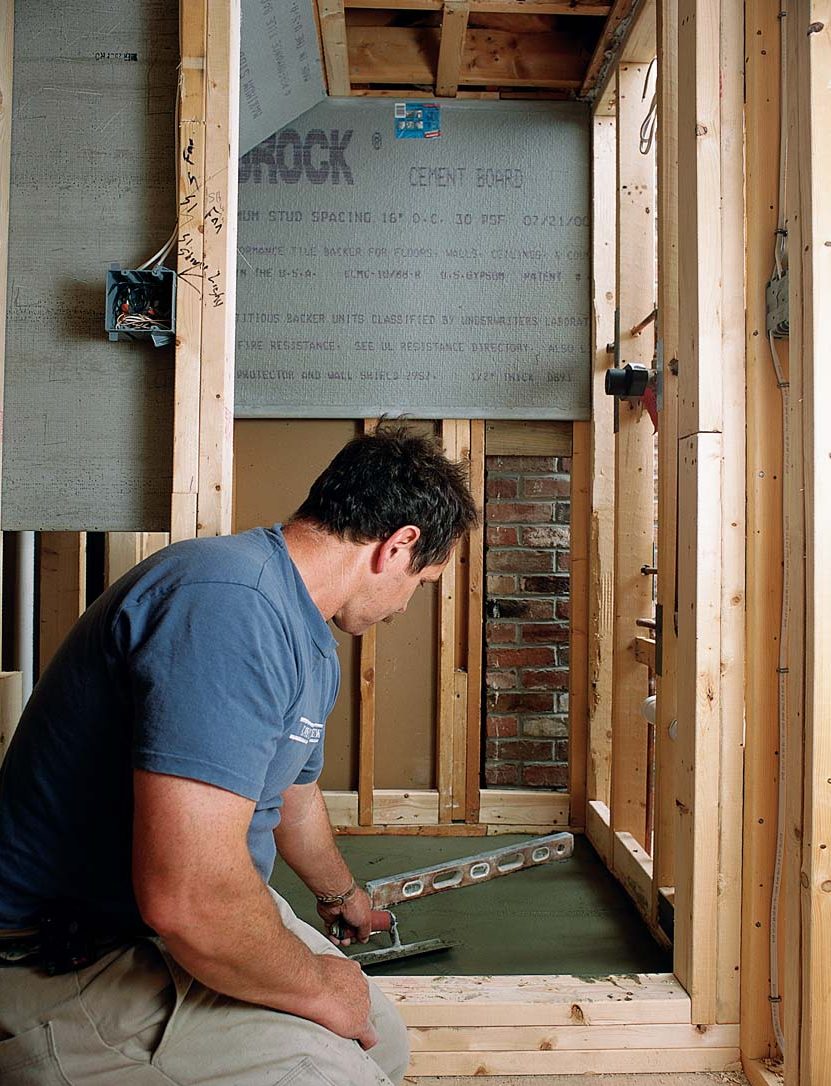 |
The mix should be just wet enough to form clumps when squeezed. Using a 2-ft. level as a gauge, the author floats a pitch of about 1/4 in. per ft. from the pan’s perimeter to the drain. |
A vinyl membrane keeps the water in the pan
Now I’m ready for the shower-pan membrane. I use a vinyl membrane called Chloraloy, made by The Noble Company (231-799-8000). I usually buy a 4-ft. by 50-ft. roll that costs about $360. The membrane is also sold by the piece; a 4-ft. by 6-ft. section costs about $50.
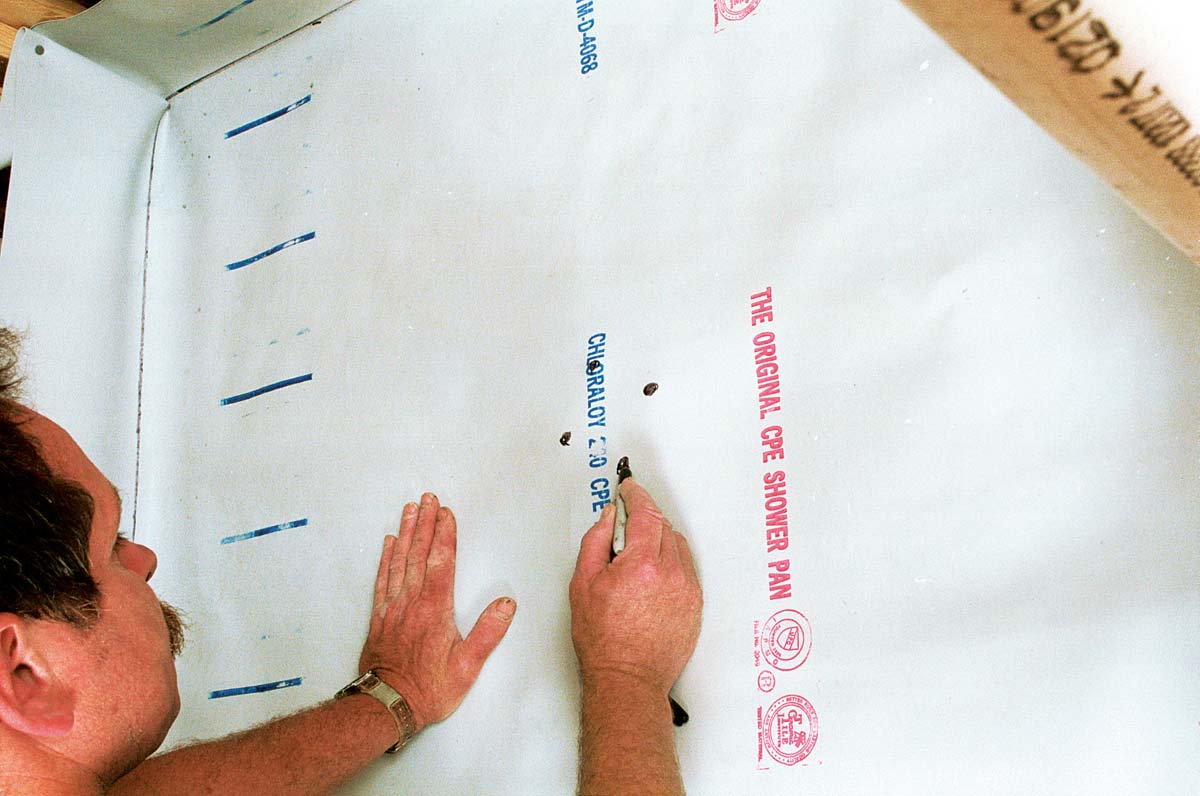
I roll out the membrane on a clean floor and map out the pan with a felt-tip pen. First, I draw the four sides of the shower pan (my fold lines) and then add 7 in. to each side for the cutlines. The fold lines let me position the membrane in the shower without having to shift it around a lot. Measuring and mapping the pan also help me to avoid mistakes in my calculations. I always double-check the lines before cutting.
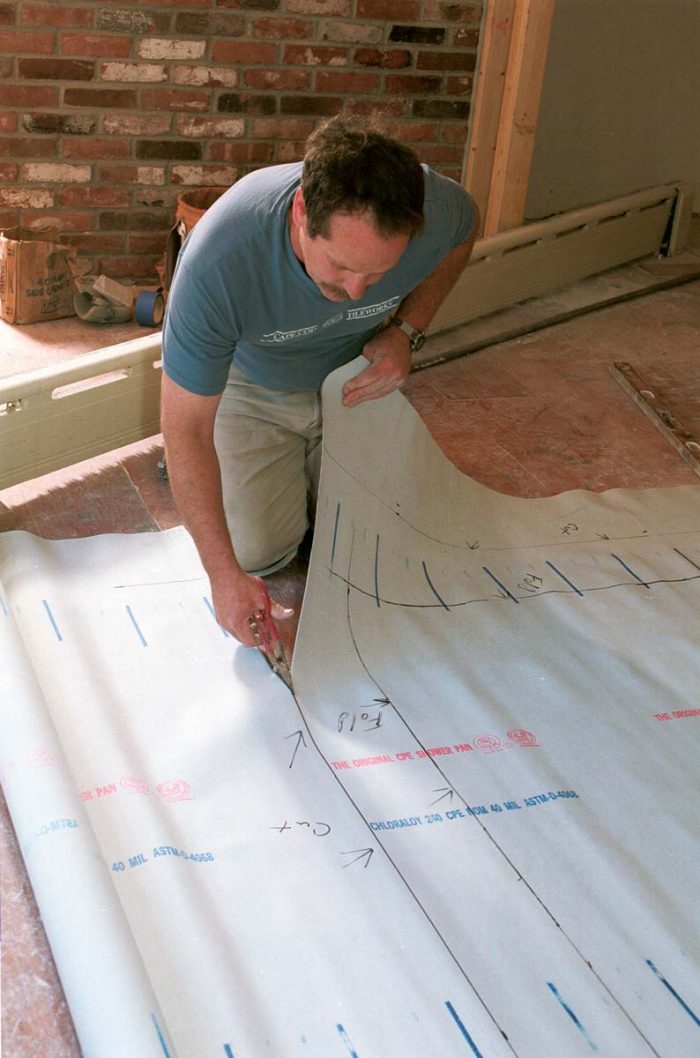 |
The membrane is rolled out on a clean floor, and the outer perimeter of the shower pan is drawn with a felt-tip pen and labeled as fold lines. An extra 7 in. is added in each direction, and the membrane is cut to those lines |
Folded corners let the membrane
Before I move the membrane, I take off the top plastic ring of the drain assembly and put it aside until later. The bolts are left threaded into the lower drain assembly. I then drop the membrane into place, pushing all the fold lines to their proper outside edges.
In the corners where excess membrane bunches up, I push the liner directly into the corner with my finger. The excess corner material is then folded into a pleat so that it lies against the framing as flat as possible. Keeping the folds flat prevents bulges in the backerboard applied over the membrane.
I secure the fold to the framing with one roofing nail along the top edge. As I move toward the next corner, I nail the upper edge of the liner at each stud, always keeping the liner square to the wall and taking care not to pull it off the floor or to stretch it too tight.
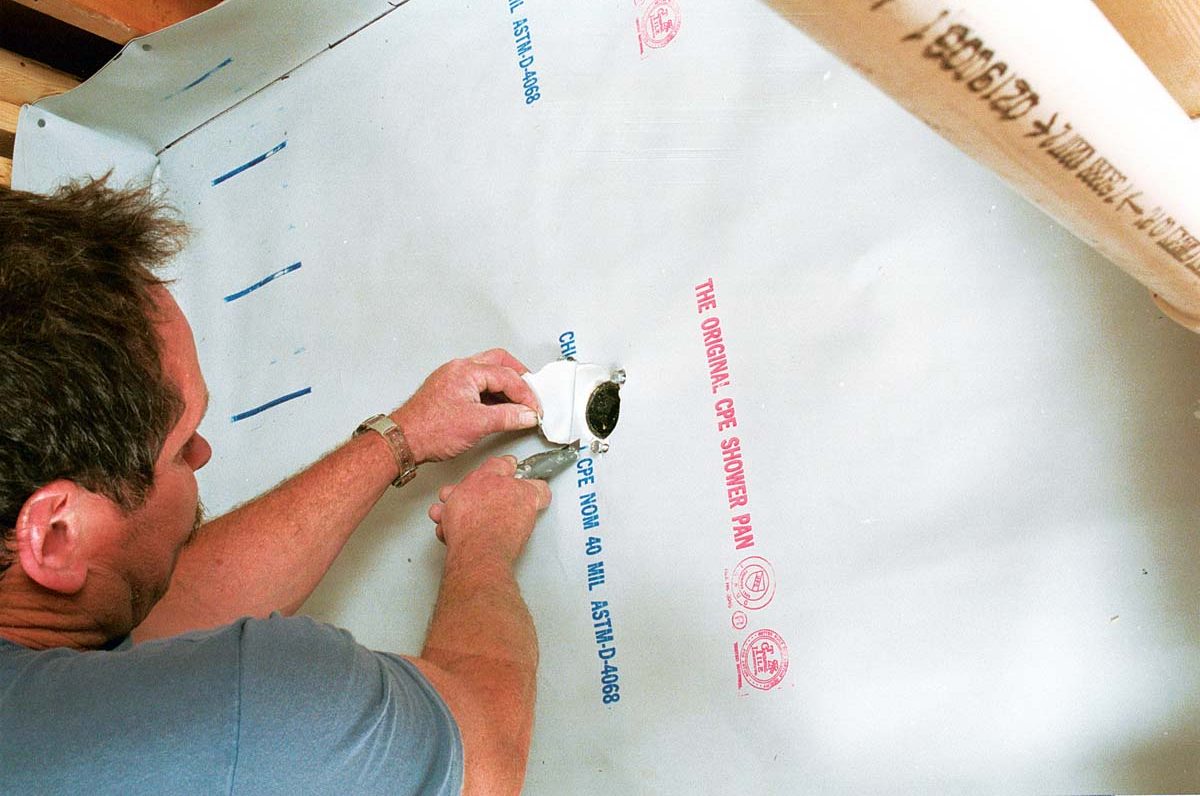
One of the most crucial steps is cutting and connecting the membrane to the plastic drain assembly. First, I mark the heads of the four drain-assembly bolts where they touch the membrane. Then, with a fresh blade in my utility knife, I make a small slit for each bolt and push the membrane down over the bolts. Next, I cut from bolt to bolt in a circle following the inside of the drain. Cuts should always be made toward the inside of the drain to avoid slipping with the knife and cutting the floor area of the membrane.
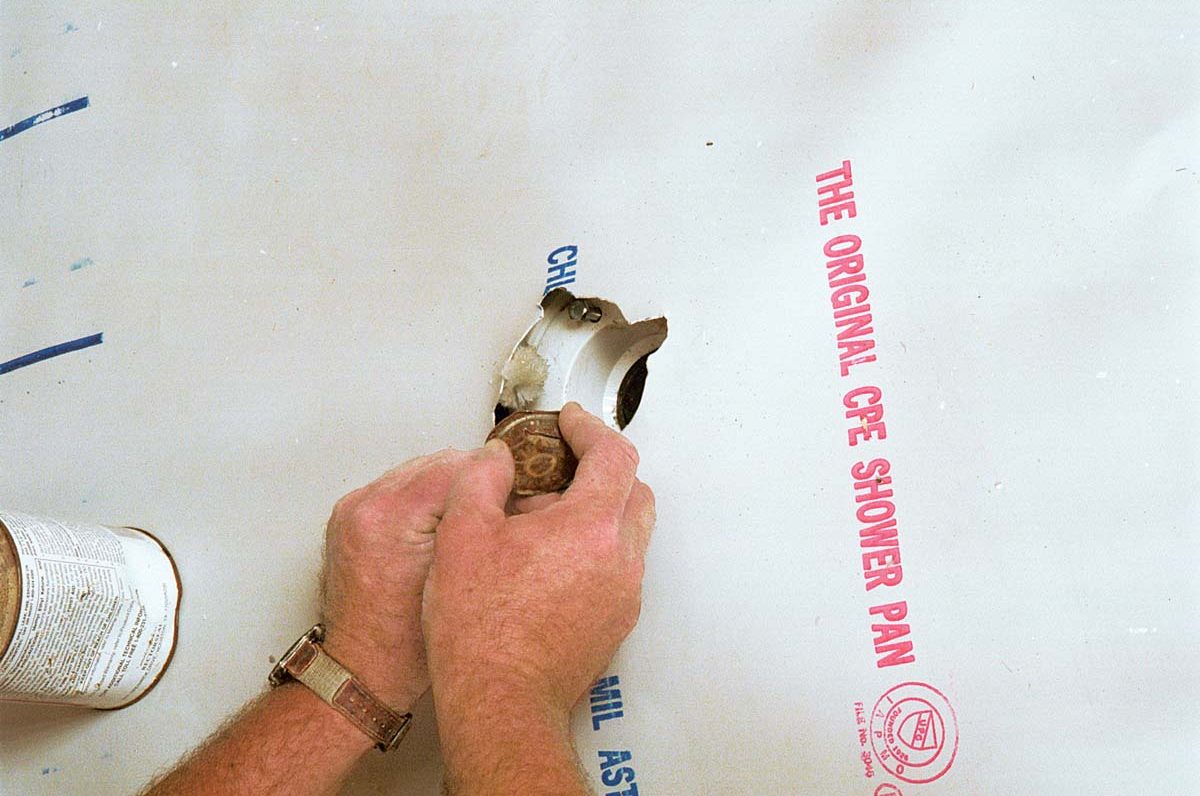
Before I install the top ring of the drain assembly, I lift the liner around the drain and make sure the bottom plastic ring is clear of dirt or grit. I like to adhere the underside of the membrane to the top of the drainassembly plate with PVC membrane cement or an elastomeric sealant. After applying the cement to both the membrane’s underside and the top of the baseplate, I quickly press them together, place the top ring in position and slowly tighten the bolts, applying equal pressure on each bolt. At the threshold, I cut the membrane along the framed opening, fold it over and nail it to the threshold framing. To avoid leaks at the cut corners, I fold and glue additional pieces of membrane into the corners with PVC cement.
To test the pan, I first insert an expandable rubber drain plug into the lower part of the drain and tighten it with a wrench. I then dump enough water to cover the entire shower pan 2 in. to 3 in. deep, and I let the pan sit overnight. The next day, I make sure the level of the water hasn’t gone down and then check for leaks in the ceiling directly below the shower stall.
I try to make it a point to have the builder or homeowner witness the shower-stall test. Once the pan has passed inspection, I make sure that no one steps into the shower pan until I have poured the mud base for the tile.
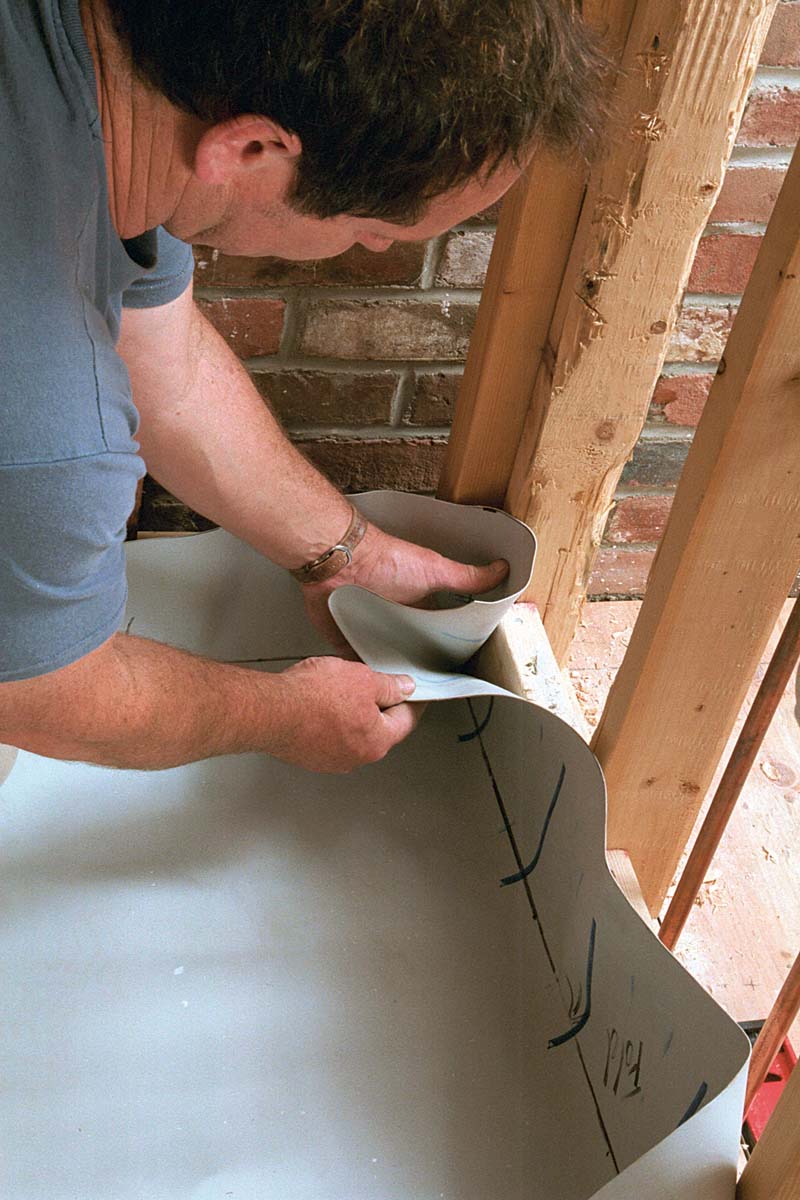 |
Once the membrane is centered in the shower, the excess is carefully folded into the corners. |
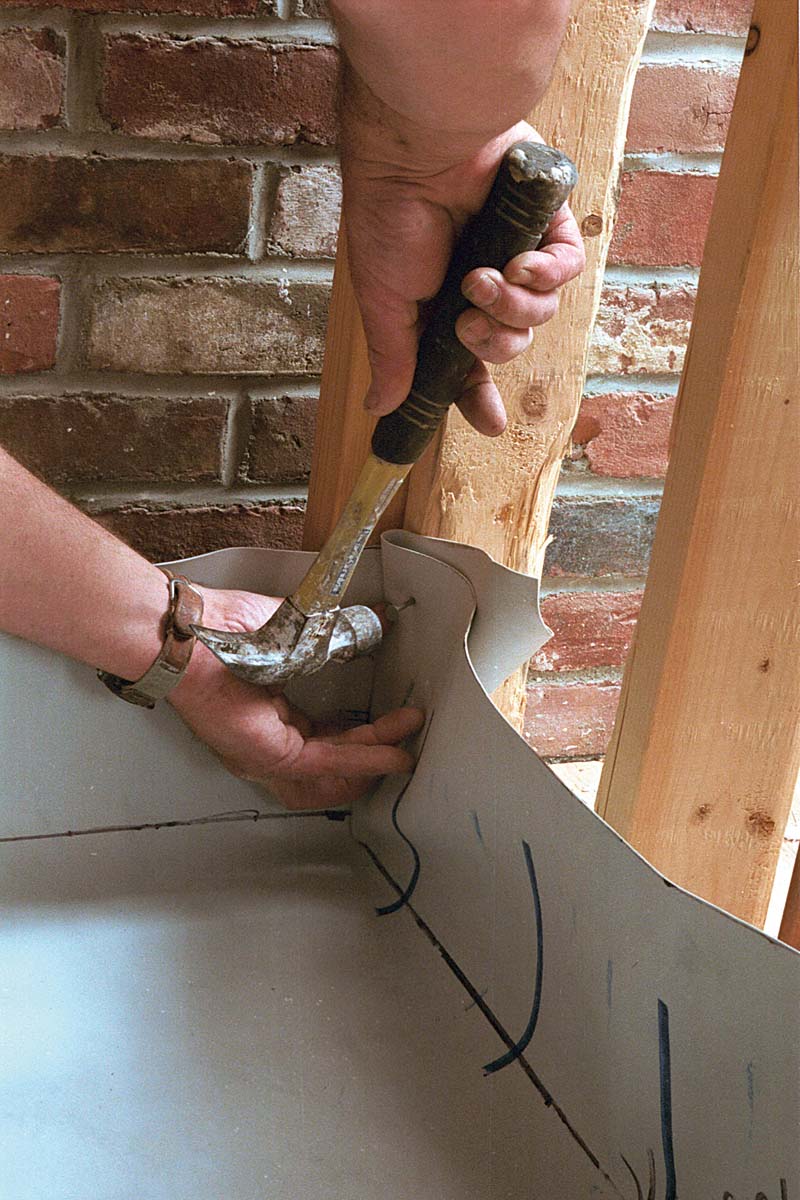 |
A roofing nail secures the fold to the framing. As the rest of the perimeter is tacked to the studs, the membrane should not be stretched too tightly. |
Cut carefully to connect
The drain must be assembled so that it forms a watertight seal with the membrane, so membrane cuts must be precise. First, bolt heads are marked. Next, small cuts are made to expose just the heads. Following the inside of the drain, a circular cut is made between bolt heads. After the membrane is cut, membrane adhesive or sealant is applied to the underside of the membrane. The top part of the drain is then slid into place and cemented, and bolts are tightened slowly and evenly.
 |
Mark the bolt locations. |
 |
Cut in a circle between the bolts. |
 |
Apply the adhesive. |
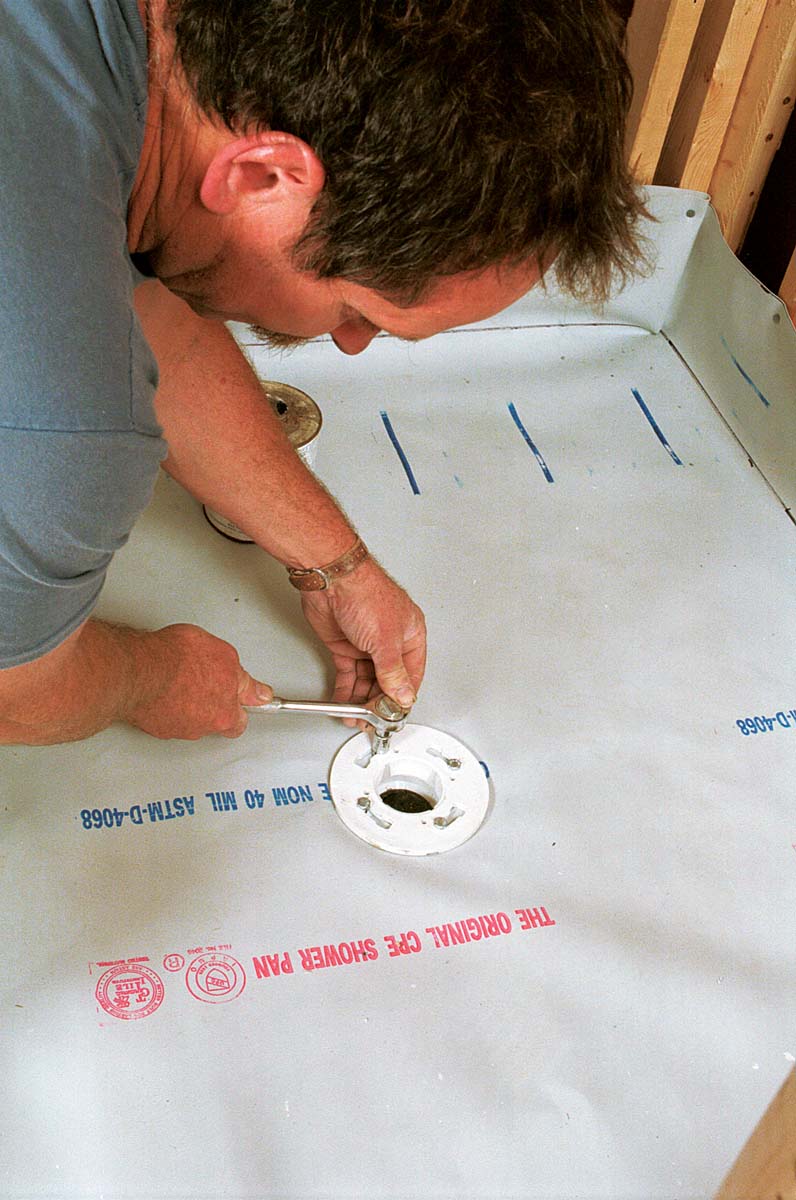 |
Tighten the bolts. |
Keep the backerboard up from the shower floor
All the shower stalls that I tile now have cement backerboard under the wall tile. The bottom course of backerboard is installed over the membrane, but I always try to install the upper sheets and the ceiling before the pan goes in to keep big clunky feet like mine off the delicate membrane.
After the pan has been installed and tested, I put a protective layer of felt paper over the membrane while I hang the bottom pieces of backerboard. All the backerboard is attached to the studs with either 1-1/2-in. galvanized roofing nails or galvanized screws. I make sure that the bottom pieces are at least 2 ft. wide to provide adequate strength for spanning the stud bays.
When installing the bottom course of backerboard, I keep in mind two important rules. First, I keep the board 1-1/2 in. from the pan floor. If the backerboard is installed too low, moisture can wick up into the wall, creating a variety of problems. The second rule is never to nail the board lower than the top of the threshold or the step into the shower. Nailing 4 in. from the finished floor usually works well. If the drain ever clogs, low nailing could cause a leak.
Thick mud makes a sturdy tile base
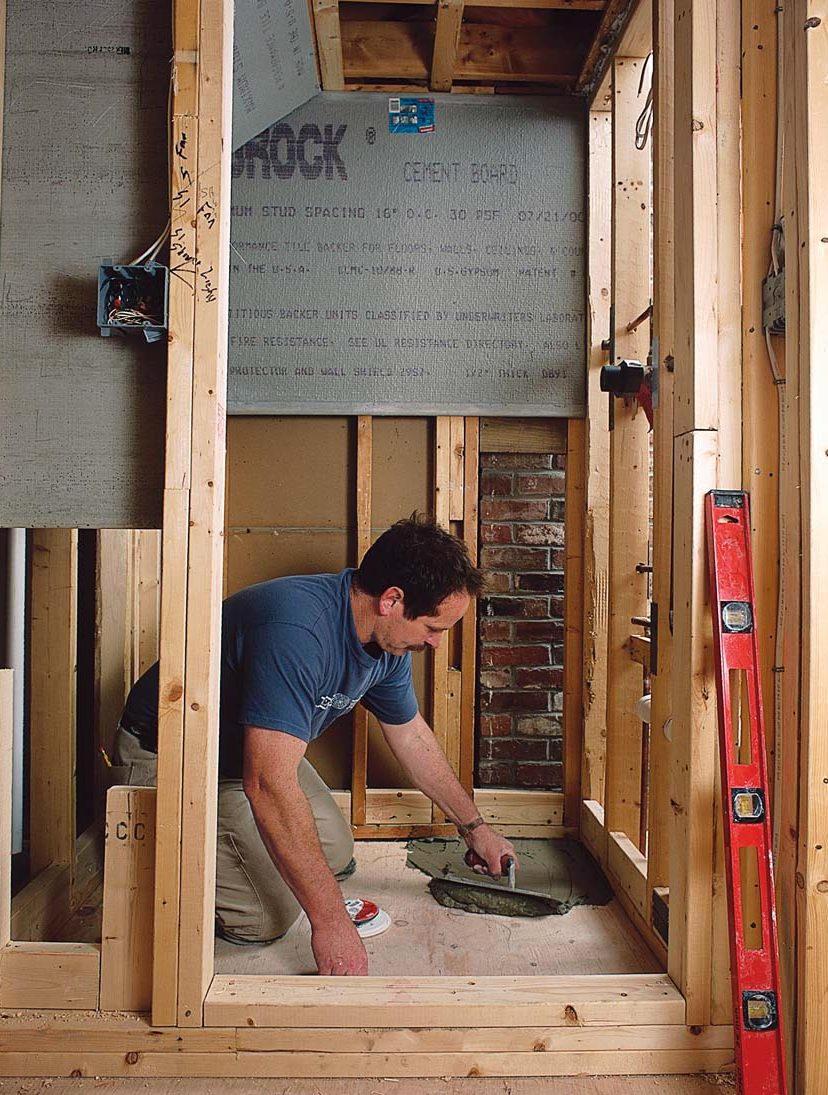
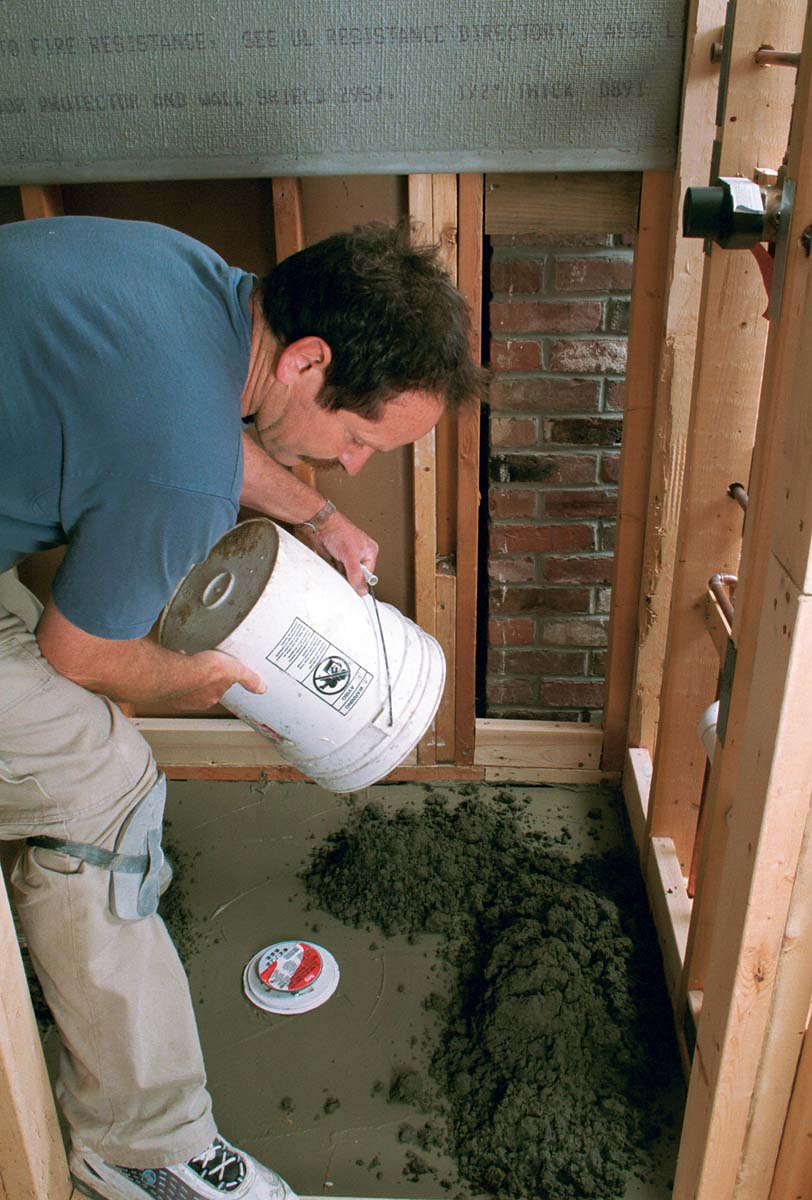
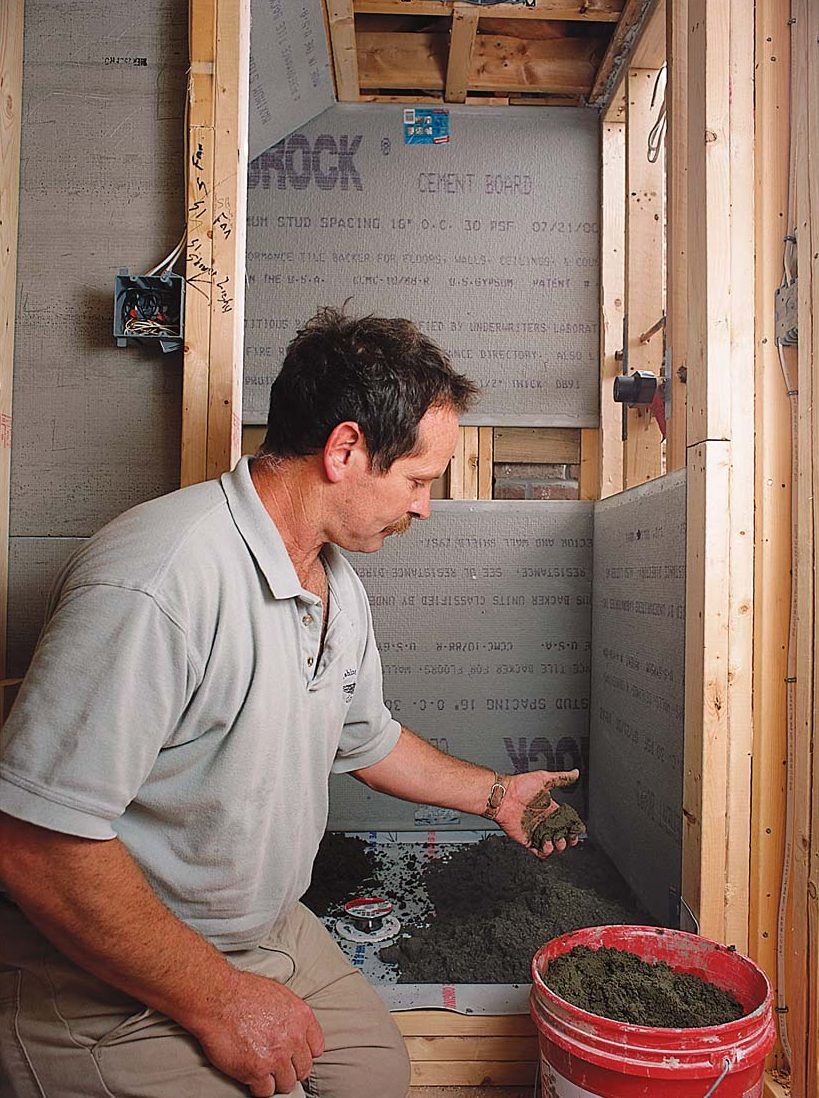
I’m now ready to put the mud layer on top of the membrane. For this layer, I use a 4:1 mixture (sand-to-portland cement). I pour a couple of handfuls of -in. stone around the base of the drain to help keep the weep holes in the drain assembly free and clear of cement (photo top left, facing page).
Again, I mix the cement to a consistency that forms a ball when compressed in my hand (photo top right, facing page). When I’m satisfied with the mix, I dump a good amount into the pan. The weight of the mix keeps the membrane from creeping. With this shower stall, I packed the cement about 2 in. to 3 in. thick to maintain the 1/4-in.-per-ft. pitch from the wall to the drain that had already been established.
I used a 2-ft. level to straighten the perimeter of the mud layer. It’s a good idea for beginners to establish a level line around the pan first. Again, I use a wooden float to pack the mud. A straightedge, in this case my 2-ft. level, and a flat steel trowel let me pitch the mud smoothly and evenly to the drain. The upper portion of the drain can be adjusted so that it will be flush with the installed tile. One precaution I take is to round over the corners of the steel trowel. A square corner could slice or puncture the membrane if I’m not careful. I keep working the surface to eliminate any voids or low spots in the mud that can collect water once the tile is installed. When the mud layer is smooth, evenly pitched and level around the perimeter, I let it sit overnight, and then I’m ready to install the tile in the morning.
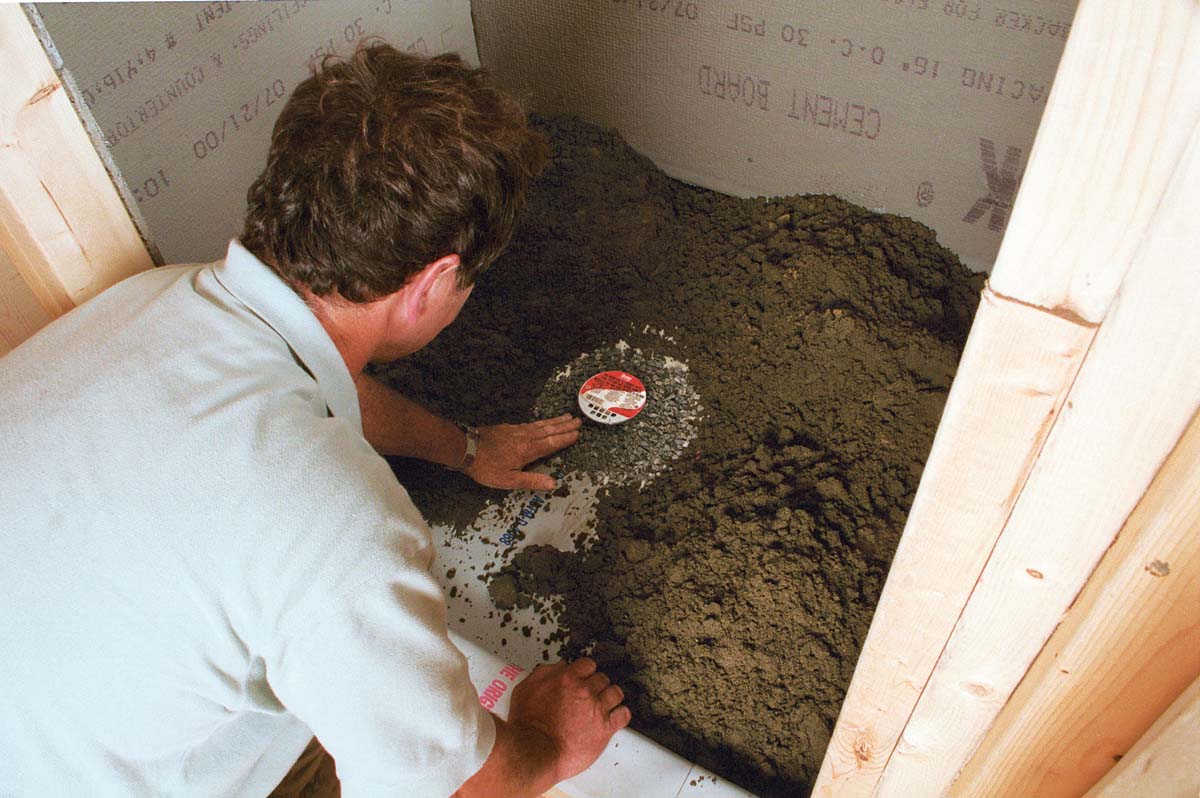 |
A couple of handfuls of pea stone keeps the mud mix from clogging the weep holes in the drain. |
 |
The mud for the shower floor should be just wet enough to stay in a clump when squeezed in the hand. |
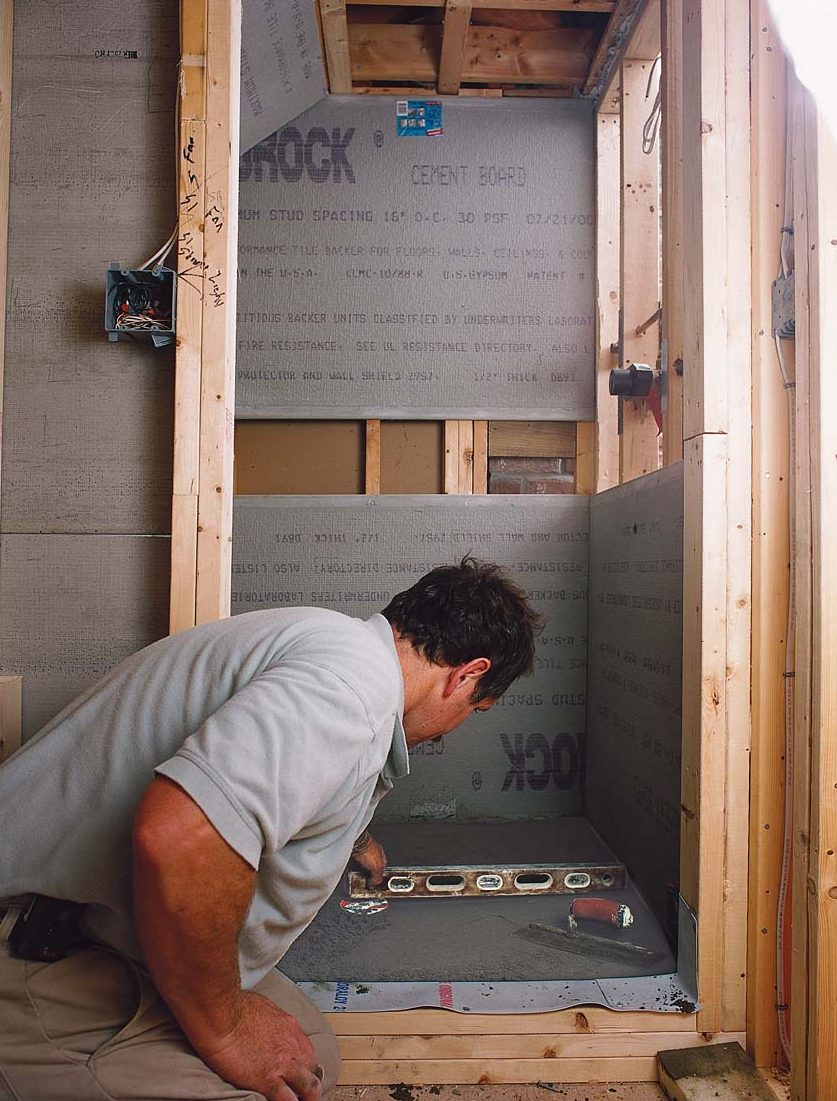 |
A 2-ft. level is used to make sure that the shower floor is flat and evenly pitched to the drain. |
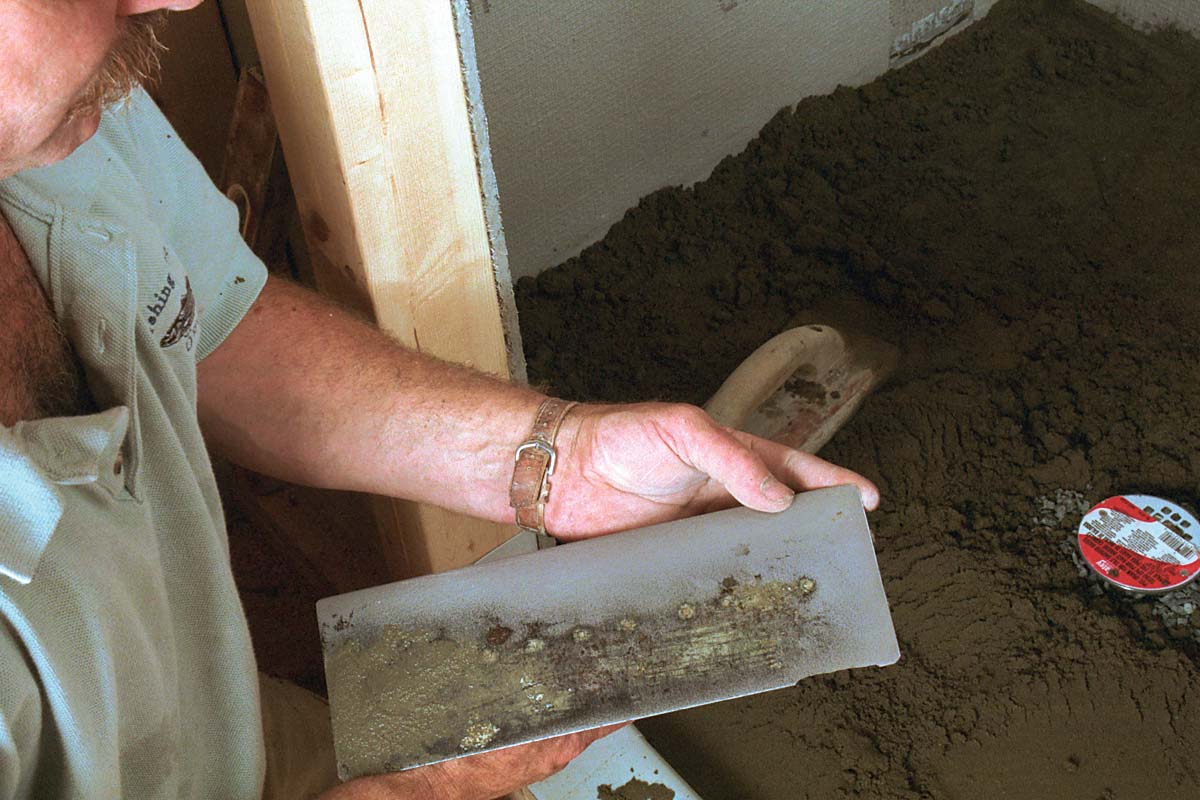 |
It does, however, double as the right tool for screeding the mud. The author rounds the corners of his steel trowel so that there are no sharp corners to puncture the membrane while he’s working the mud layer. |
Tom Meehan, a second-generation tile installer, and his wife, Lane, own Cape Cod Tileworks in Harwich, MA. Photos: Roe A. Osborn.
Fine Homebuilding Recommended Products
Fine Homebuilding receives a commission for items purchased through links on this site, including Amazon Associates and other affiliate advertising programs.

100-ft. Tape Measure
Anchor Bolt Marker

Smart String Line
