Synopsis: Keeping bottles of shampoo and bars of soap on the edge of the tub is adequate, but storing them in an easily reachable tiled niche reduces clutter and adds a nice visual touch to a tub surround. Bay Area tile contractor Jane Aeon details her process for installing a shower niche that is properly flashed and waterproofed. Aeon starts by locating the niche on the wall, then framing the space. A trio of waterproofing materials (flexible flashing, vapor retarder, and caulk) ensure that the wall behind the niche will remain dry. A cement-backerboard substrate allows a longer working time with tile, and a slightly sloped bottom lets water drain out instead of pooling in the niche. To finish the job, Aeon tiles the niche using the same process she uses when tiling a wall. This article includes a sidebar about prefabricated shower niches.
Tired of bumping into that wire shower caddy hanging awkwardly off the showerhead? Do you hate the unsightly clutter at the edges of your bathtub? Organize your shower or bath space by building a niche that offers convenient storage and a charming sense of bathroom design. In recent years, these small recessed spaces have become popular components of bathtub surrounds and showers. In fact, all the bathrooms I tile these days are outfitted with some sort of niche.
Niche size and location affect function
Before determining where on the wall the niche should go, decide the size that would be most useful for your shower niche. I often build 12-in. by 12-in. niches, but I find that 14-in.-tall niches can accommodate oversize shampoo bottles a little better. Don’t let standard stud spacing be the sole determinant in the size of a niche. The benefit of building a niche, as opposed to installing a prefabricated one, is that you can easily create spaces of all shapes and sizes.
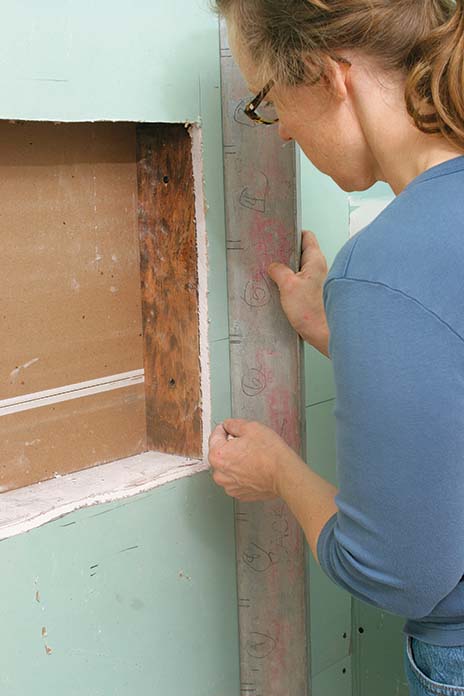
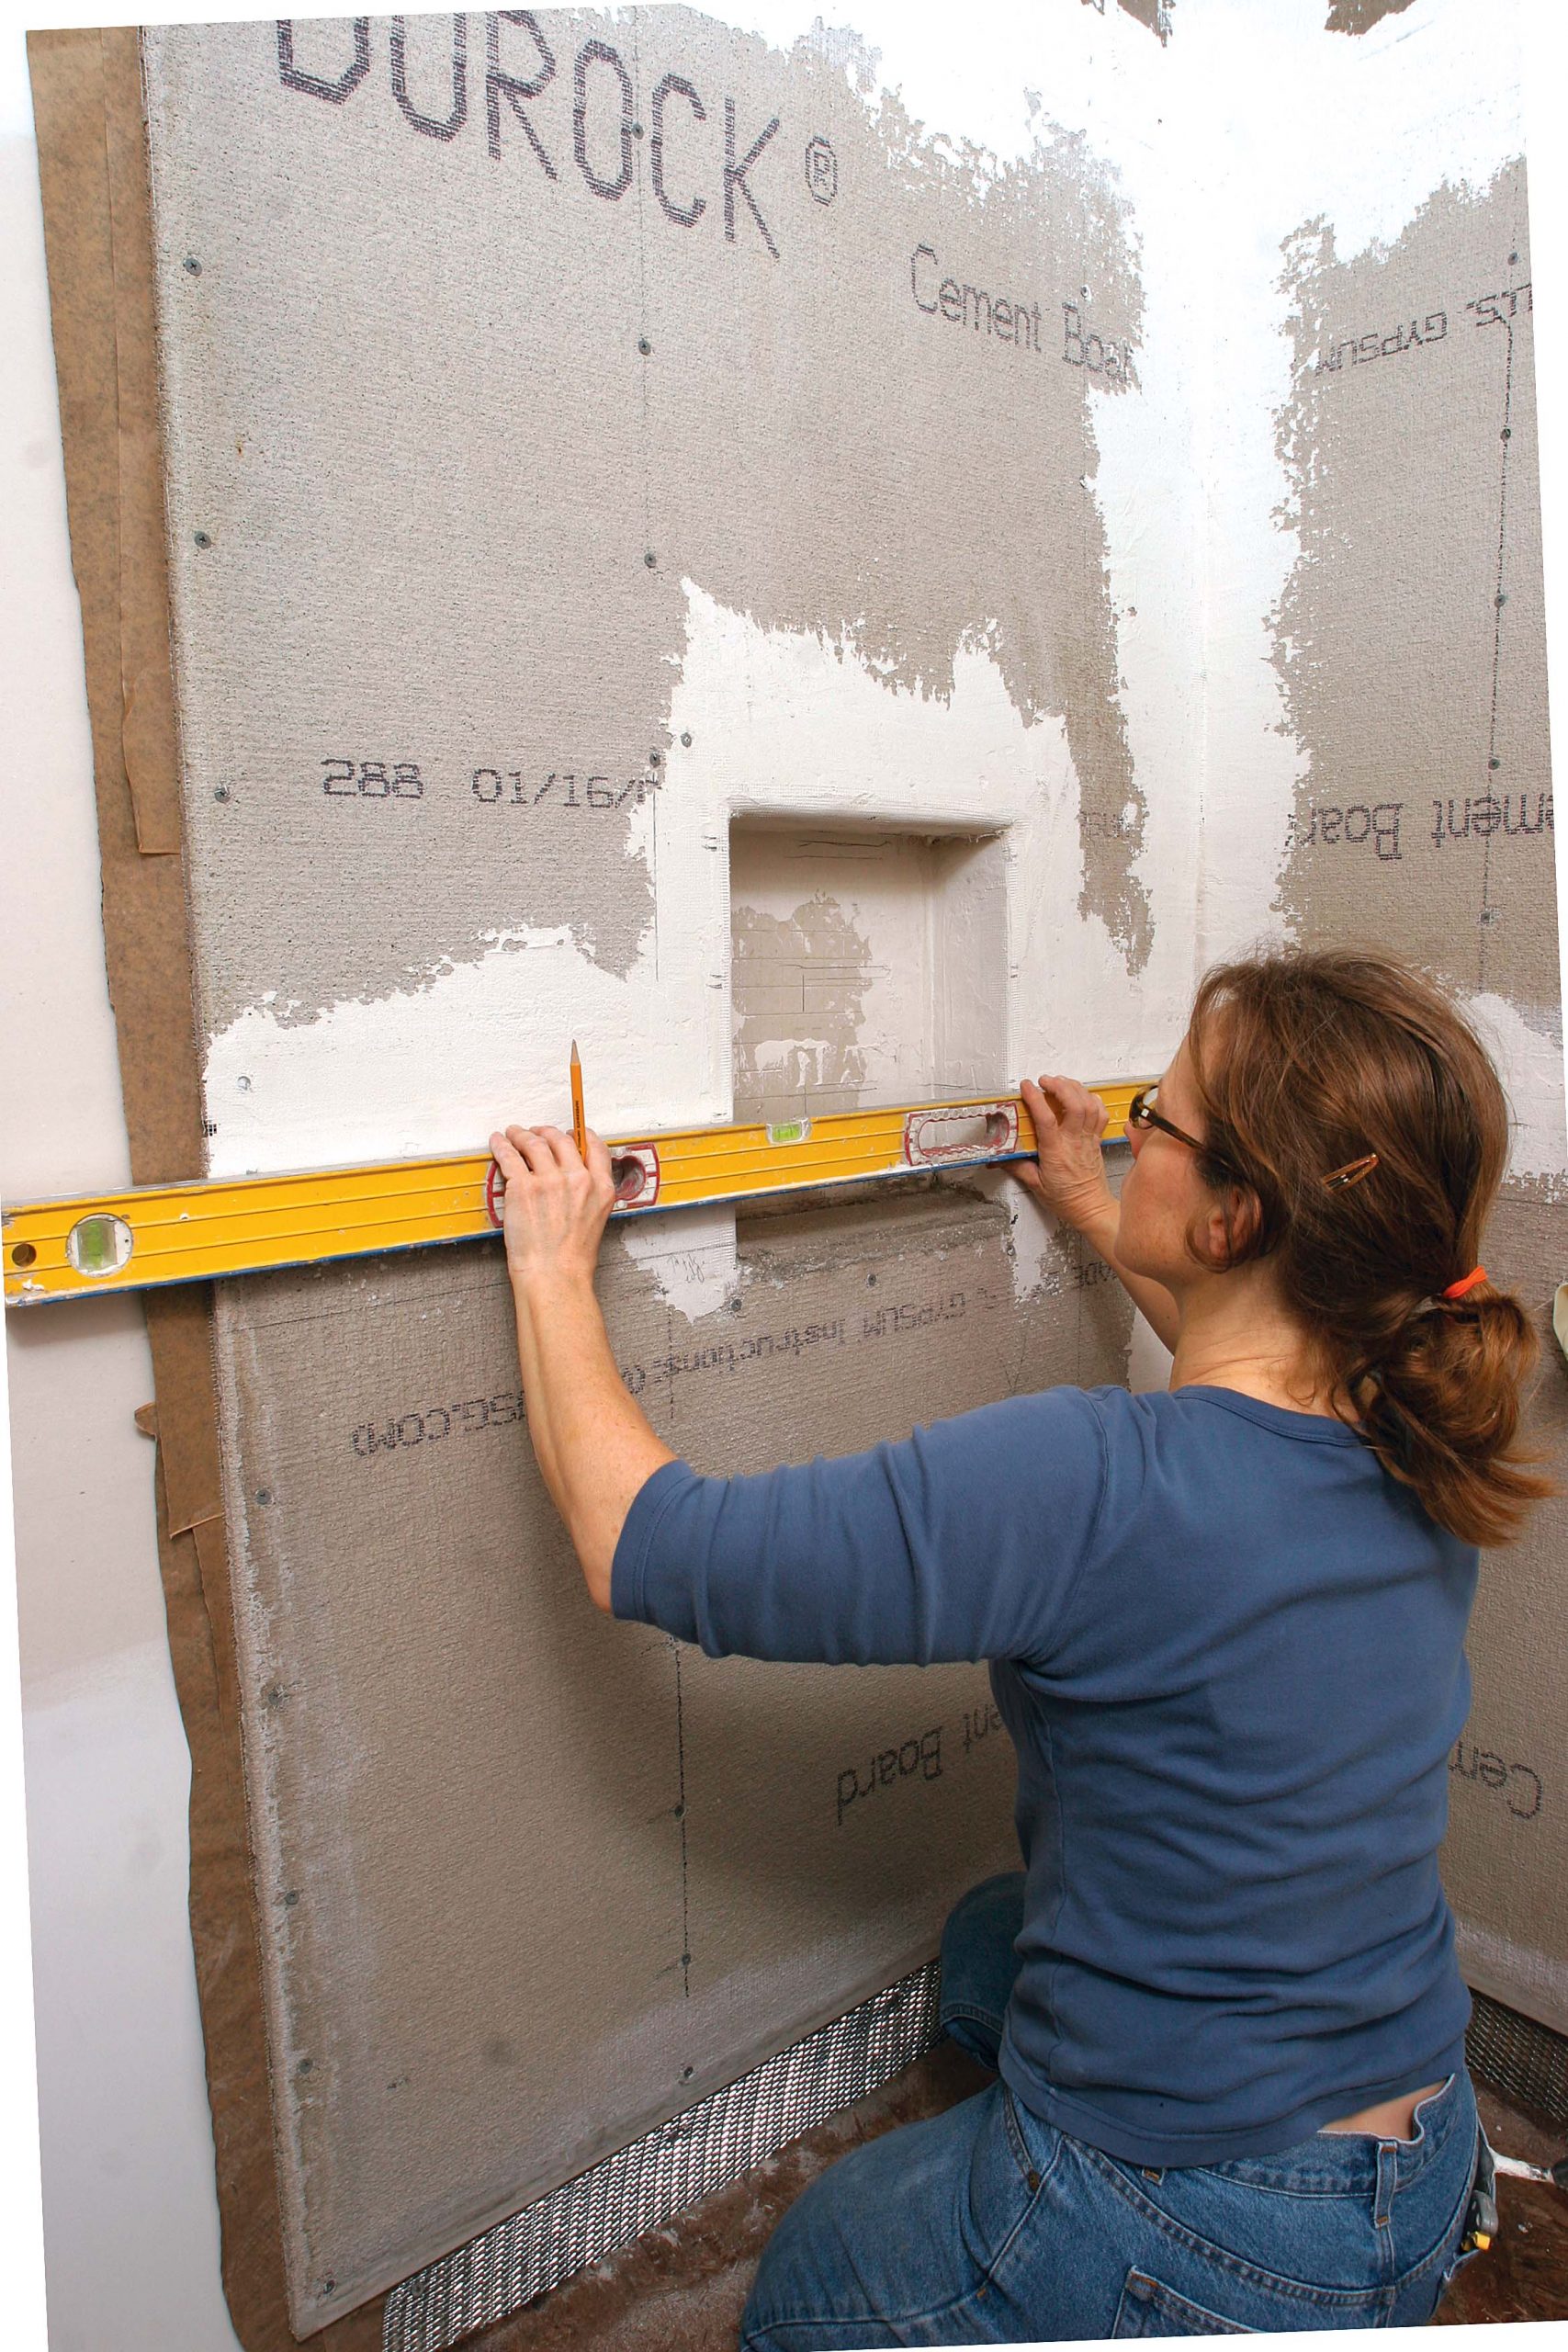
Once you’ve decided on the size of the niche and a general location on the wall that balances accessibility and aesthetics, fine-tune its position with a story pole to be sure that the niche opening lines up with the grout joints. Transfer the layout marks from the story pole to the studs to orient the framing of the niche and then again on the backerboard once it’s installed to guide the tile layout.
In the project featured here, the architect and builder positioned and framed the niche slightly above the height of a nearby vanity. I had to increase the width of the grout joints so that the tiles would align properly on the wall.
Frame the niche larger than necessary
To frame most niche openings, I nail horizontal 2x blocking between the existing studs. But each installation has subtle differences. In some 2×4 walls, the existing framing is shallower than 3-1⁄2in. In these cases, I use 1⁄4-in.-thick backerboard in the back of the niche instead 1⁄2-in.-thick backerboard to gain as much usable space as possible. When working with a 2×6 wall, I have to choose between creating a deep recess or padding it out with plywood or backerboard to decrease its depth.
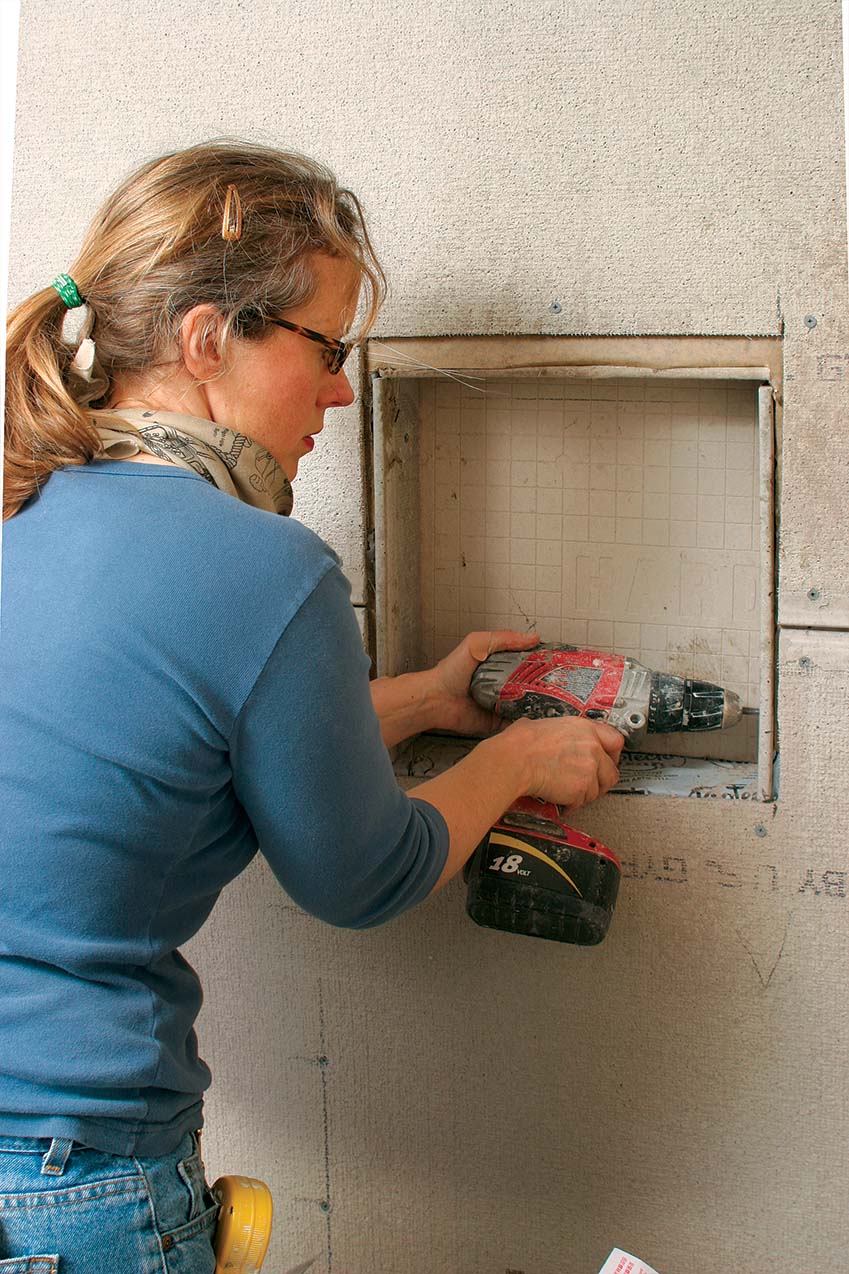
No matter what type of framing you have to deal with, always frame the niche at least 3⁄4 in. to 1 in. larger than you want the final opening to be. This allows you to adjust the tile layout if necessary and also provides room for 1⁄8-in.-thick waterproofing membrane, 1⁄2 in. of mortar and backerboard, and the thickness of the tile. If you’re using quarter-round edge tiles, like in this bath, give yourself even more room; this type of tile requires a bit more space.
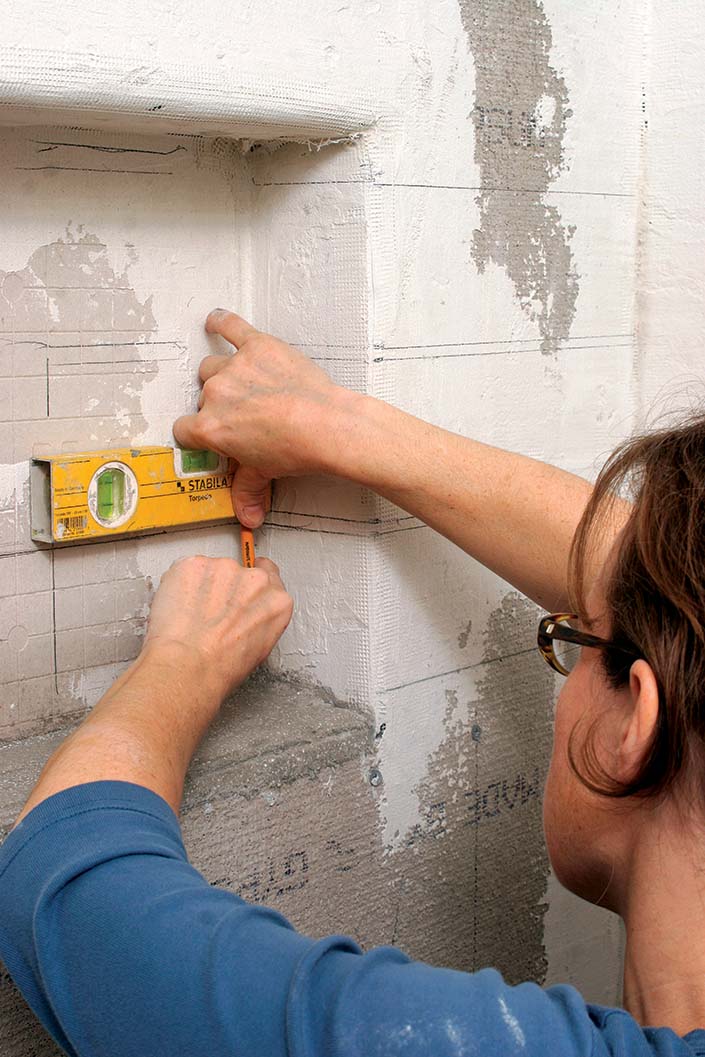
Determine the location of the niche with a story pole
By modifying the framing in a bathroom wall with blocking, you can build custom-size niches in almost any location on the wall. First, though, create a story pole (I use my aluminum straightedge) by marking off tiles spaced for 1⁄4-in. grout joints. Held vertically against the wall, this layout tool helps to determine where to frame the niche by ensuring that it won’t be bordered by awkwardly sized tiles.
A hole in a wet wall can be disastrous
If you’re not intimidated by installing a shower niche, you should be. you’re creating a hole in a wall located in the wettest area of your home. Poorly flashing and waterproofing this recess can easily lead to mold and rot problems.
In this bathroom, the architect specified quarter-round edge tiles around the niche and along the edges of the shower. To accommodate this detail, I attached backer-board over greenboard to fur out the shower perimeter from the bathroom wall. Otherwise, I would attach the backerboard directly to the studs. I use three waterproofing products in and around niches, and their installation is the same with each type of wall assembly.
Flash the wall and niche to prevent water intrusion
In many parts of the country, greenboard drywall doesn’t meet code for use as a tile substrate due to its poor performance in wet conditions. Here, I use it behind cement backerboard, which meets code, as a means of building out the shower wall. I then can install an attractive quarter-round edge tile at the thickened edge of the shower, where the tile ends and the wallboard begins. Its use, however, puts an even stronger emphasis on proper waterproofing measures.
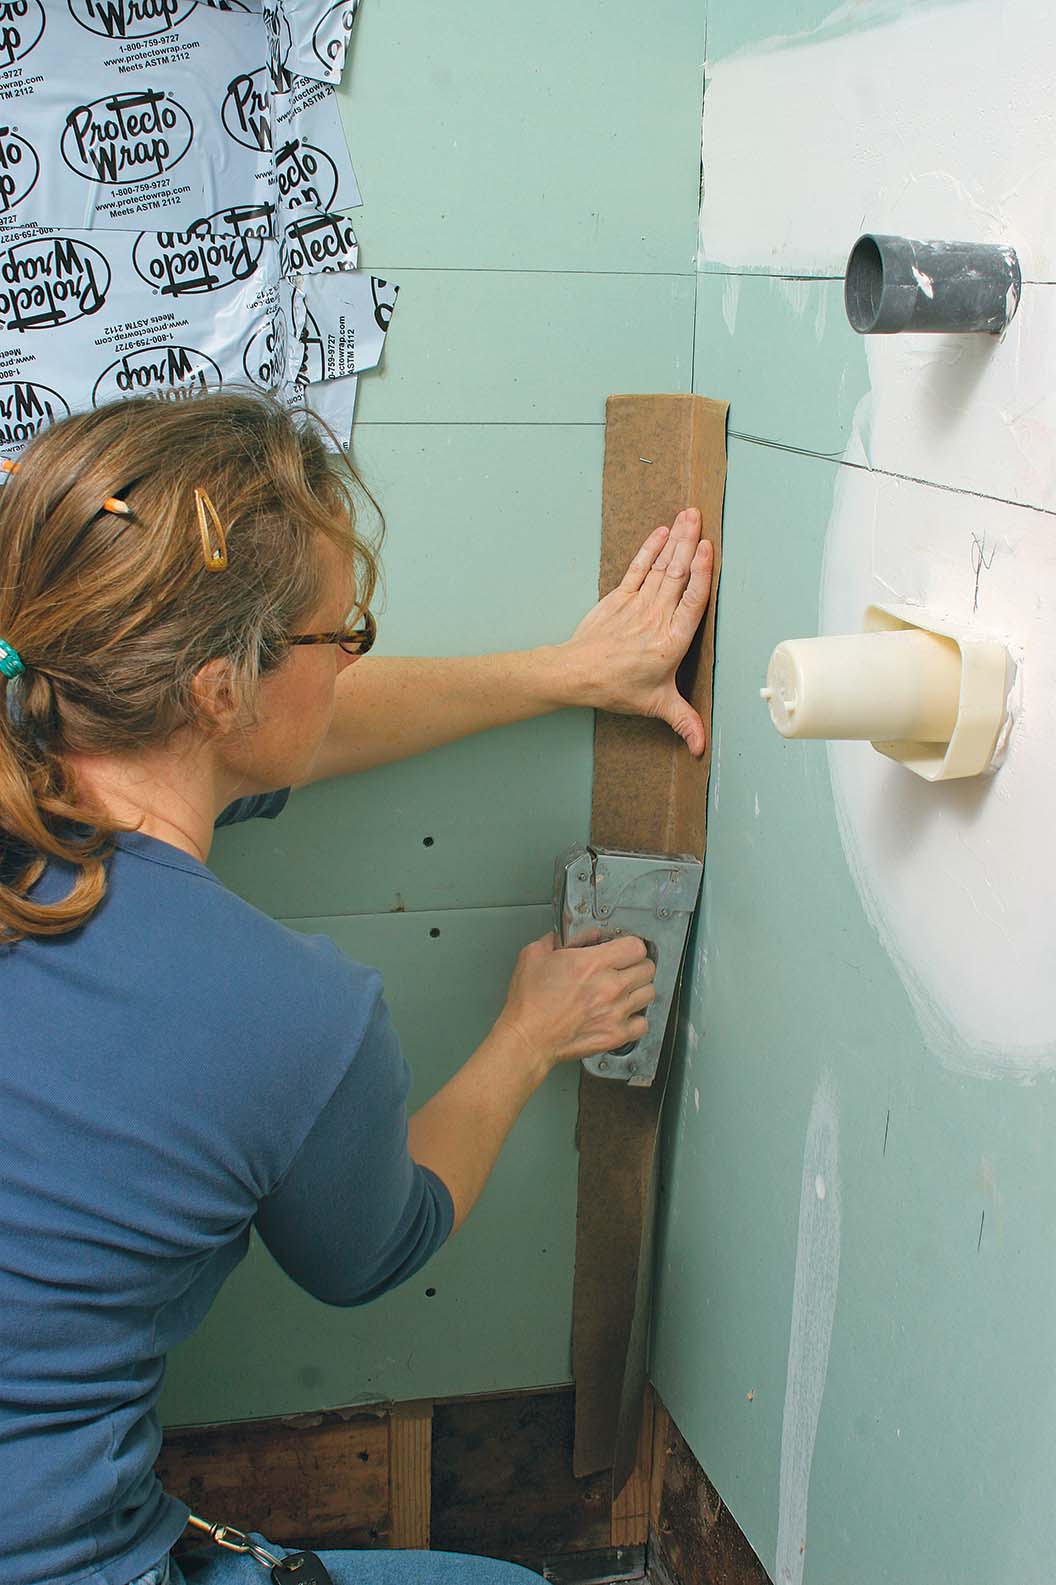
(1) Flexible flashing seals the niche. I place a thin, self-adhesive flexible-flashing membrane in the niche, being sure to lap each strip at least an inch over the one below so that any water is shed down the wall rather than being trapped inside it. I like Protecto Wrap (www.protectowrap.com) flexible flashing because it’s easy to work with, and like other flexible flashings, it seals securely around nail and staple penetrations.
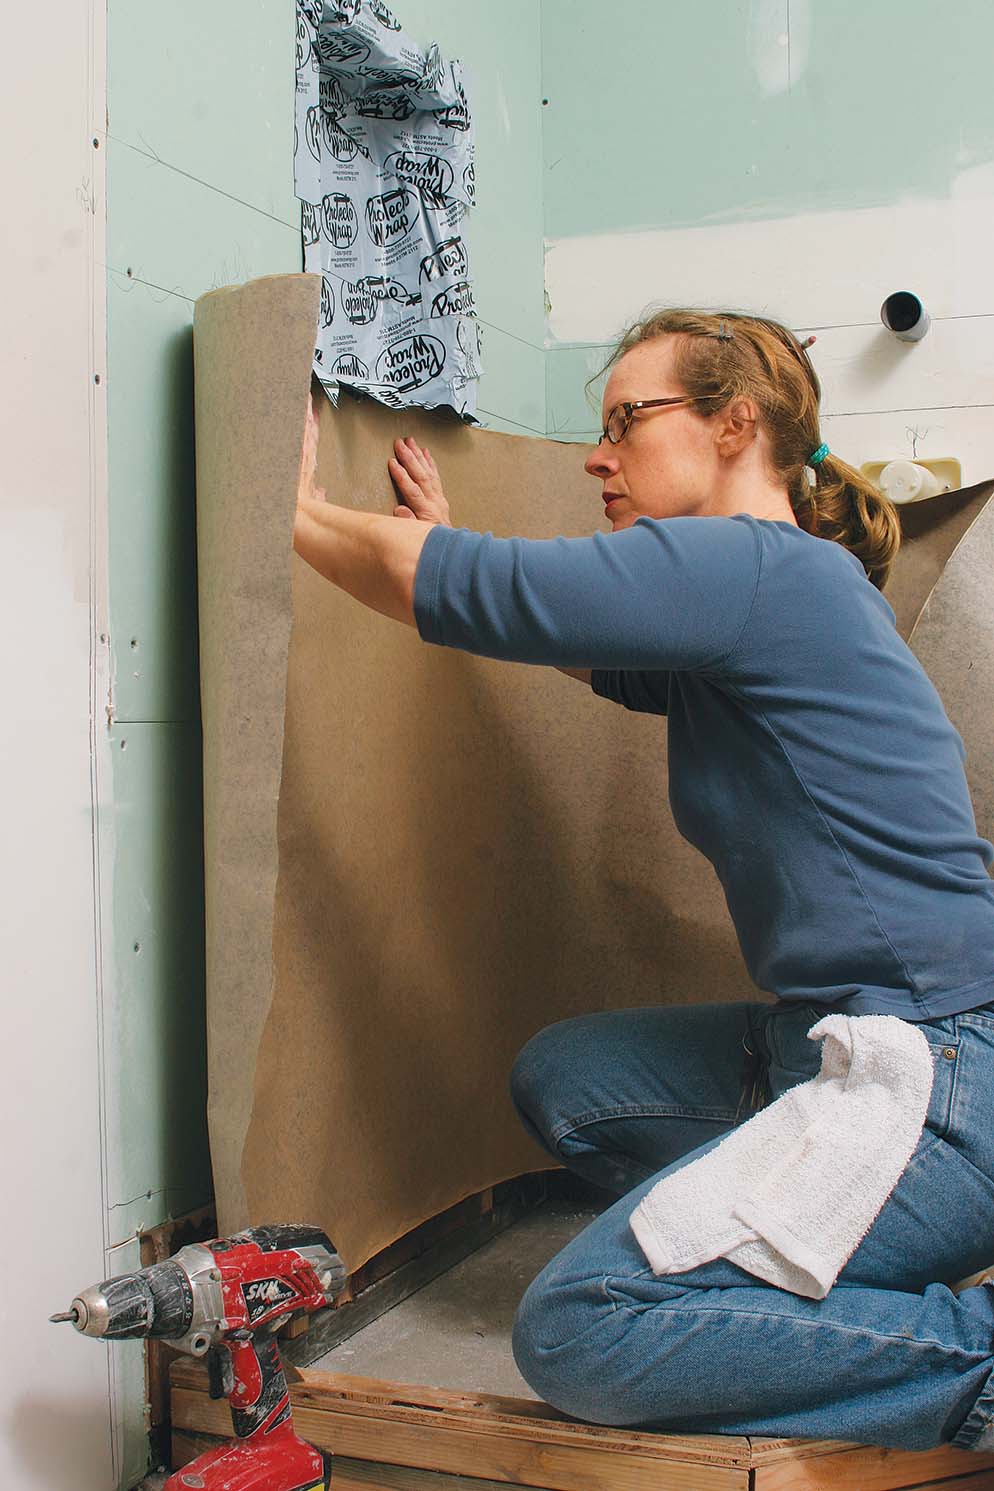
(2) A vapor retarder keeps the framing and wallboard dry. I use Fortifiber’s AquaBar (www.fortifiber.com), which is two layers of kraft paper laminated with asphalt.
(3) I attach it directly to the face of the greenboard or studs with staples, making sure to double-layer each corner for added protection. The bottom strip of niche flashing should lap over the vapor retarder.
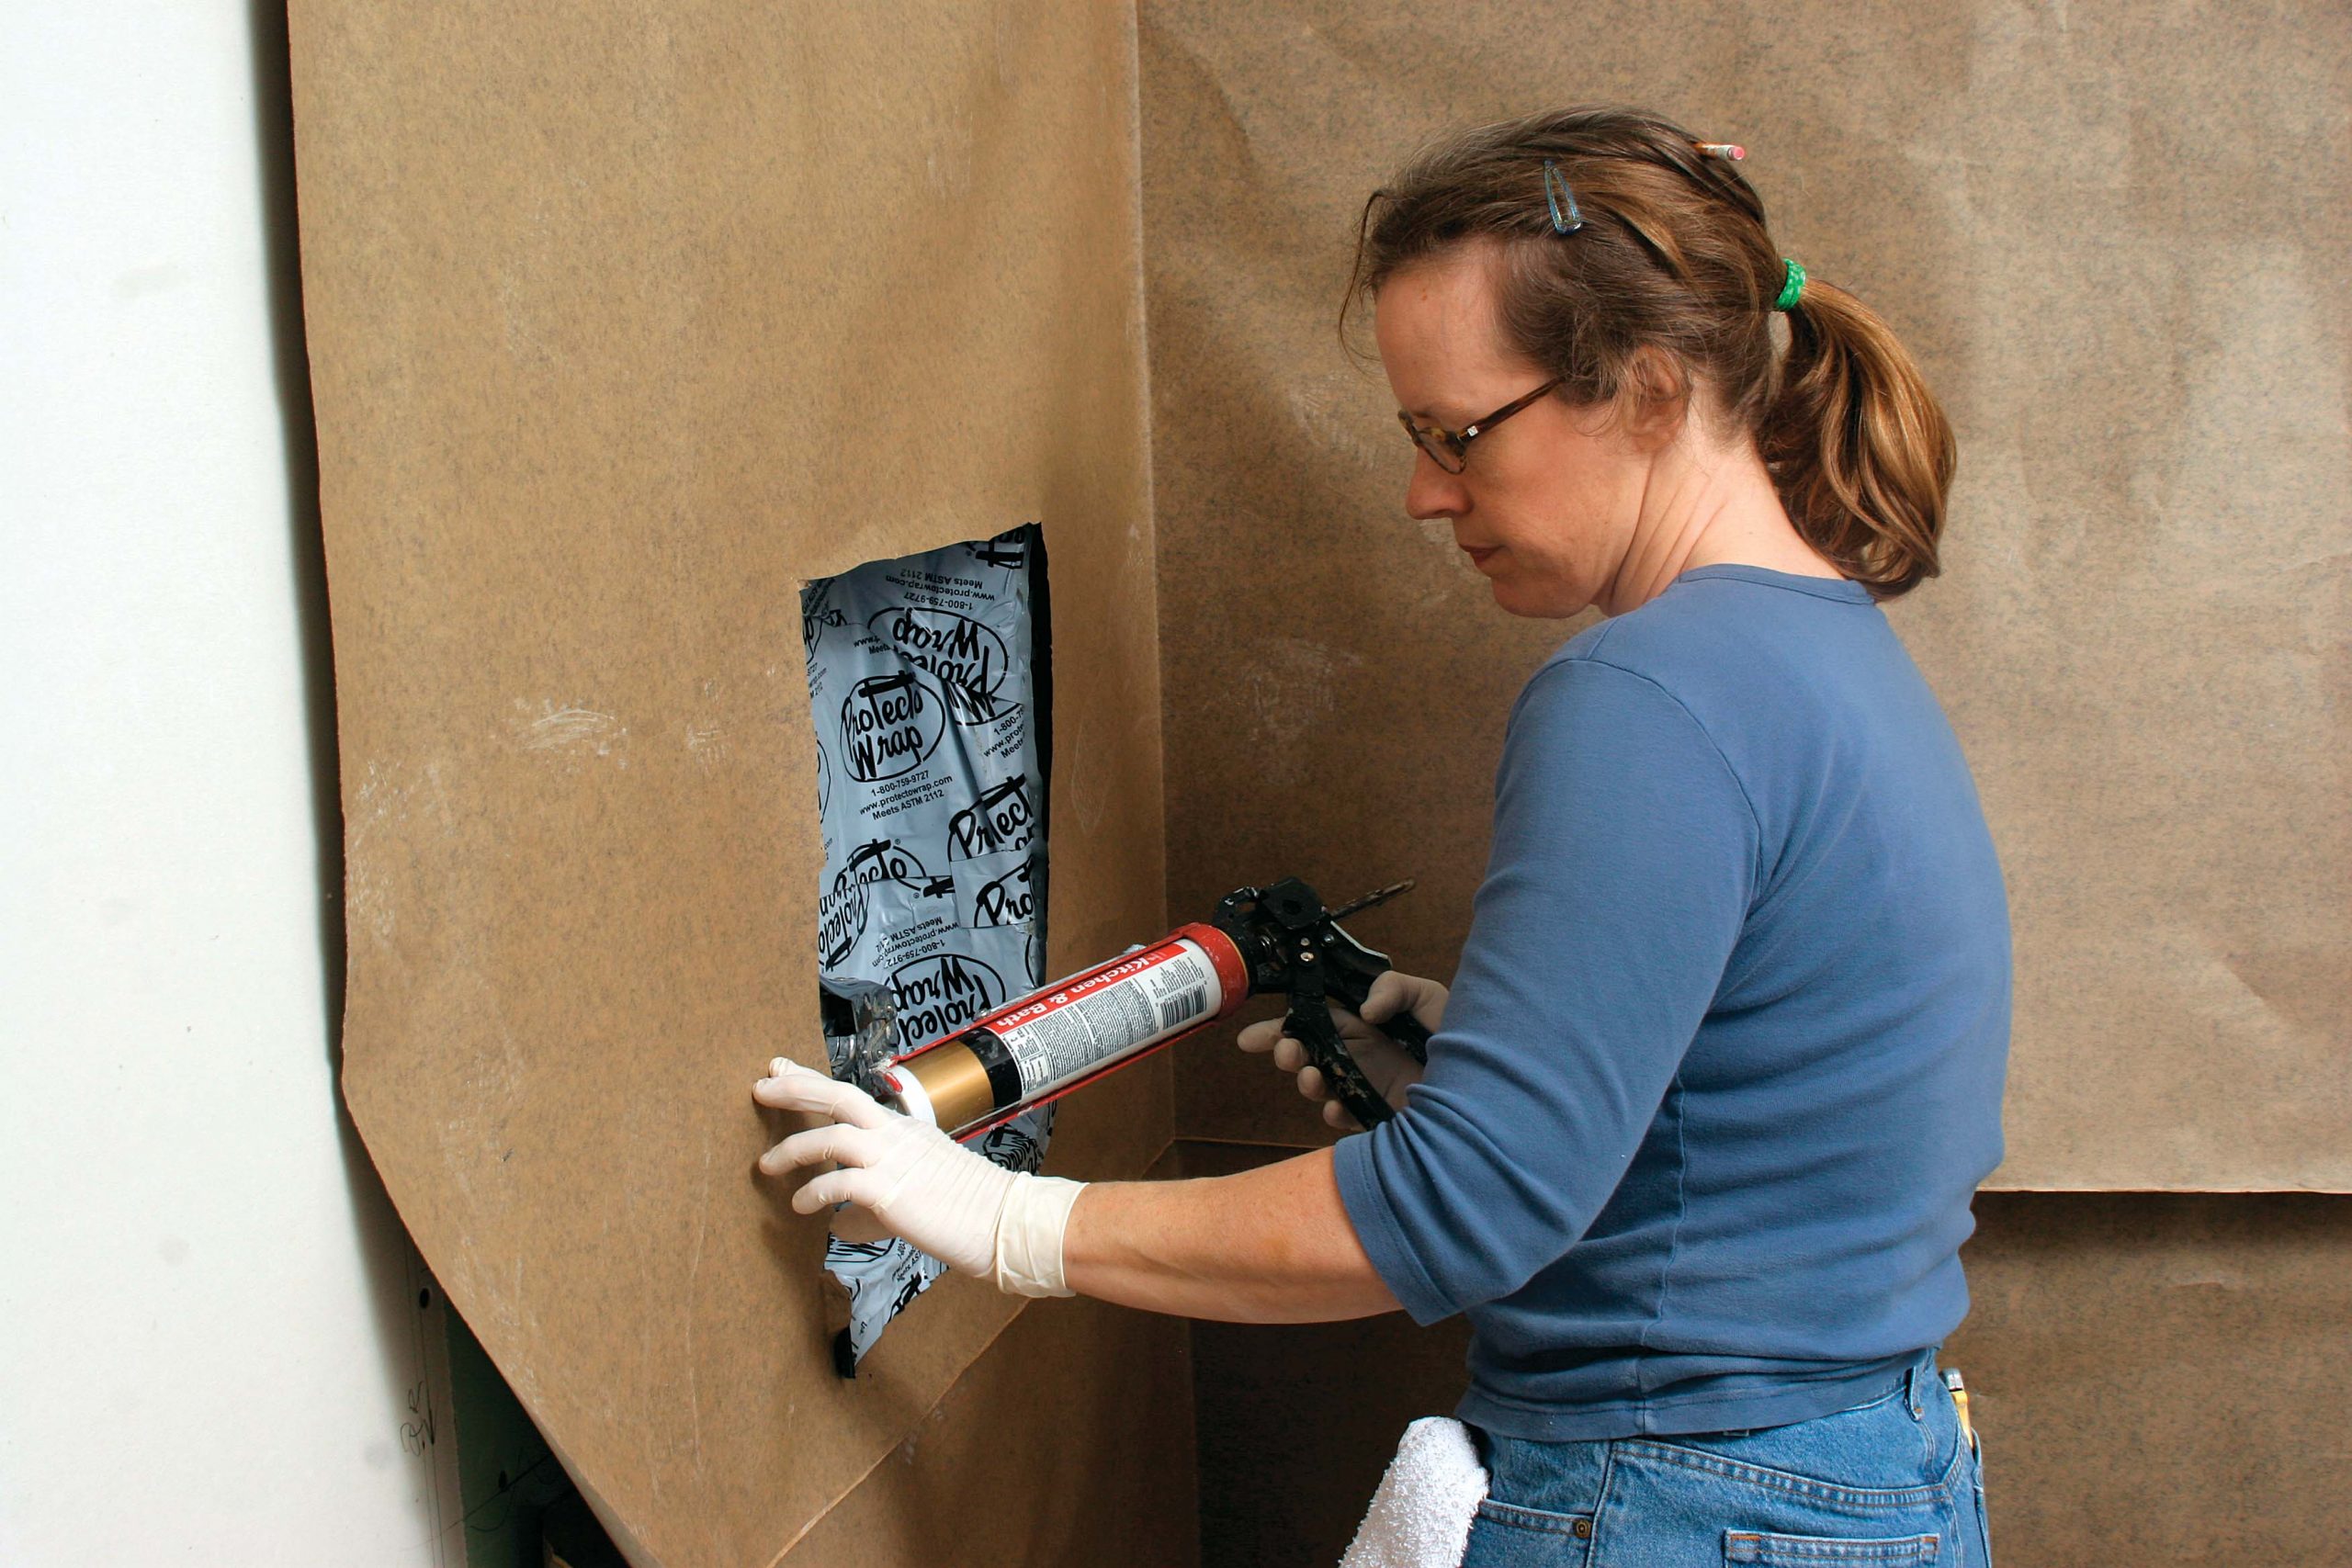
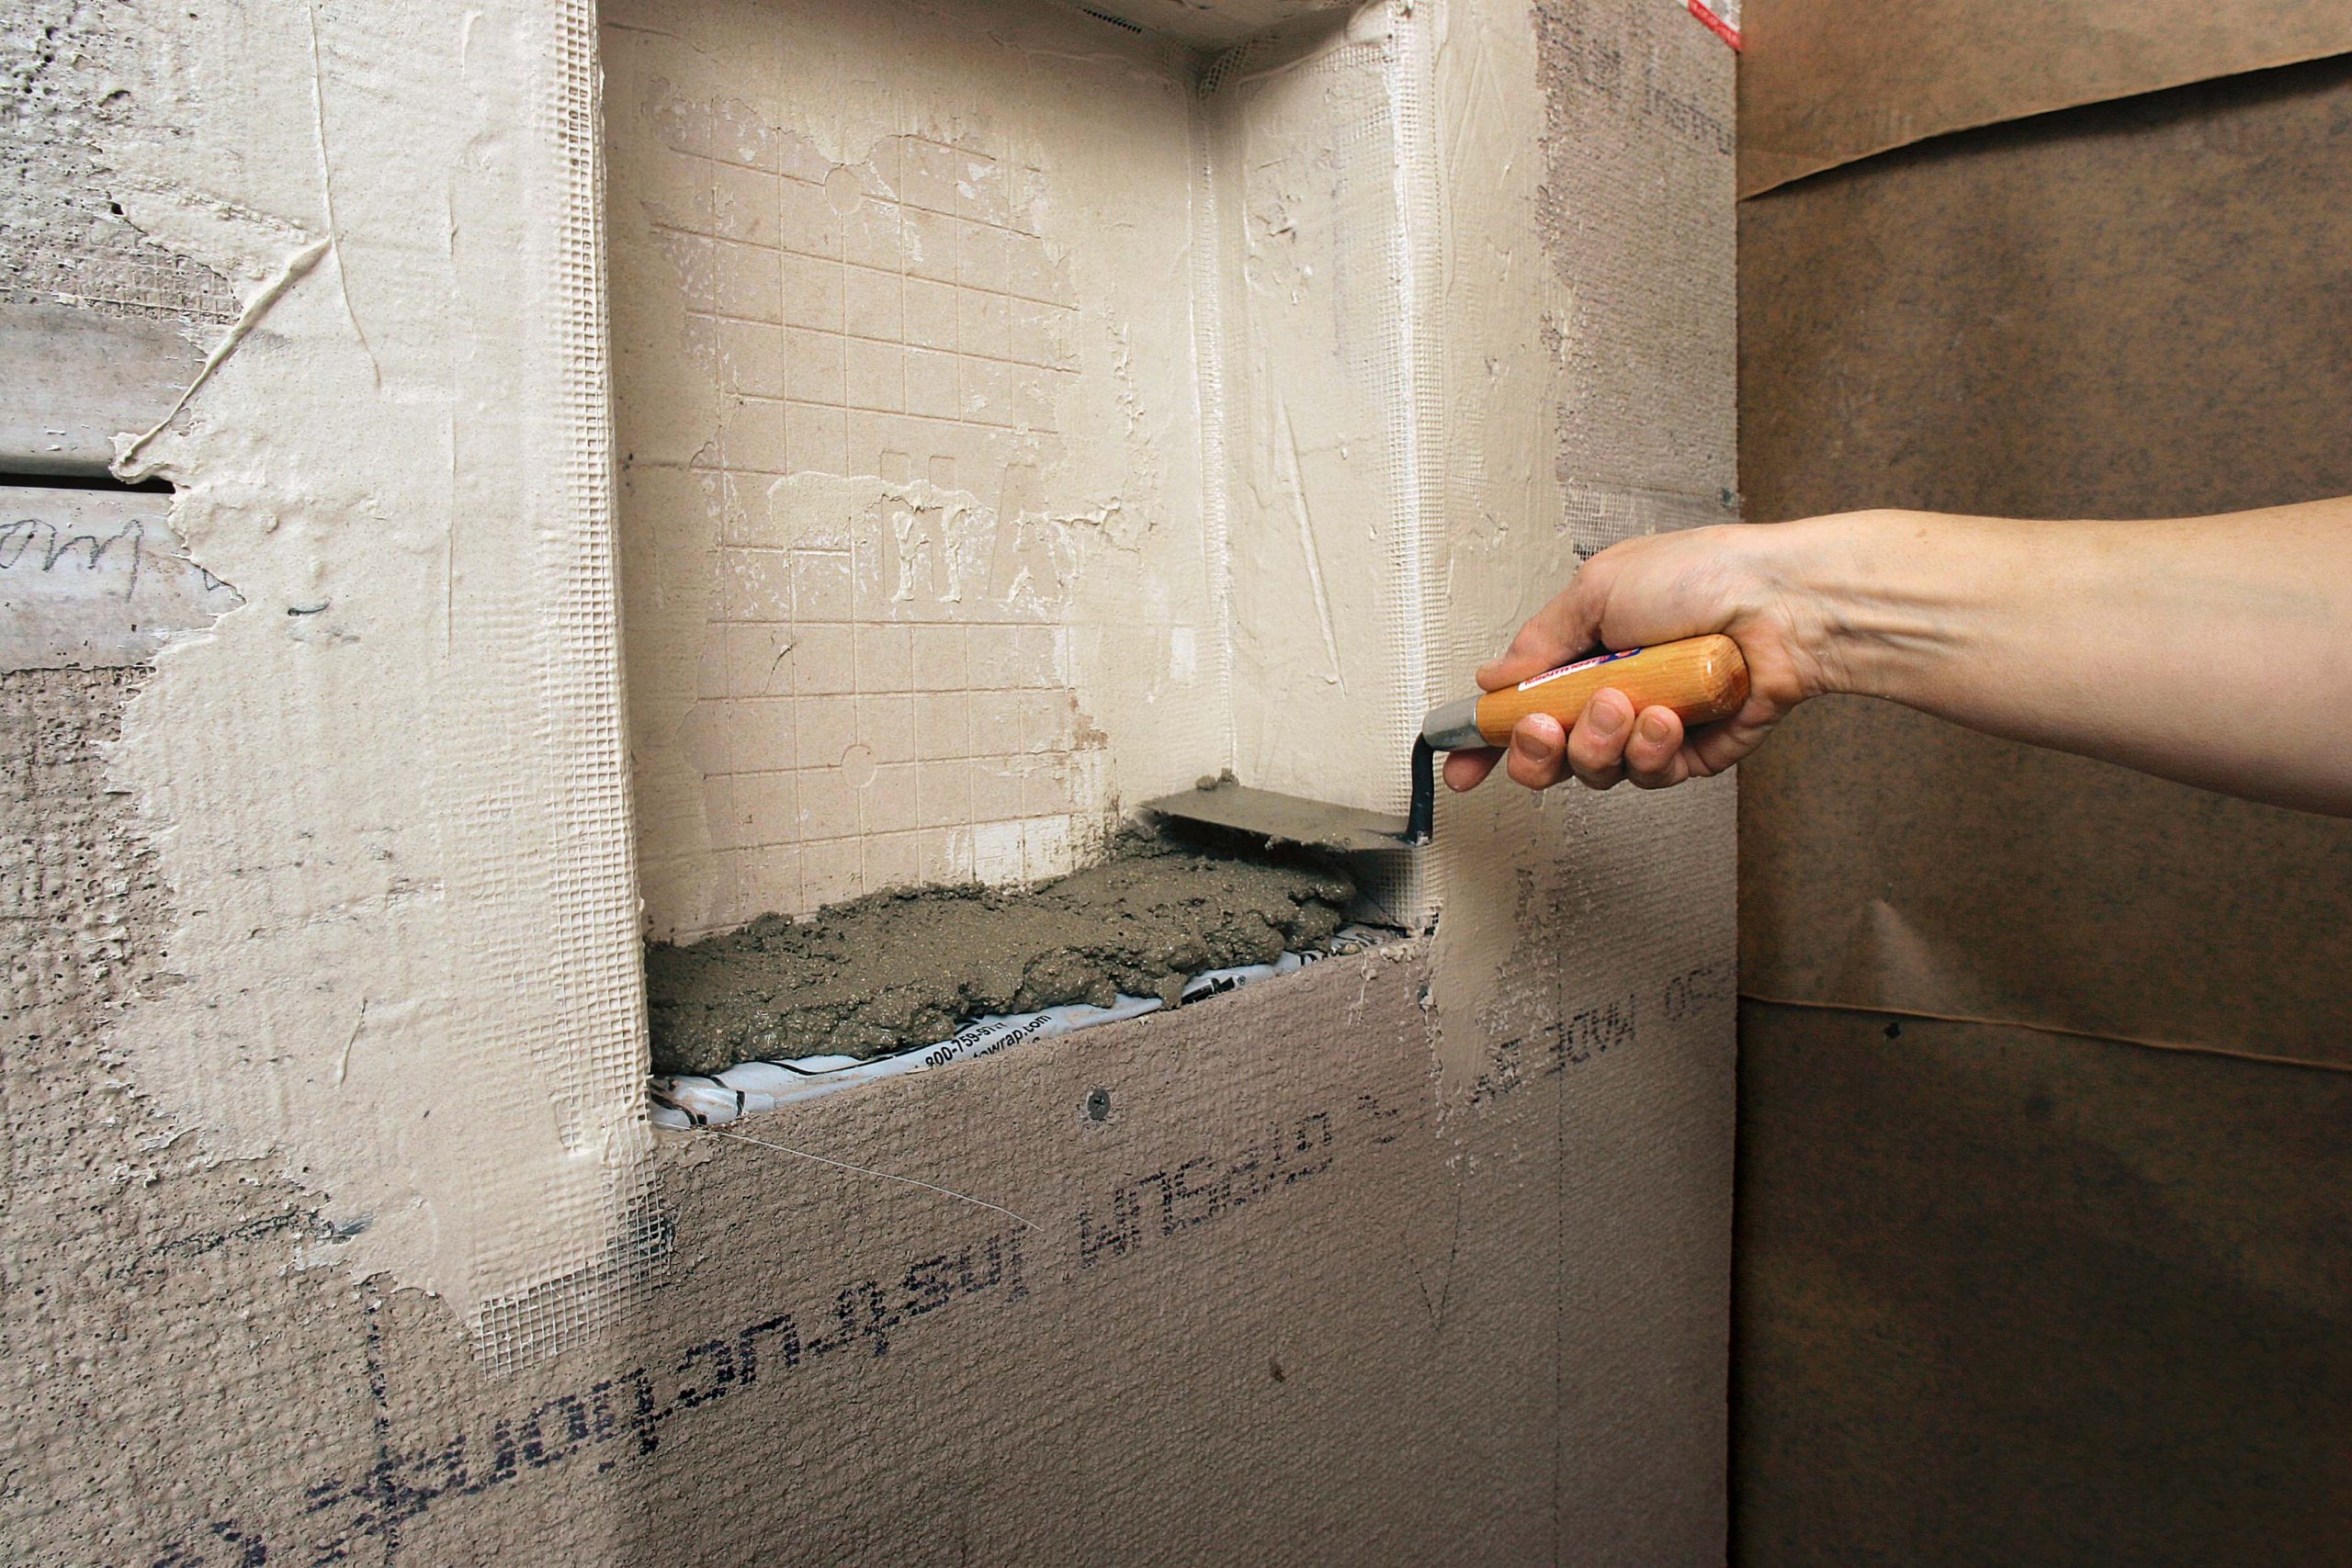
(4) Caulk seals both membranes. I cut out the niche opening and seal the edges with silicone caulk before securing them with staples.
Line the niche with backerboard and mud
Creating a solid, uniform substrate is crucial. After cutting and screwing 1⁄2-in. cement backerboard to the wall, I line the top, back, and sides of the niche with scraps. Mudding the bottom is the last preparation step.
Don’t screw in the niche’s back panel. Measure, cut, and place a few beads of silicone caulk on the back of the niche’s back panel prior to installing it. This piece is also held in place by the pressure of the niche’s top and side pieces, which are secured with screws.
Tape all the Joints at once. Once all the backerboard is firmly in place, I cover each joint in the shower with mesh tape and a coat of thinset. When the thinset has cured, I knock down any imperfections and high spots with a sanding block.
Slope the bottom to shed water. Trowel a 1⁄2-in. layer of mortar in the bot-tom of the niche, and use a level to make sure it has a slight pitch. Slant the bottom of the niche just enough so that water flows out of it, but not so much that bars of soap and bottles of shampoo slide out. I aim for a 1⁄8-in. slope over 3 in.
Create a solid substrate in the niche
I like using standard cement backerboard in bathrooms because tiles don’t set up on it nearly as quickly as with fiber-cement backerboard. That means I can make minor adjustments to the tile as I go. However, I usually use whatever product that I have excess of to avoid wasting material.
When installing backerboard in a shower niche, I install the back panel with silicone, not screws. By using silicone, I eliminate the possibility of damaging the drywall on the opposite side of the bathroom wall.
Once the cement backerboard is in place, I cover all the joints with mesh tape buried in thinset. I finish the mud work by troweling a 1⁄2 in. layer of mortar in the bottom of the niche, slightly sloped to the outside edge so that water can drain from the niche instead of pooling inside it.
Lay tile as if working on a regular wall
Secure top tiles with short sticks. Thanks to careful layout, the niche lands nicely in the tiled shower wall. To hold up the niche’s top tiles while the thinset cures, I wedge two vertical pieces of scrap wood under one flat, horizontal piece.
Tiling a wall with a well-appointed niche is done like any other wall-tiling project. When working in the shower niche, I install a row of tiles on the bottom of the niche first, followed by a course of tiles in the back of the niche; these tiles are held flush to the tops of the bottom tiles. Applying the niche’s side tiles and edge treatment, if called for, completes the course.
In some bathrooms, I like to replace the bottom tiles with a piece of solid stone for a dramatic yet elegant look. The installation sequence is the same, but the visual inter-est is certainly not.
The story pole keeps the tile layout on course
On a typical project, the tile layout is determined when I first begin framing the niche. I use the story pole as a reference to draw layout lines on the wall. Then I lay tile as I would on any other vertical tiling project.
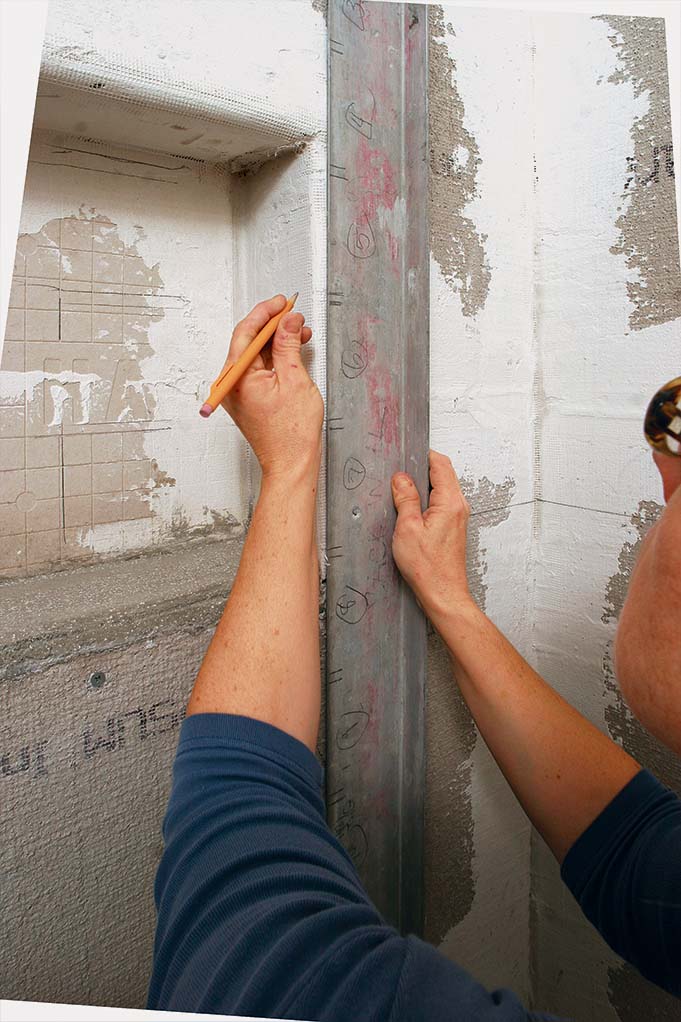
Transfer layout marks to the wall
I make layout marks on each side of the niche with a mechanical pencil for absolute accuracy.
1 Mark both the top and bottom locations of each course of tile, not just one edge.
2 Use a 4-ft. level to connect and extend the layout marks on each side of the niche.
3 Complete the layout lines within the niche by using a small level.
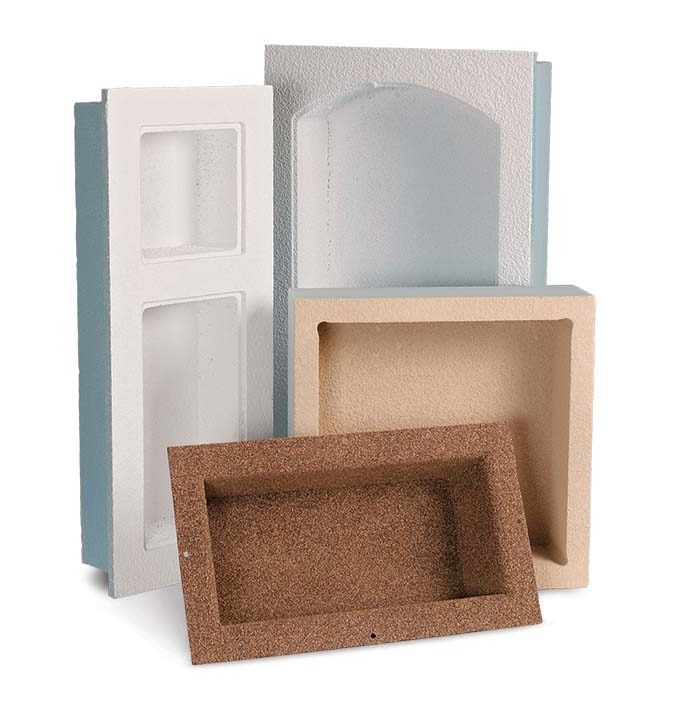
Prefab niches have their place
Prefab niche. Cost: $40 to $70, depending on size and style.
I often use prefabricated niches when a homeowner or archi-tect calls for a more-elaborate design. There’s simply no other way to get a niche with a steepled or arched top secured into a wall as quickly.
Prefabricated niches eliminate some of the steps called for when framing a niche from scratch. There’s no need to mortar the bottom of the niche because prefab niches have a slope built into their form. There are fewer joints to tape and mud,and waterproofing measures are generally less stringent because prefab niches are solid, one-piece units.
However, prefabricated niches have some limitations. Installation of certain models can be finicky if a wall’s framing is warped or out of square. And although these niches come in a variety of sizes, they don’t offer nearly as much adjustabilitywith regard to tile layout as a framed niche.
This is a dialog window which overlays the main content of the page. The modal window is a 'site map' of the most critical areas of the site. Pressing the Escape (ESC) button will close the modal and bring you back to where you were on the page.
We use cookies, pixels, script and other tracking technologies to analyze and improve our service, to improve and personalize content, and for advertising to you.
We also share information about your use of our site with third-party social media, advertising and analytics partners.
You can view our Privacy Policy
here and our Terms of Use here.