FHB Logo Facebook LinkedIn Email Pinterest Twitter X Instagram Tiktok YouTube Plus Icon Close Icon Navigation Search Icon Navigation Search Icon Arrow Down Icon Video Guide Icon Article Guide Icon Modal Close Icon Guide Search Icon Skip to content
Subscribe
Log In
  • How-To
  • Design
  • Tools & Materials
  • Restoration
  • Videos
  • Blogs
  • Forum
  • Magazine
  • Members
  • FHB House
  • Podcast
Log In

Fine Homebuilding Project Guides

Tiling

Guide Home
  • Selecting Tile
  • Tools & Techniques
  • Installation Materials
  • Preparation
  • Tiling Floors
  • Tiling Walls & Backsplashes
  • Tiling Showers
  • Grouting, Sealing & Caulking
  • Maintenance & Repair
How-To

Laying Bluestone over a Wood-Frame Floor

Tile pro Tom Meehan explains the process of installing a bluestone floor, from prepping the substrate to sealing the stones.

By Tom Meehan Issue 134
  • X
  • facebook
  • linkedin
  • pinterest
  • email
  • add to favorites Log in or Sign up to save your favorite articles

Q:

I want to lay bluestone over the wood-frame floor of my new addition. The stones are irregular shapes and vary in thickness from 3/4 in. to 1-1/2 in. How should I prepare the floor under the stone, and what tips can you give me for laying it down?

Kevin Ireton, New Milford, CT

A:

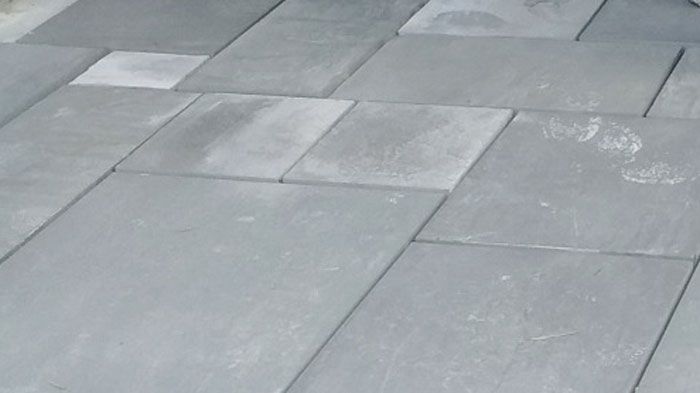
Tom Meehan, a tile installer in Harwich, Massachusetts, replies: Installing irregular bluestone is difficult and backbreaking work, but the process is really fun and the results rewarding.With the varied sizes and irregular shapes of the stone, working with it is sort of like doing a jigsaw puzzle with giant pieces, only you get to determine the final picture.

The first step is preparing the floor.The bluestone will add a lot of weight to the floor, so make sure that the substrate is strong with no bounce or deflection. I staple 15-lb. felt paper to the plywood subfloor, and then I staple or nail (with 1-1/4 in. roofing nails) galvanized metal lath over the felt paper. I overlap the metal lath sections a full inch. I do not recommend using cement backerboard under bluestone.

Next, I dry-fit the pieces of stone on the floor. This step is the most time-consuming part of the process, and a great deal of consideration should be taken to get the pieces arranged according to size and color.The thickness of the stone will vary, but I don’t worry about that yet. As I fit the stones in place, I use blackboard chalk to number them in one corner and then draw a simple map that lets me stack the stones out of the way as I am working.

As I cut the stone to fit, I like to leave a consistent 1-in. grout joint, but I’ve seen beautiful installations where the grout joint varies in size.To cut the stone, I use a grinder with a 4-in. diamond blade. If you want a more natural-looking edge, you can also score the stone about halfway through on the back, turn it over and snap it over the edge of a sawhorse.Another alternative for cutting bluestone is using a worm-drive circular saw outfitted with a wet/dry blade. Bluestone is soft enough that you can usually cut through it on a single pass.

After the stones are cut and dry-fit comes the moment of truth: cementing the stones in place. In a mixing box, I put 20 shovels of masons’ sand to one 94-lb. bag of portland cement. I first dry-mix the sand and cement thoroughly and then slowly add about 4 gal. or 5 gal. of water.

If you are at all concerned about the stiffness of the floor, you might consider substituting a latex admix for the water. It will increase the cost considerably, but it makes the floor stronger and more flexible. The mix should hold firm in your hand and not crumble. A little too wet is better than too dry.

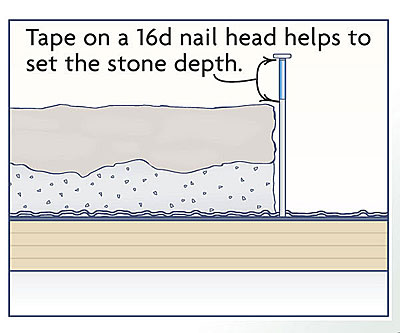
Dump enough of the mix on the floor to take care of a few stones at a time, and spread the mix evenly about an inch thick with a mason’s trowel. Check the thickness of each stone, and vary the depth of the mix accordingly. But put in more than you need, and don’t pack the mix down; you want the stone to start out too high.Next, jiggle the stone back and forth, or use a few good hits from a rubber mallet to settle the stone to its proper height.To gauge the correct height of the stone, I snap chalklines around the edge of the room. In the middle of a room, I simply use a 16d nail with a piece of tape around it. Registered against the subfloor, the nail works like a miniature story pole. A 4-ft. level is also handy for keeping the stones even, and in a really big area, you may want to use a transit. Shoot for an average of at least 1 in. of mortar under each stone.

Before each stone goes down, I skim-coat the back with a loose mixture of portland cement and water, mixed separately in a bucket. You could also use thinset here. This mix will bond the stone to the floor forever. I stay off the stone for 24 hours to keep from breaking the bond.

Grouting the stones is the most tedious part of the job. Unlike when I grout tile, I try to keep the stone as clean as possible.The grout mixture I like to use is 50/50 portland cement and sand. I make the mix the same consistency as the setting mix and push it directly into the joints with a pointing trowel. I clean the stone carefully with a damp sponge while the grout is wet, but I try not to use too much water. Alternatively, some people grout the stones as they lay them, allowing the setting-bed mortar to ooze up between the stones. I haven’t tried this technique, but it would save a tedious step. Again, sponging the stones with water to keep a haze from forming would be critical.

If the stone still needs to be cleaned, let it sit for four days, and then wash the stone with a 5:1 solution of water to muriatic acid. Wear goggles and rubber gloves, and apply the acid wash with a scrub brush about 20 sq. ft. at a time. Always double-rinse the stone with clean water.

There are two types of sealer you can apply to a stone floor. Topical sealers seal only the surface and leave a wet look. I’ve had good luck with Masonry Lusta (Silpro Corp.; 800-343-1501; silpro.com). If you prefer a dry or natural look, use a penetrating sealer such as 511 Impregnator (Miracle Sealants; 800-350-1901; www.miraclesealants.com).

tape on a 16d nail head helps to set the stone depth diagram

portland cement diagram

Previous: Dead-Flat Bathroom Floor Next: Sound-Dampening Ceramic Tile over a Concrete Floor

Guide

Tiling

Chapter

Preparation

Sign up for eletters today and get the latest how-to from Fine Homebuilding, plus special offers.

Signing you up...

This site is protected by reCAPTCHA and the Google Privacy Policy and Terms of Service apply.
See all newsletters
See all newsletters

Log in or create an account to post a comment.

Sign up Log in

Become a member and get full access to FineHomebuilding.com

Tiling

Tiling

Trusted, comprehensive guidance from the pros for a great-looking tile job in any room of the house

View Project Guide

View All Project Guides »

Become a member and get unlimited site access, including the Tiling Project Guide.

Start Free Trial

Selecting Tile
  • The Basics
  • Tile Options
Tools & Techniques
  • Job-Preparation Tools
  • Cutting Tiles
  • Setting & Grouting Tools
Installation Materials
  • Membranes & Substrates
  • Adhesives & Mortars
  • Grout
  • Sealers & Caulk
  • Spacers, Hardware & Trim
Preparation
  • The Prep Job
  • Repairs & Surface Prep
  • Installing Backerboard
Tiling Floors
  • Layout & Installation
  • Setting Specialty Tiles
Tiling Walls & Backsplashes
  • Preparation
  • Backsplashes
  • Walls
Tiling Showers
  • Tile Shower Basics
  • Waterproofing
  • Shower Pans
  • Shower Drains
  • Shower Niches
  • Video Series: Tile a Shower
  • Video Series: Tile a Barrier-Free Bathroom
Grouting, Sealing & Caulking
  • Grouting
  • Caulking
  • Sealing
Maintenance & Repair
  • Maintenance
  • Tile Repair
  • Grout Repair

Fine Home Building

Newsletter Sign-up

  • Fine Homebuilding

    Home building tips, offers, and expert advice in your inbox.

  • Green Building Advisor

    Building science and energy efficiency advice, plus special offers, in your inbox.

  • Old House Journal

    Repair, renovation, and restoration tips, plus special offers, in your inbox.

Signing you up...

This site is protected by reCAPTCHA and the Google Privacy Policy and Terms of Service apply.
See all newsletters

Follow

  • Fine Homebuilding

    Dig into cutting-edge approaches and decades of proven solutions with total access to our experts and tradespeople.

    Start Free Trial Now
    • Facebook
    • Instagram
    • X
    • LinkedIn
  • GBA Prime

    Get instant access to the latest developments in green building, research, and reports from the field.

    Start Free Trial Now
    • Facebook
    • YouTube
  • Old House Journal

    Learn how to restore, repair, update, and decorate your home.

    Subscribe Now
    • Facebook
    • Instagram
    • X

Membership & Magazine

  • Online Archive
  • Start Free Trial
  • Magazine Subscription
  • Magazine Renewal
  • Gift a Subscription
  • Customer Support
  • Privacy Preferences
  • About
  • Contact
  • Advertise
  • Careers
  • Terms of Use
  • Site Map
  • Do not sell or share my information
  • Privacy Policy
  • Accessibility
  • California Privacy Rights

© 2025 Active Interest Media. All rights reserved.

Fine Homebuilding receives a commission for items purchased through links on this site, including Amazon Associates and other affiliate advertising programs.

  • Home Group
  • Antique Trader
  • Arts & Crafts Homes
  • Bank Note Reporter
  • Cabin Life
  • Cuisine at Home
  • Fine Gardening
  • Fine Woodworking
  • Green Building Advisor
  • Garden Gate
  • Horticulture
  • Keep Craft Alive
  • Log Home Living
  • Military Trader/Vehicles
  • Numismatic News
  • Numismaster
  • Old Cars Weekly
  • Old House Journal
  • Period Homes
  • Popular Woodworking
  • Script
  • ShopNotes
  • Sports Collectors Digest
  • Threads
  • Timber Home Living
  • Traditional Building
  • Woodsmith
  • World Coin News
  • Writer's Digest
Active Interest Media logo
X
X
This is a dialog window which overlays the main content of the page. The modal window is a 'site map' of the most critical areas of the site. Pressing the Escape (ESC) button will close the modal and bring you back to where you were on the page.

Main Menu

  • How-To
  • Design
  • Tools & Materials
  • Video
  • Blogs
  • Forum
  • Project Guides
  • Reader Projects
  • Magazine
  • Members
  • FHB House

Podcasts

  • FHB Podcast
  • ProTalk

Webinars

  • Upcoming and On-Demand

Podcasts

  • FHB Podcast
  • ProTalk

Webinars

  • Upcoming and On-Demand

Popular Topics

  • Kitchens
  • Business
  • Bedrooms
  • Roofs
  • Architecture and Design
  • Green Building
  • Decks
  • Framing
  • Safety
  • Remodeling
  • Bathrooms
  • Windows
  • Tilework
  • Ceilings
  • HVAC

Magazine

  • Current Issue
  • Past Issues
  • Magazine Index
  • Subscribe
  • Online Archive
  • Author Guidelines

All Access

  • Member Home
  • Start Free Trial
  • Gift Membership

Online Learning

  • Courses
  • Project Guides
  • Reader Projects
  • Podcast

More

  • FHB Ambassadors
  • FHB House
  • Customer Support

Account

  • Log In
  • Join

Newsletter

Get home building tips, offers, and expert advice in your inbox

Signing you up...

This site is protected by reCAPTCHA and the Google Privacy Policy and Terms of Service apply.
See all newsletters
See all newsletters

Follow

  • X
  • YouTube
  • instagram
  • facebook
  • pinterest
  • Tiktok

Join All Access

Become a member and get instant access to thousands of videos, how-tos, tool reviews, and design features.

Start Your Free Trial

Subscribe

FHB Magazine

Start your subscription today and save up to 70%

Subscribe

You have 1 free article remaining.

Get complete site access, including thousands of videos, how-to tips, tool reviews, and design features.

Start your FREE trial

Already a member? Log in

We hope you’ve enjoyed your free articles. To keep reading, become a member today.

Get complete site access to expert advice, how-to videos, Code Check, and more, plus the print magazine.

Start your FREE trial

Already a member? Log in

Privacy Policy Update

We use cookies, pixels, script and other tracking technologies to analyze and improve our service, to improve and personalize content, and for advertising to you. We also share information about your use of our site with third-party social media, advertising and analytics partners. You can view our Privacy Policy here and our Terms of Use here.

Cookies

Analytics

These cookies help us track site metrics to improve our sites and provide a better user experience.

Advertising/Social Media

These cookies are used to serve advertisements aligned with your interests.

Essential

These cookies are required to provide basic functions like page navigation and access to secure areas of the website.

Delete My Data

Delete all cookies and associated data