Prefab Shower Niches
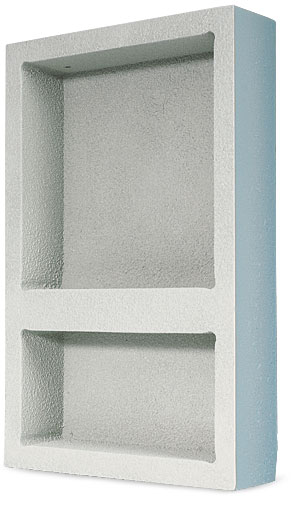
Noble Company's preformed niches are the perfect depth to slide into a 2x4 shower wall cavity.
• Manufactured by Noble Company
• Cost of niche similar to the one shown: $60 Photo by: Krysta S. Doerfler
Back in the 1970s and ’80s, when customers wanted a place to put their soap in a tile shower, I would install a ceramic soap dish or a corner shelf and call it a day. Then in the ’90s, I started cutting a cavity into the wall to create a recessed shampoo and soap holder. If I wanted to charge a little more money, I called it a niche. Today, I install them more often than not, so I’ve had the chance to become really good at making my own niches.
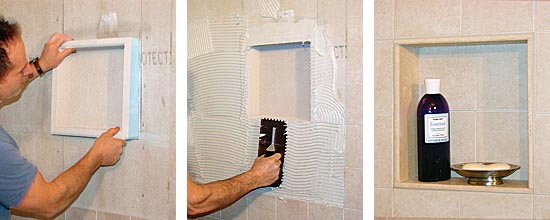
The standard way to build a niche is to cut out the cementboard where the niche is to be installed and put in 2×4 framing with construction adhesive. Then I either clad the new framing with cementboard or cover it with a waterproof membrane. But now Noble Company has come out with prefabricated niche inserts. When properly installed, they shave a few steps off the process (see photos below for an overview).
Noble Niches come in several different sizes and designs, and all of them are made of foam that has been coated with a rough-textured spray material to create a waterproof surface ready to accept tile. These prefab niches are sized to fit between 16-in. on-center studs and are the perfect depth to slide into a 2×4 wall cavity. They are adhered between the studs with an acrylic sealant, and mesh seam tape then is applied over the joint between the niche and the wallboard. Once the unit is in place, you can tile over it using latex-modified thinset.
These niches aren’t without their drawbacks, though. Sometimes the insert does not line up with the course of tile on the wall. Tiles are all different sizes, and the niche is sized specifically to fit between two 16-in. on-center studs, which doesn’t leave any room to adjust left or right. Up-and-down adjustment is not as much of a problem as long as the tilework is laid out first, which is the reason why I always start to tile before cutting out the niche. If I install the niche first and try to tile up to it, there’s a good chance I will end up with a 1-in. piece of tile above or below the recess—and then I’m in trouble. Finally, these units don’t allow for any customization. Many times, I add a shelf for soap, a razor, or a glass of wine to the niches I make.
Bottom line: These units make life easier for the do-it-yourselfer, and they should be bulletproof if installed according to the directions. But like any prefab solution, they work perfectly only when installed on a perfect job.
Prefab process yields a classy look. After you trace around the niche and cut a hole in the tile backerboard, apply a healthy dose of acrylic sealant to the back side of the unit. The seams are covered with fiberglass mesh tape, coated with thinset, and then tiled like any other surface.


View Comments
I have found niches at shower-shelf.com to be sanitary and very easy to install. Mark