FHB Logo Facebook LinkedIn Email Pinterest Twitter X Instagram Tiktok YouTube Plus Icon Close Icon Navigation Search Icon Navigation Search Icon Arrow Down Icon Video Guide Icon Article Guide Icon Modal Close Icon Guide Search Icon Skip to content
Subscribe
Log In
  • How-To
  • Design
  • Tools & Materials
  • Restoration
  • Videos
  • Blogs
  • Forum
  • Magazine
  • Members
  • FHB House
  • Podcast
Log In

Fine Homebuilding Project Guides

Tiling

Guide Home
  • Selecting Tile
  • Tools & Techniques
  • Installation Materials
  • Preparation
  • Tiling Floors
  • Tiling Walls & Backsplashes
  • Tiling Showers
  • Grouting, Sealing & Caulking
  • Maintenance & Repair
How-To

Install a High-Traffic Tile Floor

A forgiving underlayment and epoxy grout ensure that this tiled entry will stand up to heavy use.

By Tom Meehan Issue 245 - Aug/Sept 2014
  • X
  • facebook
  • linkedin
  • pinterest
  • email
  • add to favorites Log in or Sign up to save your favorite articles

Tilesetter Tom Meehan gives detailed instructions on how to install a “High-Traffic Tile Floor.” A forgiving underlayment and epoxy grout ensure that a tiled entry will stand up to heavy use. Too many tile floors are doomed from the start because of poorly prepped subfloors. Antifracture membranes, sometimes called crack-isolation membranes or uncoupling membranes, are sheet coverings that are applied on top of the subfloor or slab before the tile is installed. The main purpose of these membranes is to prevent any expansion, contraction, or flexing in the structure from leading to failed grout joints or loose and cracked tiles. If done well, you should never even notice the layout; it should just “go away.” To achieve that, plan the layout around focal points while also hiding cuts and out-of-square walls as much as possible. Having taken the time to fully prepare the subfloor, it is important to not get lazy with the thinset. There are different kinds of adhesives for different applications; a latex-modified thinset is ideal for bonding to Ditra mat. With the layout locked in, the rest of the job is just a matter of keeping an eye on the grout joints and filling in tiles as you work your way toward an interior exit from the room. The grouting process for epoxy is basically the same as with conventional grout—pack the joints firmly, but leave as little excess as possible—only the stakes are a bit higher. You need to work quickly and clean off excess grout thoroughly before it sets up, being mindful that setup time can vary based on temperature. Once the grout sets up, it sets up for good. Meehan offers numerous Pro Tips and clear representations of the process throughout.

Project House Video Series:Foyer Tile Installation


There aren’t many rooms in a house that get more foot traffic than a foyer. On this particular job, the foyer has two interior doorways, a front door, and a stairway. Add in a family of four and a pair of very active dogs, and this floor will see some abuse. I always try to provide a tile job that will stand the test of time, but when I’m told by a customer that durability is the biggest priority, I pull out all the stops.

This is an old house, and even though the plank subfloor was topped with 1⁄2-in. plywood, I decided to top off the sub-floor with an uncoupling membrane to provide additional crack resistance. The handmade, Arts and Crafts–style 8×8 tiles chosen by the customer have a naturally imperfect look, so I wasn’t worried about them showing signs of wear and tear. Modern stain-resistant grouts do a pretty good job of liv-ing up to their name, but when it comes to resisting muddy shoes and dirty dog paws, nothing is as stain resistant and rock solid as epoxy grout.

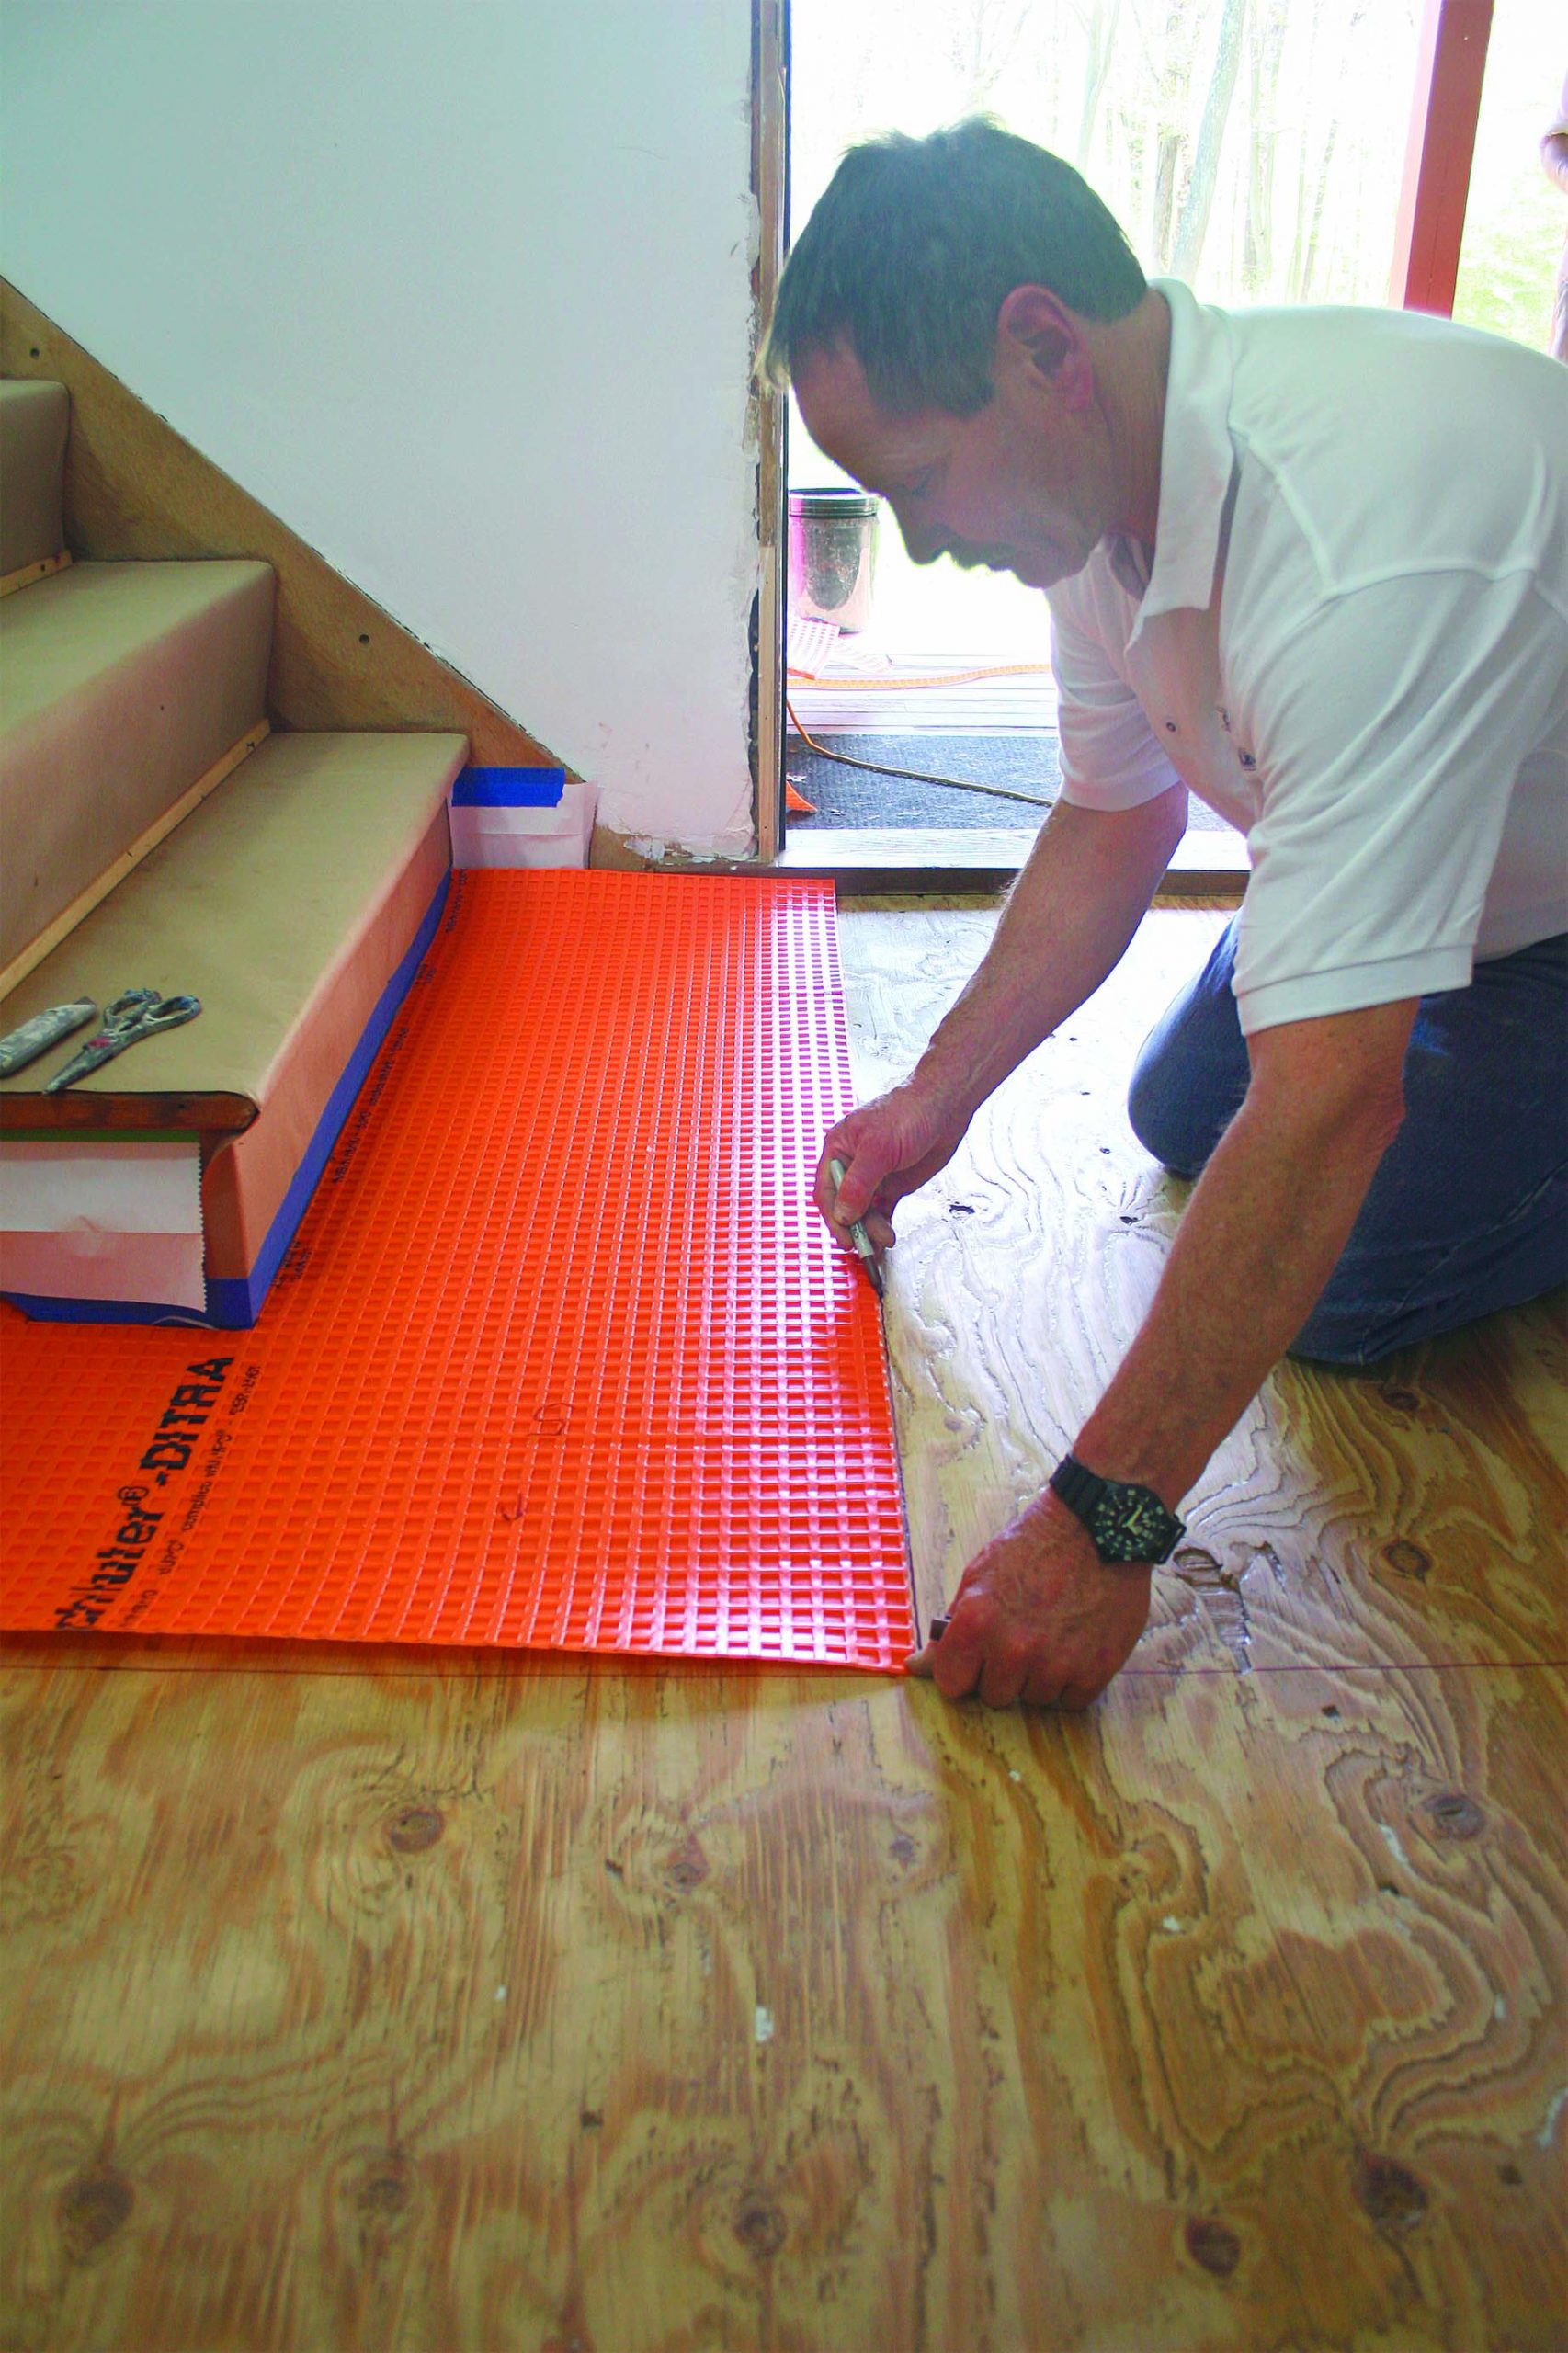
Prevent cracks with a membrane

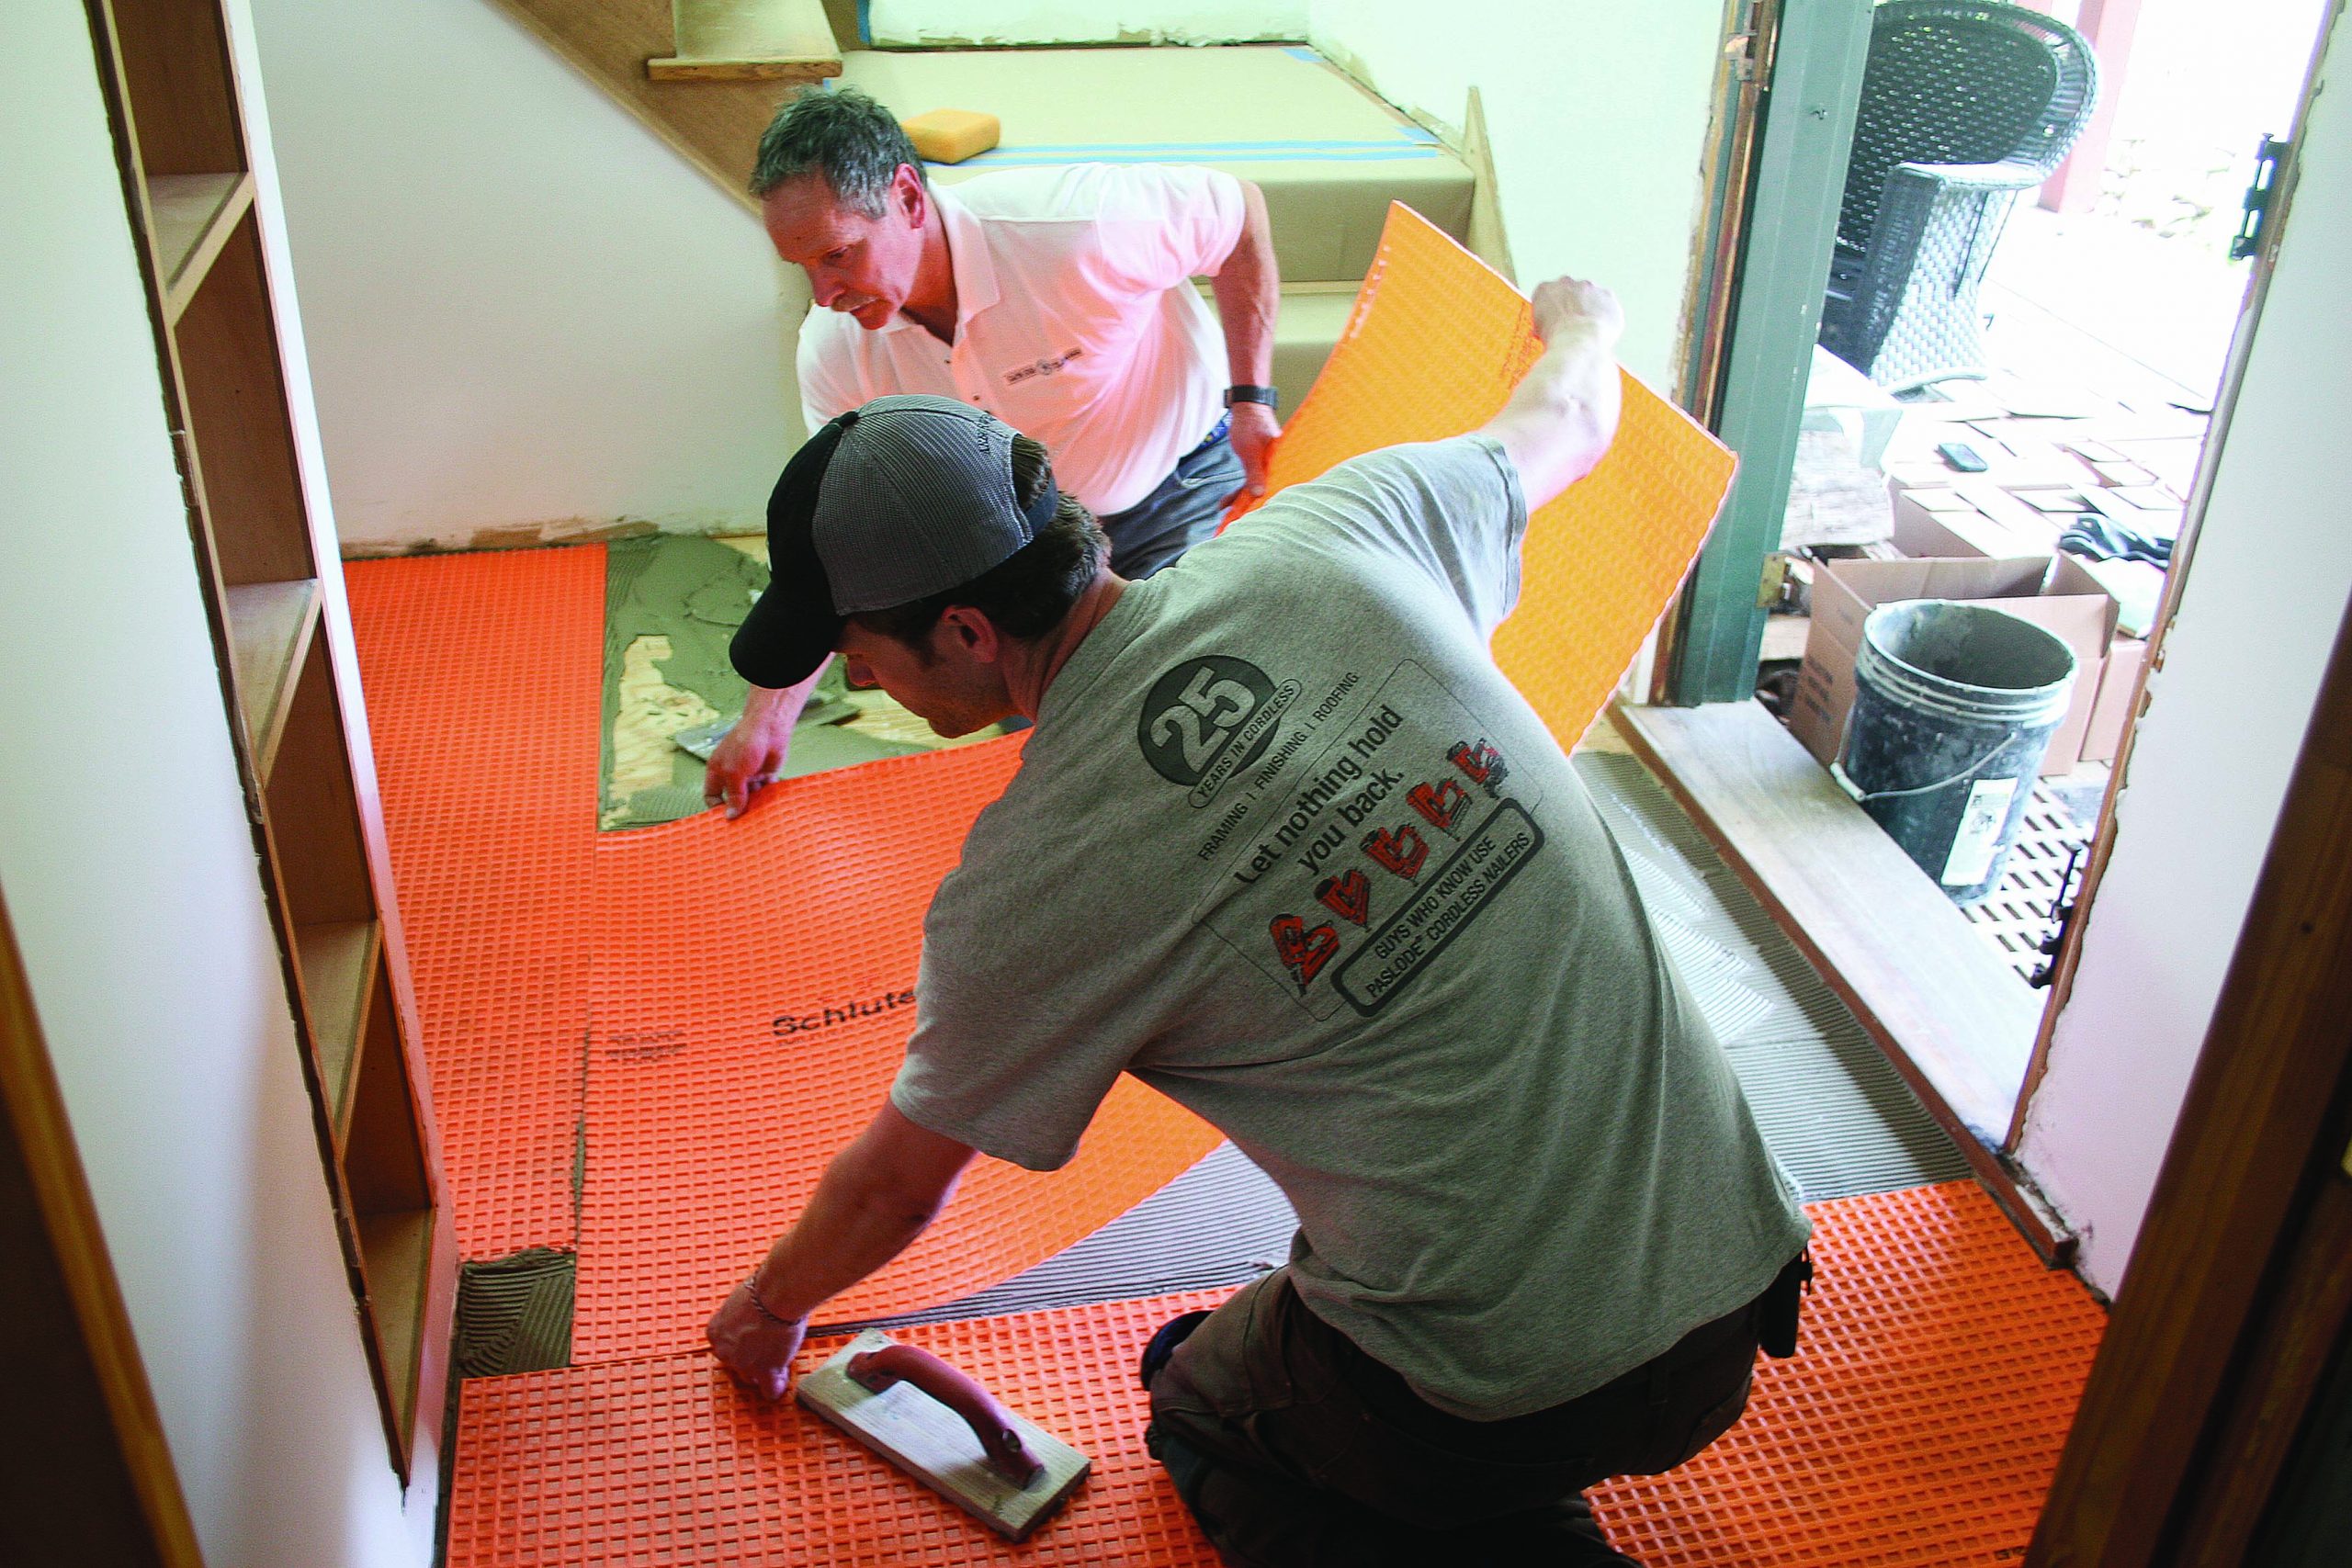
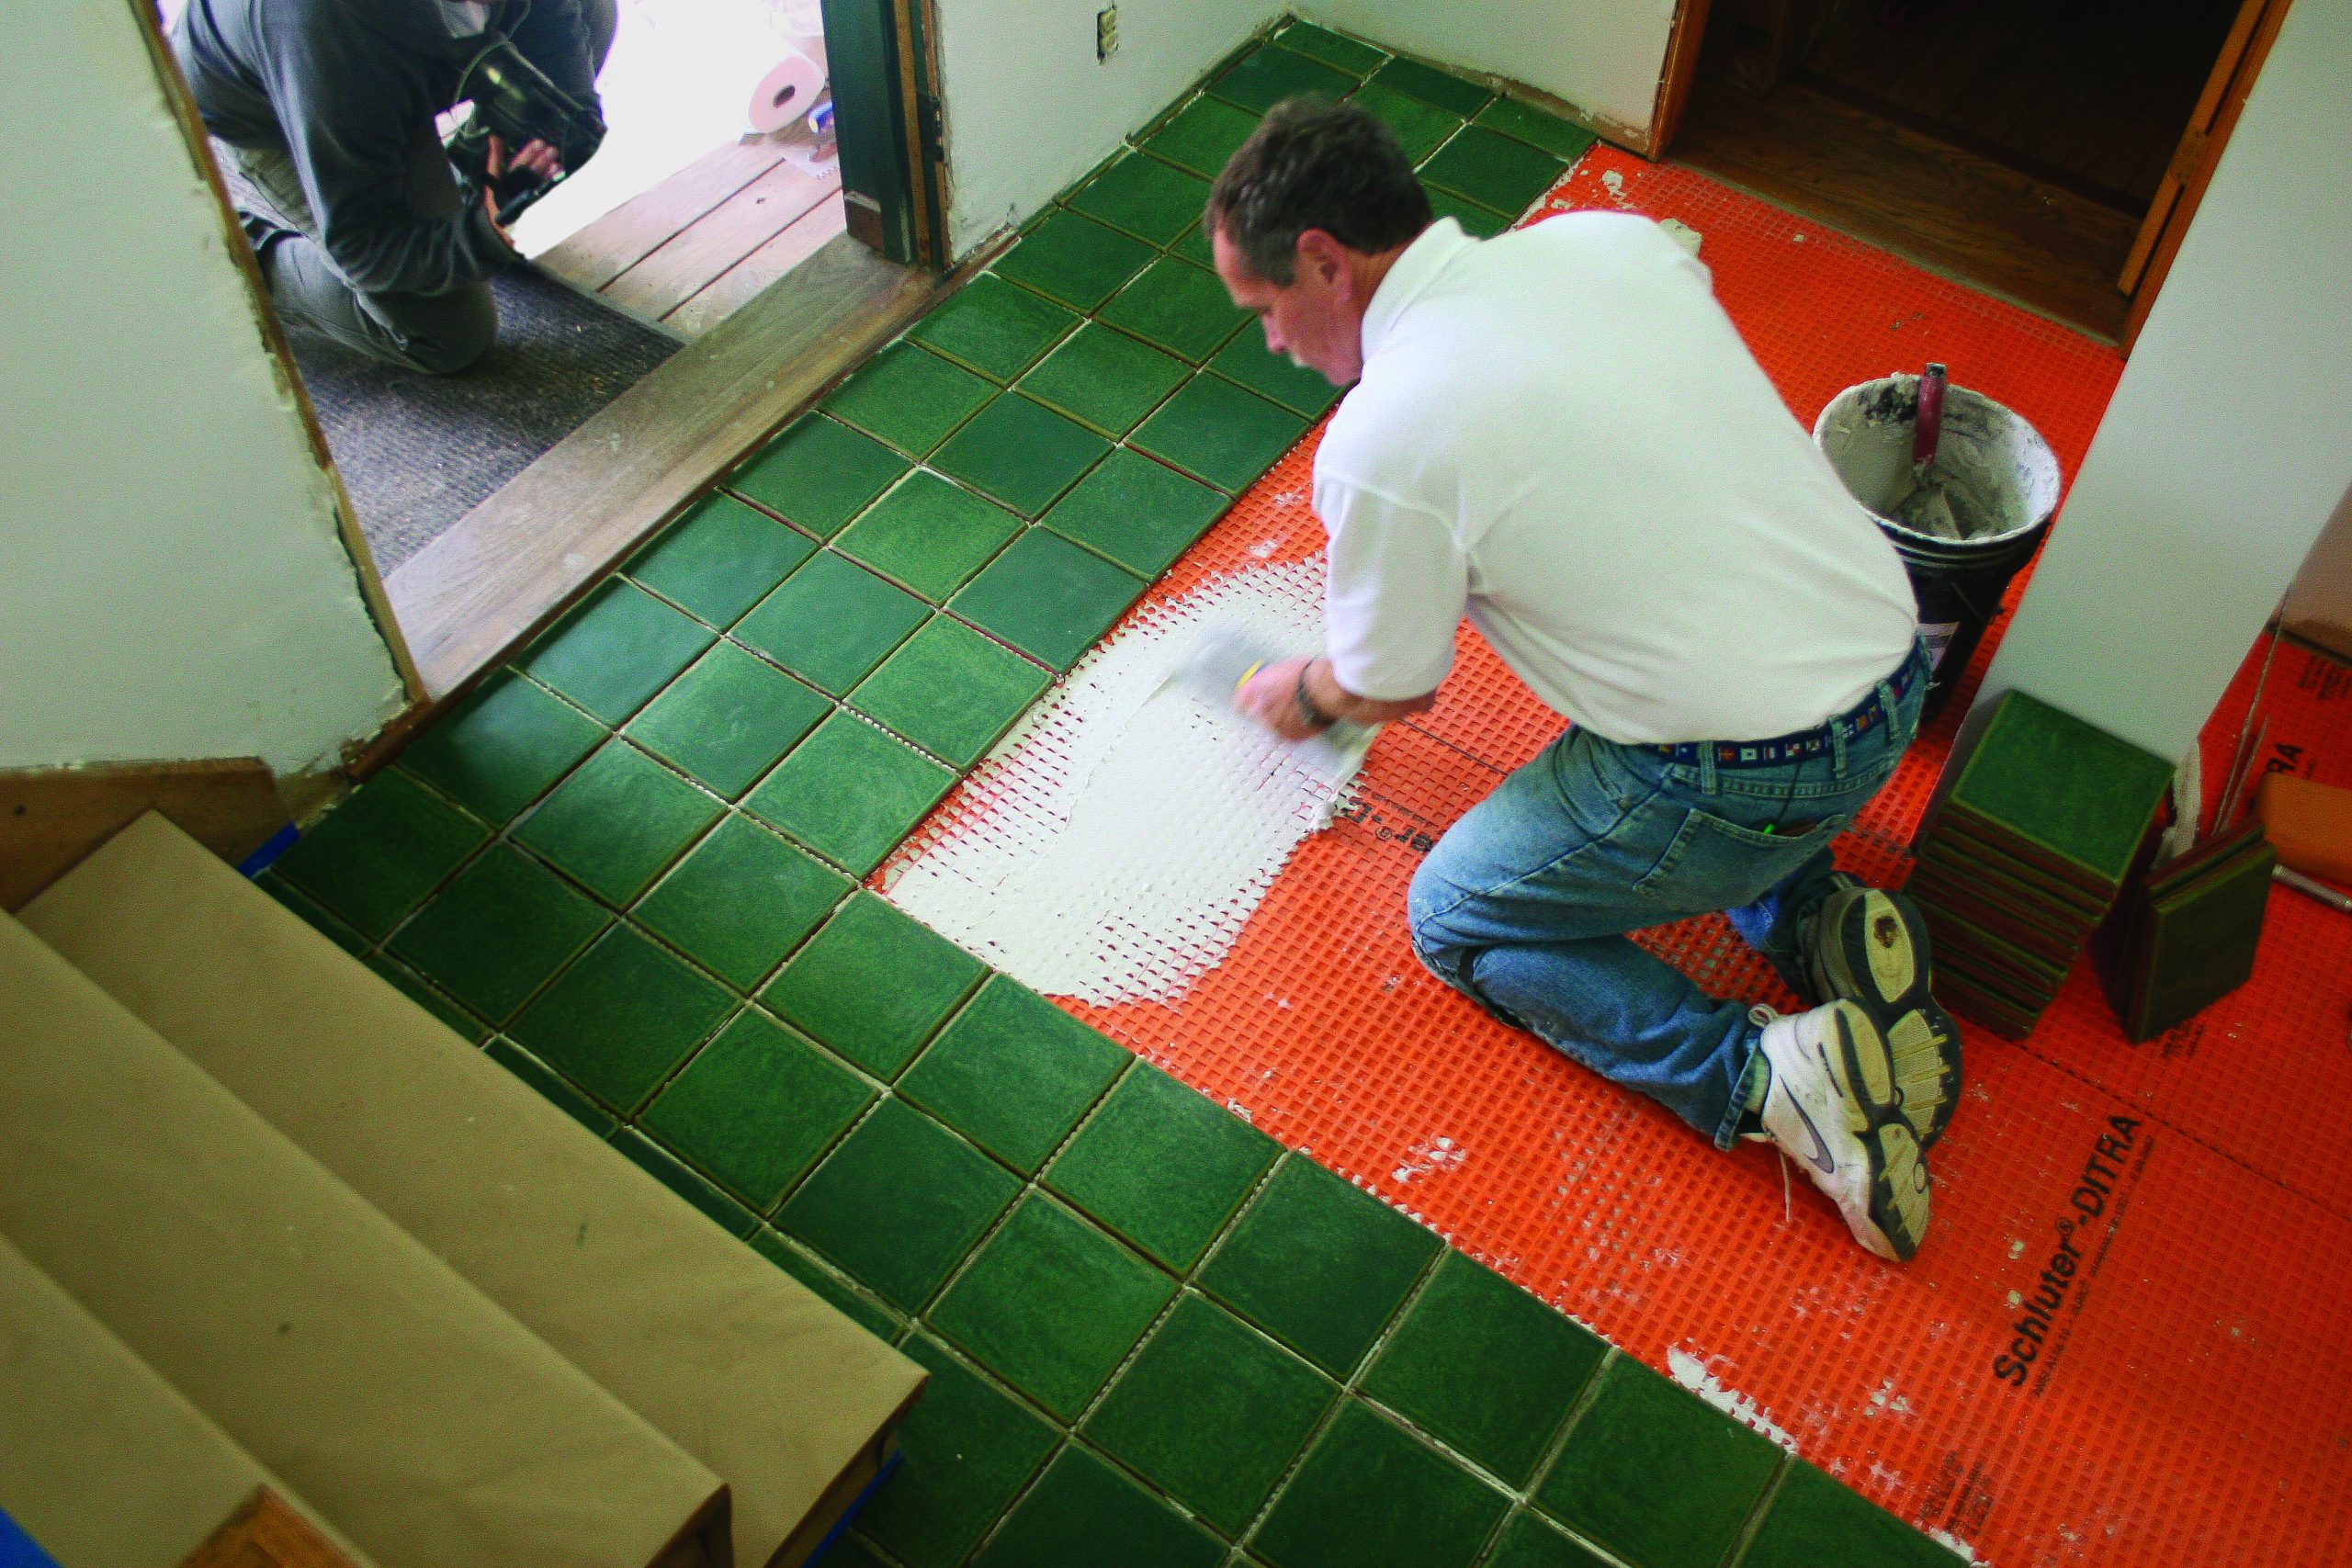
Too many tile floors are doomed from the start because of poorly prepped subfloors. antifracture membranes, sometimes called crack-isolation membranes or uncoupling membranes, are sheet coverings that are applied on top of the subfloor or slab before the tile is installed. The main purpose of these membranes is to prevent any expansion, contraction, or flexing in the structure from leading to failed grout joints or loose and cracked tiles. For this job, we used schlüter’s Ditra mat, which is a polypropylene membrane with a fleece backing that sells for about $2 per sq. ft.

dry fit
1. Start with a dry fit. The orientation and size of each piece of Ditra mat don’t matter. Just cut them to fit with a knife or scissors, tracing the location of each piece onto the subfloor with a permanent marker.

burnish then comb tile floor
2. Burnish, then comb. Working in the sections marked out in the previous step, spread thinset and burnish it into the wood with the straight edge of a 1⁄4-in. square-notch trowel to ensure a good bond. Comb out the cement with the notched side of the trowel until it’s an even thickness, with ridges eventually going in the same direction.

tile floor positioning
3. Position with care. Don’t make contact with the thinset until the Ditra is properly positioned. Hold the piece above where it will be installed, then align one end and work your way toward the other end, making sure to stay on layout.

bond tile base with pressure
4. Bond it with pressure. To ensure a flat surface and a good bond with the thinset below, use a wooden mason’s float to push out any bubbles. Start near the center of each piece, and work toward the edges. Use your body weight to lean into the float.

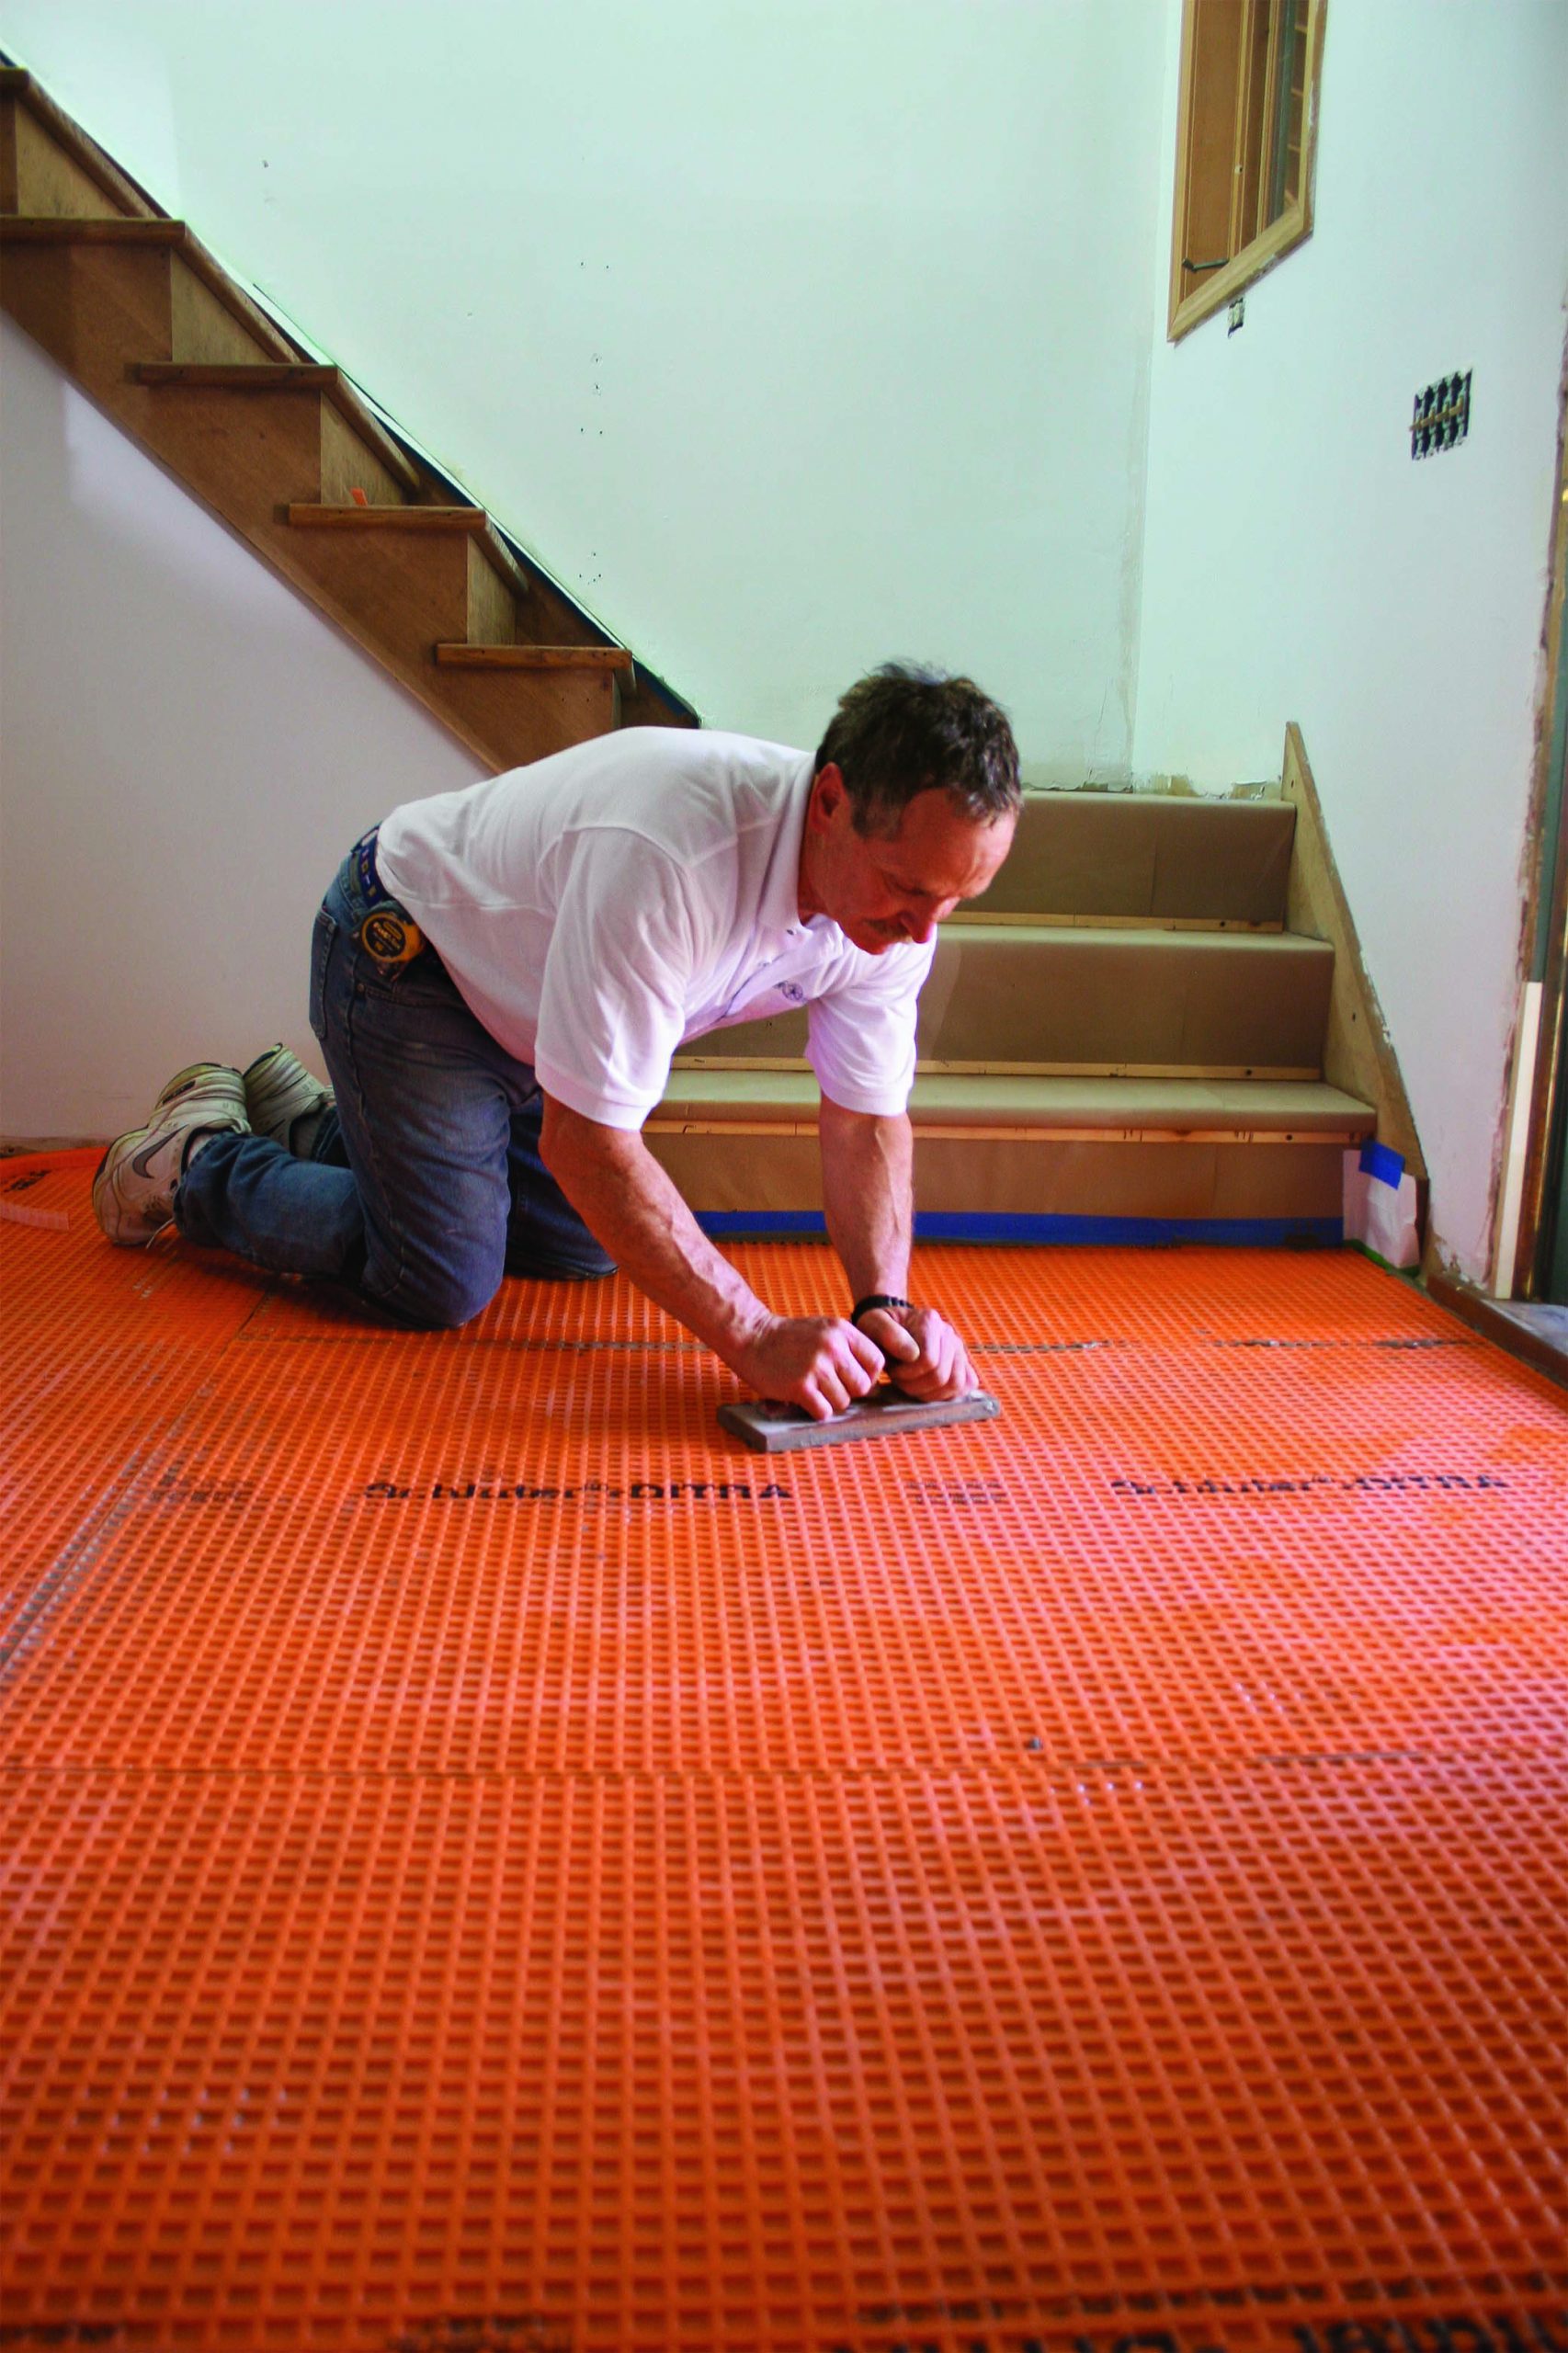
Pro Tip: Get rid of the bounce. Jump up and down in the middle of the floor to see if it will flex; then, if possible, look at the floor framing from the basement. Bottom line: if the floor isn’t structurally sound, do not install tile on it, no matter what anyone says.

Plan around focal points

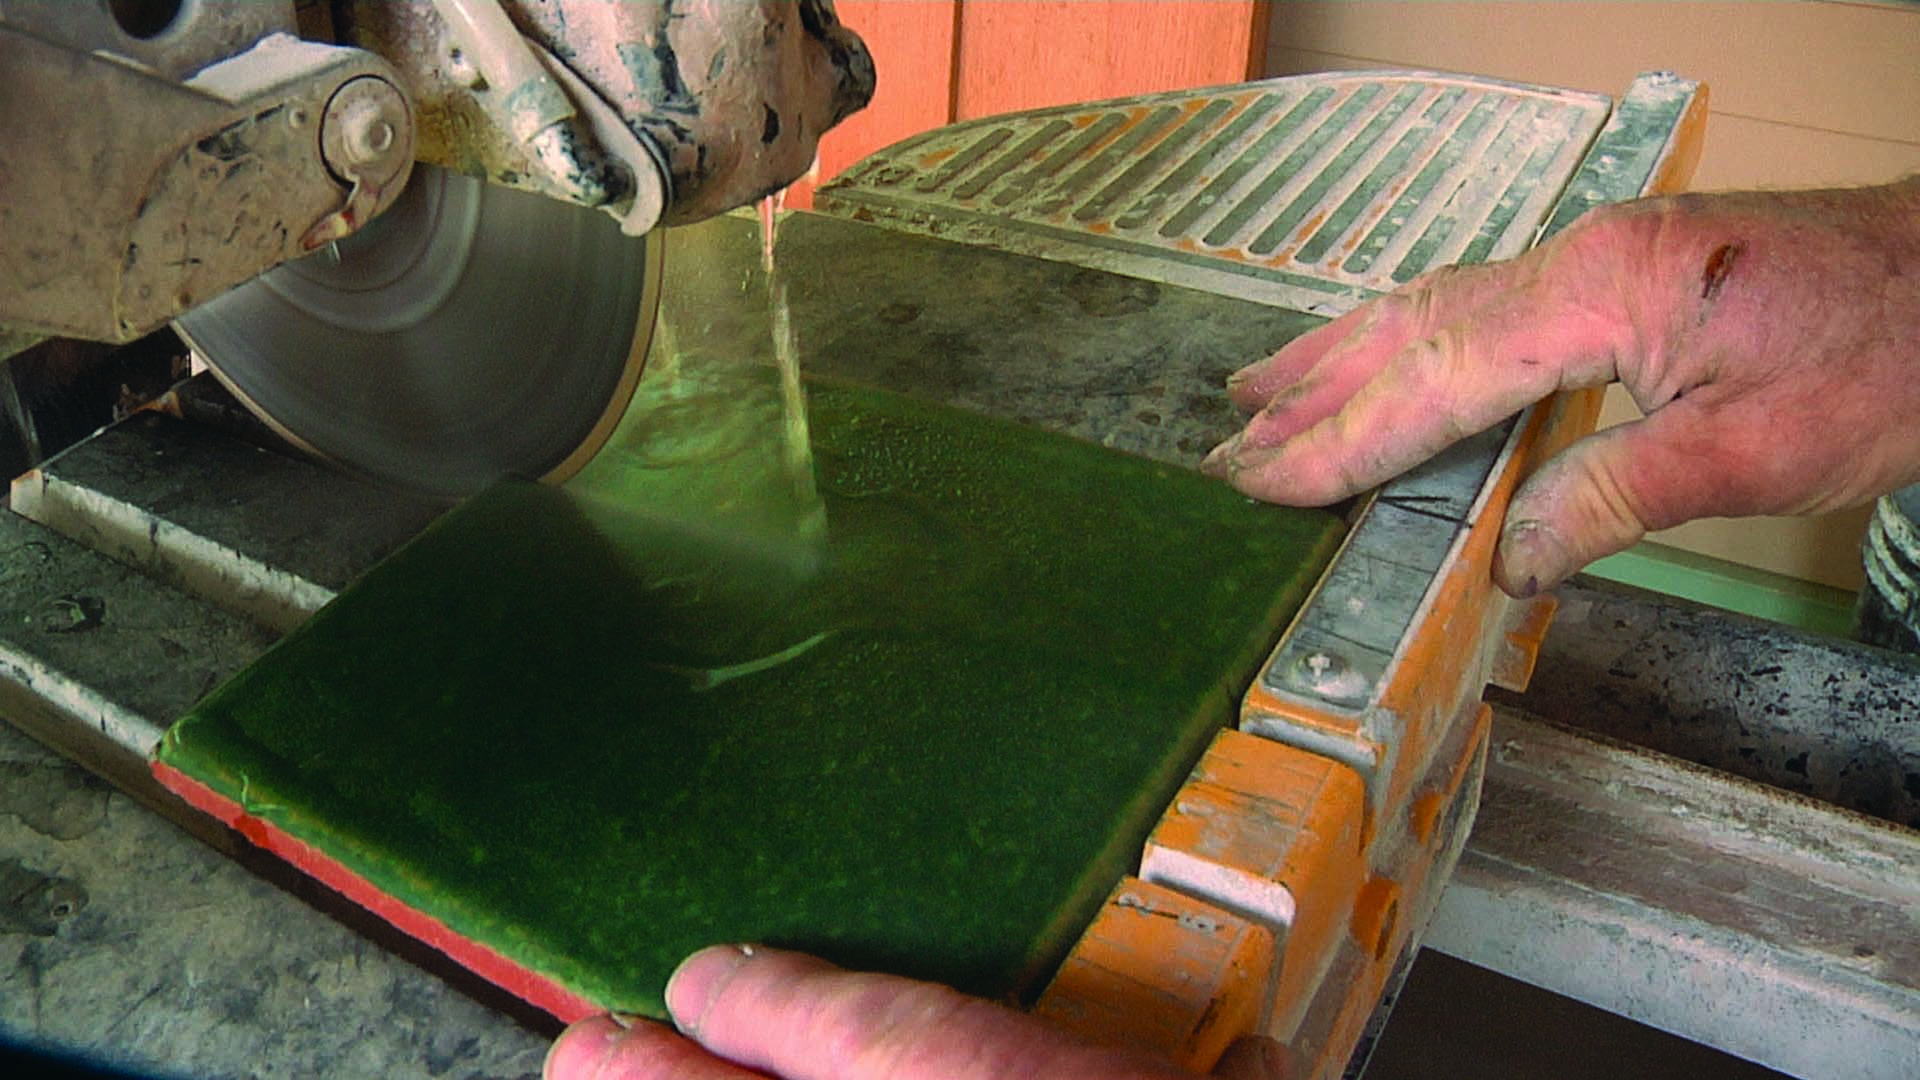
One of the easiest ways to spot an amateur tile job is to look at the layout. Beginners tend to start with a full tile on one side of the room and cut the last row to fit, no matter how awkward the resulting sliver of tile. If done well, you should never even notice the layout; it should just “go away.” To achieve that, plan the layout around focal points while also hiding cuts and out-of-square walls as much as possible. Each space is different, and some are trickier than others. Here’s how this room played out.

  1. Start with a focal point. The focal point is where your eye goes first and most often. I like to start with full tiles where they will be most visible, but only if this leaves a decent remainder at the opposite wall. if the remainder is less than half of a tile, it often looks better to split the difference.
  2. Set the first layout line. in this room, the focal point is the large front door, so i measured the length of three tiles out from the front wall of the foyer, then set a long straightedge to establish the first leg of my intended layout.
  3. Establish a perpendicular line. with the first leg of the layout in place, ineeded to project an accurate line perpendicular to this leg so that i could be sure my tiles wouldn’t wander and leave me with an out-of-square floor. to find this line, i used a long straightedge in combination with a framing square.
  4. Test-fit tiles. with my two layout lines established, i worked out from those lines to see where i would need to cut around obstacles and how i would deal with any out-of-square walls. everything looked like it would work out well, so i drew those two layout lines directly on the floor with a permanent marker. at that point, i was ready to start laying tile.

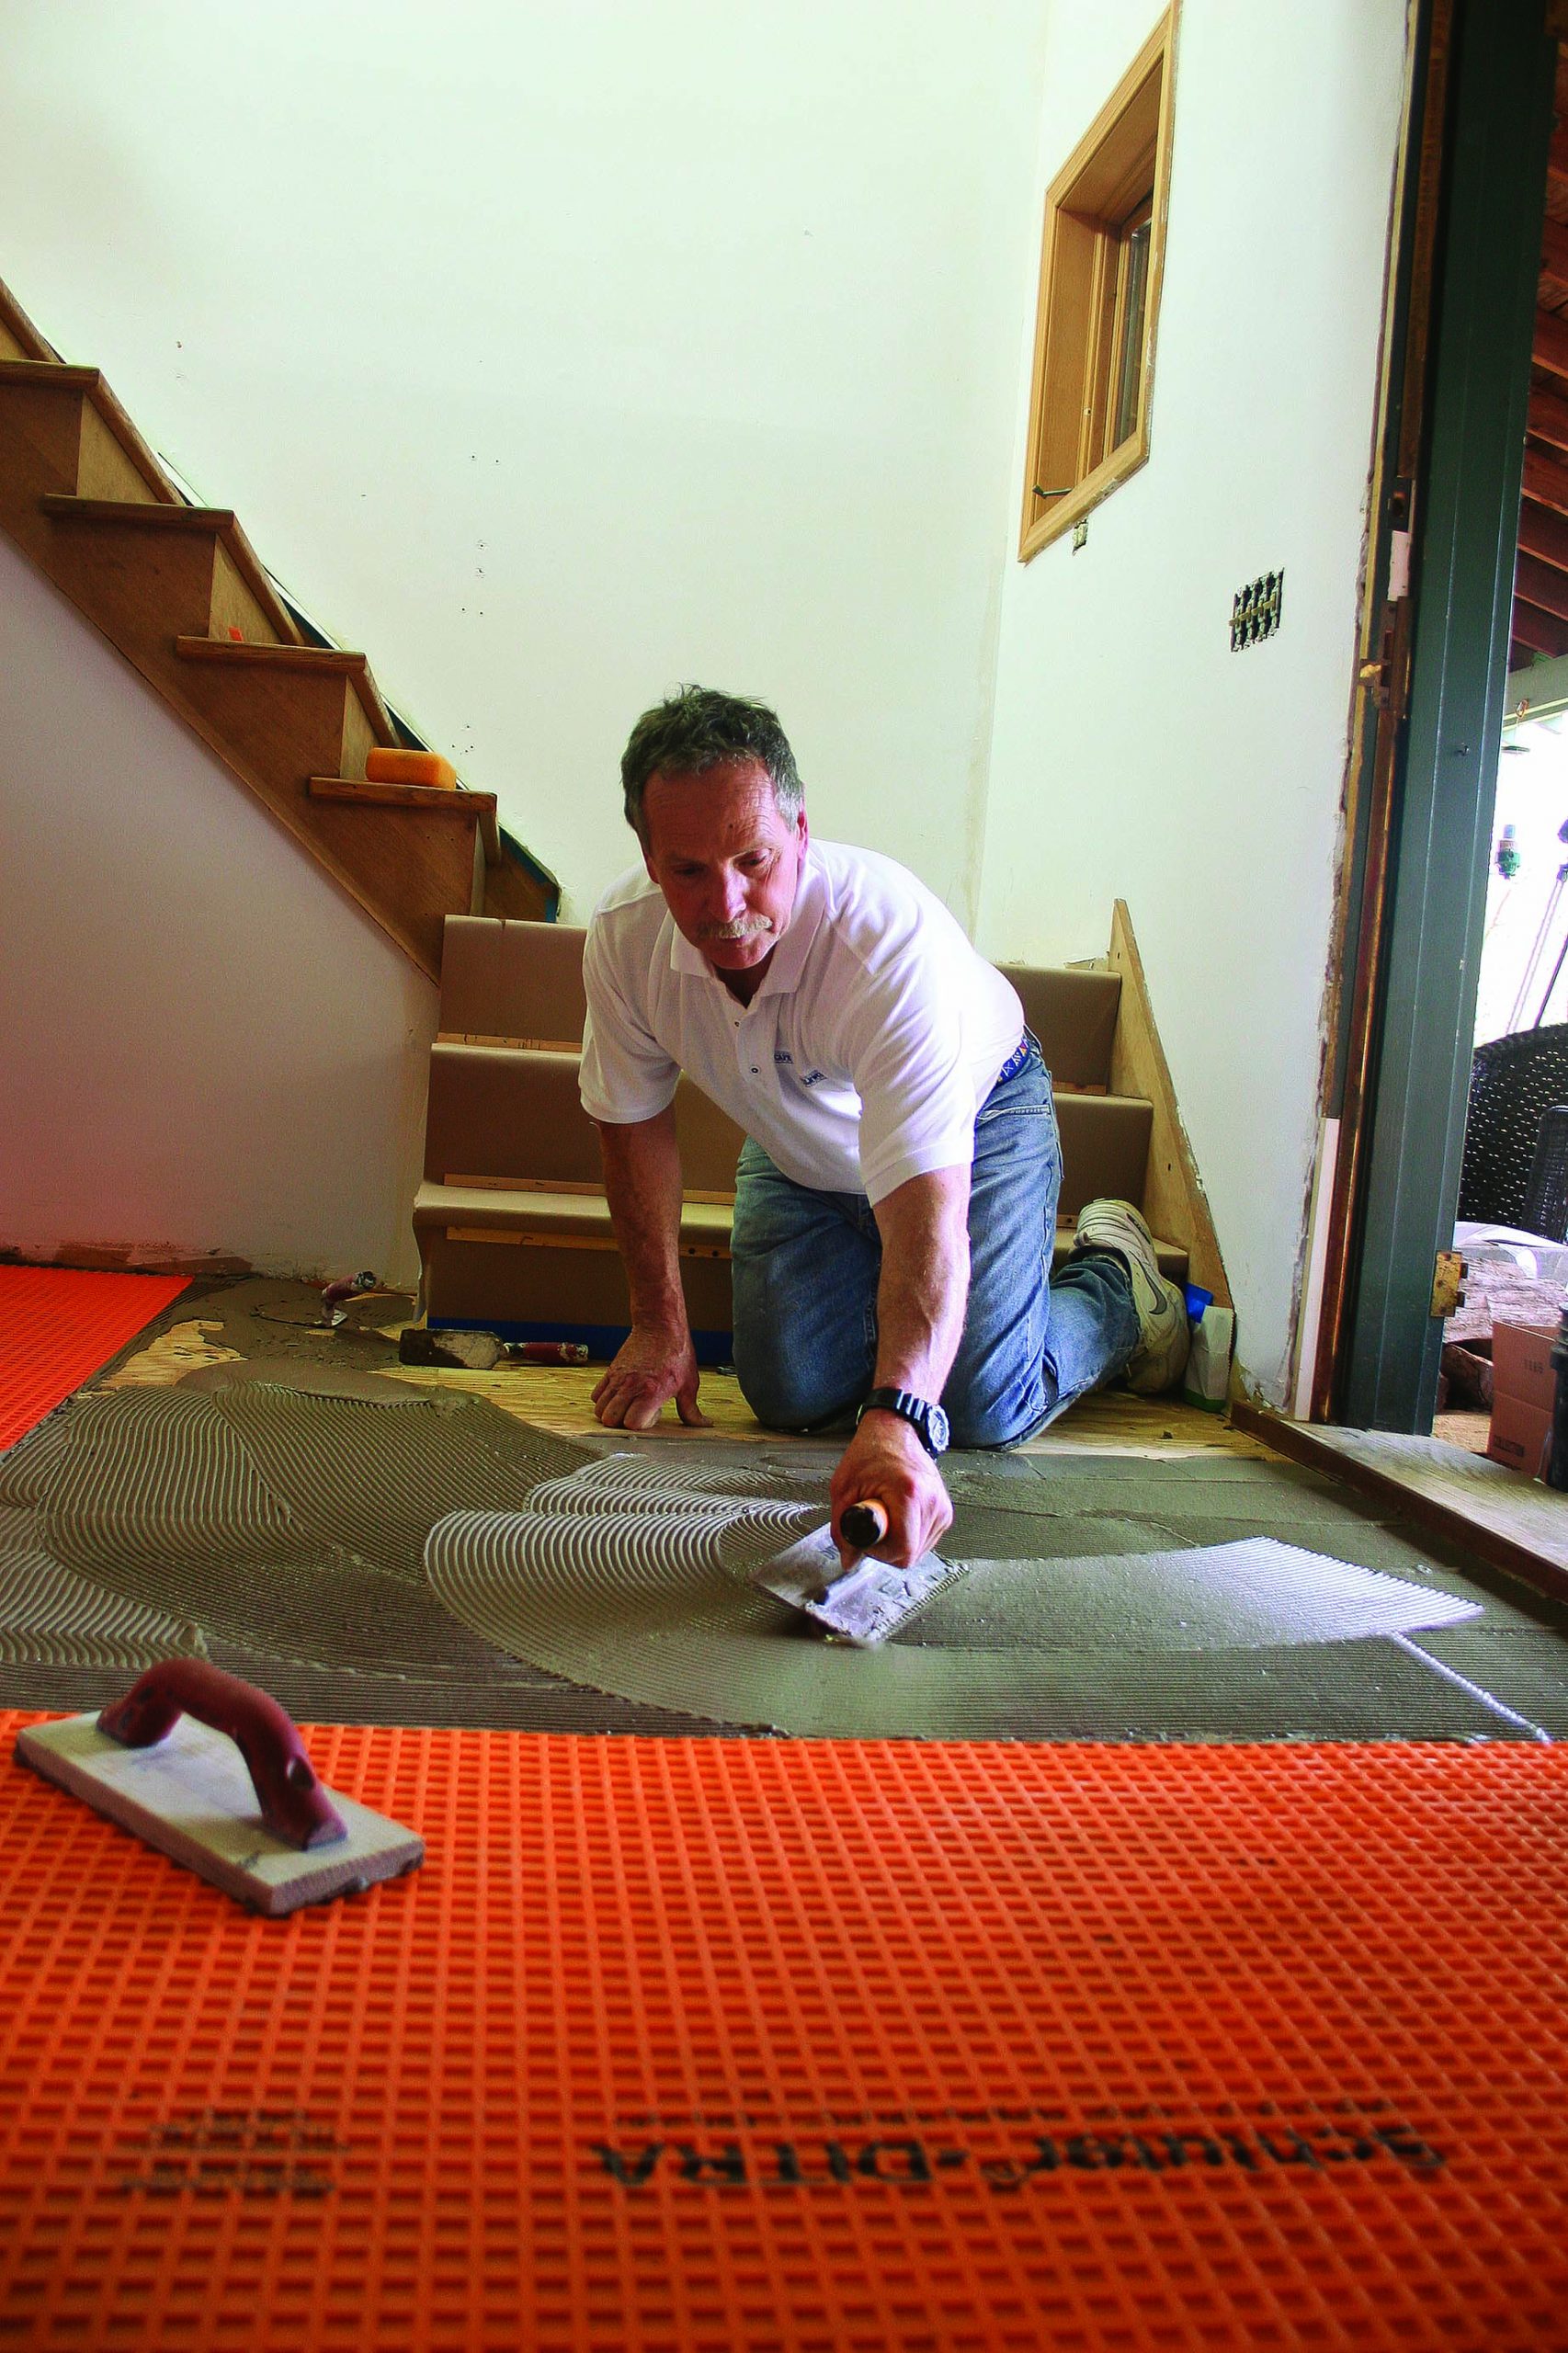
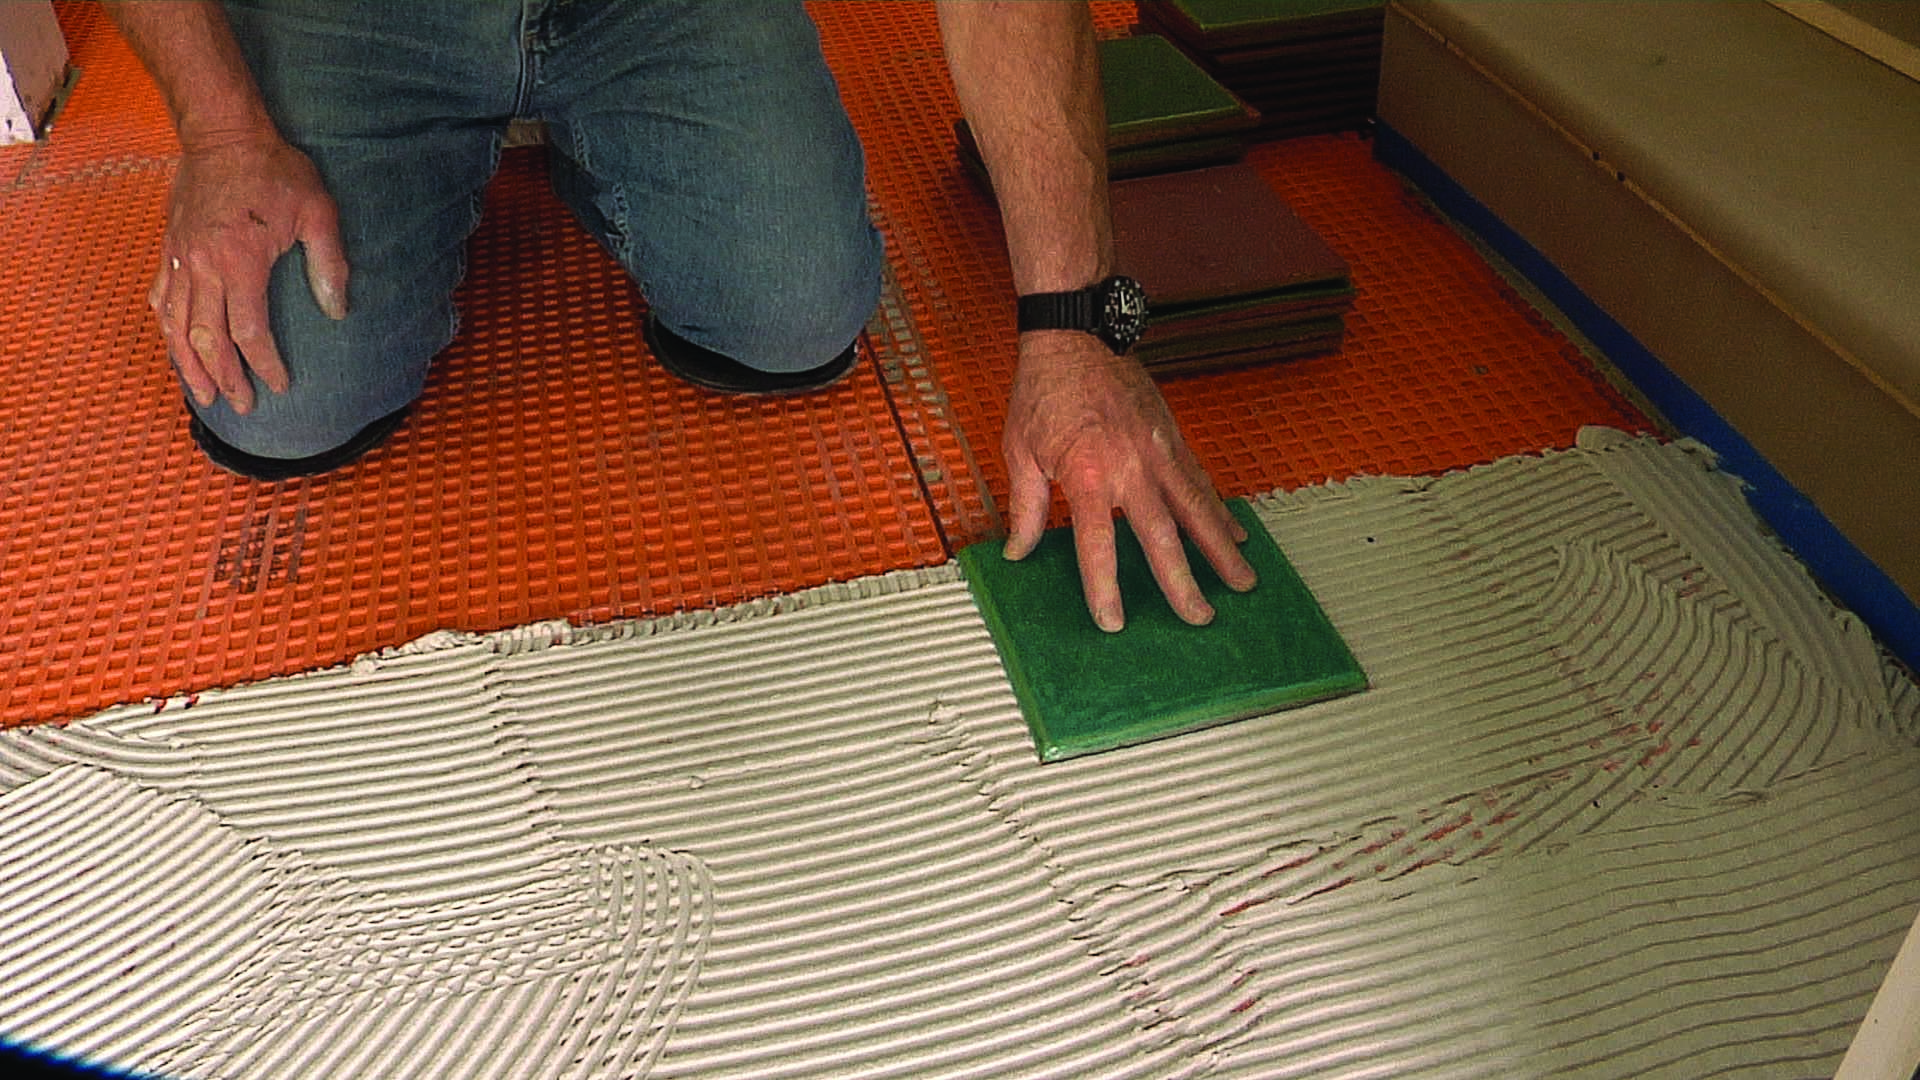
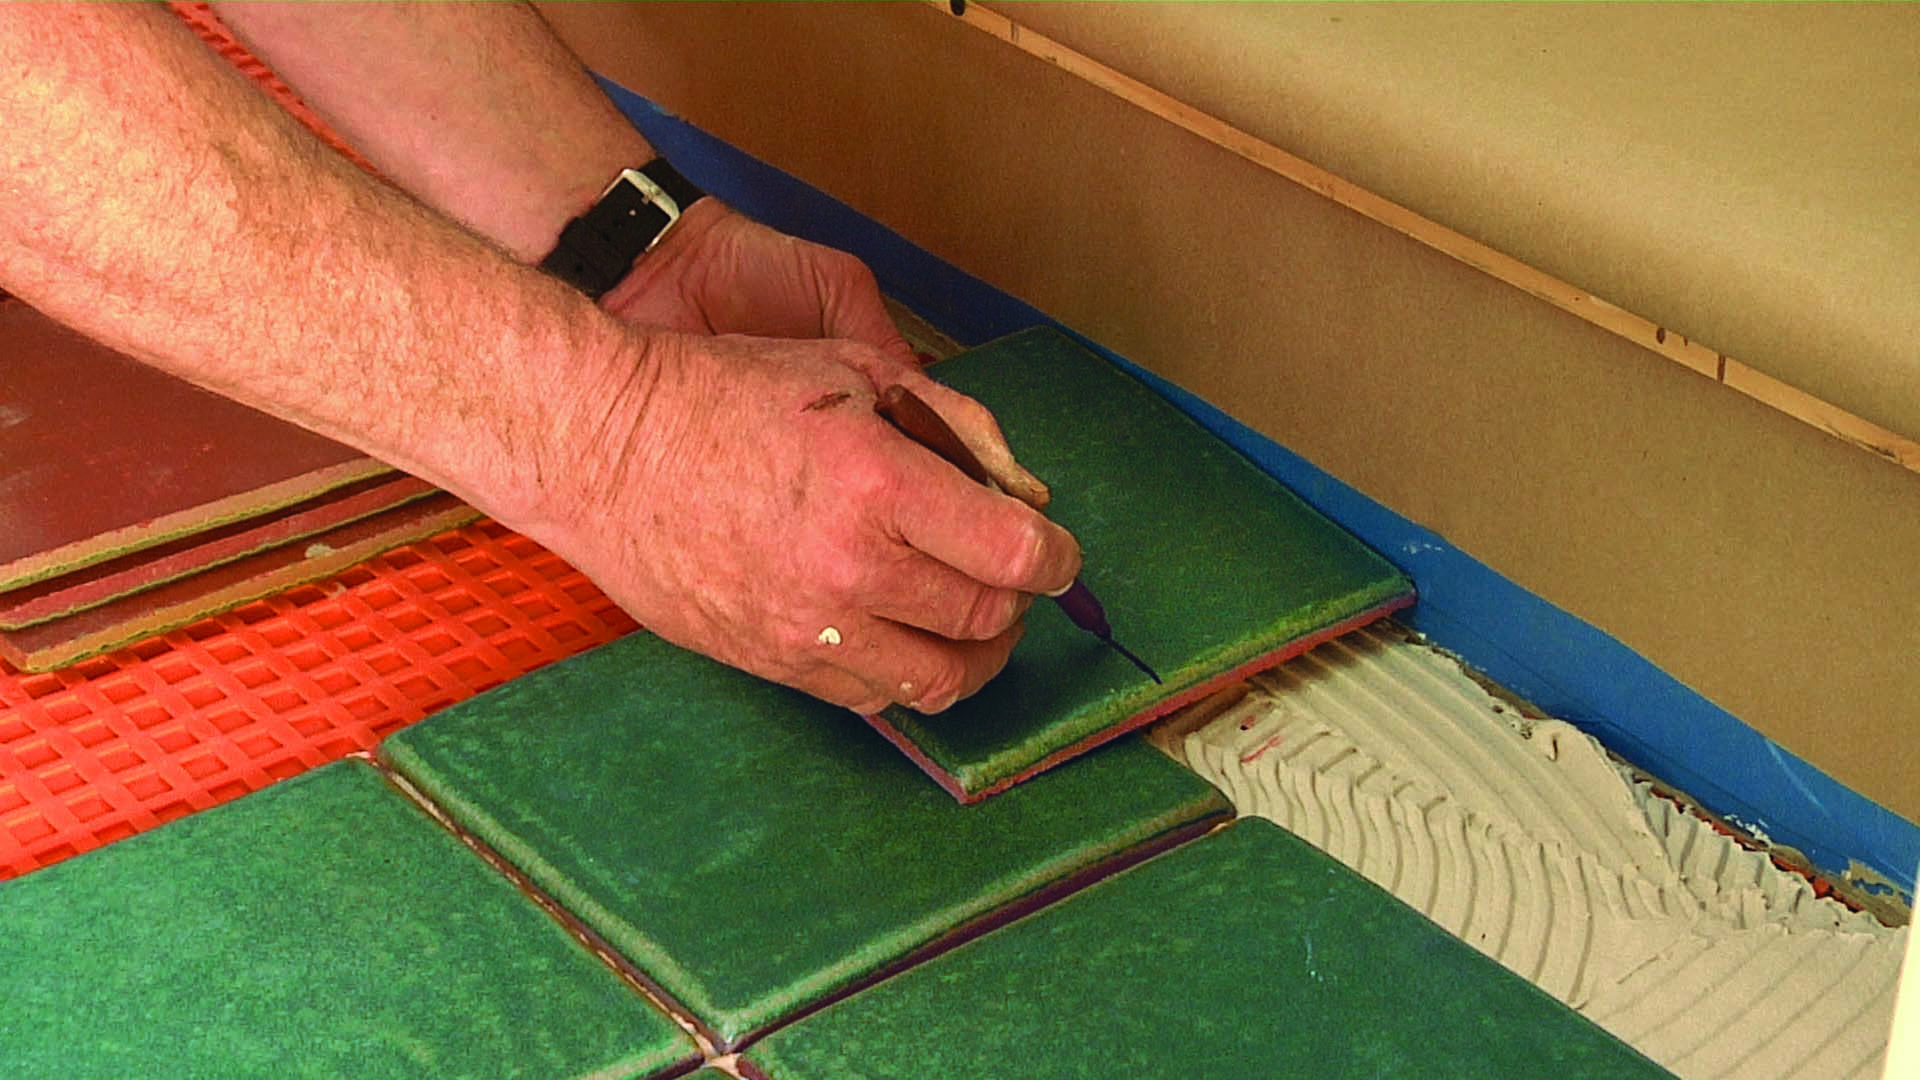
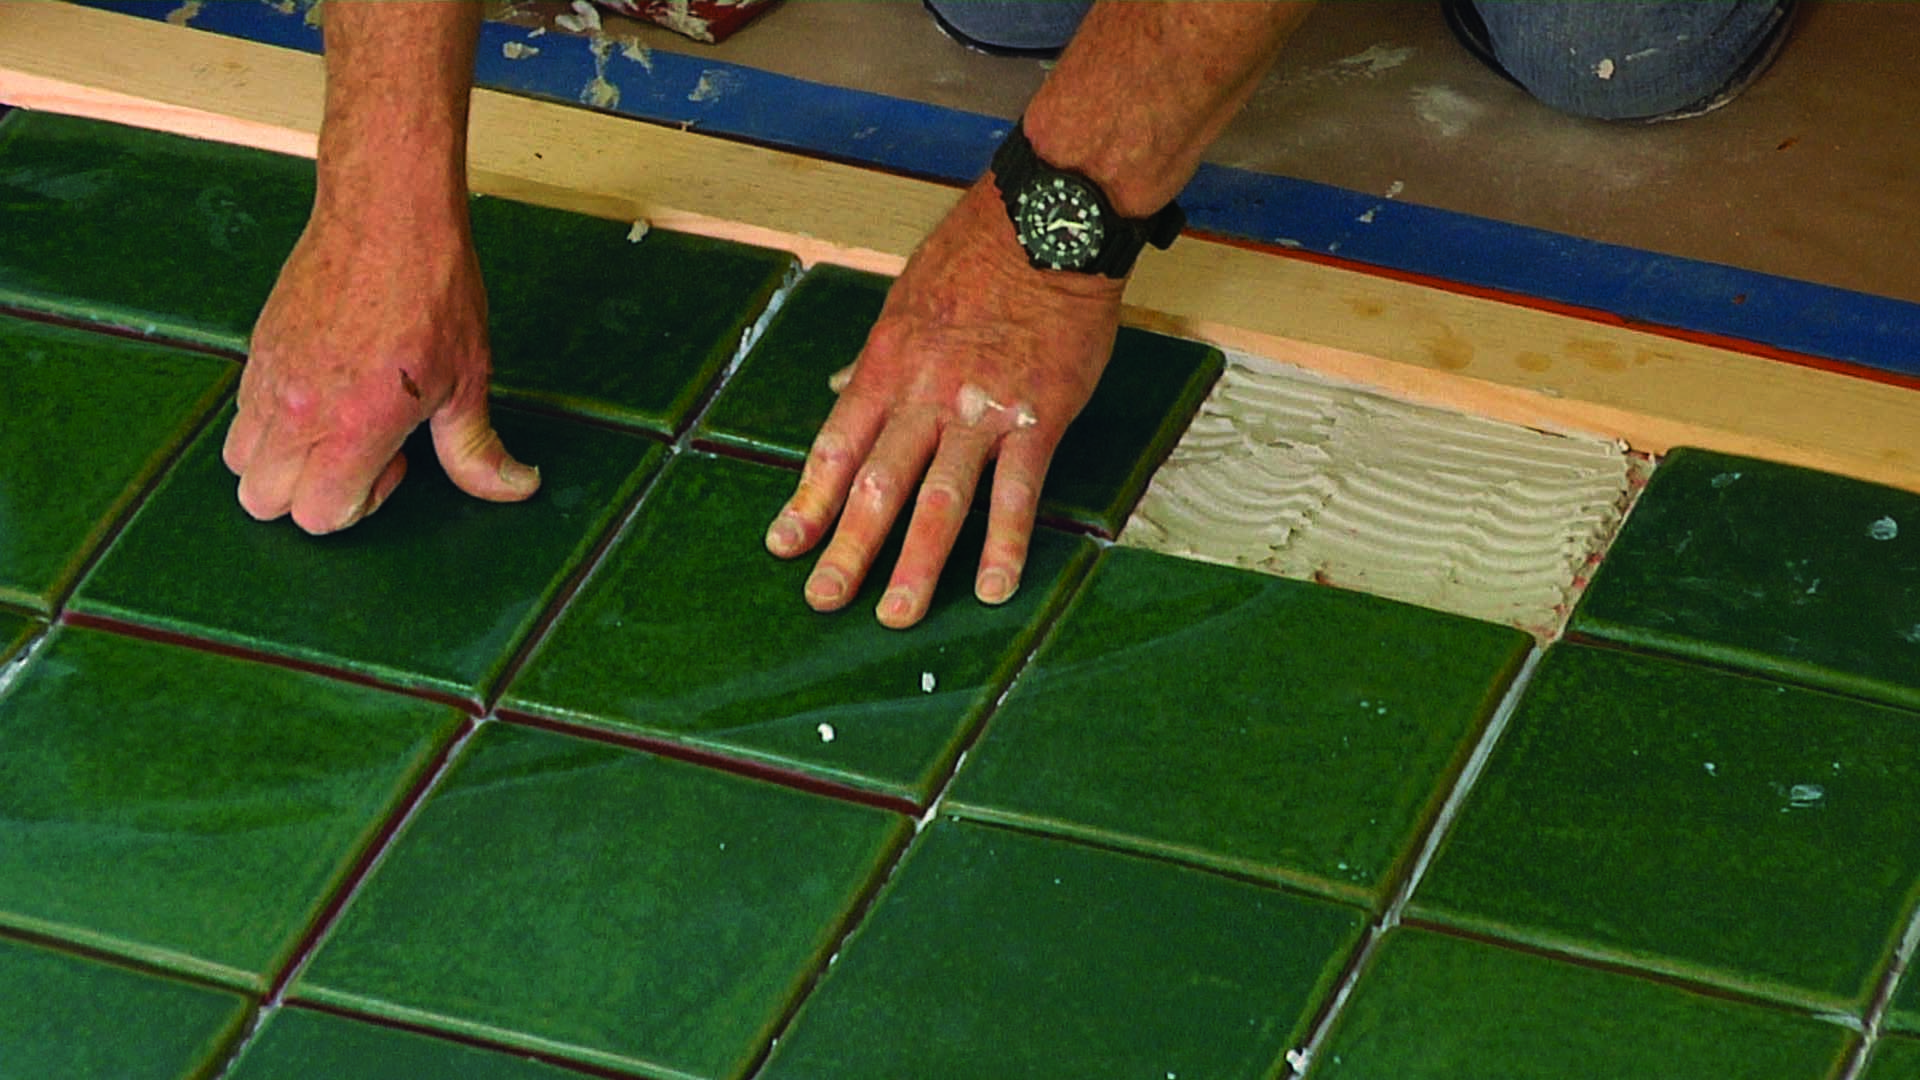
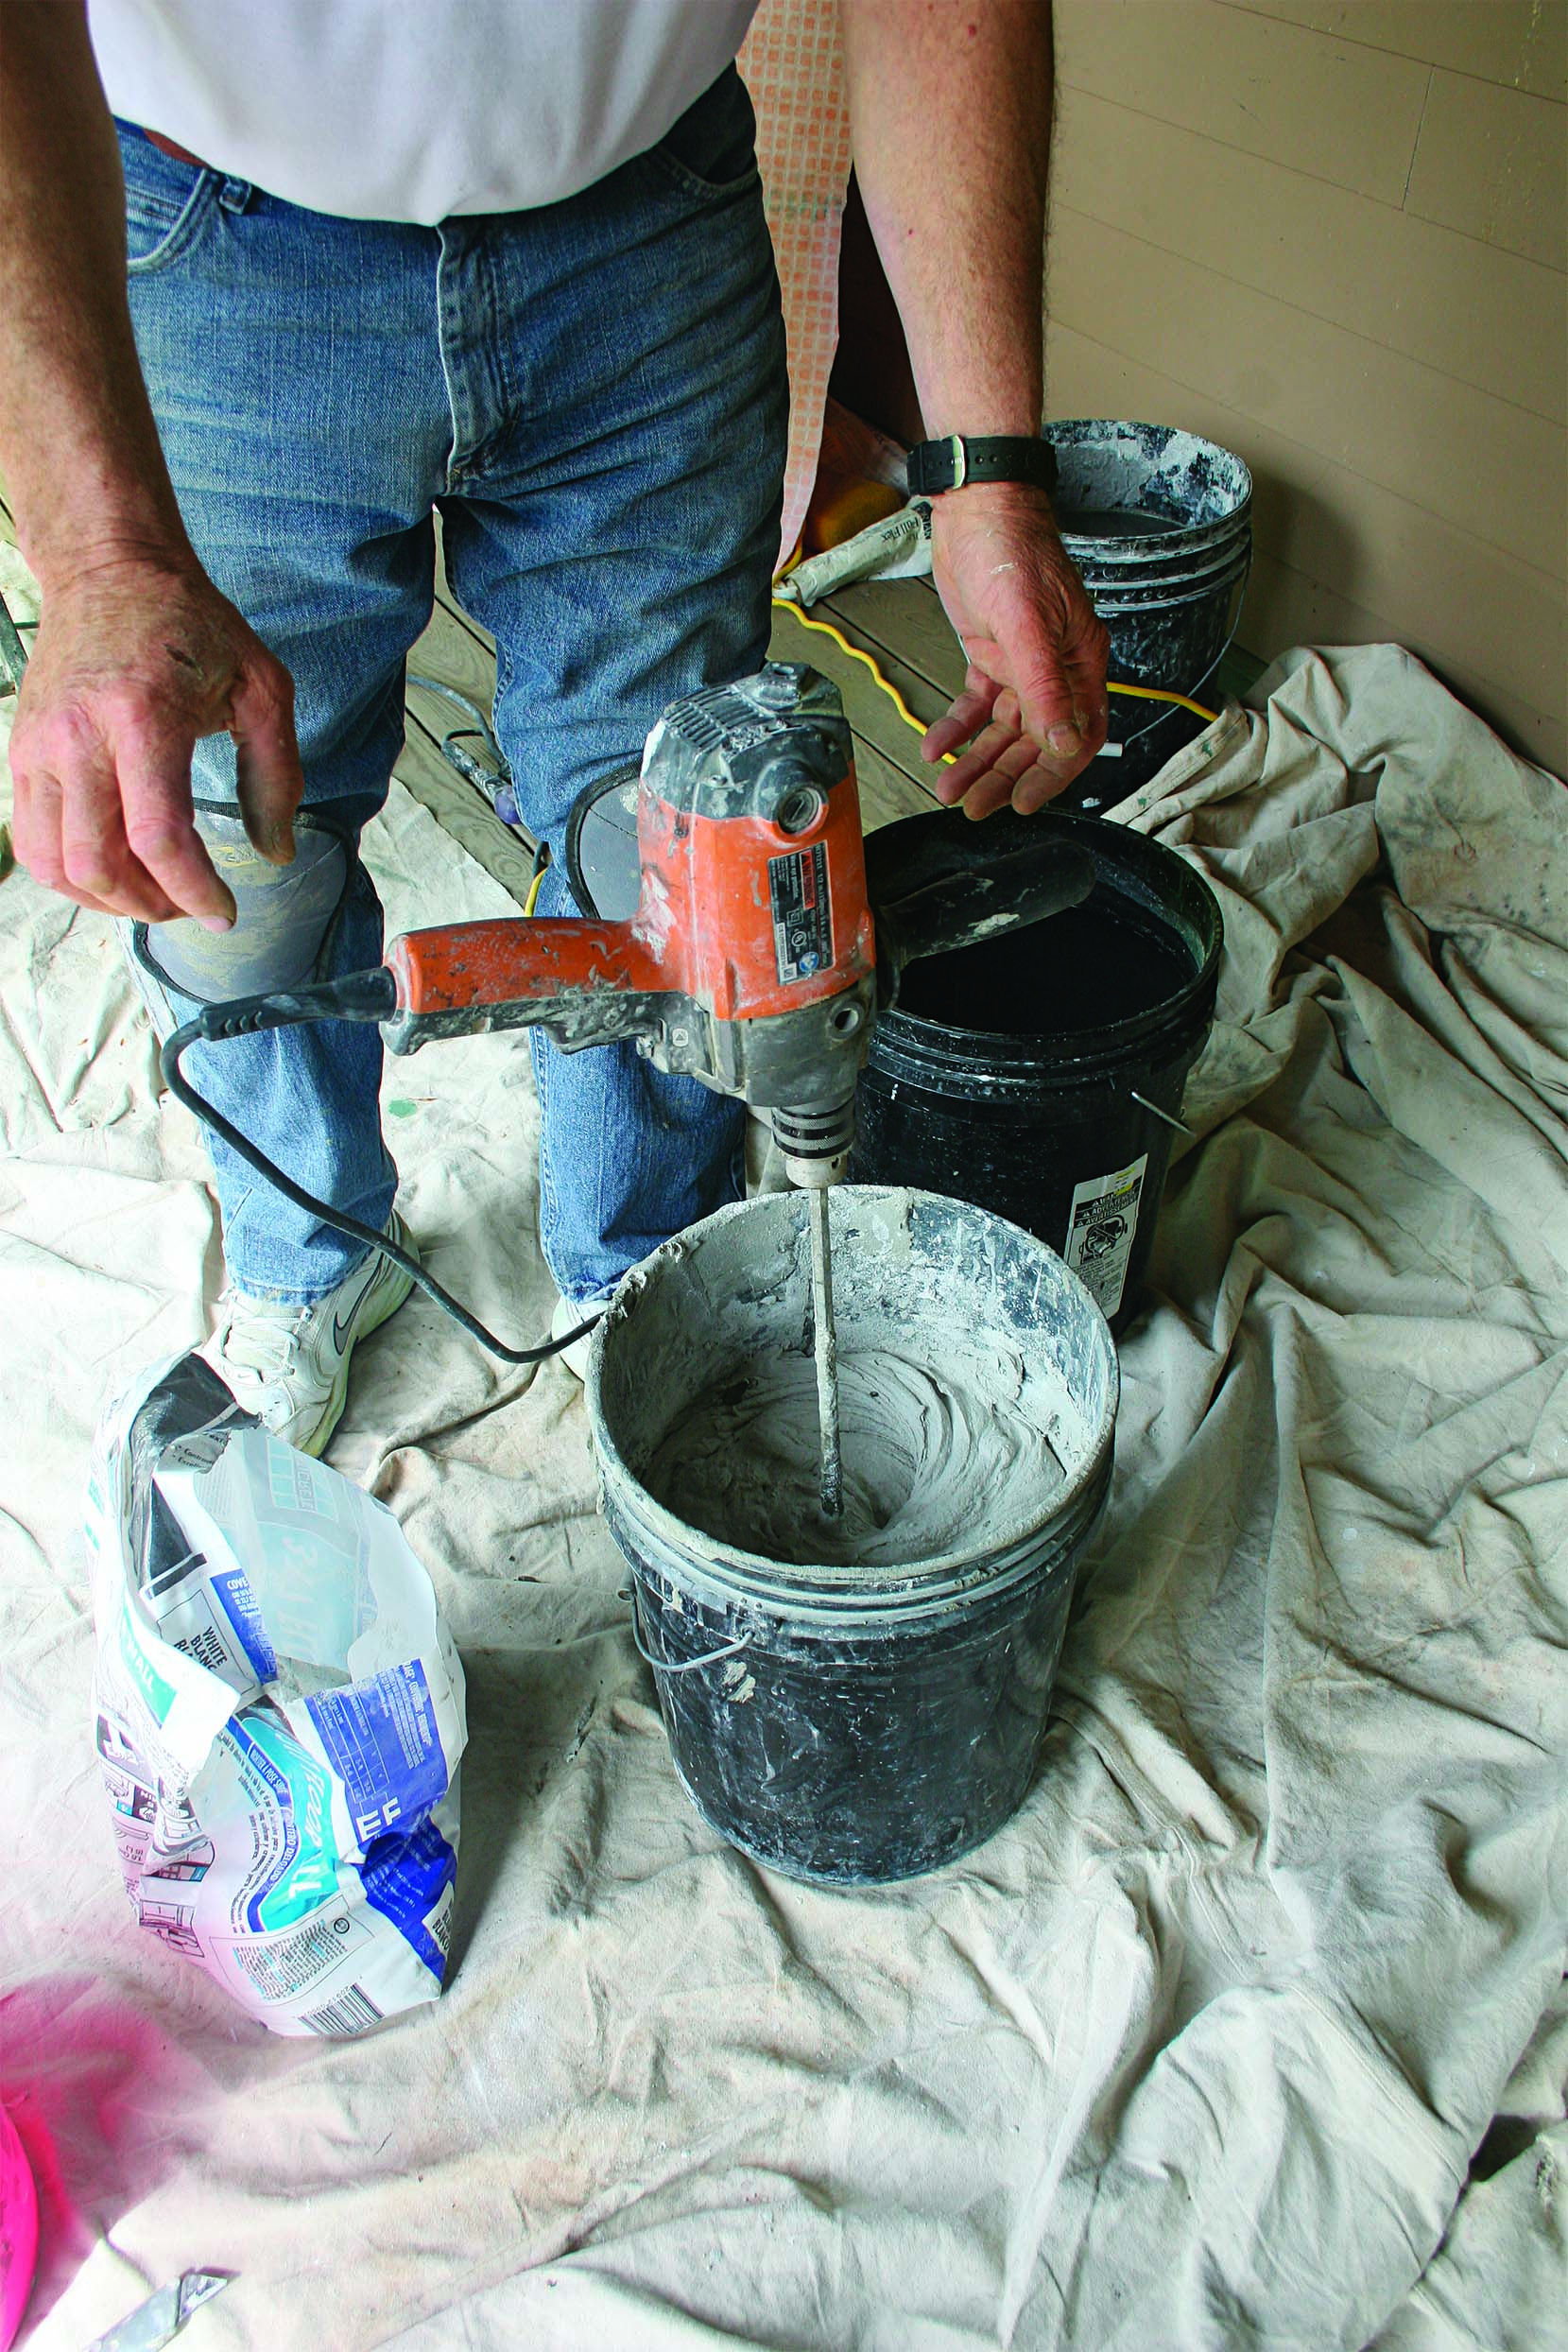
Install tile to stay stuck

You’ve taken the time to fully prepare the subfloor, so don’t get lazy with the thinset. there are different kinds of adhesives for different applications; for this project, unmodified thinset is ideal for bonding to the Ditra mat. It should be mixed so that it’s firm enough to hold a paddle mixer upright for a few seconds. You also need to match the type of trowel to the tile being installed. The slightly irregular 8×8 tiles installed on this job called for a 1⁄4-in. by 1⁄4-in. notched trowel, which helped fill in any voids in the back of the tile for a better bond.

setting the first tile
1. Set the first tile. After burnishing and combing the thinset as you did under the Ditra mat, set the first tile, pushing it firmly into the cement with a 1⁄4-in. sliding motion to ensure that it bonds well.

high-traffic tile floor layout
2. Mind the layout. Work in sections, spreading thinset in patches only as big as you can reach across while in a kneeling position. Stop the spread just shy of the marked lines so that you don’t cover them and lose track of the layout.

check tile bond
3. Check the bond. The best way to be sure that the tile has bonded well to the floor is to set one piece of tile and then pry it up to look at the backside. There should be even coverage of thinset across the back of the tile. Any missing spots mean that you’re either not using enough thinset or spreading the thinset with the wrong trowel.

mark cuts on the tile
4. Mark cuts directly on the tile. There’s no need for a tape measure when determining tile cuts. Just hold the piece above where it will be set, and mark one edge with a permanent marker.

use a tile saw for cuts
5. Use a tile saw for cuts. A score-and-snap cutter is great for straight cuts in ceramic tile; for anything more than that, you want a decent tile saw. If you do only a few tile jobs a year, it’s better to spend $40 to $60 to rent a good saw than $100 to buy a piece of junk.

no more than 1/4 inch gap between tiles
6. Mind the gap. The author aims for tiles to leave no more than a 1⁄4-in. gap where they meet the wall. Any more than that, and you’ll be wasting grout where it’s not needed and taking a risk that the baseboard molding will not conceal the gap.

Pro Tip: Not just any thinset will do. The thinset you use has to be compatible with the substrate you’re applying it to. The basic rules of thumb are to use latex-modified thinset with ply-wood or hardiebacker, and unmodified thinset with concrete or with cement backerboard.

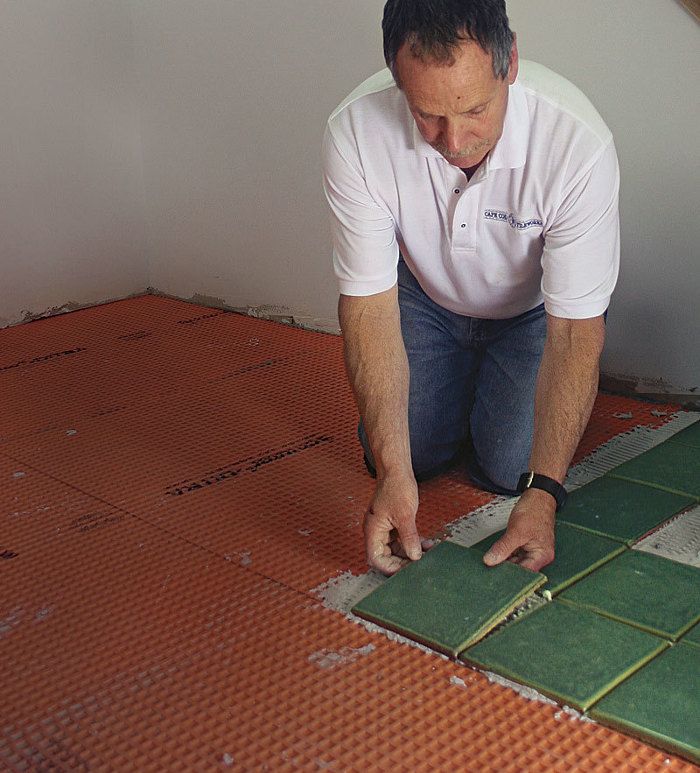
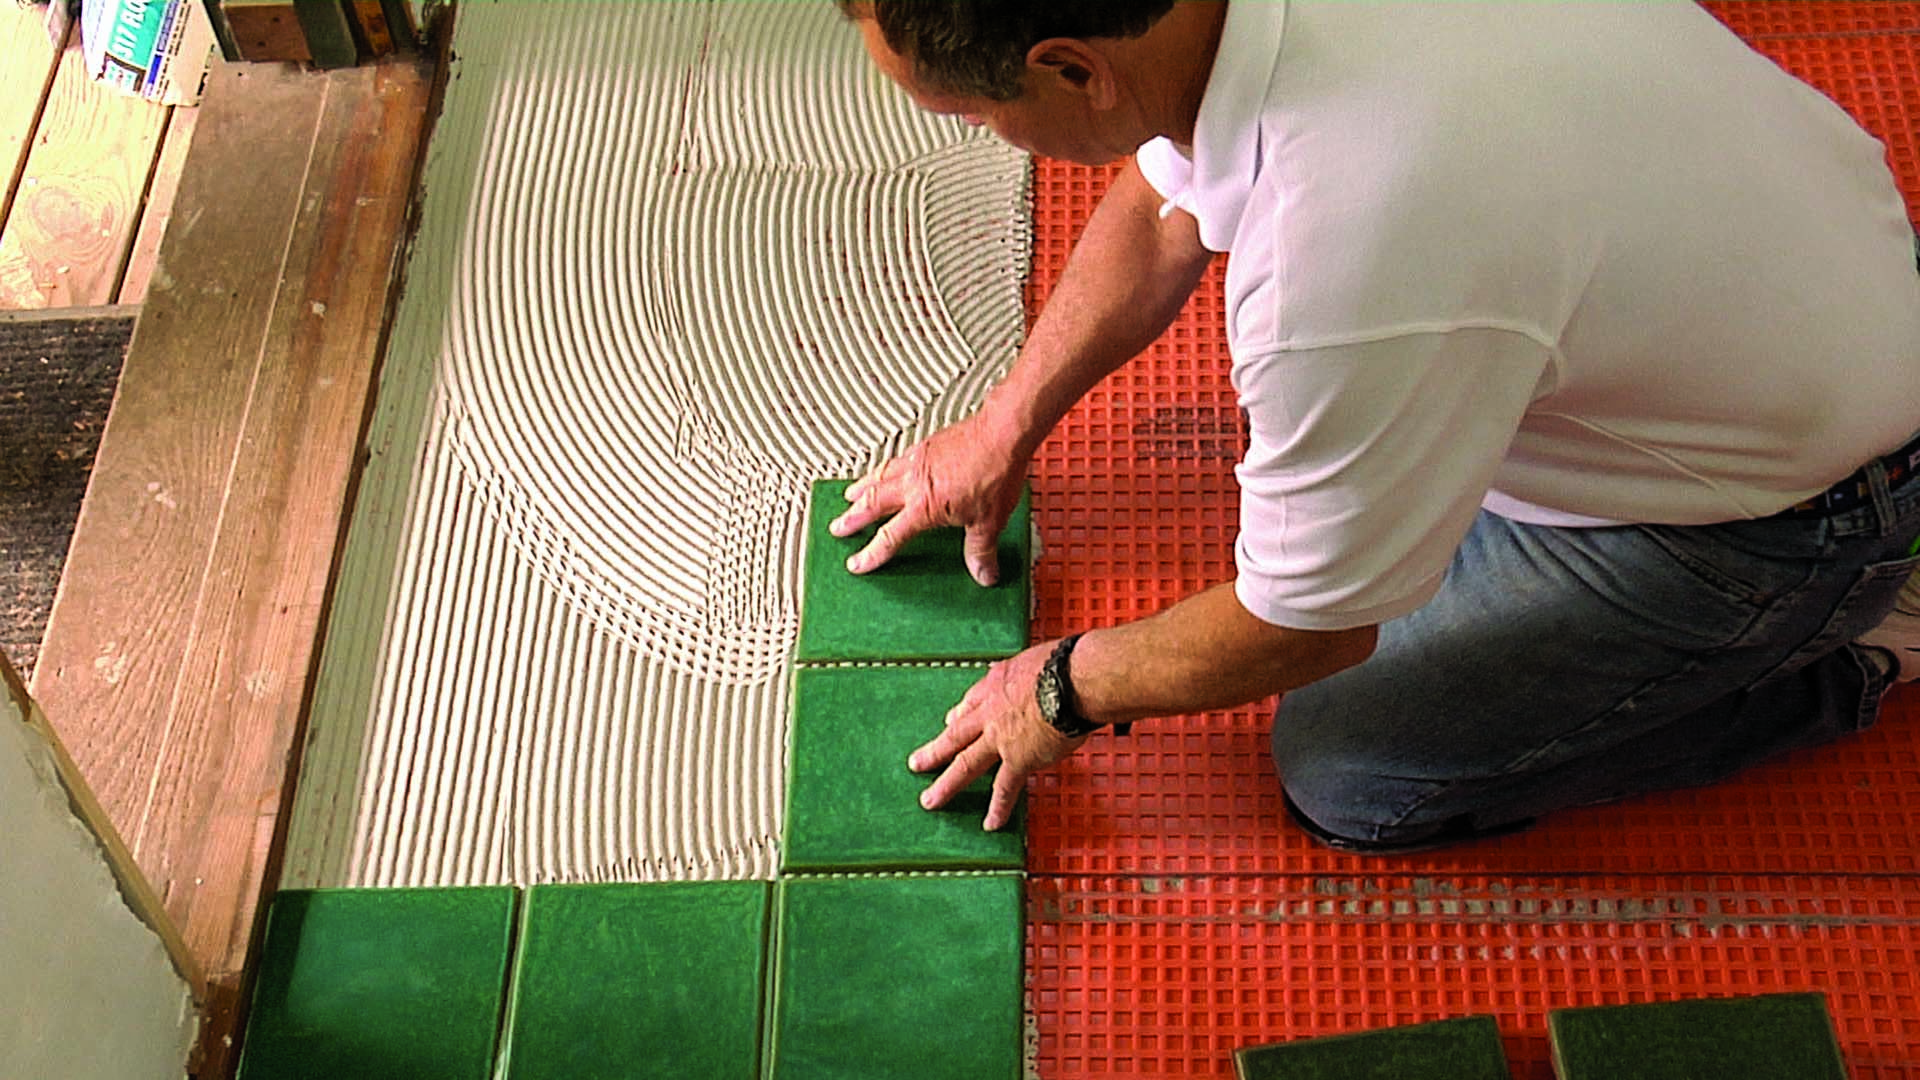
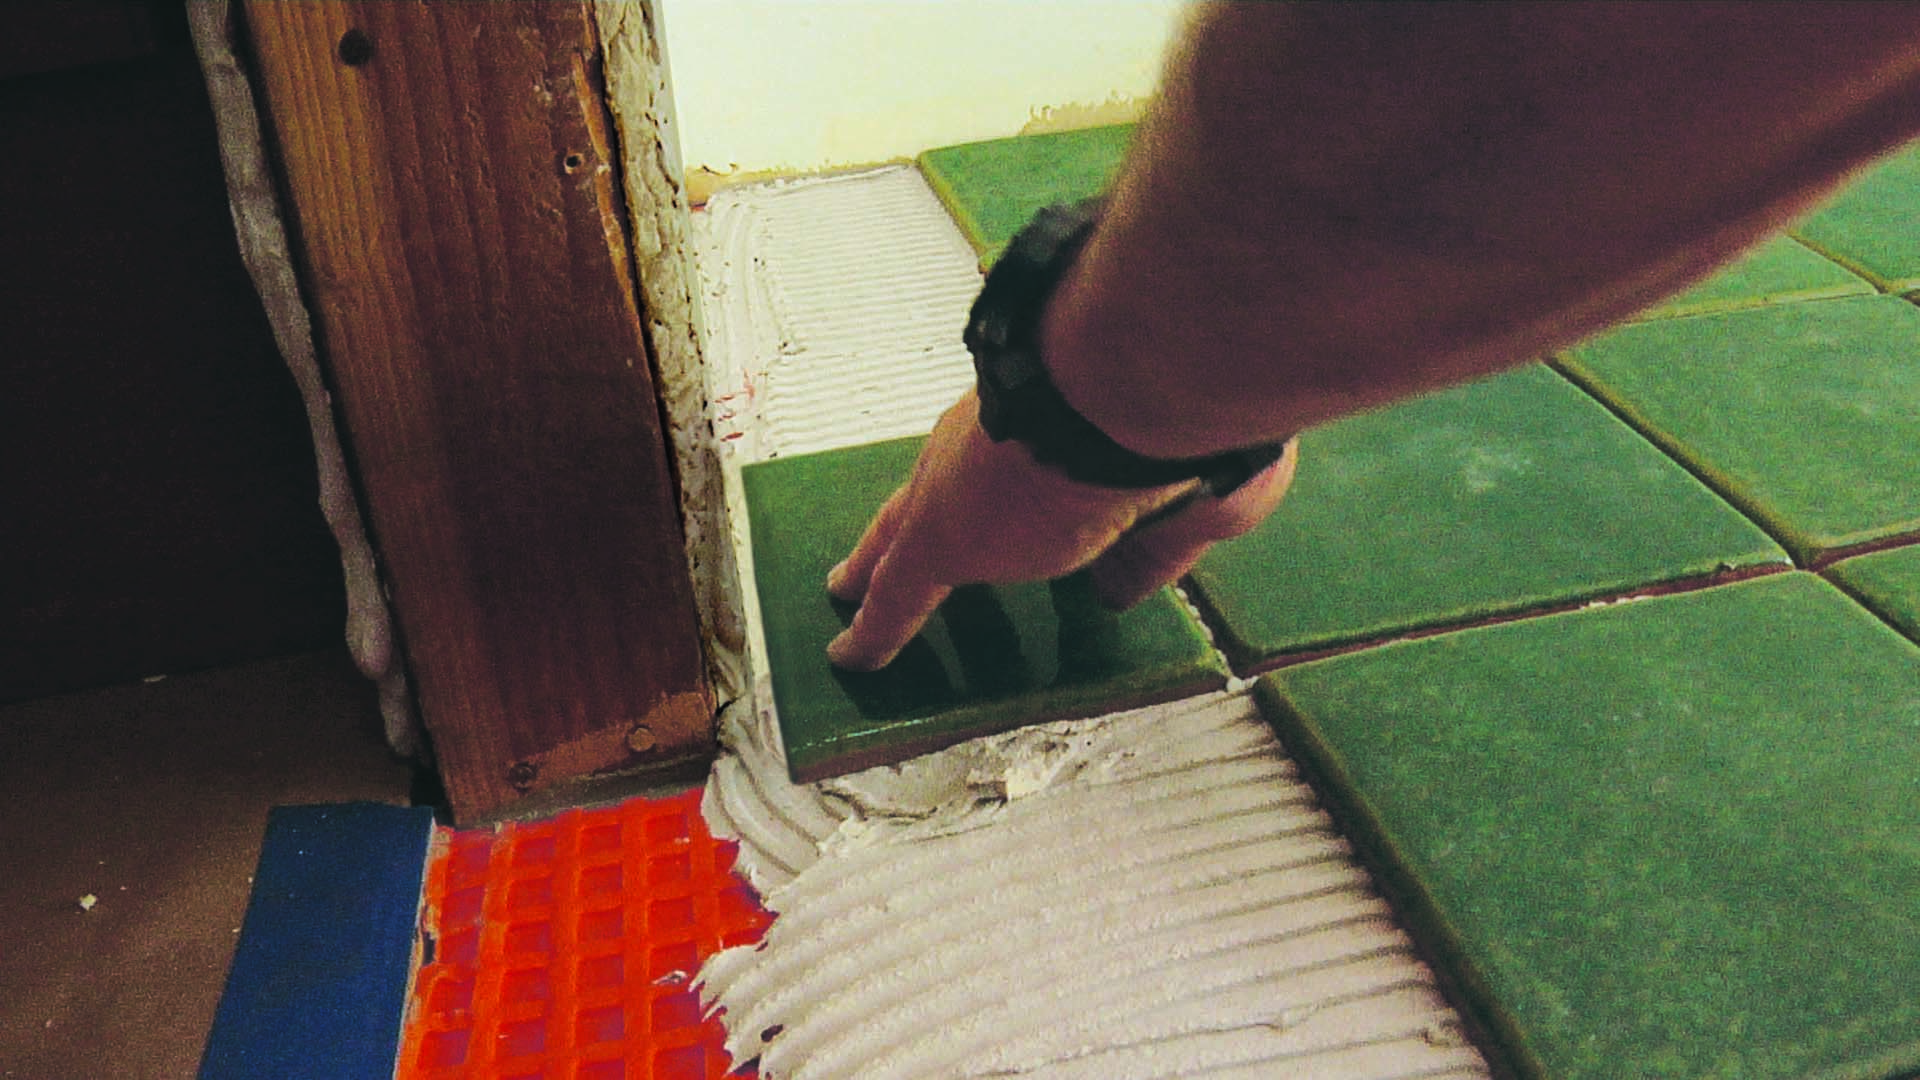
Work your way out of the room

With the layout locked in, the rest of the job is just a matter of keeping an eye on the grout joints and filling in tiles as you work your way toward an interior exit from the room. Every room is different, but you always want the last tiles you set to be the ones closest to a doorway or other exit.

high-traffic tile floor laying
Keep materials close at hand. To avoid a lot of up and down, keep a stack of tiles, a bucket of thinset, and a sponge nearby.

clean and seal high-traffic tile floor
Clean and seal as you go. You won’t be able to walk across the tile until the thinset has set up, so now is your chance to keep the surface neat. After laying tile in each section, wipe the surface with a tile sponge and as little water as possible, then apply a coat of sealer. The sealer is especially important when grouting stone tile or tile with a flat finish.

tile floor without spacers
Use your eye, not tile spacers. Some tile installers use temporary spacers to ensure a consistent layout, but with handmade tiles like these, the variations in size and squareness of each piece make the spacers useless. Lay a small section, then adjust the tiles until the joints look even. When you get to doorways, use a level or a piece of wood as a guide to ensure a straight edge.

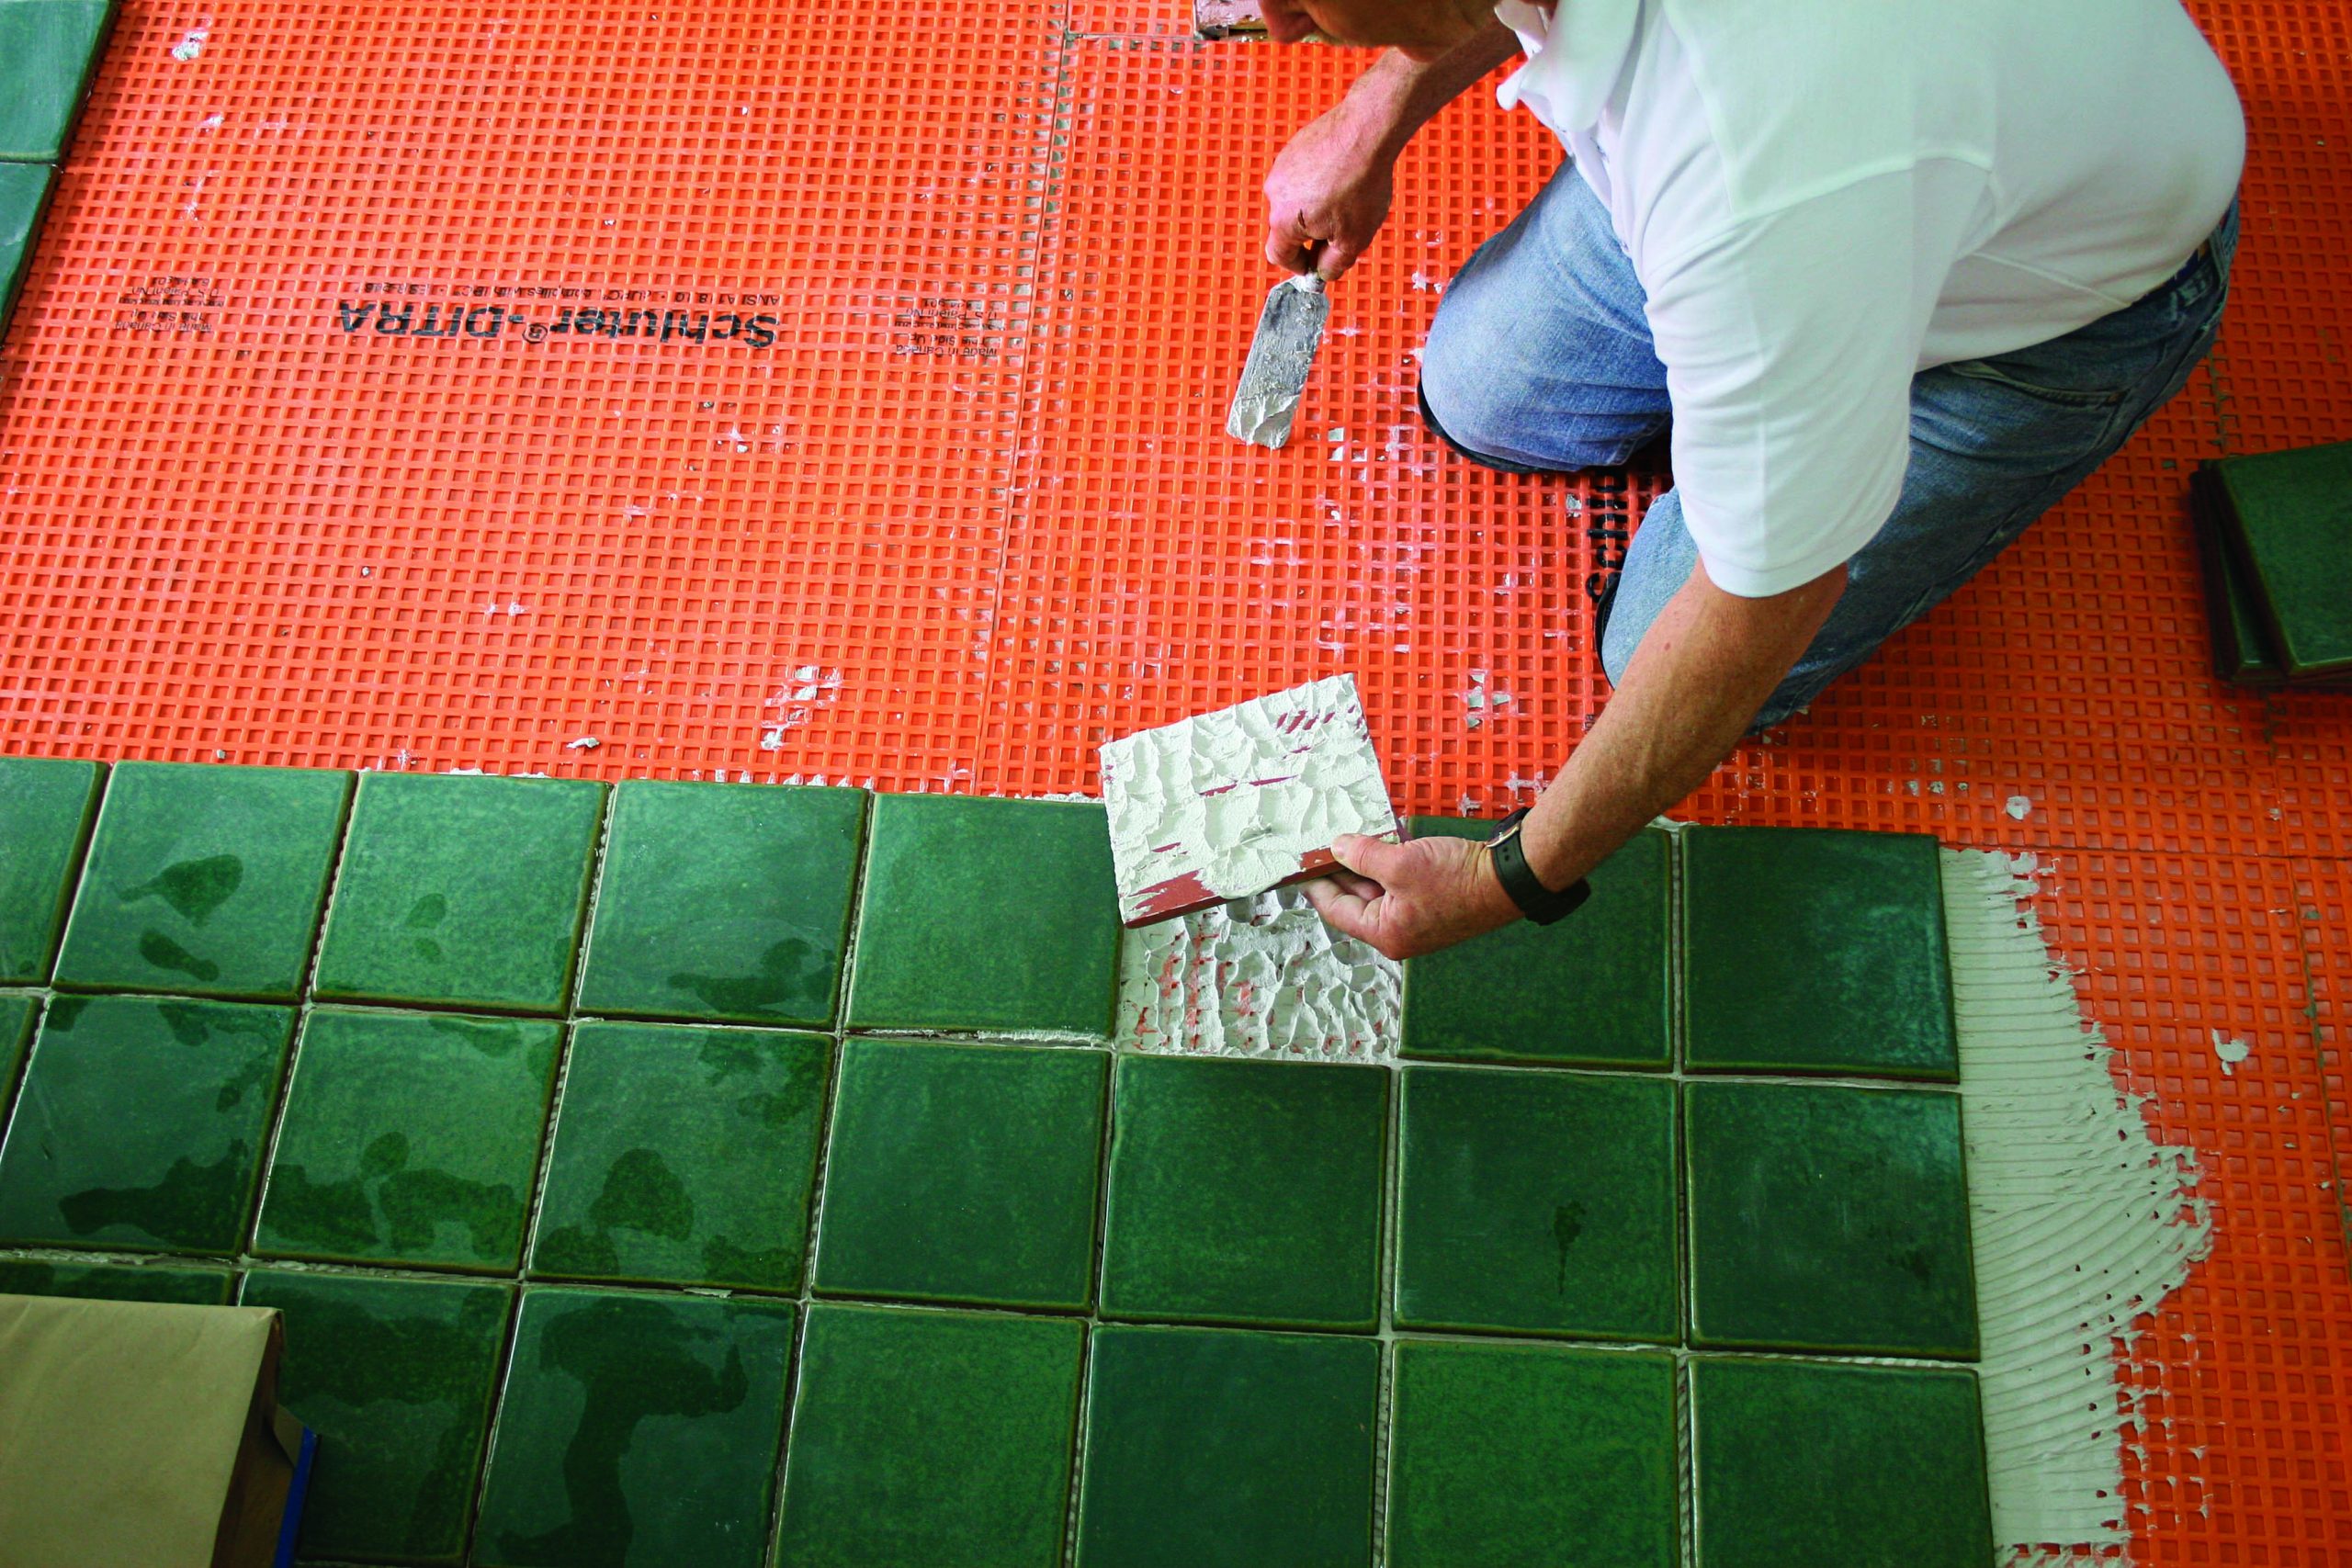
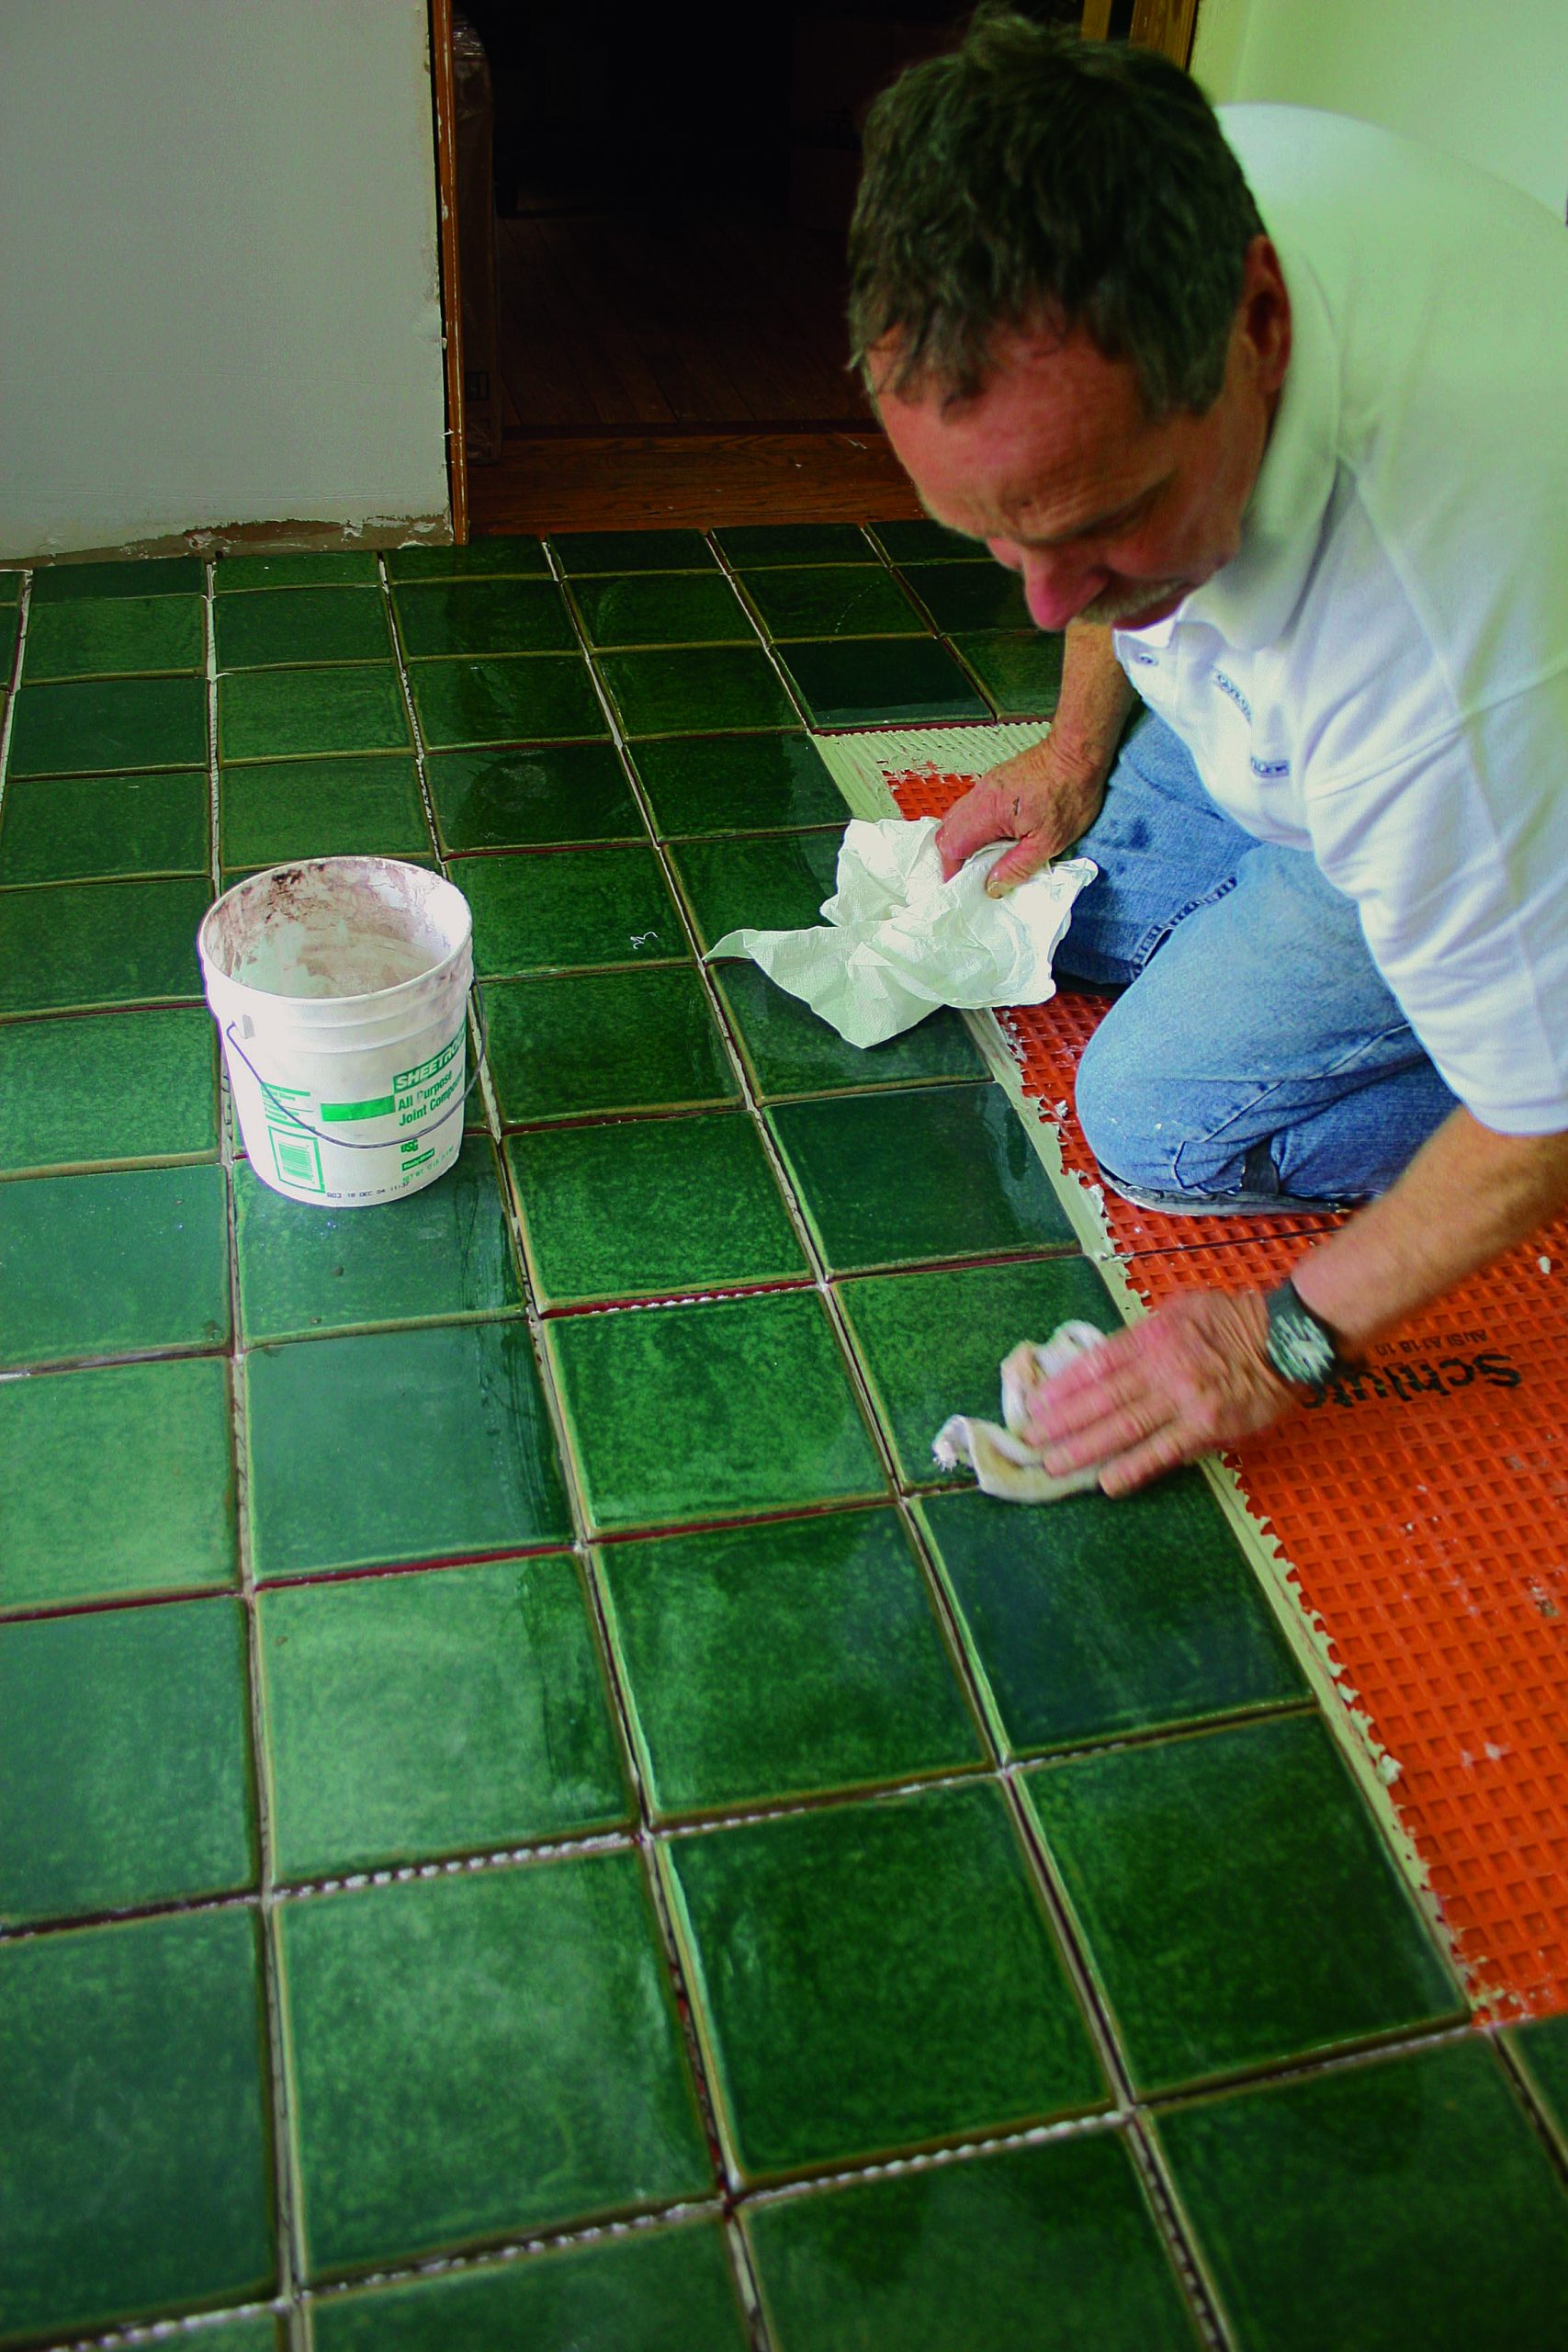
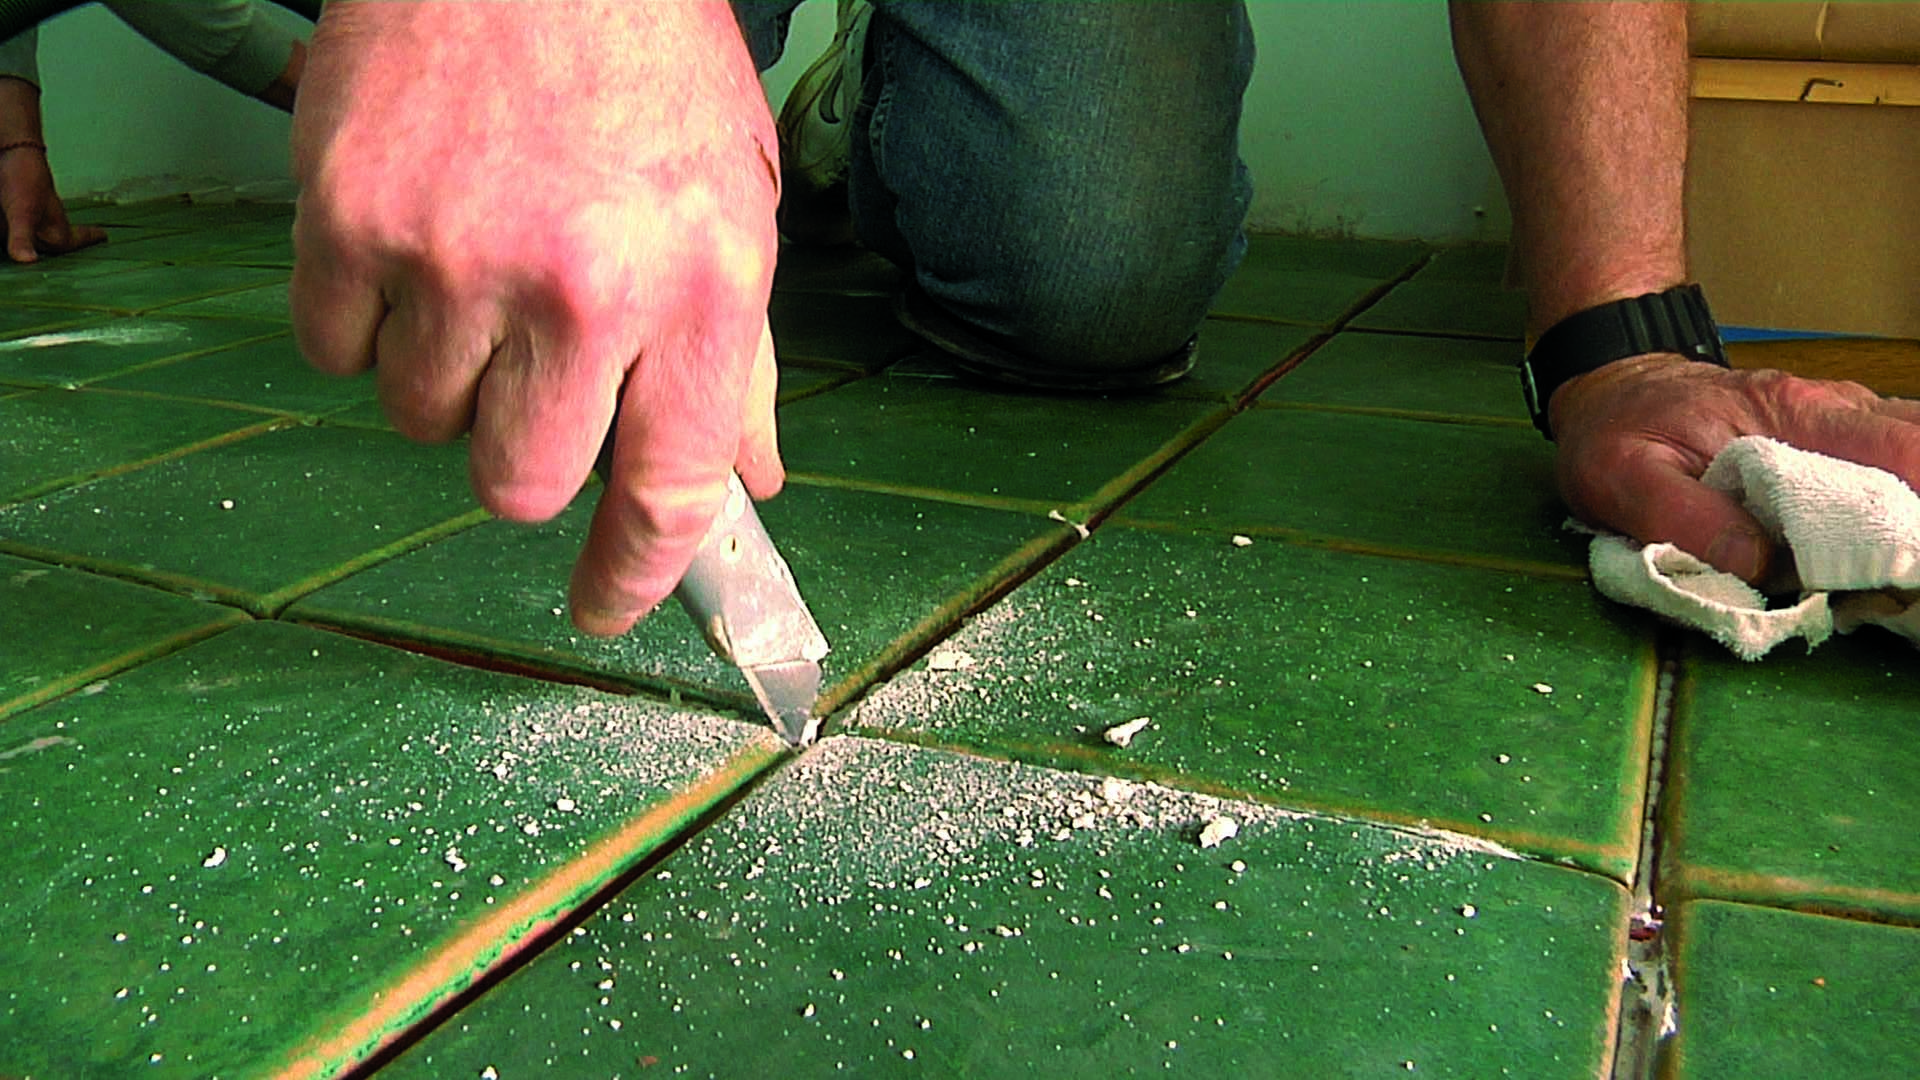
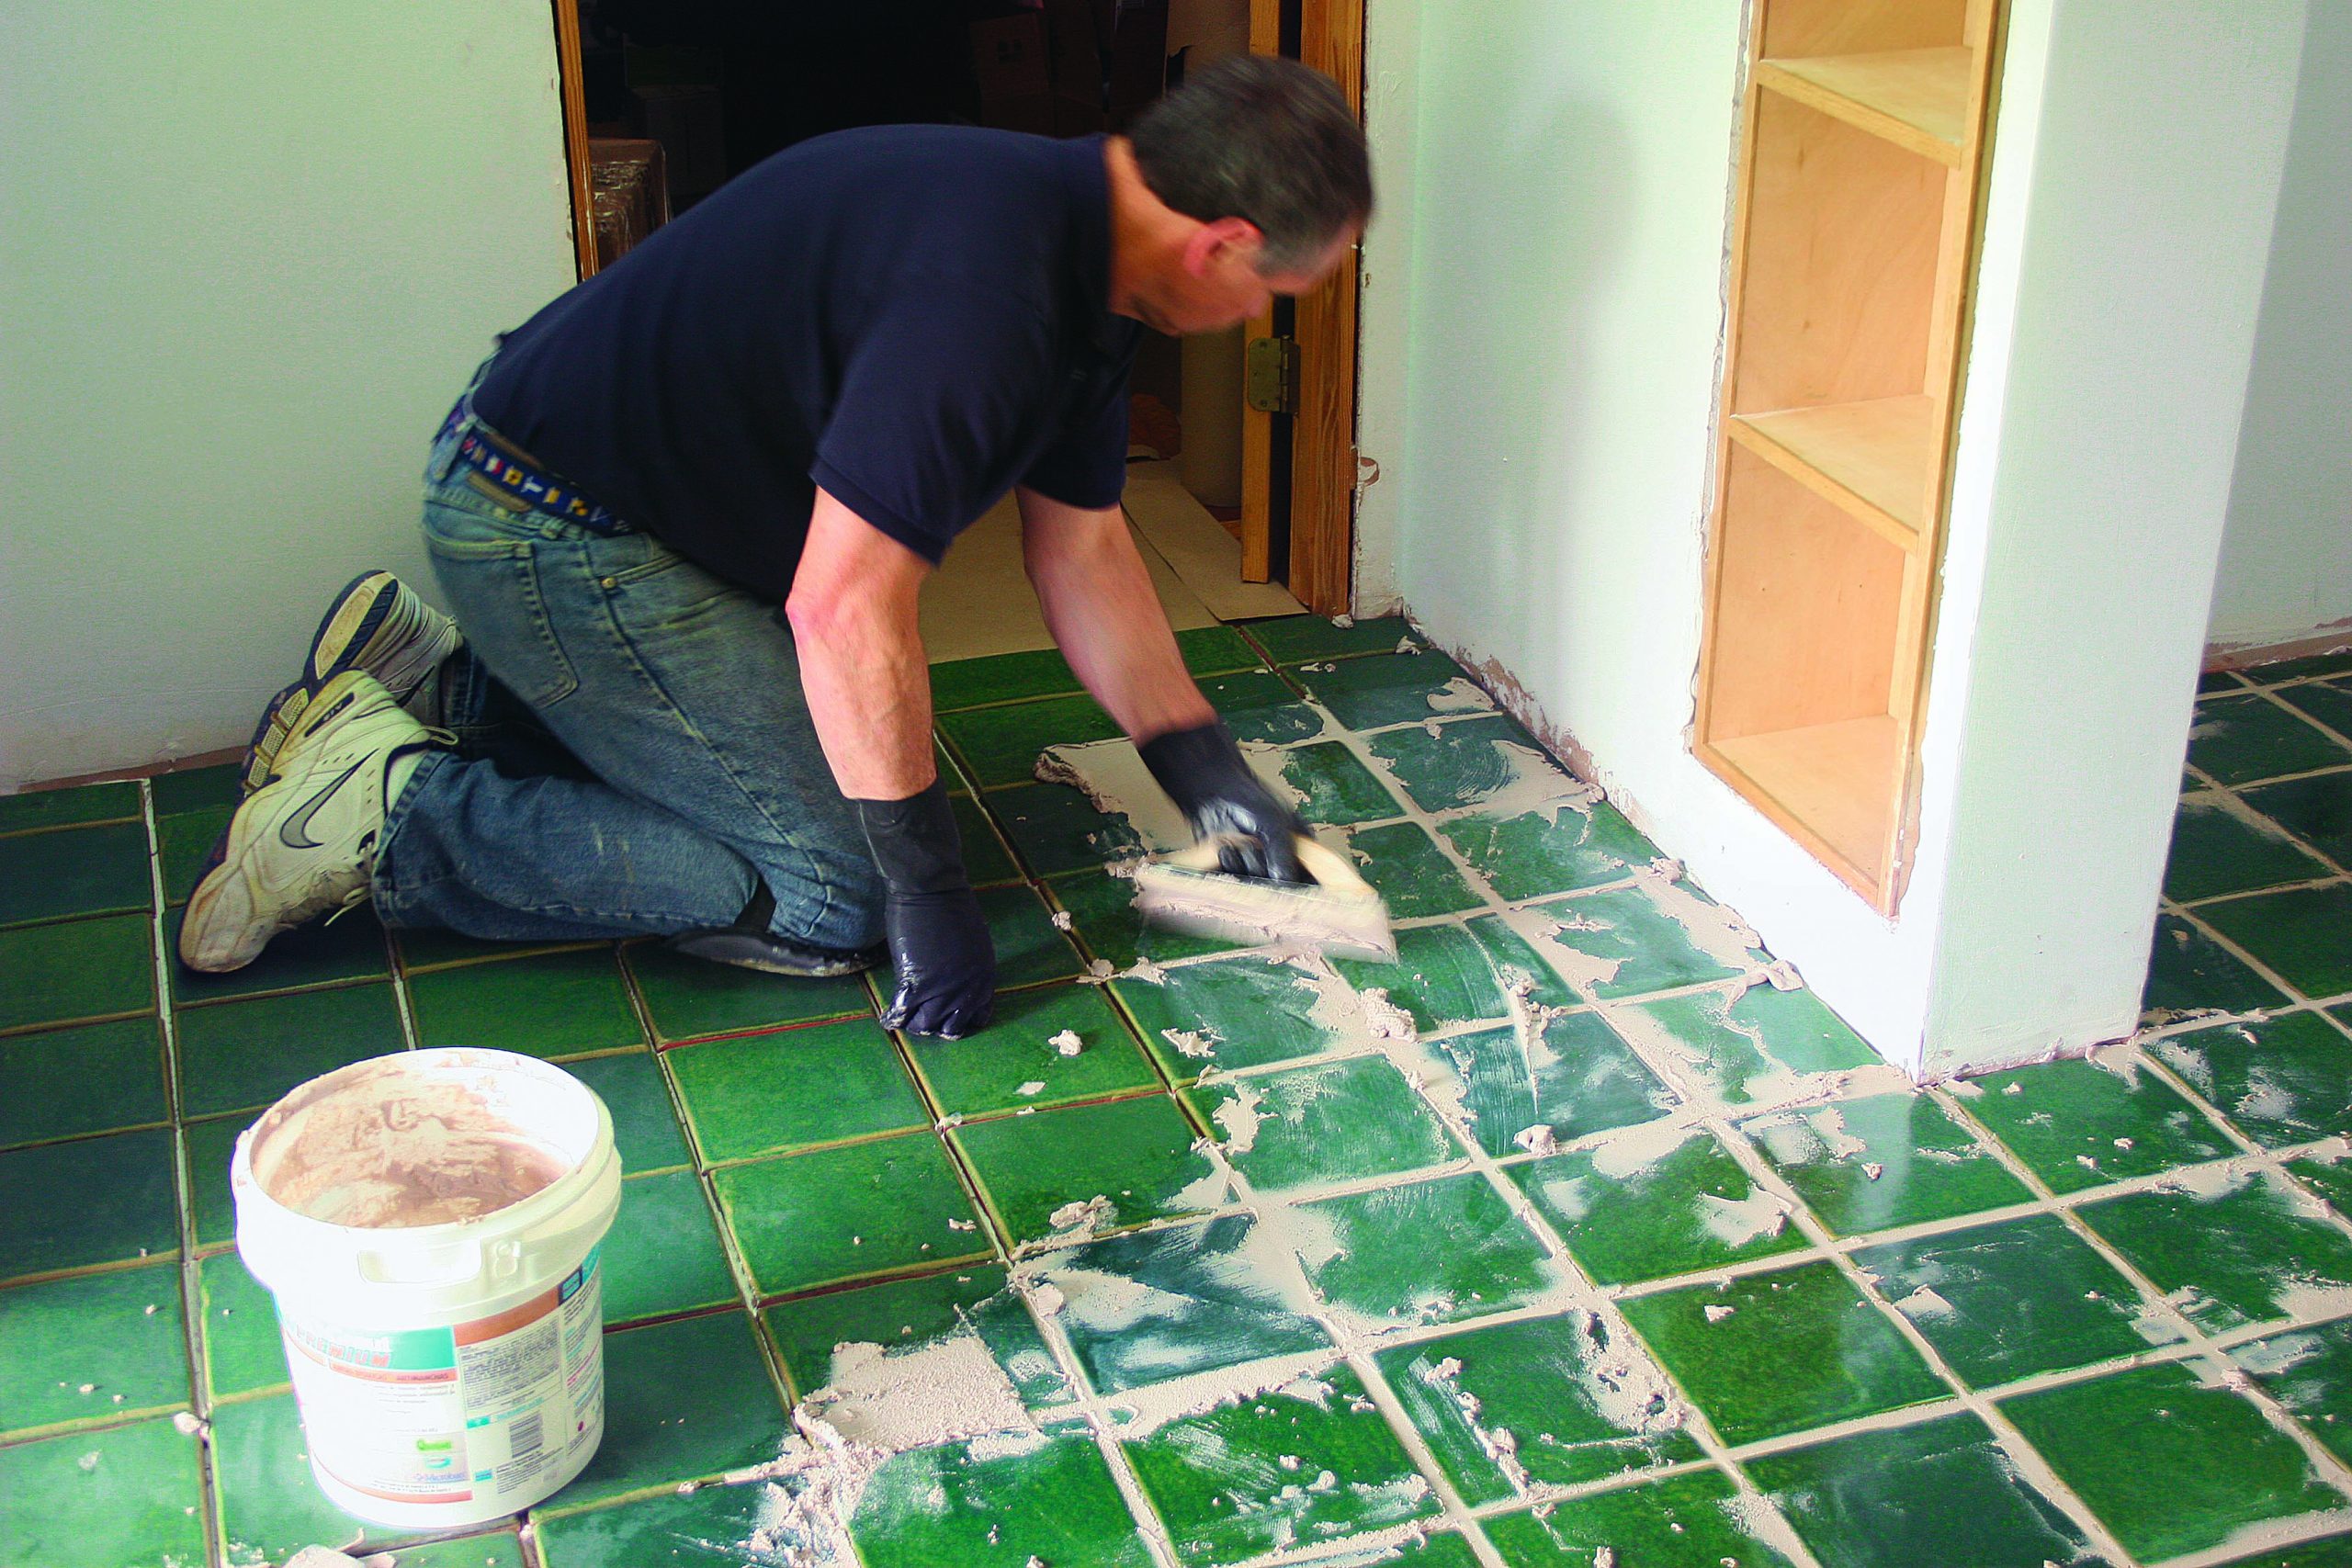
Finish strong with epoxy grout

The grouting process for epoxy is basically the same as with conventional grout—pack the joints firmly, but leave as little excess as possible—only the stakes are a bit higher. You need to work quickly and clean off excess grout thoroughly before it sets up, being mindful that setup time can vary based on temperature. Once the grout sets up, it sets up for good.

clear for grout on high-traffic tile floor
1. Clear the way for grout. The next day, after the thinset has hardened, use a utility knife to loosen any chunks of cement from between tiles, and then vacuum the whole floor.

grout mixing for tile floor
2. Know the ABCs of mixing. Combine part A and part B, the pouches of liquid epoxy, in a clean bucket. Mix the two liquids together with a margin trowel, and then add part C, the carton of colored filler.

spread grout for high-traffic floor
3. Take the right angles of attack. Spread the grout, and push it into the tile joints using a premium quality rubber float held at a 30° angle to the floor. After switching the float angle to 60°, scrape off the excess, being careful not to dig into the side of the joints.

clean and shine high-traffic tile floor
4. Clean and shine. The grout kit includes two packets of powder that are added to water to create a cleaning solution. About 15 to 20 minutes after the grout has been applied, use the first solution and a thoroughly wrung-out sponge to clean off the remaining residue. Follow up with the second cleaning solution, and finish by buffing away any haze with a lint-free cloth.

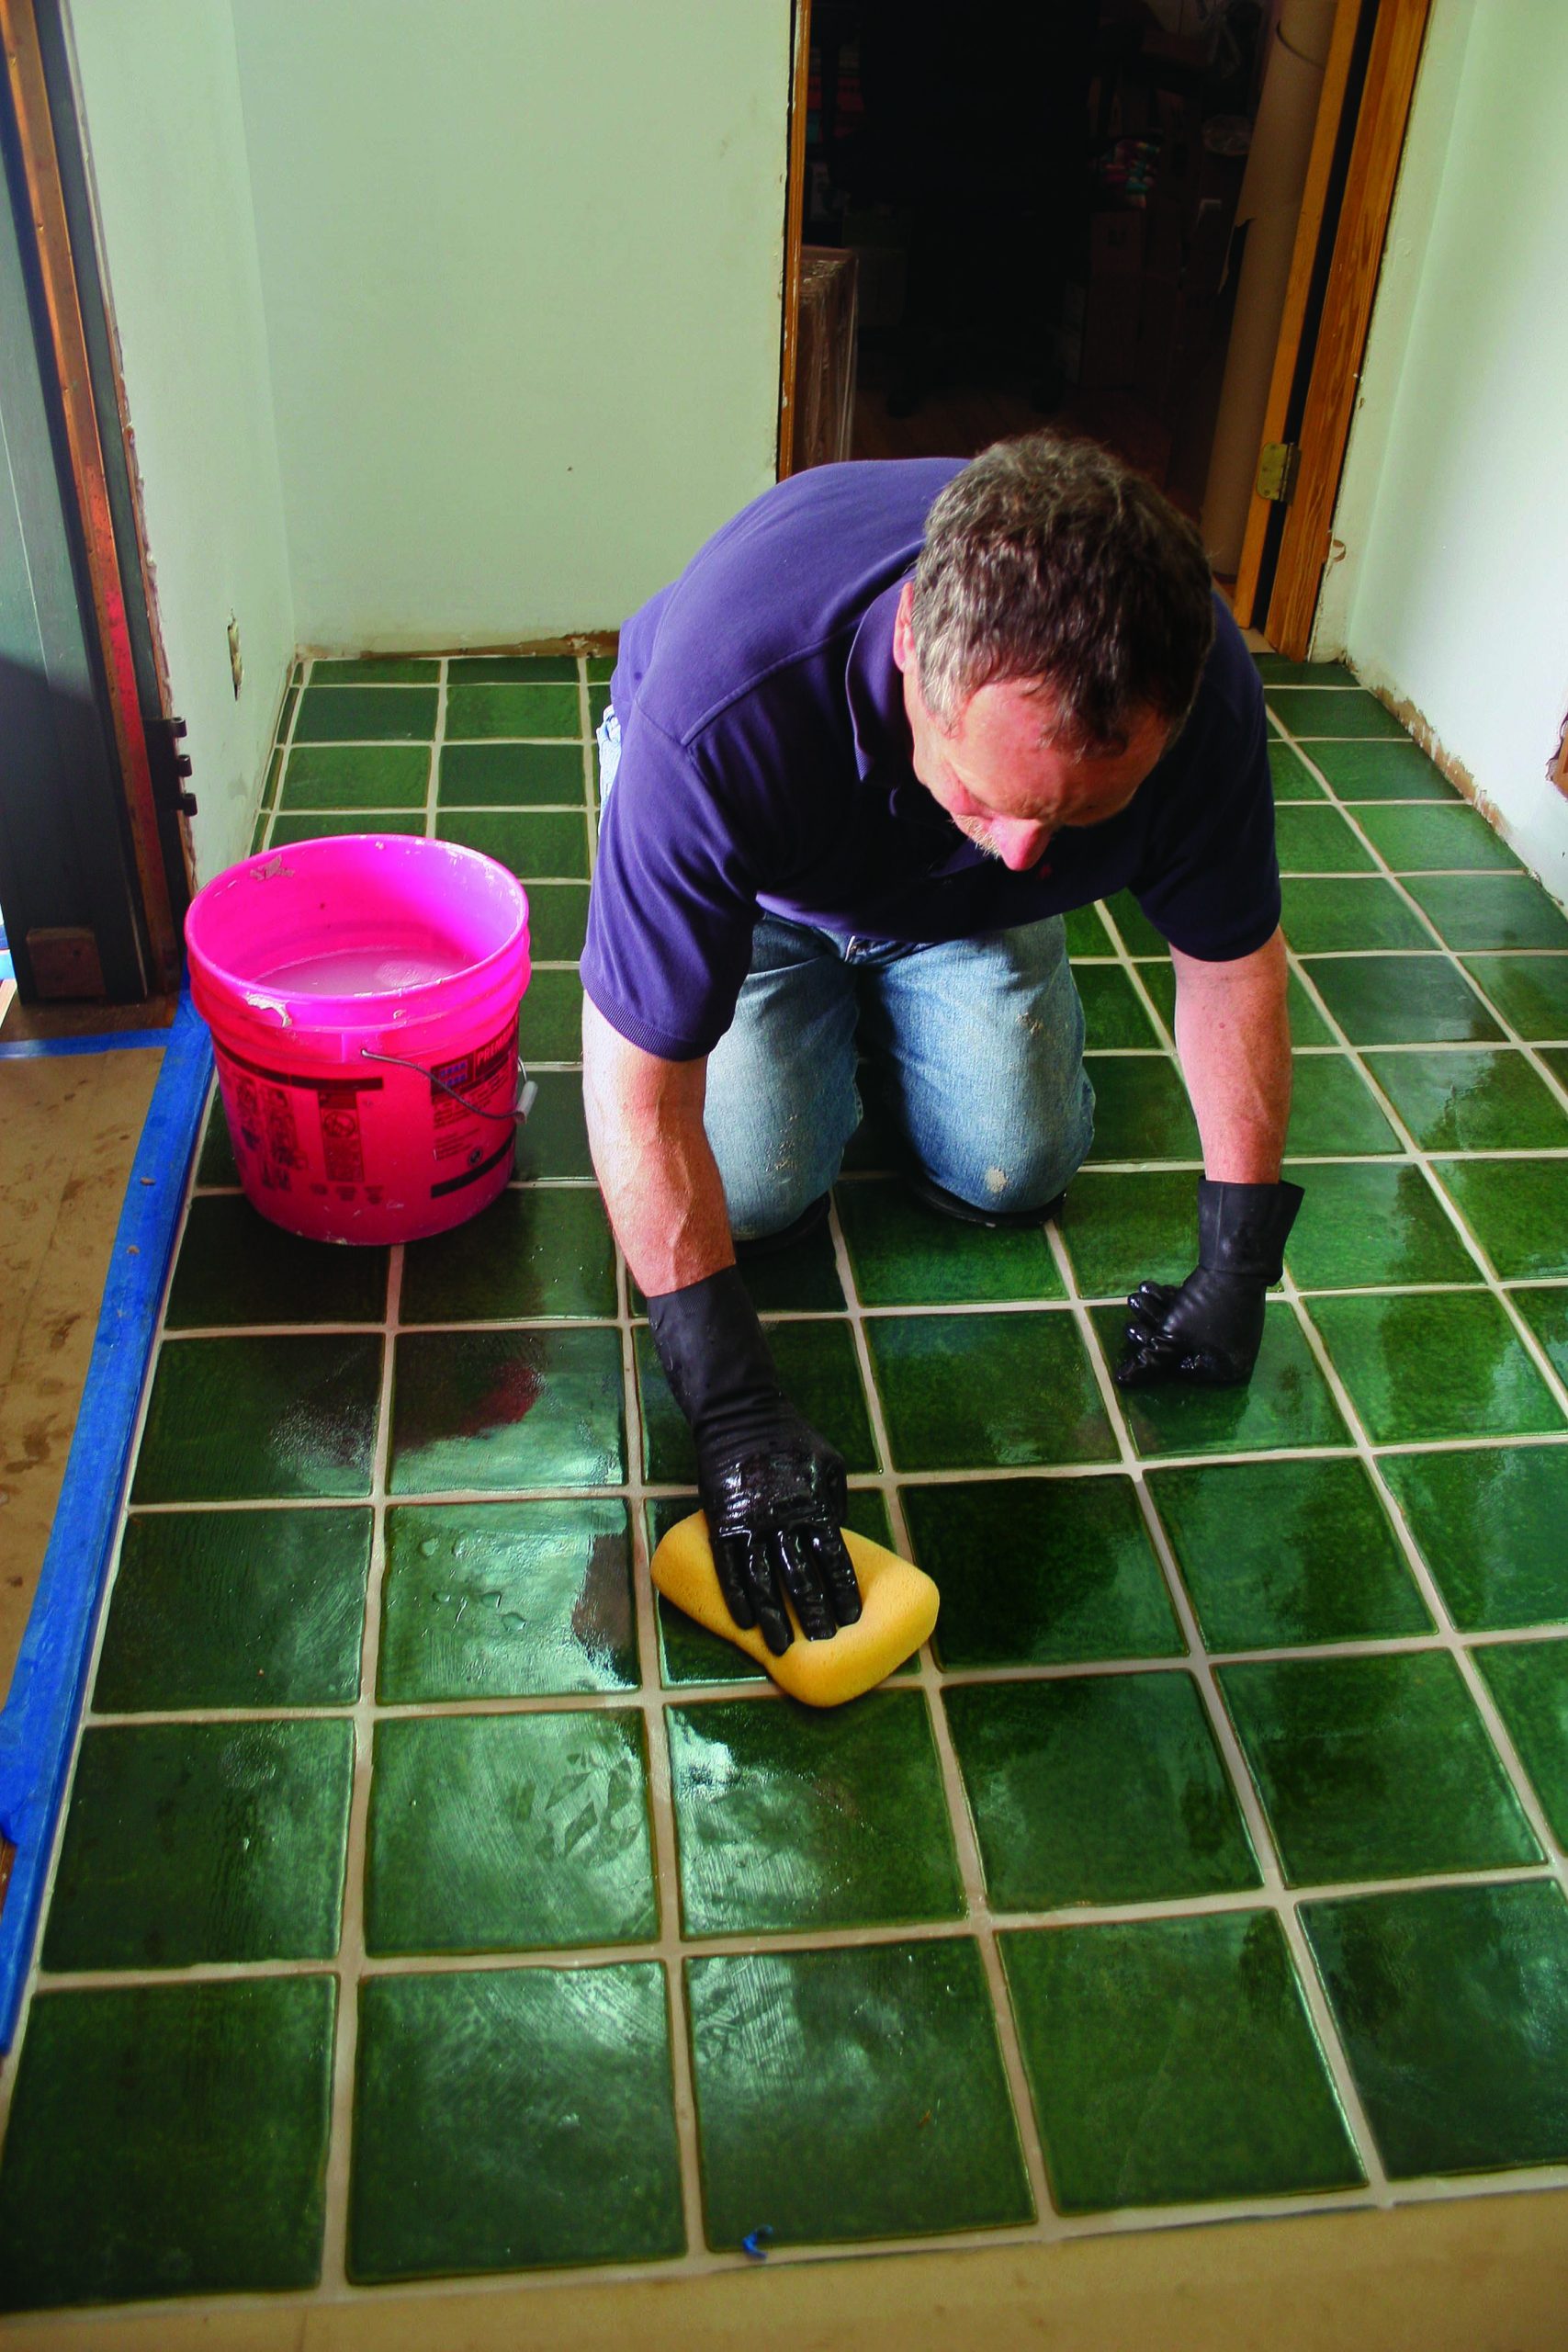
Pro Tip: Don’t grout more than you can clean. I find Laticrete’s por–tioned kits of spectralock epoxy to be the most user-friendly. Don’t try to mix several batches at once, though, or you’ll risk the first parts setting up before you’ve had a chance to wipe them clean. Instead, mix, spread, and clean one batch at a time.

From Fine Homebuilding #245

View PDF
Previous: Foyer Tile Installation, Part 3: Applying Epoxy Grout Next: Tiling a Large Floor Area

Guide

Tiling

Chapter

Tiling Floors

Sign up for eletters today and get the latest how-to from Fine Homebuilding, plus special offers.

Signing you up...

This site is protected by reCAPTCHA and the Google Privacy Policy and Terms of Service apply.
See all newsletters
See all newsletters

Log in or create an account to post a comment.

Sign up Log in

Become a member and get full access to FineHomebuilding.com

Tiling

Tiling

Trusted, comprehensive guidance from the pros for a great-looking tile job in any room of the house

View Project Guide

View All Project Guides »

Become a member and get unlimited site access, including the Tiling Project Guide.

Start Free Trial

Selecting Tile
  • The Basics
  • Tile Options
Tools & Techniques
  • Job-Preparation Tools
  • Cutting Tiles
  • Setting & Grouting Tools
Installation Materials
  • Membranes & Substrates
  • Adhesives & Mortars
  • Grout
  • Sealers & Caulk
  • Spacers, Hardware & Trim
Preparation
  • The Prep Job
  • Repairs & Surface Prep
  • Installing Backerboard
Tiling Floors
  • Layout & Installation
  • Setting Specialty Tiles
Tiling Walls & Backsplashes
  • Preparation
  • Backsplashes
  • Walls
Tiling Showers
  • Tile Shower Basics
  • Waterproofing
  • Shower Pans
  • Shower Drains
  • Shower Niches
  • Video Series: Tile a Shower
  • Video Series: Tile a Barrier-Free Bathroom
Grouting, Sealing & Caulking
  • Grouting
  • Caulking
  • Sealing
Maintenance & Repair
  • Maintenance
  • Tile Repair
  • Grout Repair

Fine Home Building

Newsletter Sign-up

  • Fine Homebuilding

    Home building tips, offers, and expert advice in your inbox.

  • Green Building Advisor

    Building science and energy efficiency advice, plus special offers, in your inbox.

  • Old House Journal

    Repair, renovation, and restoration tips, plus special offers, in your inbox.

Signing you up...

This site is protected by reCAPTCHA and the Google Privacy Policy and Terms of Service apply.
See all newsletters

Follow

  • Fine Homebuilding

    Dig into cutting-edge approaches and decades of proven solutions with total access to our experts and tradespeople.

    Start Free Trial Now
    • Facebook
    • Instagram
    • X
    • LinkedIn
  • GBA Prime

    Get instant access to the latest developments in green building, research, and reports from the field.

    Start Free Trial Now
    • Facebook
    • YouTube
  • Old House Journal

    Learn how to restore, repair, update, and decorate your home.

    Subscribe Now
    • Facebook
    • Instagram
    • X

Membership & Magazine

  • Online Archive
  • Start Free Trial
  • Magazine Subscription
  • Magazine Renewal
  • Gift a Subscription
  • Customer Support
  • Privacy Preferences
  • About
  • Contact
  • Advertise
  • Careers
  • Terms of Use
  • Site Map
  • Do not sell or share my information
  • Privacy Policy
  • Accessibility
  • California Privacy Rights

© 2025 Active Interest Media. All rights reserved.

Fine Homebuilding receives a commission for items purchased through links on this site, including Amazon Associates and other affiliate advertising programs.

  • Home Group
  • Antique Trader
  • Arts & Crafts Homes
  • Bank Note Reporter
  • Cabin Life
  • Cuisine at Home
  • Fine Gardening
  • Fine Woodworking
  • Green Building Advisor
  • Garden Gate
  • Horticulture
  • Keep Craft Alive
  • Log Home Living
  • Military Trader/Vehicles
  • Numismatic News
  • Numismaster
  • Old Cars Weekly
  • Old House Journal
  • Period Homes
  • Popular Woodworking
  • Script
  • ShopNotes
  • Sports Collectors Digest
  • Threads
  • Timber Home Living
  • Traditional Building
  • Woodsmith
  • World Coin News
  • Writer's Digest
Active Interest Media logo
X
X
This is a dialog window which overlays the main content of the page. The modal window is a 'site map' of the most critical areas of the site. Pressing the Escape (ESC) button will close the modal and bring you back to where you were on the page.

Main Menu

  • How-To
  • Design
  • Tools & Materials
  • Video
  • Blogs
  • Forum
  • Project Guides
  • Reader Projects
  • Magazine
  • Members
  • FHB House

Podcasts

  • FHB Podcast
  • ProTalk

Webinars

  • Upcoming and On-Demand

Podcasts

  • FHB Podcast
  • ProTalk

Webinars

  • Upcoming and On-Demand

Popular Topics

  • Kitchens
  • Business
  • Bedrooms
  • Roofs
  • Architecture and Design
  • Green Building
  • Decks
  • Framing
  • Safety
  • Remodeling
  • Bathrooms
  • Windows
  • Tilework
  • Ceilings
  • HVAC

Magazine

  • Current Issue
  • Past Issues
  • Magazine Index
  • Subscribe
  • Online Archive
  • Author Guidelines

All Access

  • Member Home
  • Start Free Trial
  • Gift Membership

Online Learning

  • Courses
  • Project Guides
  • Reader Projects
  • Podcast

More

  • FHB Ambassadors
  • FHB House
  • Customer Support

Account

  • Log In
  • Join

Newsletter

Get home building tips, offers, and expert advice in your inbox

Signing you up...

This site is protected by reCAPTCHA and the Google Privacy Policy and Terms of Service apply.
See all newsletters
See all newsletters

Follow

  • X
  • YouTube
  • instagram
  • facebook
  • pinterest
  • Tiktok

Join All Access

Become a member and get instant access to thousands of videos, how-tos, tool reviews, and design features.

Start Your Free Trial

Subscribe

FHB Magazine

Start your subscription today and save up to 81%

Subscribe

You have 1 free article remaining.

Get complete site access, including thousands of videos, how-to tips, tool reviews, and design features.

Start your FREE trial

Already a member? Log in

We hope you’ve enjoyed your free articles. To keep reading, become a member today.

Get complete site access to expert advice, how-to videos, Code Check, and more, plus the print magazine.

Start your FREE trial

Already a member? Log in

Privacy Policy Update

We use cookies, pixels, script and other tracking technologies to analyze and improve our service, to improve and personalize content, and for advertising to you. We also share information about your use of our site with third-party social media, advertising and analytics partners. You can view our Privacy Policy here and our Terms of Use here.

Cookies

Analytics

These cookies help us track site metrics to improve our sites and provide a better user experience.

Advertising/Social Media

These cookies are used to serve advertisements aligned with your interests.

Essential

These cookies are required to provide basic functions like page navigation and access to secure areas of the website.

Delete My Data

Delete all cookies and associated data