
Silicone Caulking Basics
For caulking around bathroom and kitchen fixtures or ceramic tile, nothing lasts longer or keeps out moisture better than silicone.
Synopsis: It’s not hard to make a mess with a tube of silicone caulk and a caulk gun — plenty of us do. This article, written by an experienced renovation contractor, explains how to apply this material so it goes where you want it to. Tips cover the simple tools used to shape a bead of caulk once it’s in place.
Sealing a bathroom fixture, kitchen fixture or ceramic tiles with silicone caulk is one of those small details that — done well — raises a job above an ordinary level. I don’t know how many times I’ve seen the effect of a good tiling job — and sometimes even a superior one — spoiled by sloppy caulking.
Proper silicone caulking accomplishes two things. It prevents water from finding its way into the gaps where two surfaces meet, with enough flexibility to maintain the integrity of the seal even if the materials shift a bit over time. And when the caulk is smooth and even, it helps to prevent the accumulation of dirt and mildew outside the seal, which helps to maintain the aesthetics of the job over time. A workmanlike job accomplishes the first purpose, but it requires more practice and care to accomplish the second.
Silicone caulk is the caulking of choice for ceramic tile, showers, tubs, sinks and other bathroom and kitchen fixtures. It costs more than latex caulk, but it lasts longer — up to 20 years. It’s a rubbery material with a tenacious grip, so it does a better job of stretching and flexing. Because it stretches without cracking or splitting, it does a better job than latex of sealing out water that inevitably accumulates next to kitchen and bath fixtures. Also, it has a wide temperature-application range and can withstand temperatures from below 0°F to about 400°F.
The drawbacks include silicone caulk’s finicky nature when it’s being tooled and its reluctance to adhere to painted surfaces, plastics or oily woods. Also, silicone caulking is generally not paintable.
Start with the right stuff
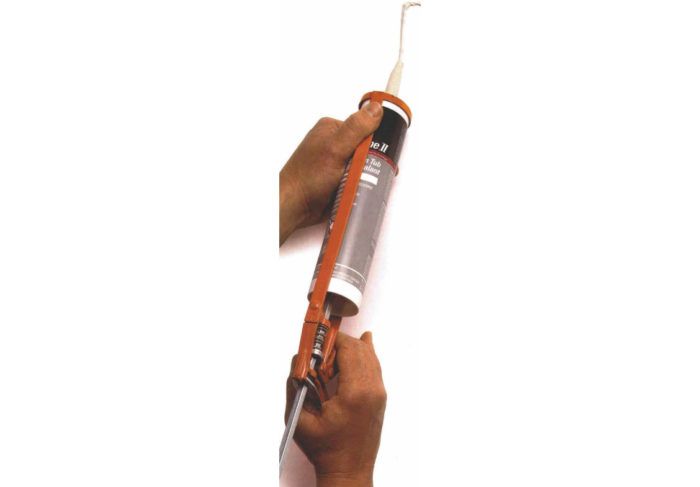
The basic caulking tool is, of course, a caulking gun, but even here a little care is needed. A gun that operates with ratchet action is no good for fine work. With ratchet action, you have to release the trigger and reach around to the back, grab the end of the rod and twist it to relieve pressure in the tube. In that time, it’s easy for excess material to squeeze out, and the action can cause the tip to jerk, which spoils the bead.
Instead, find the type with a (usually) hexagonal rod and no notches, which is released by pressing your thumb on a tab behind the handle. This type of caulk gun delivers caulk with a smoother flow, and the pressure can be released instantly so that you won’t have to take your eyes or your hands away from the work. (Tub and tile caulk in a squeeze tube works only on very small jobs. There’s just not enough caulk there to give a long and consistent bead.) Some caulk guns have a spout cutter that is incorporated in the handle, but I prefer to cut the spout cleanly with a sharp knife.
All silicone is not the same, either. Some caulks are firmer than others coming out of the tube, and some skin over faster. Some are more flexible when cured or come in more colors. GE’s silicone, the granddaddy of them all, is still among the best. I find it easy to work, strong and flexible, and I like the opaqueness of its white. I also find that the white yellows a bit, so when working with pure-white tiles, I prefer to use an-other brand, such as Hilti. Whatever brand you choose, always get the type specifically made for tub and tile work, which contains compounds to inhibit mildew.
Choosing a color when the job calls for some-thing other than white can be tricky. Almond (or bone) and gray are the most common variations, but manufacturers offer widely differing renditions of those colors. If a close match is important, I often buy tubes of a few different brands, then squeeze out test beads on site to make a final choice. Usually, an exact match is impossible, in which case I prefer a color slightly darker than the material I’m applying it to.
One expedient is using clear silicone, but that’s a last resort for me for two reasons. First, if there’s a fair-size gap at the joint, it remains visible after the caulking is done. Also, after tooling clear caulk, I may not be able to see some smears or excess, but they sure will show up once the bead gets dirty. Nevertheless, for some jobs, particularly against wood trim or where you have materials of different colors meeting,clear may be the best solution.
 |
 |
 |
Prepare the area to be caulked— Proper preparation of the area to be caulked is especially important with silicone. Even with a brand-new installation, I make sure the surfaces are clear of dirt, excess glue or silty deposits of grout. When remodeling, the big enemies are soap, scale and mildew.
If I’m recaulking, I start by cutting out all the existing silicone with a utility knife, then scraping the surface clean with one of those paint scrapers that hold a single-edge razor. Next I scrub the whole area with a bit of wood alcohol. It does a good job of dissolving soap deposits, and it’s also the least toxic thing I know of that will dissolve uncured silicone(nothing I know of dissolves cured silicone). This comes in handy later if I need to clean up stray silicone. If the area to be caulked is really scaly or particularly disgusting, I’ll scrub it with a weak solution of muriatic acid or trisodiumphosphate (TSP).
If there is still some mildew remaining in the grout, I may wash it with bleach or even rake out the grout and redo it. After making sure that the whole area is clean and dry and that any traces of the wood alcohol have evaporated, I’m ready to start. Before cutting the tip of the caulking tube, though, I always have a plentiful sup-ply of paper towels close at hand. Silicone caulking can be pretty messy.
Start with the smallest-possible bead— I cut the tip of the tube spout on an angle, as close to the end as practicable for the job. It’s all too easy to get too much caulk on the work, and all too hard to get rid of it neatly if you do. So I work with the absolute smallest bead that will fill the gap. Silicone-caulking manufacturers say there is no minimum-size bead, although they don’t recommend beads that are more than in. wide. That’s because the bigger the bead,the longer it takes to cure. However, if time isn’t a problem, a larger bead won’t be a problem.
I always start at an inside corner. If there is an inside comer at each end of a joint, then I work out from both, overlap-ping the two beads somewhere in the middle. Otherwise, if I caulk continuously from one in-side corner to the next, I end up obstructing my own view of the bead and risk putting a kink in the bead at the point where I turn the gun to-ward the other corner.
If there is a three-legged joint, such as where two tub-enclosure walls meet the tub, I do the vertical joint first. I keep the caulk flowing smoothly out under the angled tip and am careful not to let it squeeze out from either side. It takes some practice to lay down along, even bead, especially to be able to slowdown just enough to compensate for the reduced flow when releasing the trigger to start another stroke.
Some manufacturers recommend pushing the gun away from you as you lay down caulk, but I like to pull the gun away from the bead. Pushing the gun won’t squeeze the caulk down into agap as well as having the long angled tip bearing against the bead as you move along. Also, pushing the gun obscures the bead, which makes it impossible to control its size and position.
 |
 |
The best bead tool is always within reach— I almost always tool each bead immediately after applying it before I move to the next joint. This way, I’m sure I get to the material be-fore it skins over. Also, if I have to add a bit more on top somewhere, I want to do this while it’s in its most workable state.
Like a lot of people, I find that the most useful tool for dressing joints is a finger, which can adapt itself to the small variations in the surface or size of the joint. If I’ve put down a bead that is no larger than necessary, one firm swipe with my finger usually gives a nice convex shape to the joint and adheres it firmly to the surfaces on both sides of the gap or angle.
Small irregularities in the caulk will trap dirt and harbor mildew, making for unsightly problems later on. For this reason, I take more care than would be needed just to ensure a water-tight joint. Most times, I wet my finger with saliva and go over the joint again, polishing it and eliminating tiny irregularities. I’ve tried wetting my finger with water, but saliva seems to work best. I’m careful not to wet the ends of a bead where the next bead needs to adhere to it.
I talked to several manufacturers of silicone caulk, none of whom recommend a licked finger to tool their caulk. All agree, however, that the licked finger is in widespread use and that there is no major health risk involved. They also say it’s not a good idea to allow silicone to stay on the skin. They recommend using a spoon dipped in soapy water or smeared with petroleum jelly. I haven’t had a problem doing it my way, though. But silicone isn’t particularly tasty,so I keep paper towels or newspapers handy to clean my finger.
Sometimes, usually when a joint is wider than my finger can bridge properly, I need a different tool. I keep an old cereal spoon with a fairly tight radius on the tip just for this purpose. Turning the spoon at various angles, I can create just about any type of cross section I need.
I find that the spoon works best used in a scooping position instead of with its rounded back pressed into the bead. When tooling with the spoon, I do a dry run along the joint before applying the caulk, testing for the proper angle to achieve the bead I want.
 |
 |
Finishing up and putting away the caulk— When I’m tooling a wider joint using the spoon—a joint that’s in. wide or more—it’s often impossible not to have some caulk squeeze out on both sides of the tool. I don’t worry about this.The hard edges of the spoon create a definite edge to the joint and scrape a clean track right beside it. If I go back an hour or two later, when the caulk has just firmed up, I can scrape away the excess.
I rarely mask both sides of a joint with tape; I don’t like to because the edge of the bead can-not feather down to absolutely nothing due to the thickness of the masking tape.
I’ve heard many tips about how to close spouts of partially used tubes of caulking, but generally they don’t help for long. Any seal has to be air-tight. Some manufacturers help by supplying snap-on caps for spouts, but even this solution doesn’t work if you’ve had to cut the spout short to get a wide bead. I save the tip I cut off when I started the tube. Inverting this into the opening and holding it in place with a bit of caulk squeezed out around the edges works better than anything else I’ve tried.
From Fine Homebuilding #111
For more photos and details, click the View PDF button below:
Fine Homebuilding Recommended Products
Fine Homebuilding receives a commission for items purchased through links on this site, including Amazon Associates and other affiliate advertising programs.
Anchor Bolt Marker

100-ft. Tape Measure

Plate Level
