Sound-Dampening Ceramic Tile over a Concrete Floor
Follow these guidelines from the Tile Council of America for sound-deadening tile over a concrete floor.
Q:
My wife and I live in a condominium, and the condo owners’ association recently passed a requirement that all future ceramic-tile installations must include a layer of cork tile between the ceramic tile and the concrete floor for sound-deadening purposes. Is this method of sound-deadening okay, and if it is not, do you have any other suggestions for sound-deadening?
David Bruce, Juneau, AR
A:
Roe A. Osborn, a former senior editor at Fine Homebuilding, replies: I contacted the Tile Council of America (310-574-7800), and they referred me to the section on sound-deadening in their Handbook for Ceramic Tile Installation. Their handbook makes no mention of cork as an acceptable substrate.
Cork flooring does possess sound-deadening qualities, but cork also compresses under weight and springs back when the weight is removed. Because a successful ceramic-tile installation depends on a solid, unyielding substrate, it seems that the use of cork tile under ceramic tile would mean disaster for the installation.
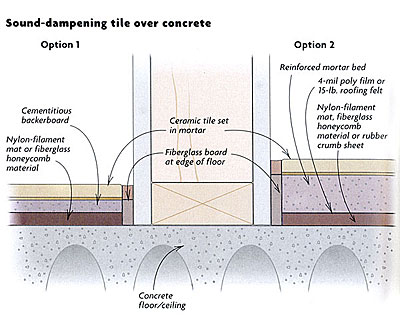
Instead, the Tile Council offers a couple of alternatives for sound-deadening a ceramic-tile floor over a concrete slab. Both methods use a layer of commercially available sound-dampening material covered with either cementitious backerboard or a mortar bed below the tile. And both methods start with a waterproof membrane over the concrete slab.
In the backerboard alternative, the sound-deadening material can be either an extruded-nylon filament mat called Enkasonic (www.maxxon.com) or a molded-fiberglass honeycomb material called SR Floorboard (Peabody Kinetics; 614-889-0480). The sound-deadening layer is covered by a 7/16-in. layer of cementitious backerboard, and the ceramic tile is then installed on top of that, using mortar as a bonding agent.
With the mortar-bed option, a layer of rubber crumb sheet (Carlisle; 800-479- 6832) can also be used instead of the first two choices. The sound-deadening layer is then covered with a cleavage membrane (4-mil polyethylene film or 15-lb. roofing felt) with a reinforced mortar bed 1-1/4 in. to 2 in. thick on top of that. The tile is installed in mortar over the mortar bed.
The bad news is that both of these methods add thickness to the floor, which can be a drawback in trying to join with existing floor levels or doorways. The backerboard option ends up 7/8 in. to 1-1/8 in. thick (not including the tile), and the mortar-bed option adds 1-5/8 in. to 2 in. to the thickness of the floor. In both cases, a strip of 3/8-in. fiberglass board is installed around the perimeter of the room between the wall and the substrate to complete the sound-dampening system.
The good news is that all the configurations mentioned here have good STC (sound-transmission class) ratings and average to good IIC (impact-insulation class) ratings, the two standards used for measuring sound-dampening. (STC is a measurement of room sounds such as voices, and IIC is a measure of sound from impact on the floor such as footfalls or tap-dancing).

Fine Homebuilding Recommended Products
Fine Homebuilding receives a commission for items purchased through links on this site, including Amazon Associates and other affiliate advertising programs.

Original Speed Square

Plate Level

100-ft. Tape Measure


View Comments
Good start to a useful article, but you left out the details regarding the locations and types of adhesives and mortars. Please update.