FHB Logo Facebook LinkedIn Email Pinterest Twitter X Instagram Tiktok YouTube Plus Icon Close Icon Navigation Search Icon Navigation Search Icon Arrow Down Icon Video Guide Icon Article Guide Icon Modal Close Icon Guide Search Icon Skip to content
Subscribe
Log In
  • How-To
  • Design
  • Tools & Materials
  • Restoration
  • Videos
  • Blogs
  • Forum
  • Magazine
  • Members
  • FHB House
  • Podcast
Log In

Fine Homebuilding Project Guides

Tiling

Guide Home
  • Selecting Tile
  • Tools & Techniques
  • Installation Materials
  • Preparation
  • Tiling Floors
  • Tiling Walls & Backsplashes
  • Tiling Showers
  • Grouting, Sealing & Caulking
  • Maintenance & Repair
How-To

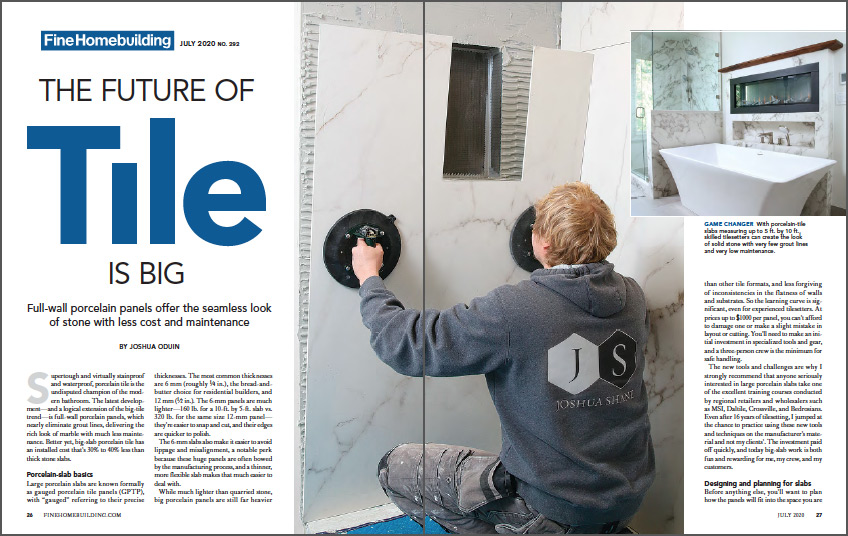
The Future of Tile Is Big

Full-wall porcelain panels offer the seamless look of stone with less cost and maintenance.

By Joshua Oduin Issue 292 - July 2020
  • X
  • facebook
  • linkedin
  • pinterest
  • email
  • add to favorites Log in or Sign up to save your favorite articles
Game changer. With porcelain-tile slabs measuring up to 5 ft. by 10 ft., skilled tilesetters can create the look of solid stone with very few grout lines and very low maintenance.

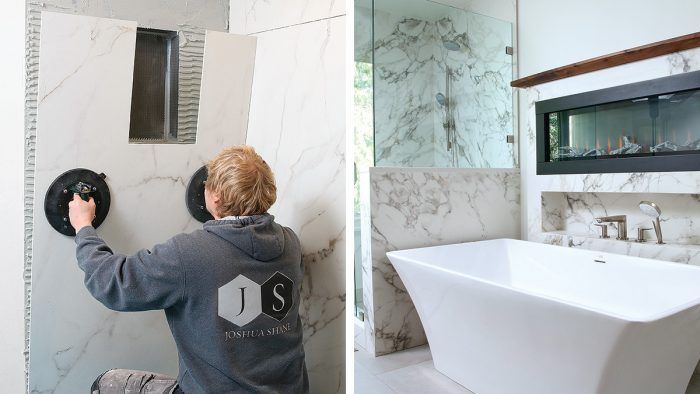
Synopsis: Big-slab tile delivers the rich look of marble with much less maintenance and much lower cost than a thick stone slab. Builder, remodeler, and tilesetter Joshua Oduin explains the basics of porcelain-slab tile, including installation considerations and costs and tips and tools for safe handling. Using photos of a recent project, he details the process of cutting the tile, setting the slabs, and using templates for complex layouts.


Supertough and virtually stainproof and waterproof, porcelain tile is the undisputed champion of the modern bathroom. The latest development— and a logical extension of the big-tile trend—is full-wall porcelain panels, which nearly eliminate grout lines, delivering the rich look of marble with much less maintenance. Better yet, big-slab porcelain tile has an installed cost that’s 30% to 40% less than thick stone slabs.

Porcelain-slab basics

big tiles and porcelain tub
Game changer. With porcelain-tile slabs measuring up to 5 ft. by 10 ft., skilled tilesetters can create the look of solid stone with very few grout lines and very low maintenance.

Large porcelain slabs are known formally as gauged porcelain tile panels (GPTP), with “gauged” referring to their precise thicknesses. The most common thicknesses are 6 mm (roughly 1/4 in.), the bread-and-butter choice for residential builders, and 12 mm (1/2 in.). The 6-mm panels are much lighter—160 lb. for a 10-ft. by 5-ft. slab vs. 320 lb. for the same size 12-mm panel— they’re easier to snap and cut, and their edges are quicker to polish.


The 6-mm slabs also make it easier to avoid lippage and misalignment, a notable perk because these huge panels are often bowed by the manufacturing process, and a thinner, more flexible slab makes that much easier to deal with.

While much lighter than quarried stone, big porcelain panels are still far heavier than other tile formats, and less forgiving of inconsistencies in the flatness of walls and substrates. So the learning curve is significant, even for experienced tilesetters. At prices up to $1000 per panel, you can’t afford to damage one or make a slight mistake in layout or cutting. You’ll need to make an initial investment in specialized tools and gear, and a three-person crew is the minimum for safe handling.

The new tools and challenges are why I strongly recommend that anyone seriously interested in large porcelain slabs take one of the excellent training courses conducted by regional retailers and wholesalers such as MSI, Daltile, Crossville, and Bedrosians. Even after 16 years of tilesetting, I jumped at the chance to practice using these new tools and techniques on the manufacturer’s mate-rial and not my clients’. The investment paid off quickly, and today big-slab work is both fun and rewarding for me, my crew, and my customers.

transporting big tile slabs
Frames and Suction cups. Similar to transporting countertops or glass, slab tiles must be supported by an A-frame for the drive to the job site. The extra bodies, suction-cup handles, and stiffening bar are also critical.

Designing and planning for slabs

Before anything else, you’ll want to plan how the panels will fit into the space you are finishing. Wall widths, ceiling heights, and access are all factors, and some slabs can be ordered in only one size. If a wall is bigger than a single slab, you need to decide where the seams should go.

Because the lifelike veining patterns are manufactured, porcelain slabs can be offered in matched sets of up to four, allowing a skilled tilesetter to “roll the grain” around corners, creating shower curbs and pony walls that look like solid stone, and walls that flow into each other.

To ensure a dead-flat substrate, I frame my own walls whenever possible, power-planing and shimming studs as needed. Other tricks include wet-setting the backer board—put-ting thinset on studs and joists to fill and sup-port lows—or creating the shower floor with a full mud bed.

The floor tile goes in after the wall tile, but I build the shower pan and complete the waterproofing ahead of time, of course, before any tile goes in. In showers, I go with a mud bed instead of a foam-based pan because the mortar is much stronger and more rigid, with no chance of compressing or deflecting over time.

As for the floor profile in a shower, I either angle the whole surface in one plane toward a linear drain, or angle multiple planes toward a center drain, templating the finished pan to create an “envelope” array of tile.

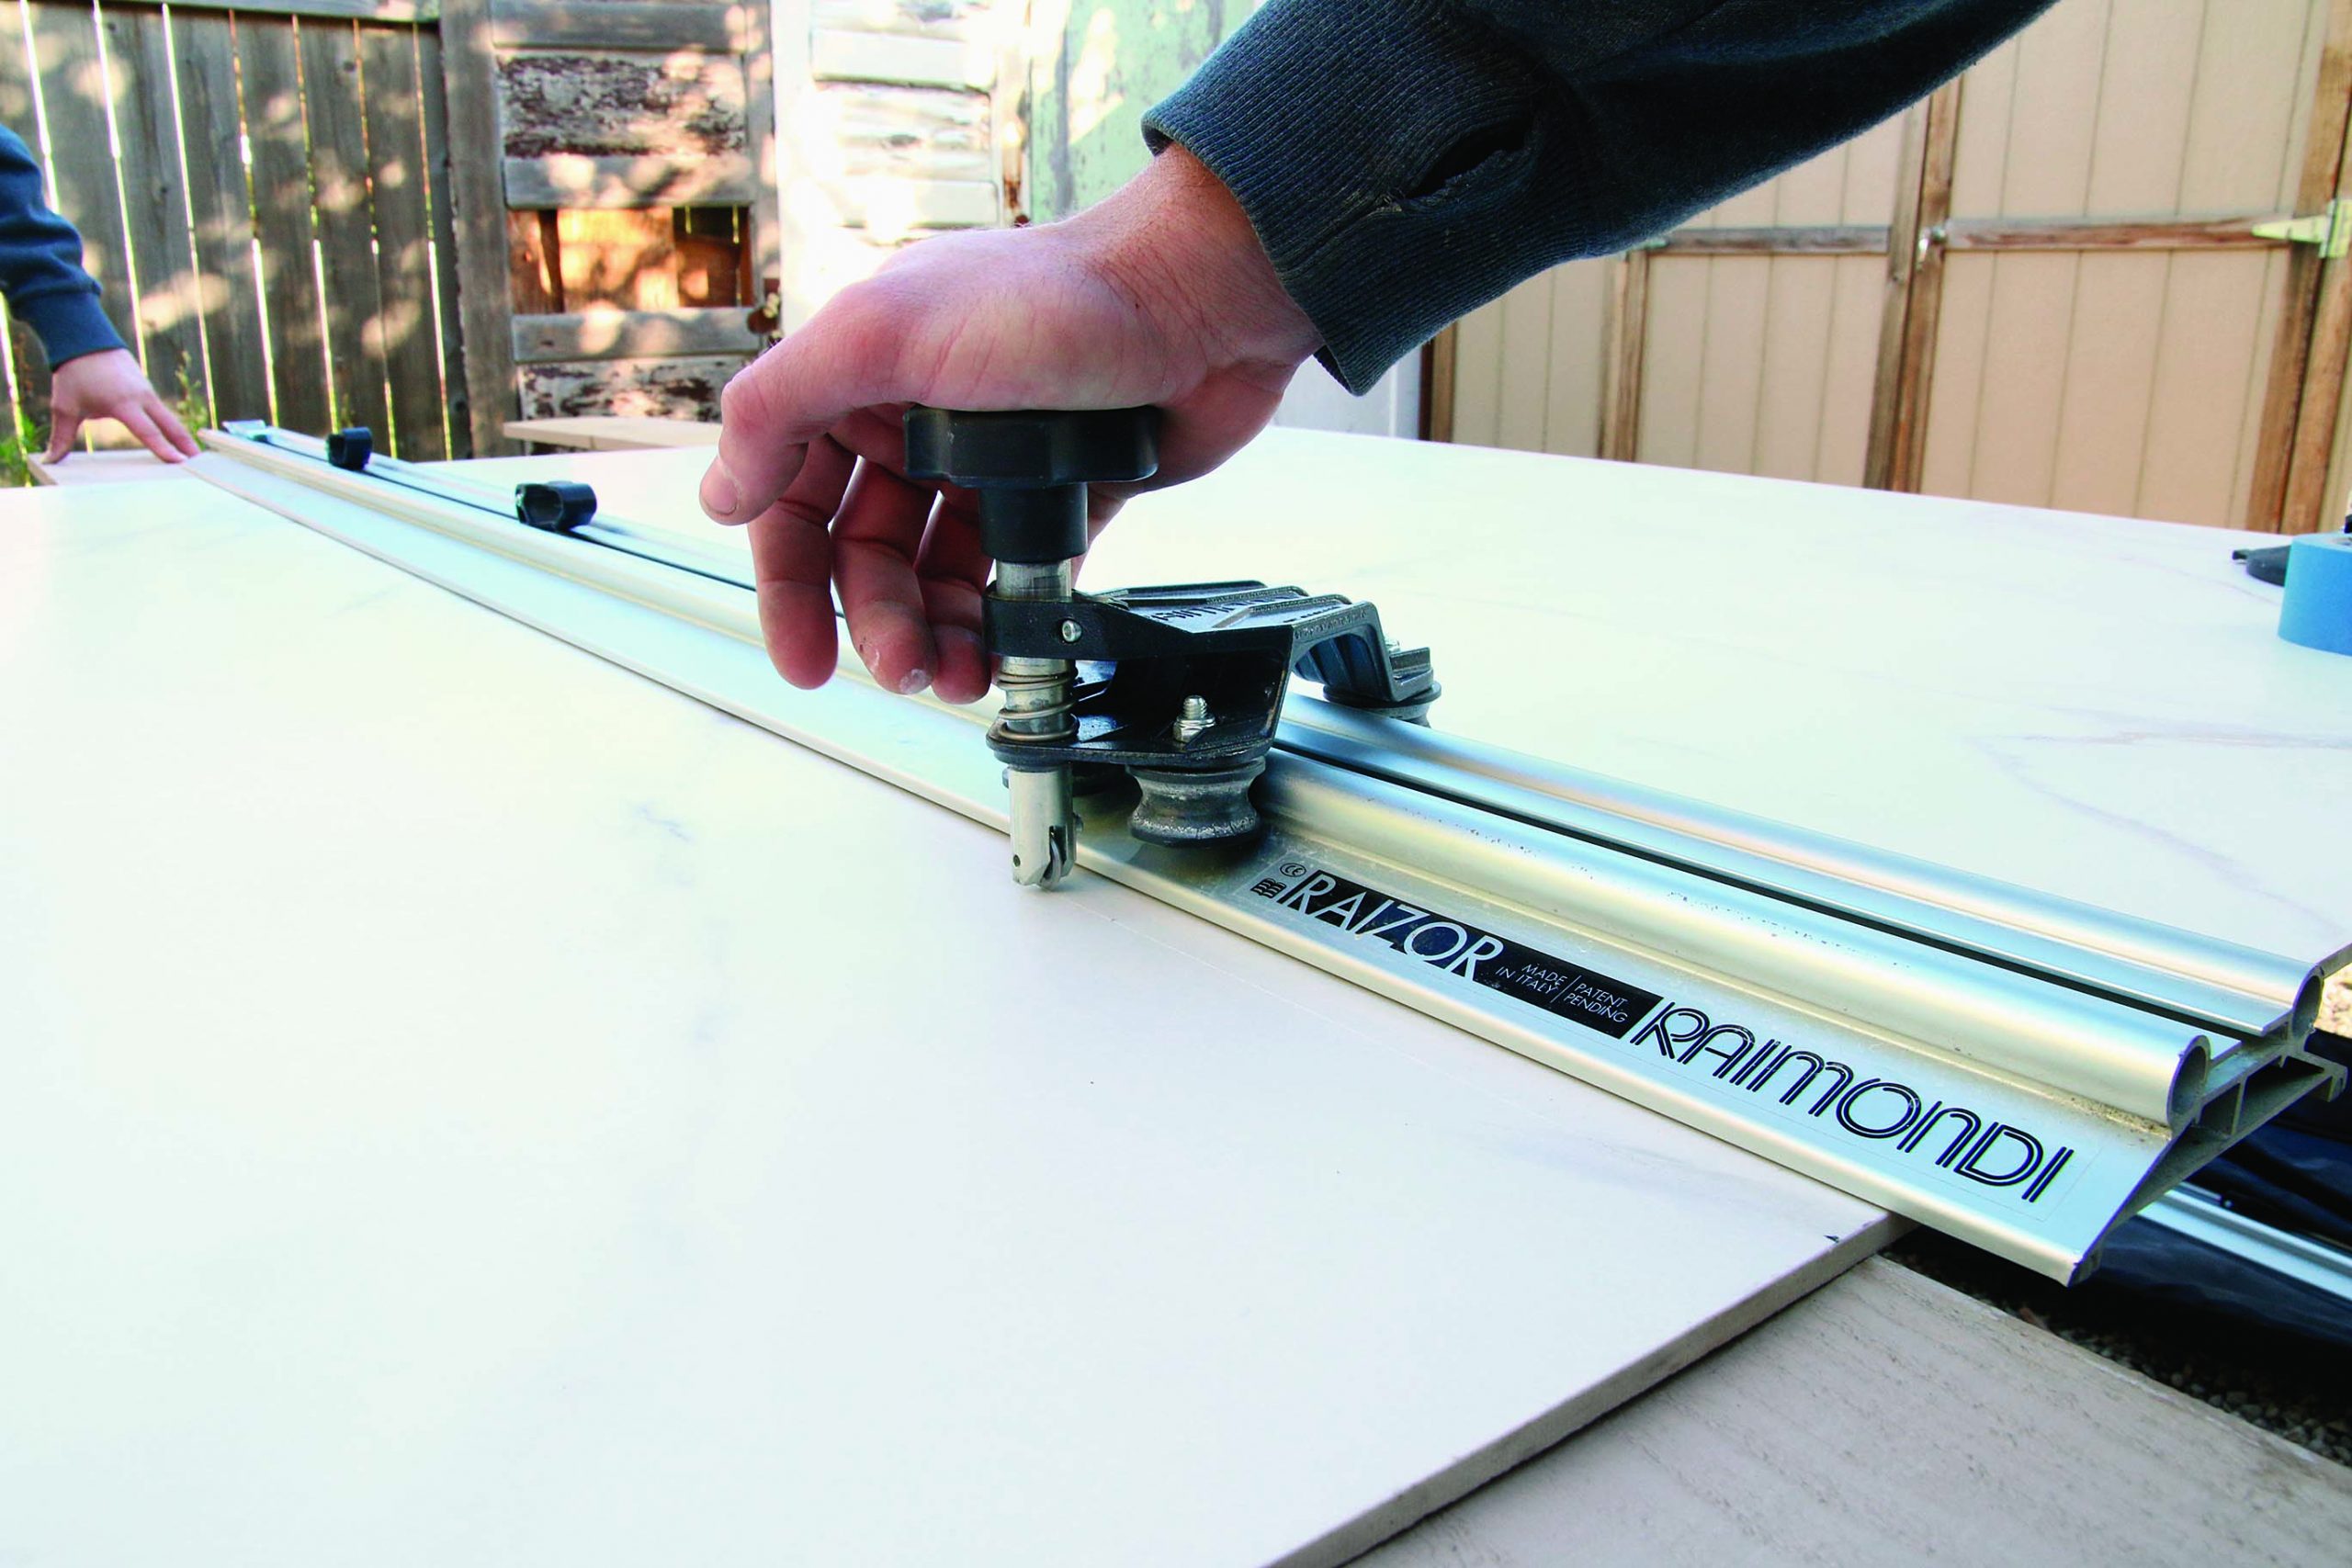
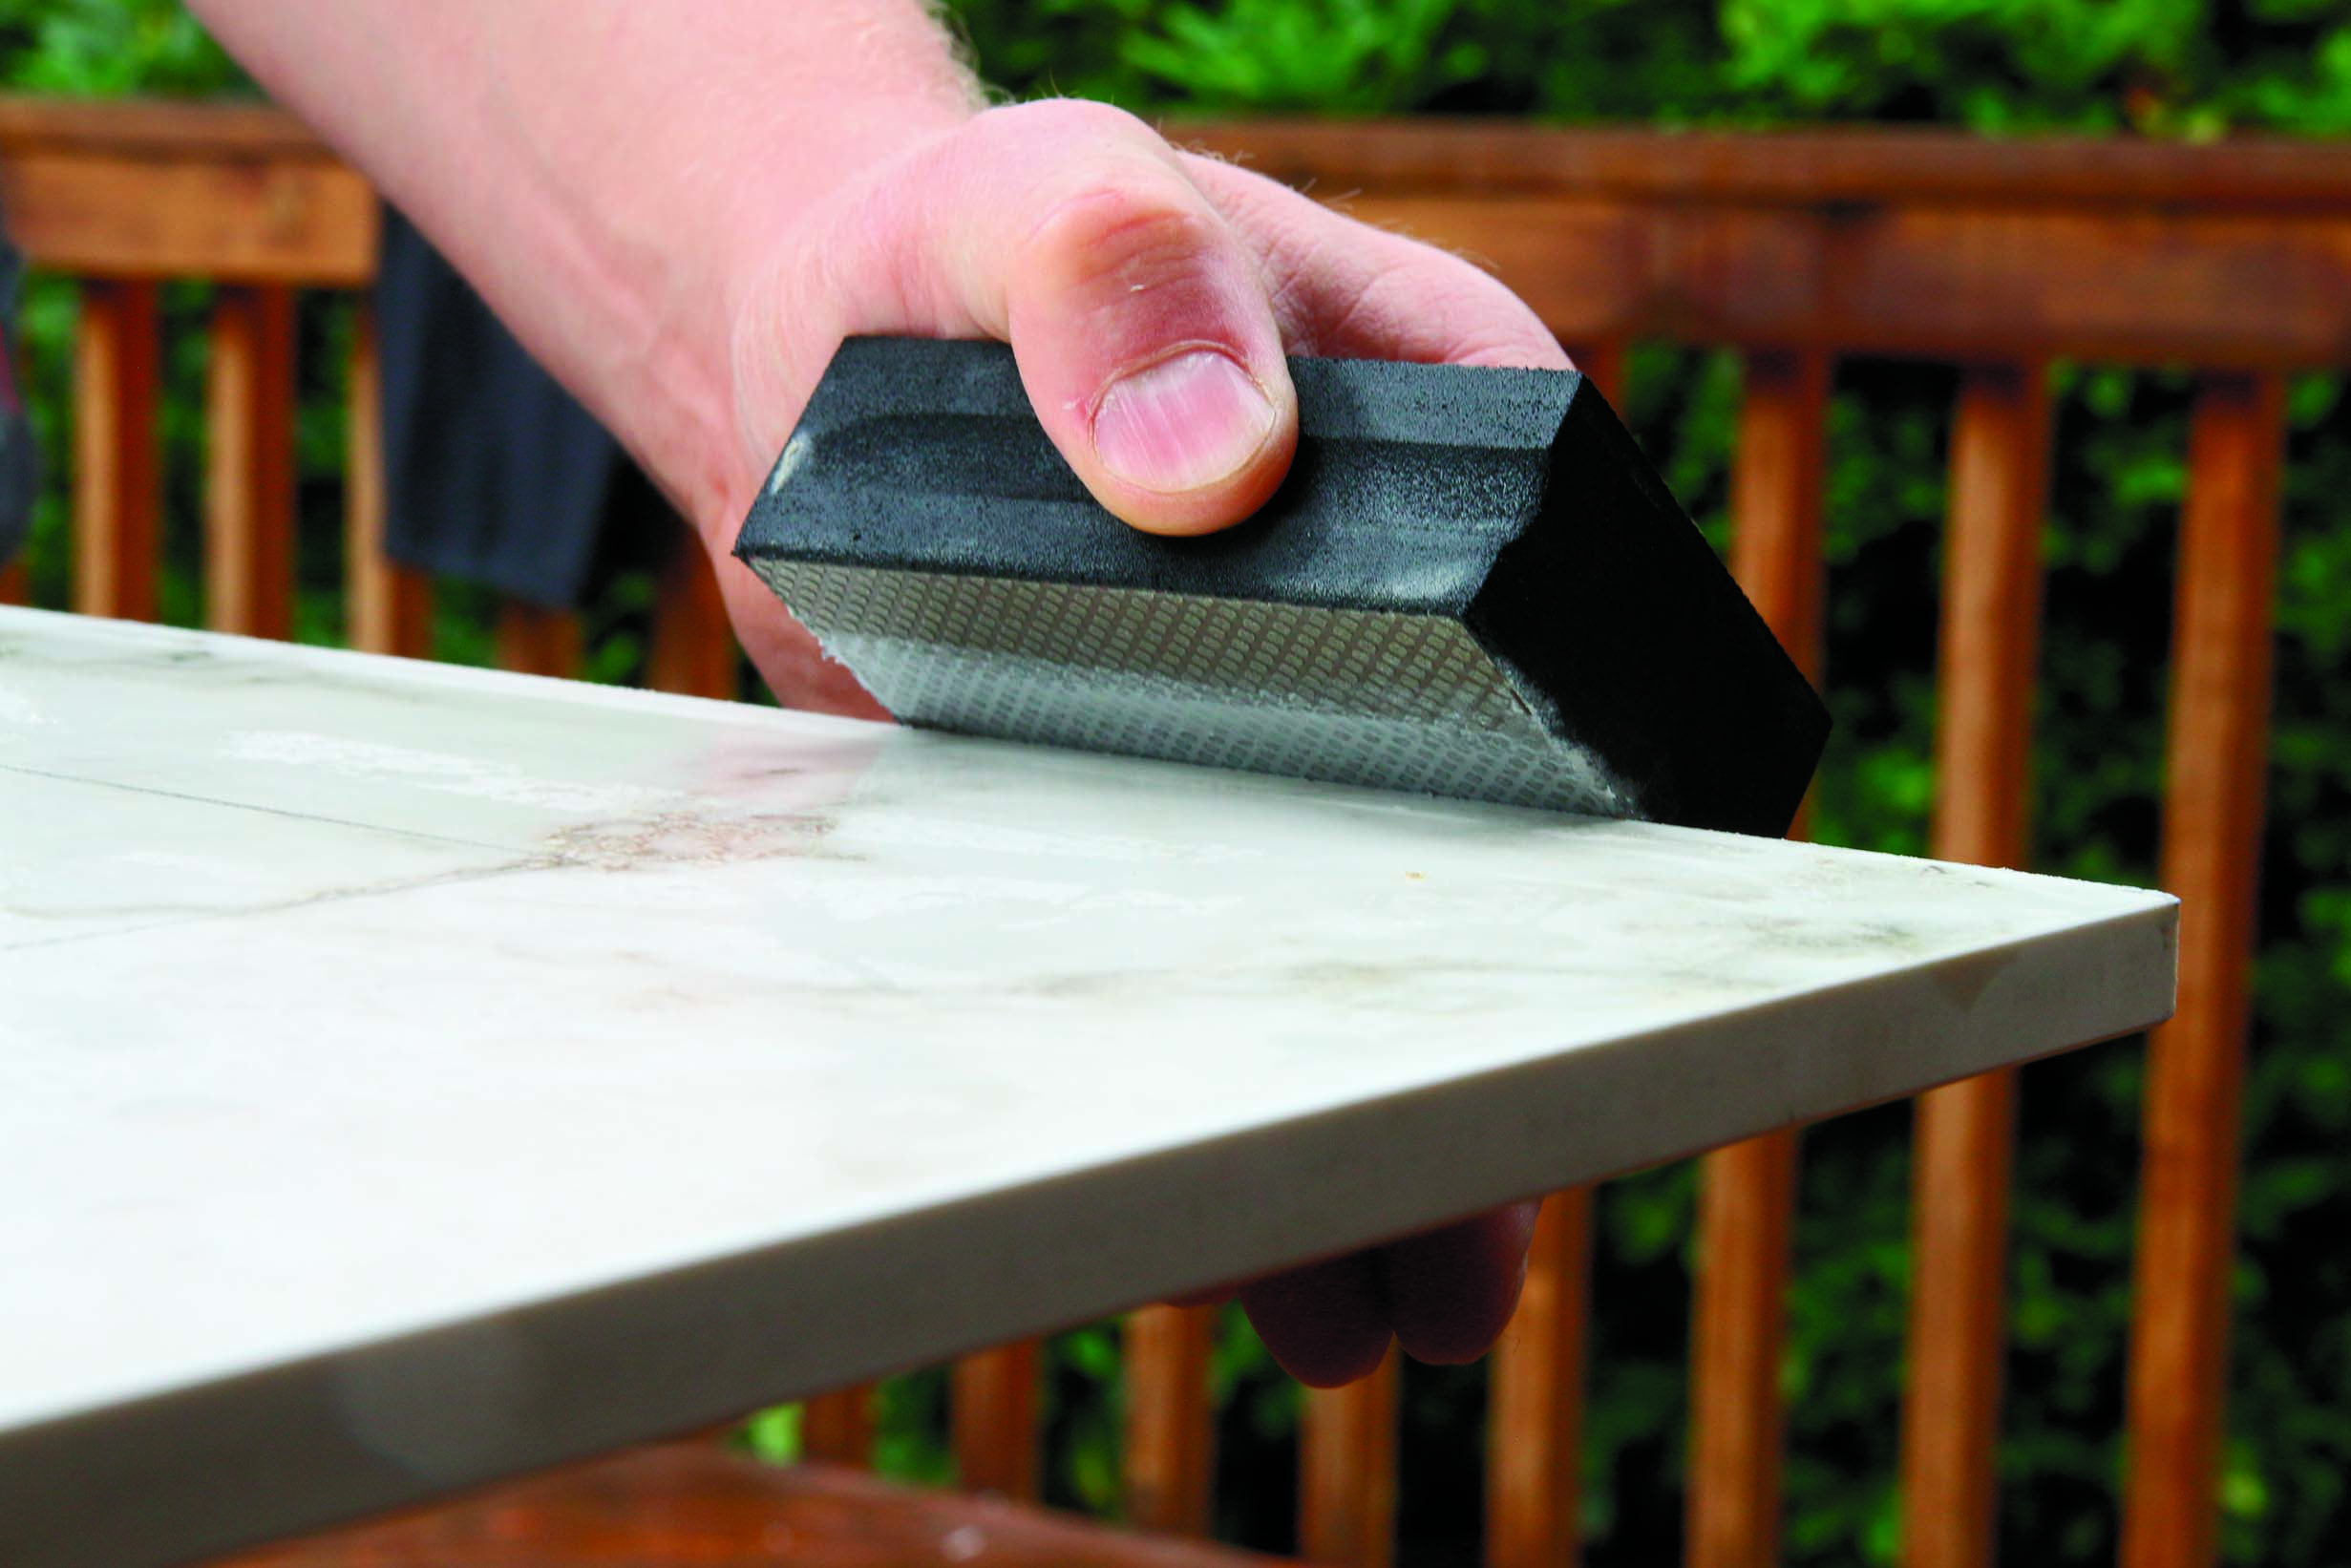
Scoring and Snapping

For edge-to-edge cuts, or butt-joined inside-corner cuts, tile slabs can be scored and snapped like glass using some specialty tools. But when joining panels on an outside corner I prefer to snap and then miter both pieces for a cleaner, more convincing finished look.

score the tile
Score first. The Raimondi Raizor cutting system includes two rails that span just beyond 10 ft., and using it is as simple as lining up the scoring unit with your marks, locking down the suction cups, and scoring a line with firm hand pressure.

fracture the ends
Fracture the ends. Specialty pliers are used to bend the panel at the score line, causing an audible crack. Do that at both ends and the panel is ready to snap. A slight push may be needed, but often the weight of the overhang is enough to send the fracture down the score line, so be ready to catch the heavy offcut.

polish the edge of the big tile
Polish The edge. The snapped slab edges will need to be cleaned up before installation. For square edges I use a 5-in. dry polishing pad with a stiff aluminum backer to smooth the cuts.

smooth outside corners of big tile by hand
Outside corners by hand. Don’t be intimidated by creating mitered edges with a grinder—only the very point of the miter will be visible. The angle of the cut doesn’t have to be exact, so bevel it beyond 45° and leave 1⁄16 in. or so of flat material at the edge.

break tile edges
Break the edges. The last step on all cuts is to take a quick pass with a 120-grit diamond pad, smoothing out any imperfections left by the polishing pad and putting a slight curve on any sharp edges.

jig for holes
Jig up for holes. When drilling holes in the field of a tile slab, like this one for a showerhead, I use a diamond hole saw, which I cool and lubricate using water squeezed from a sponge. These bits are not self-centering, so I use a couple of wood scraps to establish the X and Y positioning of the hole, with one piece bored (slightly wider than the diamond hole saw) so there’s no chance of the bit wandering.

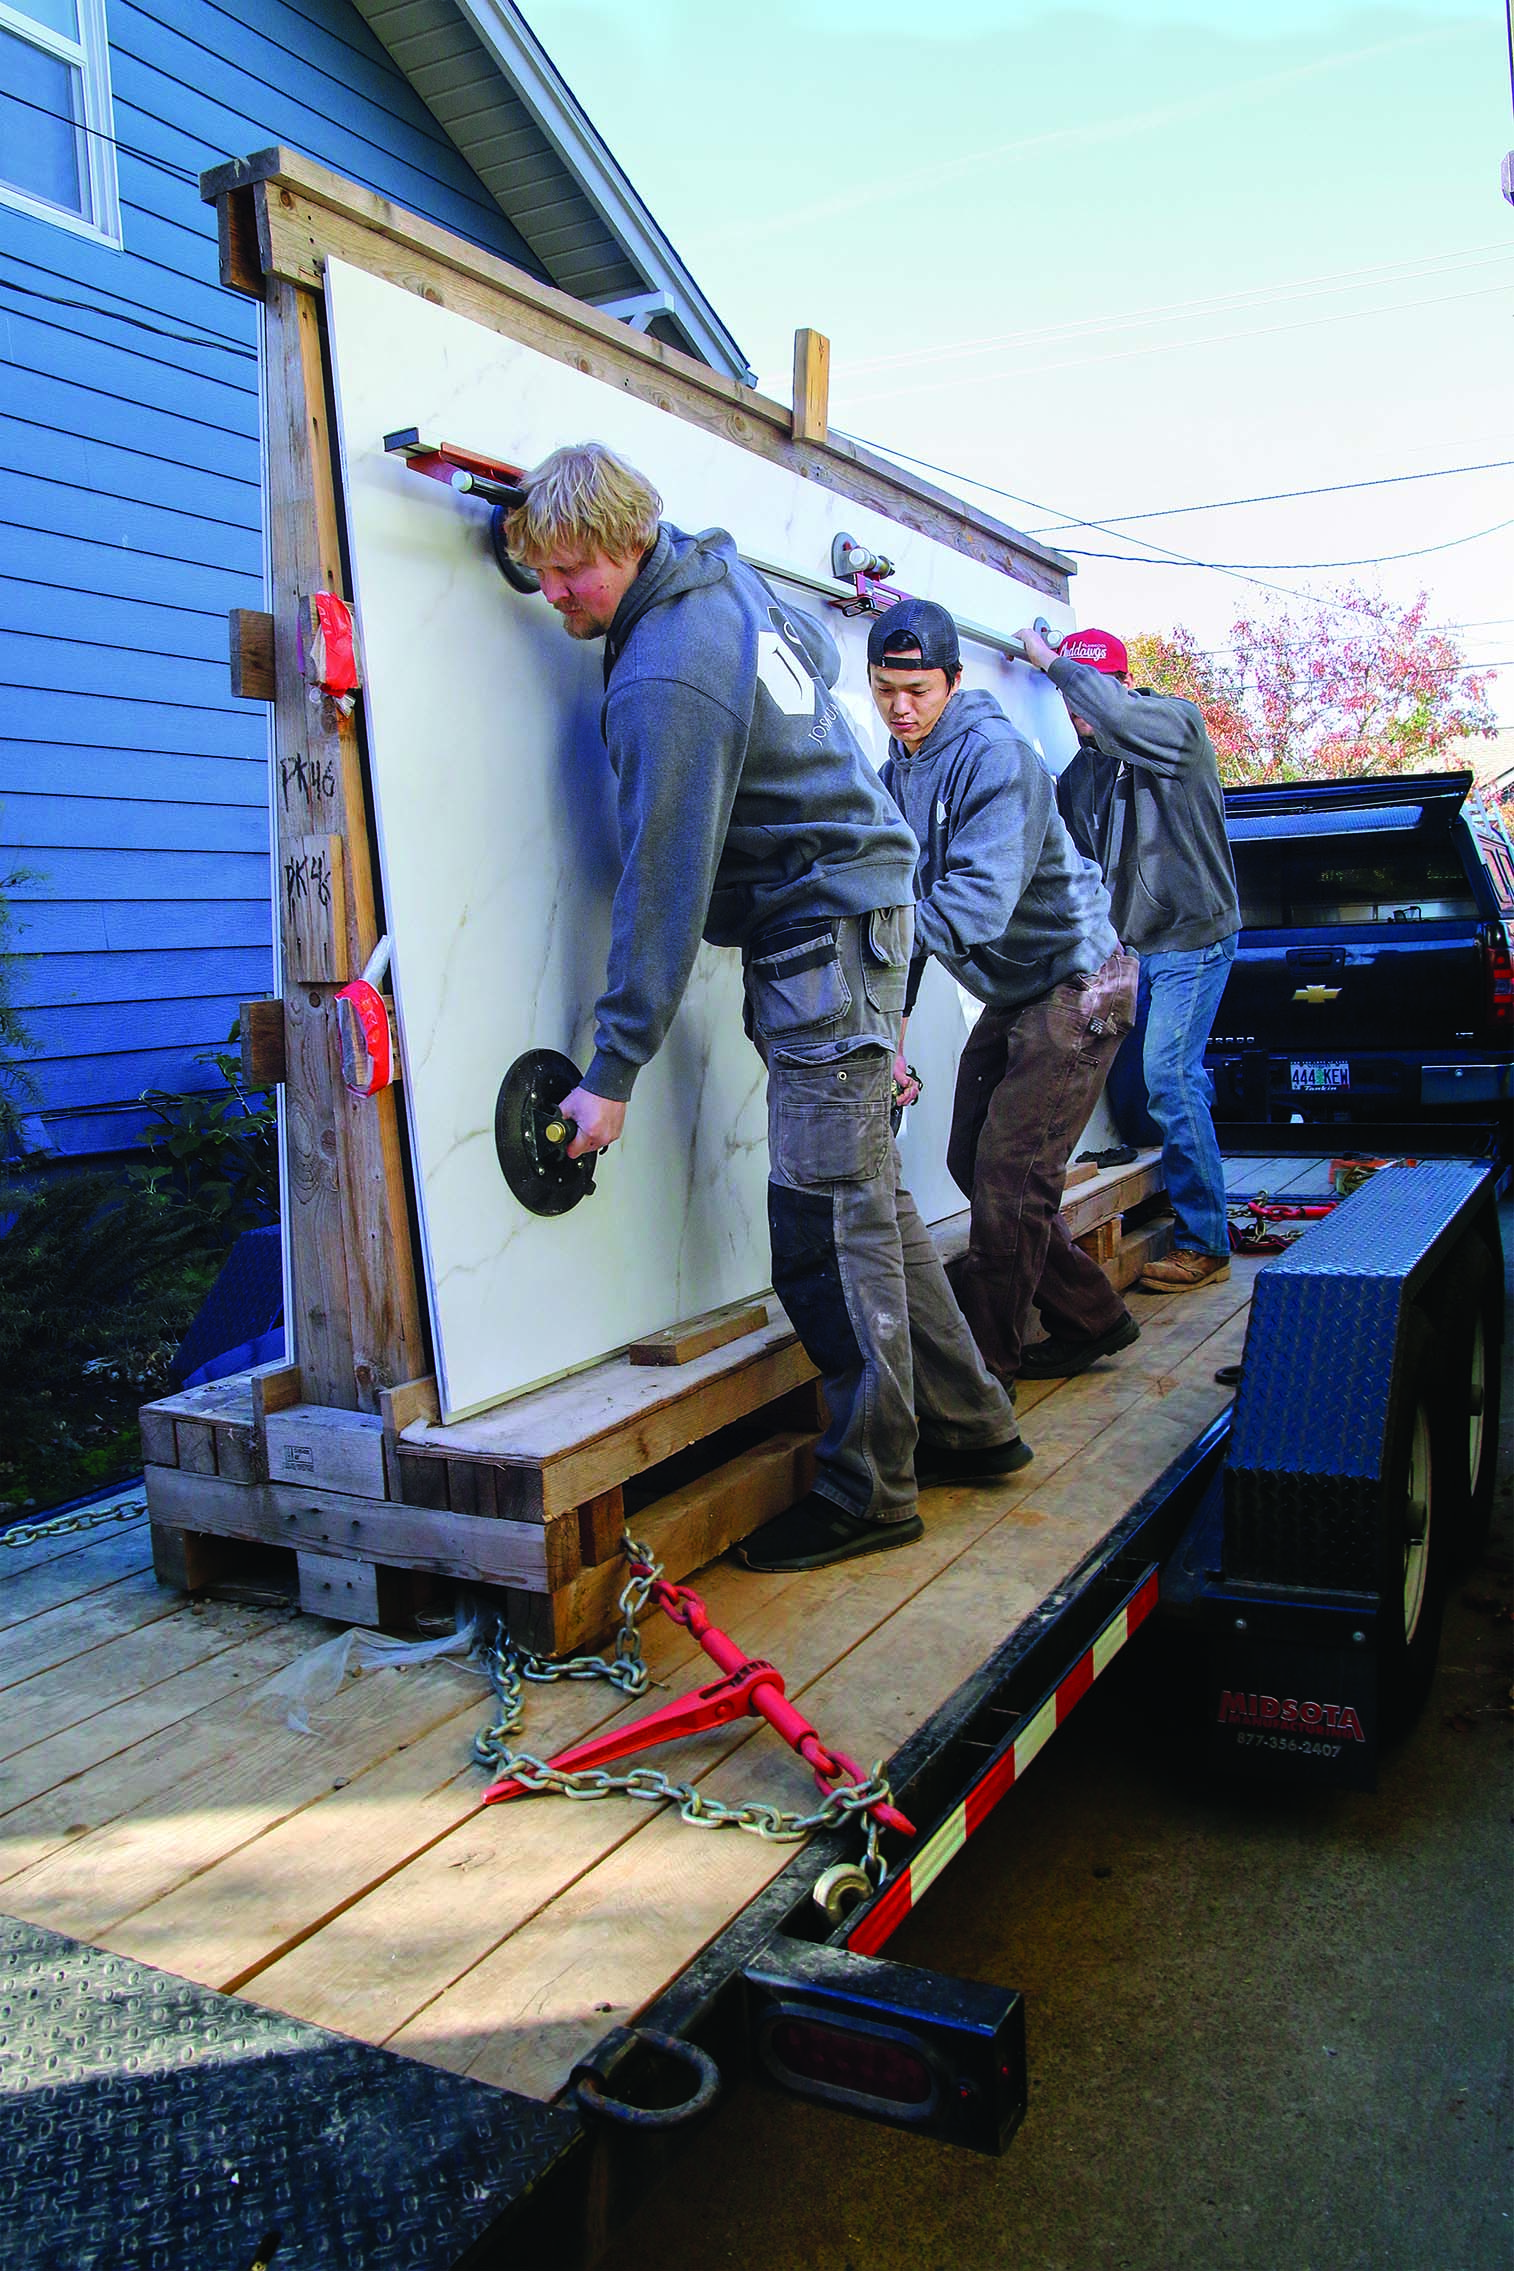
Tips and tools for safe handling

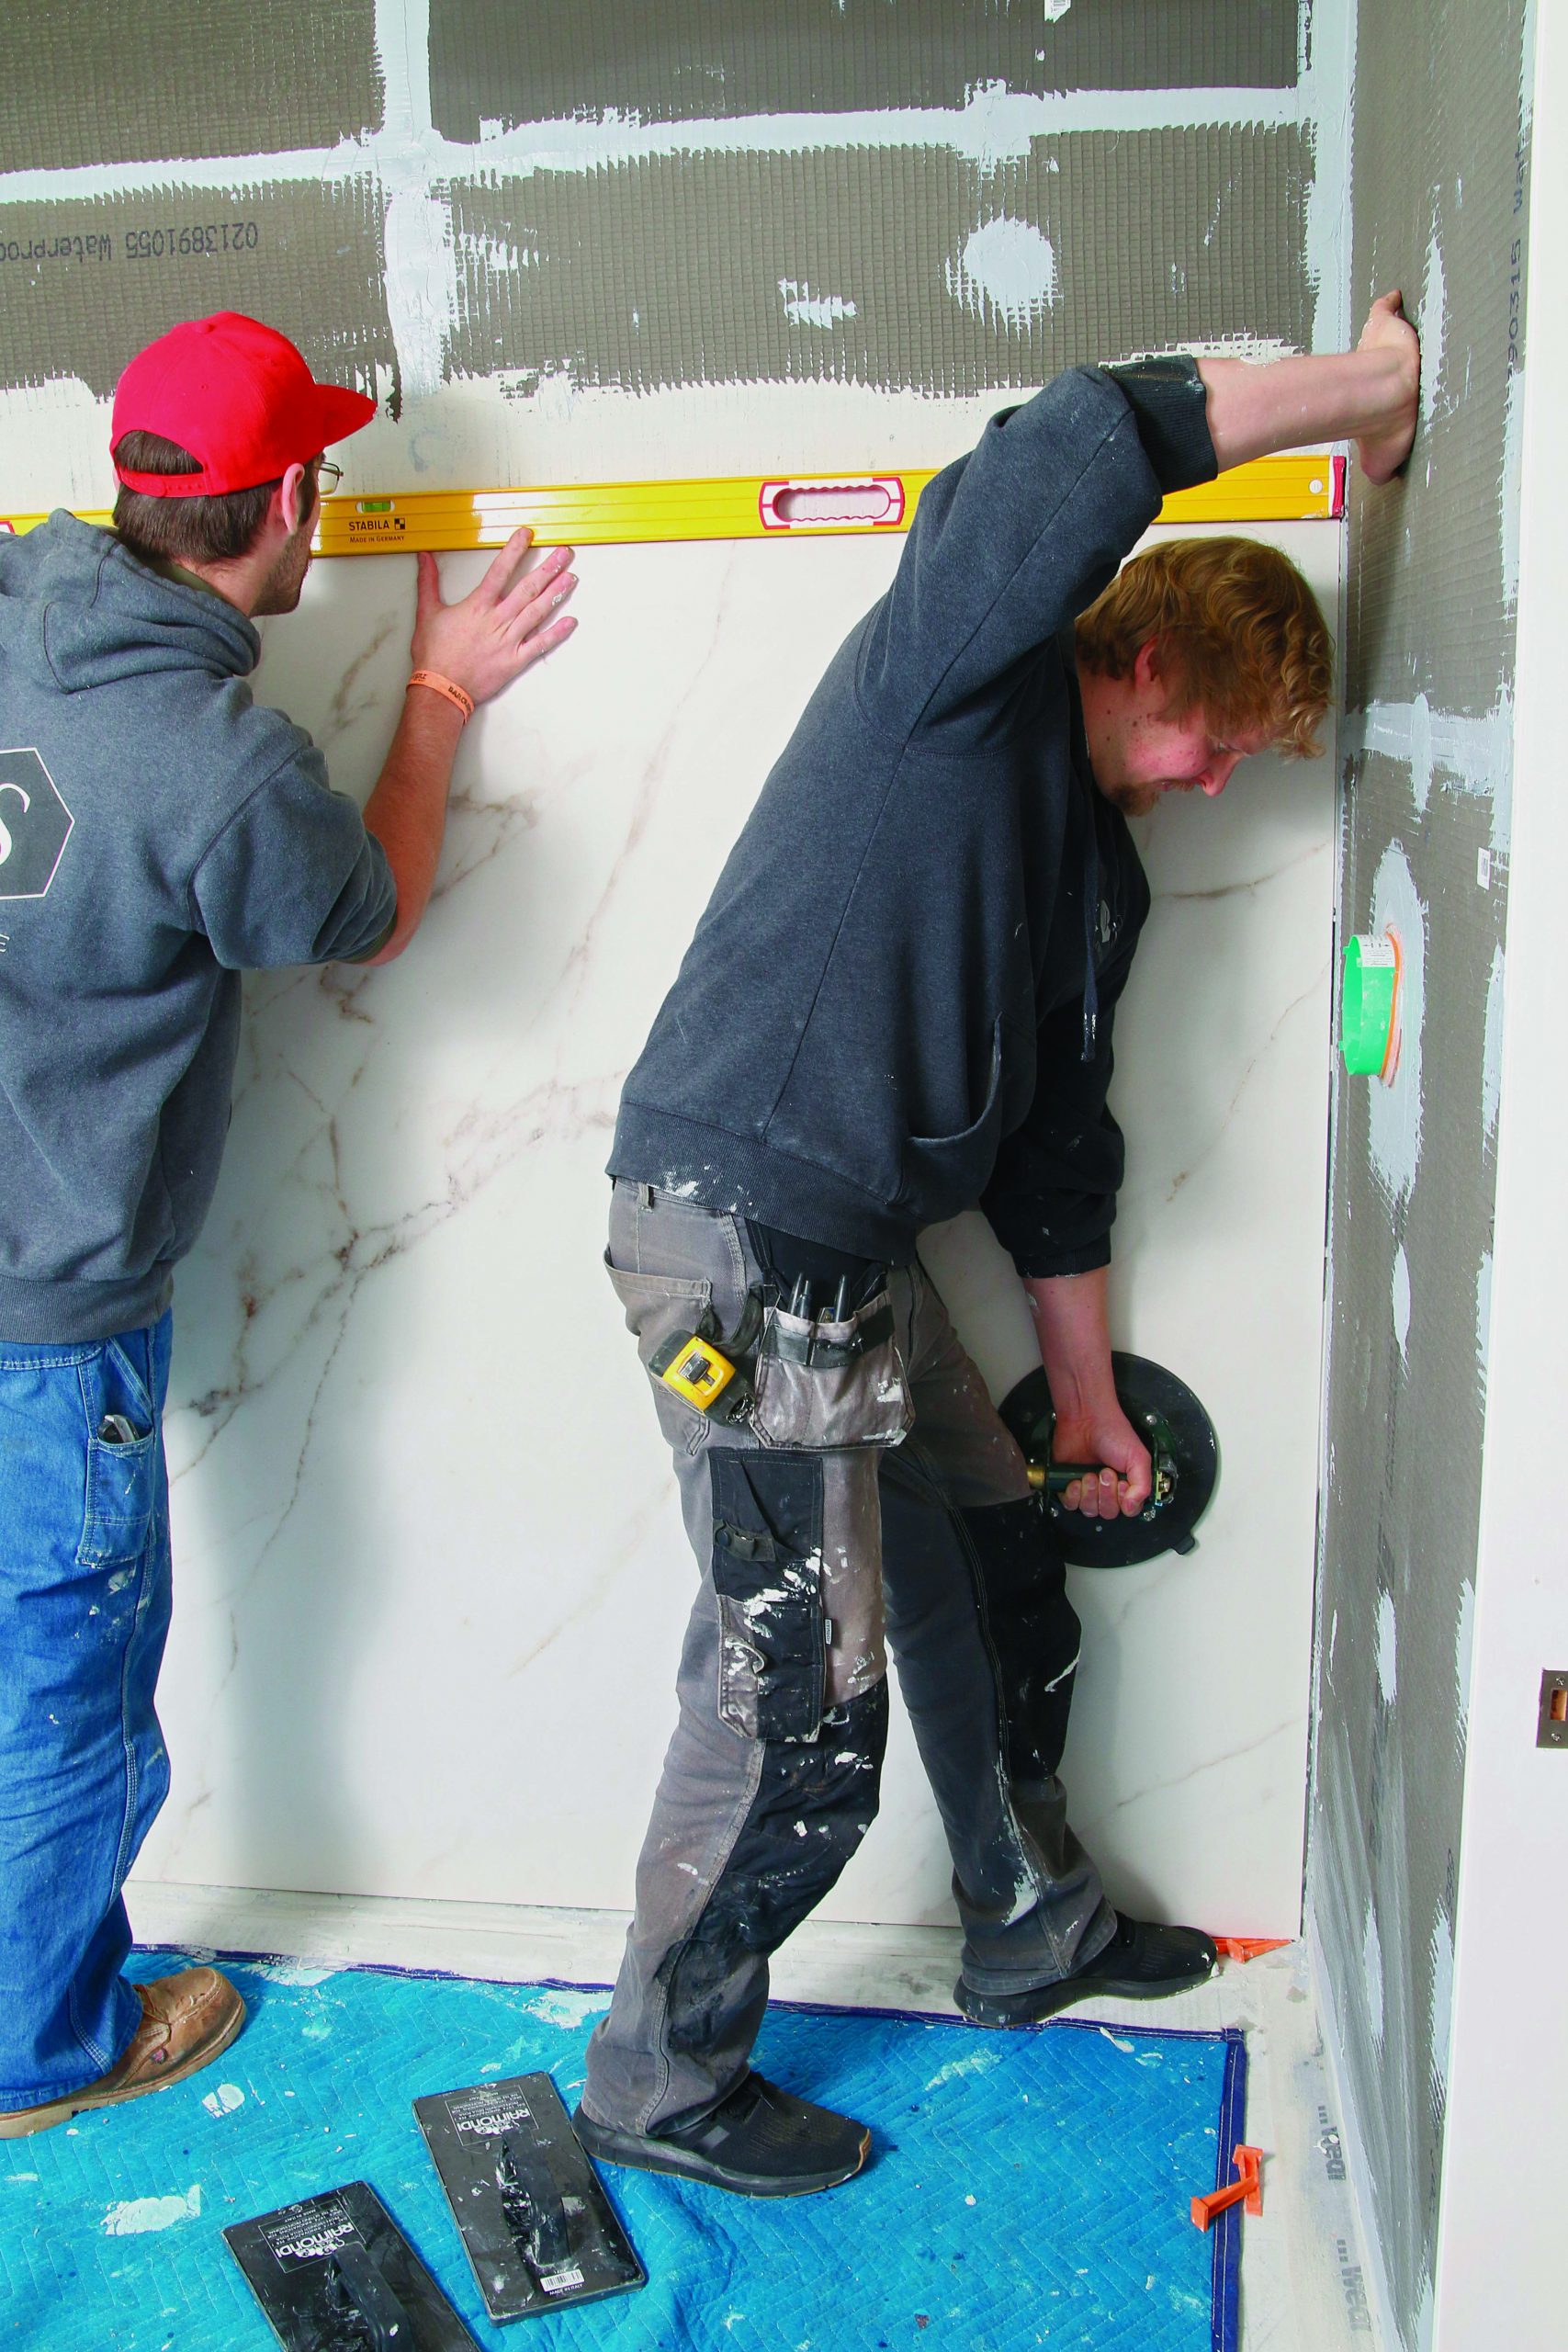
The first challenge in working with porcelain slabs is transporting the thin, heavy panels. Like glass companies do, I use a wood A-frame setup, which is bolted onto a standard trailer. For the rest of the process—carrying, cutting, and setting the slabs—you’ll need a handful of specialized tools developed in Europe, where the trend started, available from industry leaders Raimondi, Sigma, Montolit, Omni Cubed, and ETM (European Tile Masters).

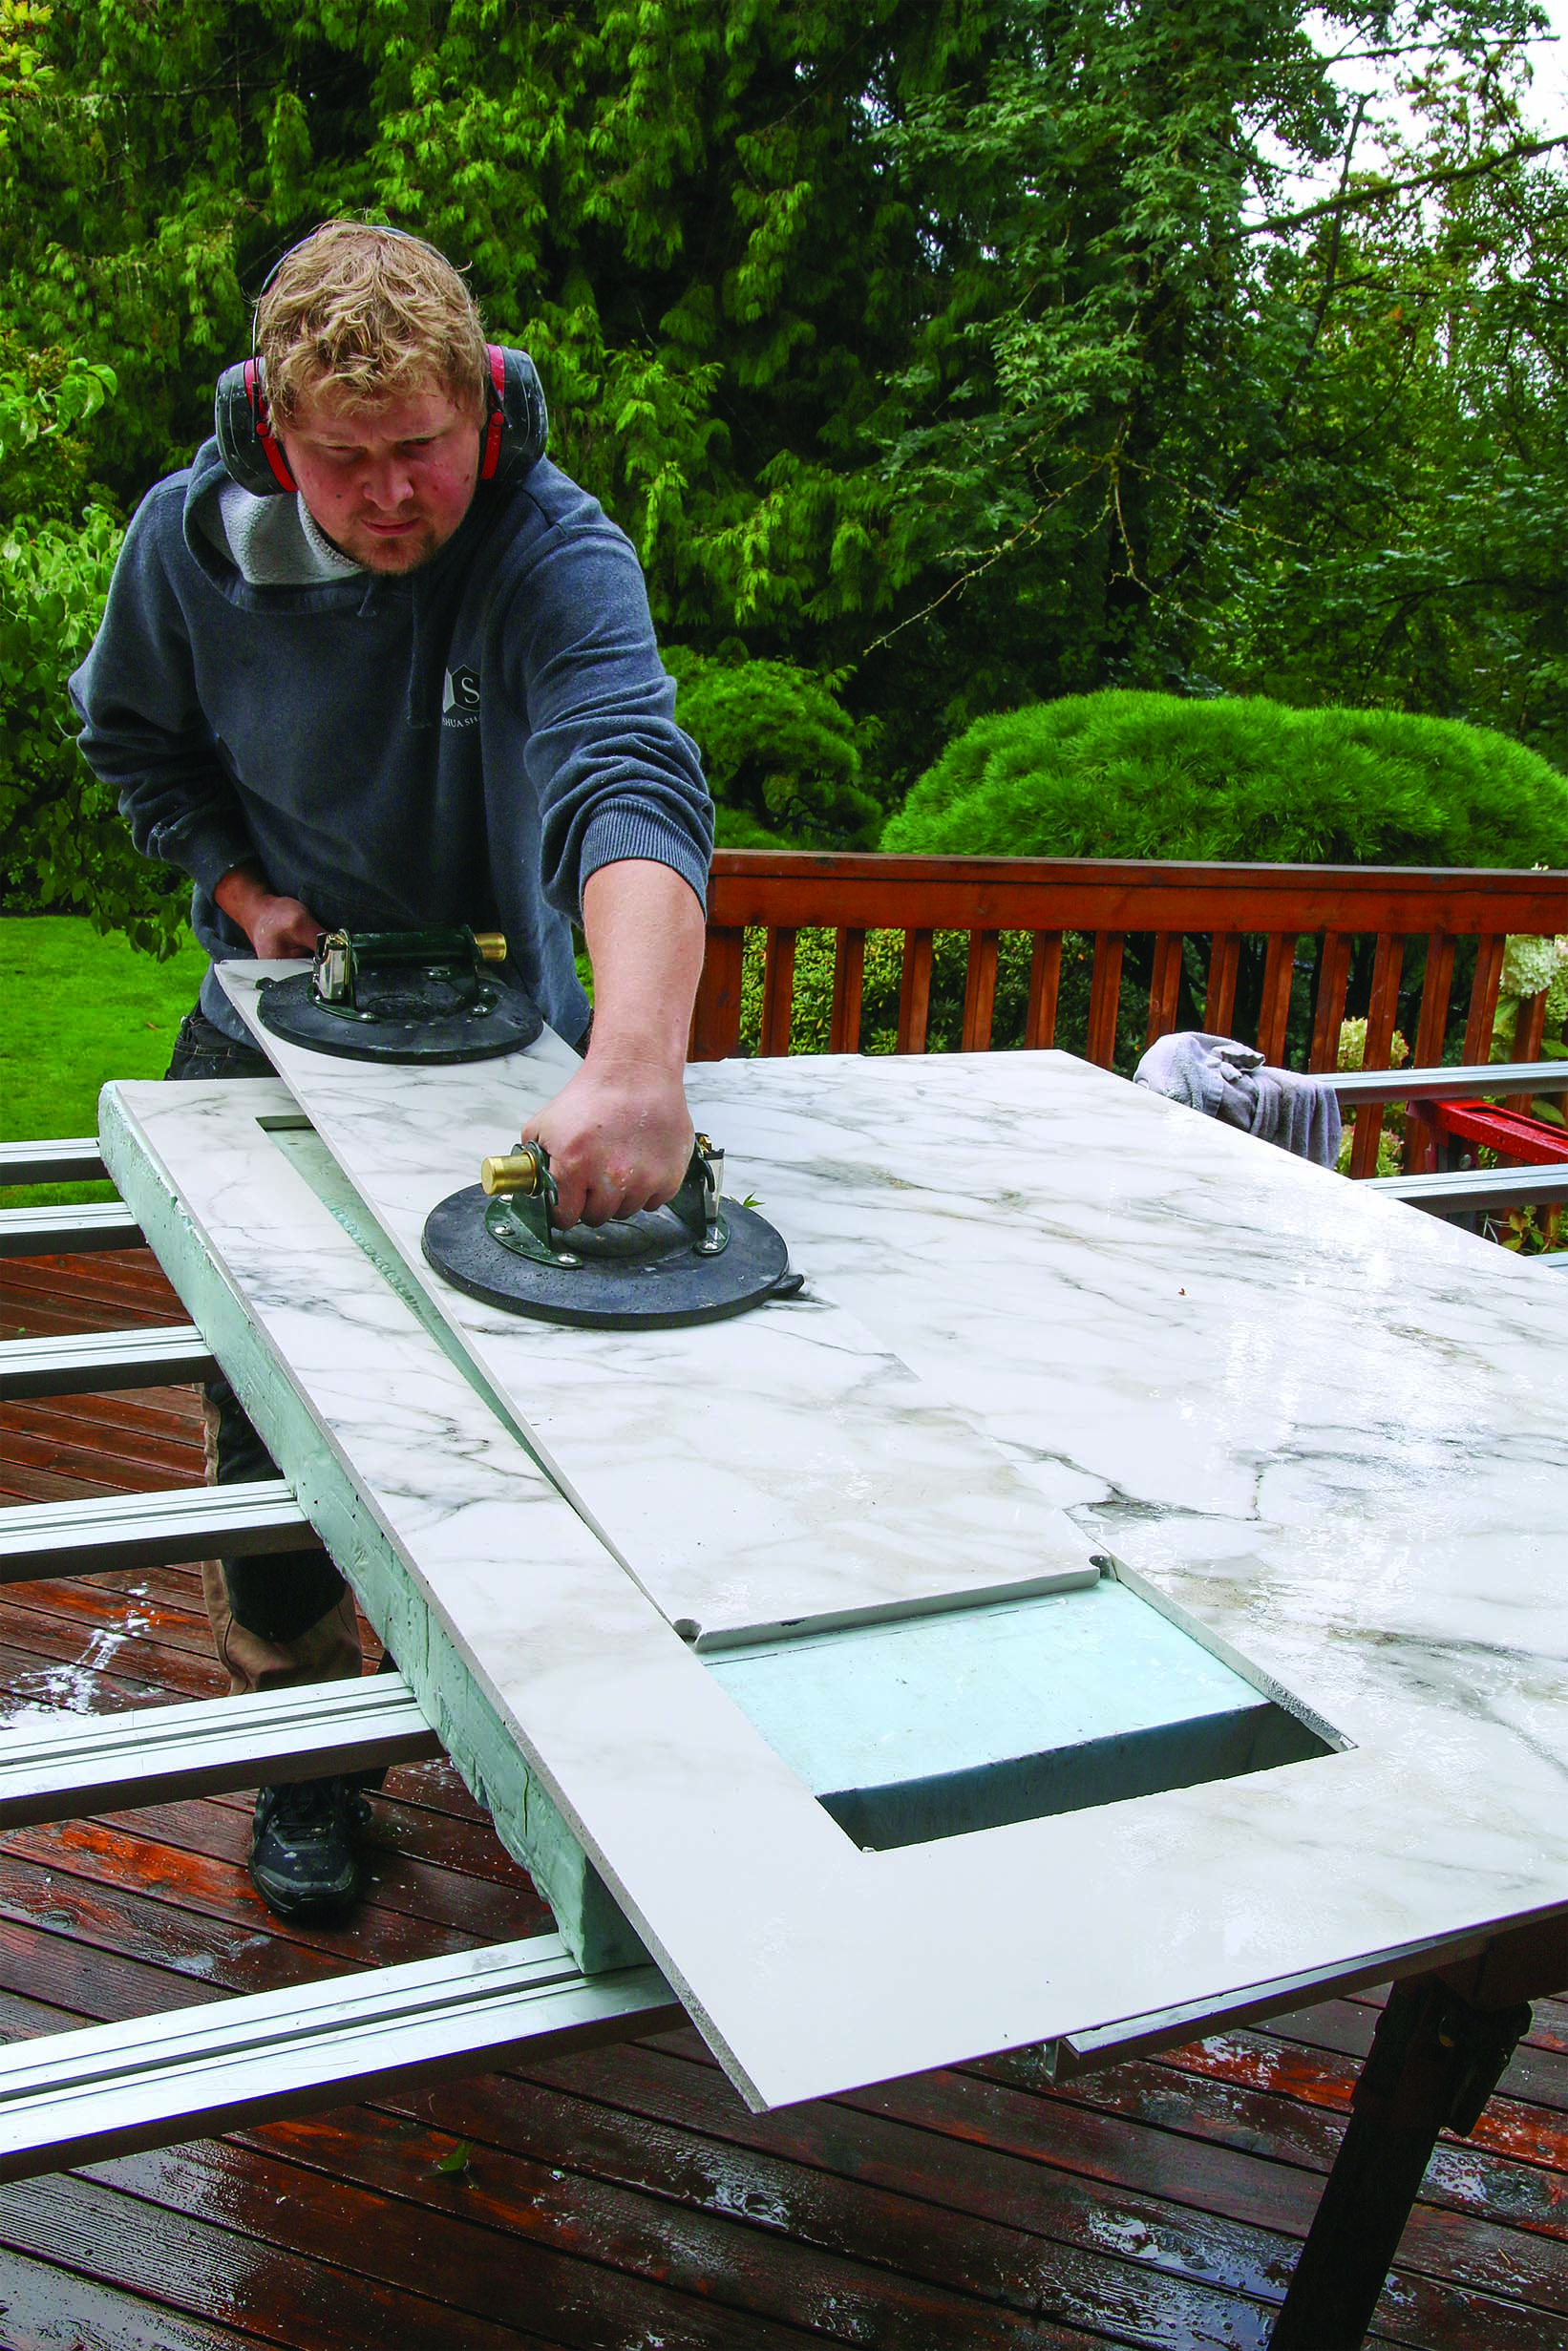
Two initial tools are critical for moving the thin panels safely on and off the trailer and fabrication table, and moving them carefully through the house and precisely into place. These are suction-cup handles and a stabilizer frame that stiffens the panel for trans-port, and also attaches with suction cups.

You’ll also need a big, flat, portable cutting table, which is the first thing you’ll set up on the job site. Some installers get away with sawhorses and a big slab door of some kind, but I prefer my light, flat, modular worktable from Raimondi, which is made for the job and folds up for transport and storage.
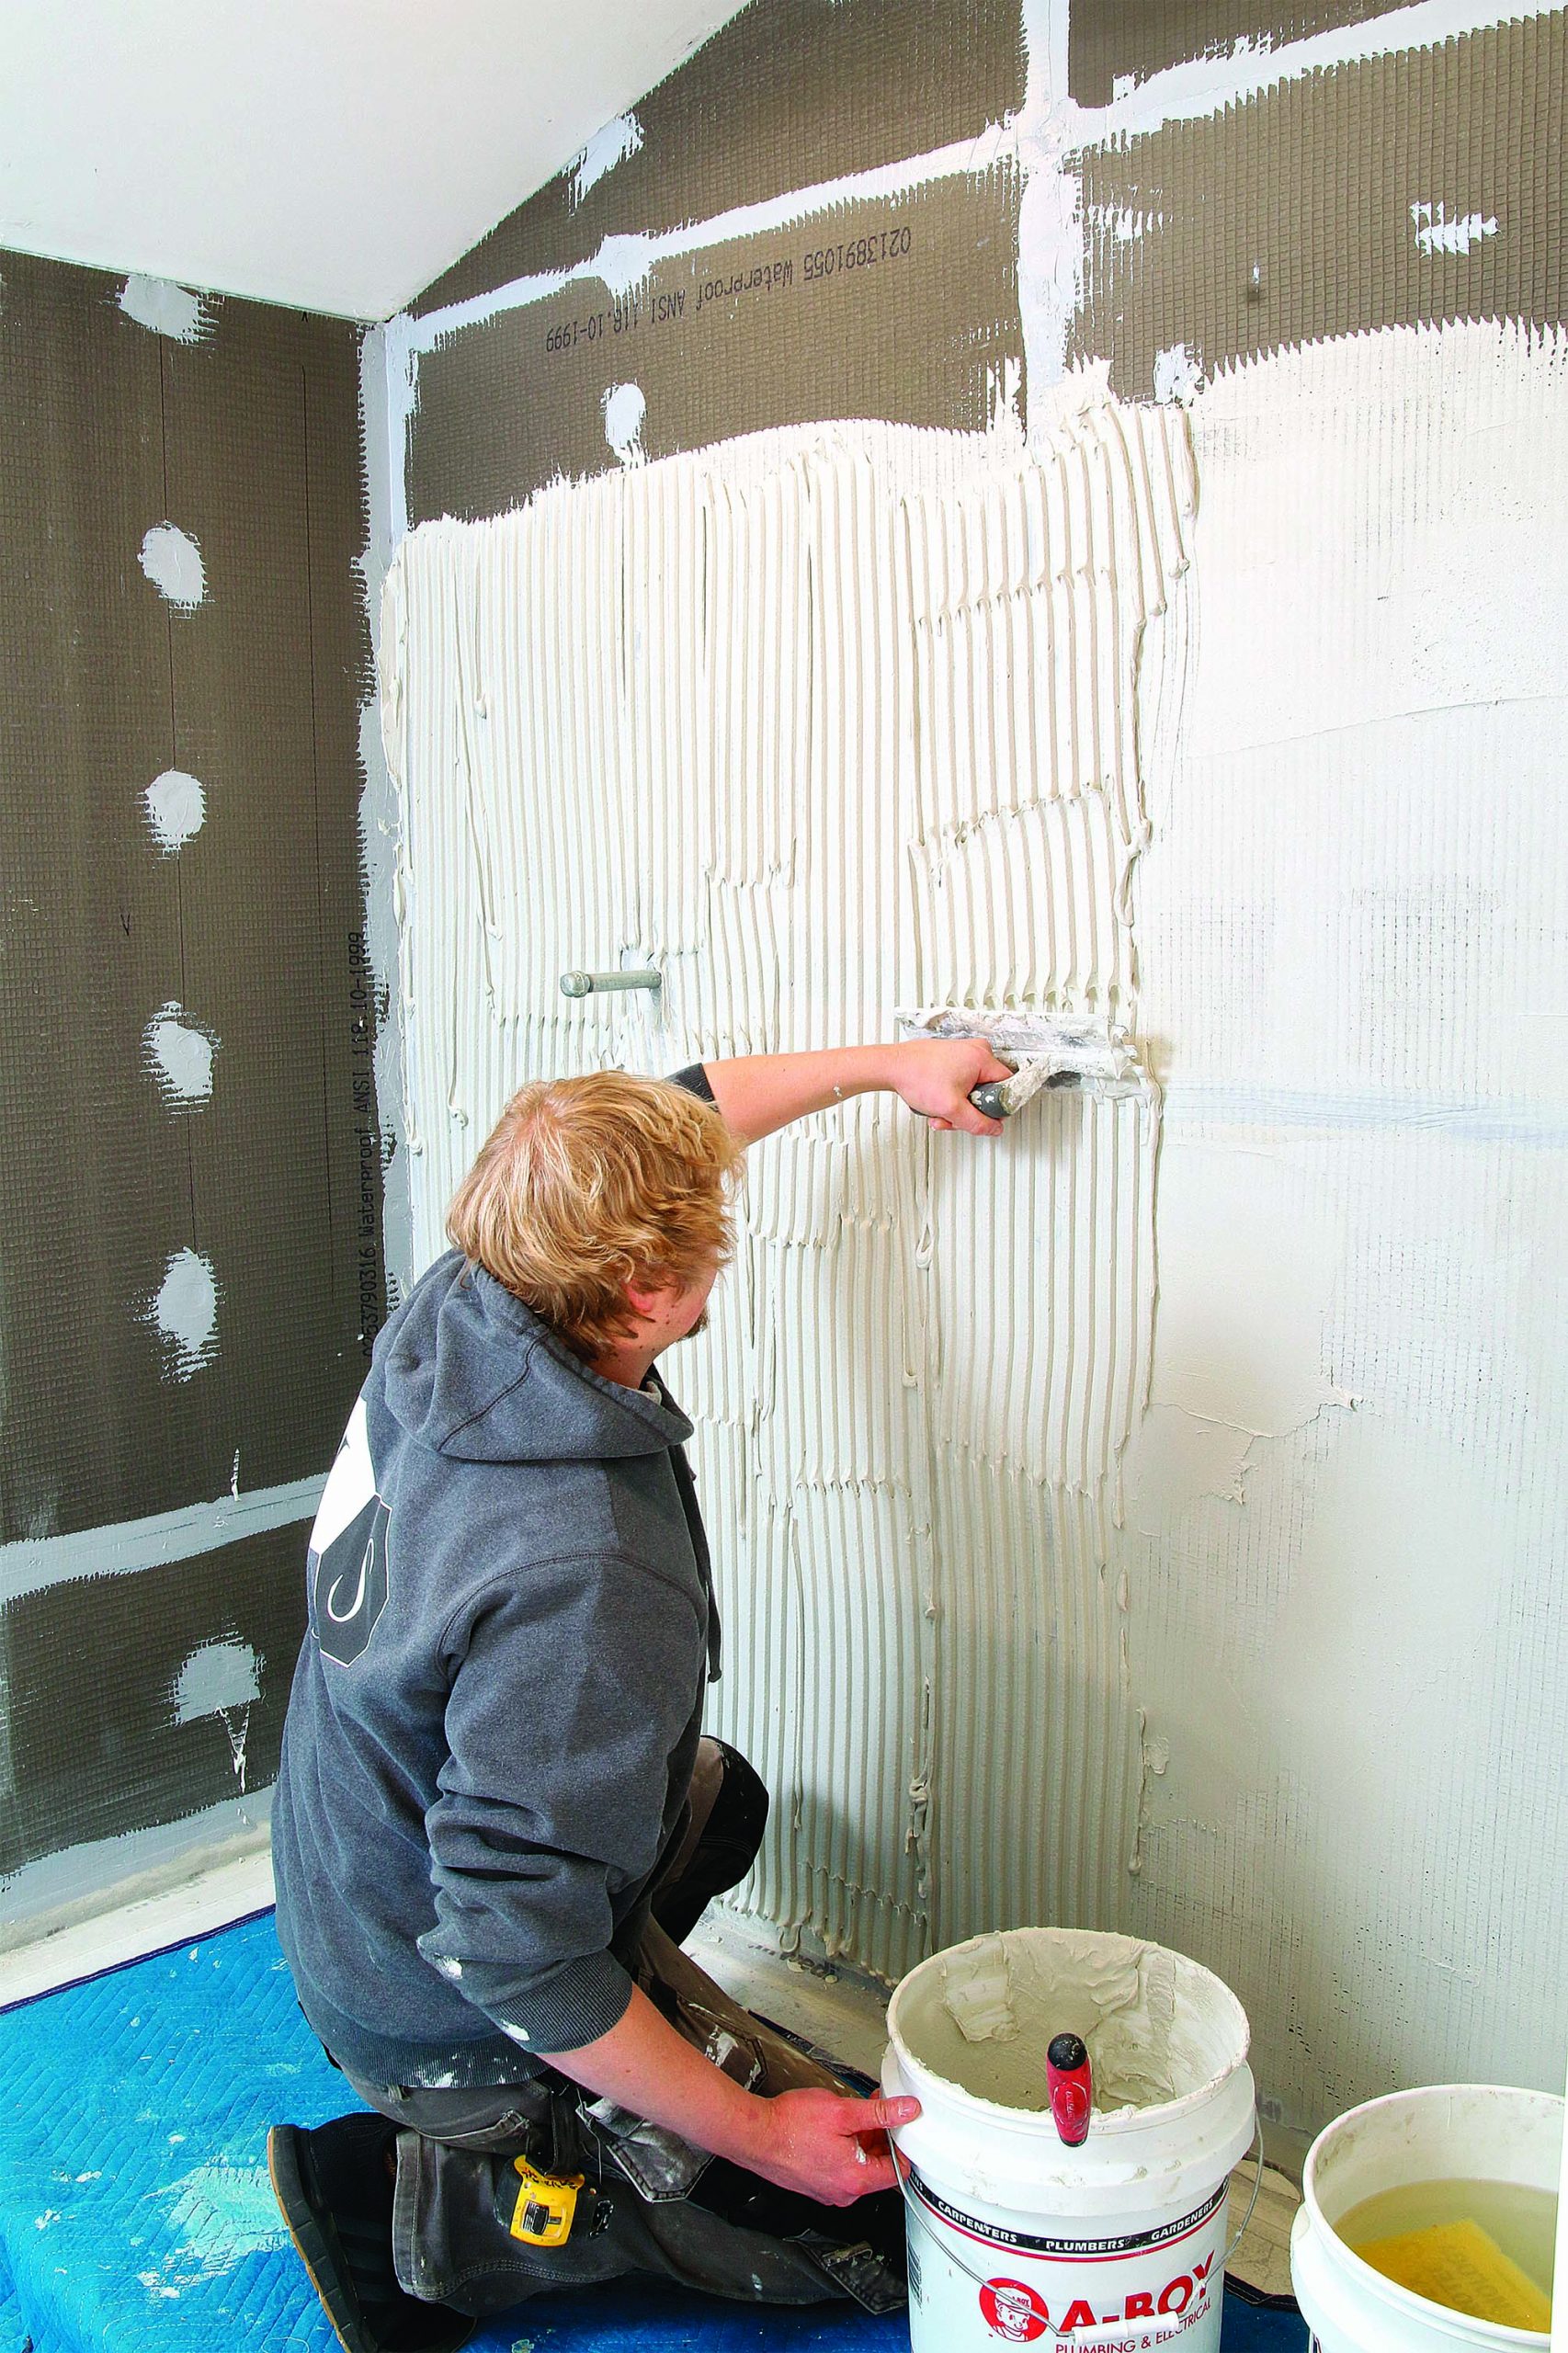
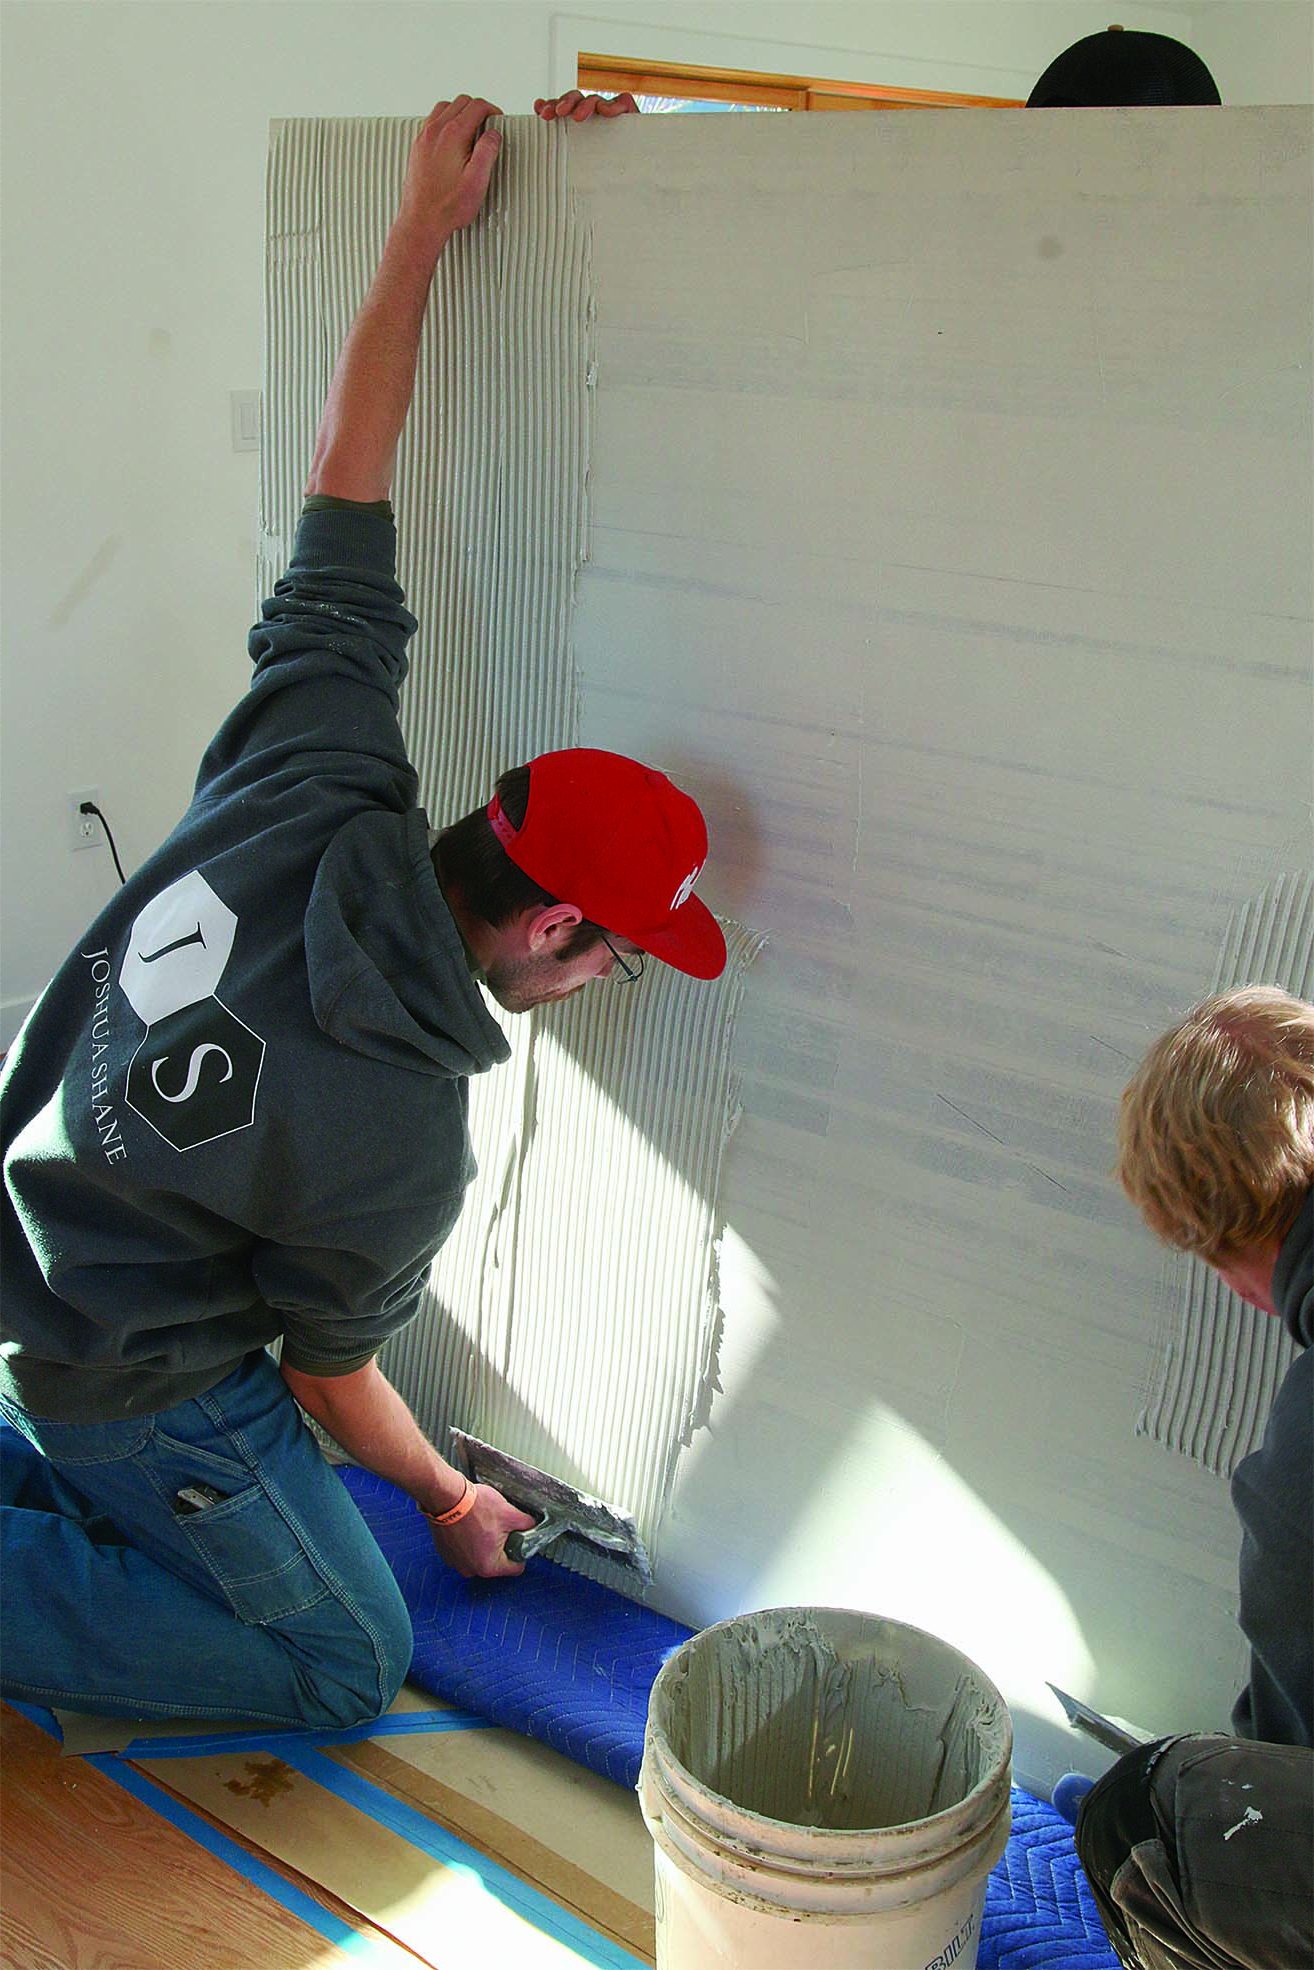
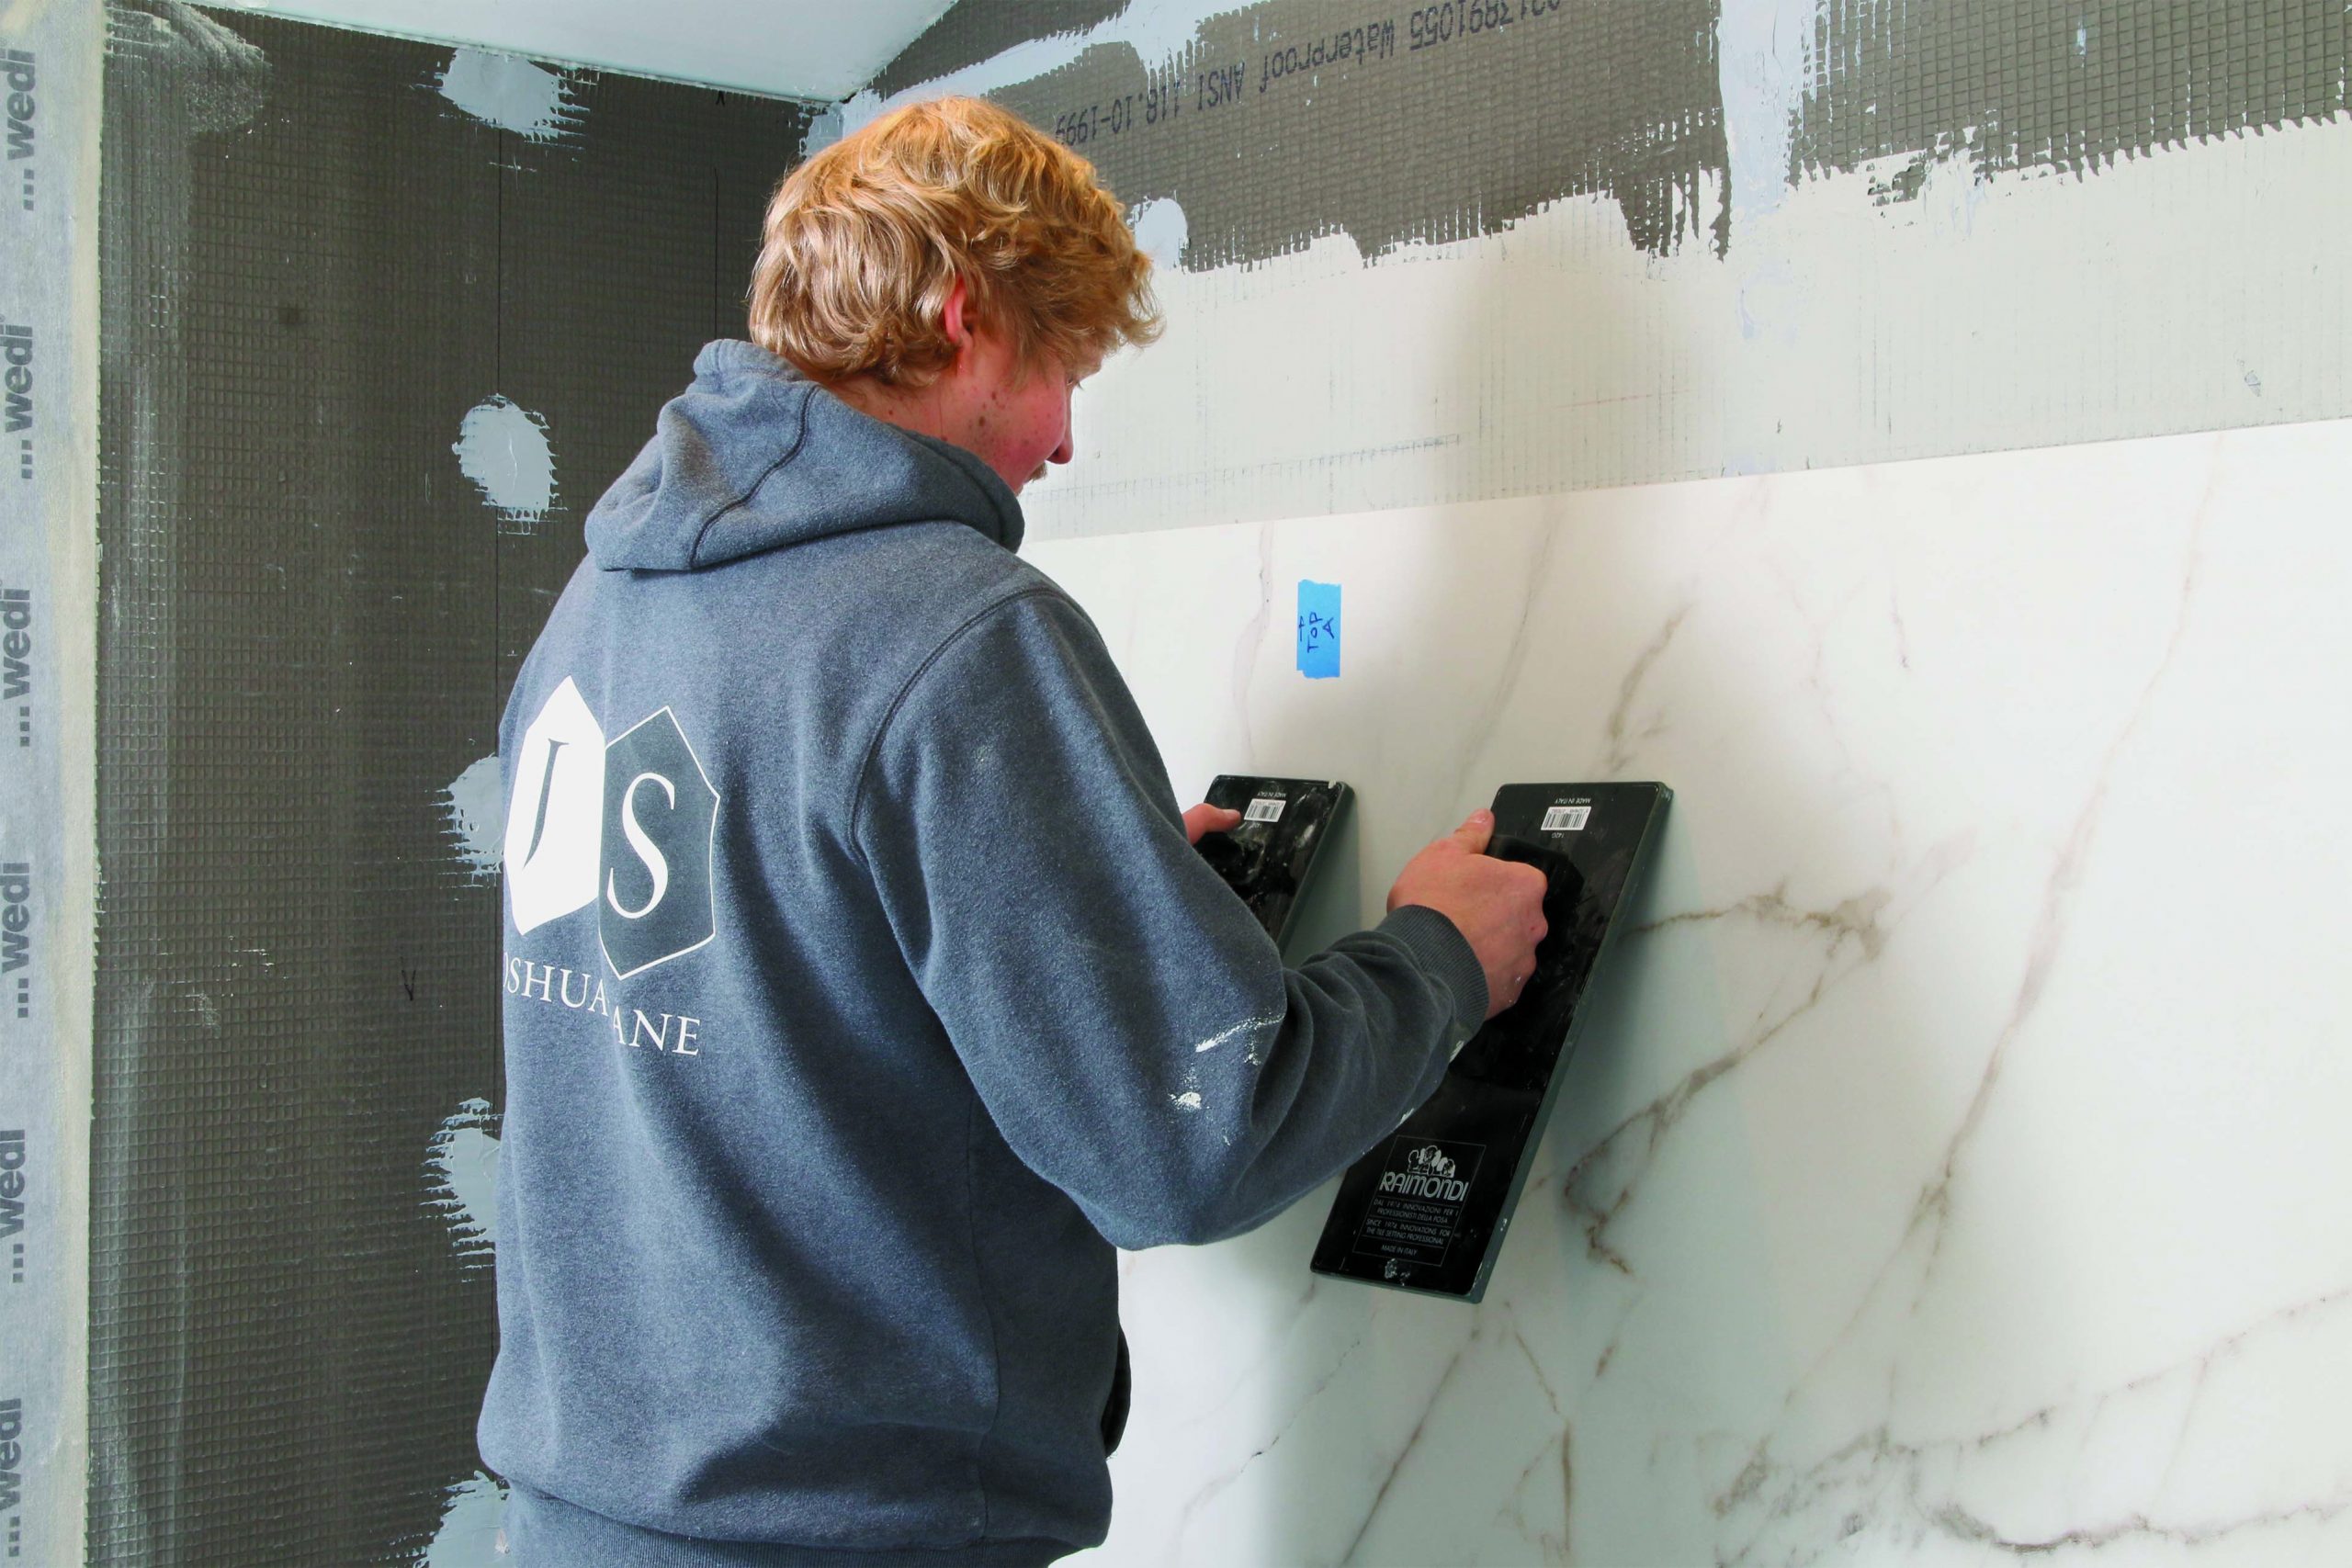
Setting Slabs

Large, thin slabs require tighter tolerances for the substrate. I only allow substrate flatness to vary by 1⁄8 in. or less overall so the thinset bonds properly. I also apply notched coats of medium-bed thinset mortar, including an initial scratch coat to ensure a strong bond, to both the substrate and the panel. A thicker coat of thinset helps fill the gaps caused by slightly bowed panels (almost all of them are) and any minor inconsistencies in the substrate.

tile walls first to avoid damaging floors
Walls first. To avoid damage to floor tiles, it’s best to install the walls first. Start with a scratch coat of medium-body thinset, using the flat side of the trowel, and then apply a notched coat (1⁄2-in. notches in this case).

back butter
Back-butter. Before applying thinset to the back of the slab, it’s critical to remove any manufacturing dust with a damp rag or sponge. Holding the slab upright and near the substrate about to receive it, apply a scratch coat and 1⁄4-in.-notched coat of thinset across the back of the slab.

use suciton cups to wiggle and level big tiles
Wiggle and level. Use the suction-cup handles to wrestle the slab safely into place, and then slide it back and forth to start collapsing the ridges in the thinset. It’s critical that each part of every installation goes in square and level, so we use plastic wedges as necessary.

get out any air pockets behind big tile
Thump out the air pockets. Heavy, rubber-faced “beating blocks” are used to remove air pockets. The blocks are used by touching down one end and then thumping the whole block against the tile. To allow the air to escape, start down along one edge of the slab and then move across it.

check tile slabs with level against wall
Keep it plumb. Always check each slab with a level after placing it on the wall. If the substrate is flat and plumb, and the tile is too, you know you’ve got an even layer of thinset without major air pockets.

match big tile slab edges
Matched edges. Matched slab sets have continuous veining at their long edges for creating a seamless look. To ensure a clean transition, we scrape away any thinset squeeze-out from the edge of the first slab and set 1⁄16-in. spacers (part of the leveling system we use) before placing the second slab on top.

Be ready for a variety of cuts

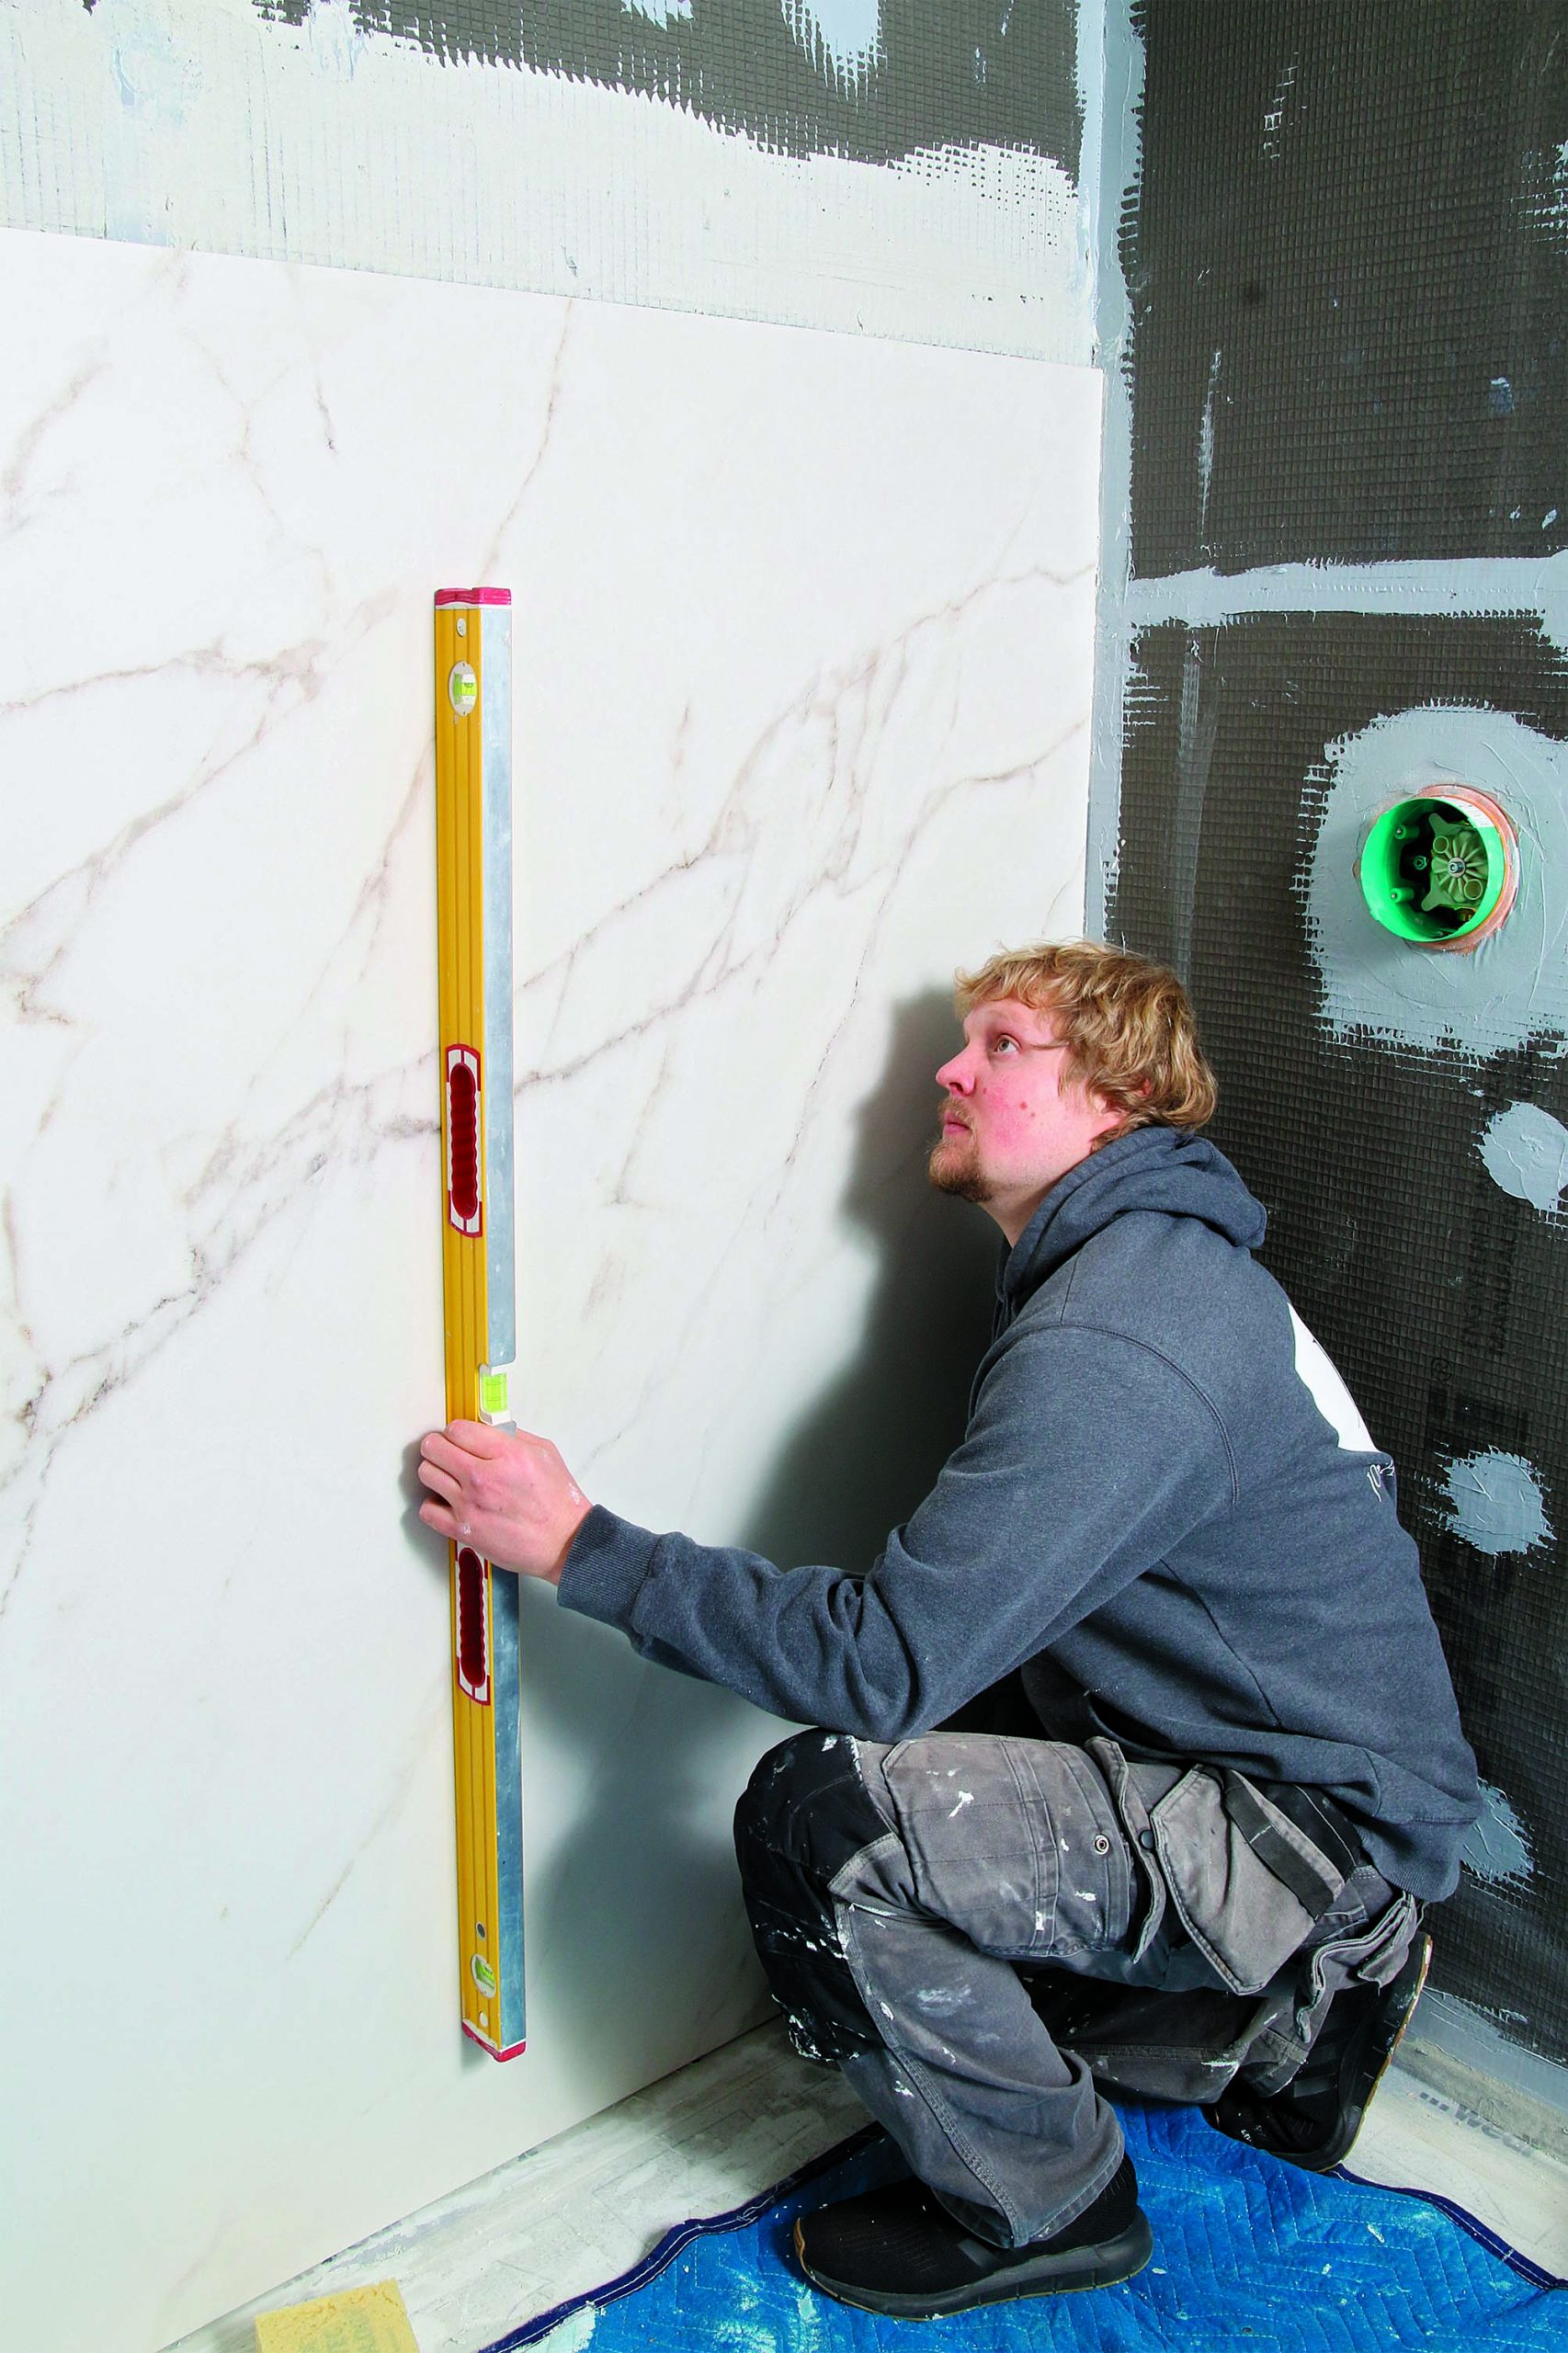
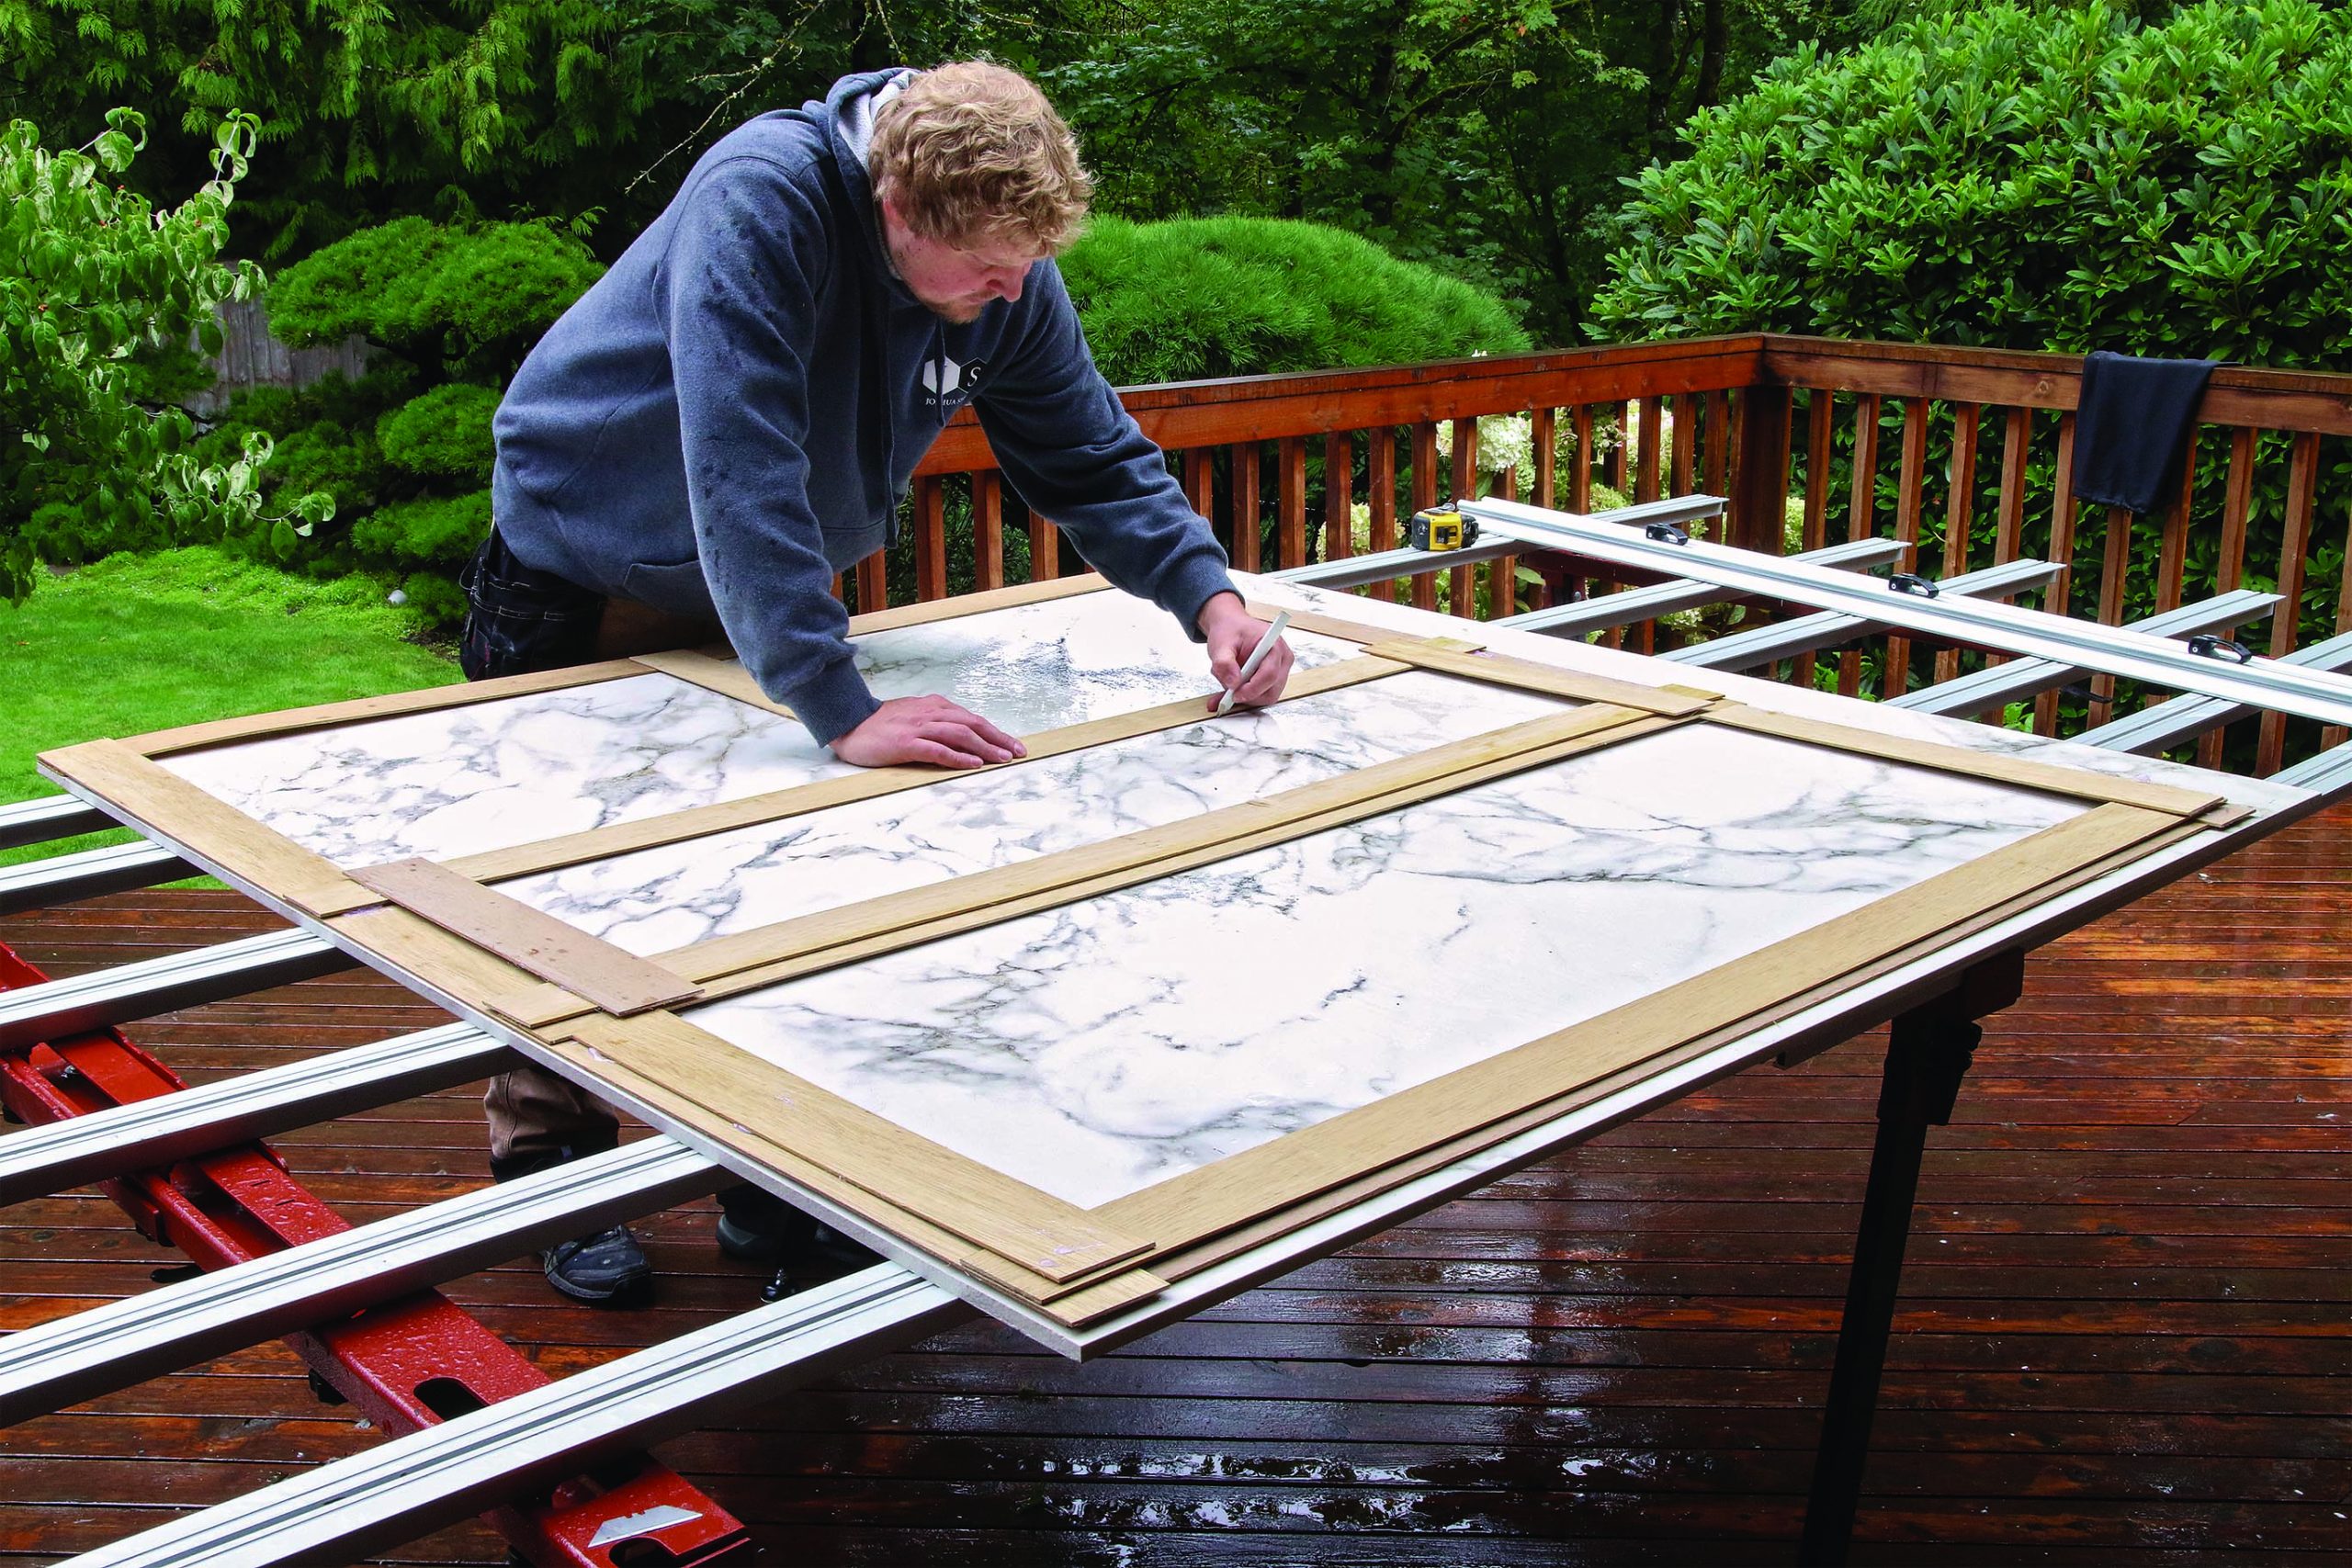
For straight cuts and straightforward cut–outs, I trust my tape, knowing I can make slight adjustments when installing parts and panels. For anything trickier, I make a template using 1⁄8-in. plywood.

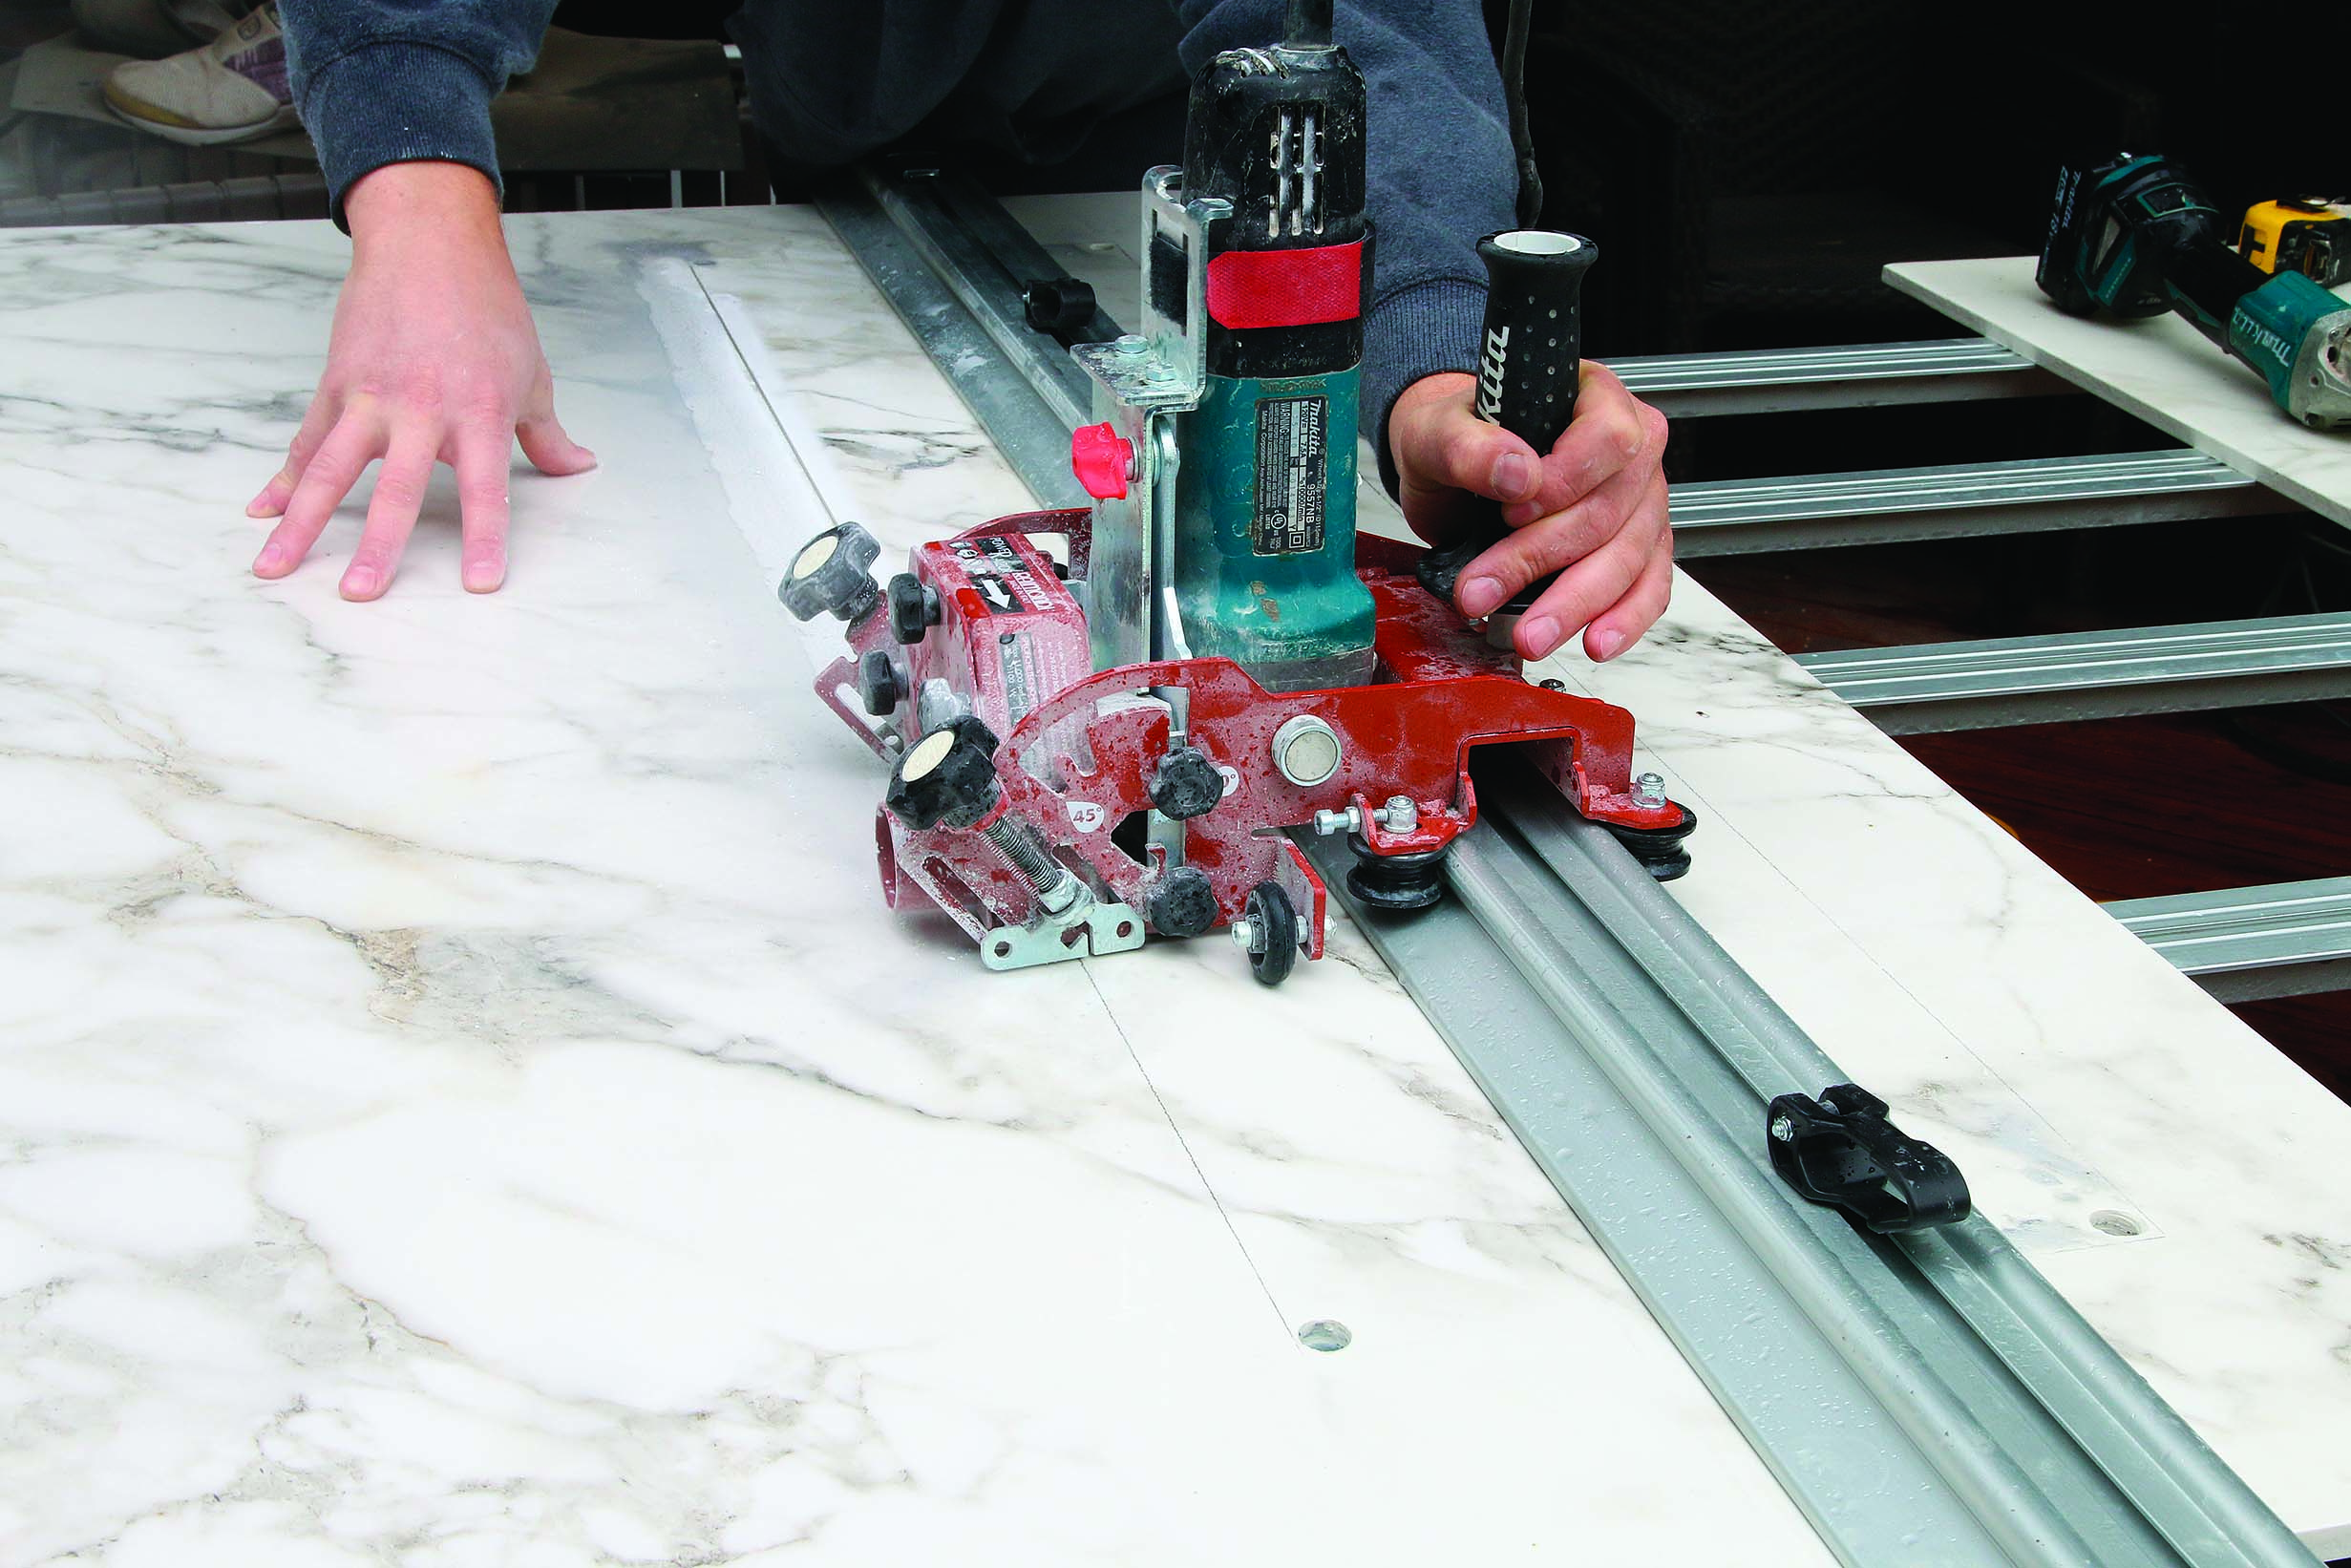
Accuracy is key—you need every edge to come out plumb, level, and square. I use a self-adjusting laser level for this, plus large squares. For end-to-end cuts across an entire panel (or stopped cuts, which end at a cut already made) you can snap porcelain slabs like glass. The first step is scoring, which is done with a tool that rides on a rail that attaches to the tile with more suction cups, the big-slab tilesetter’s best friend. You just line up the scoring point with your layout marks, lock down the cups, and scratch a line across the slab. One thing I learned early on is to wet the suction cups slightly before switching them on, so there’s no chance they’ll shift.

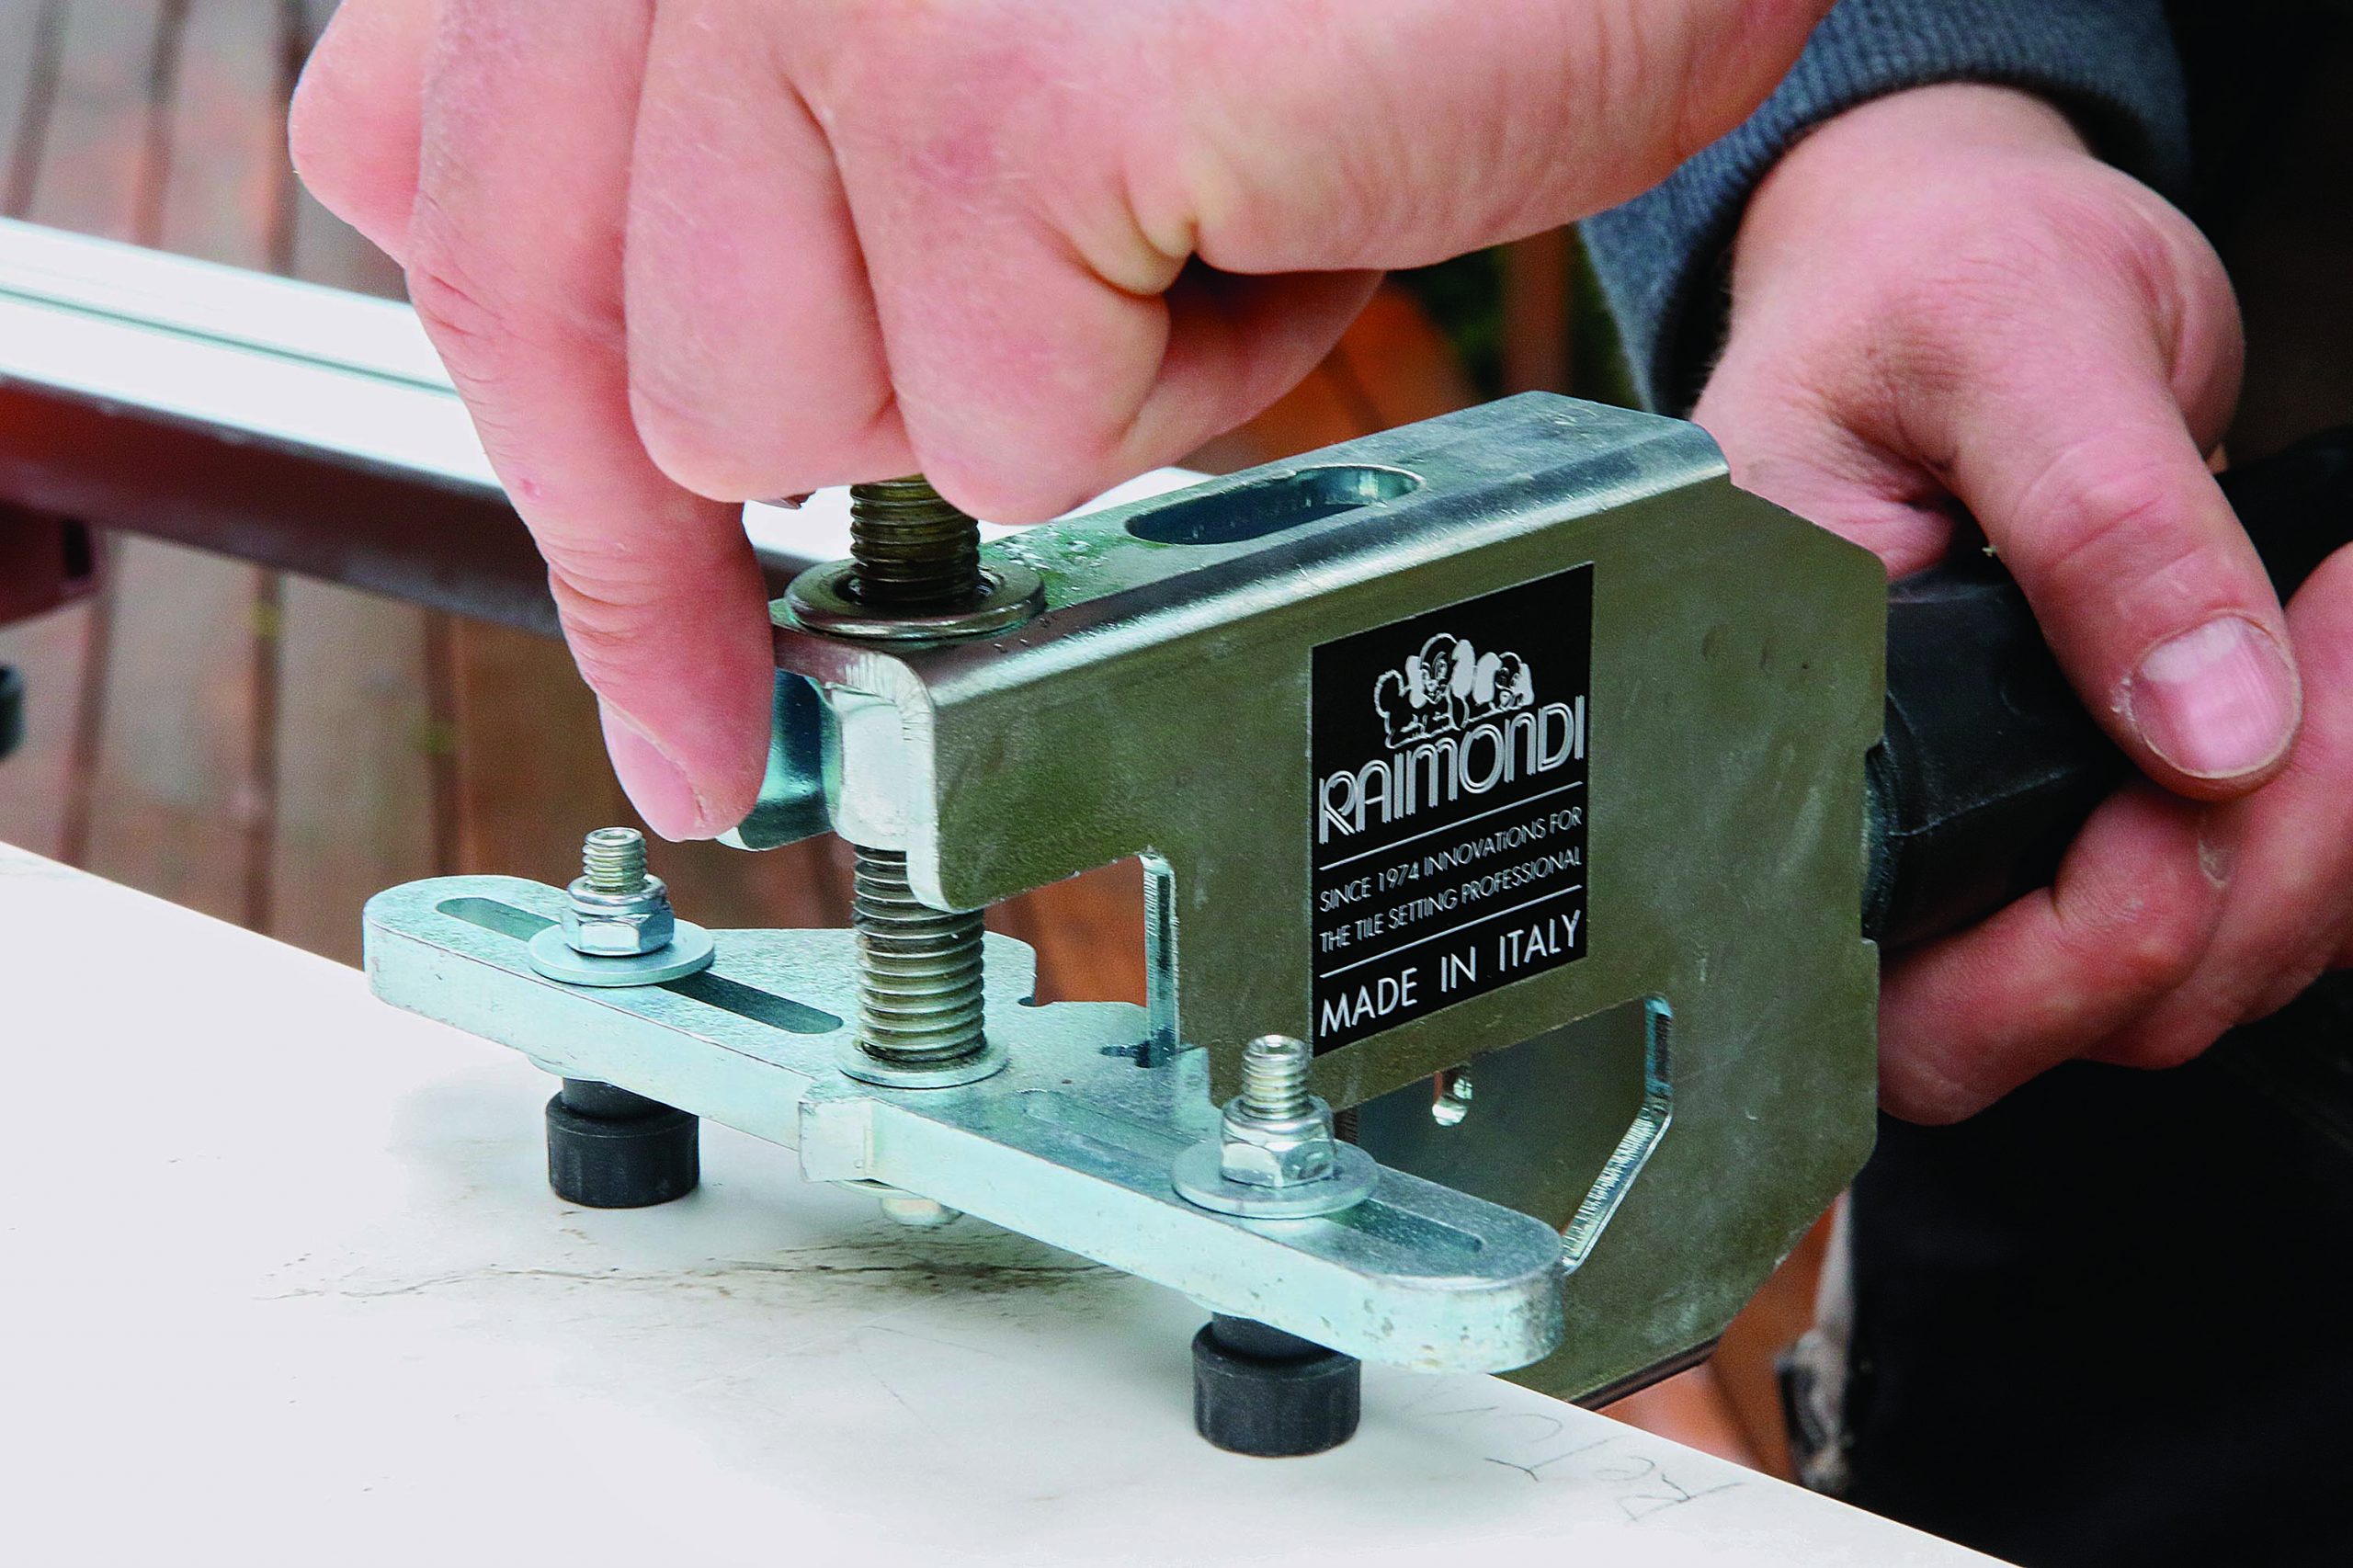
After scoring the slab, fracture it at each end of the score lines using small pliers designed for the job. Apply pressure until you hear or see a faint crack (you’ll almost always hear it). The overhanging offcut usually breaks as you snap the second end, so be sure someone is supporting it. Sometimes I have to return to the first end to use the snap pliers there again, but once the score line snaps, the break usually happens all at once simply from the weight of the tile or with a light push downward.

For inside corners and cutouts, with cuts that need to stop at a precise mark, I use the Raimondi Power Raizor plunge saw, which rides on the same rails the scoring system uses. It uses a diamond wheel to make cuts in a single, slow pass.

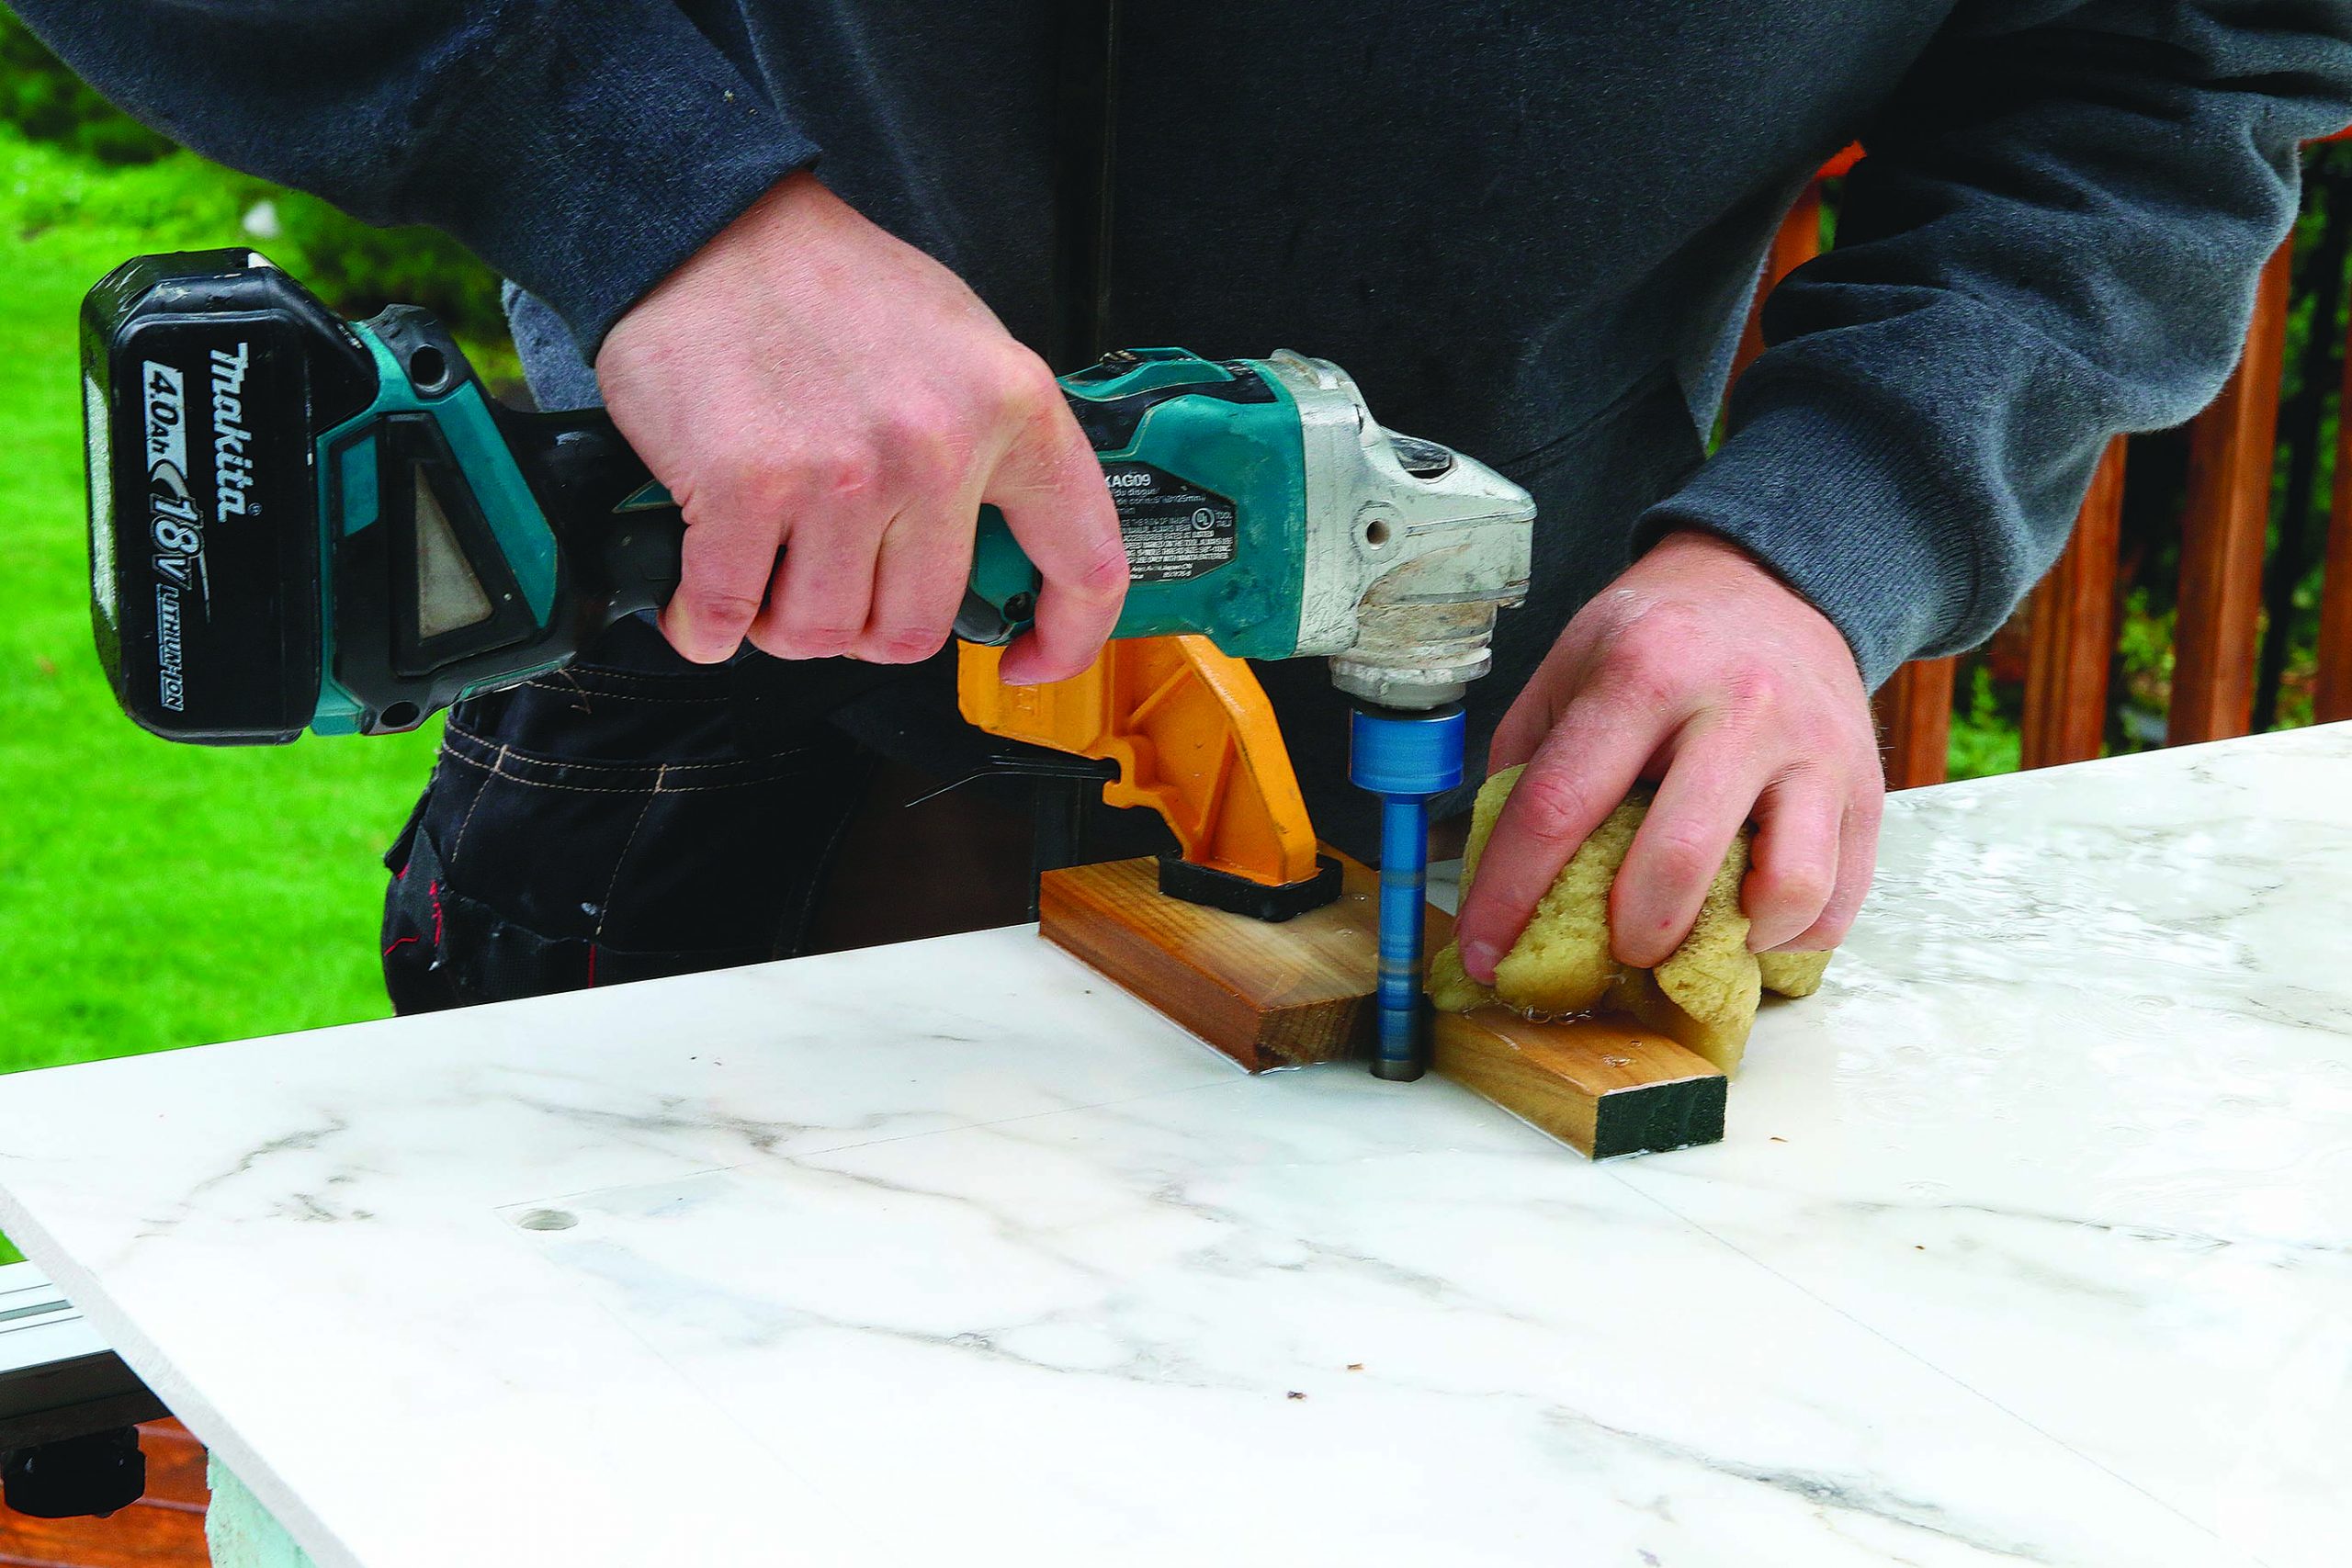
I like to miter outside joints, wrapping the marble veining around the corners for a seamless look. While the Power Raizor can tilt to 45°, I find that it’s quicker and cleaner to cut miters by making a square snap cut or plunge cut first, and then creating the miter freehand with a grinder and diamond wheel, using the square edge as my guide and cut-ting the miter a bit beyond 45° to ensure the joint comes together tight on the show side.

A big payoff

As with any large-format tile, a leveling system is required when installing porcelain slabs. For flat walls, I like the broad pressure of a clip-and-wedge system, like Acufloor leveling spacers. When the floor has a number of angled planes, I prefer the spinner type, which have a smaller footprint.

Panel manufacturers recommend 1⁄8-in. grout lines between slab tiles in the field, and a 1⁄8-in. space where they meet adjacent surfaces, such as inside corners. In my experience, 1⁄16 in. is enough between panels, but I stick with the recommended gap at the adjacent edges to allow the framing to expand and contract, especially in a humid bath-room. Those corners get silicone caulk for the same reason, color-matched to the grout used in the field—but avoid silicone seal-ant between panels, as it tends to hold dirt. Epoxy grout is a better choice for field joints.

I can do a standard porcelain-tile installation for about $25 to $35 per sq. ft., including all necessary materials, backer and waterproofing systems, and installation. Large-format porcelain tile, with pieces 2 ft. by 4 ft. in size, will land somewhere around $35 to $55 per sq. ft., altogether. The porcelain slabs we’re talking about here will be in the neighborhood of $65 to $80 per sq. ft.—a significant jump in price, but still less than I need in the budget to install quarried stone, which typically lands at about $100 to $125 per sq. ft. here in the Pacific Northwest.

And once I tell my clients that they can say goodbye to cleaning miles of grout joints, have the look of true marble at a fraction of the cost and maintenance, and be kinder to the planet in the process, big-slab tile is an easy sell.

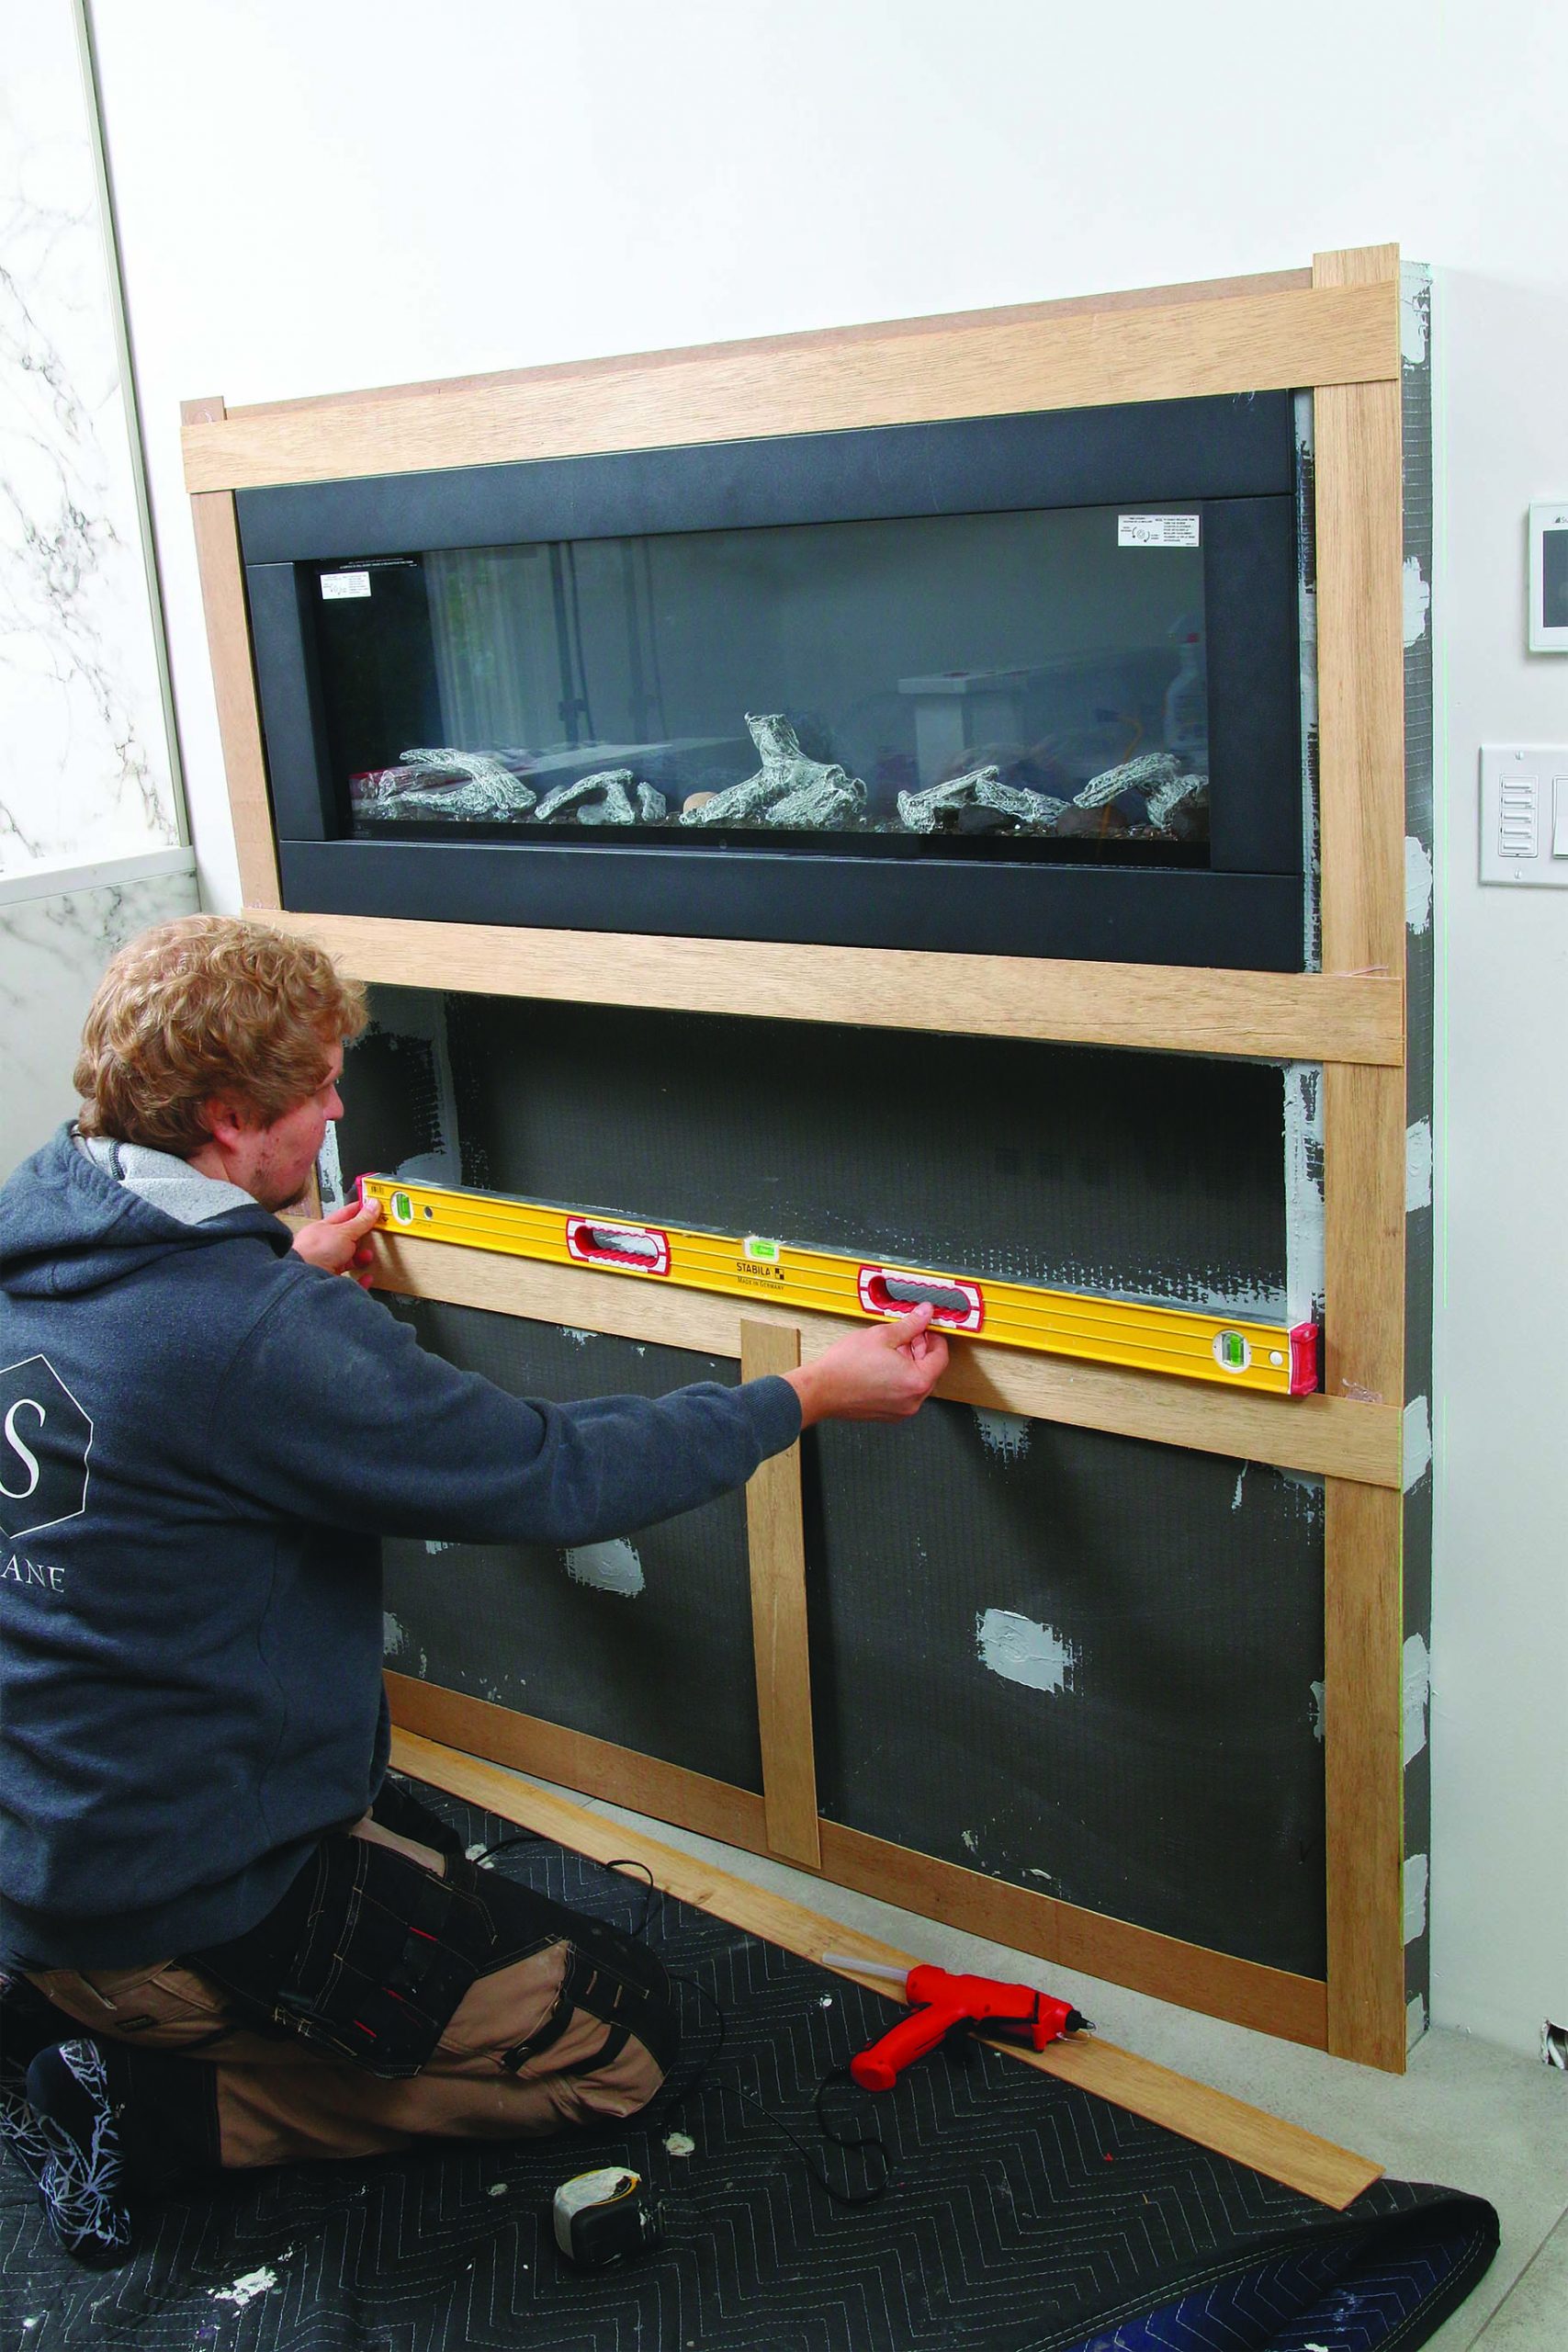
Templates and Plunge Cuts

For complex layouts like this bathroom-fireplace surround, it’s best to make templates, just like when preparing to install countertops. But unlike cutting to length and width, cuts in the center of a slab require a different procedure.

slab tile template basics
Template basics. I build slab-tile templates the same way countertop installers do, using thin plywood strips, with a dab of hot glue attaching each to the substrate and a glob attaching each strip to its mates. At outside corners, where I miter the slabs, the template extends past the substrate by a bit more than the thickness of the tile, leaving room for thinset behind the adjacent piece.

trace the big tile pattern
Trace the pattern. After snap-cutting the panel to the right overall size, I align the template on it and trace inside the perimeter of the cutout with a pencil.

drill holes to relieve pressure
Drilled holes relieve pressure. To prevent cracking at the corners of a center-slab cutout, drill a hole at each corner before making any cuts. I use diamond-core bits—between 1⁄4 in. and 1⁄2 in. in diameter—which I keep on track using a simple wood jig, and keep lubricated with water squeezed from a sponge.

plunge cuts to big tile
Special saw for plunge cuts. The Raimondi Power Raizor plunge-cutting attachment rides the same rails the scoring unit does. Plunge cuts are made slowly, in a single pass.

clean up corners
Clean up The corners. Working from both the show side and underside of the slab, use a 4-in. grinder to square the rounded corners left by the drill bit.

use suction cups to free big tile cutout
Cutout comes free. Use suction cups to carefully lift and remove the waste, exposing the cut edges for the usual mitering and cleanup prior to installation.

tip in the tile panels
Tip it in. For small panels like these, I find it easiest to set the bottom edge in place and then tip the slab against the wall.

tight miters fool the eye
Tight miters fool the eye. Tight miters and matched veining make this fireplace surround look like a thick marble slab. After attaching the return with thinset, I wrap blue tape across the miters to draw them tight, and later fill the grout line with color-matched silicone to allow the framing to move slightly.

From FineHomebuilding #292

To view the entire article, please click the View PDF button below.

More about tile setting:

Job-Site Diaries: Dry-Pack Shower – Watch remodeler Joshua Oduin explain the details and techniques that he uses to install and waterproof a dry-pack concrete shower pan.

Installing Large-Format Tile – In this episode of Job-Site Diaries, watch remodeler Josh Oduin prep and place giant tiles for a custom curbless shower.

Prepping for Tile – Schluter waterproofing and uncoupling membranes cover nearly every surface in the Kentucky FHB House bathroom before the tile goes down.


View PDF
Previous: Tiling Bathroom Walls: Grout Next: Pro Tips for Tiling Walls

Guide

Tiling

Chapter

Tiling Walls & Backsplashes

Sign up for eletters today and get the latest how-to from Fine Homebuilding, plus special offers.

Signing you up...

This site is protected by reCAPTCHA and the Google Privacy Policy and Terms of Service apply.
See all newsletters
See all newsletters

Log in or create an account to post a comment.

Sign up Log in

Become a member and get full access to FineHomebuilding.com

Tiling

Tiling

Trusted, comprehensive guidance from the pros for a great-looking tile job in any room of the house

View Project Guide

View All Project Guides »

Become a member and get unlimited site access, including the Tiling Project Guide.

Start Free Trial

Selecting Tile
  • The Basics
  • Tile Options
Tools & Techniques
  • Job-Preparation Tools
  • Cutting Tiles
  • Setting & Grouting Tools
Installation Materials
  • Membranes & Substrates
  • Adhesives & Mortars
  • Grout
  • Sealers & Caulk
  • Spacers, Hardware & Trim
Preparation
  • The Prep Job
  • Repairs & Surface Prep
  • Installing Backerboard
Tiling Floors
  • Layout & Installation
  • Setting Specialty Tiles
Tiling Walls & Backsplashes
  • Preparation
  • Backsplashes
  • Walls
Tiling Showers
  • Tile Shower Basics
  • Waterproofing
  • Shower Pans
  • Shower Drains
  • Shower Niches
  • Video Series: Tile a Shower
  • Video Series: Tile a Barrier-Free Bathroom
Grouting, Sealing & Caulking
  • Grouting
  • Caulking
  • Sealing
Maintenance & Repair
  • Maintenance
  • Tile Repair
  • Grout Repair

Fine Home Building

Newsletter Sign-up

  • Fine Homebuilding

    Home building tips, offers, and expert advice in your inbox.

  • Green Building Advisor

    Building science and energy efficiency advice, plus special offers, in your inbox.

  • Old House Journal

    Repair, renovation, and restoration tips, plus special offers, in your inbox.

Signing you up...

This site is protected by reCAPTCHA and the Google Privacy Policy and Terms of Service apply.
See all newsletters

Follow

  • Fine Homebuilding

    Dig into cutting-edge approaches and decades of proven solutions with total access to our experts and tradespeople.

    Start Free Trial Now
    • Facebook
    • Instagram
    • X
    • LinkedIn
  • GBA Prime

    Get instant access to the latest developments in green building, research, and reports from the field.

    Start Free Trial Now
    • Facebook
    • YouTube
  • Old House Journal

    Learn how to restore, repair, update, and decorate your home.

    Subscribe Now
    • Facebook
    • Instagram
    • X

Membership & Magazine

  • Online Archive
  • Start Free Trial
  • Magazine Subscription
  • Magazine Renewal
  • Gift a Subscription
  • Customer Support
  • Privacy Preferences
  • About
  • Contact
  • Advertise
  • Careers
  • Terms of Use
  • Site Map
  • Do not sell or share my information
  • Privacy Policy
  • Accessibility
  • California Privacy Rights

© 2025 Active Interest Media. All rights reserved.

Fine Homebuilding receives a commission for items purchased through links on this site, including Amazon Associates and other affiliate advertising programs.

  • Home Group
  • Antique Trader
  • Arts & Crafts Homes
  • Bank Note Reporter
  • Cabin Life
  • Cuisine at Home
  • Fine Gardening
  • Fine Woodworking
  • Green Building Advisor
  • Garden Gate
  • Horticulture
  • Keep Craft Alive
  • Log Home Living
  • Military Trader/Vehicles
  • Numismatic News
  • Numismaster
  • Old Cars Weekly
  • Old House Journal
  • Period Homes
  • Popular Woodworking
  • Script
  • ShopNotes
  • Sports Collectors Digest
  • Threads
  • Timber Home Living
  • Traditional Building
  • Woodsmith
  • World Coin News
  • Writer's Digest
Active Interest Media logo
X
X
This is a dialog window which overlays the main content of the page. The modal window is a 'site map' of the most critical areas of the site. Pressing the Escape (ESC) button will close the modal and bring you back to where you were on the page.

Main Menu

  • How-To
  • Design
  • Tools & Materials
  • Video
  • Blogs
  • Forum
  • Project Guides
  • Reader Projects
  • Magazine
  • Members
  • FHB House

Podcasts

  • FHB Podcast
  • ProTalk

Webinars

  • Upcoming and On-Demand

Podcasts

  • FHB Podcast
  • ProTalk

Webinars

  • Upcoming and On-Demand

Popular Topics

  • Kitchens
  • Business
  • Bedrooms
  • Roofs
  • Architecture and Design
  • Green Building
  • Decks
  • Framing
  • Safety
  • Remodeling
  • Bathrooms
  • Windows
  • Tilework
  • Ceilings
  • HVAC

Magazine

  • Current Issue
  • Past Issues
  • Magazine Index
  • Subscribe
  • Online Archive
  • Author Guidelines

All Access

  • Member Home
  • Start Free Trial
  • Gift Membership

Online Learning

  • Courses
  • Project Guides
  • Reader Projects
  • Podcast

More

  • FHB Ambassadors
  • FHB House
  • Customer Support

Account

  • Log In
  • Join

Newsletter

Get home building tips, offers, and expert advice in your inbox

Signing you up...

This site is protected by reCAPTCHA and the Google Privacy Policy and Terms of Service apply.
See all newsletters
See all newsletters

Follow

  • X
  • YouTube
  • instagram
  • facebook
  • pinterest
  • Tiktok

Join All Access

Become a member and get instant access to thousands of videos, how-tos, tool reviews, and design features.

Start Your Free Trial

Subscribe

FHB Magazine

Start your subscription today and save up to 81%

Subscribe

We hope you’ve enjoyed your free articles. To keep reading, become a member today.

Get complete site access to expert advice, how-to videos, Code Check, and more, plus the print magazine.

Start your FREE trial

Already a member? Log in

Privacy Policy Update

We use cookies, pixels, script and other tracking technologies to analyze and improve our service, to improve and personalize content, and for advertising to you. We also share information about your use of our site with third-party social media, advertising and analytics partners. You can view our Privacy Policy here and our Terms of Use here.

Cookies

Analytics

These cookies help us track site metrics to improve our sites and provide a better user experience.

Advertising/Social Media

These cookies are used to serve advertisements aligned with your interests.

Essential

These cookies are required to provide basic functions like page navigation and access to secure areas of the website.

Delete My Data

Delete all cookies and associated data