FHB Logo Facebook LinkedIn Email Pinterest Twitter X Instagram Tiktok YouTube Plus Icon Close Icon Navigation Search Icon Navigation Search Icon Arrow Down Icon Video Guide Icon Article Guide Icon Modal Close Icon Guide Search Icon Skip to content
Subscribe
Log In
  • How-To
  • Design
  • Tools & Materials
  • Restoration
  • Videos
  • Blogs
  • Forum
  • Magazine
  • Members
  • FHB House
  • Podcast
Log In

Fine Homebuilding Project Guides

Tiling

Guide Home
  • Selecting Tile
  • Tools & Techniques
  • Installation Materials
  • Preparation
  • Tiling Floors
  • Tiling Walls & Backsplashes
  • Tiling Showers
  • Grouting, Sealing & Caulking
  • Maintenance & Repair
How-To

Tiling over a Tiled Shower Pan

A pro tilesetter gives tips for a solid installation without removing existing tiles.

Issue 206
  • X
  • facebook
  • linkedin
  • pinterest
  • email
  • add to favorites Log in or Sign up to save your favorite articles

Q:

I’d like to change the tile in my shower pan. Is there a way to do so without removing the existing tile? Neither the tile nor the drain leaks.

Rob Brenner, Hannibal, KS

A:

Tom Meehan, owner of Cape Cod Tileworks, replies: Absolutely. In fact, I recently completed a similar job. It’s a straightforward process that requires isolating the old tile with a waterproofing membrane, removing the old drain cover, and setting a new grate over the existing drain.

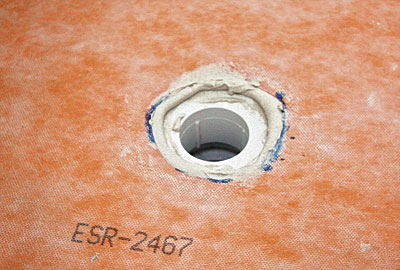
I isolate the old tile with Schluter-Kerdi membrane (www.schluter.com) set in a thin bed of latex-modified thinset. To get a good bond between the old tile and the thinset, I score the old tile and drain assembly with an angle grinder. Then I cover the entire pan with latex-modified thinset, making sure the membrane overlaps the existing drain flange. Once the thinset is down, I install the Schluter-Kerdi membrane and let it cure for about 24 hours.

thinset

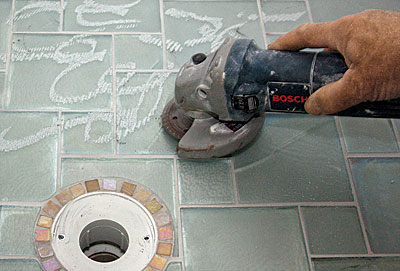
1. Rough up the tile

Use an angle grinder equipped with a diamond blade to score the old tile. This creates a better bonding substrate for the latex-modified thinset.
tiled shower pan base

2. Lay the waterproofing membrane

After spreading a thin layer of thinset over the old tile, install Schluter-Kerdi membrane. Trowel the membrane flat, and remove all excess thinset around the drain flange. Let the membrane set for 24 hours.

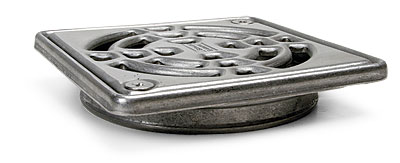
The key to this process is making sure that the new drain grate doesn’t sit above the new tile, so I install the tile and the drain grate at the same time. I use the top section of Schluter’s Kerdi-Drain two-part assembly. The assembly is designed to work with Schluter’s bonding flange, but I simply set it in thinset above the existing drain’s flange. Other drain grates might work, but this is the only one I’ve found that’s shallow enough to work in this application.

Using a grinder, I grind down the small knobs that protrude from the existing drain flange, and I lay a generous amount of thinset around the drain and around the grate. Then I set the grate over the drain, pushing down firmly with both hands to ensure a tight seal all around.

tiled shower pan grate

3. Lock the grate in place with thinset and tile

After applying thinset around the drain, press the grate in place until it sits flat. Next, I test-fit the new tile around the grate, adding or removing thinset until the tile is even with or slightly above the new grate. I proceed by tiling around the drain toward the walls. The key here is to ensure that everything pitches toward the drain. Once the thinset cures, I complete the job with grout followed by two coats of Miracle Sealants 511 Impregnator sealer.

Previous: Keep Heavy Tile on the Ceiling Next: Curbless Shower: Build Up, Not Down

Guide

Tiling

Chapter

Tiling Showers

Sign up for eletters today and get the latest how-to from Fine Homebuilding, plus special offers.

Signing you up...

This site is protected by reCAPTCHA and the Google Privacy Policy and Terms of Service apply.
See all newsletters
See all newsletters

View Comments

  1. Ptech | Sep 14, 2016 05:42pm | #1

    I have a simular situation, but there appears to be a leak at my clients. I was wondering if this would be a good approach after testing the drain, and all pluming for leaks prior to re-tiling the floor.

  2. BrickmanConsulting | Nov 14, 2017 09:07am | #2

    The Schluter-Kerdi membrane instructions repeatedly state that unmodified thin set should be used to insure proper bonding. Could you please resolve this discrepancy?

    1. Suburbanguy | Oct 17, 2019 05:01pm | #4

      BrickmanConsulting. You are correct. The author fails to mention the VERY long cure time that might be required. I've learned that one can't believe everything one reads on Fine Homebuilding.

      "Modified thin-set mortars must dry for the polymers to coalesce and form a hard film in order to gain strength. When sandwiched between two impervious materials such as KERDI and ceramic tile, including porcelain tile, drying takes place very slowly through the open joints in the tile covering. [According to the Tile Council of North America’s Handbook for Ceramic Tile Installation, this drying period can fluctuate from 14 days to over 60 days,....."

      https://www.schluter.com/schluter-us/en_US/faq/shower-system-kerdi-thin-set-mortar-type-ceramic-stone-tile

  3. fallline20h | Nov 22, 2018 11:51pm | #3

    I am interested in doing pretty much this exact same thing i am just a little confused on the drain part. can the kerdi drain system simply set into the old drain system? just that piece without the flange that the grate piece screws into? thanks for the help

  4. user-7946516 | Feb 19, 2025 04:06pm | #5

    Look at the ARC TrueDeck shower bases. They are available in several sizes, with an offset central or linear drain, and reducing the floor joist height is unnecessary. Measure the size of the shower base you want and check with your local supplier for availability. Cut out the subfloor (typically 3/4"), set the new ARC base over the opening, and install it according to the manufacturer's directions. I have installed several, and they are foolproof. Tile over the shower base and the rest of the bathroom floor. When installed as directed, they will support up to 800 lbs. YouTube videos are showing the installation process.

Log in or create an account to post a comment.

Sign up Log in

Become a member and get full access to FineHomebuilding.com

Tiling

Tiling

Trusted, comprehensive guidance from the pros for a great-looking tile job in any room of the house

View Project Guide

View All Project Guides »

Become a member and get unlimited site access, including the Tiling Project Guide.

Start Free Trial

Selecting Tile
  • The Basics
  • Tile Options
Tools & Techniques
  • Job-Preparation Tools
  • Cutting Tiles
  • Setting & Grouting Tools
Installation Materials
  • Membranes & Substrates
  • Adhesives & Mortars
  • Grout
  • Sealers & Caulk
  • Spacers, Hardware & Trim
Preparation
  • The Prep Job
  • Repairs & Surface Prep
  • Installing Backerboard
Tiling Floors
  • Layout & Installation
  • Setting Specialty Tiles
Tiling Walls & Backsplashes
  • Preparation
  • Backsplashes
  • Walls
Tiling Showers
  • Tile Shower Basics
  • Waterproofing
  • Shower Pans
  • Shower Drains
  • Shower Niches
  • Video Series: Tile a Shower
  • Video Series: Tile a Barrier-Free Bathroom
Grouting, Sealing & Caulking
  • Grouting
  • Caulking
  • Sealing
Maintenance & Repair
  • Maintenance
  • Tile Repair
  • Grout Repair

Fine Home Building

Newsletter Sign-up

  • Fine Homebuilding

    Home building tips, offers, and expert advice in your inbox.

  • Green Building Advisor

    Building science and energy efficiency advice, plus special offers, in your inbox.

  • Old House Journal

    Repair, renovation, and restoration tips, plus special offers, in your inbox.

Signing you up...

This site is protected by reCAPTCHA and the Google Privacy Policy and Terms of Service apply.
See all newsletters

Follow

  • Fine Homebuilding

    Dig into cutting-edge approaches and decades of proven solutions with total access to our experts and tradespeople.

    Start Free Trial Now
    • Facebook
    • Instagram
    • X
    • LinkedIn
  • GBA Prime

    Get instant access to the latest developments in green building, research, and reports from the field.

    Start Free Trial Now
    • Facebook
    • YouTube
  • Old House Journal

    Learn how to restore, repair, update, and decorate your home.

    Subscribe Now
    • Facebook
    • Instagram
    • X

Membership & Magazine

  • Online Archive
  • Start Free Trial
  • Magazine Subscription
  • Magazine Renewal
  • Gift a Subscription
  • Customer Support
  • Privacy Preferences
  • About
  • Contact
  • Advertise
  • Careers
  • Terms of Use
  • Site Map
  • Do not sell or share my information
  • Privacy Policy
  • Accessibility
  • California Privacy Rights

© 2025 Active Interest Media. All rights reserved.

Fine Homebuilding receives a commission for items purchased through links on this site, including Amazon Associates and other affiliate advertising programs.

  • Home Group
  • Antique Trader
  • Arts & Crafts Homes
  • Bank Note Reporter
  • Cabin Life
  • Cuisine at Home
  • Fine Gardening
  • Fine Woodworking
  • Green Building Advisor
  • Garden Gate
  • Horticulture
  • Keep Craft Alive
  • Log Home Living
  • Military Trader/Vehicles
  • Numismatic News
  • Numismaster
  • Old Cars Weekly
  • Old House Journal
  • Period Homes
  • Popular Woodworking
  • Script
  • ShopNotes
  • Sports Collectors Digest
  • Threads
  • Timber Home Living
  • Traditional Building
  • Woodsmith
  • World Coin News
  • Writer's Digest
Active Interest Media logo
X
X
This is a dialog window which overlays the main content of the page. The modal window is a 'site map' of the most critical areas of the site. Pressing the Escape (ESC) button will close the modal and bring you back to where you were on the page.

Main Menu

  • How-To
  • Design
  • Tools & Materials
  • Video
  • Blogs
  • Forum
  • Project Guides
  • Reader Projects
  • Magazine
  • Members
  • FHB House

Podcasts

  • FHB Podcast
  • ProTalk

Webinars

  • Upcoming and On-Demand

Podcasts

  • FHB Podcast
  • ProTalk

Webinars

  • Upcoming and On-Demand

Popular Topics

  • Kitchens
  • Business
  • Bedrooms
  • Roofs
  • Architecture and Design
  • Green Building
  • Decks
  • Framing
  • Safety
  • Remodeling
  • Bathrooms
  • Windows
  • Tilework
  • Ceilings
  • HVAC

Magazine

  • Current Issue
  • Past Issues
  • Magazine Index
  • Subscribe
  • Online Archive
  • Author Guidelines

All Access

  • Member Home
  • Start Free Trial
  • Gift Membership

Online Learning

  • Courses
  • Project Guides
  • Reader Projects
  • Podcast

More

  • FHB Ambassadors
  • FHB House
  • Customer Support

Account

  • Log In
  • Join

Newsletter

Get home building tips, offers, and expert advice in your inbox

Signing you up...

This site is protected by reCAPTCHA and the Google Privacy Policy and Terms of Service apply.
See all newsletters
See all newsletters

Follow

  • X
  • YouTube
  • instagram
  • facebook
  • pinterest
  • Tiktok

Join All Access

Become a member and get instant access to thousands of videos, how-tos, tool reviews, and design features.

Start Your Free Trial

Subscribe

FHB Magazine

Start your subscription today and save up to 81%

Subscribe

We hope you’ve enjoyed your free articles. To keep reading, become a member today.

Get complete site access to expert advice, how-to videos, Code Check, and more, plus the print magazine.

Start your FREE trial

Already a member? Log in

Privacy Policy Update

We use cookies, pixels, script and other tracking technologies to analyze and improve our service, to improve and personalize content, and for advertising to you. We also share information about your use of our site with third-party social media, advertising and analytics partners. You can view our Privacy Policy here and our Terms of Use here.

Cookies

Analytics

These cookies help us track site metrics to improve our sites and provide a better user experience.

Advertising/Social Media

These cookies are used to serve advertisements aligned with your interests.

Essential

These cookies are required to provide basic functions like page navigation and access to secure areas of the website.

Delete My Data

Delete all cookies and associated data