FHB Logo Facebook LinkedIn Email Pinterest Twitter X Instagram Tiktok YouTube Plus Icon Close Icon Navigation Search Icon Navigation Search Icon Arrow Down Icon Video Guide Icon Article Guide Icon Modal Close Icon Guide Search Icon Skip to content
Subscribe
Log In
  • How-To
  • Design
  • Tools & Materials
  • Restoration
  • Videos
  • Blogs
  • Forum
  • Magazine
  • Members
  • FHB House
  • Podcast
Log In

Fine Homebuilding Project Guides

Windows & Doors

Guide Home
  • Choosing Windows
  • Installing Windows In New Walls
  • Retrofitting Windows
  • Window Repairs
  • Door Basics
  • Interior Doors
  • Exterior Doors
How-To

Cutting a Prehung Exterior Door

While it's good practice to order the door cut to fit from the lumberyard, it is possible to shorten the unit yourself.

By Andy Engel Issue 238 - Oct/Nov 2013
  • X
  • facebook
  • linkedin
  • pinterest
  • email
  • add to favorites Log in or Sign up to save your favorite articles

cut exterior door

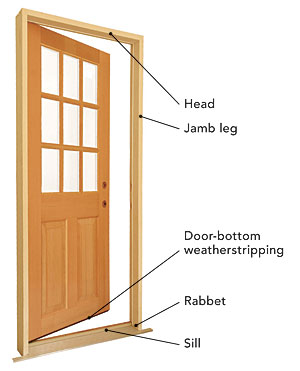
Most times when you need a prehung exterior door that’s shorter than normal, it’s easiest to order it from the lumberyard. It’s possible, however, to shorten the unit yourself. Manufacturers typically allow wood doors to be trimmed by 1⁄2 in. at the top and 1-1⁄2 in. at the bottom. You can cut more away from the bottom without hitting one of the dowels that hold the door together. If possible, I like to cut the top of a prehung exterior door because then I don’t need to remove and reinstall the door-bottom weatherstripping. Here, though, enough had to come off that I cut the bottom.

Disassemble the unit

Take the door out of its frame, and place it on a surface that won’t scratch the door, with the protruding hinges facing down. That keeps the hinges out of the saw’s way when the cut is made.

Remove the door-bottom weatherstripping carefully so that it can be reinstalled. Mark the cut on each edge of the door, and clamp a shooting board to the door, with the edge of the board indexed on the marks. Position the clamps with their long ends down so that they won’t interfere with the saw, and place a block under each clamp to protect the other side of the door.

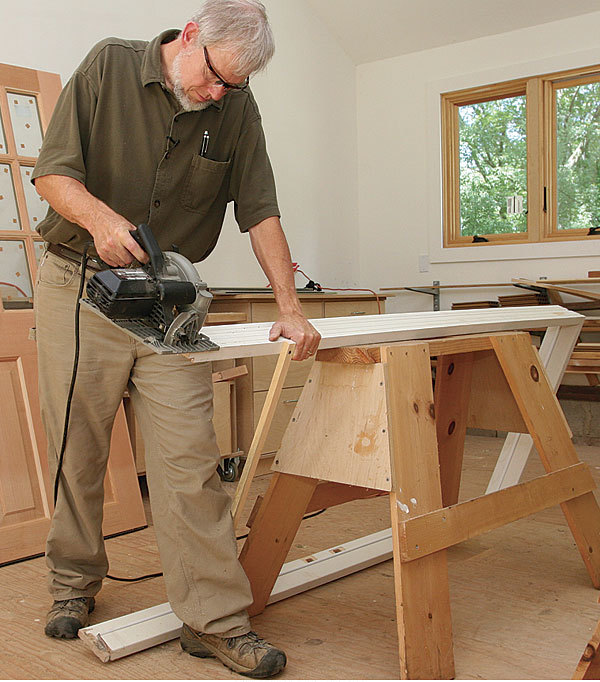
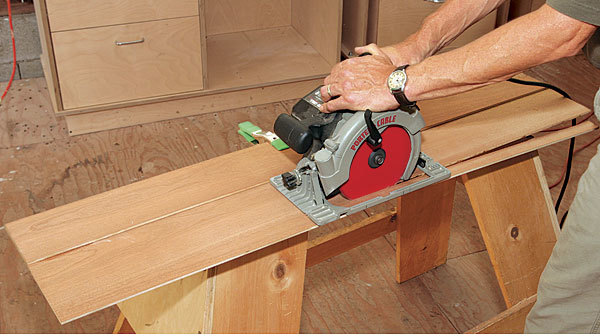
To prevent tearout, score the door with a sharp knife before cutting it with a circular saw. With the saw’s baseplate against the fence of the shooting board, cut slowly but without stopping.

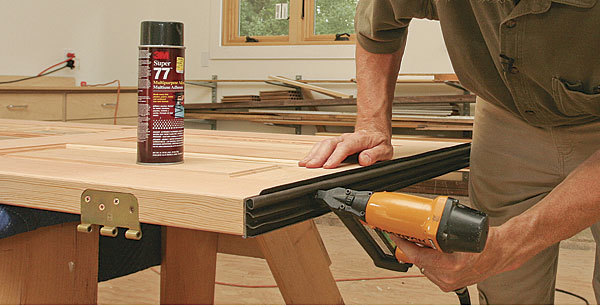
Reattach the door-bottom weatherstripping with spray adhesive and staples, or with caulk and low-profile screws or roofing nails.

Cutting the frame

Cut the same amount from the bottom of the frame as you cut from the door. Because exteriordoor frames are rabbeted, in addition to shortening the jamb legs, you need to recut the rabbets for the sill.

Cut the fasteners holding the jambs to the sill with an oscillating multitool. You also can use a hacksaw. Don’t worry about caulk residue or minor splitting on the jamb legs; they’ll be cut off later.

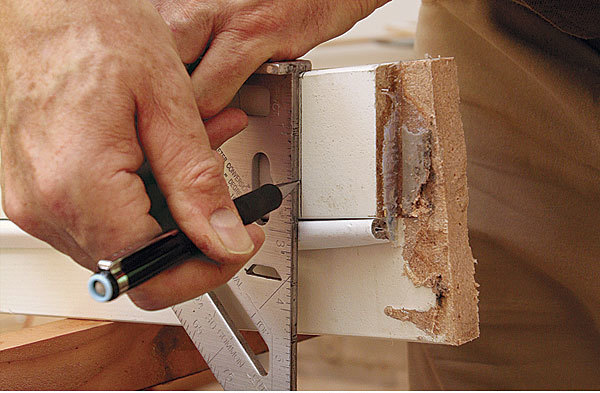
Before cutting the jamb legs, mark the new location of the sill rabbet, measuring the cut and the angle from the original rabbet. If you shorten the jambs before marking the new rabbet cut, you lose the reference point. Pull out the weatherstripping, and keep it out of the way with a spring clamp. Later, shorten it with a knife, then stuff it back into its kerf. Mark the height cut on the outside of the jambs, and cut a sill rabbet with a circular saw and chisel.

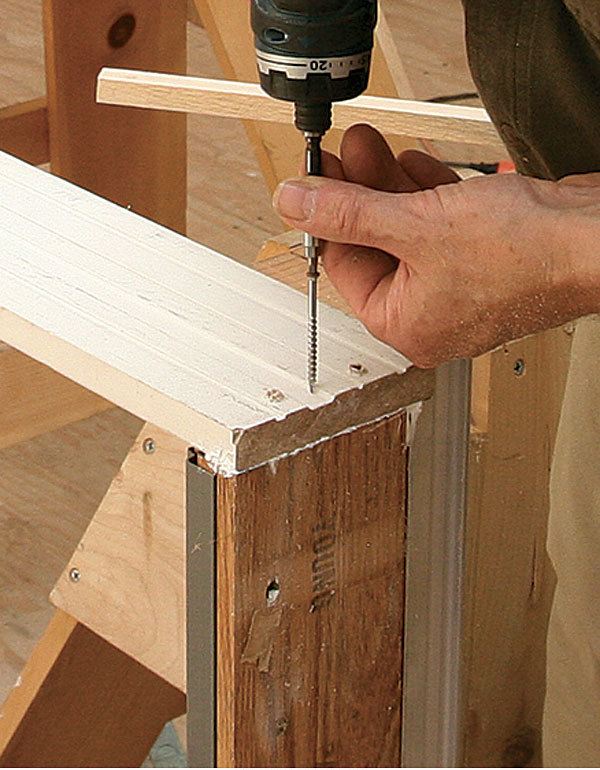
On a wood jamb, seal cuts with primer. The bottom of the jamb shown here is plastic, so no primer was needed. Apply a bead of paintable exterior sealant such as urethane caulk to the end of the sill, and reassemble the frame. I used stainless-steel decking screws.

That’s it. You’re done—except for installing the door, but that’s another story.
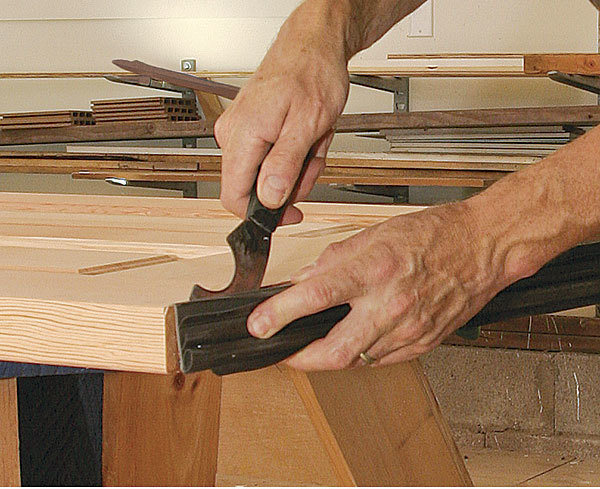

Remove the bottom weatherstripping
Score the veneer.

1) Remove the bottom weatherstripping.

Use a putty knife or 5-in-1 tool to break the sealant bond between the weatherstripping and the door and to pry out any fasteners. Work carefully so that the weatherstripping can be reused.
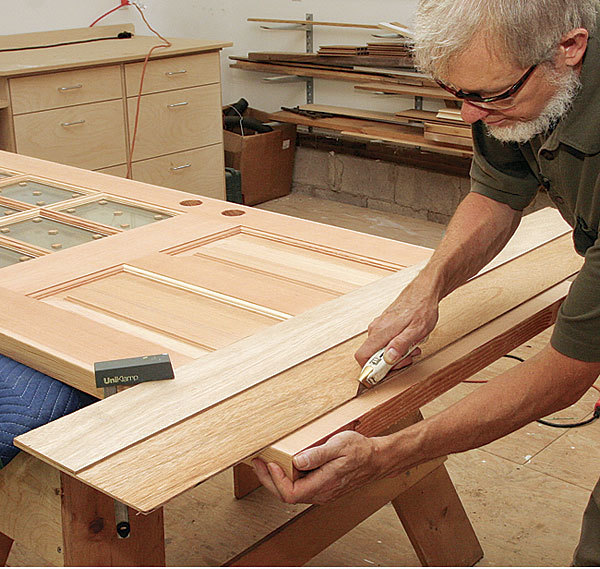
2) Score the veneer.

After laying out the cut and clamping the shooting board to the door, score the door’s veneer with a knife to minimize tearout.
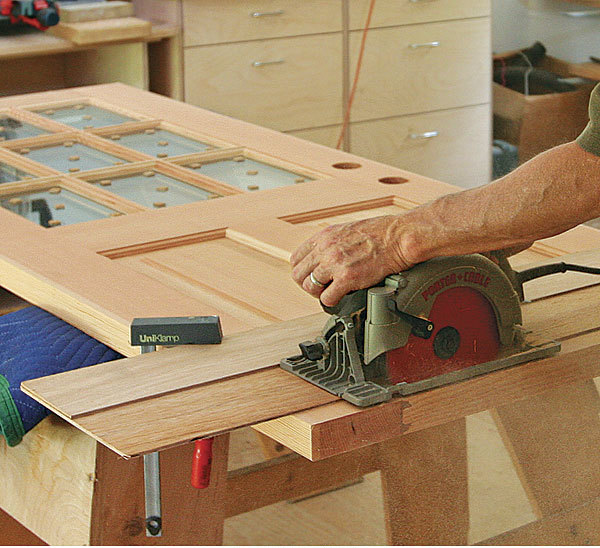
Cut the door Reattach the door bottom

3) Cut the door.

Use a sharp, new 40-tooth blade in a circular saw. Let the shooting board guide the cut.

4) Reattach the door bottom.

Spray adhesive on both surfaces creates an instant bond. Staples reinforce the connection.


Lay out the rabbet cut Cut down the door frame

5) Lay out the rabbet cut.

After carefully removing the sill from the door frame, mark the edge of the new rabbet. Duplicate the existing rabbet’s angle.

6) Cut down the door frame.

Before recutting the rabbet, mark the jamb legs to length, and cut them down. A cleat between the legs keeps them from flopping.
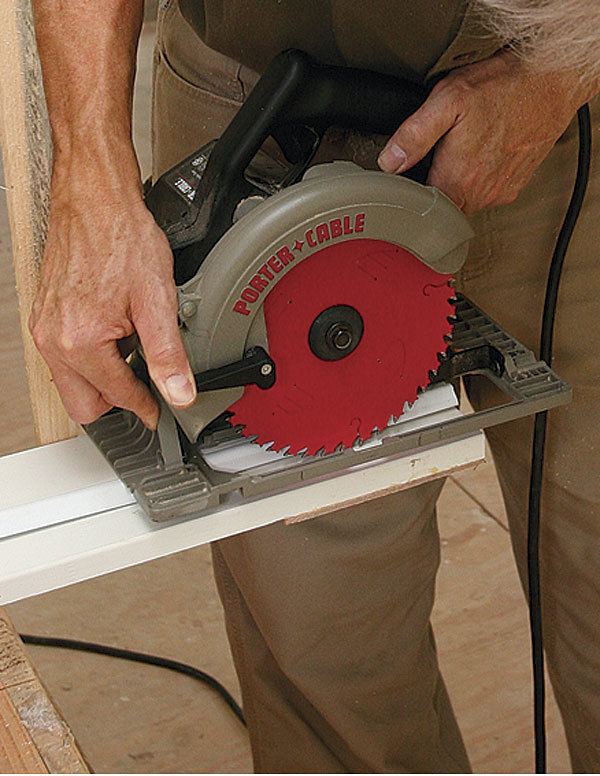
 

Set the saw to cut the rabbet Clean up the rabbet

7) Set the saw to cut the rabbet.

With the wide part of the saw’s baseplate on the thick part of the jamb, set the depth of the blade so that it barely touches the rabbet on the jamb.

8) Clean up the rabbet.

After making a series of cuts with the saw, clean out the waste with a sharp chisel. A spring clamp holds the weatherstripping out of the way.


Reassemble the frame

9) Reassemble the frame.

Use corrosion-resistant screws to fasten the sill back in place.


Make A Shooting Board

Shooting boards are jigs that keep the saw’s baseplate from damaging the workpiece

Shooting boards are jigs that keep the saw’s baseplate from damaging the workpiece, serve as a fence, ease layout, and minimize chipping. They can be made in any length and are custom to each saw. Start with a base made of 1⁄4-in. plywood or hardboard that’s about 12 in. wide. Glue to one edge of the base a piece of 1⁄4-in. plywood that’s about 5 in. wide. This will serve as a fence, so be sure it has straight edges. The amount of base to the side of the fence must be wider than the base of your circular saw. Once the glue has set, cut off the excess stock by running the circular saw along the fence. The edge of the shooting board is now indexed exactly to the sawblade, so there’s no guesswork about where to place the shooting board.

Photos: Patrick McCombe

Previous: How to Install Doors in Thick Walls Next: How to Cut a Prehung Exterior Door to a Custom Height

Guide

Windows & Doors

Chapter

Exterior Doors

Sign up for eletters today and get the latest how-to from Fine Homebuilding, plus special offers.

Signing you up...

This site is protected by reCAPTCHA and the Google Privacy Policy and Terms of Service apply.
See all newsletters
See all newsletters

Log in or create an account to post a comment.

Sign up Log in

Become a member and get full access to FineHomebuilding.com

Windows & Doors

Windows & Doors

Trusted, comprehensive guidance from the pros for choosing, installing, replacing, and repairing windows and doors on any house

View Project Guide

View All Project Guides »

Become a member and get unlimited site access, including the Windows & Doors Project Guide.

Start Free Trial

Choosing Windows
  • Window Types
  • Design and Materials
  • Energy-Efficient Windows
Installing Windows In New Walls
  • Installation, Start to Finish
  • Head Flashing for Windows
  • Video Series: Nail-Fin Window over Zip System Sheathing
  • Video Series: Nail-Fin Window over Exterior Rigid-Foam Insulation
  • Video Series: Nail-Fin Window over Housewrap
  • Video Series: Nail-Fin Window over Peel-and-Stick Housewrap
  • Video Series: Nail-Fin Window over a Fluid-Applied WRB
  • Video Series: Weatherproof Window Installation
Retrofitting Windows
  • Removing the Old, Installing the New
  • Video Series: How to Replace a Window
  • Video Series: Install a Full-Frame Replacement Window in a Brick Wall
  • Video Series: Install an Insert Replacement Window in a Brick Wall
  • Video Series: Retrofit a Flanged Window
Window Repairs
  • Restoring Old Windows
  • Repairs and Upgrades
Door Basics
  • Tools & Jigs for Door Hanging
  • How to Install Doors
  • Hinges
  • Handles, Knobs, and Locksets
  • Fixing Door Problems
Interior Doors
  • Prehung Doors
  • Pocket Doors
  • Other Types of Doors
  • Custom-Built Doors
Exterior Doors
  • Door Choices and Design
  • Installing Entry Doors
  • Building Exterior Doors
  • Installing French Doors
  • Replacing a Door
  • Adding Weatherstripping and Sweeps

Fine Home Building

Newsletter Sign-up

  • Fine Homebuilding

    Home building tips, offers, and expert advice in your inbox.

  • Green Building Advisor

    Building science and energy efficiency advice, plus special offers, in your inbox.

  • Old House Journal

    Repair, renovation, and restoration tips, plus special offers, in your inbox.

Signing you up...

This site is protected by reCAPTCHA and the Google Privacy Policy and Terms of Service apply.
See all newsletters

Follow

  • Fine Homebuilding

    Dig into cutting-edge approaches and decades of proven solutions with total access to our experts and tradespeople.

    Start Free Trial Now
    • Facebook
    • Instagram
    • X
    • LinkedIn
  • GBA Prime

    Get instant access to the latest developments in green building, research, and reports from the field.

    Start Free Trial Now
    • Facebook
    • YouTube
  • Old House Journal

    Learn how to restore, repair, update, and decorate your home.

    Subscribe Now
    • Facebook
    • Instagram
    • X

Membership & Magazine

  • Online Archive
  • Start Free Trial
  • Magazine Subscription
  • Magazine Renewal
  • Gift a Subscription
  • Customer Support
  • Privacy Preferences
  • About
  • Contact
  • Advertise
  • Careers
  • Terms of Use
  • Site Map
  • Do not sell or share my information
  • Privacy Policy
  • Accessibility
  • California Privacy Rights

© 2025 Active Interest Media. All rights reserved.

Fine Homebuilding receives a commission for items purchased through links on this site, including Amazon Associates and other affiliate advertising programs.

  • Home Group
  • Antique Trader
  • Arts & Crafts Homes
  • Bank Note Reporter
  • Cabin Life
  • Cuisine at Home
  • Fine Gardening
  • Fine Woodworking
  • Green Building Advisor
  • Garden Gate
  • Horticulture
  • Keep Craft Alive
  • Log Home Living
  • Military Trader/Vehicles
  • Numismatic News
  • Numismaster
  • Old Cars Weekly
  • Old House Journal
  • Period Homes
  • Popular Woodworking
  • Script
  • ShopNotes
  • Sports Collectors Digest
  • Threads
  • Timber Home Living
  • Traditional Building
  • Woodsmith
  • World Coin News
  • Writer's Digest
Active Interest Media logo
X
X
This is a dialog window which overlays the main content of the page. The modal window is a 'site map' of the most critical areas of the site. Pressing the Escape (ESC) button will close the modal and bring you back to where you were on the page.

Main Menu

  • How-To
  • Design
  • Tools & Materials
  • Video
  • Blogs
  • Forum
  • Project Guides
  • Reader Projects
  • Magazine
  • Members
  • FHB House

Podcasts

  • FHB Podcast
  • ProTalk

Webinars

  • Upcoming and On-Demand

Podcasts

  • FHB Podcast
  • ProTalk

Webinars

  • Upcoming and On-Demand

Popular Topics

  • Kitchens
  • Business
  • Bedrooms
  • Roofs
  • Architecture and Design
  • Green Building
  • Decks
  • Framing
  • Safety
  • Remodeling
  • Bathrooms
  • Windows
  • Tilework
  • Ceilings
  • HVAC

Magazine

  • Current Issue
  • Past Issues
  • Magazine Index
  • Subscribe
  • Online Archive
  • Author Guidelines

All Access

  • Member Home
  • Start Free Trial
  • Gift Membership

Online Learning

  • Courses
  • Project Guides
  • Reader Projects
  • Podcast

More

  • FHB Ambassadors
  • FHB House
  • Customer Support

Account

  • Log In
  • Join

Newsletter

Get home building tips, offers, and expert advice in your inbox

Signing you up...

This site is protected by reCAPTCHA and the Google Privacy Policy and Terms of Service apply.
See all newsletters
See all newsletters

Follow

  • X
  • YouTube
  • instagram
  • facebook
  • pinterest
  • Tiktok

Join All Access

Become a member and get instant access to thousands of videos, how-tos, tool reviews, and design features.

Start Your Free Trial

Subscribe

FHB Magazine

Start your subscription today and save up to 70%

Subscribe

We hope you’ve enjoyed your free articles. To keep reading, become a member today.

Get complete site access to expert advice, how-to videos, Code Check, and more, plus the print magazine.

Start your FREE trial

Already a member? Log in

Privacy Policy Update

We use cookies, pixels, script and other tracking technologies to analyze and improve our service, to improve and personalize content, and for advertising to you. We also share information about your use of our site with third-party social media, advertising and analytics partners. You can view our Privacy Policy here and our Terms of Use here.

Cookies

Analytics

These cookies help us track site metrics to improve our sites and provide a better user experience.

Advertising/Social Media

These cookies are used to serve advertisements aligned with your interests.

Essential

These cookies are required to provide basic functions like page navigation and access to secure areas of the website.

Delete My Data

Delete all cookies and associated data