
Synopsis: A primer on identifying and fixing common door ailments, including doors that bind, that won’t latch properly, that are warped, or that otherwise don’t function properly.
Doors are unlike countertops, fireplace mantels and many other building components: They’re designed to move. We depend on them to open and close smoothly, day after day. When they stick or bind, it’s nothing but aggravation.
High humidity is a temporary condition that can swell a door in its frame. But a sticking door also can be the outward sign of something years in the making: a settling foundation, shrinkage in the framing or hinges that have loosened.
It may seem sensible to plane the latch-side edge of a door where it rubs against the jamb. Nine times out of ten, however, the real problem is on the opposite side: the hinge side. One of the best aids in pinpointing the problem is the gap between the door and the jamb. Ideally, it should be an even 3 /32 in. or so on the sides and top, and enough to clear the floor easily. Finding where the gap (also called the margin) is either too large or too small can point to the real culprit and suggest a long lasting solution.
Loose Hinge Screws Cause Binding On The Latch Side
As the screws securing the top hinge loosen due to constant tension, the gap at the hinge side of the door widens, and the gap on the latch side of the door gradually closes until the door starts to bind at the top. To identify this problem, open the door slightly and pull upward on the knob while looking at the uppermost hinge. Check for play between the hinge and the jamb and between the hinge and the door. Also, note whether there’s any movement in the middle or lower hinges. A loose lower hinge allows the bottom of the door to move toward the hinge jamb, worsening the problem.
Improperly sized pilot holes for hinge screws often lead to trouble. When pilot holes are too large, screw threads can’t bite into the wood; when holes are too small, the wood may split. Pilot holes should be the same size as the root diameter of the screw, the part of the shank between threads.
If there are loose hinge screws in either the door or the jamb, open the door as far as it goes and insert shims between the bottom of the door and the floor to take weight off the hinges. One by one, remove the loose screws, drill new pilot holes, and install screws about 1-1/⁄2 in. longer than the originals. There’s no point in replacing the screws closest to the hinge barrel on the jamb leaf because they’ll probably grab only plaster or drywall. Screws closest to the doorstop, however, should be long enough to penetrate the stud behind the jamb.
If the hinge leaf on a hollow-core door has loosened, longer screws may not work because wooden stiles inside the door are often only 1 in. thick. A longer screw hits only air. On this type of door, try reinserting the screws with a dab of five-minute epoxy on the threads. Keep the door propped up until the glue has set. If that doesn’t work, consider relocating the hinges or replacing the door. Screws also may work loose in doors with a solid core of particleboard. In that case, try using long screws—3 in. to 4 in.—and drill the pilot holes slightly smaller than you ordinarily would.
Bent Or Improperly Mortised Hinges Also Cause Latch-Side Rubbing
When hinges are fastened tightly but the door still binds on the latch side—typically at the top—the problem may be a bent hinge (drawing bottom right). To adjust the margins at the top of the door, bend the hinge knuckles with an adjustable wrench. First, lift the pin until it engages only the top knuckle. Leave the knuckles on the jamb leaf alone, but use the wrench to bend the knuckles on the door leaf gently. Moving the knuckles toward the lock narrows the margin on the hinge side and widens it on the latch side. If you overshoot the mark, simply reverse the procedure, then reinstall the pin.
An alternative to bending hinge knuckles to increase the gap at a hinge is to insert cardboard shims between the hinge leaf and jamb. Most of the time, this adjustment is necessary at the bottom hinge, which is under compression. Widening the gap at the bottom hinge narrows the gap between the door and the head jamb on the latch side of the door (drawing bottom left, p. 91). Shimming a hinge also is useful when a hinge gain, or recess, has been cut too deeply and the door binds on the hinge side.
To shim the bottom hinge, open the door and loosen the screws on the jamb leaf a few turns. Cut cardboard strips about 1⁄2 in. wide and almost as long as the hinge is tall. Lift the door on the latch side with one hand, which opens a gap between the hinge and the jamb (for heavy doors, use a pry bar). Slip a shim or two into the gap with your other hand until it presses against the hinge screws. Tighten the screws, and test the door’s fit. When you have installed the correct number of shims and retightened the screws, trim off any excess with a utility knife.
When a door begins to look like a potato chip—because one or both stiles warp—the latch-side stile will not contact the doorstop evenly. To close the door, a lot of force may be needed to bend the warped stile flat. The same problem crops up when one leg of the door frame doesn’t lie in the same plane as the other. There are two solutions. One is to move the position of the stop on the latch-side jamb. The other is to move either the top or bottom hinge away from the doorstop. The door or frame still will be warped, but it will close with less difficulty.
Racking And Swelling May Mean Refitting The Door
Sometimes no amount of hinge adjustment allows a door to close properly. One of two things usually can be blamed: Either the door opening or the door itself has changed shape. The door frame may have racked because the foundation settled or the framing dried unevenly. That’s common in old houses. Alternatively, a door may sag as the joints that hold it together loosen over time. This situation is more common with doweled doors than with mortise-and-tenon doors. It may be possible to knock the door apart and reglue it, but it’s usually quicker simply to trim the door or to replace it.
Racking causes the door to bind on the latch side, either at the top against the head or at the bottom against the sill. The solution is to trim a tapered piece of wood from the top or bottom of the door. Rather than use a straightedge to lay this out, set a compass to at least 1⁄8 in. and scribe along the binding head or sill. If the frame or floor wavers, the scribe transfers the line accurately to the door so that the gap remains constant.
After one end of the door has been trimmed, a tapered piece can be added to the other end to make the gap even at the top and bottom. Wet glue can make a tapered filler piece curl at the feather end, so to produce a tight joint, I attach an oversize piece and then trim it to fit after the glue dries.
High humidity can swell a door and cause it to stick in the jamb. Check first to make sure the gap on the hinge side is correct and that hinges are tight. If the hinge-side gap is an even 1⁄8 in. and the door sticks on the latch side, the door should be removed so that the latch-side edge can be planed to fit. If the entire edge must be planed, the latch has to be removed. After the edge is planed, the latch-plate gain must be deepened.
Also, if you plane down the edge enough, a cylinder lock might end up rubbing on the inside edge of the face bore when you reinstall it. Similarly, in the case of a mortise lock, the knob spindle might rub the sides of the spindle bore. In either case, you need to enlarge the bore slightly with a rasp or router. Don’t use a jigsaw for this task; it may chip the wood’s surface. Then plane the latch-side edge with a bevel of about 3° so that the inner corner clears the jamb as the door closes. Paint dulls a plane iron immediately, so it’s a good idea to scrape or sand off any finish before taking your prized jointer plane out of the toolbox.
Adjusting A Strike Plate
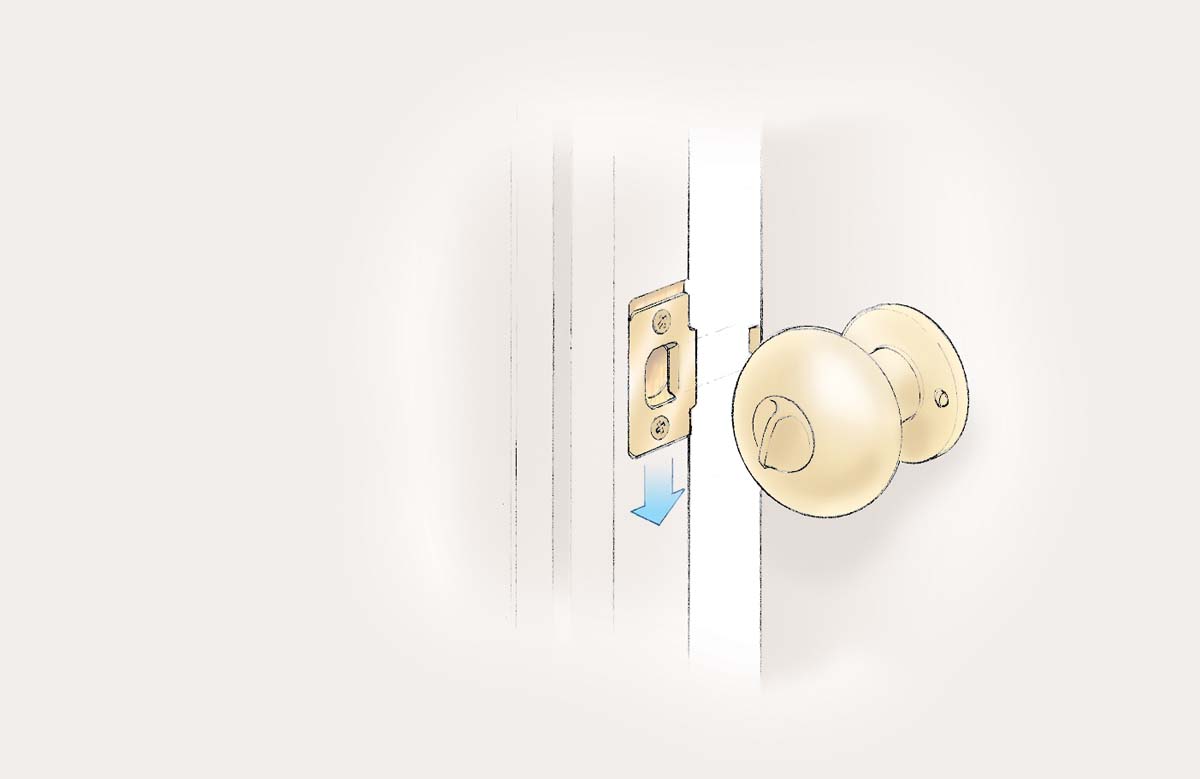
When a door or door frame racks, the latch bolt may no longer line up correctly with the strike plate. Although the door may close smoothly, it refuses to latch. No amount of slamming seems to make it any better.
To fix it, swing the door nearly closed, and mark the jamb where the latch bolt intersects it. Then open the door and check whether the strike plate must be moved up or down. Remove the plate, enlarge the gain with a chisel, and reinstall. Try, however, to move the strike plate at least 1⁄4 in. so that you can drill fresh pilot holes for the plate screws. If you move it less than that, the screws may wander back into the old holes. Use epoxy filler to conceal the newly exposed portion of the gain.
Sometimes the opening in the strike plate is so close in size to the latch bolt that the plate can’t be moved 1⁄4 in. In that case, enlarge the opening in the plate. Remove the plate, reshape the opening with a file, and reinstall.
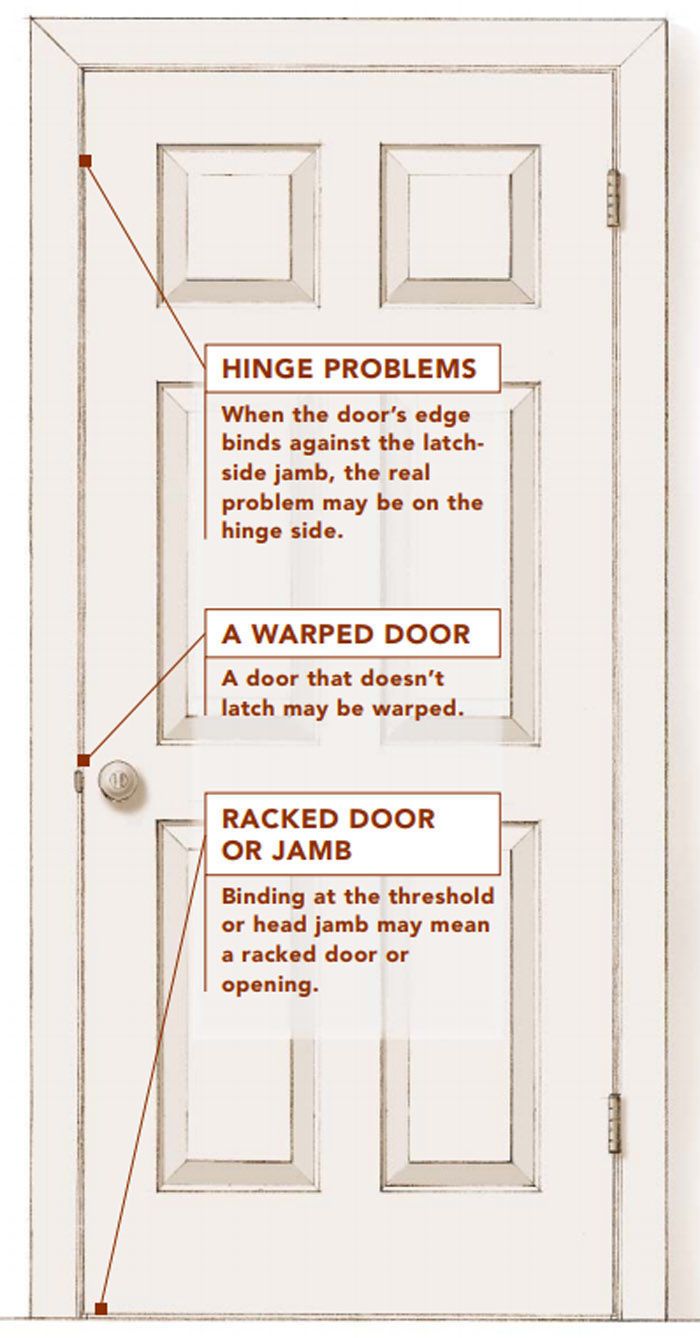
Hinge Problems Cause Door To Bind
Binding on the latch side is a symptom of a wider than normal gap between the door and jamb on the hinge side, often caused by loose hinges. A loose bottom hinge makes the problem even worse.
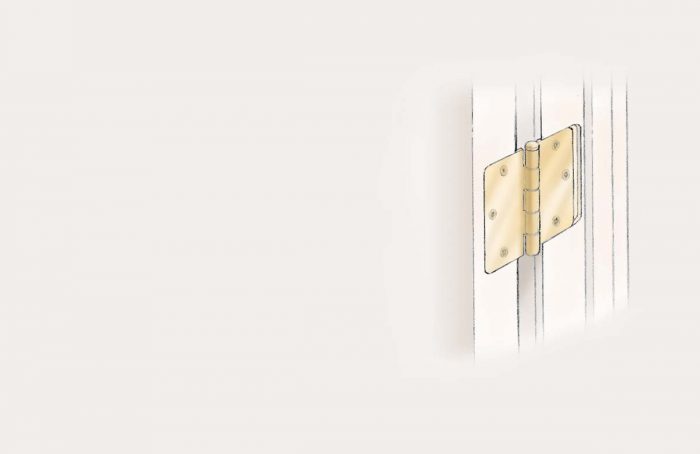
For Hinge-Side Binding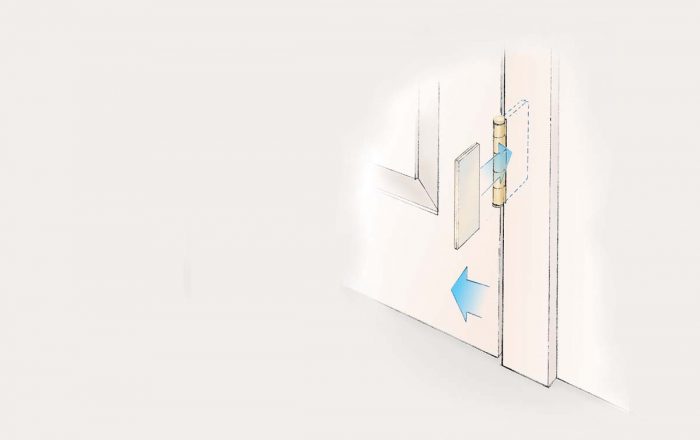
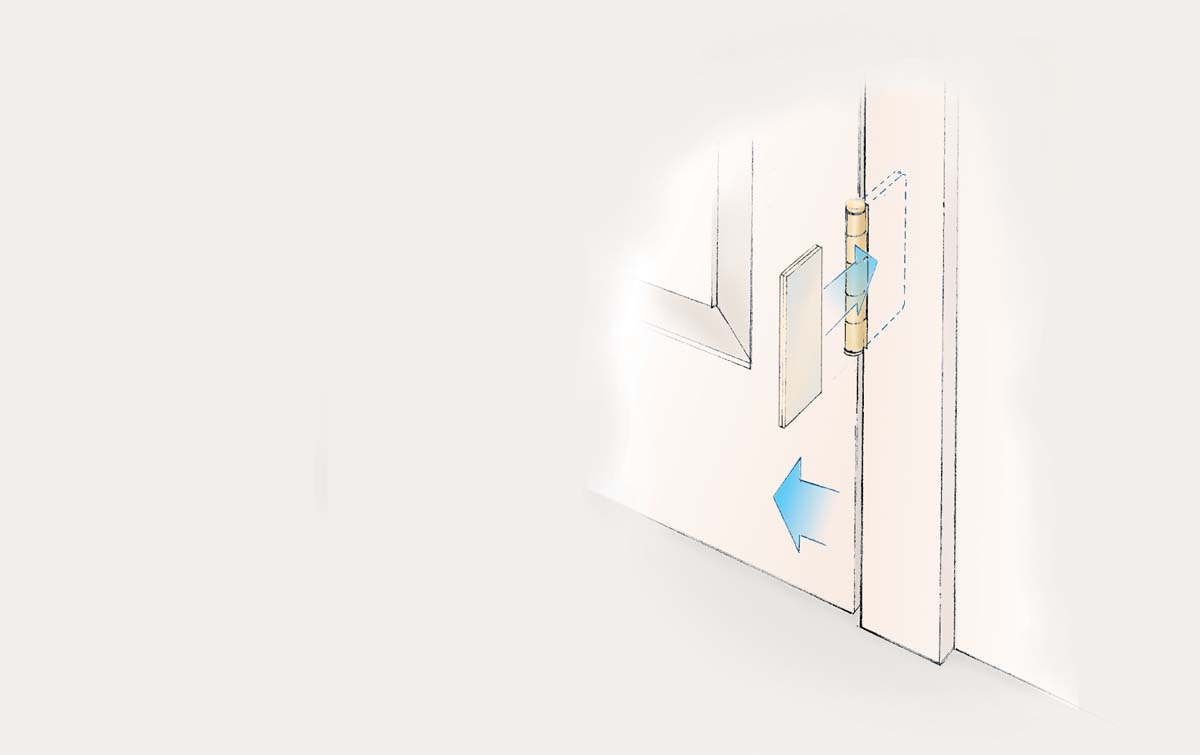
The best way to treat binding on the hinge side is to widen the gap between the door and the hinge jamb by inserting cardboard shims beneath the jamb leaf. After shims have been added and screws retightened, trim excess cardboard with a utility knife.
For Latch-Side Binding, Look For Loose Hinges
To narrow the gap on the hinge side caused by loose hinges, replace the original hinge screws in either the door or the jamb with longer ones, which relieves binding on the latch side of the door. Replacing the outer screw on the jamb leaf may be ineffective, but inner screws should reach the stud that frames the door opening.
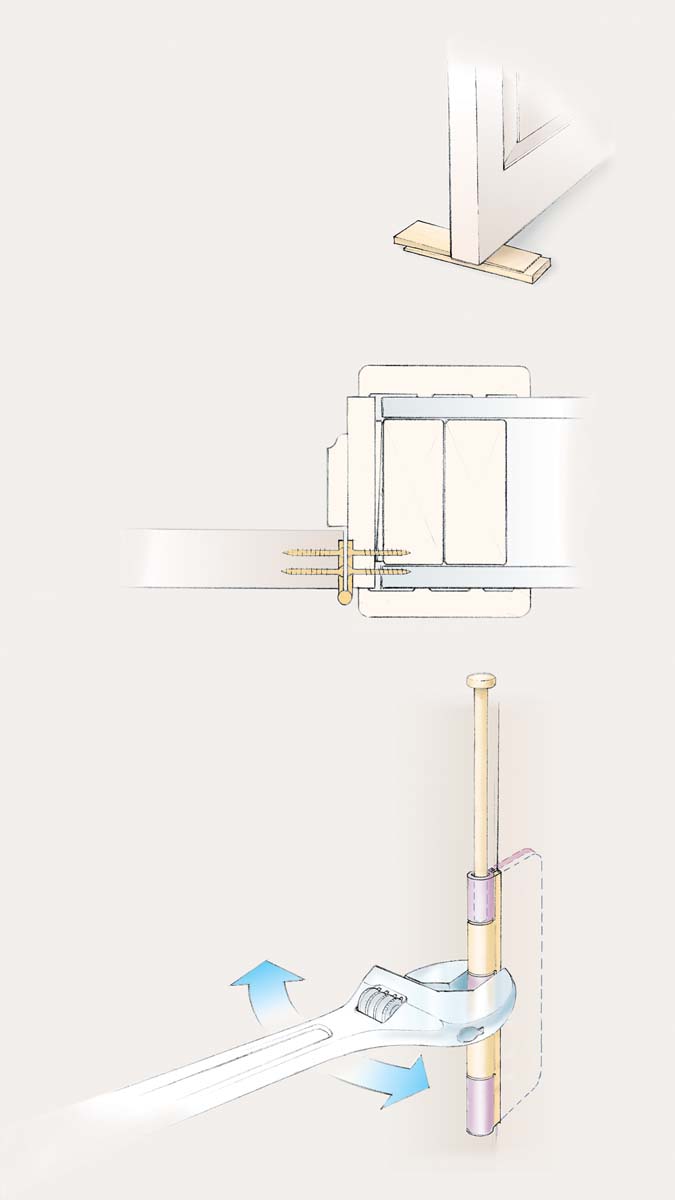
Second, Look For A Bent Hinge
If there’s still binding on the latch side and the hinges are tight, the problem may be a bent hinge. The remedy is to use an adjustable wrench to bend the hinge-leaf knuckles attached to the door, which shifts the door in relation to the opening and eases binding on the latch side of the door.
Door Or Door Frame Is Racked
Fit The Door To The Opening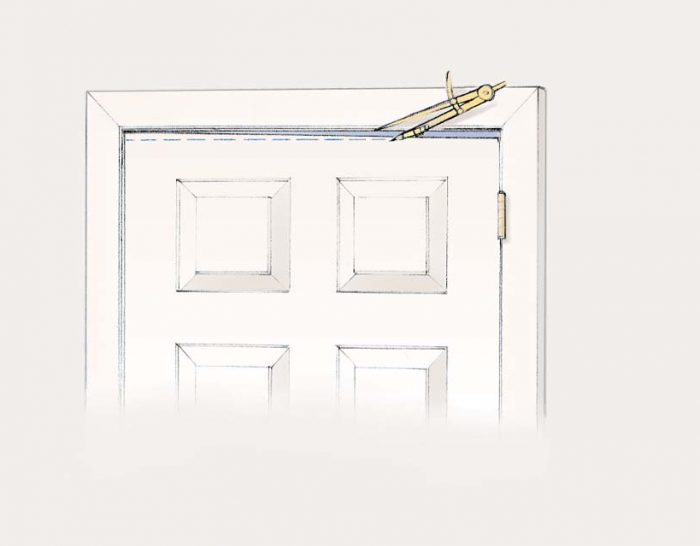
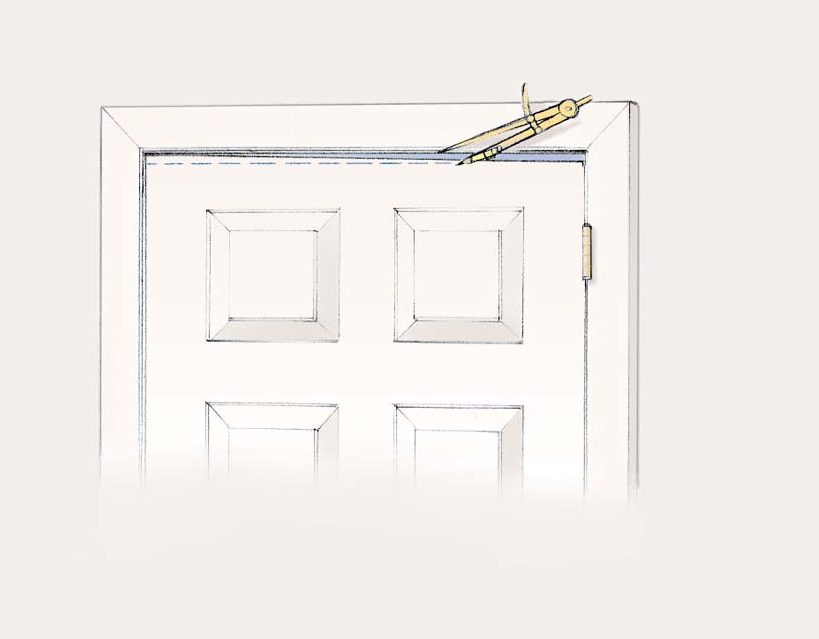
The proper cure for a racked door or opening is to use a pair of dividers to scribe a line on the door along the door’s binding head or sill. Cutting along this line yields an even gap.
Adjust Strike Plate When Door Won’t Latch
Warped Door Or Jamb
If the door contacts the latch-side stop at the top but not at the bottom (or the other way around) and is difficult to latch, the door is warped, or the frame is twisted.
 Moving Hinge Can Compensate For Warping

A door can be coaxed into closing smoothly by shifting either the top or bottom hinge outward at the jamb.
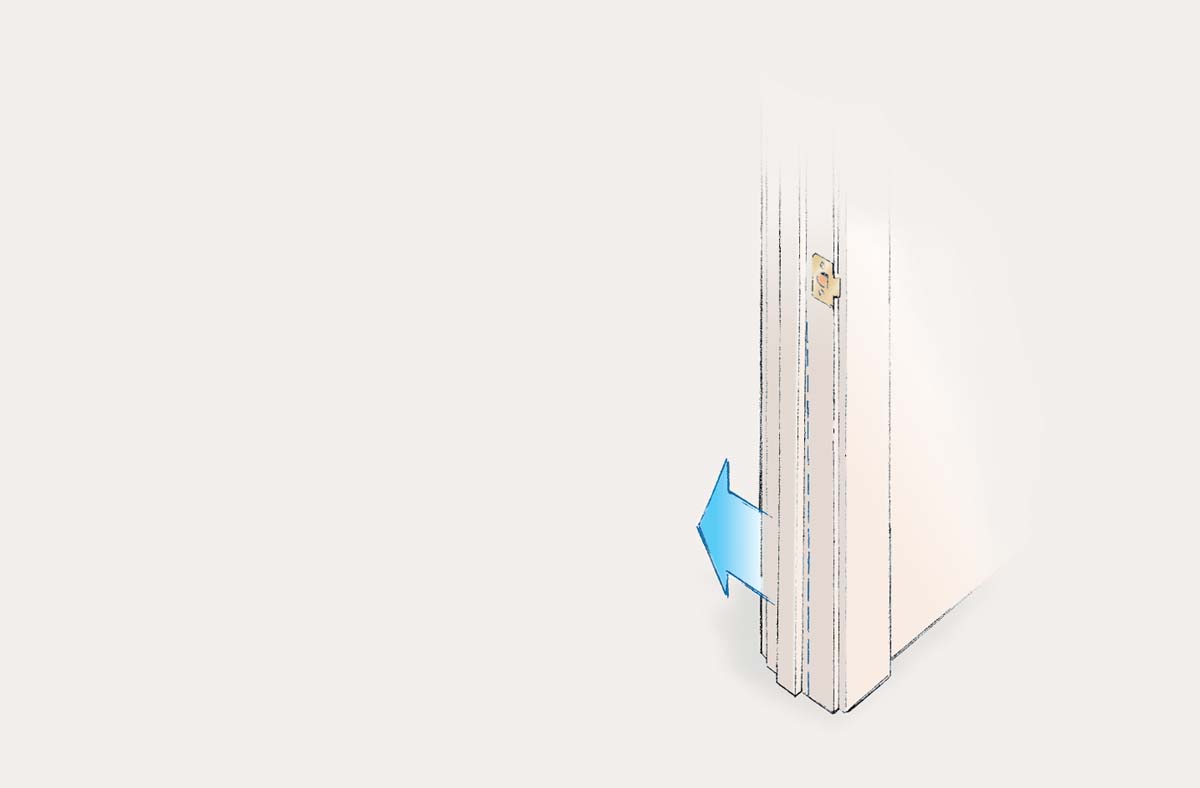
Move Stop To Compensate For Warping
If moving the hinge doesn’t work, it may be necessary to move the doorstop so that it contacts the entire latch side of the door.
For more photos, diagrams, and information on refitting a door, click the View PDF button below.
