Flashing a Round Window
The process is the same as for a rectangular window, but special attention should be paid to the head flashing.

I have to install a round wood window on an upcoming project. I know how to integrate the water-resistive barrier (WRB) and flashings on a rectangular unit, but I’m not sure how to do this with a round one. Can you help?
—Victor Gostman via email
Ben Bogie, a project manager for BPC Green Builders in Wilton, Conn., replies: Flashing a round window is pretty similar to flashing rectilinear window, but there are a few nuances to consider.
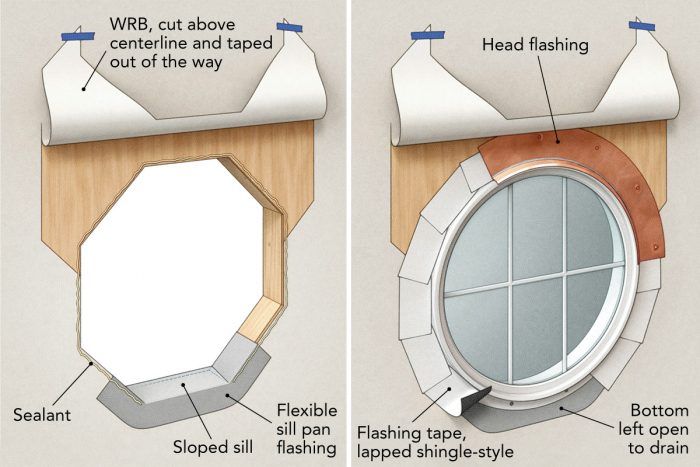
Like any other window installation, the first step is preparing the rough opening with some form of pan flashing. It’s a good idea to pitch the sill toward the outside with a scrap of clapboard siding, shimmed plywood, or a simple bevel rip of wood—a few degrees goes a long way. Most framing for round windows ends up as some kind of polygon with six or more sides, the bottom of which is horizontal. Seal the horizontal sill and a few inches up the angled sides with either a flexible flashing tape or a fluid-applied flashing. There’s no perfect way to do this with a round window, but the overarching goal is to direct any incidental leakage toward the lowest point where it can weep out.
With the rough opening prepped, install the window per the manufacturer’s recommendations. With a mechanically attached WRB (housewrap), make a horizontal cut 2 in. to 4 in. above the centerline of the window and fold the WRB up and out of the way. If the window has a nailing flange, squeeze sealant behind it except at the lowest spot—leave it out in that location so water can drain from the sill pan. From this point, we can treat flanged and cased windows essentially the same way. You can cut a nonstretchable flashing tape in short sections, applying them by working from the bottom up (leave a couple inches of the bottom untaped so the sill can drain) in shingle-lap fashion. Tape the bottom of the window flange or edge of the jamb to the WRB. At the centerline, begin taping to the sheathing. Use a roller or squeegee to firmly bed the flashing tape. Alternatively, you can use a flexible flashing tape to flash the window in far fewer pieces.
Now you can tackle the head flashing. There are a few ways to approach this, but the general idea is to flash from the centerline up. The least expensive method is to use a flexible vinyl head flashing purpose-made for the application. With this approach you’ll want to consult the manufacturer’s documents for details. Most rely on a combination of sealant and flashing tape to complete the flashing. An old-school but perfectly effective alternate option is to form sheet lead to the curve. The nicest solution, in my opinion, is to make a custom copper head flashing. This can be done by competent metal roofers or architectural metal fabricators.
With any of these head flashings complete, the final step is to fold down the WRB over the vertical leg of the head flashing, tack it in place with staples or tape, and tape the cuts.
RELATED LINKS
- Flashing on a Curve
- Shop Class: How to Install Nail-Fin Windows in 5 Common Wall Types
- Windows & Doors Project Guide
Drawings: Christopher Mills
From Fine Homebuilding #301


