FHB Logo Facebook LinkedIn Email Pinterest Twitter X Instagram Tiktok YouTube Plus Icon Close Icon Navigation Search Icon Navigation Search Icon Arrow Down Icon Video Guide Icon Article Guide Icon Modal Close Icon Guide Search Icon Skip to content
Subscribe
Log In
  • How-To
  • Design
  • Tools & Materials
  • Restoration
  • Videos
  • Blogs
  • Forum
  • Magazine
  • Members
  • FHB House
  • Podcast
Log In

Fine Homebuilding Project Guides

Windows & Doors

Guide Home
  • Choosing Windows
  • Installing Windows In New Walls
  • Retrofitting Windows
  • Window Repairs
  • Door Basics
  • Interior Doors
  • Exterior Doors
How-To

Laminated Custom Interior Doors

Carpenter Chris Green made interior doors for his own house using a vacuum press.

By Chris Green Issue 222
  • X
  • facebook
  • linkedin
  • pinterest
  • email
  • add to favorites Log in or Sign up to save your favorite articles

laminated interior doors
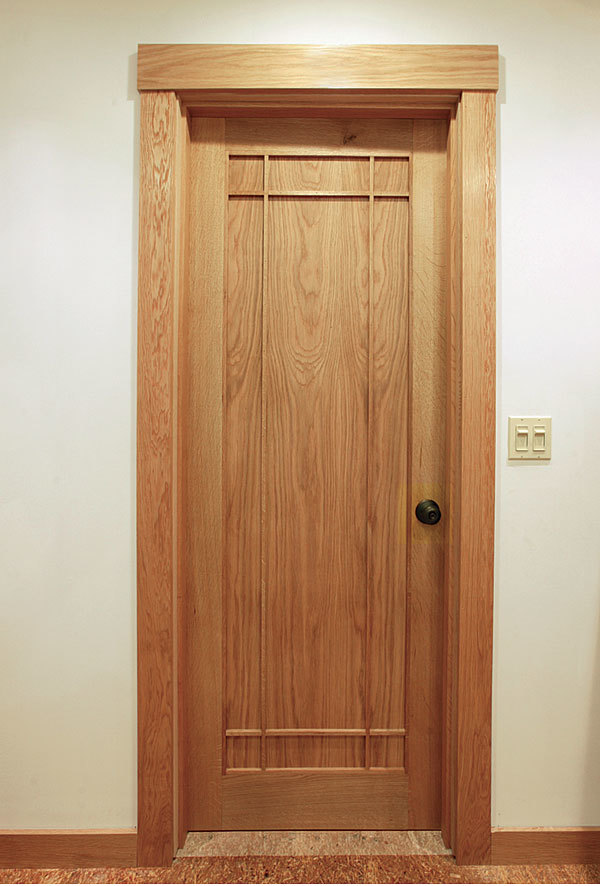
I’m in the process of a massive renovation. For a builder like me, that’s usually good news, but it’s my own house, which I’m working on between other jobs. An addition and a radical rearrangement of the existing floor plan are nearly complete, but it turned out I needed 10 interior doors. I wanted them to be made of white oak in a Craftsman style. After searching locally, the closest I could come to my ideal was a unit in red oak that wasn’t quite what I had in mind. Also, at $670 each, they were a budget buster.

I’d been thinking about making laminated interior doors for some time. The benefits were that I could choose the individual boards, bookmatched if I pleased, and control the design. So I decided to make my own. I didn’t want to build mortise-and-tenon doors, figuring it would take too long to get up to speed.

Instead, I decided to laminate three layers of solid wood to form a frame and add finish-grade plywood or glass as panels. The rails’ middle layer would extend through the stiles like a built-up bridle joint—strong, flat, and less  likely to move seasonally. Gluing and clamping a project like this isn’t for the faint of heart. A completely flat door is essential.

It all came together one day when a friend at the local hardwood mill mentioned a vacuum press. I couldn’t stop thinking about it. It would give me substantial, perfectly even clamping pressure with a finished product as flat as the form it was in. It seemed perfect for making laminated doors.

I built the form and used a compressor and vacuum bag to clamp the entire assembly. That way, once I had finished the setup, I could replicate the remaining nine frames easily.

From the first door, they’ve turned out even better than I imagined—flat, square, and good-looking. The best part was the cost. With the pump, the bag, and the materials factored in, the total cost of each door was about $200. Now I know I can offer custom doors to my customers and make money, too.

Start With a Ventilated Form

The base layer of 3⁄4-in.-thick melamine was crosshatched with a 4-in. grid of 1⁄4-in.-deep sawkerfs that allow air to move freely once the vacuum process has started.
Start filling in the form. After lining the form with waxed paper, cut the pieces to 1⁄32 in. less than the size of the form.
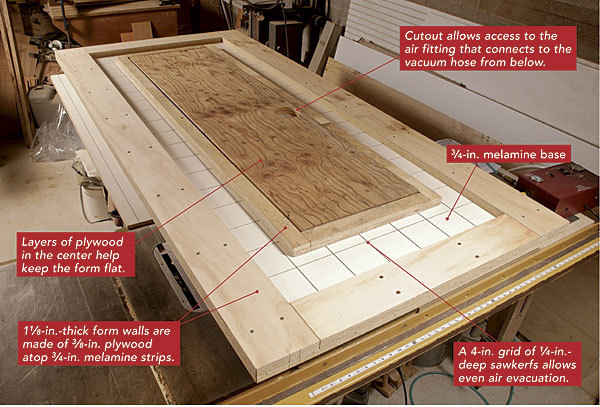
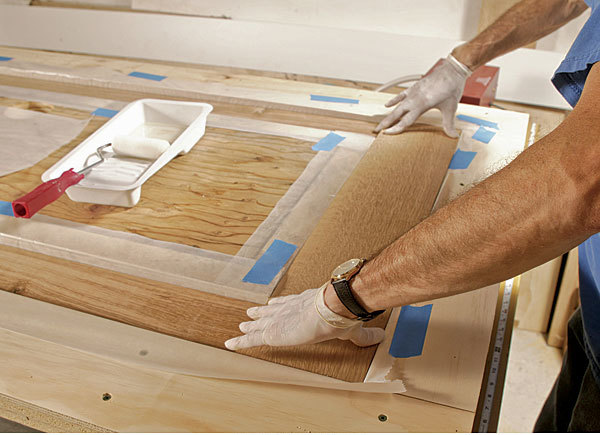
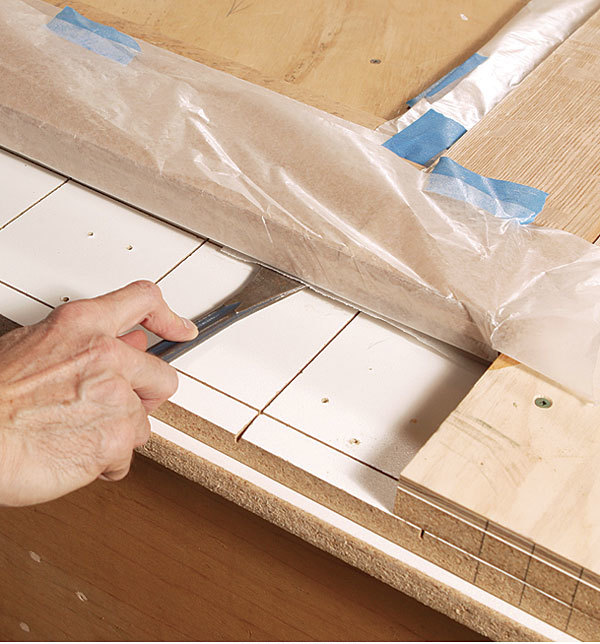
A flat, square form is critical for this type of door production. The base layer of 3⁄4-in.-thick melamine was crosshatched with a 4-in. grid of 1⁄4-in.-deep sawkerfs that allow air to move freely once the vacuum process has started. A strip of 3⁄4-in. material screwed around the perimeter defines the door dimensions plus 1⁄32 in. of total clearance. A layer of 3⁄8-in. plywood thickens the form to 1-1⁄8 in. This way, the door’s laminations stand 1⁄8 in. proud of the form so that a melamine caul can press down on the laminations without interference from the form. Start filling in the form. After lining the form with waxed paper, cut the pieces to 1⁄32 in. less than the size of the form. Arrange the first of three laminations in the form.


Alternating Laminations Add Strength

The door is made of three laminations of stiles and rails that overlap at the corners to create bridle joints. Each lamination was about 13⁄32 in. thick. Each door was 1-1⁄4 in. thick, 80-1⁄4 in. long, and 30-1⁄4 in. wide. The stiles and upper rail measure 4-3⁄8 in. wide, and the bottom rail measures 6-1⁄4 in. wide.

Add the second and third layers of the door frame


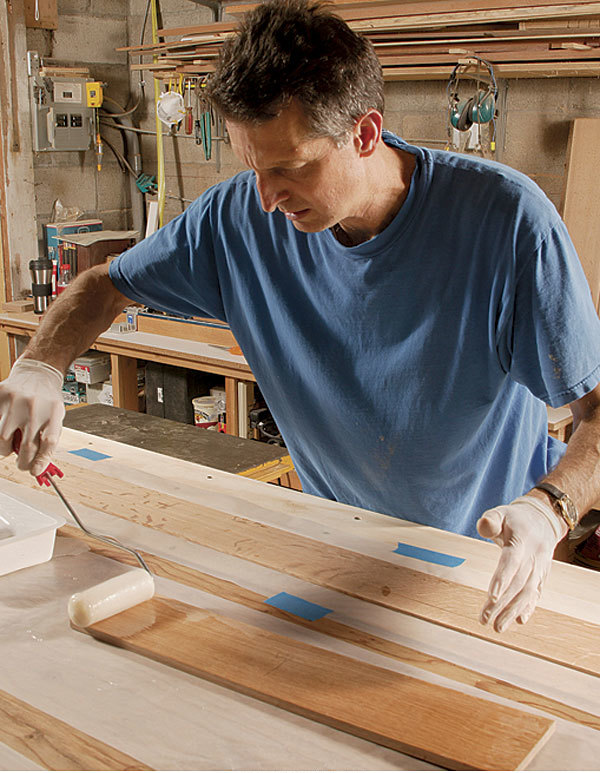
Add the second and third layers of the door frame. Mix up a batch of two-part epoxy (used for its longer open time), and coat the second layer of rails and stiles. Place them glue side down in the form. Repeat with the third layer.


Tool of the Trade

Pro VM4, a 2-hp model from Quality Vakuum Products (www.qualityvak.com) for $570.

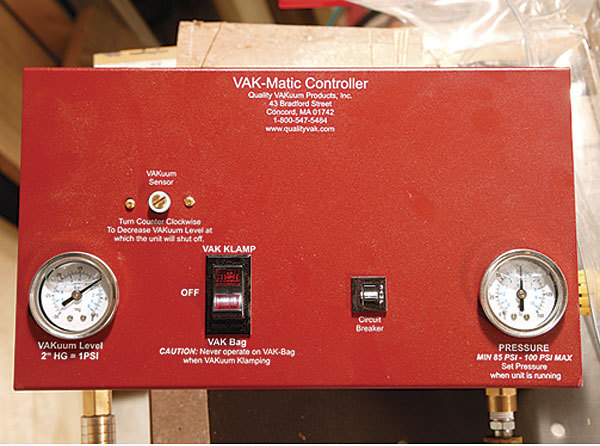
The centerpieces of the process are, of course, the vacuum compressor and bag. There are many to choose from, but after doing some research, I bought the Pro VM4, a 2-hp model from Quality Vakuum Products (www.qualityvak.com) for $570. Sold as a kit, the unit comes with a hose, a fitting, and a 78-in. by 52-in. 30-mil vinyl bag. (The company also offers custom bag sizes up to 12 ft. by 80 ft.) The compressor is a bit noisy, but once it attains the designated pressure, it shuts off and cycles on only to tune up the vacuum.

The vacuum bag is gradually slid over the form, which is now supported off the table by four 4-in.-sq. blocks, which are removed and then replaced as the bag passes by.
The bag is sealed by folding over the open end and applying the bag clamp. Now the vacuum hose can be connected to the air fitting.
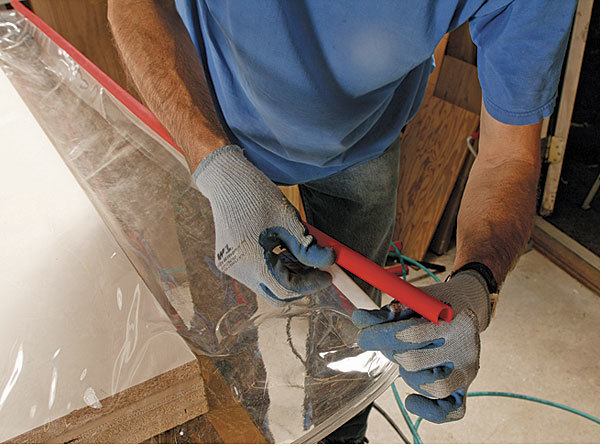
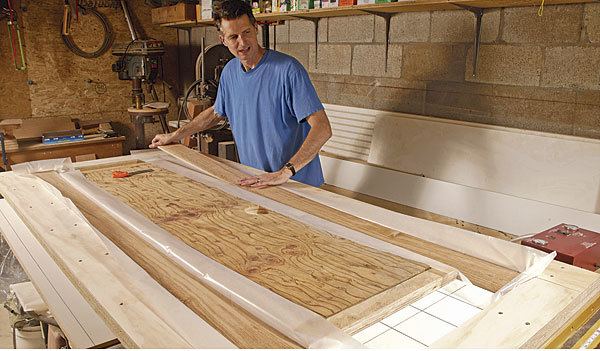
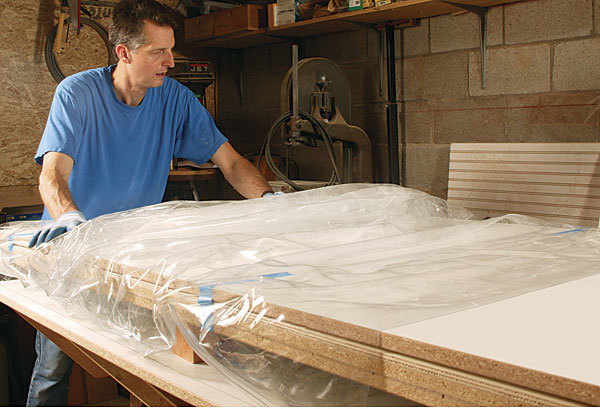
In the bag. The vacuum bag is gradually slid over the form, which is now supported off the table by four 4-in.-sq. blocks, which are removed and then replaced as the bag passes by. When the bag has enveloped the form, the air fitting is pushed through the bag, and the blocks are removed so that the form rests on the table. (A cutout in the table allows access to the air fitting.) The bag is sealed by folding over the open end and applying the bag clamp. Now the vacuum hose can be connected to the air fitting.

Let the Epoxy Cure for 24 Hours

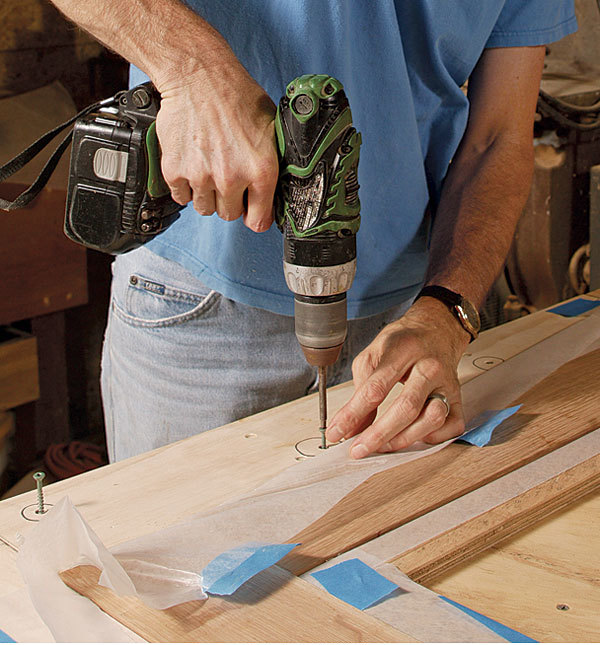
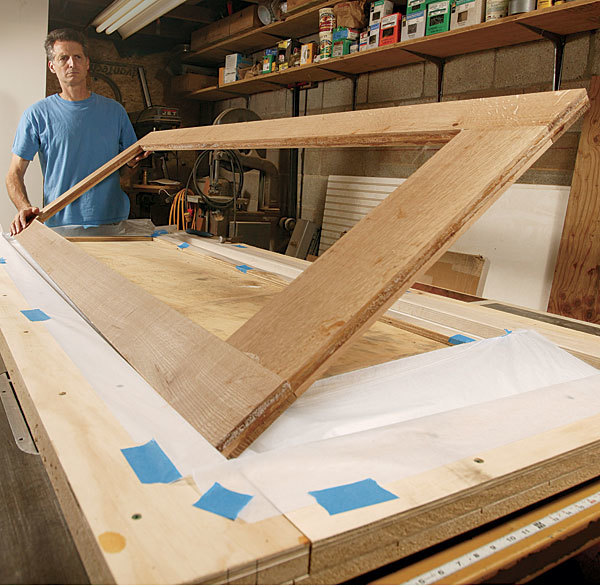
After the epoxy has cured, remove a section of the form, and pop out the door with a flat bar. Next, apply stops inside the stiles and rails to anchor the center panel.

remove a section of the form
A gauge block speeds layout.
A muntin pattern finished the door
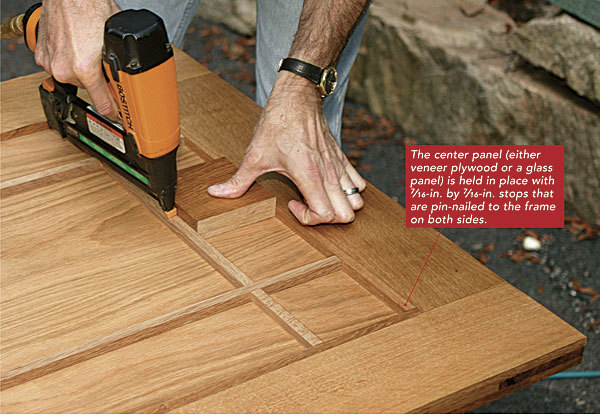
A gauge block speeds layout. A muntin pattern finished the door. The author used an appropriately sized block to position the muntins as he tacked them in place.

Photos: Charles Bickford

Previous: Building Big Doors, On Site Next: Prepare Big Doors for Glue Up

Guide

Windows & Doors

Chapter

Interior Doors

Sign up for eletters today and get the latest how-to from Fine Homebuilding, plus special offers.

Signing you up...

This site is protected by reCAPTCHA and the Google Privacy Policy and Terms of Service apply.
See all newsletters
See all newsletters

Log in or create an account to post a comment.

Sign up Log in

Become a member and get full access to FineHomebuilding.com

Windows & Doors

Windows & Doors

Trusted, comprehensive guidance from the pros for choosing, installing, replacing, and repairing windows and doors on any house

View Project Guide

View All Project Guides »

Become a member and get unlimited site access, including the Windows & Doors Project Guide.

Start Free Trial

Choosing Windows
  • Window Types
  • Design and Materials
  • Energy-Efficient Windows
Installing Windows In New Walls
  • Installation, Start to Finish
  • Head Flashing for Windows
  • Video Series: Nail-Fin Window over Zip System Sheathing
  • Video Series: Nail-Fin Window over Exterior Rigid-Foam Insulation
  • Video Series: Nail-Fin Window over Housewrap
  • Video Series: Nail-Fin Window over Peel-and-Stick Housewrap
  • Video Series: Nail-Fin Window over a Fluid-Applied WRB
  • Video Series: Weatherproof Window Installation
Retrofitting Windows
  • Removing the Old, Installing the New
  • Video Series: How to Replace a Window
  • Video Series: Install a Full-Frame Replacement Window in a Brick Wall
  • Video Series: Install an Insert Replacement Window in a Brick Wall
  • Video Series: Retrofit a Flanged Window
Window Repairs
  • Restoring Old Windows
  • Repairs and Upgrades
Door Basics
  • Tools & Jigs for Door Hanging
  • How to Install Doors
  • Hinges
  • Handles, Knobs, and Locksets
  • Fixing Door Problems
Interior Doors
  • Prehung Doors
  • Pocket Doors
  • Other Types of Doors
  • Custom-Built Doors
Exterior Doors
  • Door Choices and Design
  • Installing Entry Doors
  • Building Exterior Doors
  • Installing French Doors
  • Replacing a Door
  • Adding Weatherstripping and Sweeps

Fine Home Building

Newsletter Sign-up

  • Fine Homebuilding

    Home building tips, offers, and expert advice in your inbox.

  • Green Building Advisor

    Building science and energy efficiency advice, plus special offers, in your inbox.

  • Old House Journal

    Repair, renovation, and restoration tips, plus special offers, in your inbox.

Signing you up...

This site is protected by reCAPTCHA and the Google Privacy Policy and Terms of Service apply.
See all newsletters

Follow

  • Fine Homebuilding

    Dig into cutting-edge approaches and decades of proven solutions with total access to our experts and tradespeople.

    Start Free Trial Now
    • Facebook
    • Instagram
    • X
    • LinkedIn
  • GBA Prime

    Get instant access to the latest developments in green building, research, and reports from the field.

    Start Free Trial Now
    • Facebook
    • YouTube
  • Old House Journal

    Learn how to restore, repair, update, and decorate your home.

    Subscribe Now
    • Facebook
    • Instagram
    • X

Membership & Magazine

  • Online Archive
  • Start Free Trial
  • Magazine Subscription
  • Magazine Renewal
  • Gift a Subscription
  • Customer Support
  • Privacy Preferences
  • About
  • Contact
  • Advertise
  • Careers
  • Terms of Use
  • Site Map
  • Do not sell or share my information
  • Privacy Policy
  • Accessibility
  • California Privacy Rights

© 2025 Active Interest Media. All rights reserved.

Fine Homebuilding receives a commission for items purchased through links on this site, including Amazon Associates and other affiliate advertising programs.

  • Home Group
  • Antique Trader
  • Arts & Crafts Homes
  • Bank Note Reporter
  • Cabin Life
  • Cuisine at Home
  • Fine Gardening
  • Fine Woodworking
  • Green Building Advisor
  • Garden Gate
  • Horticulture
  • Keep Craft Alive
  • Log Home Living
  • Military Trader/Vehicles
  • Numismatic News
  • Numismaster
  • Old Cars Weekly
  • Old House Journal
  • Period Homes
  • Popular Woodworking
  • Script
  • ShopNotes
  • Sports Collectors Digest
  • Threads
  • Timber Home Living
  • Traditional Building
  • Woodsmith
  • World Coin News
  • Writer's Digest
Active Interest Media logo
X
X
This is a dialog window which overlays the main content of the page. The modal window is a 'site map' of the most critical areas of the site. Pressing the Escape (ESC) button will close the modal and bring you back to where you were on the page.

Main Menu

  • How-To
  • Design
  • Tools & Materials
  • Video
  • Blogs
  • Forum
  • Project Guides
  • Reader Projects
  • Magazine
  • Members
  • FHB House

Podcasts

  • FHB Podcast
  • ProTalk

Webinars

  • Upcoming and On-Demand

Podcasts

  • FHB Podcast
  • ProTalk

Webinars

  • Upcoming and On-Demand

Popular Topics

  • Kitchens
  • Business
  • Bedrooms
  • Roofs
  • Architecture and Design
  • Green Building
  • Decks
  • Framing
  • Safety
  • Remodeling
  • Bathrooms
  • Windows
  • Tilework
  • Ceilings
  • HVAC

Magazine

  • Current Issue
  • Past Issues
  • Magazine Index
  • Subscribe
  • Online Archive
  • Author Guidelines

All Access

  • Member Home
  • Start Free Trial
  • Gift Membership

Online Learning

  • Courses
  • Project Guides
  • Reader Projects
  • Podcast

More

  • FHB Ambassadors
  • FHB House
  • Customer Support

Account

  • Log In
  • Join

Newsletter

Get home building tips, offers, and expert advice in your inbox

Signing you up...

This site is protected by reCAPTCHA and the Google Privacy Policy and Terms of Service apply.
See all newsletters
See all newsletters

Follow

  • X
  • YouTube
  • instagram
  • facebook
  • pinterest
  • Tiktok

Join All Access

Become a member and get instant access to thousands of videos, how-tos, tool reviews, and design features.

Start Your Free Trial

Subscribe

FHB Magazine

Start your subscription today and save up to 81%

Subscribe

We hope you’ve enjoyed your free articles. To keep reading, become a member today.

Get complete site access to expert advice, how-to videos, Code Check, and more, plus the print magazine.

Start your FREE trial

Already a member? Log in

Privacy Policy Update

We use cookies, pixels, script and other tracking technologies to analyze and improve our service, to improve and personalize content, and for advertising to you. We also share information about your use of our site with third-party social media, advertising and analytics partners. You can view our Privacy Policy here and our Terms of Use here.

Cookies

Analytics

These cookies help us track site metrics to improve our sites and provide a better user experience.

Advertising/Social Media

These cookies are used to serve advertisements aligned with your interests.

Essential

These cookies are required to provide basic functions like page navigation and access to secure areas of the website.

Delete My Data

Delete all cookies and associated data