
Retrofitting French Doors
Install hinged patio doors so that they work perfectly, even in an out-of-plumb wall.
When installing a new door in an old wall, it’s rare for that wall to be perfectly plumb, level, and square. In this article, remodeling contractor Mike Sloggatt provides a detailed account of the steps he took to install new French patio doors in Fine Homebuilding‘s Project House. He begins by discussing the three options for installing a door in an out-of-plumb wall. The first is to hang it to match the wall. This is a viable method if the distance the wall is out of plumb is 3/8 in. or less over 8 ft.; otherwise, the door may develop phantom swing, which is when the door swings open or shut on its own. The second option is to hang the door plumb, which will work if the door is within 1/4 in. of plumb but will present problems for trim and siding if it’s greater than that. The third option is to hang the door almost plumb–essentially a combination of the first two options. This is the method Sloggatt chose for the doors at the Project House. First, he prepped the opening, which involved checking it for plumb, level, and square and then using a sledgehammer to bring the wall closer to plumb. Second, he installed the pan after applying flexible flashing, then set the door in place. The final steps were positioning the door, checking the diagonals, fastening the door, strengthening the hinges, and installing the hardware. Sloggatt recommends two tools for installing doors, both of which he used on this project: an 8-in. suction cup for help in lifting doors, and a Pump Wedge, which holds a door in place with an adjustable amount of friction.
In the nearly 40 years that I’ve been remodeling old houses, I’ve rarely installed a new door in an existing wall that was perfectly plumb, level, and square. When I was asked to install new French patio doors in an out-of-plumb wall at Fine Homebuilding’s Project House, I knew that getting the doors to work well and look good would involve making some compromises and choosing the right approach among my three basic strategies for hanging doors in out-of-plumb walls.
OPTION 1: Hang It To Match The Wall
Perhaps the simplest way to hang a door in an out-of-plumb wall is to install the door itself out of plumb so that it matches the plane of the wall. For this method to work, though, the wall can’t be out of plumb by more than 3⁄8 in. over an 8-ft. span, or the door will almost certainly swing on its own, a condition that I call phantom swing (sidebar p. 45).
Some carpenters bend hinge pins slightly to correct a door plagued with phantom swing, but that’s not possible with the adjustable hinges that are found on high-quality patio doors. These hinges are a great feature on many modern doors, and they simplify the process of making adjustments, including later adjustments made necessary by structural settling.
If you or your client can tolerate a phantom swing on a seldom-used door, hanging the door to match the wall plane often looks best. It also makes the door easier to trim because the casing and extension jambs will be at consistent dimensions without rabbets or tapers that compensate for the out-of-plumb condition.
OPTION 2: Hang It Plumb
Another strategy is to install the door perfectly plumb. This option makes sense for regularly used doors where it would be annoying to have a door open or close on its own. Unfortunately with this
approach, siding and trim may not look as good as they do on a door that matches the plane of the wall exactly. You’ll also have to spend extra time modifying the casing and/or making tapered extension jambs so that you can integrate the new door with its surrounding wall. This method works best for regularly used doors when the opening is within 1⁄4 in. of plumb over a span of 8 ft.
OPTION 3: Hang It Almost Plumb
The last method is a combination of the other two. Install the door so that it’s close to plumb, but not quite perfect. Ideally, the door won’t have a phantom swing, and the trim and siding will be easier to install because you’re not correcting for the entire amount the wall deviates from true plumb. If the wall is out of plumb by 3⁄4 in. or more, this strategy is often the best option because the out-of-plumb door helps to hide the wall’s out-of-plumb condition.
If the wall is really bad (1 in. or more over 8 ft.), you or the homeowner will have to decide if aesthetics or function is the greater concern. If a phantom swing is tolerable, you can make the installation look better by hanging the door a greater amount out of plumb so that the trim is closer to a consistent width. A trial installation will help you to decide how much force behind a phantom swing is acceptable. Some phantom swings are gentle, and some slam the door with enough force to rattle the china. If it’s more important for the door to stay in any position without a phantom swing, you’ll have to adjust the trim accordingly, which might not look as good.
This Case Called For A Combination Of Tricks
Because this particular wall was out of plumb about 5⁄8 in. from top to bottom, I used a modification of the third method. I began with a few well-placed sledgehammer blows to the bottoms of the jack studs, which got me in the ballpark for splitting the difference
between plumb and perfect trim installation. The sledgehammer blows didn’t straighten the wall entirely; it stopped moving easily after about 5⁄16 in., and I wasn’t prepared to rebuild the whole wall.
The amount out of plumb a door will tolerate without a phantom swing varies from door to door. Because there are no hard-and-fast rules, you may discover that you have to make adjustments after the door is screwed in place. It might seem obvious, but you’ll want to check the door’s operation before you apply caulk and air-seal with spray foam. Making adjustments is much tougher when you have to dig out foam first.
When I checked the door after it was screwed in place, I found that it had a consistent phantom swing, so it had to be fixed, even if it meant fussing with back-cut casing or tapered extension jambs later.
To make adjustments after checking for proper operation, I first close both panels and then activate the head and foot bolts or multipoint latch to keep the doors properly aligned in their frame. After I removed the jamb screws, pulled out the top of the doors slightly, and checked the reveals on the inside to be sure I hadn’t made the doors cross-legged, I refastened the doors. The half hour spent fixing the phantom swing was well worth the effort. Once you get the doors to work, it’s just a matter of fine-tuning the adjustable hinges for the smoothest possible operation and consistent reveals between the doors and the jambs on all sides.
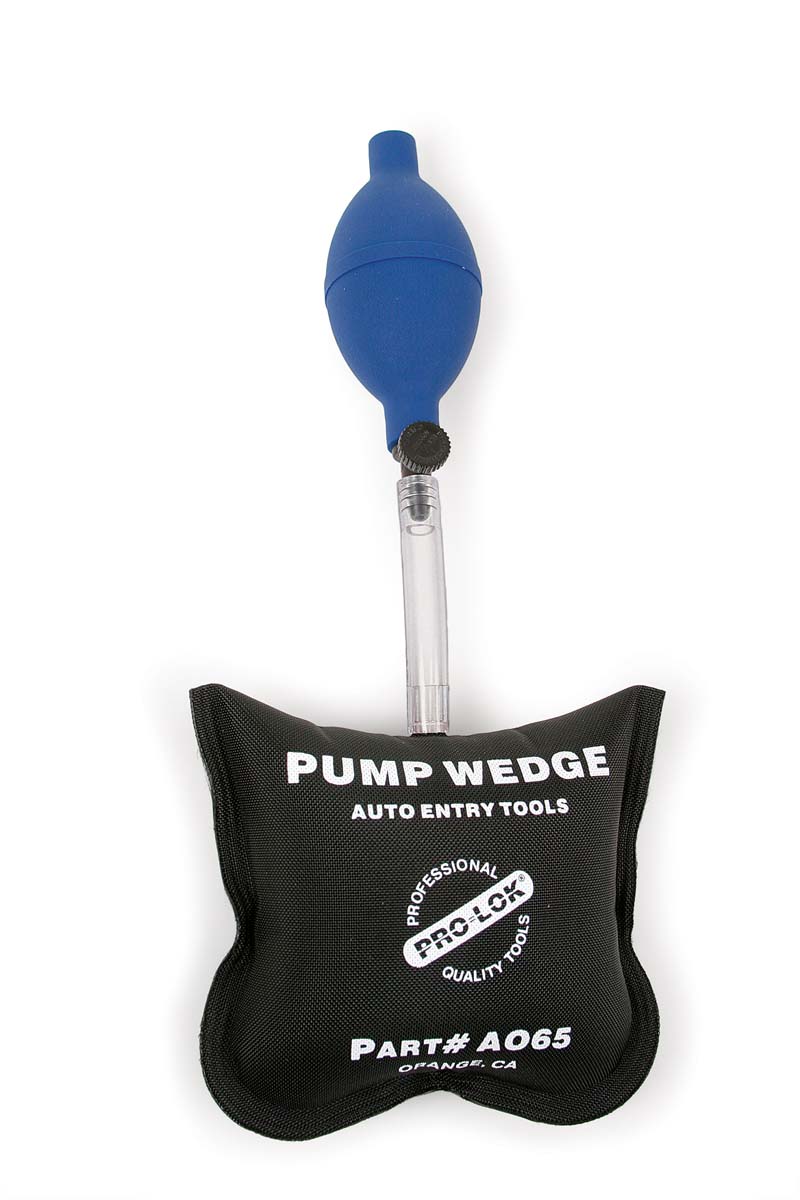
To make adjustments and the initial hanging easier, I use a pair of inflatable Pump Wedges (more commonly used by automotive locksmiths; visit pro-lok.com for more information). These devices hold the door in the opening while I loosen the screws. I also use them to move the doors precisely within the opening.
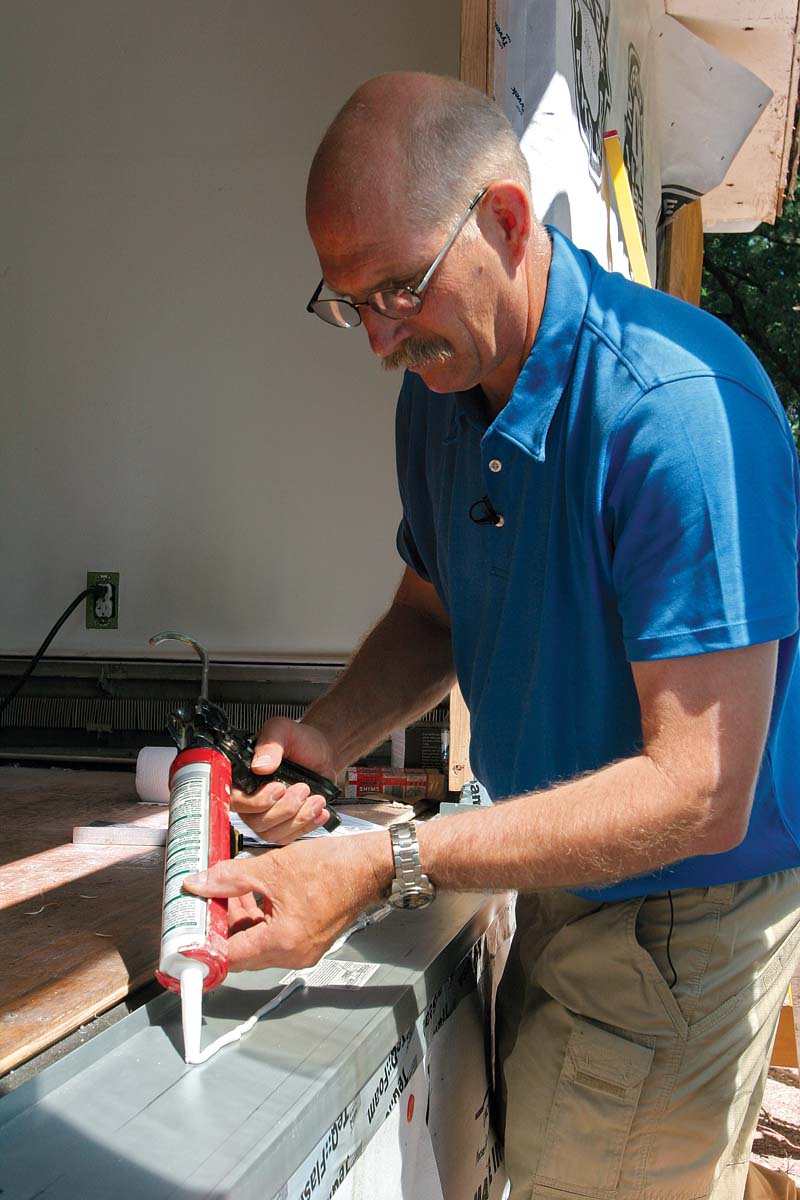
The rest of this French-door installation was pretty typical. Before installing the door in the opening, I put down a manufactured sill pan with peel-and-stick flashing underneath to stop airflow through the tongue-and-groove subfloor. I caulked under the sill pan, under the door, and behind the installation flanges.
When the door was secure and operational, I air-sealed with low-expansion foam and flashed around the door with flexible flashing. I included an aluminum drip cap above the head casing even though it was only inches below the roof overhang. Other carpenters sometimes harass me when they see me flashing things that they think will never get wet. They usually pipe down, though, when I remind them about tornadoes, tropical storms, and pressure washers.
Install Hinged Patio Doors So That They Work Perfectly, Even In An Out-Of-Plumb Wall
|
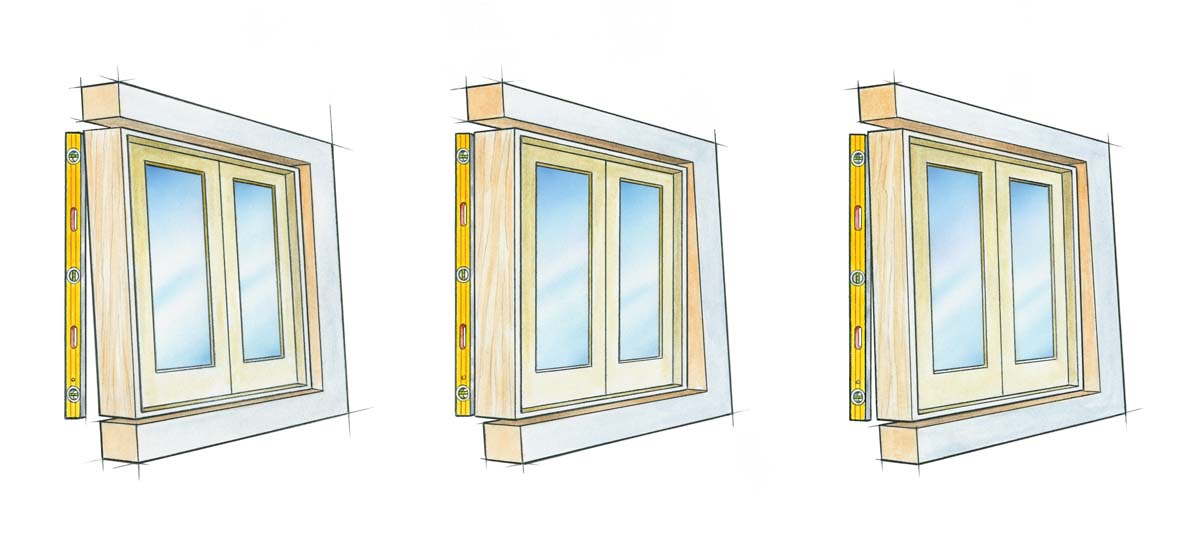
Option 1. Hang the door in plane Hanging the door in plane with the wall often looks best because trim and extension jambs are uniform in width and thickness. Unfortunately, a door hung to match an out-of-plumb wall often swings open or closed on its own. |
Option 2. Hang the door plumb A door hung perfectly plumb in an out-of-plumb wall functions properly with little fuss, but the trim or extension jambs have to be altered. This is often the best choice for frequently used doors. |
Option 3. Hang the door almost plumb A door hung almost plumb shares the positive attributes of doors hung using the other stategies: The trim looks better, and the door holds its position if it’s not too far out of plumb. |
First, Prep The Opening
|
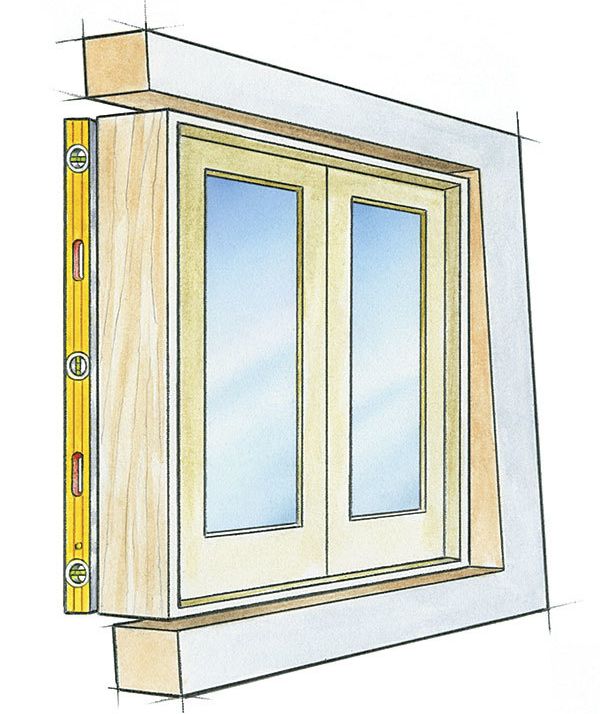
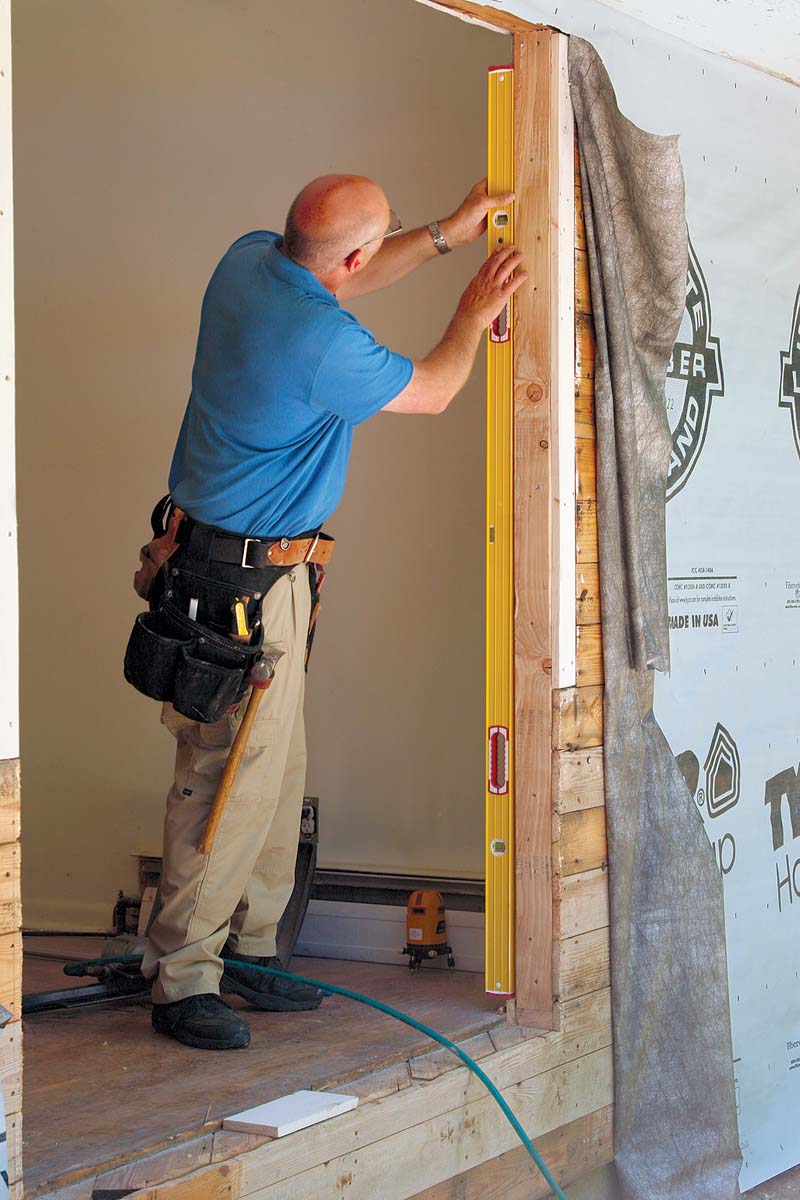
Check for plumb and level. Use a 6-ft. level to check the door opening for plumb and the rough sill for level. It’s better to adjust the door within the opening for out-of-plumb conditions, but correct out-of-level rough sills with shims or new framing before installing the door. |
 |
|
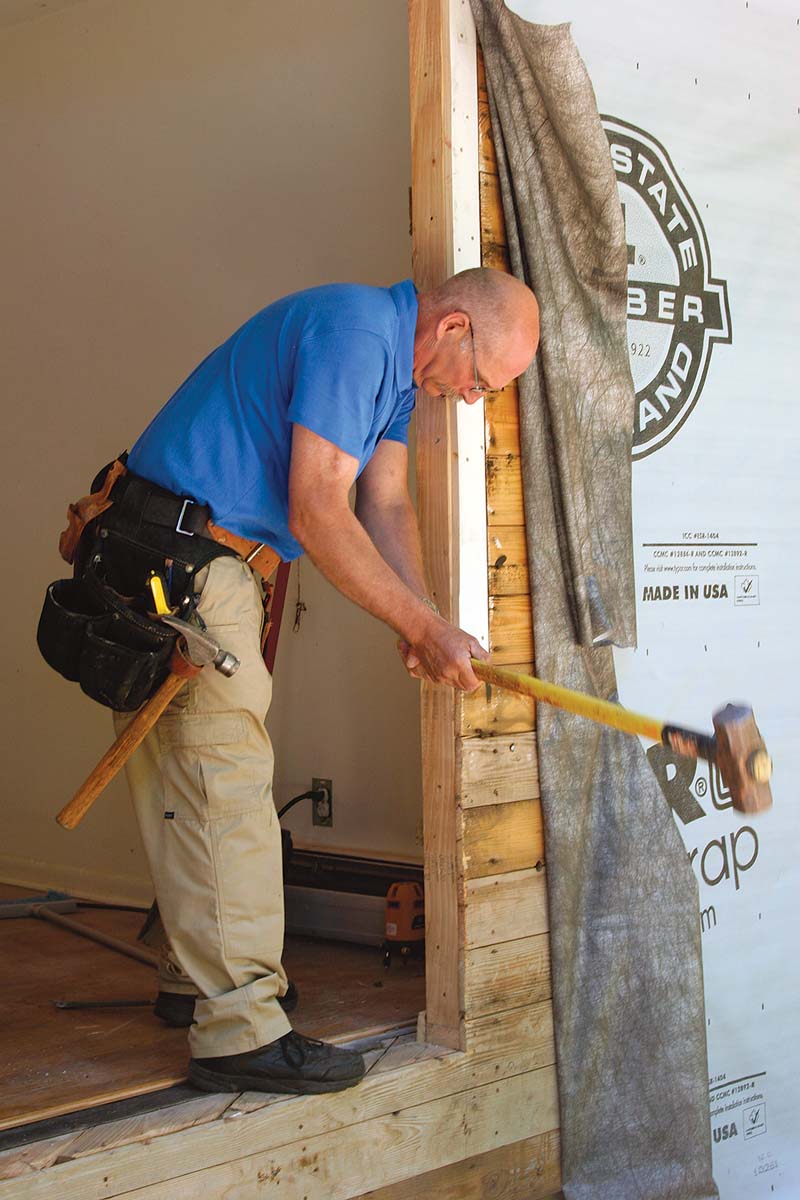
Use brute force. Out-of-plumb and cross-legged openings often can be made straighter with a sledgehammer. The author decided to bring this out-of-plumb wall closer to plumb rather than make it perfect. Banging in the bottom the full amount would have created a hump in the wall big enough to complicate siding and trim. |
 |
|
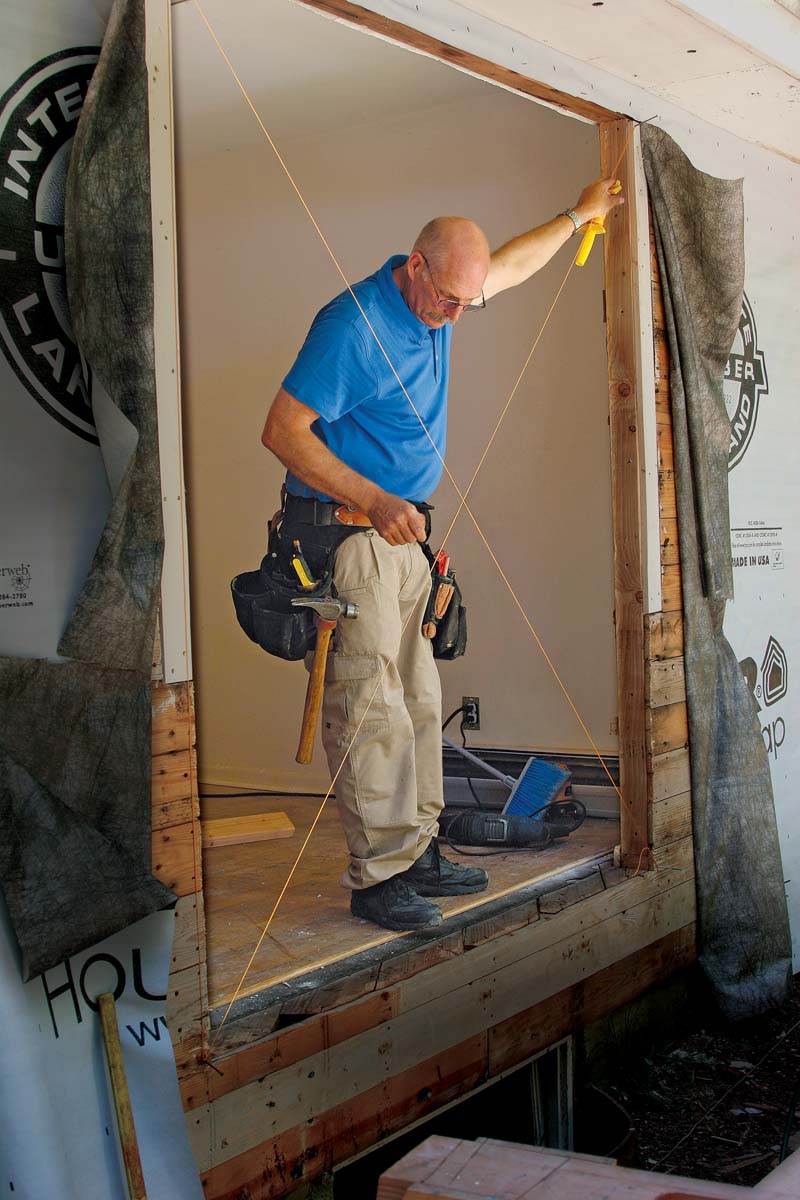
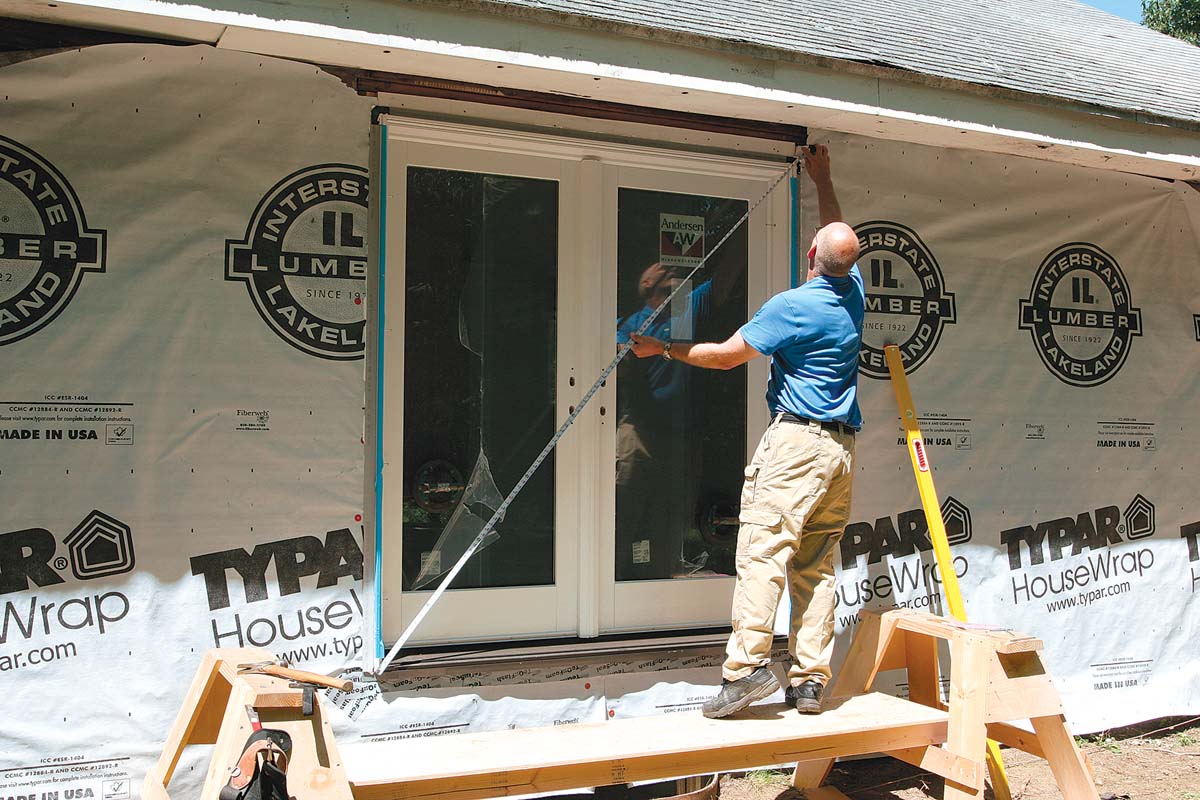
Assess the opening. Diagonal strings are an accurate way to see if the jack studs are in the same plane. Use nails to attach strings tight to the building on all four corners of the opening, and look for a gap where they cross. Check with one string in front of the other and then with the string positions reversed. A gap with the strings in either position indicates that the opening is cross-legged. |
 |
|
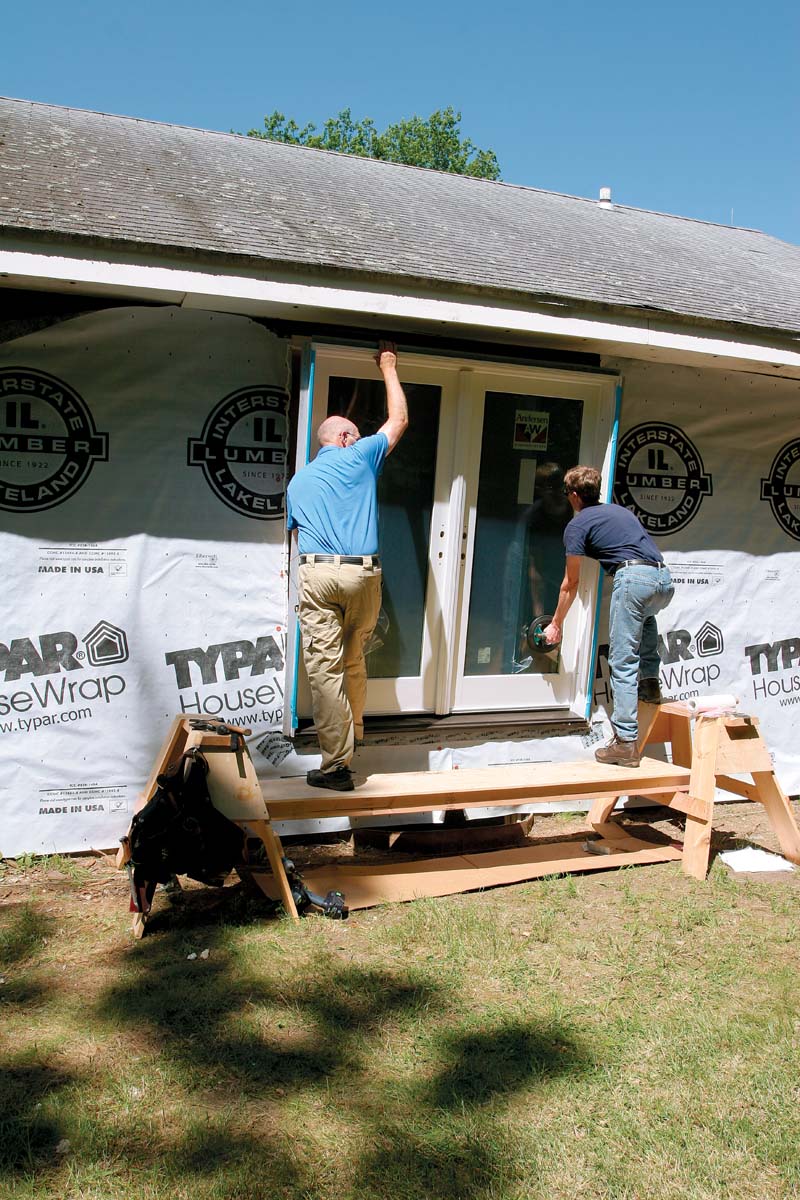
Lift, don’t shove. To prevent smearing the sealant underneath the sill, thereby reducing its effectiveness, lift the door into the opening and lower it into the sealant. A pair of suction-cup lifters makes this process much easier. |
 |
|
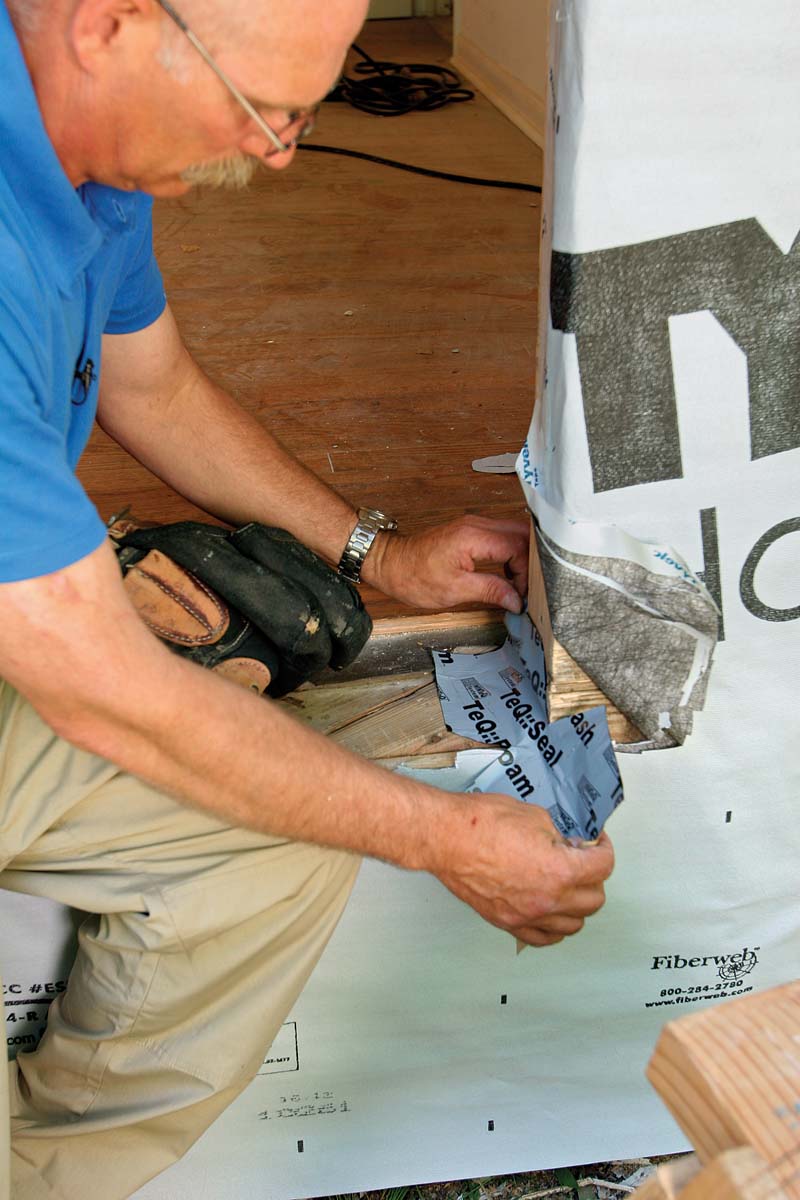
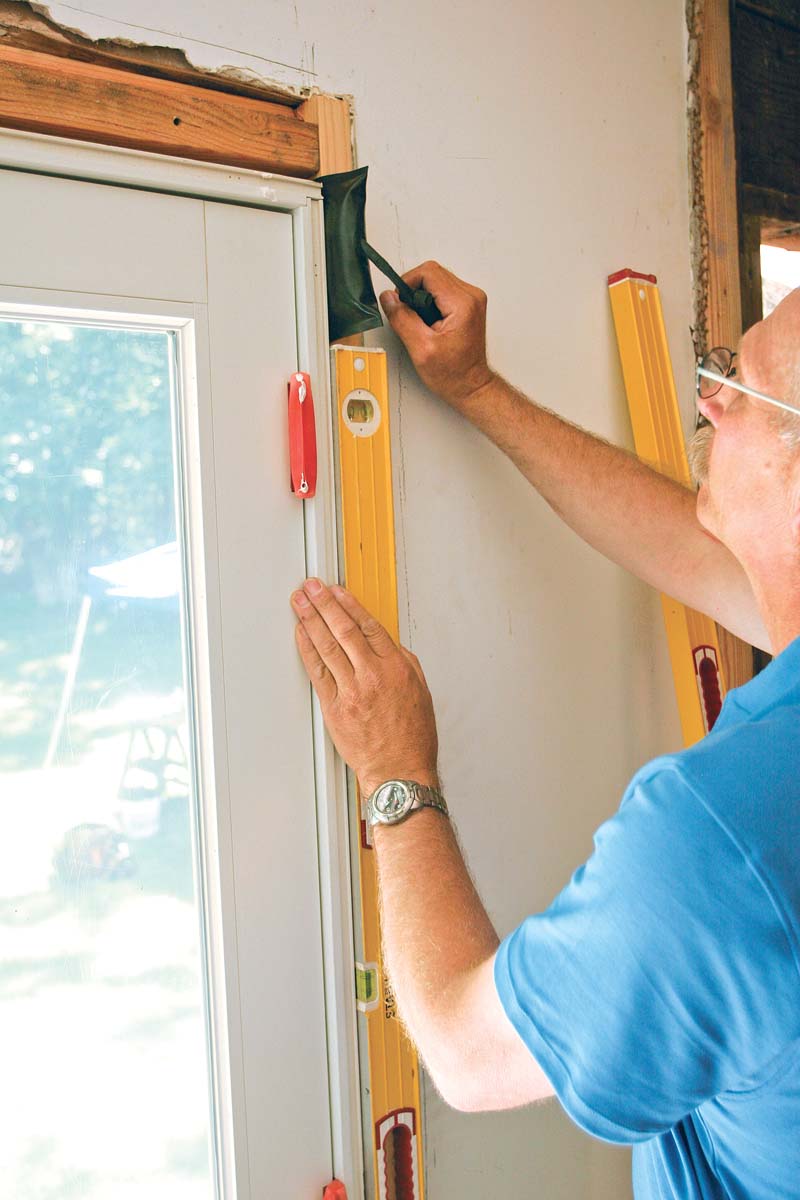
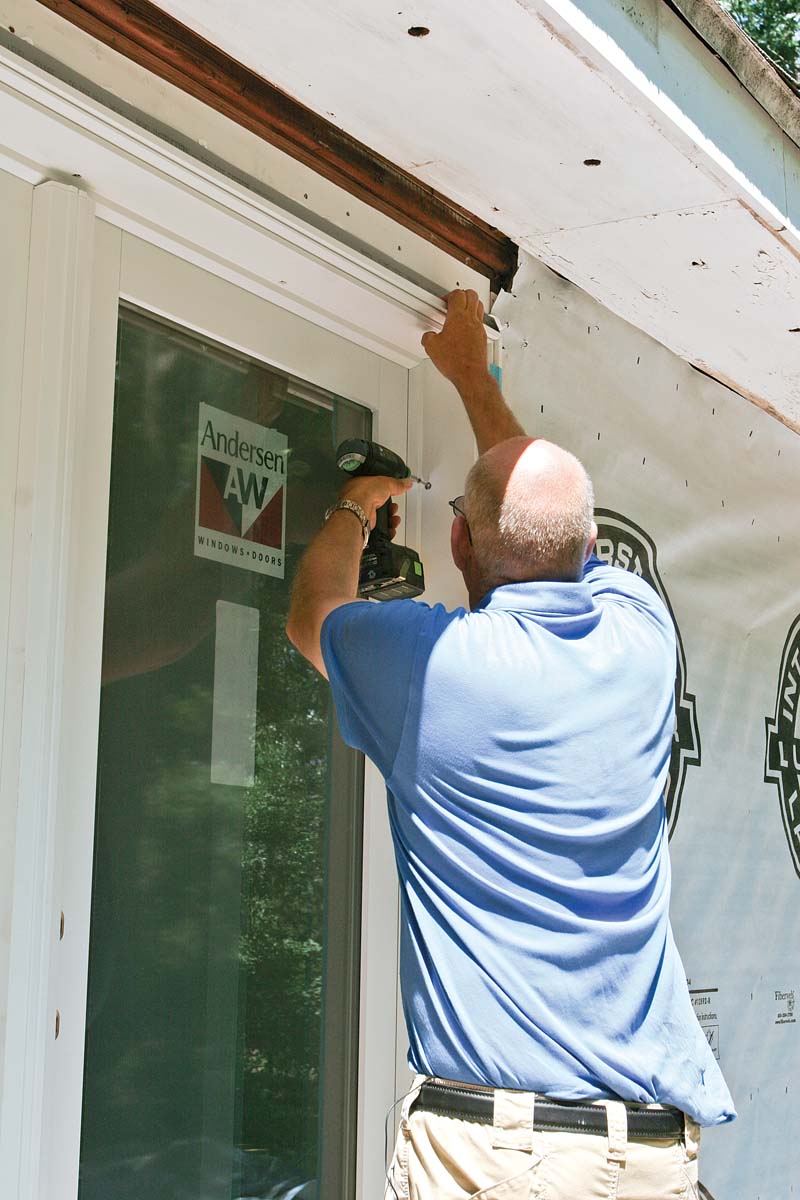
Finishing touches. Once the door operates easily and is fully fastened, tape over the door’s installation flange with flexible flashing, and install the hardware. This door includes an aluminum drip cap that protects the head jamb from water intrusion. Even though this door is protected by a generous overhang, the drip cap is critical for keeping the door weathertight when it’s exposed to high winds and pressure-washing. |
 |
Prep The Pan, Then Set The Door
|
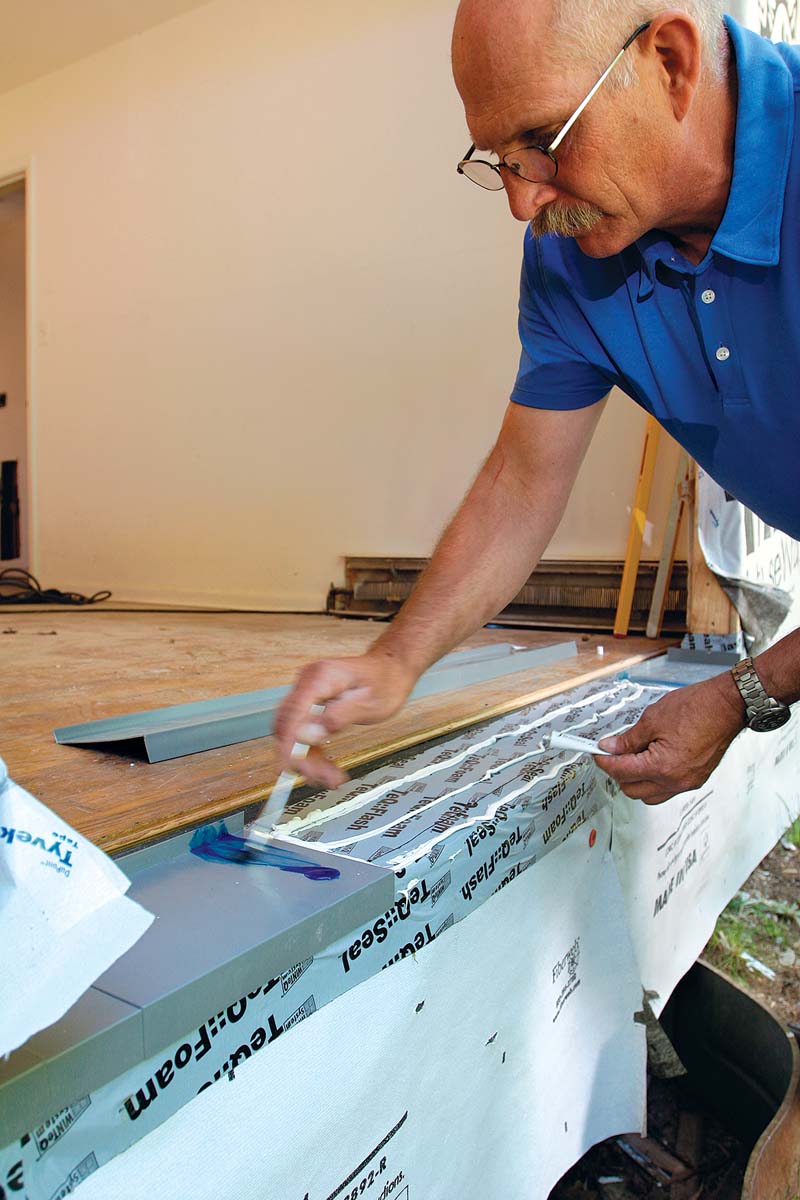
Flexible flashing stops air. The author includes a layer of flexible flashing underneath the sill pan flashing. It’s extra insurance against water intrusion, but more important, it stops air movement through the subflooring, which is made from diagonal boards. Bow ties cut from the roll of flashing seal the corners before larger pieces of flashing are placed on top. |
 |
|
Assemble the pan. This PVC sill pan is shipped in three parts and is field-assembled to match the width of the opening. The sections are joined with PVC cement included with the kit. Between the pan and flexible flashing are three beads of window-and-door sealant meant to keep water and air from blowing under the pan and into the house. |
 |
|
Caulk carefully. This door has a composite sill with strengthening ribs underneath. The ribs must be bedded in sealant for a weathertight seal, so the author draws lines on the sill pan that correspond to the rib locations. He then covers the three lines with heavy beads of window-and-door sealant. |
 |
Final Steps: Fit And Fasten
Inside
 |
 |
|
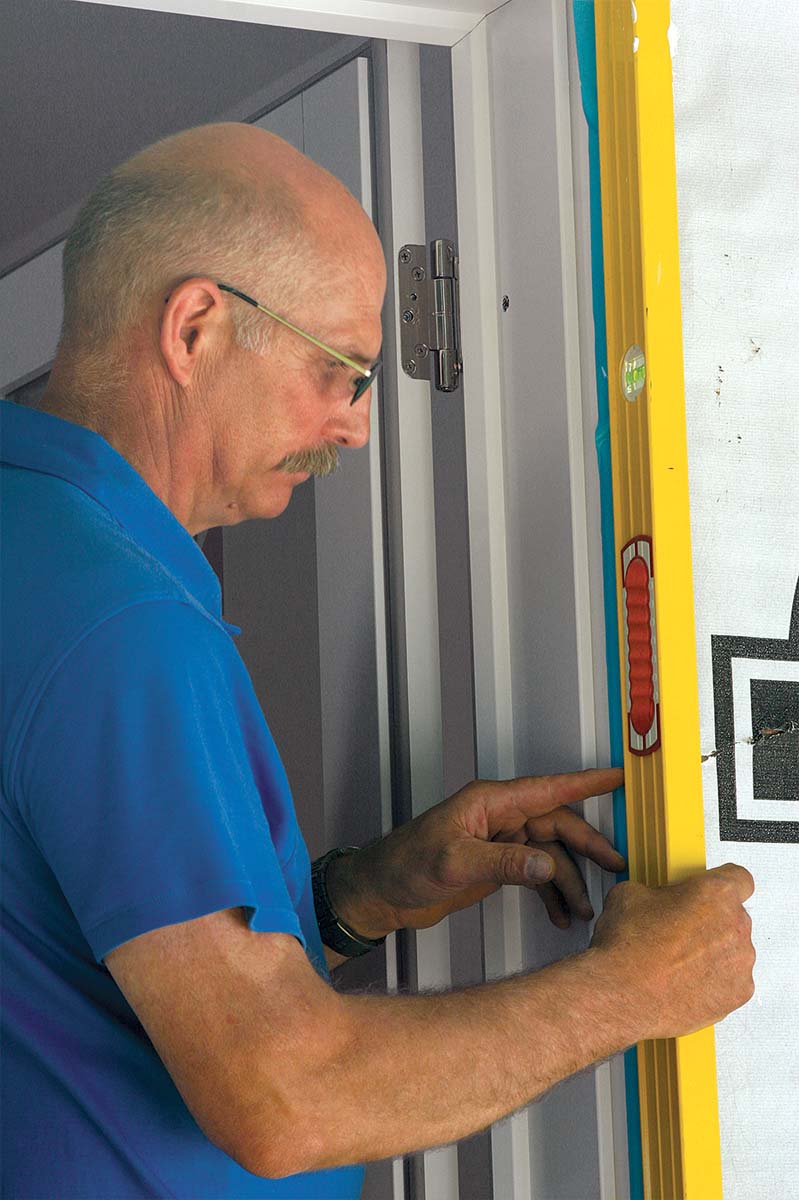
Position the door. With the help of a 6-ft. level, the author matches the door to the wall’s out-of-plumb condition as best he can without sacrificing the door’s operation. Pump Wedges, which hold the door with adjustable amounts of friction, allow him to remove screws more easily and to tweak the door’s position in the opening. |
Outside
|
Check diagonals. With two operating panels, French doors are more susceptible to racking than other styles of patio doors. Unequal diagonal measurements indicate the door is not square and won’t operate correctly. If necessary, shim a top corner and recheck until the measurements are equal. |
 |
|
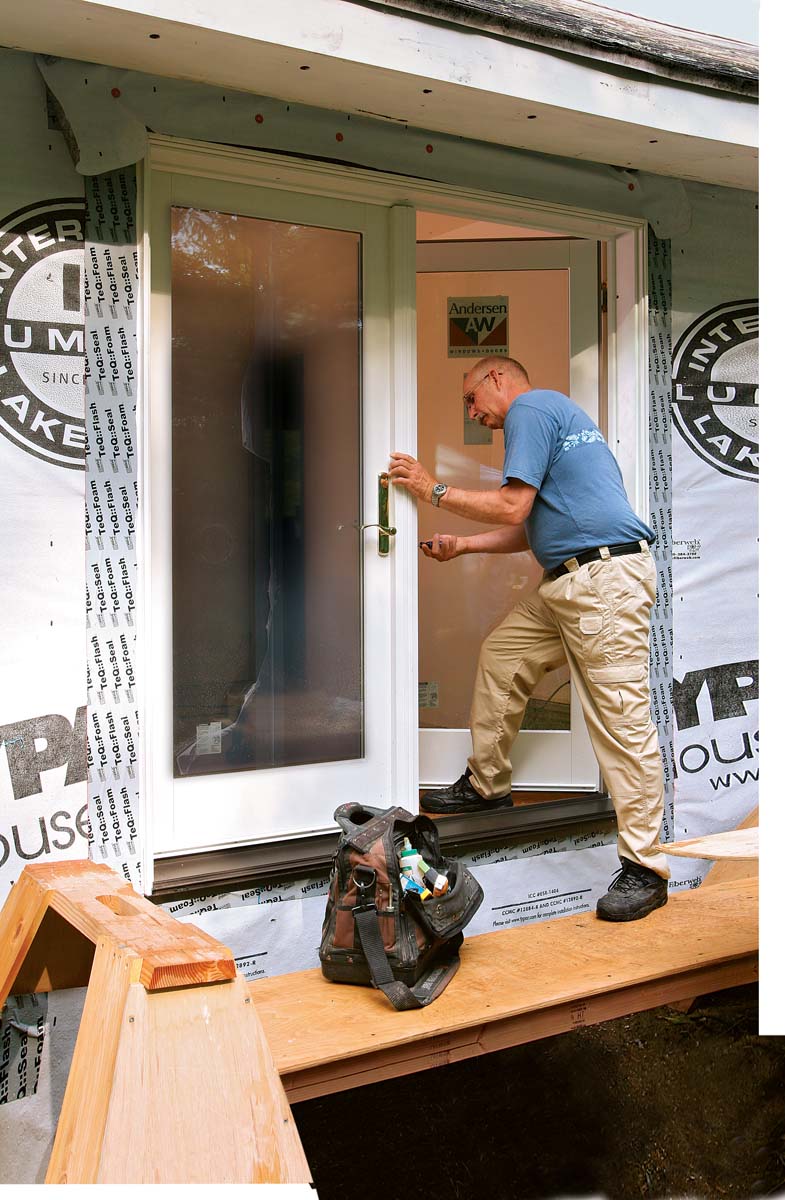
Fasten the door. Once the door is shimmed and square, install the jamb screws, and move inside to check the door’s operation. Both panels should latch and lock easily. If necessary, use Pump Wedges to hold the door so you can remove the screws for adjustments. |
 |
|
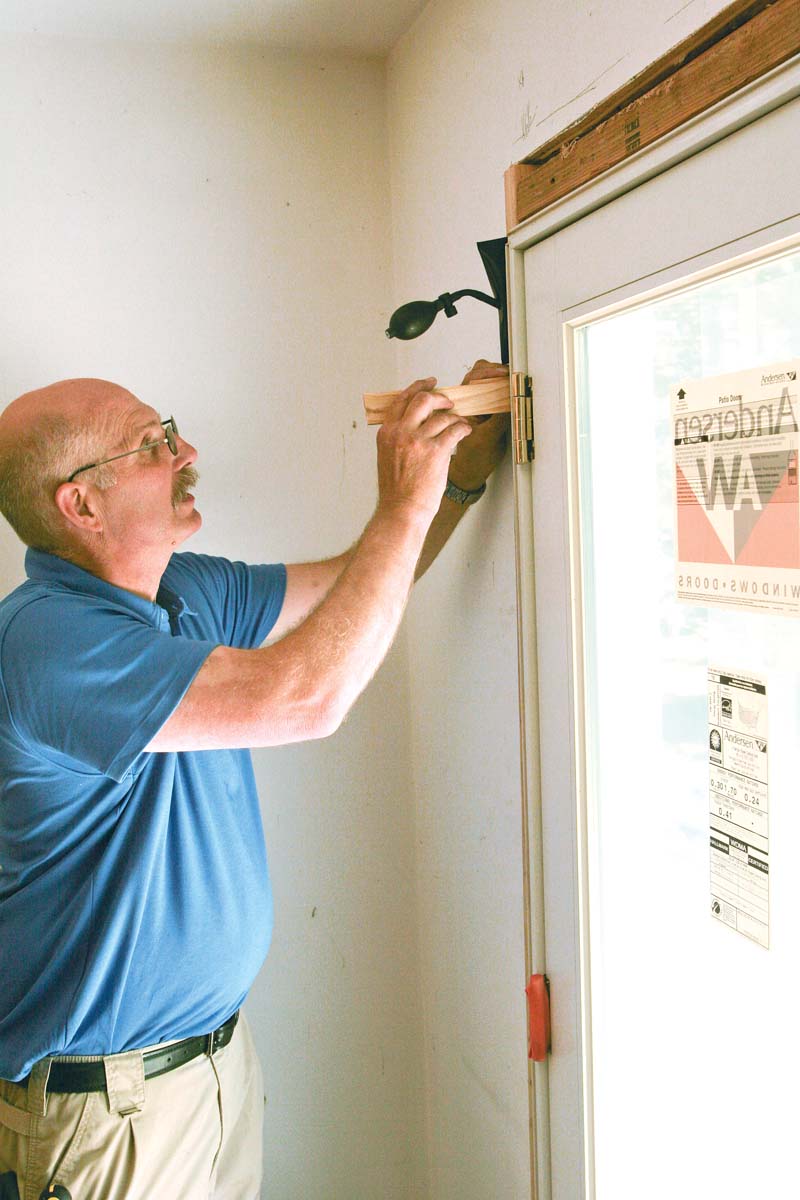
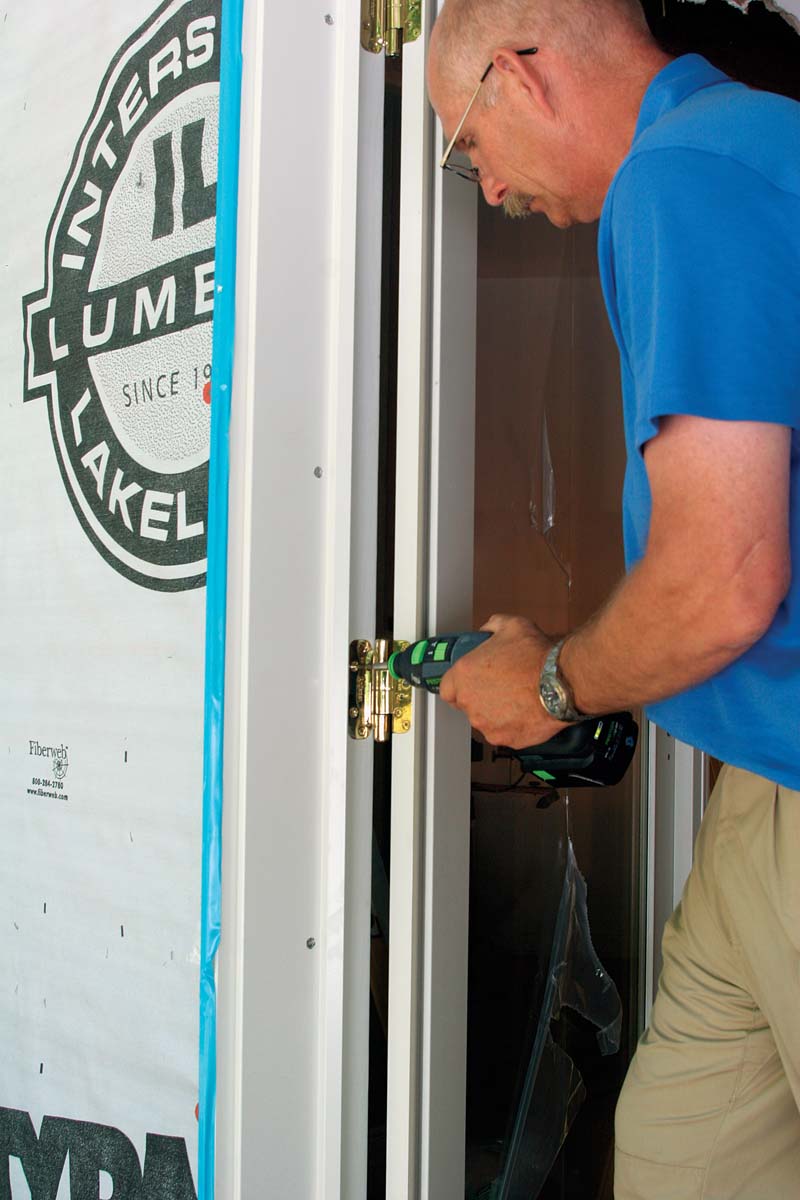
Strengthen the hinges. Once the door works properly and the frame is fully fastened, use the 3-in. screws provided to fasten the hinges to the jack studs. This step is necessary to get the door’s advertised design pressure (DP) or performance-grade (PG) rating. |
 |
What Is Phantom Swing?
Cool Tools
 |
 |
|
$180 per pair Commonly used by auto-glass and countertop installers, vacuum lifters are a great help when you’re hefting a 200-lb. patio door into a rough opening. Use only cups with sufficient lifting capacity and a visual alert that warns you when the cup has insufficient vacuum for lifting. |
$100 per pair Inflated like blood-pressure cuffs, Pump Wedges are thinner, lighter, and more powerful than a flat bar. These qualities make them especially useful when you’re dealing with heavy patio doors in problem openings. |
