Another Hinge-Mortising Template
This simple template and a router make quick work of hinge mortises.
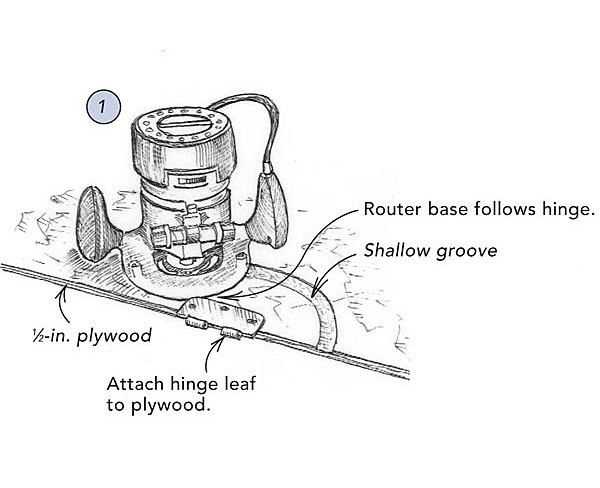
I had a fair number of doors that needed hanging, and I wanted to take advantage of my router and my 3/4-in-dia. straight bit to make quick work of the hinge mortises. I had tried freehanding the mortises with mixed results. So I decided to make the hinge-mortising template shown in the drawings.
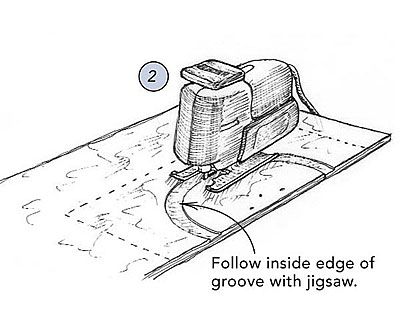
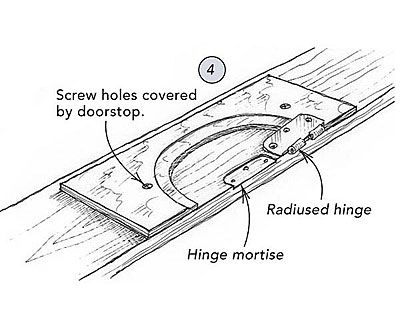
I started with a piece of 1/2-in. plywood, to which I attached the leaf of a radiused butt hinge aligned to the edge of the plywood as it will be placed on the door or jamb (drawing 1). Using the hinge as a guide for the router’s base, I routed a shallow groove in the plywood. The inside edge of this shallow groove became the cutline that I followed with my jigsaw as I made a circular cut in the template (drawing 2). Next, I cut the template along the dotted lines to make it more convenient to maneuver.
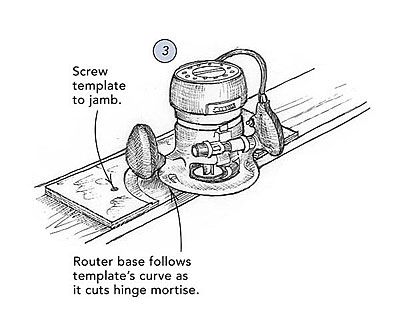
To cut a hinge mortise, I screwed the template to a jamb and followed the curved edge of the plywood with the router’s base (drawing 3). I used the same 3/4-in. straight bit, set at a depth equal to the thickness of a hinge leaf, to make the cuts. By the way, I placed the screws that hold the template to the jamb in positions that allow their holes to be covered by the doorstops.
Ray Freud, Cherry Hill, N.J.
Please click the gallery link above to see all the drawings in this tip.



View Comments
Would be nice to have all three drawings.
Drawings 2 and 3 not shown.
This is a great idea, can we get the other two drawings to show the full solution?
I would also like drawings 2 and 3
years past, did I screw up my mahogany front door attempting this. Homeowner here. A stack of interior doors are now waiting on you Ray....Thanks for posting. You guys have some great tips, I read them all.
Very resourceful, but I would like to see the other 2 drawings.
Yes, we seem to be missing the rest of the tip's illustrations.
Why bother posting this with half the information missing? You owe Ray and everyone an apology and a link to the real tip, wherever you keep it.
This has happened more than once. This is most annoying to have pictures missing. I read all the tips. (Except for this one).
I need to hang a door and this procedure would be very helpful. I agree with the other posts, what is the sense of looking at these if half the information is missing. Where are the other drawins
Here is the link to the original article. Scroll to the bottom of the article and click on the "Launch Gallery" button to see all three images:
https://www.finehomebuilding.com/readerproject/2011/01/31/routing-hinge-mortises
That tip is some where i have seen it before
Sorry everybody! I fixed the original source (https://www.finehomebuilding.com/readerproject/2011/01/31/routing-hinge-mortises) -- and I thought it would carry over here. Obviously it did not, so let me fix it here too right now.
FHB Web Producer Mike
This "tip" demonstrates the level of interest that the Fine Homebuilding editors have in subscribers. The previous 13 posts were posted 2-1/2 years ago, and the error persists and was re-posted.
Level of interest by Fine Homebuilding --- ZERO.
Found the 'launch gallery' link right there and this brought up the missing drawings. Worked fine. Interesting tip, but I'll have to try it before I believe it.
Why not replicate the jig on a longer piece to allow all of the hinges to be cut without resetting? Also, won't clamps work instead of screws?