
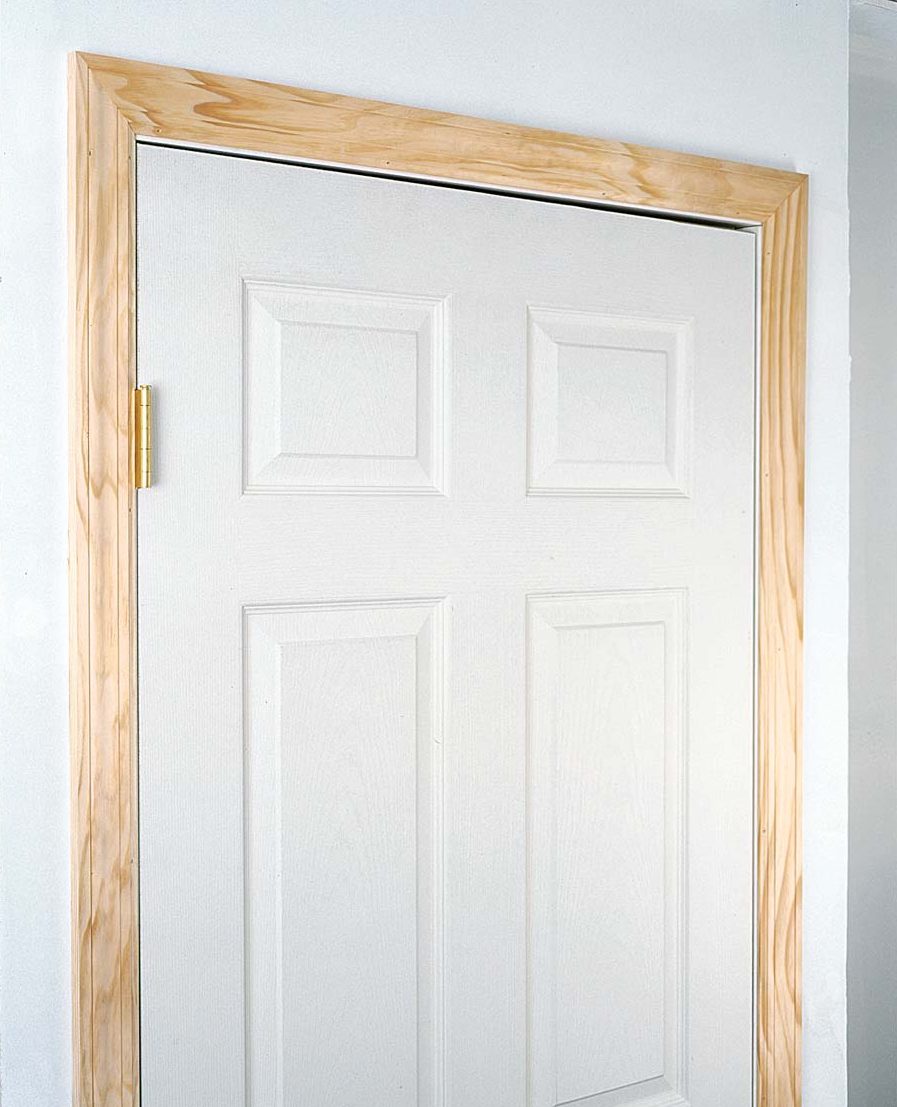
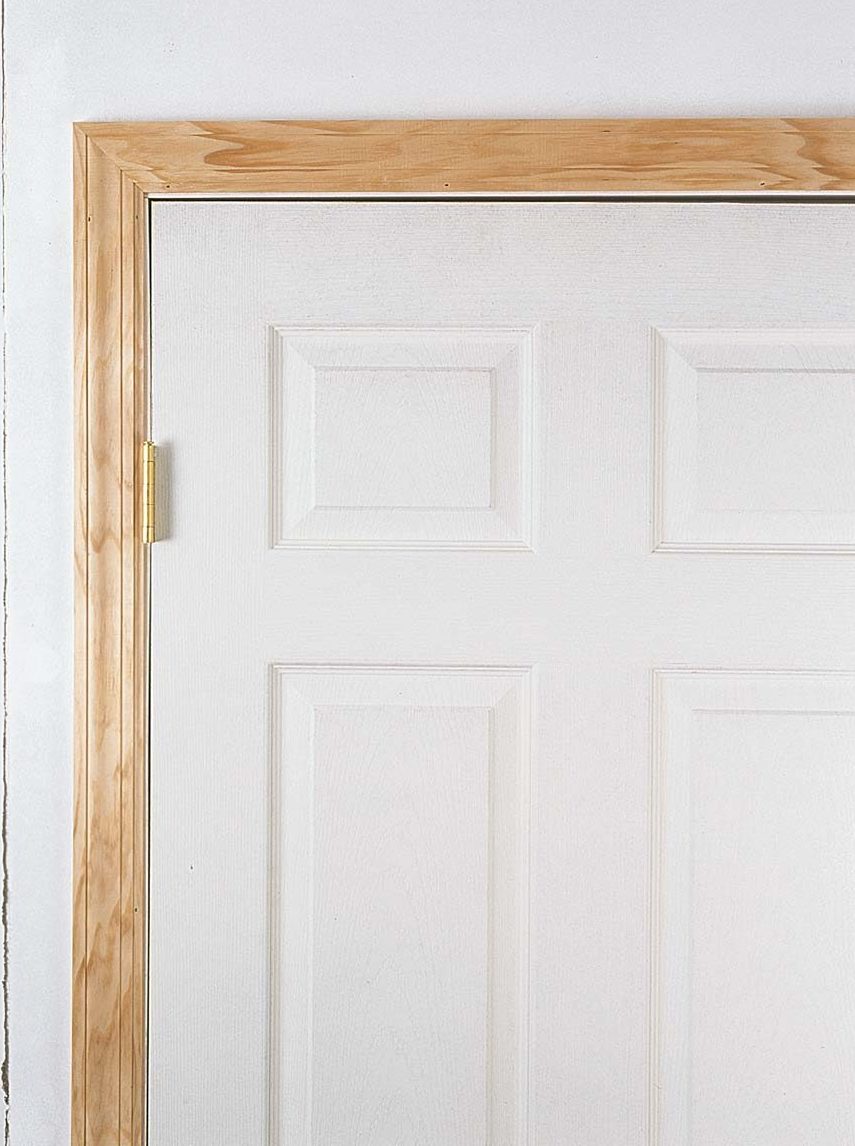
Setting Prehung Doors
With hollow-core doors, you can skip the shims and hang the jambs from the casing without sacrificing quality.
Synopsis: A finish carpenter’s production techniques for quickly and accurately installing prehung, hollow-core doors without using shims. Included is a sidebar on shimming solid-core doors.
In the early 1980s, apartment and condominium construction fueled another building boom in Southern California. I remember standing with my brother in the middle of a muddy 380-unit project and staring at receding rows of brand-new two-story town houses. We’d just landed the interior-finish contract, and we both wondered how we’d make a living installing prehung hollow-core doors at $6 each.

But as most carpenters would have done, we jumped into the job feet first. It didn’t take us long to learn new tricks for setting prehung doors. By the time we finished that development, my brother and I were convinced that the production techniques we had developed on that job would also work on custom homes, our real bread and butter.
Hanging doors without shimming probably raises a few eyebrows. However, I install only hollow-core 6-ft. 8-in. prehung doors this way. I’ve installed thousands of doors, and I’ve never had one settle by itself.
I once returned to an apartment complex to switch the swing of a bathroom door. I guess my crew must have installed the door just before quitting time because the casing on the stop side was not nailed to the wall and the jamb wasn’t nailed to the trimmers at all. But even after being installed this way for two months, the door still fit fine.
Make Certain The Right Doors Are At The Right Openings
Before my crew begins to install doors, I walk through the house and mark a large X on the wall beside each door opening. The X marks the location of the hinges so that the crew will know which way each door swings. Next, we scatter the doors to the correct openings and check each opening to be sure it’s framed 2 in. wider than the size of the door.
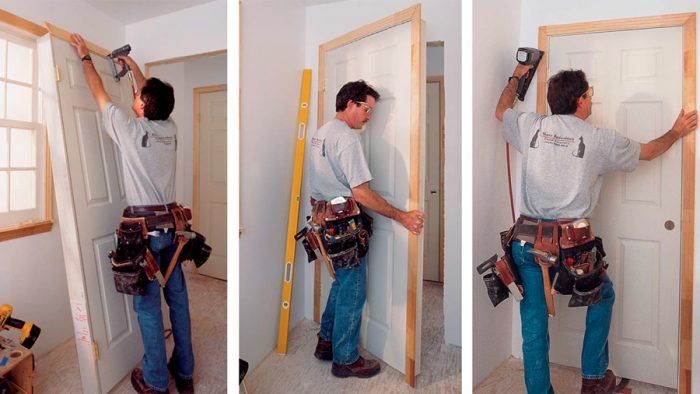
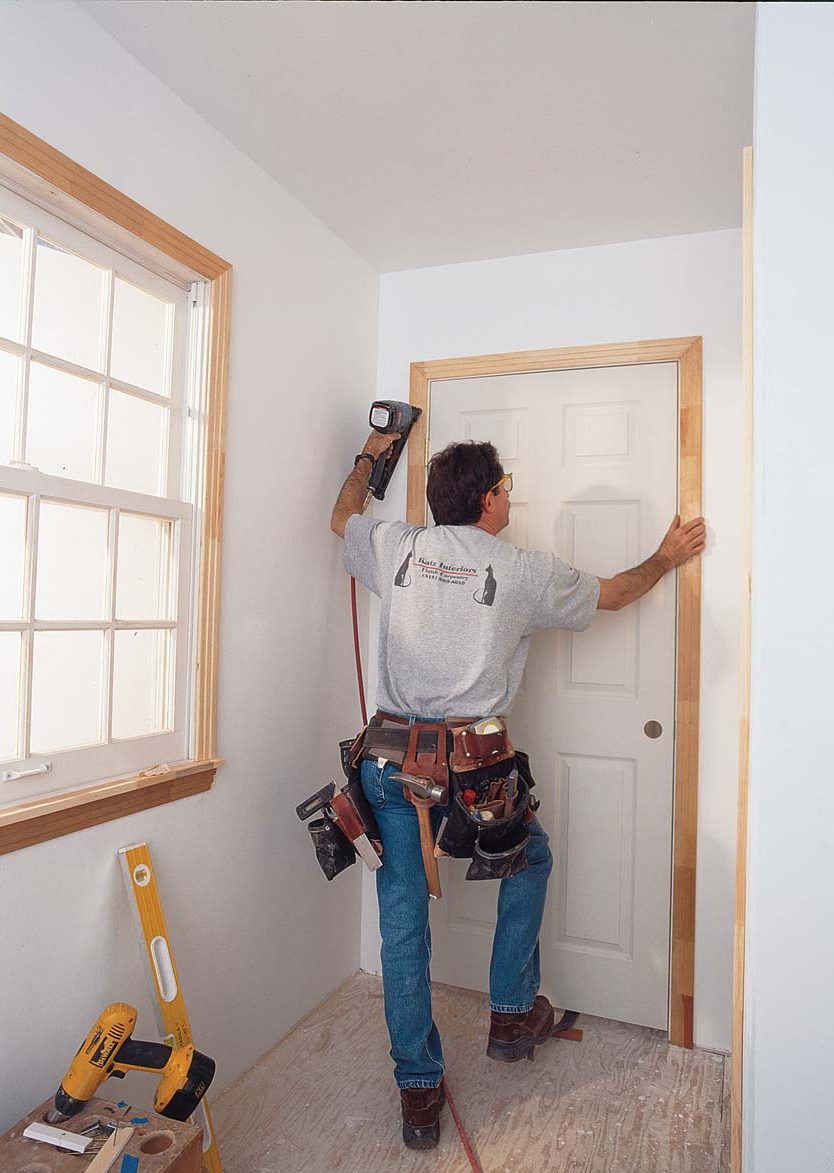
Most of the prehung doors I install are shipped to the site without attached casing. I always begin installation by nailing the casing to the jamb about every 2 ft. using 1-in., 18-ga. brads, and gluing and bradding the miters together as well. (When setting doors this way, I always use a nail gun. Hand-nailing would negate much of the method’s efficiency.) It’s not only easier to set the unit with the casing attached, but the casing also firms and straightens the otherwise wiggly 1 1⁄16-in. thick jambs. When I nail the door permanently into the opening, I also shoot some 2 1⁄4-in., 15-ga. finish nails through the casing into the jamb, especially near the hinges and the floor, to reinforce the brads.
Once the casing is attached, I set the unit partially in the opening and pull the plug or the duplex nail that holds the door in the jamb for shipping. Most doors then fall toward the floor, and the head gap between the top of the door and the jamb expands. It might seem that you need three hands to align the jamb and door in the opening, but a pry bar well placed on the floor is the only extra help I ever need.
Use Your Foot As A Third Hand
In a perfect world, the houses that I trim would be plumb and level, the doors would all be square, and the jamb legs the same length. That’s not how it is, though. What follows is how I hang doors that work well and look good in the often-skewed reality of construction sites.
Although most hollow-core doors aren’t too tough to handle, a pry bar makes the job easier. I place the pry bar under the door a bit closer to the strike side than to the hinge side. If the door has been undercut for carpet, then I set a small block of wood on the floor to act as a fulcrum so that the tail end of the pry bar is 1 in. or so off the floor.
Stepping lightly on the pry bar, just enough to balance the weight of the door, will rack the door back toward the hinge-side jamb. The head gap will close as the door approaches plumb. Also, as I step on the pry bar, I rotate the tail end toward the strike jamb. A slight rotation pulls the bottom of the hinge jamb away from the trimmer and helps to plumb the door, too. I find a comfortable stance and apply just enough pressure to hold the door still.
Perfectly Plumb Isn’t Always Perfect
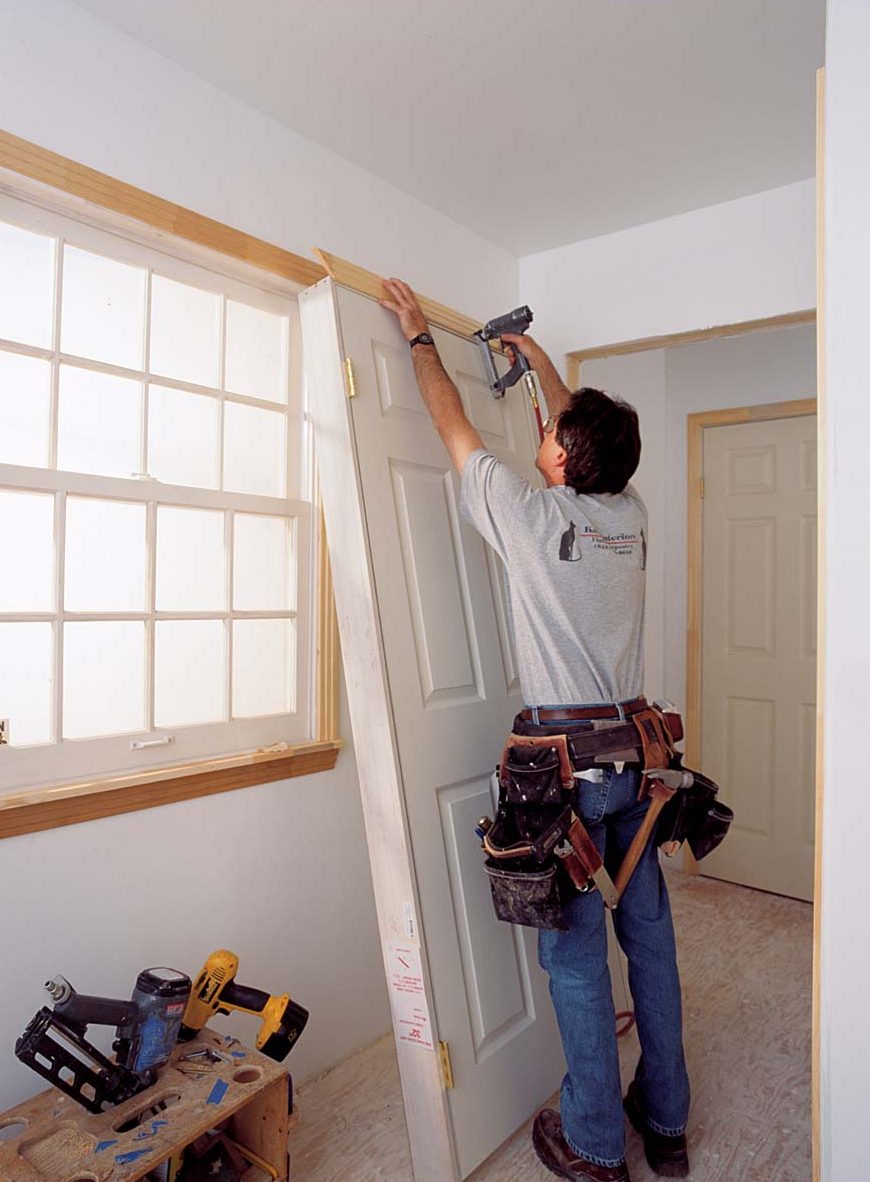
If a door is standing alone with no other door or wall nearby, then plumbing the hinge jamb with a good 6-ft. or longer level should determine the door’s position in the opening. Perfectly plumb jamb legs and level jamb heads are the best choice.
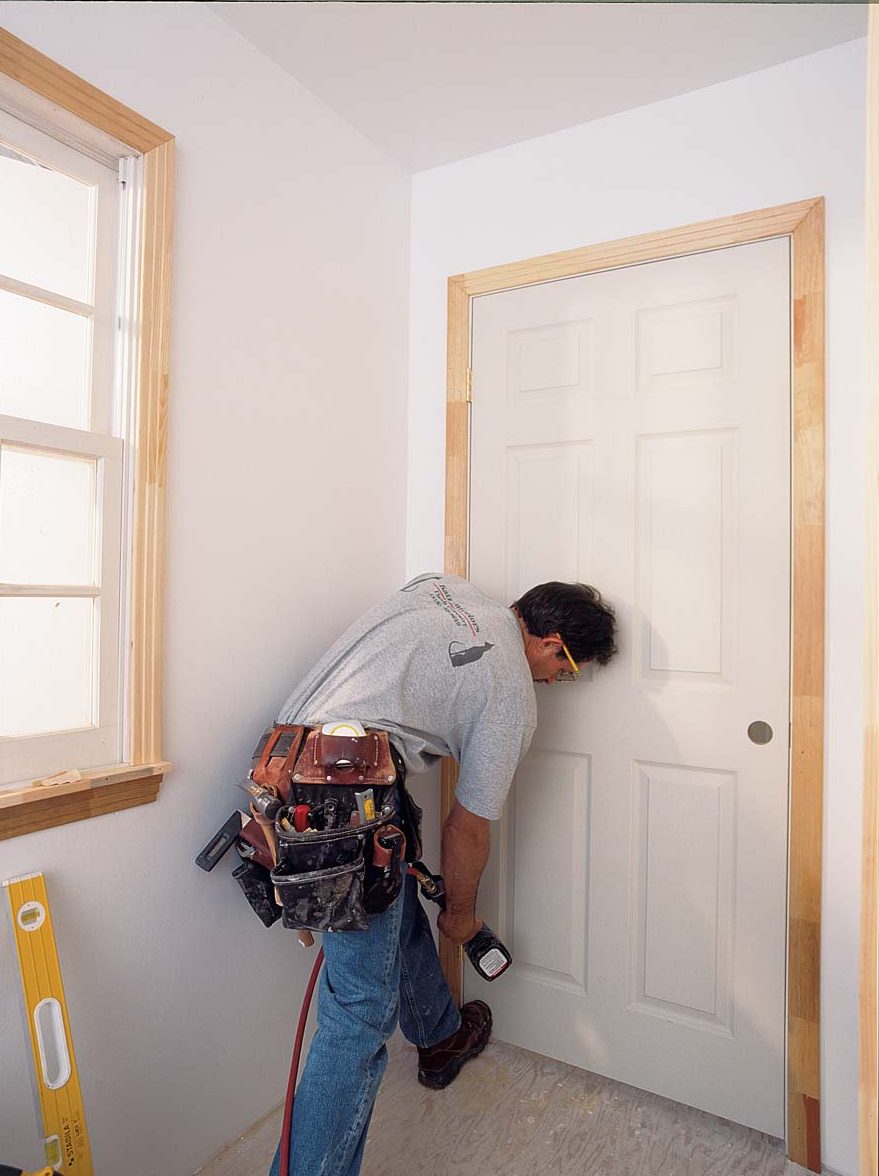
However, the casing should also be parallel to any adjacent wall or door, which may not be exactly plumb. I frequently set prehungs slightly out of plumb to achieve even margins with existing walls and trim. So while I’m stepping on the pry bar, I pull my tape measure to check the margin between an adjacent door or wall at the top and bottom of the casing.
Also, the head casing must line up with adjacent door and window casings. I check alignment with a level. Occasionally, a jamb must be cut down or shimmed up to align the head casing.The closer adjacent openings are to the door, the more important it is to match them.
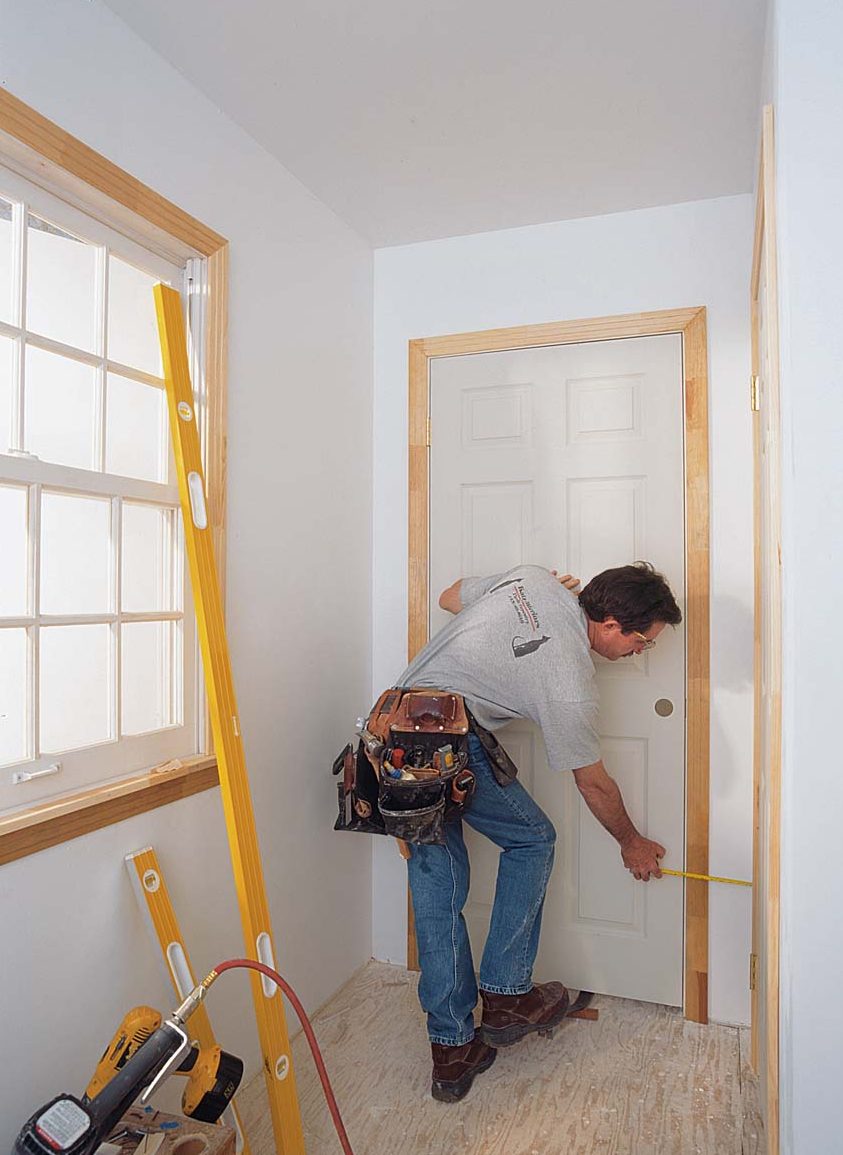
Finally, I check the head gap. This margin between the door and the head jamb should be uniform, about the thickness of a nickel. If the floor is out of level, you’ll find that the head gap will be too tight or too loose even if the hinge jamb is plumb. Either jamb leg may have to be shimmed off the floor to even up the gap, but more on that in a minute.
The Right Nailing Sequence Is Crucial
I always place the first nail (I use 15-ga., 21 ⁄4-in. pneumatic nails) through the casing and into the wall about 3 in. below the miter on the hinge side. Before driving a second nail, I check the head gap again.
If I have the hinge jamb plumb to my liking, a head gap that’s too big near the strike jamb means I’ll have to shim under the hinge jamb. With only one nail holding it, the jamb can still be easily shifted using a pry bar. I place the pry bar beneath the door on the hinge side and raise the door and jamb straight up until the head gap is uniform. Once I’m satisfied with the head gap, I shoot the second nail through the casing about 2 in. below the bottom hinge. The nails through the casing will hold the door until I shim between the jamb and the floor. This shim keeps the door from settling and cracking open the miter.
After the first nail, if the head gap is too small, then the floor is out of level in the opposite direction. A shim under the strike jamb cures this problem.
If the floor is level but the head gap is too big anyway, the door is racked in the jamb. I can move the bottom of the hinge jamb inward and close the gap by slightly lifting the door with a pry bar, then rotating the pry bar. To open the gap, I simply tap the bottom of the hinge jamb toward the trimmer (the inner studs in the rough opening) with a block of wood and a hammer.
After securing the door, I step back a little and take a long look at the head gap and the margins between the casing and the adjacent walls or doors. The two nails I’ve installed will hold the unit still, but I can still move the jamb easily with a pry bar.
Before shooting another nail, I again check the head gap. If it’s still too tight, I lift the strike jamb and make sure there’s enough wiggle room between the head jamb and header so that I can correct the gap later. But I don’t nail the casing on the strike jamb just yet.
The Third Nail Is The Most Important
The weight of a door always pulls down on the top hinge and often causes the jamb to deflect. Jamb deflection at the top hinge, or tweaking, as we call it, is usually a problem that occurs on heavier solid-core doors, but tweaking can cause problems with hollowcore doors, too. Deflection at the top hinge causes a wide gap between the door and jamb above and below the top hinge. And if the hinge gap is too big, you can bet the strike gap will be too tight. Here’s how I quickly correct jamb deflection.
With the jamb secured by the first two nails through the casing and with the door closed, I place a pry bar under the strike edge of the door and step on it lightly. I apply enough pressure to take the weight of the door off the jamb and to force the jamb and the top hinge back toward the trimmer. Before I place the third nail, I like to see a slightly tight gap between the door and the jamb above the top hinge. The gap between the top of the door and the strike jamb should conversely be slightly large. After the third nail is driven—through the casing and into the trimmer behind the top hinge—the door will settle slightly, and the gaps will be perfect. Then I shoot a fourth nail nearby, just to be sure the gaps stay perfect.
The remainder of the hinge-side casing can now be fastened to the wall. I use about one nail per foot, with an extra nail or two behind each hinge. Next, I drive a nail through the head casing above the strike jamb, about 3 in. away from the miter. Then I tack the strike-side casing to the wall about every 2 ft., keeping the door-to-jamb margin about the thickness of a nickel.
Correcting Cross-Legged Jambs
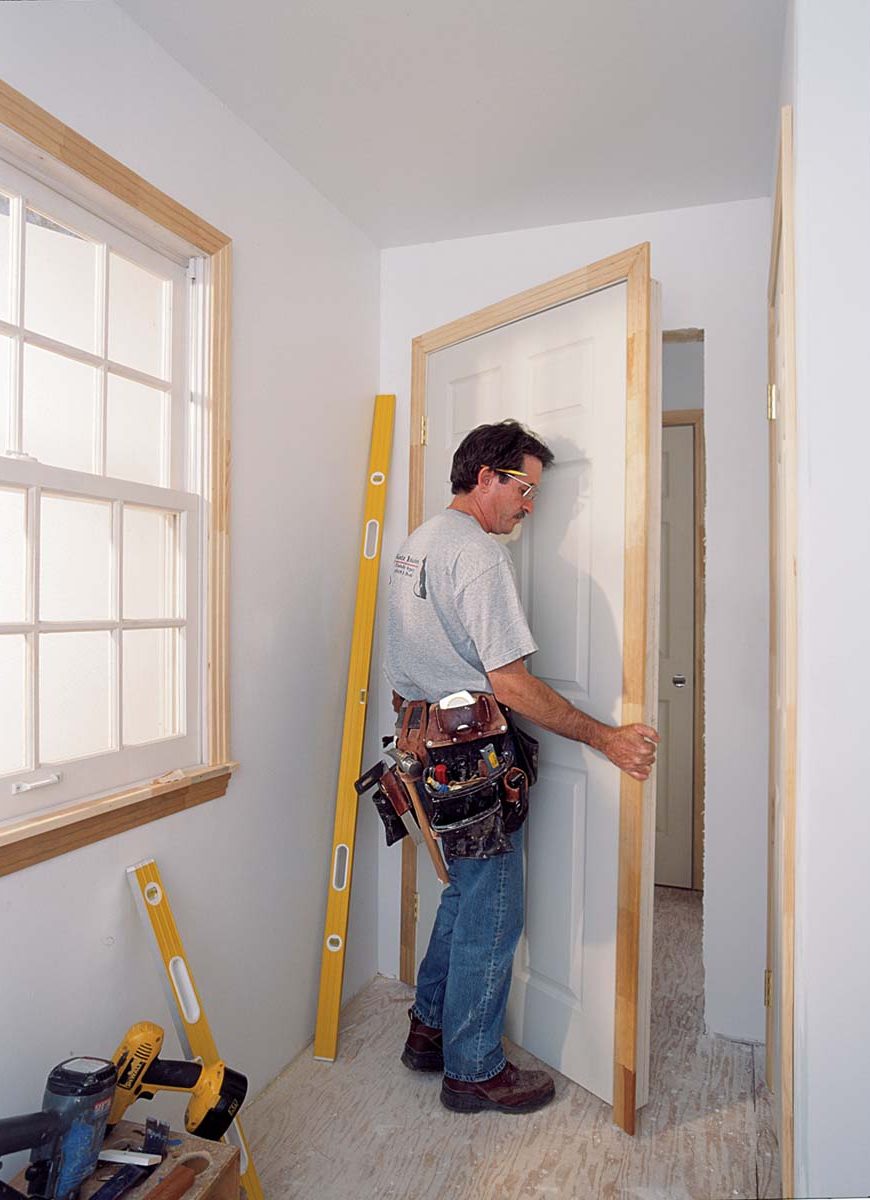
Before attaching the casing to the opposite side of the unit, I straighten any cross-legged jambs. If the jamb is cross-legged, the door won’t lie flat against the door stop on the strike side. Sometimes the top of the door will hit the stop, but the bottom won’t, which is easy to fix: Just tap the bottom of the strike jamb toward the door with a block of wood and a hammer.
I always adjust for cross-legged jambs at the bottom of the jamb, not at the top. This adjustment keeps the jamb head flush with the drywall so that joining the casing miters on the stop side of the door is easier.
If the bottom of the door touches the strikeside stop but the top doesn’t, then tapping the bottom of the hinge jamb toward the door is the fix. I press against the door or the jamb leg with my shoe, then smack the jamb leg. Once the door is flat against the stop, I nail through the face of the jamb a few inches from the floor to hold the jamb in place.
After I’ve corrected any cross-legged jambs, I install the casing on the other side of the opening, nailing only into the jamb. Then I check the fit of the door once more before nailing the casing to the wall. If necessary, the jamb can still be adjusted minutely with a hammer, a block of wood and a few light taps. Once I’m satisfied with the fit, I nail off the casing on the hinge side with a nail about every 12 in. I also place one nail above the strike and one below. In addition, I drive a nail through the casing about 2 in. above the floor. This way, if the baseboard is cut and installed too tight, it won’t push the jamb and ruin the fit of the door. I also shoot a nail through the jamb, above and below each hinge, to prevent the door from settling. Finally, because I never shim hollow-core prehung doors, I replace one of the short hinge screws in the top hinge with a long screw that reaches through the jamb to the trimmer. I tighten that screw only enough to seat it snugly.
 |
 |
| Casing the prehung unit is the first step. With no drywall irregularities to contend with, perfect casing miters are a snap. The author glues and nails the miters to ensure that they stay perfect. | Set the cased prehung in the rough opening. So that the unit remains easy to handle, the author will remove the plug or nail that secures jamb to door only after the unit is partially in the opening. |
 |
 |
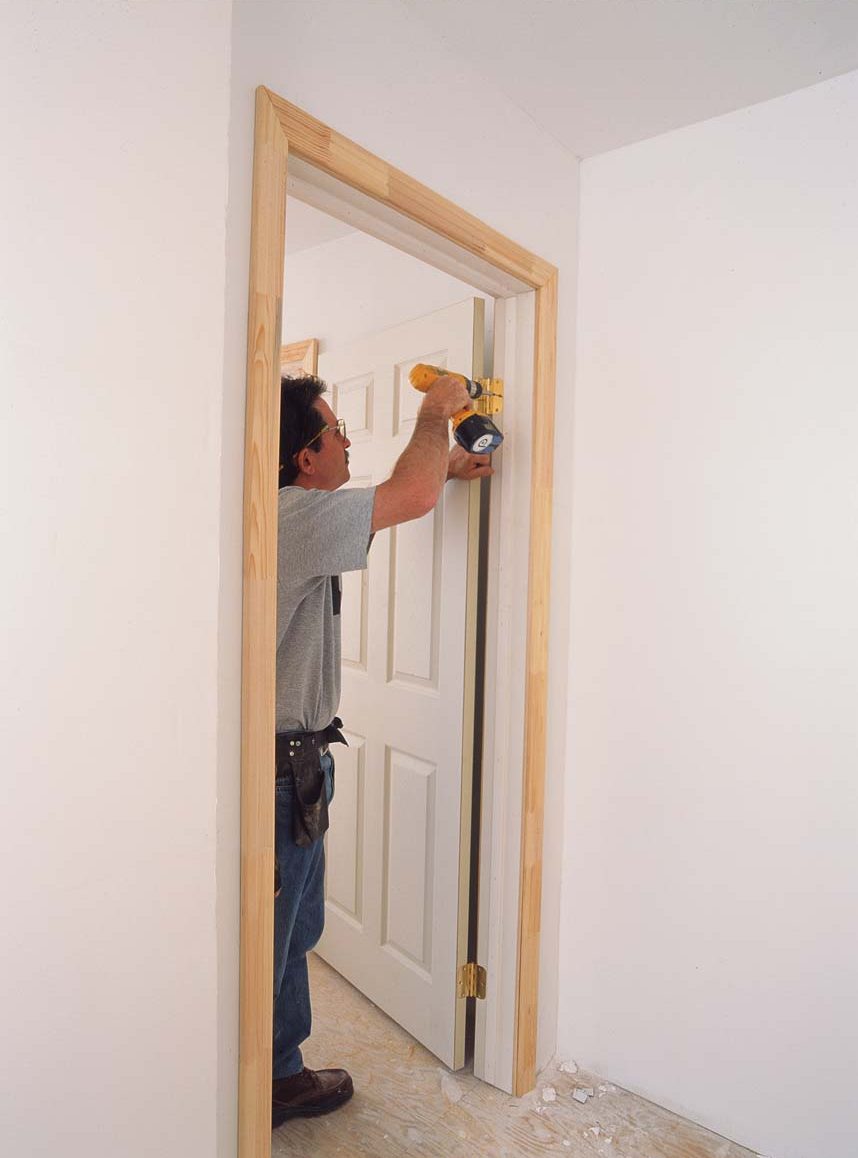
| There’s more to setting a door than plumb and level. Although setting a door plumb is ideal, it must also look parallel to adjacent walls or trim. A quick check with a tape confirms parallel. | A pry bar on the floor controls the door. The author eyes the gap between the head jamb and the door. When the gap is even, he sets the first nail into the wall, just below the miter. |
 |
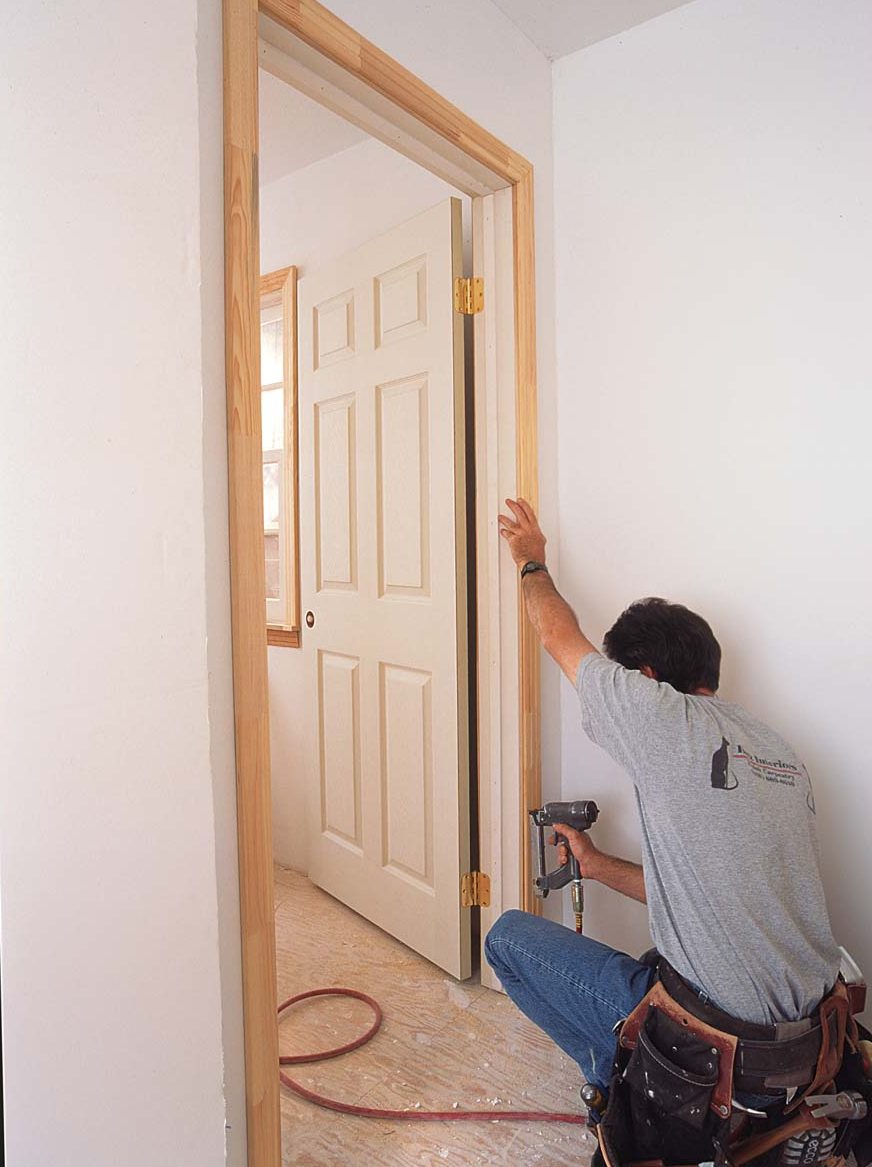 |
| Correcting cross-legged jambs with a boot and tap. The fix when the door doesn’t hit the top of the strike-side stop is pushing in on the bottom of the hinge jamb. If the door doesn’t hit the bottom of the stop, simply moving the strikejamb bottom toward the door is the cure. | Tight miters are the only challenge on the stop side. With the door adjusted to the jambs, trimming the stop side is a matter of shooting in nails every 12 in. |
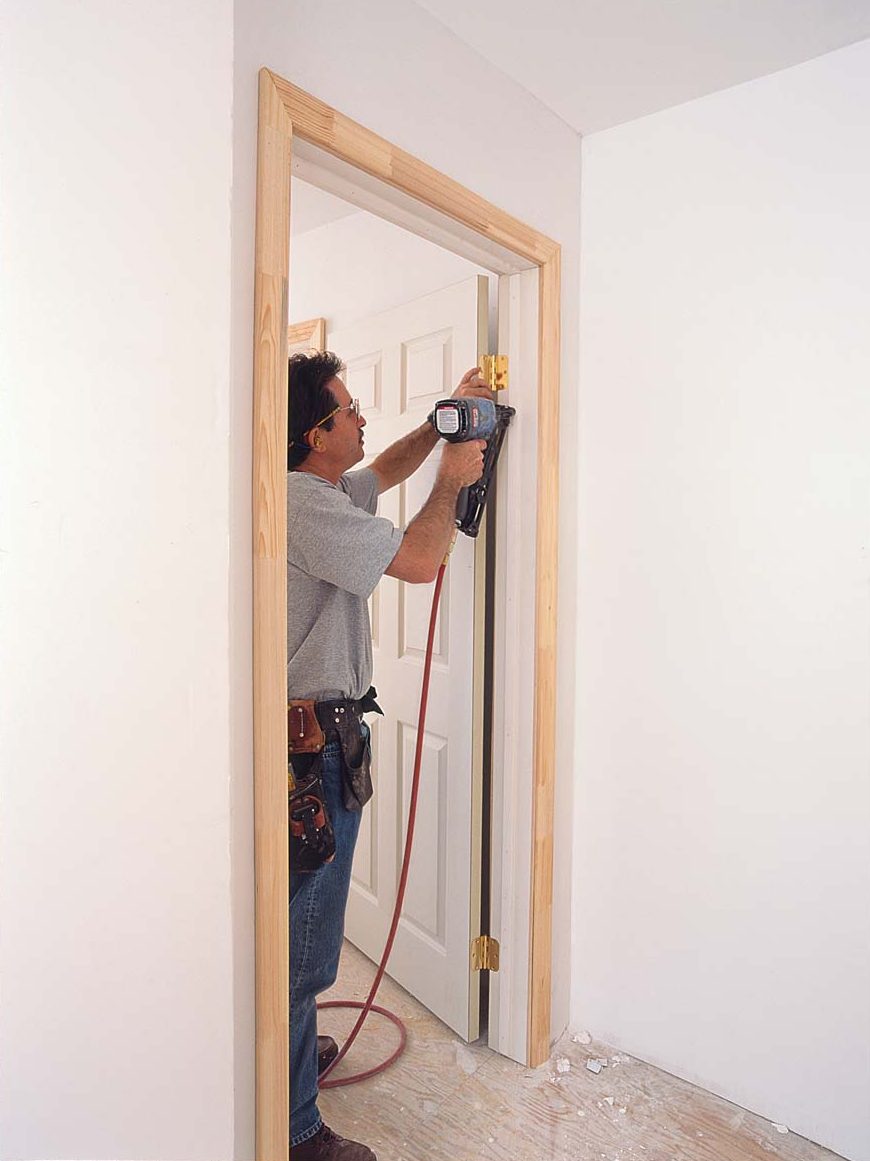 |
The final nails go through the jamb. After all the adjustments are finished, a final nail is fired above and below each hinge. These nails serve as insurance against the door’s sagging and hold final any adjustments to cross-legged jambs. |
Fixing Uneven Gaps Between Door And Jamb
 |
 |
| Wide head gap requires correction. Raising the hinge jamb or moving its bottom toward the opening’s center will close this gap. Another alternative is to lower the jamb by trimming the bottom of the strike jamb. | Even lightweight hollow-core doors can cause hinge deflection. Notice that the gap between door and jamb is larger above and below the hinge. Raising the door with a pry bar and nailing the casing to the wall behind the hinge corrects this problem. |
Shimming Solid-Core Doors
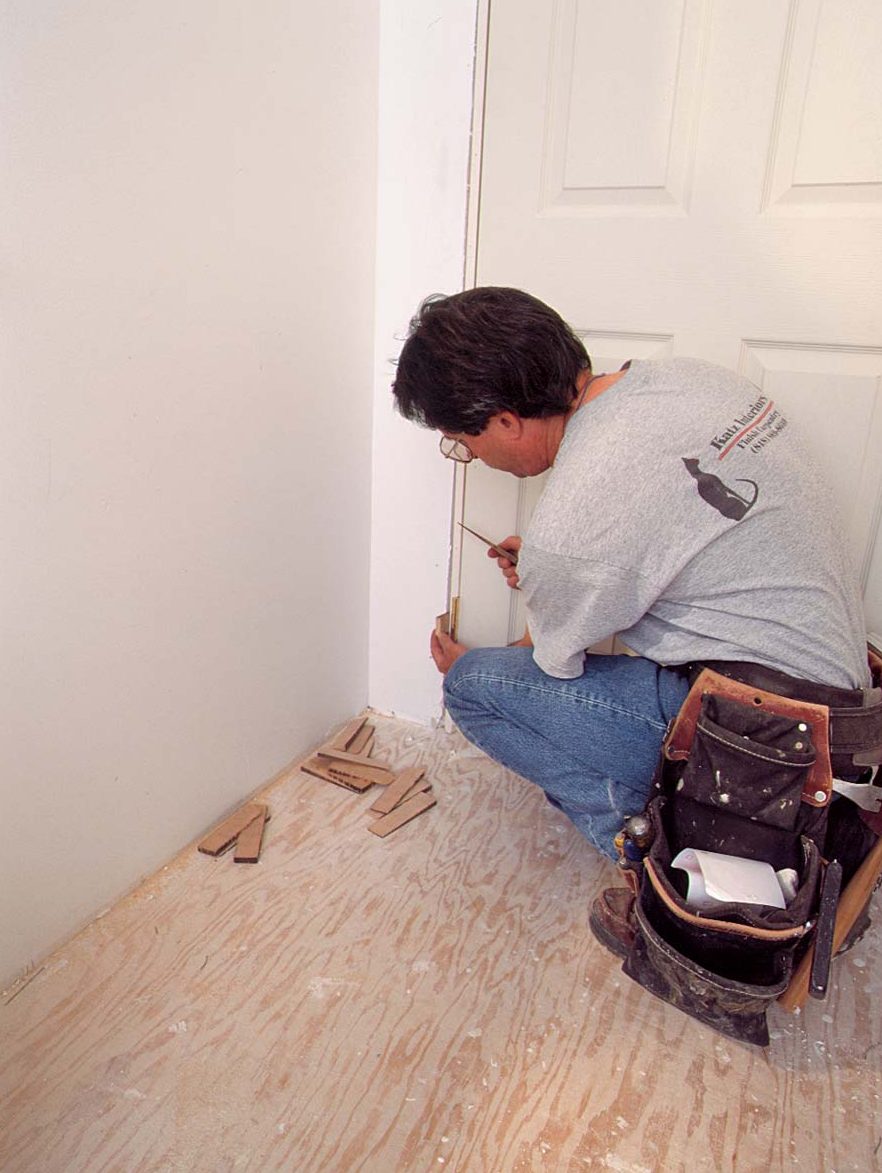
Although I don’t shim hollow-core doors, I do shim all solid-core doors, as well as any door that’s more than 6 ft. 8 in. tall. Shims should be installed behind every hinge, and there should be at least three sets of shims on the strike side, especially behind the strike plate.
I cut my own end-grain shims from 2×6 scrap on my table saw. Although it sounds like a lot of work, it’s worth every minute. These shims are all 51 ⁄2 in. long, 1 ⁄4 in. thick at the butt end and sharp at the point end. I cut them cross-grain so that they’ll snap off easily. Because they’re only 1 ⁄4 in. thick, I can slip one behind most prehung jambs, butt end first, then follow it up with the point of another shim. When they are stacked tightly atop one another, these perfectly uniform shims quickly adjust to fill any odd-size gap between a twisted trimmer and the back of a flat jamb. If space is tight, I use only one shim. I shoot a nail or two beneath the shims to hold them in place, but I never nail through the shims. It seems that every time I nail through a shim I have to move it later, which is nearly impossible.
Along with shims, I also use screws to secure solid-core door jambs. Heavy doors always cause jamb deflection, and finish nails don’t have enough strength to secure the weight. I replace one screw in each hinge with a long screw that reaches through the jamb and into the trimmer. Often I replace two screws in the top hinge. I tighten the screws carefully because too much torque will cause a belly in the jamb and ruin the fit of the door. If I don’t have the right-size screw, I remove the hinge from the jamb and countersink a screw behind the hinge, then reattach the hinge to the jamb. —G. M. K.
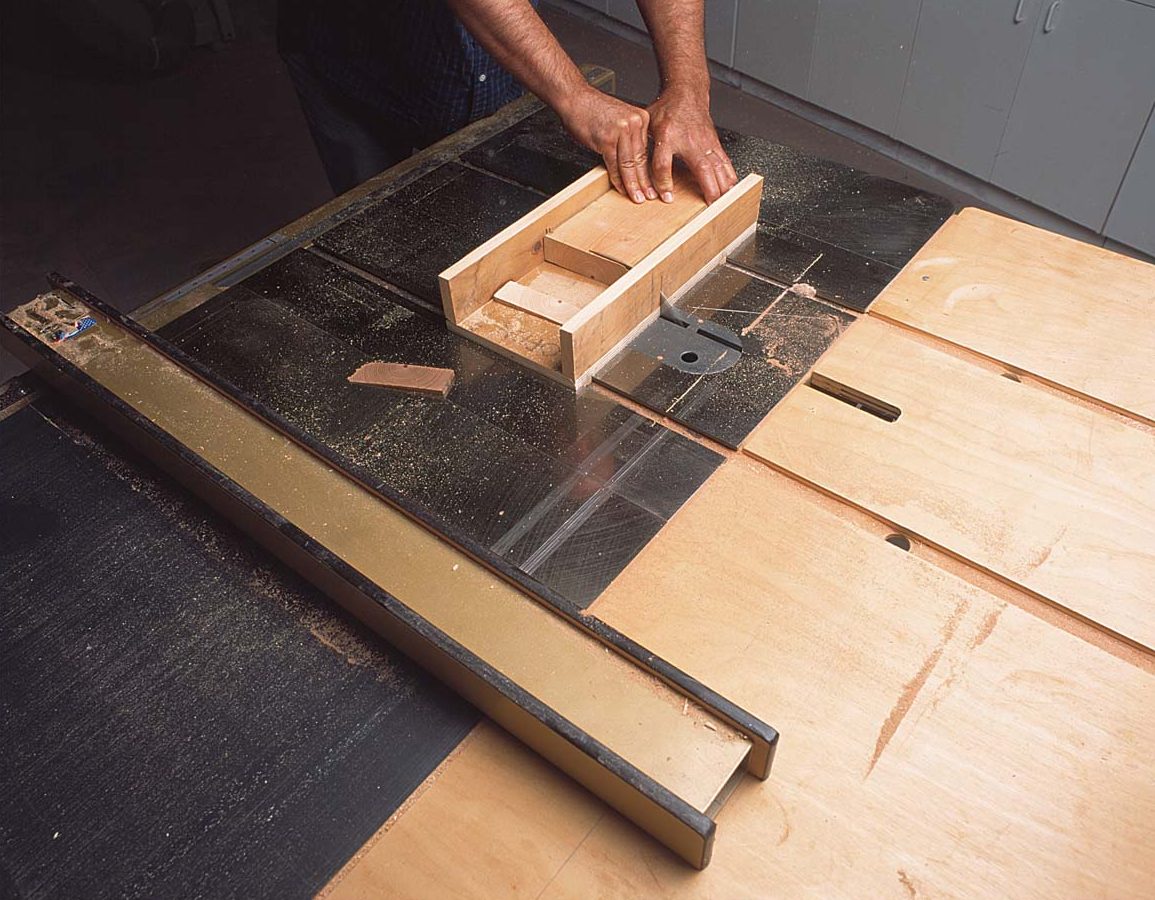 |
Shop-made sled makes cutting shims fast and safe. A sled also serves as a template to cut each shim exactly the same size. The author stops cutting when the block reaches 6 in. in length. |
 |
 |
| Solid-core doors get shimmed and screwed. Homemade endgrain shims that snap off cleanly go behind each hinge and behind the strike plate of solid-core doors. A 21 ⁄2-in. screw through the hinge ensures that the door won’t sag. |
To read the entire article, click the View PDF button below:
