FHB Logo Facebook LinkedIn Email Pinterest Twitter X Instagram Tiktok YouTube Plus Icon Close Icon Navigation Search Icon Navigation Search Icon Arrow Down Icon Video Guide Icon Article Guide Icon Modal Close Icon Guide Search Icon Skip to content
Subscribe
Log In
  • How-To
  • Design
  • Tools & Materials
  • Restoration
  • Videos
  • Blogs
  • Forum
  • Magazine
  • Members
  • FHB House
  • Podcast
Log In

Fine Homebuilding Project Guides

Windows & Doors

Guide Home
  • Choosing Windows
  • Installing Windows In New Walls
  • Retrofitting Windows
  • Window Repairs
  • Door Basics
  • Interior Doors
  • Exterior Doors
How-To

Window Replacement With a Side of Rot Repair

What started out as a leaky window replacement snowballed into replacing a big chunk of wall.

By Travis Brungardt Issue 304 - Dec 2021/Jan 2022
  • X
  • facebook
  • linkedin
  • pinterest
  • email
  • add to favorites Log in or Sign up to save your favorite articles
Looks can be deceiving. A home’s exterior may appear to be just fine, but things are not always as they seem. This stucco-clad home built in the early 2000s looked good from the outside, but leaking, poorly flashed windows and a missing water-resistive barrier had turned the sheathing to compost on the south-facing elevation.

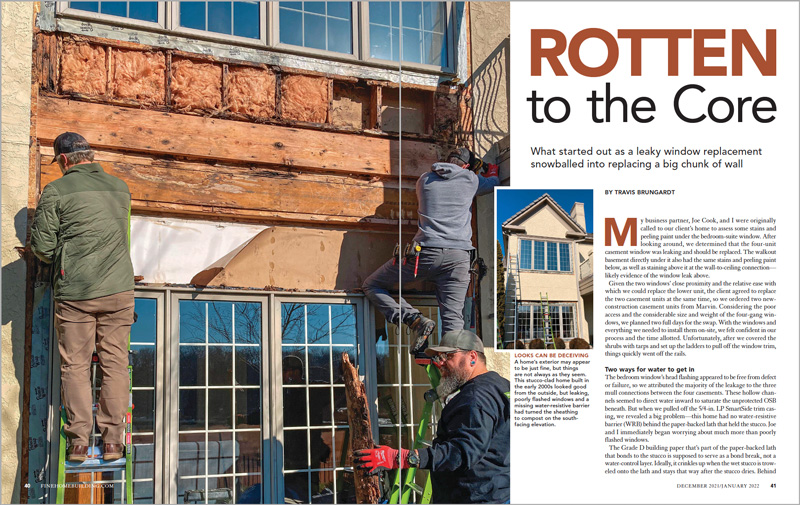
Synopsis: For Travis Brungardt and Joe Cook, co-owners of Catalyst Construction, a call to a client’s home that began as an assessment of some stains and peeling paint under a bedroom-suite window revealed other underlying issues. After pulling off the trim casing, the two found out that the home also had no water-resistive barrier behind the paper-backed lath that held the stucco. Through this repair job, Travis and Joe had to get rid of the rot, install new windows, and prep the new wall for stucco, which was not an inexpensive repair.


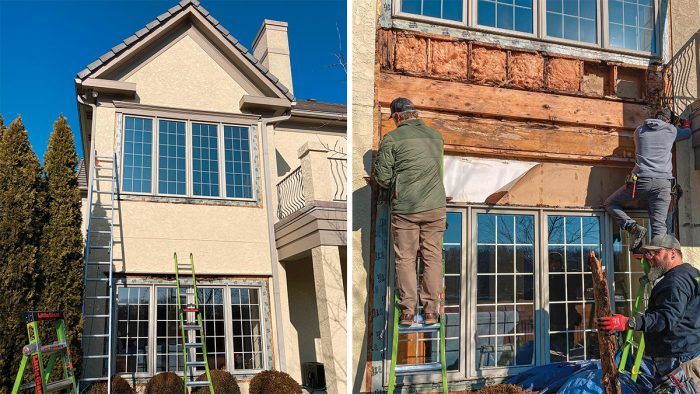
My business partner, Joe Cook, and I were originally called to our client’s home to assess some stains and peeling paint under the bedroom-suite window. After looking around, we determined that the four-unit casement window was leaking and should be replaced. The walkout basement directly under it also had the same stains and peeling paint below, as well as staining above it at the wall-to-ceiling connection—likely evidence of the window leak above.

Given the two windows’ close proximity and the relative ease with which we could replace the lower unit, the client agreed to replace the two casement units at the same time, so we ordered two new-construction casement units from Marvin. Considering the poor access and the considerable size and weight of the four-gang windows, we planned two full days for the swap. With the windows and everything we needed to install them on-site, we felt confident in our process and the time allotted. Unfortunately, after we covered the shrubs with tarps and set up the ladders to pull off the window trim, things quickly went off the rails.

removing window trim
More than a new window. Once we removed the trim, we found that the damage was worse than we expected. The original builders tried to seal the windows from water intrusion by taping over the nailing flange with flashing tape, but it did little to prevent water from getting into the opening and rotting the sheathing. We pulled off the stucco to get to the rotten sheathing and framing.

removing stucco

Two ways for water to get in

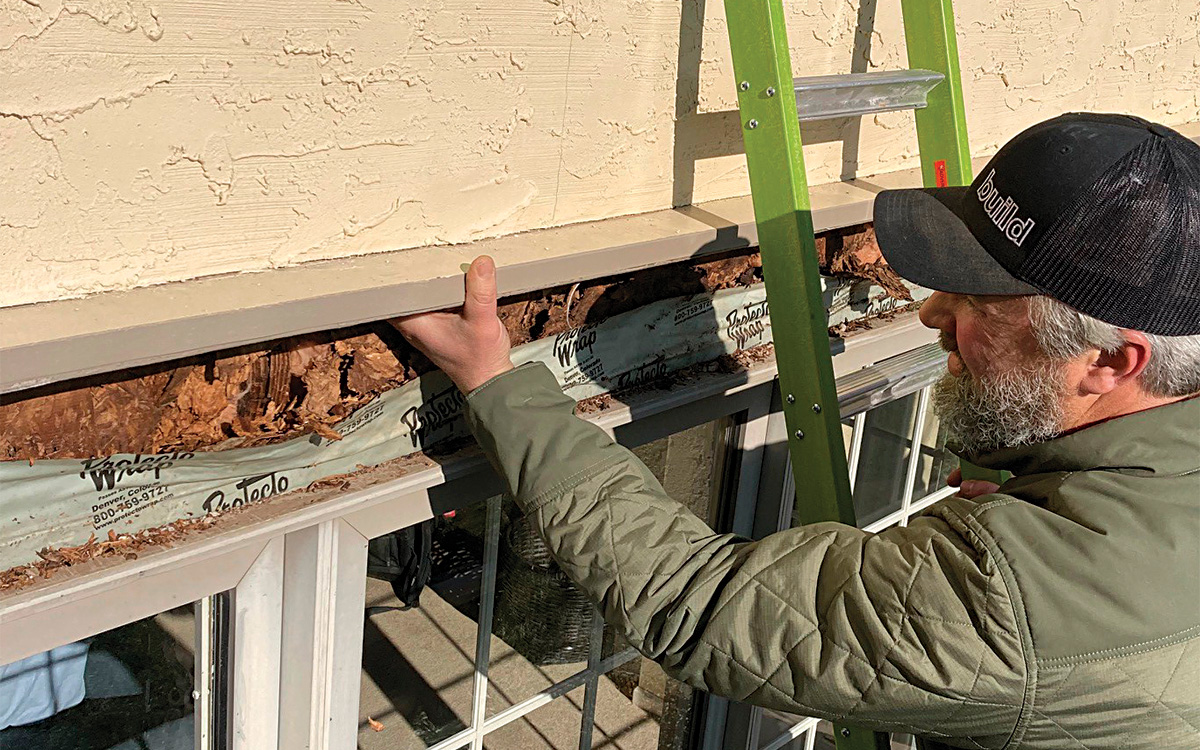
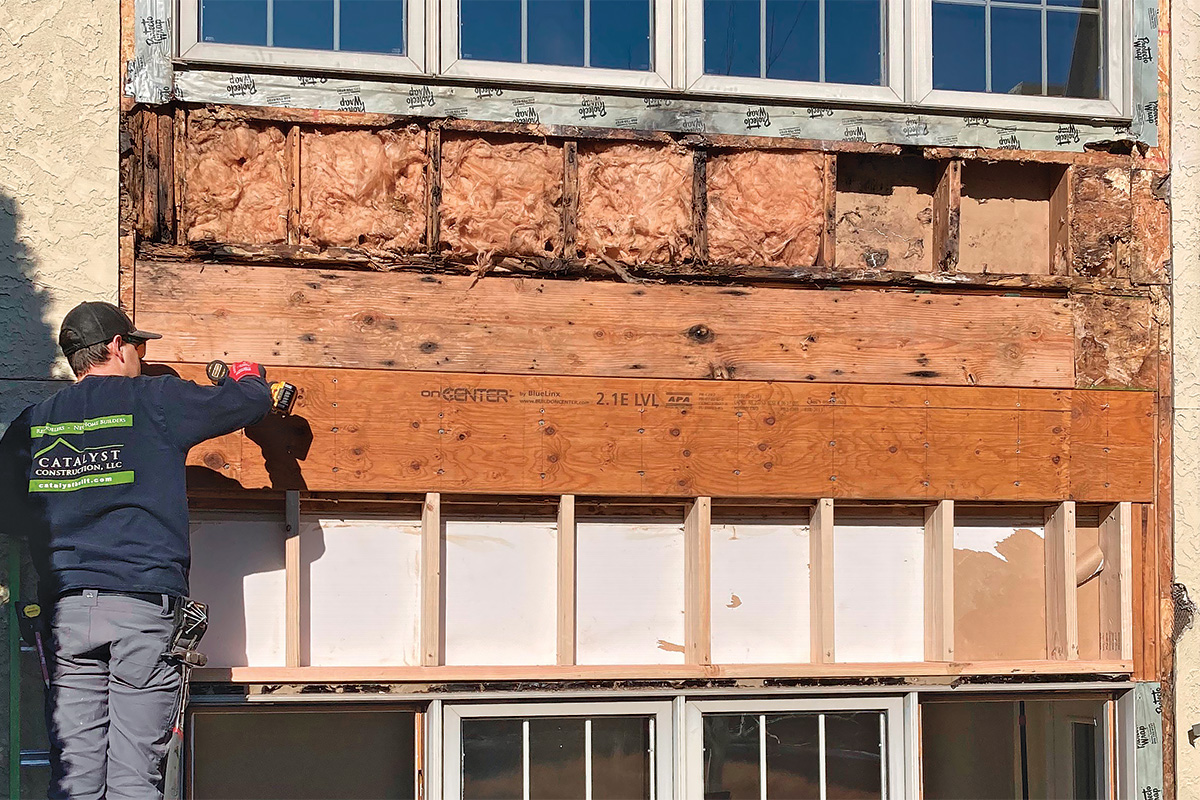
The bedroom window’s head flashing appeared to be free from defect or failure, so we attributed the majority of the leakage to the three mull connections between the four casements. These hollow channels seemed to direct water inward to saturate the unprotected OSB beneath. But when we pulled off the 5/4-in. LP SmartSide trim casing, we revealed a big problem—this home had no water-resistive barrier (WRB) behind the paper-backed lath that held the stucco. Joe and I immediately began worrying about much more than poorly flashed windows.

cutting out rotten wood from window
Cut out the rot. Fortunately, the jack and king studs flanking the window were still in good repair, so we could use them to support a new LVL header. We cut back the top plates to good wood with a recip saw to make room for an 11-7/8-in.-deep LVL.

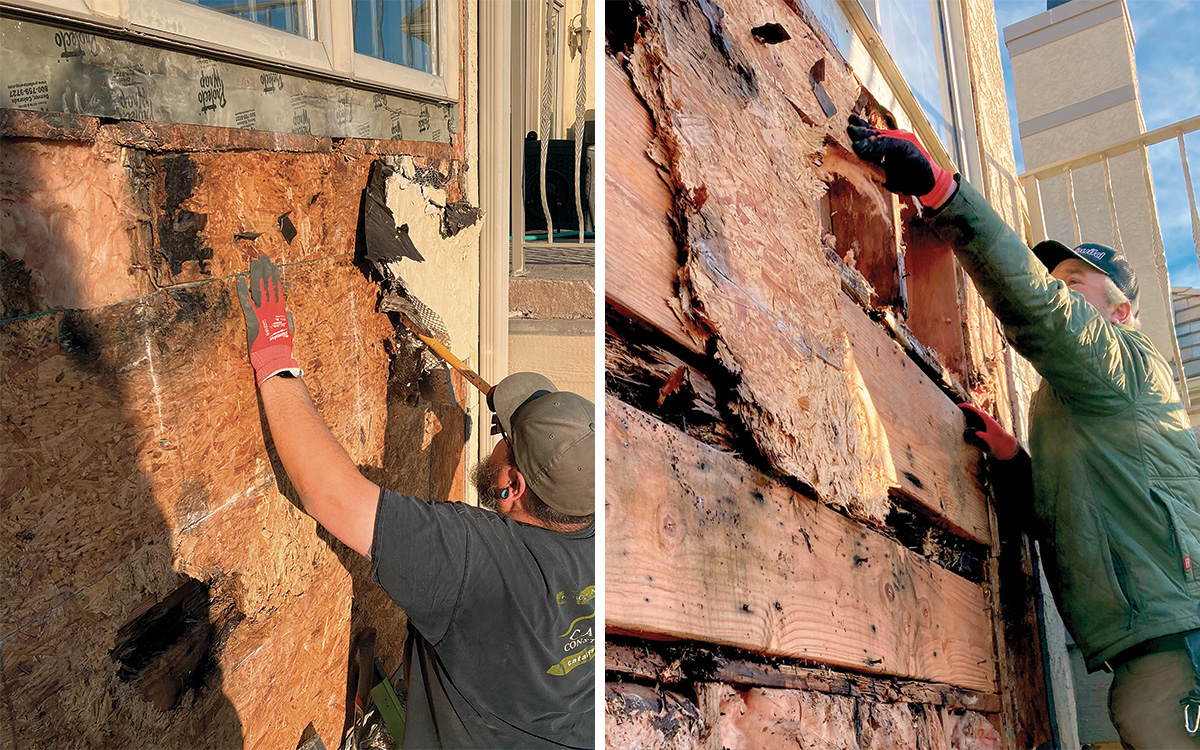
The Grade D building paper that’s part of the paper-backed lath that bonds to the stucco is supposed to serve as a bond break, not a water-control layer. Ideally, it crinkles up when the wet stucco is troweled onto the lath and stays that way after the stucco dries. Behind it should be an additional layer of building paper or other water-shedding material that serves as the actual WRB. Working together, the wrinkly first layer and the secondary layer create a drainage cavity and air space that promotes drying. An even better assembly would include a drainage matrix or air gap between the two layers to improve drainage and drying; such a gap is required in wet climates. (For more on creating this drainage plane, see “Rainscreen Products for Stucco Installations”) With no WRB, the wet stucco and paper give up their moisture directly to the OSB. Just as we feared, we found that the OSB was absolute toast in a number of areas. When we pulled it off, we found mold on the insulation’s kraft facing and the back of the drywall, both of which were easily disposed of. Unfortunately, we also found severe framing rot.

Every morning during the project, we’d find a heavy frost on our materials and ladders that quickly converted to liquid water as soon as the sun hit the site. We suspect this regular wetting of the stucco further contributed to wetting the rest of the assembly, though the client declined to allow us to investigate the extent of the damage to verify our hunches.

installing a new lvl header
New header and cripples. With the top plates cut back, the new LVL header was placed under the existing band joist. New cripple studs under the LVL have a bead of construction adhesive on the interior edge to attach the drywall.

Making repairs

installing tape to create a continuous sill-pan flashing
Prep the opening. Poor window flashing details contributed to this wall’s sorry condition. We used Zip System stretch tape to create a continuous sill-pan flashing to protect the sheathing and framing.

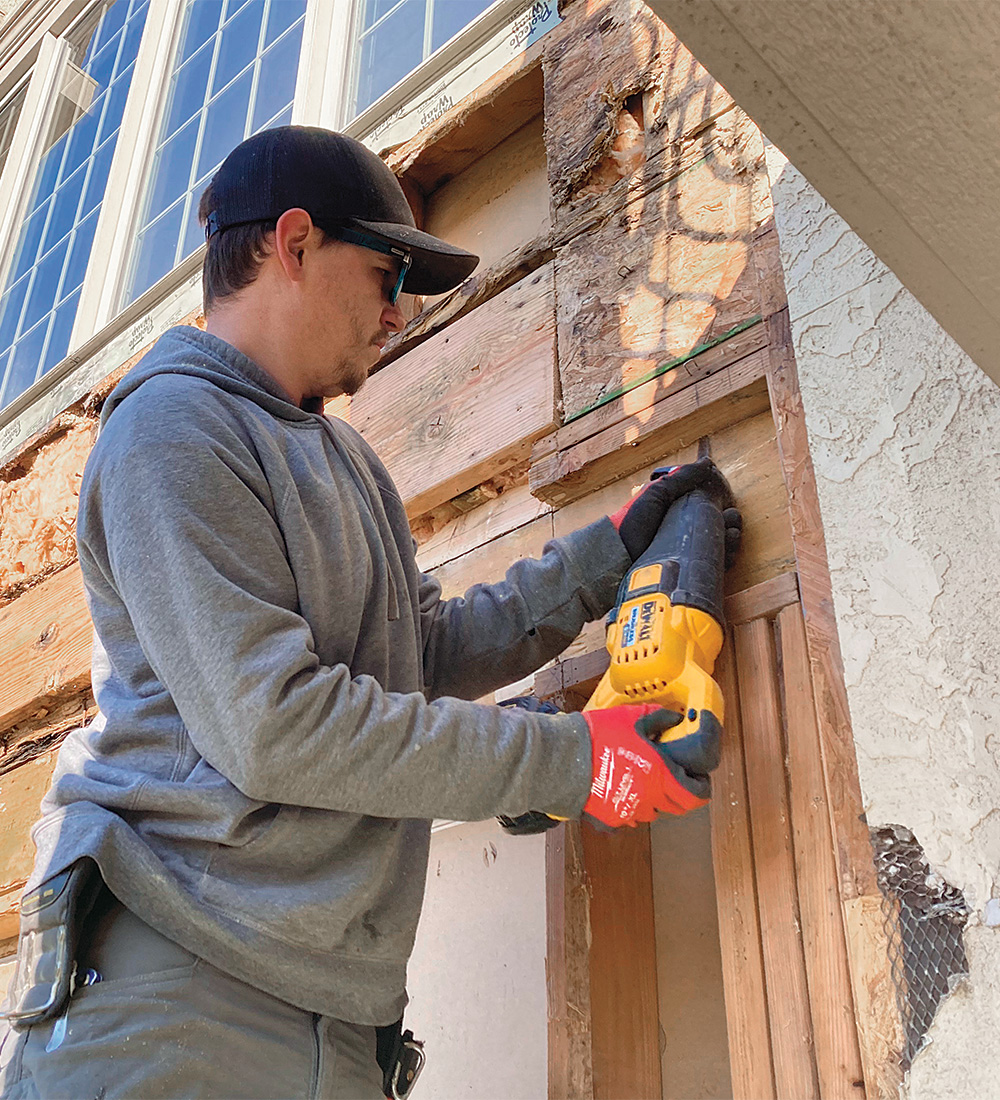
On day two, with the scope of work much larger than the day before, we removed the lower window unit and stripped the OSB from the jacks and kings on both sides. With the window out, we could see that the sill, cripples, and bottom plate under the window were completely rotted, so we removed the stucco beneath the window all the way to the ground to replace the framing. Fortunately, the jack and king studs supporting the header were in far better shape, and we only had to splice in a short section at the bottom of one side.

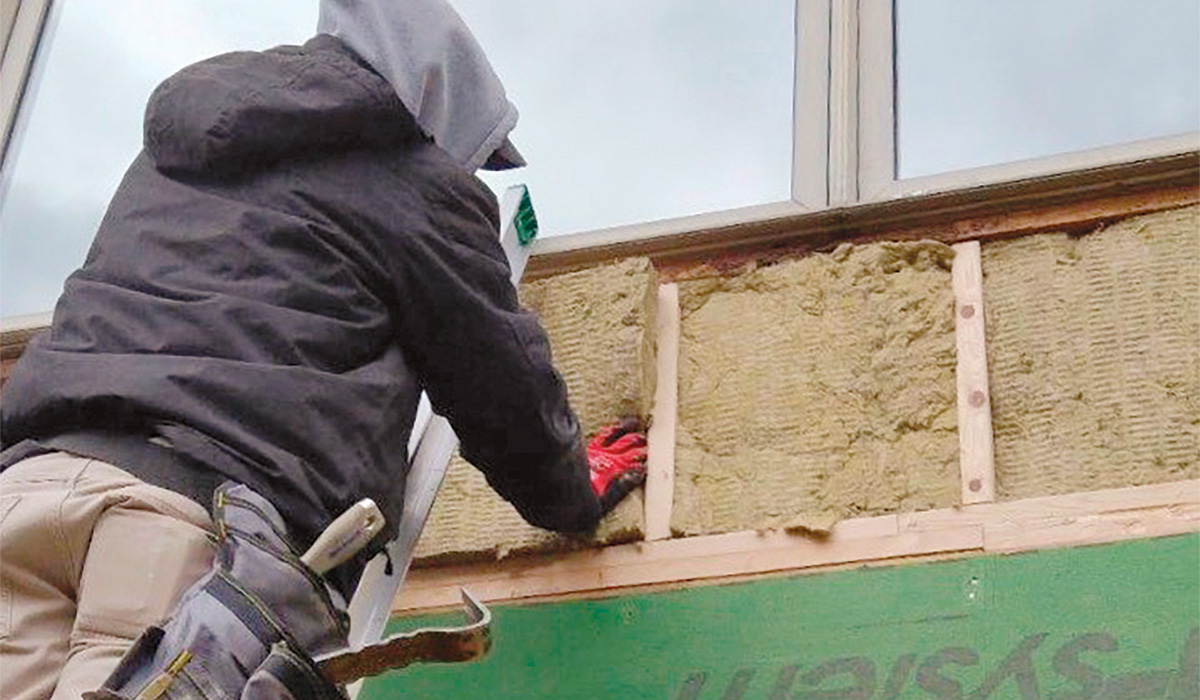
After replacing the rotten framing with new stock, we installed Rockwool insulation and Zip System sheathing. We flashed the opening with Zip System stretch tape and sealant and installed the ganged Marvin windows on some 1/4-in. shims under the mulls and outside corners. With the lower window unit in place, we temporarily attached pieces of OSB to the header to protect our work as we moved up the wall. With no realistic hope of finishing, we chose not to remove the bedroom window and instead focused on cleanup and prep for the next day.

installing window with flashing tape
Seal the flange. With the window opening prepped, we installed the lower window. A generous bead of sealant on the nailing flange prevents water intrusion. With the window fully nailed, we covered the top and side flanges with flashing tape and rolled it for a strong bond.

Joe drove several structural screws through the top and side jambs of the existing upper window to secure it to the header and jack studs. We removed the fiberglass insulation, moldy backing paper on the drywall, and rotten cripples and sill below that upper window. We then began reframing, which kept us busy until the end of the day, when we had to tarp up for what became two lost work days because of high wind and snow.

removing rotten framing
Movin’ on up. With the framing above the lower window rebuilt, insulated, and sheathed, we moved on to the upper window. We removed the rotten framing and added a receptacle under the window so that we could splice the cut cable and rout it through new cripple studs.

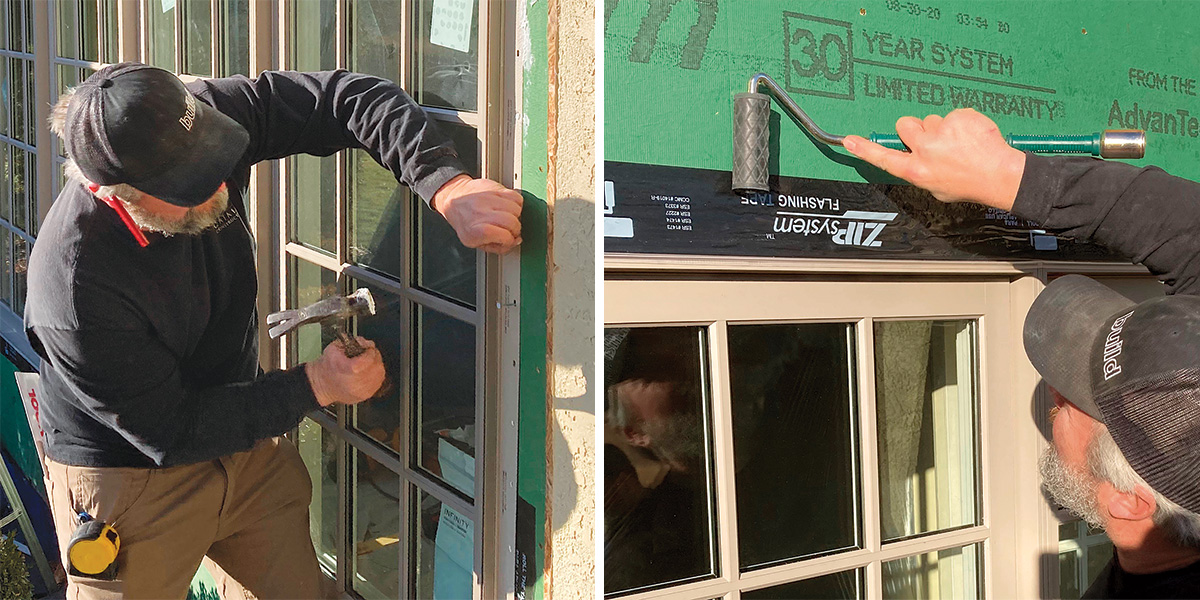
We returned the following Monday to remove the upper window and install its replacement following the same procedure as the lower window unit. It was far more challenging to install this window from ladders, so we removed the sashes from the frames and reinstalled them after squaring the unit.

installing new insulation
New insulation. The fiberglass batts under the windows had mold and water damage to the kraft-paper facing, so we replaced them with mineral wool. We like mineral-wool batts because they’re more rigid, making it easier to get a tight fit.

We tacked the flange level across the top, and with the unit centered in the opening, we pulled diagonal measurements and shimmed the frame until both diagonal measurements were the same, indicating that the window was square. Then we nailed off the flanges and reinstalled the two fixed and two operating casements. Following that, we taped the window and the remaining Zip sheathing seams to the existing OSB. We did have one area of existing OSB that we weren’t confident in as it disappeared behind the stucco, so we cut some sheet metal and slid it back behind the stucco as far as we could before taping the head and accessible side of it in place. We installed new 5/4-in. LP SmartSide trim around the windows and replaced the crown molding above the window, getting everything ready for the stucco crew.
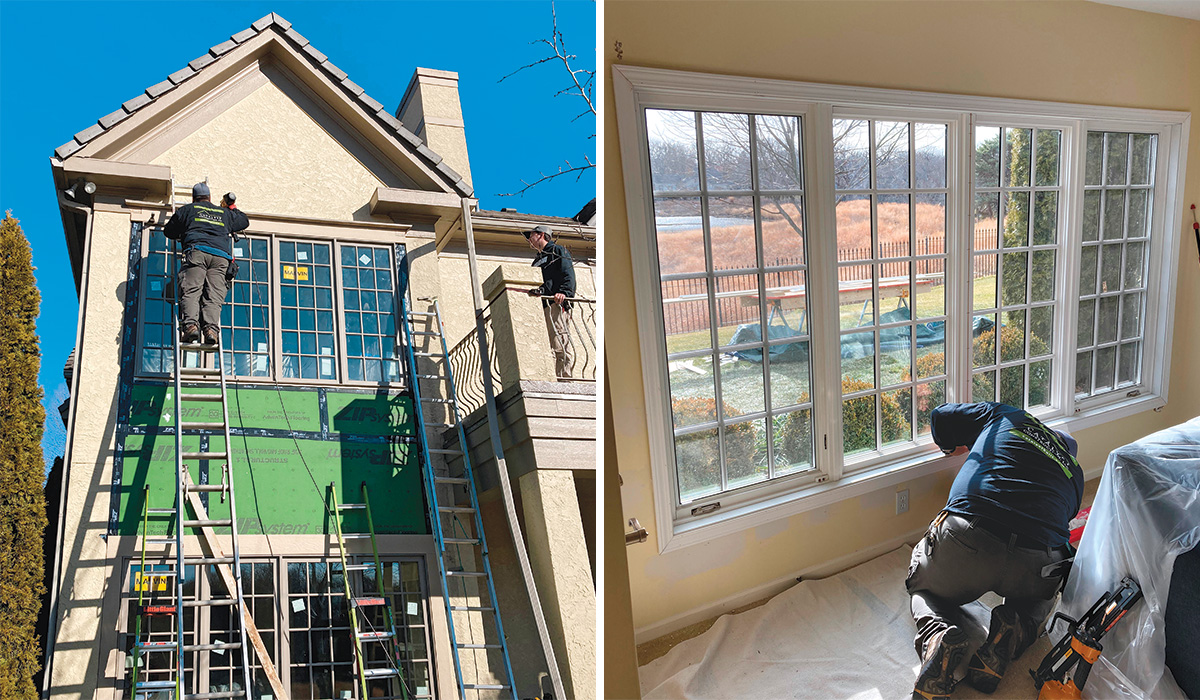
rolling seam tape
Staying dry. We used Zip System sheathing with its integral water-resistive barrier to protect the house and keep things dry until the stucco is reinstalled. Rolling the seam tape is key to getting a good bond with the tape.

Moving inside

With our work completed outside, we moved inside and trimmed out the new window with jamb extensions and casing to match the existing, spackled the few defects in the drywall, and left this for the client to paint. The client also chose to hire a stucco contractor directly, which allowed us to keep our two days of scheduled work to only a week and half with weather delays. It appears that the mull connections on the windows were leaking, but the original builder’s decision to use paper-backed lath directly over the OSB without a second layer only added to the problem and has possibly compromised the sheathing in other areas.

window after repairs
Like it never happened. After patching the drywall under the window, we cased the opening, completing our part of the job. The client would later repaint the room and arrange for a stucco contractor to patch the stucco we removed for the repair.

The owner of this house has opted to repair things as they fail rather than address all the potential failures at once. As you can imagine, this wasn’t an inexpensive repair, and it will likely cost tens of thousands of dollars to fix the assembly and set up it up to manage moisture intrusion the right way.

Travis Brungardt is co-owner of Catalyst Construction in Prairie Village, Kan. Photos by the author.

rotten to the core spread

From Fine Homebuilding #304

To read the entire article, please click the View PDF button below.


RELATED LINKS

    • Restore a Wood Window Sash
    • What to Do With Old Windows


Fine Homebuilding Recommended Products

Fine Homebuilding receives a commission for items purchased through links on this site, including Amazon Associates and other affiliate advertising programs.

Insulation Knife

If you like insulating with mineral wool, this knife makes cuts that are clean, neat, and easy — it's much better than a utility knife which can be slow and messy.
Buy at Amazon

Great Stuff Foam Cleaner

It’s important to clean and maintain a professional foam-dispensing gun, and this product fits the bill. It has a spray applicator for general cleaning, plus it screws onto the dispensing gun so you can clean the inside.
Buy at Amazon

Disposable Suit

This suit provides full body protection to help you stay clean from head to toe when installing insulation. We recommend wearing sweats underneath for additional coverage.
Buy at Amazon
View PDF
Previous: How to Replace a Basement Window Next: Nesting Casement Window Handles

Guide

Windows & Doors

Chapter

Retrofitting Windows

Sign up for eletters today and get the latest how-to from Fine Homebuilding, plus special offers.

Signing you up...

This site is protected by reCAPTCHA and the Google Privacy Policy and Terms of Service apply.
See all newsletters
See all newsletters

Log in or create an account to post a comment.

Sign up Log in

Become a member and get full access to FineHomebuilding.com

Windows & Doors

Windows & Doors

Trusted, comprehensive guidance from the pros for choosing, installing, replacing, and repairing windows and doors on any house

View Project Guide

View All Project Guides »

Become a member and get unlimited site access, including the Windows & Doors Project Guide.

Start Free Trial

Choosing Windows
  • Window Types
  • Design and Materials
  • Energy-Efficient Windows
Installing Windows In New Walls
  • Installation, Start to Finish
  • Head Flashing for Windows
  • Video Series: Nail-Fin Window over Zip System Sheathing
  • Video Series: Nail-Fin Window over Exterior Rigid-Foam Insulation
  • Video Series: Nail-Fin Window over Housewrap
  • Video Series: Nail-Fin Window over Peel-and-Stick Housewrap
  • Video Series: Nail-Fin Window over a Fluid-Applied WRB
  • Video Series: Weatherproof Window Installation
Retrofitting Windows
  • Removing the Old, Installing the New
  • Video Series: How to Replace a Window
  • Video Series: Install a Full-Frame Replacement Window in a Brick Wall
  • Video Series: Install an Insert Replacement Window in a Brick Wall
  • Video Series: Retrofit a Flanged Window
Window Repairs
  • Restoring Old Windows
  • Repairs and Upgrades
Door Basics
  • Tools & Jigs for Door Hanging
  • How to Install Doors
  • Hinges
  • Handles, Knobs, and Locksets
  • Fixing Door Problems
Interior Doors
  • Prehung Doors
  • Pocket Doors
  • Other Types of Doors
  • Custom-Built Doors
Exterior Doors
  • Door Choices and Design
  • Installing Entry Doors
  • Building Exterior Doors
  • Installing French Doors
  • Replacing a Door
  • Adding Weatherstripping and Sweeps

Fine Home Building

Newsletter Sign-up

  • Fine Homebuilding

    Home building tips, offers, and expert advice in your inbox.

  • Green Building Advisor

    Building science and energy efficiency advice, plus special offers, in your inbox.

  • Old House Journal

    Repair, renovation, and restoration tips, plus special offers, in your inbox.

Signing you up...

This site is protected by reCAPTCHA and the Google Privacy Policy and Terms of Service apply.
See all newsletters

Follow

  • Fine Homebuilding

    Dig into cutting-edge approaches and decades of proven solutions with total access to our experts and tradespeople.

    Start Free Trial Now
    • Facebook
    • Instagram
    • X
    • LinkedIn
  • GBA Prime

    Get instant access to the latest developments in green building, research, and reports from the field.

    Start Free Trial Now
    • Facebook
    • YouTube
  • Old House Journal

    Learn how to restore, repair, update, and decorate your home.

    Subscribe Now
    • Facebook
    • Instagram
    • X

Membership & Magazine

  • Online Archive
  • Start Free Trial
  • Magazine Subscription
  • Magazine Renewal
  • Gift a Subscription
  • Customer Support
  • Privacy Preferences
  • About
  • Contact
  • Advertise
  • Careers
  • Terms of Use
  • Site Map
  • Do not sell or share my information
  • Privacy Policy
  • Accessibility
  • California Privacy Rights

© 2025 Active Interest Media. All rights reserved.

Fine Homebuilding receives a commission for items purchased through links on this site, including Amazon Associates and other affiliate advertising programs.

  • Home Group
  • Antique Trader
  • Arts & Crafts Homes
  • Bank Note Reporter
  • Cabin Life
  • Cuisine at Home
  • Fine Gardening
  • Fine Woodworking
  • Green Building Advisor
  • Garden Gate
  • Horticulture
  • Keep Craft Alive
  • Log Home Living
  • Military Trader/Vehicles
  • Numismatic News
  • Numismaster
  • Old Cars Weekly
  • Old House Journal
  • Period Homes
  • Popular Woodworking
  • Script
  • ShopNotes
  • Sports Collectors Digest
  • Threads
  • Timber Home Living
  • Traditional Building
  • Woodsmith
  • World Coin News
  • Writer's Digest
Active Interest Media logo
X
X
This is a dialog window which overlays the main content of the page. The modal window is a 'site map' of the most critical areas of the site. Pressing the Escape (ESC) button will close the modal and bring you back to where you were on the page.

Main Menu

  • How-To
  • Design
  • Tools & Materials
  • Video
  • Blogs
  • Forum
  • Project Guides
  • Reader Projects
  • Magazine
  • Members
  • FHB House

Podcasts

  • FHB Podcast
  • ProTalk

Webinars

  • Upcoming and On-Demand

Podcasts

  • FHB Podcast
  • ProTalk

Webinars

  • Upcoming and On-Demand

Popular Topics

  • Kitchens
  • Business
  • Bedrooms
  • Roofs
  • Architecture and Design
  • Green Building
  • Decks
  • Framing
  • Safety
  • Remodeling
  • Bathrooms
  • Windows
  • Tilework
  • Ceilings
  • HVAC

Magazine

  • Current Issue
  • Past Issues
  • Magazine Index
  • Subscribe
  • Online Archive
  • Author Guidelines

All Access

  • Member Home
  • Start Free Trial
  • Gift Membership

Online Learning

  • Courses
  • Project Guides
  • Reader Projects
  • Podcast

More

  • FHB Ambassadors
  • FHB House
  • Customer Support

Account

  • Log In
  • Join

Newsletter

Get home building tips, offers, and expert advice in your inbox

Signing you up...

This site is protected by reCAPTCHA and the Google Privacy Policy and Terms of Service apply.
See all newsletters
See all newsletters

Follow

  • X
  • YouTube
  • instagram
  • facebook
  • pinterest
  • Tiktok

Join All Access

Become a member and get instant access to thousands of videos, how-tos, tool reviews, and design features.

Start Your Free Trial

Subscribe

FHB Magazine

Start your subscription today and save up to 81%

Subscribe

You have 1 free article remaining.

Get complete site access, including thousands of videos, how-to tips, tool reviews, and design features.

Start your FREE trial

Already a member? Log in

We hope you’ve enjoyed your free articles. To keep reading, become a member today.

Get complete site access to expert advice, how-to videos, Code Check, and more, plus the print magazine.

Start your FREE trial

Already a member? Log in

Privacy Policy Update

We use cookies, pixels, script and other tracking technologies to analyze and improve our service, to improve and personalize content, and for advertising to you. We also share information about your use of our site with third-party social media, advertising and analytics partners. You can view our Privacy Policy here and our Terms of Use here.

Cookies

Analytics

These cookies help us track site metrics to improve our sites and provide a better user experience.

Advertising/Social Media

These cookies are used to serve advertisements aligned with your interests.

Essential

These cookies are required to provide basic functions like page navigation and access to secure areas of the website.

Delete My Data

Delete all cookies and associated data