FHB Logo Facebook LinkedIn Email Pinterest Twitter X Instagram Tiktok YouTube Plus Icon Close Icon Navigation Search Icon Navigation Search Icon Arrow Down Icon Video Guide Icon Article Guide Icon Modal Close Icon Guide Search Icon Skip to content
Subscribe
Log In
  • How-To
  • Design
  • Tools & Materials
  • Restoration
  • Videos
  • Blogs
  • Forum
  • Magazine
  • Members
  • FHB House
  • Podcast
Log In

Fine Homebuilding Project Guides

Wiring

Guide Home
  • Working with Electricity
  • Tools and Materials
  • Receptacles and Switches
  • Lights and Fans
  • Rough-In
  • Outdoor Wiring
  • Panels and Subpanels
How-To

Installing Low-Voltage Monorail Track Lighting

Track-lighting systems are inherently complex, so follow the guidelines carefully for mounting the transformer, hanging the track, and installing the light fixtures.

By Mike Litchfield, Michael McAlister
  • X
  • facebook
  • linkedin
  • pinterest
  • email
  • add to favorites Log in or Sign up to save your favorite articles

Before installing lo-vo monorail track lighting, turn off the power at the breaker panel or fuse box. As with any low-voltage system, a transformer will reduce the 120v current to 12v or 24v. Because monorail track systems have a lot of small parts that are easily lost, don’t open the packages until you’re ready to use the parts.

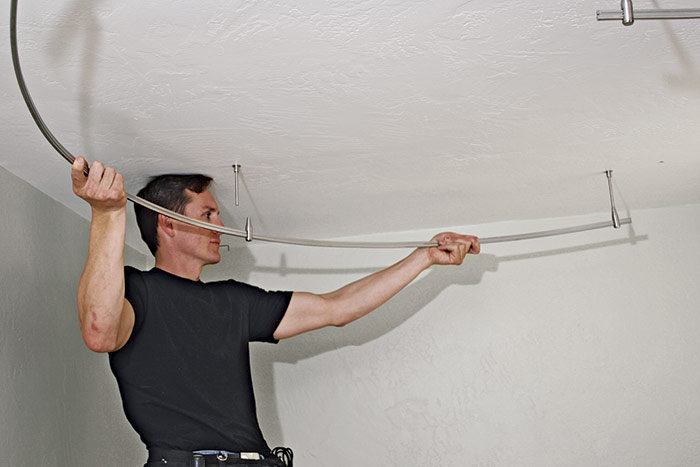
In cross-section, the monorail track is two square pieces of chrome-plated copper conductor sandwiched together with a clear (insulating) plastic piece. Although the track is sturdy, it can be bent freehand or shaped against a curved piece of plywood.

Low-Voltage Monorail System

Low-Voltage Monorail System

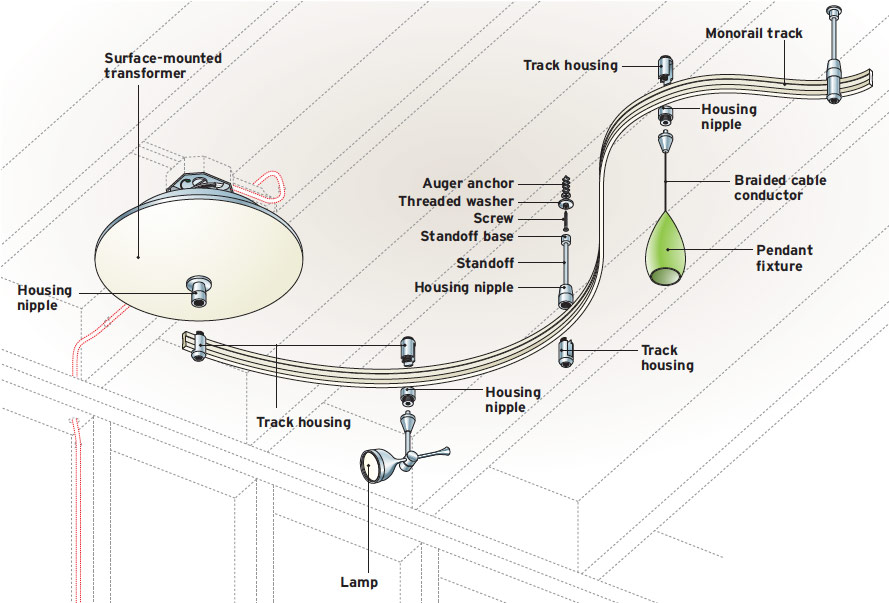
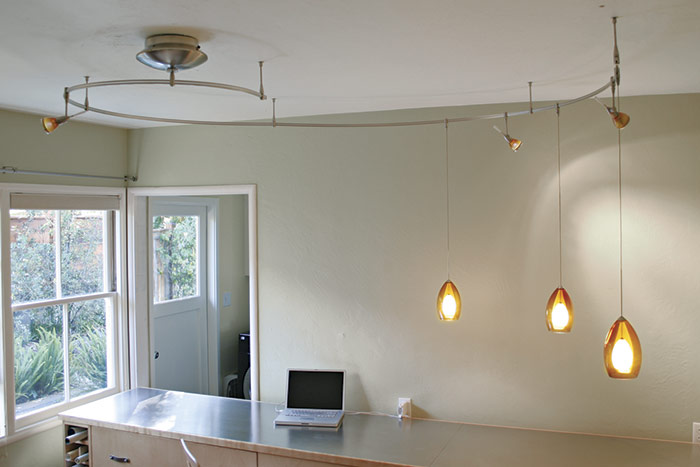
In the installation shown, the transformer is surface-mounted in a circular housing. Although the transformer housing must be mounted to a ceiling box to be adequately supported, individual standoff supports can be anchored in drywall or plaster alone because the track and fixtures are lightweight. The illustrations have been adapted from installation instructions from a product by Tech Lighting; your instructions may be different.

Locating the Track & Standoffs

If possible, before working overhead shape the track sections of your monorail system and preassemble them on the floor, then use a plumb bob or laser level to plumb up to the ceiling. First determine where you’ll place the transformer box for the system, then mark off the standoffs that will mount the track to the ceiling.

Standoff post
Standoff supports for monorail track systems consist of many small parts.


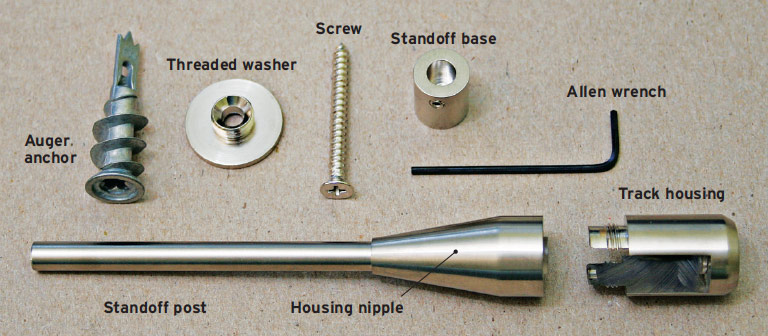
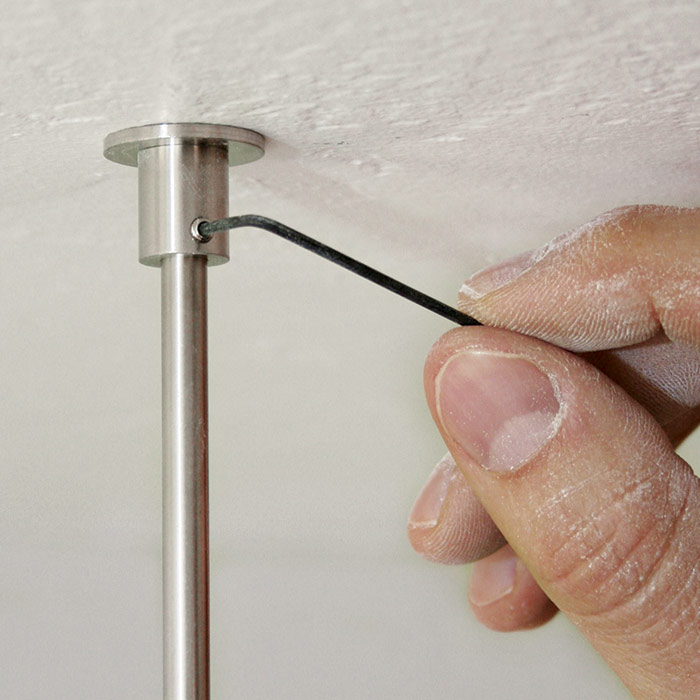
With a helper holding one end, hold sections of the track against the ceiling and mark off standoff points at the track ends, where sections meet, and at intervals suggested by the fixture maker—usually, every 3 ft. 1. Standoffs have multiple parts, which anchor them to the ceiling and support the track.

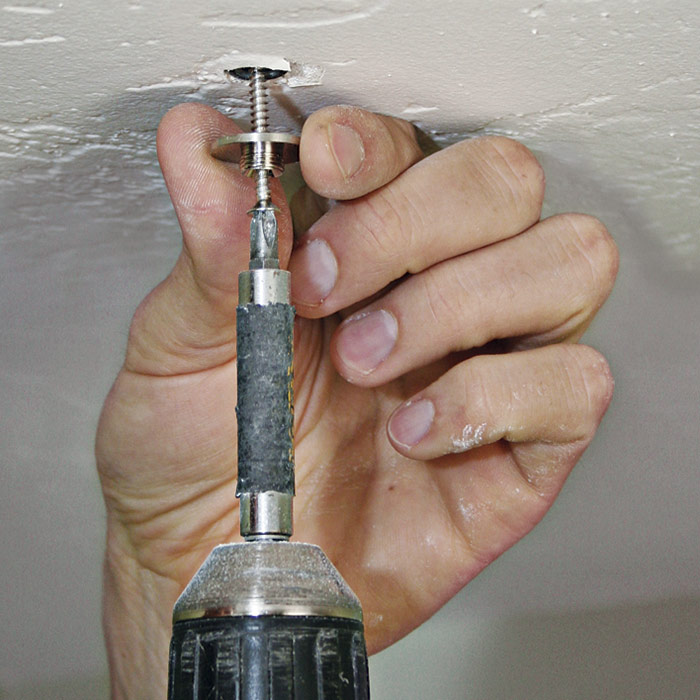
Fortunately, because the track weighs little you can mount standoffs almost anywhere on a drywall or plaster ceiling, using auger anchors with wide threads. (That is, you don’t need to mount standoffs to framing.) Sink the anchors flush, then screw a threaded washer to each anchor 2. Then, using a setscrew, screw the standoff base to that threaded washer 3.

1  Mark out the standoff locations on the ceiling.
1) Mark out the standoff locations on the ceiling.

2  Screw threaded washers onto the anchors.
2) Screw threaded washers onto the anchors.

3  Screw the standoff base to the threaded washers.
3) Screw the standoff base to the threaded washers.

Mount all the standoffs so that when you raise the monorail again you can attach it quickly to the standoffs and to the bottom of the transformer housing. If you need to reposition a standoff or two, it’s easy to patch the small holes left by misplaced standoff anchors.

Mounting & Wiring the Transformer

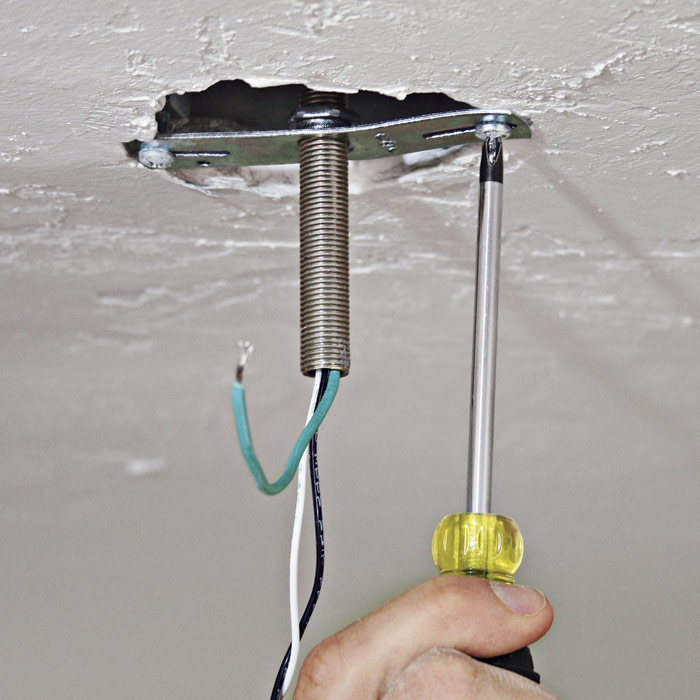
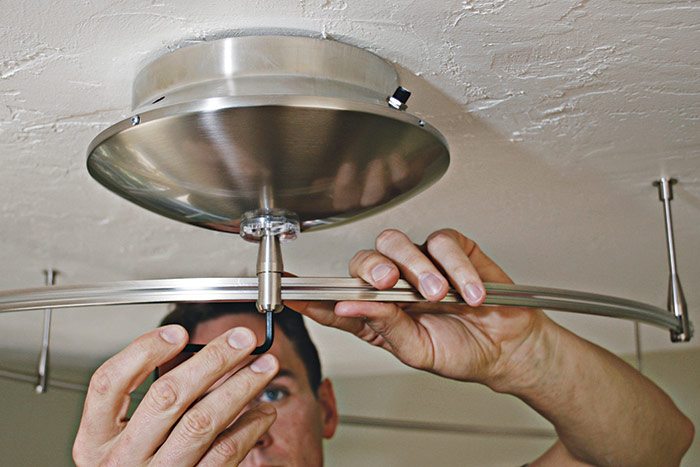
Once the standoffs are installed, mount the ceiling box to a ceiling joist and attach the bracket that will support the transformer 1. In this case, a nipple screws into the bracket and runs through the center of the transformer housing. The supply wires sticking out of the box will connect to the primary leads on the transformer.

Feed the supply wires into the center of the transformer housing 2, push the top piece of the housing snug against the ceiling box, slip a washer over the end of the nipple, and then tighten the inside nut that secures the transformer housing 3. The circular mass inside the housing is a magnetic transformer, which has a series of copper coils.

1 Attach the mounting bracket.
1) Attach the mounting bracket.

2  Feed the supply wires into the housing.
2) Feed the supply wires into the housing.

3  Secure the transformer housing.
3) Secure the transformer housing.

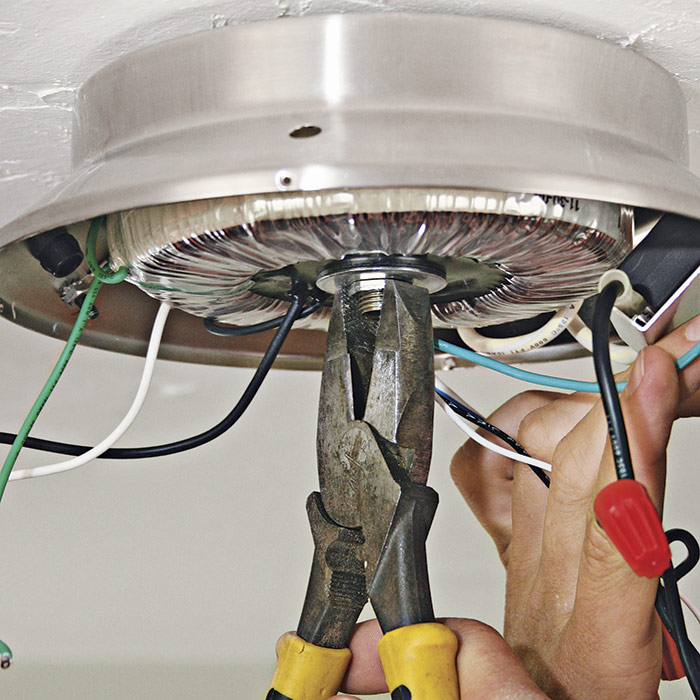
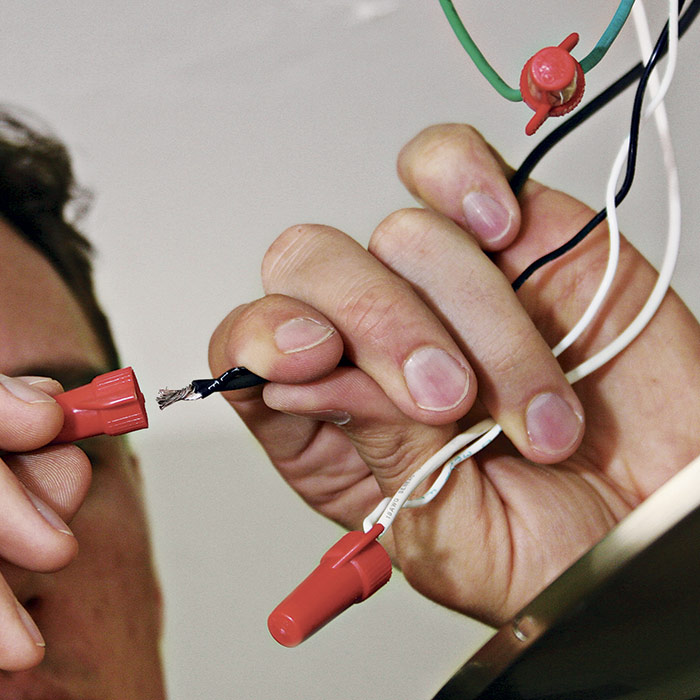
Many transformers come with secondary leads preattached, so that the installer need only splice supply wires to the primary fixture leads. Using the wire connectors provided, splice the ground wires first, then the neutral leads, and finally the hot wires 4. When all the wire connections are snug—gently tug on the spliced wires to be sure—close the transformer housing by snapping the bottom to the top and installing the screws provided 5. (By the way, the fat striped wires are secondary leads, which run from the transformer to the lo-vo power feed that energizes the track.)

4  Splice the supply wires to the primary leads. Of course, the power is off.
4) Splice the supply wires to the primary leads. Of course, the power is off.

5  Test the connections and then close the housing.
5) Test the connections and then close the housing.


Hanging the Track

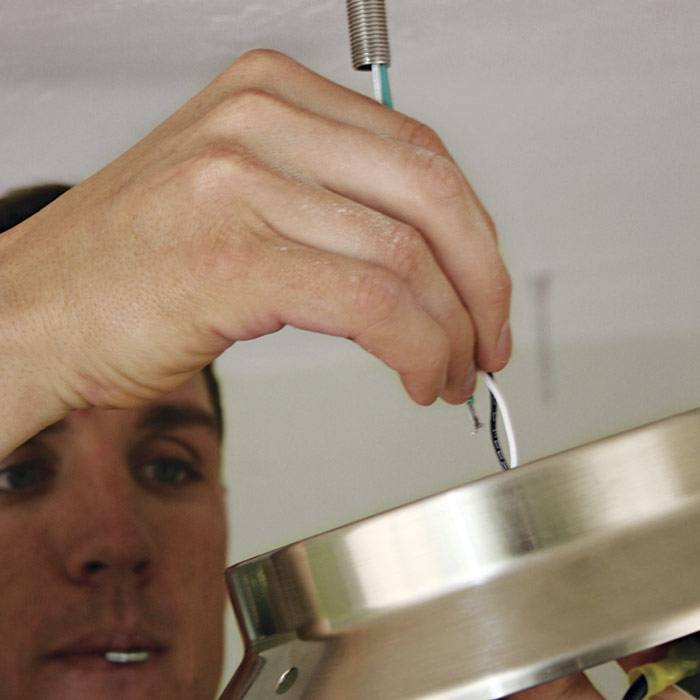
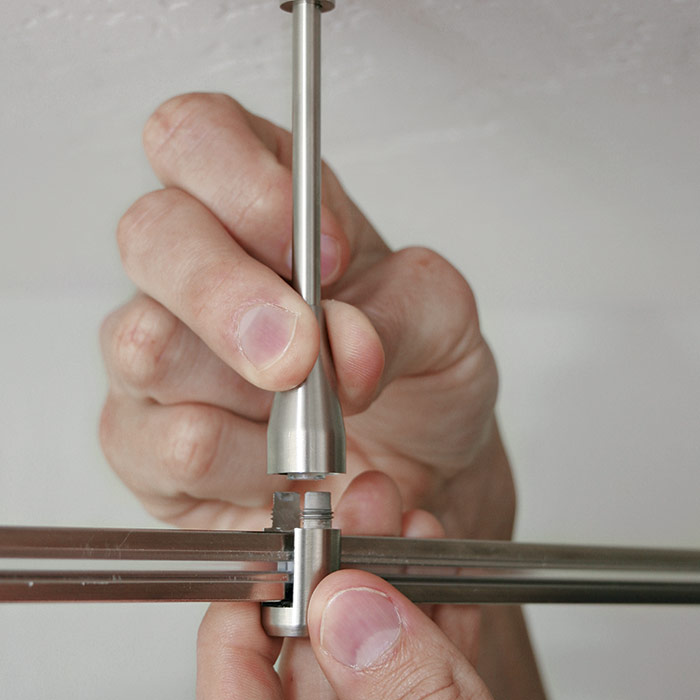
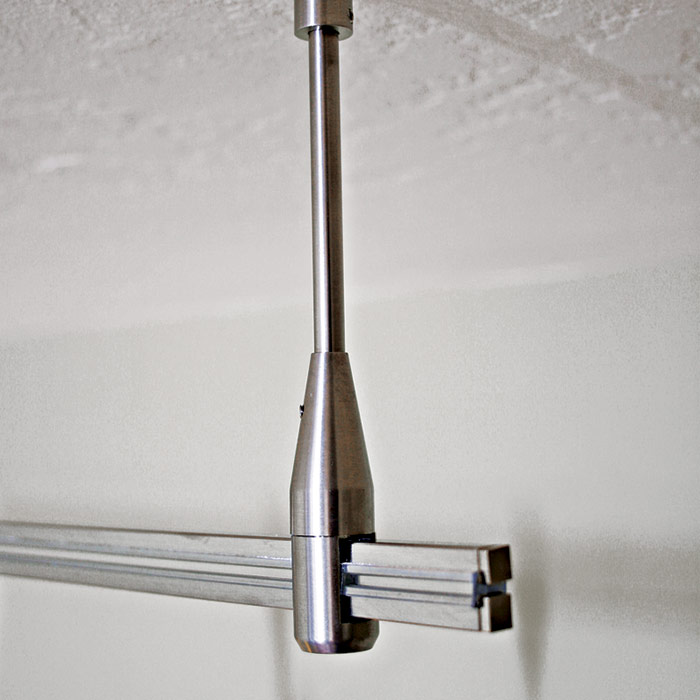
With the transformer secured and the standoffs installed in the ceiling, you’re ready to hang the track. Get help supporting the track until you have two or three points secured. Place the track into the track housing—the lowest piece on that assembly—then screw on the housing nipple 1. Once that’s done, tighten the setscrew that holds the nipple to the standoff post.


PRO TIP: If you can’t find anyone to help you support the track, bend short lengths of coat hanger into Z-shaped hanger brackets. Drill a 1⁄4-in. hole into the ceiling and insert one end of the bracket; the other end supports the track. Once the track is up, remove the hangers and patch the holes with joint compound.


1 Place the track into the track housing.
1) Place the track into the track housing.

2  Use conductive connectors to join the sections.
2) Use conductive connectors to join the sections.

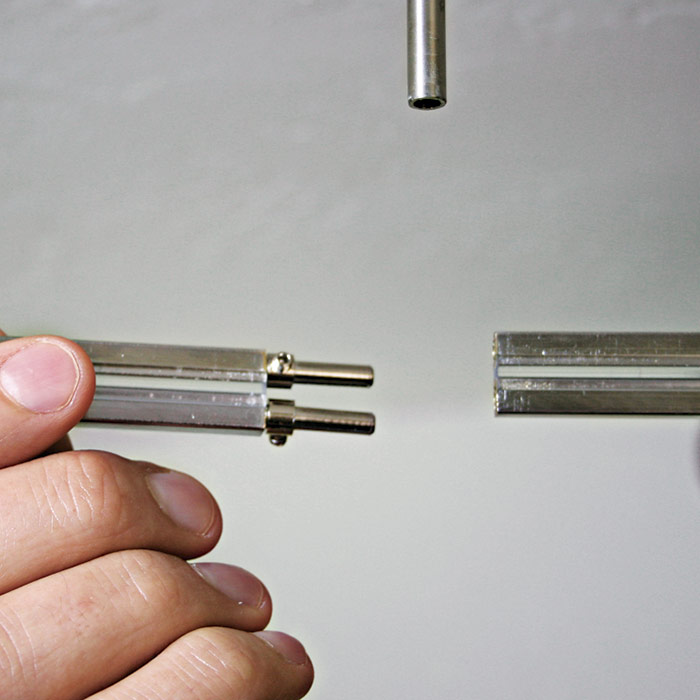
Where track sections meet, join them with conductive connectors and support the junction with a standoff 2. Once the track is supported at several points, loosely attach the track housing and nipple assemblies at several points, slide them beneath the support rails, and use an Allen wrench to tighten the setscrews that join the nipples to the standoff posts 3. Make sure the connections are tight.

3  Attach the track to the standoffs.
3) Attach the track to the standoffs.

Because the housing on the bottom of the transformer has setscrews on the side and the bottom, you’ll need two different sizes of Allen wrenches. Loosen the small screw on the side of the housing nipple so you can turn it onto the threads of the housing. Once the nipple is tight on the housing, retighten that small screw. Then use a 3⁄16-in. Allen wrench to tighten the setscrew on the bottom of the housing 4. Finally, retighten all connections and place end caps on the ends of the track 5.

4  The transformer support requires two wrenches.
4) The transformer support requires two wrenches.

5  Place end caps at the end of each run.
5) Place end caps at the end of each run.


Installing the Light Fixtures

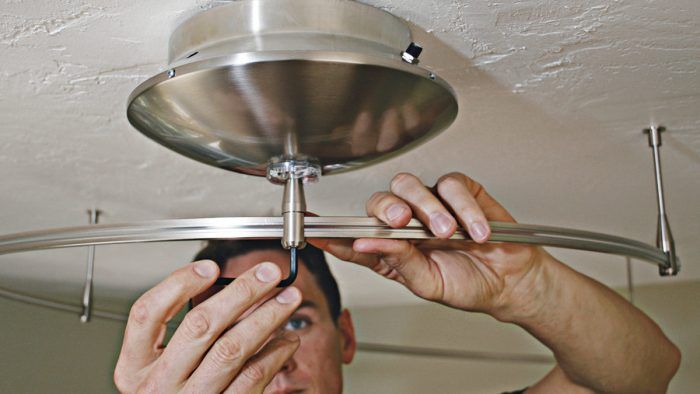
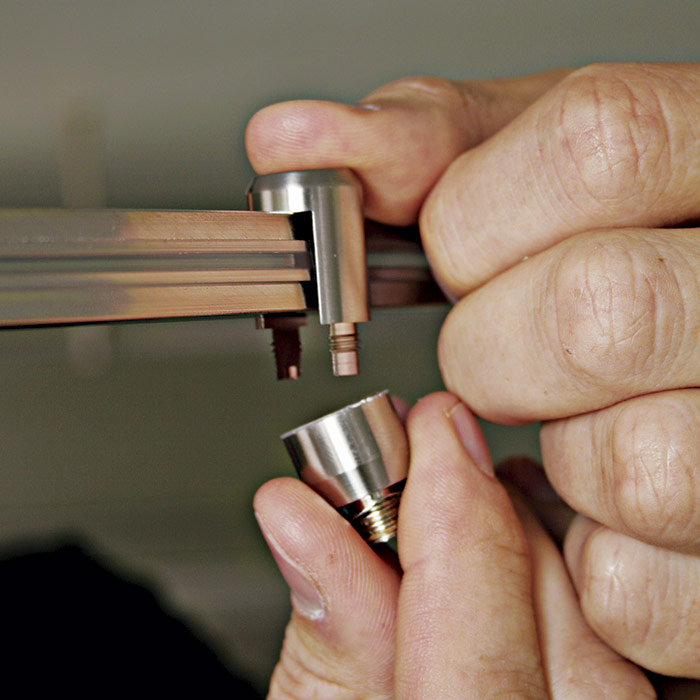
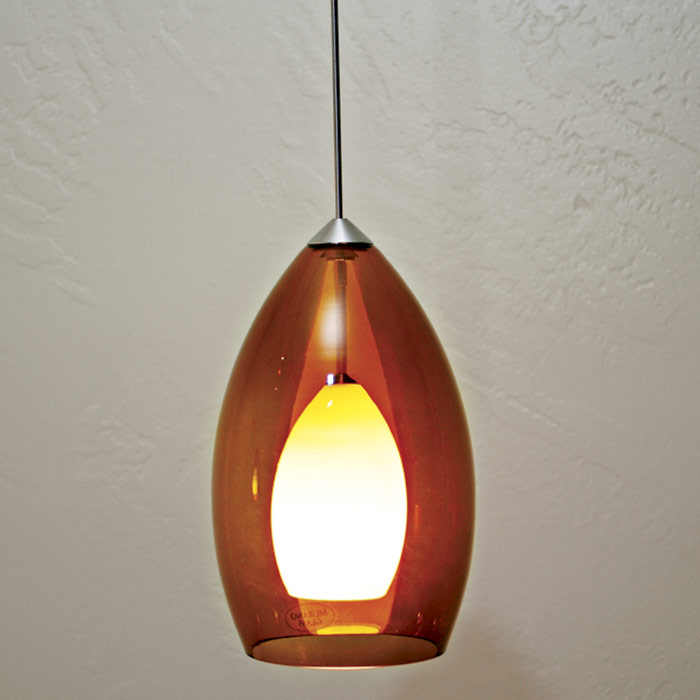
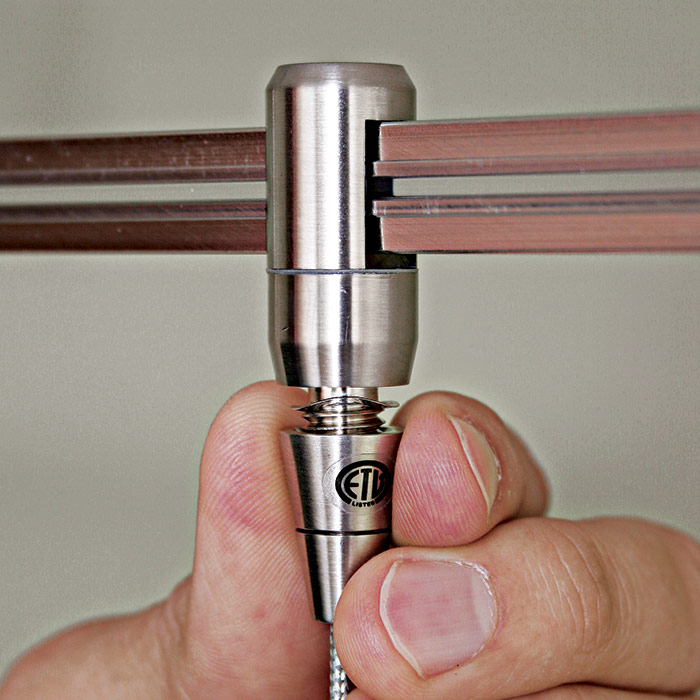
Once the monorail tracks are installed, you can add the light fixtures. The fixtures require a two-part assembly that straddles the monorail track; note that in this case the housing and nipples are inverted. Insert the housing on top of the track and the nipple on the bottom 1. Screw the pieces together, insert the shaft of the light fixture into the inverted nipple 2, then screw the fixture nipple onto the threaded housing nipple and hand tighten it.

1  To attach lights, invert the track housing and screw on the nipple.
1) To attach lights, invert the track housing and screw on the nipple.

2  Insert the shaft of the light fixture.
2) Insert the shaft of the light fixture.

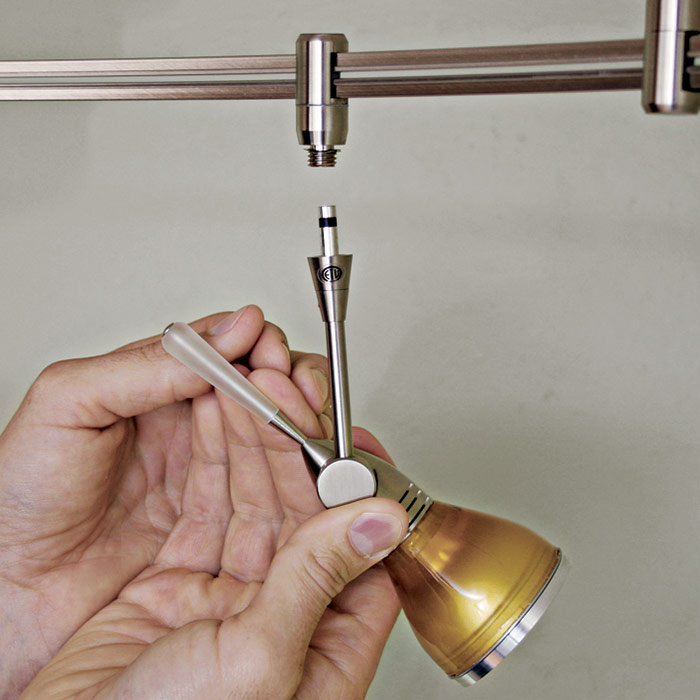
Attaching the pendant lights is similar, although the light pendants use braided cable rather than a solid shaft. Braided cable can be shortened if necessary, allowing you to install the pendant lights at the same or varying heights 3. Once you’ve adjusted the pendant cables, tighten the fixture nipple to the housing nipple on the track 4.

3  Support pendant lights with braided cable.
3) Support pendant lights with braided cable.

4  Pendant light supports screw into housing nipples.
4) Pendant light supports screw into housing nipples.

Most manufacturers recommend energizing the system and turning the lights on for 20 minutes or 30 minutes before checking the monorail connections to see if any are hot to the touch. Warm is normal, but hot connections should be retightened 5. Do not, however, touch any halogen lights; they are certain to be hot enough to burn you (which is normal).

5  Energize the system for 20 minutes, then make sure the connections aren’t overheated.
5) Energize the system for 20 minutes, then make sure the connections aren’t overheated.


PRO TIP: After installing a complex assembly such as mono-rail track lighting, disconnect the power and retighten all connections after the first 10 to 20 hours of use.


Wiring Complete, 3rd Edition

Excerpted from Wiring Complete, 3rd Edition (The Taunton Press, 2017) by Michael Litchfield and Michael McAlister

Available in the Taunton Store and at Amazon.com.

Previous: Installing Low-Voltage Fixtures Next: Retrofitting a Ceiling Fan

Guide

Wiring

Chapter

Lights and Fans

Sign up for eletters today and get the latest how-to from Fine Homebuilding, plus special offers.

Signing you up...

This site is protected by reCAPTCHA and the Google Privacy Policy and Terms of Service apply.
See all newsletters
See all newsletters

Log in or create an account to post a comment.

Sign up Log in

Become a member and get full access to FineHomebuilding.com

Wiring

Wiring

Trusted, code-compliant guidance from the pros for working safely on any wiring project

View Project Guide

View All Project Guides »

Become a member and get unlimited site access, including the Wiring Project Guide.

Start Free Trial

Working with Electricity
  • Basics
  • Safety
  • Troubleshooting and Upgrades
Tools and Materials
  • Electrical Tools
  • Electrical Boxes
  • Cables and Wires
Receptacles and Switches
  • Materials
  • Wiring Receptacles
  • Wiring Switches
Lights and Fans
  • Lighting Design
  • Installing Lights
  • Fans
Rough-In
  • Planning
  • Installing Electrical Boxes
  • Running Cable
  • Retrofit Work
  • Making Connections in Boxes
  • Electrical Conduit
Outdoor Wiring
  • Basics
  • Outlets
  • Installing Lighting
Panels and Subpanels
  • Understanding Panels
  • Circuits
  • Installing a Subpanel

Fine Home Building

Newsletter Sign-up

  • Fine Homebuilding

    Home building tips, offers, and expert advice in your inbox.

  • Green Building Advisor

    Building science and energy efficiency advice, plus special offers, in your inbox.

  • Old House Journal

    Repair, renovation, and restoration tips, plus special offers, in your inbox.

Signing you up...

This site is protected by reCAPTCHA and the Google Privacy Policy and Terms of Service apply.
See all newsletters

Follow

  • Fine Homebuilding

    Dig into cutting-edge approaches and decades of proven solutions with total access to our experts and tradespeople.

    Start Free Trial Now
    • Facebook
    • Instagram
    • X
    • LinkedIn
  • GBA Prime

    Get instant access to the latest developments in green building, research, and reports from the field.

    Start Free Trial Now
    • Facebook
    • YouTube
  • Old House Journal

    Learn how to restore, repair, update, and decorate your home.

    Subscribe Now
    • Facebook
    • Instagram
    • X

Membership & Magazine

  • Online Archive
  • Start Free Trial
  • Magazine Subscription
  • Magazine Renewal
  • Gift a Subscription
  • Customer Support
  • Privacy Preferences
  • About
  • Contact
  • Advertise
  • Careers
  • Terms of Use
  • Site Map
  • Do not sell or share my information
  • Privacy Policy
  • Accessibility
  • California Privacy Rights

© 2025 Active Interest Media. All rights reserved.

Fine Homebuilding receives a commission for items purchased through links on this site, including Amazon Associates and other affiliate advertising programs.

  • Home Group
  • Antique Trader
  • Arts & Crafts Homes
  • Bank Note Reporter
  • Cabin Life
  • Cuisine at Home
  • Fine Gardening
  • Fine Woodworking
  • Green Building Advisor
  • Garden Gate
  • Horticulture
  • Keep Craft Alive
  • Log Home Living
  • Military Trader/Vehicles
  • Numismatic News
  • Numismaster
  • Old Cars Weekly
  • Old House Journal
  • Period Homes
  • Popular Woodworking
  • Script
  • ShopNotes
  • Sports Collectors Digest
  • Threads
  • Timber Home Living
  • Traditional Building
  • Woodsmith
  • World Coin News
  • Writer's Digest
Active Interest Media logo
X
X
This is a dialog window which overlays the main content of the page. The modal window is a 'site map' of the most critical areas of the site. Pressing the Escape (ESC) button will close the modal and bring you back to where you were on the page.

Main Menu

  • How-To
  • Design
  • Tools & Materials
  • Video
  • Blogs
  • Forum
  • Project Guides
  • Reader Projects
  • Magazine
  • Members
  • FHB House

Podcasts

  • FHB Podcast
  • ProTalk

Webinars

  • Upcoming and On-Demand

Podcasts

  • FHB Podcast
  • ProTalk

Webinars

  • Upcoming and On-Demand

Popular Topics

  • Kitchens
  • Business
  • Bedrooms
  • Roofs
  • Architecture and Design
  • Green Building
  • Decks
  • Framing
  • Safety
  • Remodeling
  • Bathrooms
  • Windows
  • Tilework
  • Ceilings
  • HVAC

Magazine

  • Current Issue
  • Past Issues
  • Magazine Index
  • Subscribe
  • Online Archive
  • Author Guidelines

All Access

  • Member Home
  • Start Free Trial
  • Gift Membership

Online Learning

  • Courses
  • Project Guides
  • Reader Projects
  • Podcast

More

  • FHB Ambassadors
  • FHB House
  • Customer Support

Account

  • Log In
  • Join

Newsletter

Get home building tips, offers, and expert advice in your inbox

Signing you up...

This site is protected by reCAPTCHA and the Google Privacy Policy and Terms of Service apply.
See all newsletters
See all newsletters

Follow

  • X
  • YouTube
  • instagram
  • facebook
  • pinterest
  • Tiktok

Join All Access

Become a member and get instant access to thousands of videos, how-tos, tool reviews, and design features.

Start Your Free Trial

Subscribe

FHB Magazine

Start your subscription today and save up to 81%

Subscribe

You have 1 free article remaining.

Get complete site access, including thousands of videos, how-to tips, tool reviews, and design features.

Start your FREE trial

Already a member? Log in

We hope you’ve enjoyed your free articles. To keep reading, become a member today.

Get complete site access to expert advice, how-to videos, Code Check, and more, plus the print magazine.

Start your FREE trial

Already a member? Log in

Privacy Policy Update

We use cookies, pixels, script and other tracking technologies to analyze and improve our service, to improve and personalize content, and for advertising to you. We also share information about your use of our site with third-party social media, advertising and analytics partners. You can view our Privacy Policy here and our Terms of Use here.

Cookies

Analytics

These cookies help us track site metrics to improve our sites and provide a better user experience.

Advertising/Social Media

These cookies are used to serve advertisements aligned with your interests.

Essential

These cookies are required to provide basic functions like page navigation and access to secure areas of the website.

Delete My Data

Delete all cookies and associated data