FHB Logo Facebook LinkedIn Email Pinterest Twitter X Instagram Tiktok YouTube Plus Icon Close Icon Navigation Search Icon Navigation Search Icon Arrow Down Icon Video Guide Icon Article Guide Icon Modal Close Icon Guide Search Icon Skip to content
Subscribe
Log In
  • How-To
  • Design
  • Tools & Materials
  • Restoration
  • Videos
  • Blogs
  • Forum
  • Magazine
  • Members
  • FHB House
  • Podcast
Log In

Fine Homebuilding Project Guides

Wiring

Guide Home
  • Working with Electricity
  • Tools and Materials
  • Receptacles and Switches
  • Lights and Fans
  • Rough-In
  • Outdoor Wiring
  • Panels and Subpanels
How-To

Pulling Cable vs. Fishing Cable

Running cable between outlets in new construction is relatively straightforward, but it gets tricky when you have to fish cable behind finish walls or ceilings.

By Mike Litchfield, Michael McAlister
  • X
  • facebook
  • linkedin
  • pinterest
  • email
  • add to favorites Log in or Sign up to save your favorite articles

For greatest efficiency, install cable in two steps: (1) Pull cable between outlets, leaving roughly 1 ft. extra beyond each box for future splices, and (2) retrace your steps, stapling cable to framing and installing nail-protection plates. As with drilling, it doesn’t matter whether you start pulling cable from the first box of a circuit or from the last box. If there are several circuits in a room, start at one end and proceed along each circuit, pulling cable until all the boxes are wired. Don’t jump around: You may become confused and miss a box.

Pro Tip: Put a piece of red tape on the first box in each circuit to ensure that you run cable from it to the panel. On a complex job with many circuits, you might run cable between all the outlets in a circuit but forget to install the home-run cable that will energize the circuit. Not something you want to discover after the drywall is up.


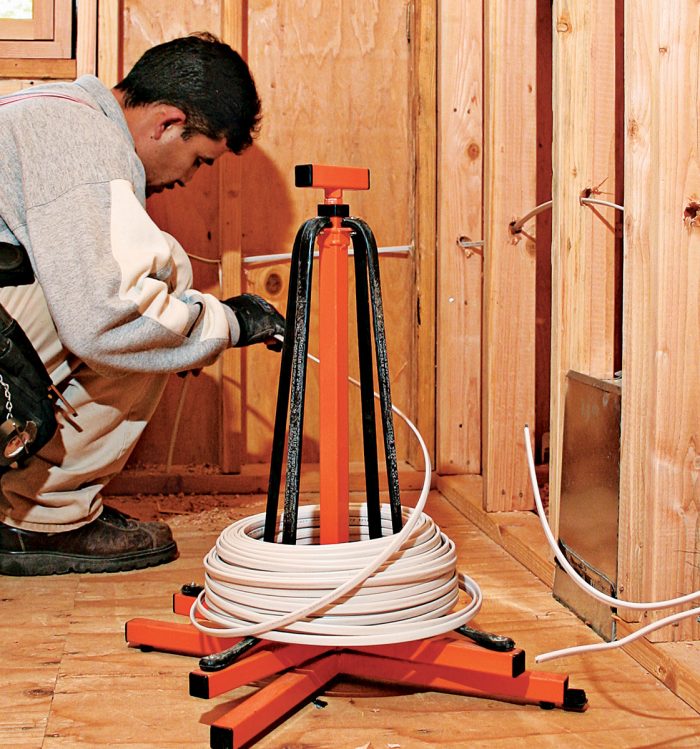
In new construction, electricians usually place several wire reels by the panel and pull cables from there toward the first box of each circuit 1. These circuit segments are called “home runs.” Once electricians have run cable to all the home-run boxes, they move a reel next to each box and continue to pull cable outward until they reach the last box 2. When doing remodel wiring in a house with a crawlspace, however, electricians often start at the last box and pull cables toward the panel. When they reach the first boxes of several circuits, they will move the wire reels to those locations. From there, they feed, say, three cables down to a helper in the crawlspace. The helper can pull all the cables toward the panel at the same time. This method is much faster than pulling single cables three different times.

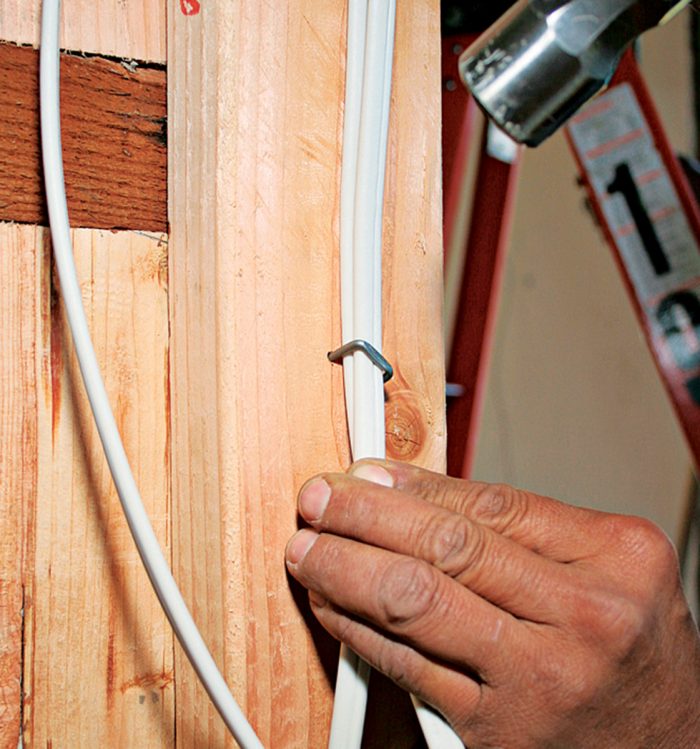
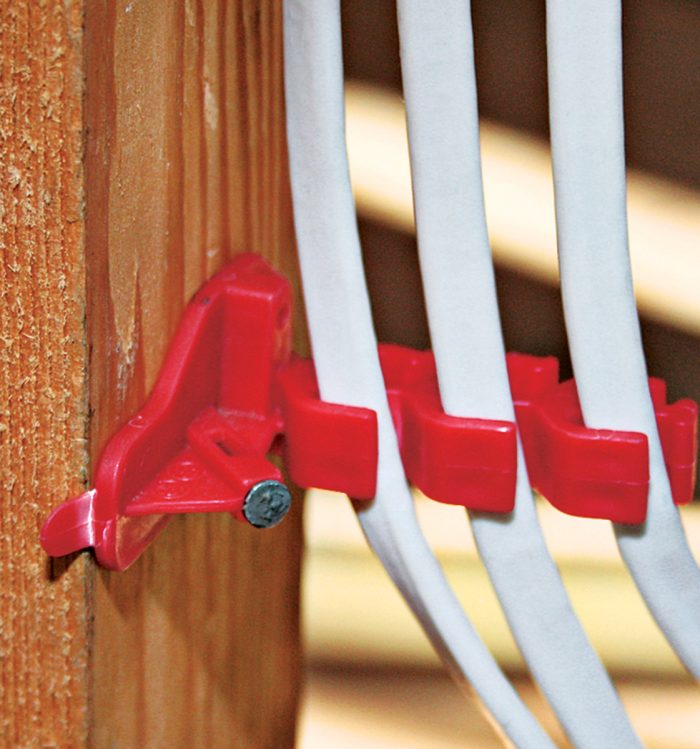
Staple cable along stud centers to prevent nail or screw punctures. It’s acceptable to stack two cables under one staple 3, but use standoffs 4 to fasten three or more cables traveling along the same path. (Multi-gang boxes are fed by multiple cables, for example.) Standoffs and ties bundle cables loosely to prevent heat buildup. As you secure cable, install nail plates where needed 5.

Place a wire reel near the beginning or end of each circuit.
1) Place a wire reel near the beginning or end of each circuit.
Avoid crimping cable as you pull it through narrow spaces.
2) Avoid crimping cable as you pull it through narrow spaces.
Drive staples just snug to the cable.
3) Drive staples just snug to the cable.
When bundling two or more cables, use standoffs.
4) When bundling two or more cables, use standoffs.
For cable within 1 1⁄4 in. of a stud edge, install a steel plate.
5) For cable within 1 1⁄4 in. of a stud edge, install a steel plate.

Feeding Cable Through Corners

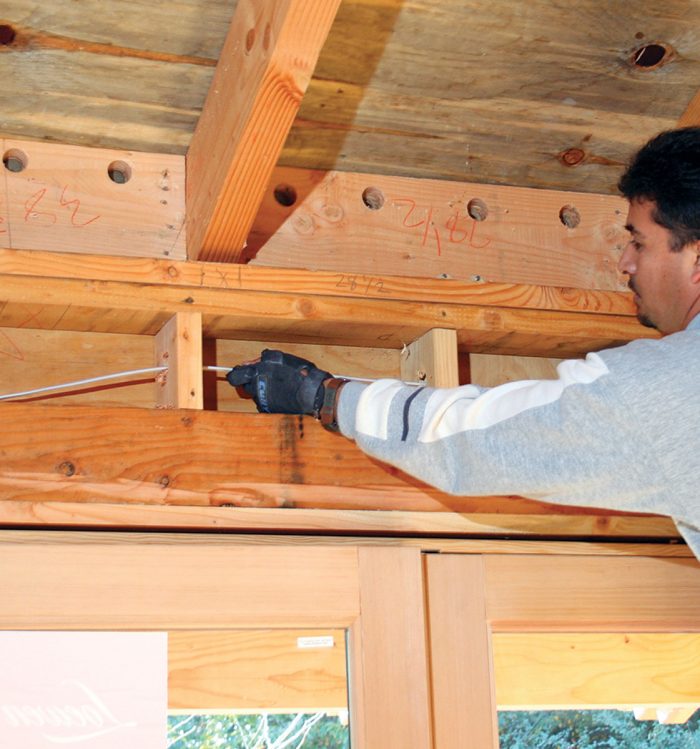
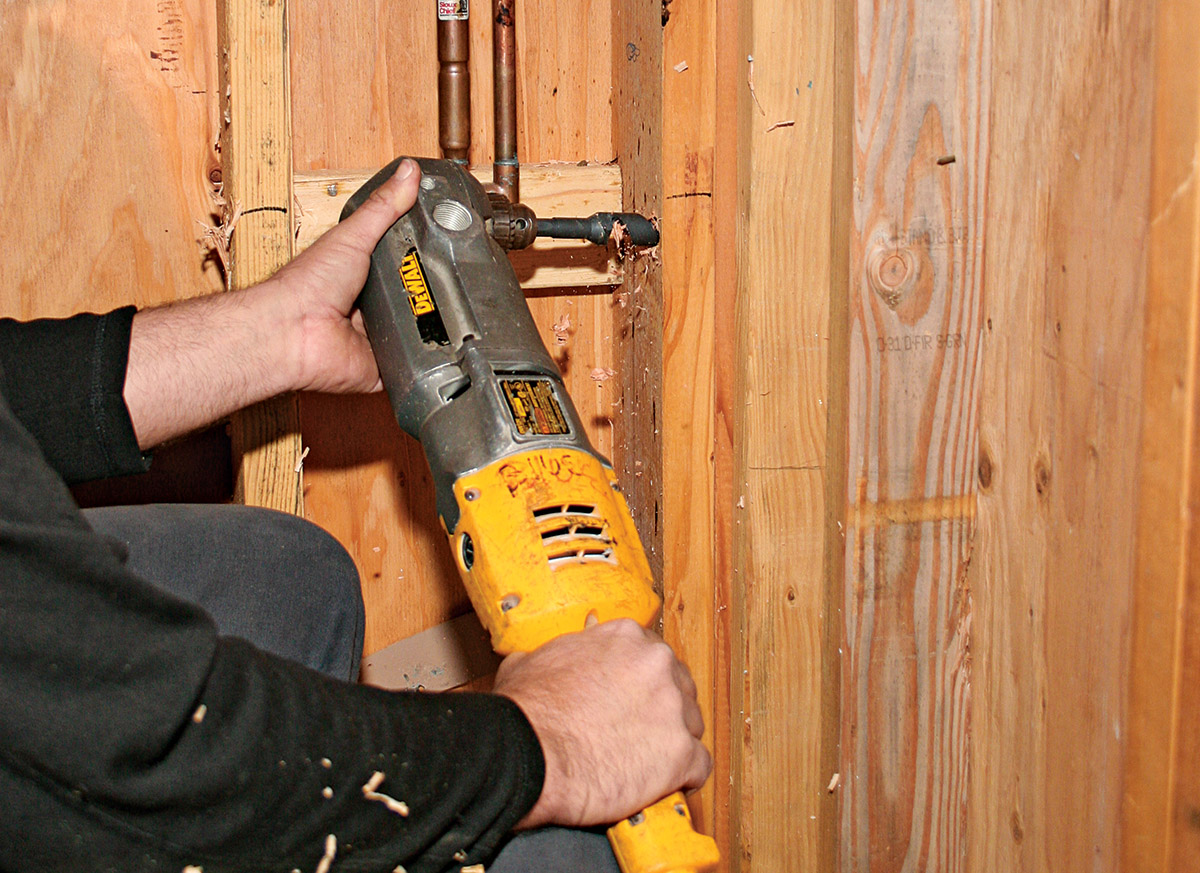
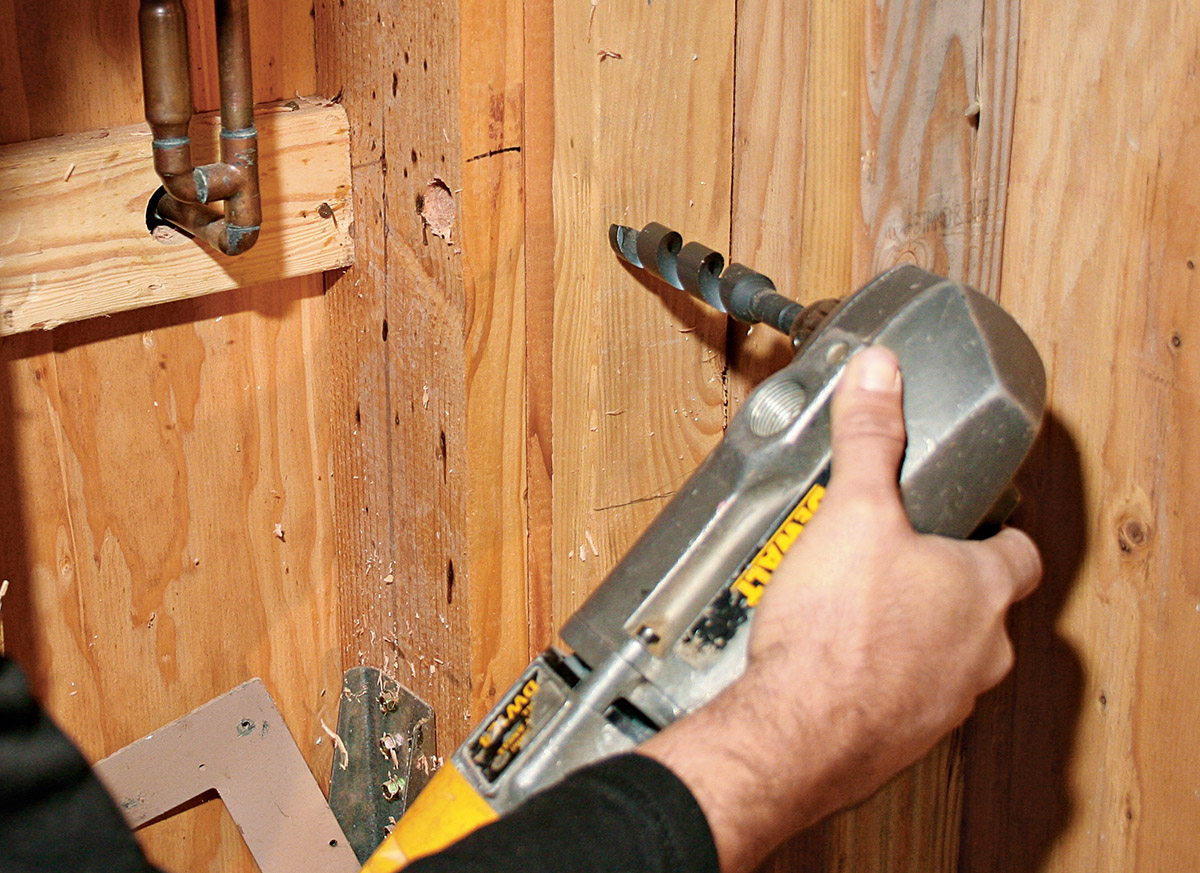
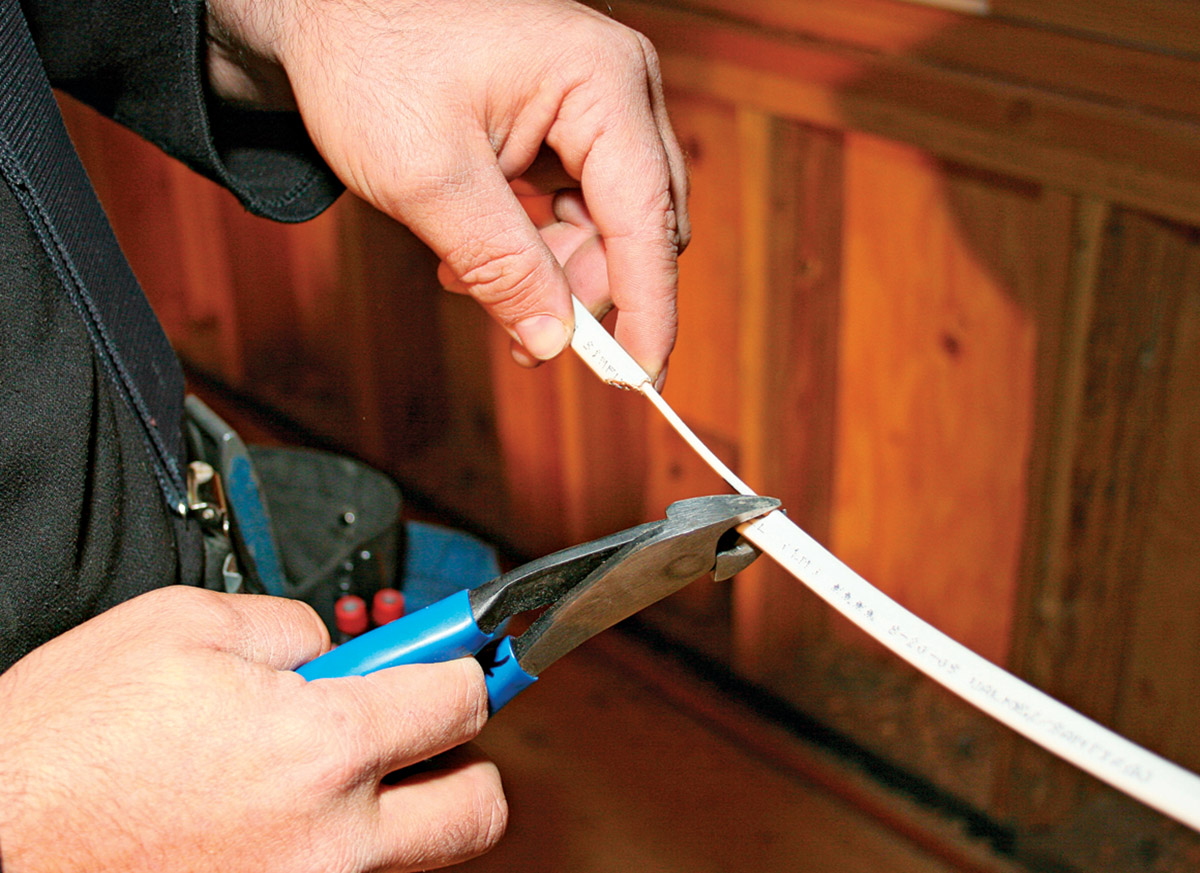
Corners are usually built by nailing three or four studs together, so feeding cable through them can be tricky. Drill intersecting holes at the same height, as shown in photos 1 and 2. Use diagonal cutters to cut through the sheathing and two of the wires, thus leaving a single wire protruding from the cable 3.

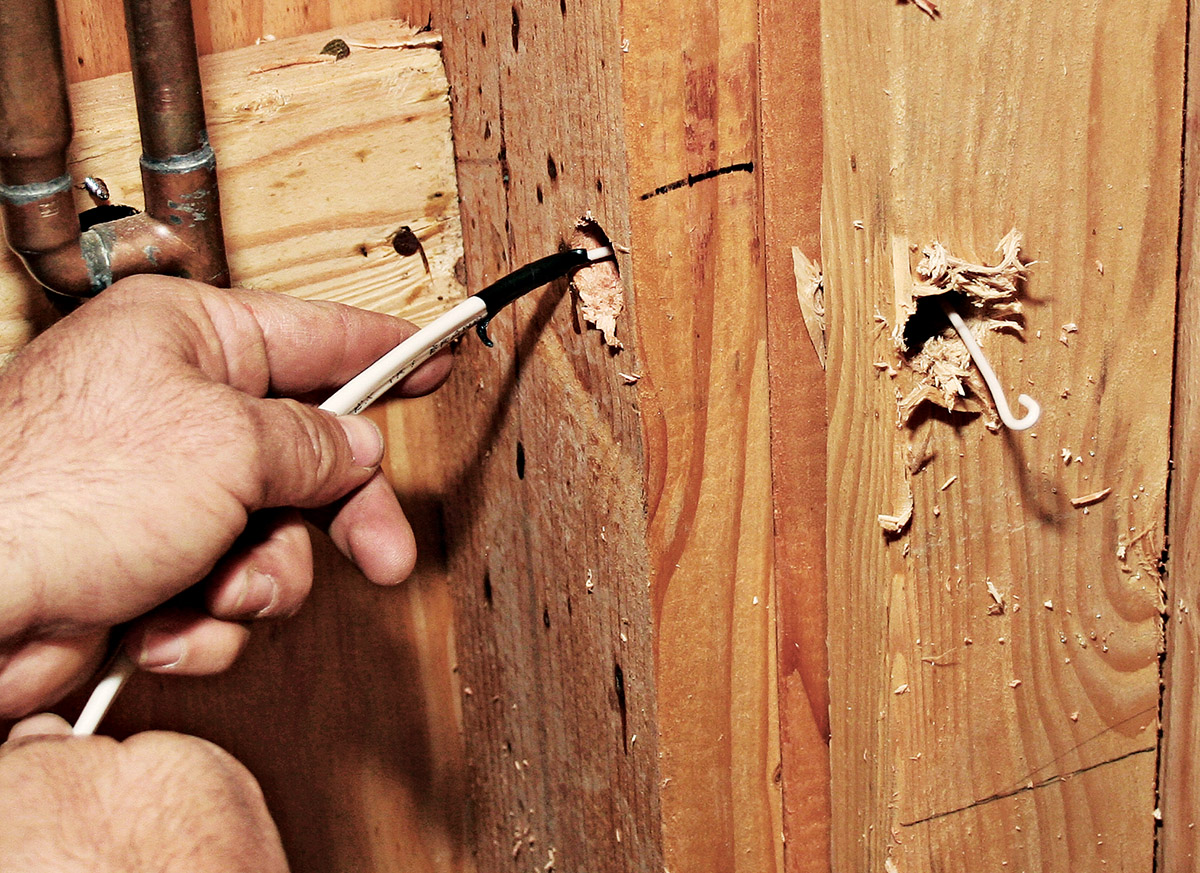
Use pliers to loop the end of the wire. Then wrap tape around the end of the cable and onto the wire to create a tapering point that will slide easier through the hole. Push the wire through the corner holes until it emerges from the other side 4. If the wire gets hung up midway through, insert a finger from the other side to fish for its end.

To feed cable through a corner, drill a level hole on one side of the built-up studs.
1) To feed cable through a corner, drill a level hole on one side of the built-up studs.

Drill a second hole, at the same height, so the holes intersect.
2) Drill a second hole, at the same height, so the holes intersect.

Use diagonal cutters to cut through the sheathing and two of the three wires in the cable, then loop the end of the remaining wire.
3) Use diagonal cutters to cut through the sheathing and two of the three wires in the cable, then loop the end of the remaining wire.

Wrap the end of the cable so it slides through the hole easier, then work the looped wire through the holes.
4) Wrap the end of the cable so it slides through the hole easier, then work the looped wire through the holes.

Fishing Cable Behind Finish Walls

Most electricians hate fishing wire behind existing walls. It can be tricky to find the cable and time-consuming to patch the holes in plaster or drywall. If you’re adding a box or two, try fishing cable behind the wall. But if you’re rewiring an entire room, it’s probably faster to cut a “wiring trench” in the wall. Before cutting into or drilling through a wall, however, turn off power to the area.

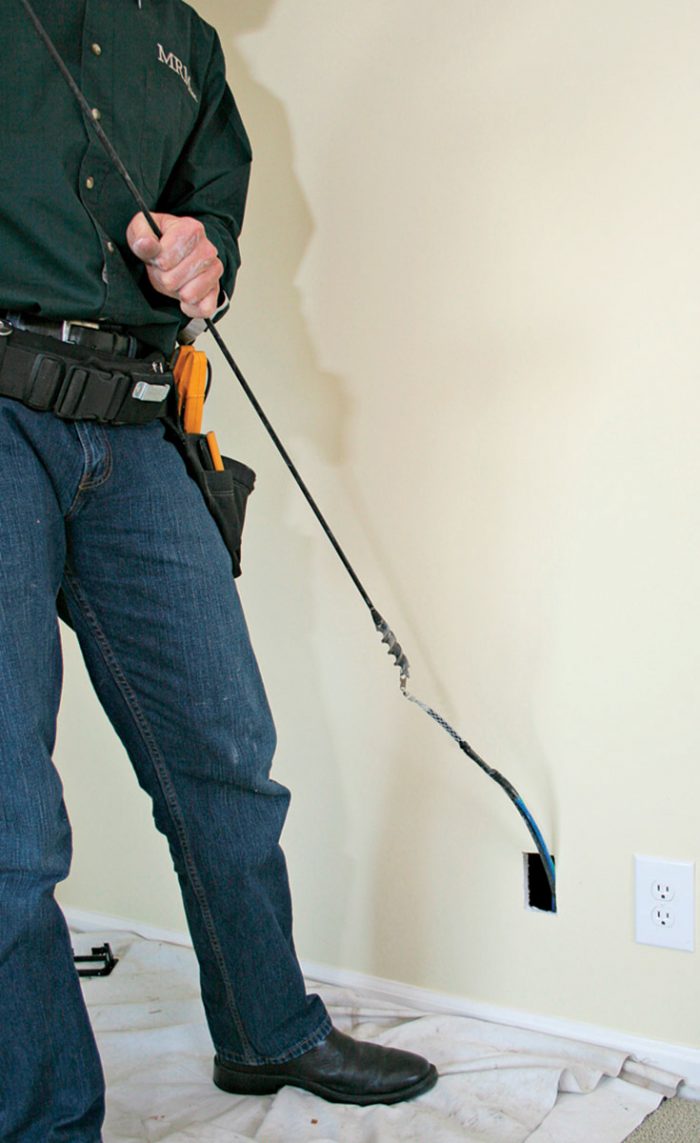
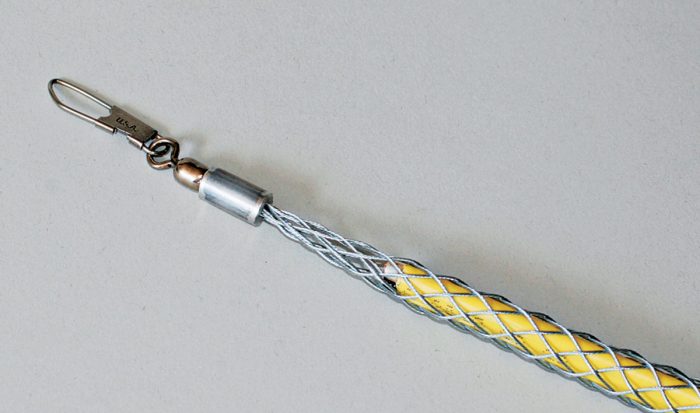
If you’re adding an outlet over an unfinished basement, fishing cable can be straightforward. Outline and cut out an opening for the new box, insert a flex bit into the opening, and then drill down through the wall’s bottom plate 1 (wear gloves to protect hands). When the bit emerges into the basement, a helper can insert one wire of the new cable into the small “fish hole” near the bit’s point. As you slowly back the bit out of the box opening, you pull new cable into it 2. No fish tape required! The only downside is that the reversing drill can twist the cable. This problem is easily avoided by sliding a swivel kellum over the cable end instead of inserting a cable wire into the flex bit hole 3. Because the kellum turns, the cable doesn’t.

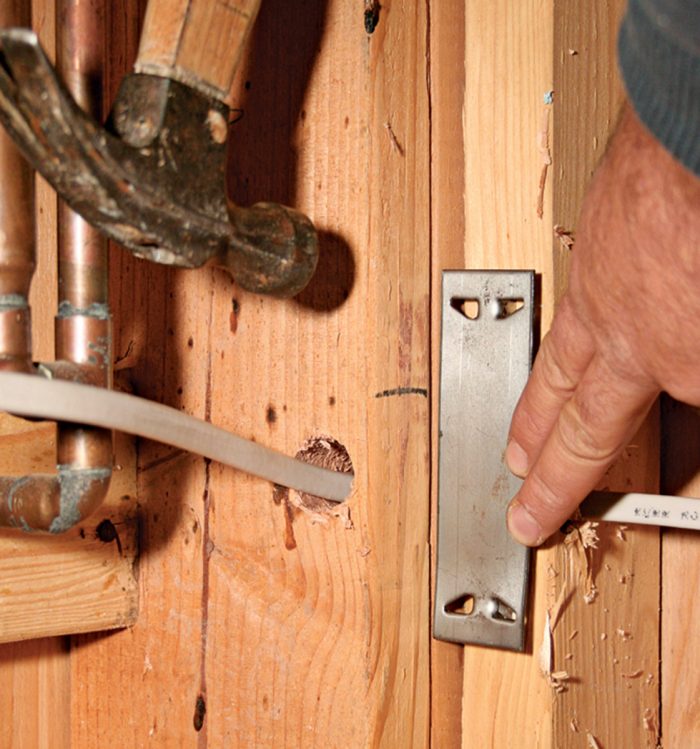
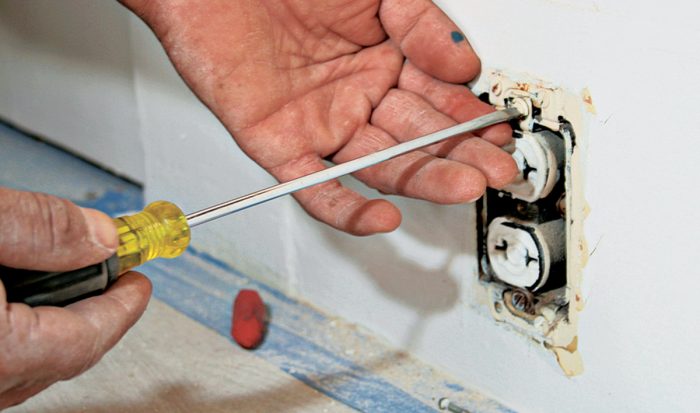
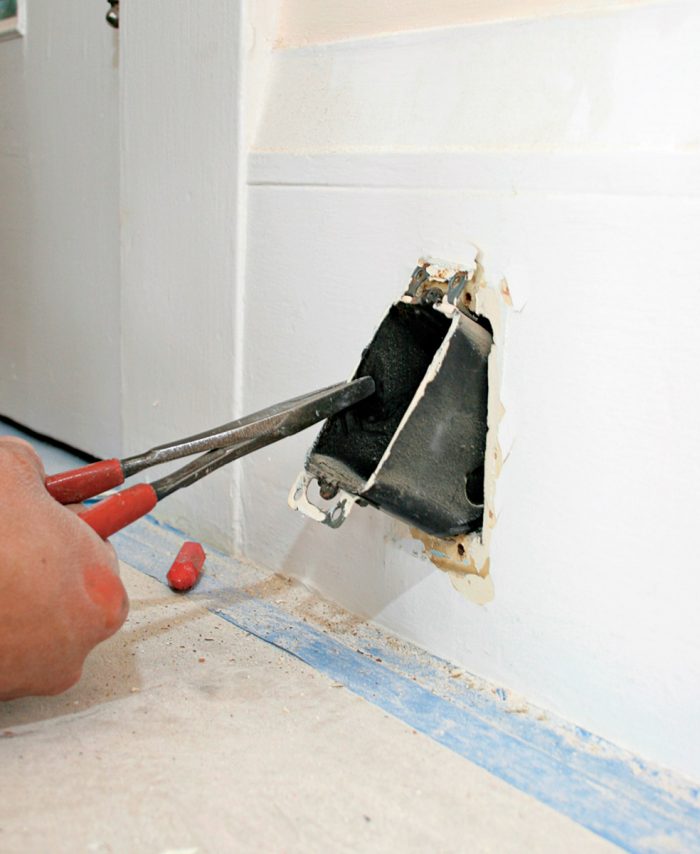
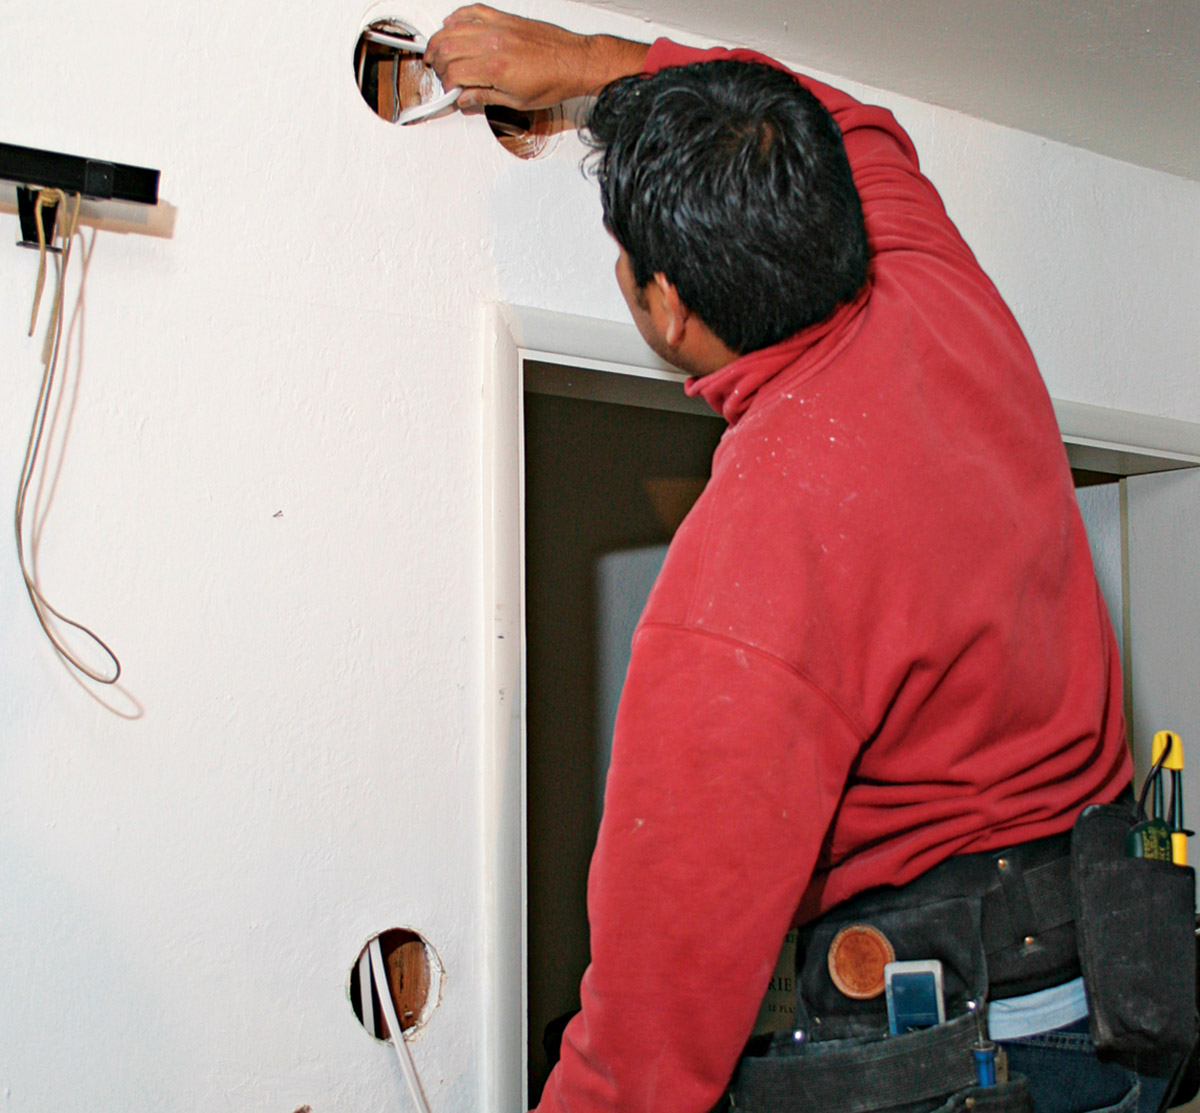
Alternatively, you can start by removing a wall box. The closest power source is often an existing outlet. Cut power to that outlet and test to make sure it’s off. The easiest way to access the cable is to disconnect the wires to the receptacle 4 and remove it. Then remove the box 5, which may require using a metal-cutting reciprocating-saw blade to cut through the nails holding the box to the stud. Fish a new cable leg to the location and insert the new and old cables into a new cut-in box. Secure the cut-in box to the finish surface, splice the cables inside the box, and connect pigtails from the splices to the new receptacle.


Use a flex bit to drill through wall plates.
1) Use a flex bit to drill through wall plates.

Pull back after a helper below the floor attaches the cable.
2) Pull back after a helper below the floor attaches the cable.


A swivel kellum grip slides over the end of the cable being fished so the cable doesn’t twist.
3) A swivel kellum grip slides over the end of the cable being fished so the cable doesn’t twist.

OR


After testing for voltage, remove the cover plate, unscrew the receptacle from the box, and pull it out.
4) After testing for voltage, remove the cover plate, unscrew the receptacle from the box, and pull it out.
Remove the old outlet box, drill, fish new cable, and splice the old cable to the new.
5) Remove the old outlet box, drill, fish new cable, and splice the old cable to the new.

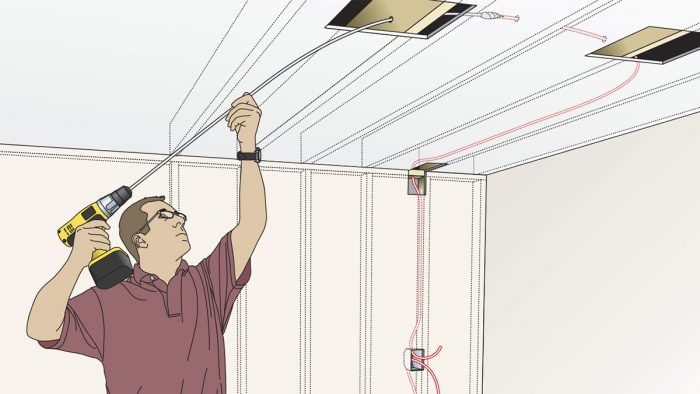
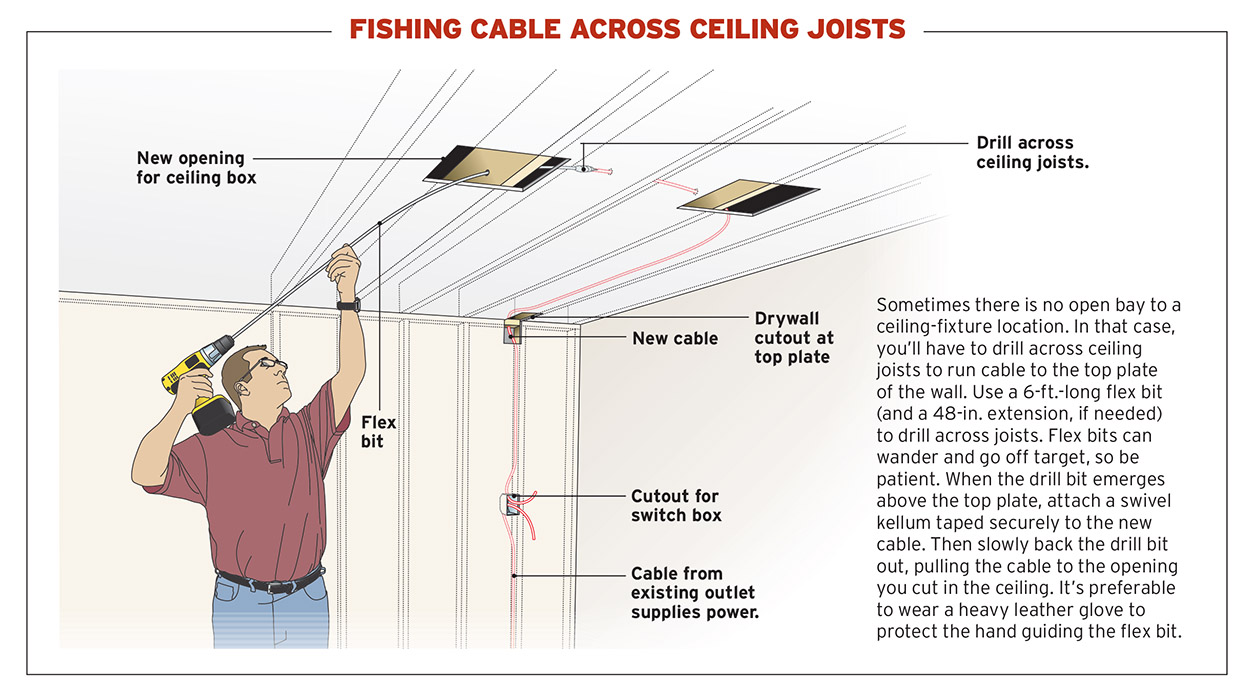
Fishing Cable to a Ceiling Fixture

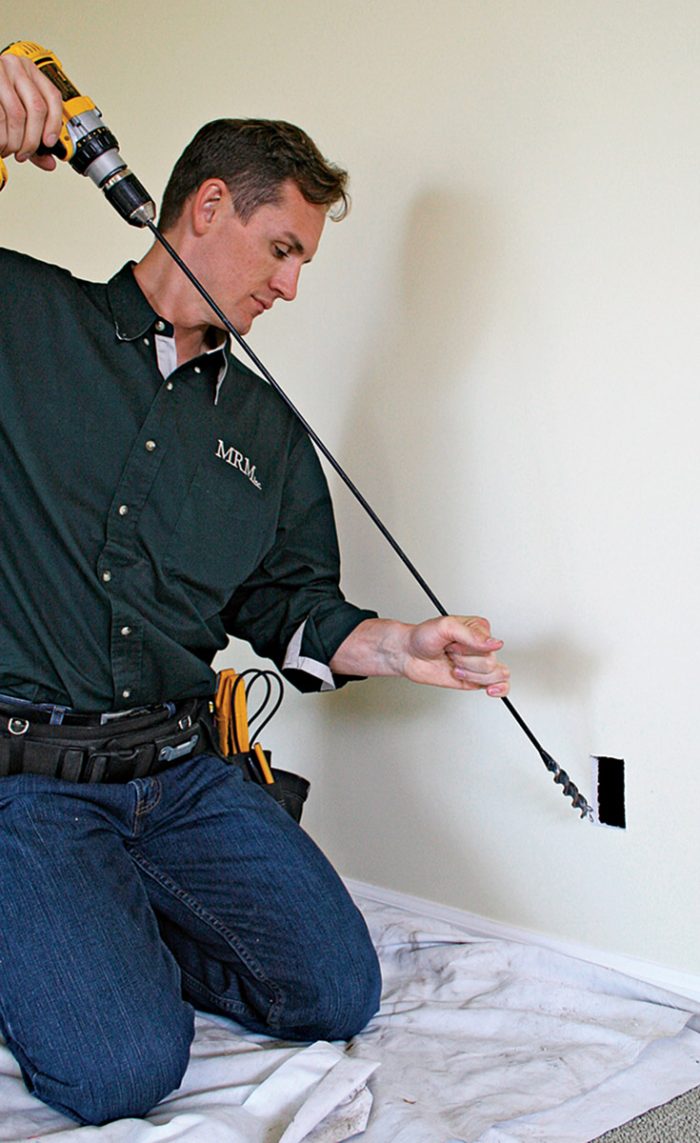
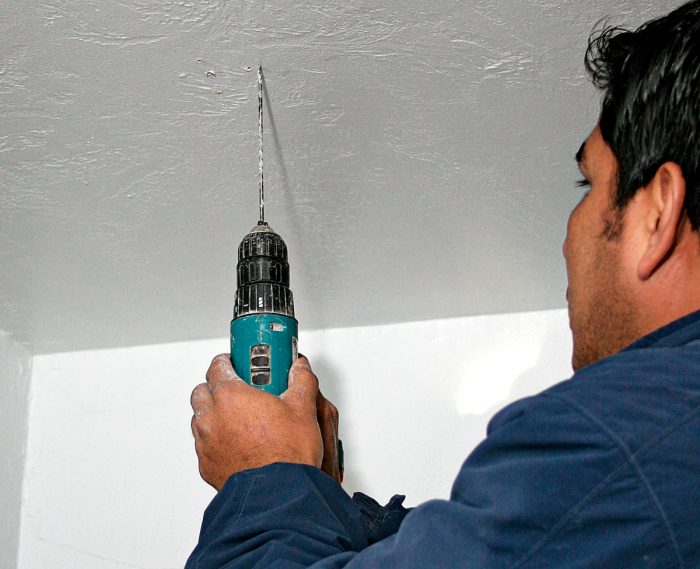
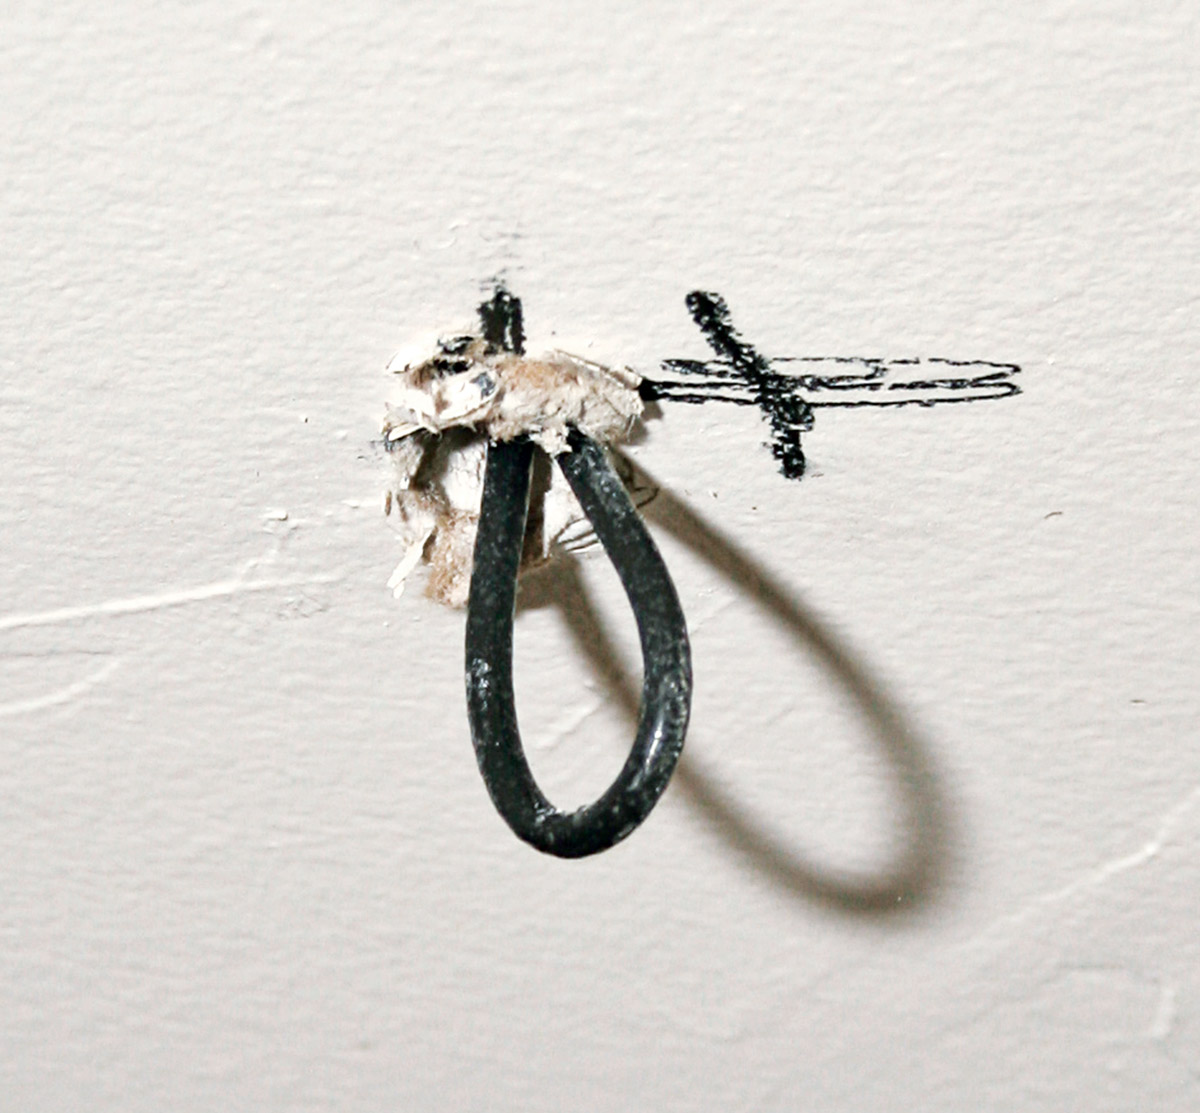
Fishing cable to ceiling fixtures or wall switches is usually a bit complicated. If there is an unfinished attic above or a basement below, run the cable across it, then route the cable through a stud bay to the new box in the ceiling. To run cable to a ceiling light, for example, drill up through the fixture location using a 3⁄16-in. by 12-in. bit to minimize patching later 1. Use a bit at least 6 in. long so a helper in the attic can see it—use a longer one if the floor of the attic is covered with insulation. Measure the distance from the bit to the wall; a helper in the attic can use that measurement to locate the nearest stud bay to drill an access hole into. If you’re working alone, loop the end of a stiff piece of wire about 1 ft. long 2 and insert it in the drilled hole; friction will keep the wire upright in the hole until you can locate it in the attic.

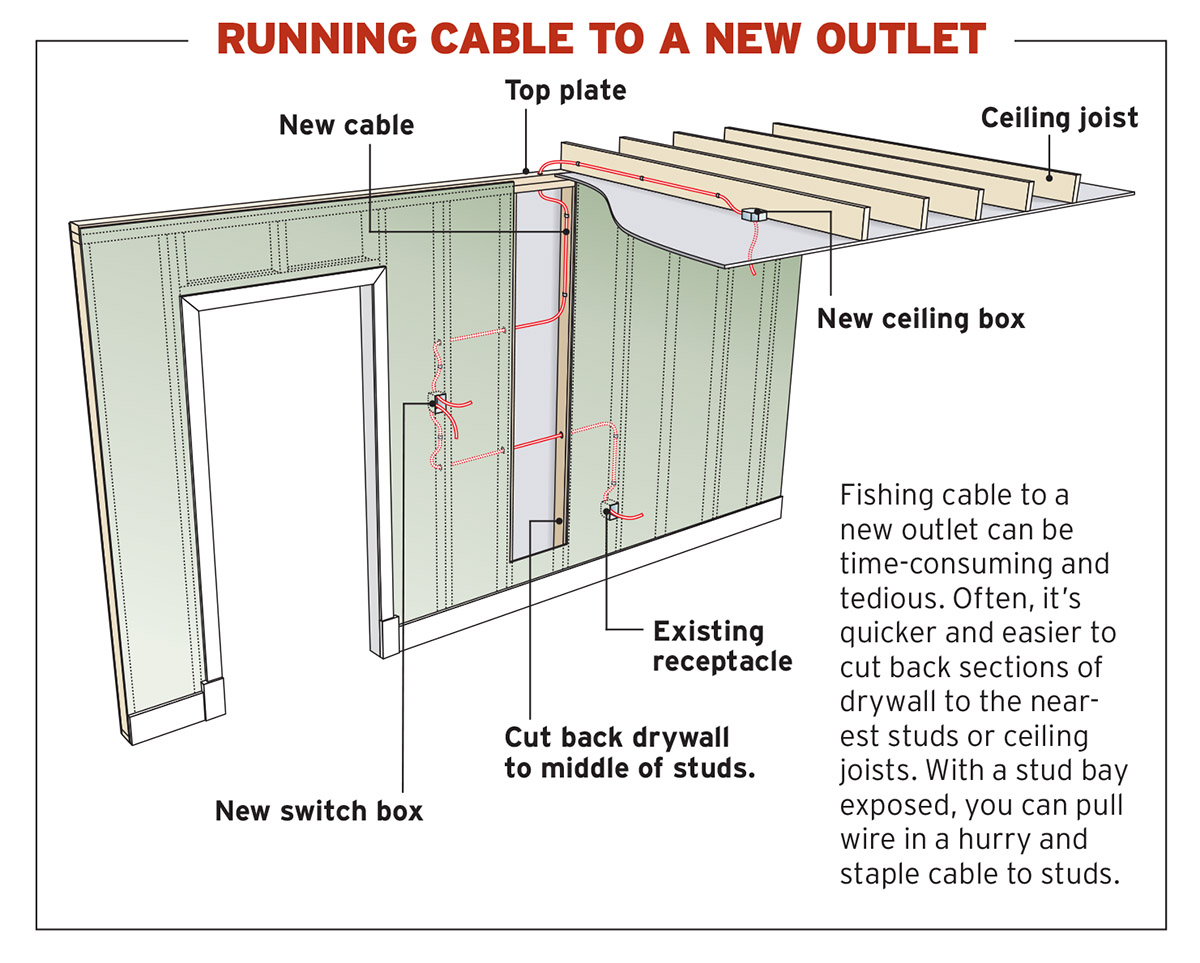
If there’s no access above the ceiling and/or cable must cross several ceiling joists to get from a switch to a light fixture, you’ll have to cut into finish surfaces at several points 3. To access cable in a stud bay, you’ll need a cutout to expose the top plate. Using a flex bit may minimize the number of holes you must cut to drill across ceiling joists. But as noted earlier, it may ultimately take less time to cut and repair a single slot running across several joists than to patch a number of isolated holes. Whatever method you choose, make cuts cleanly to facilitate repairs. First outline all cuts using a utility knife.


To run cable to a ceiling fixture, start by drilling an exploratory hole with a small-diameter bit.
1) To run cable to a ceiling fixture, start by drilling an exploratory hole with a small-diameter bit.

If you’re working alone, jam a long, looped wire into the exploratory hole, then go into the attic to look for it.
2) If you’re working alone, jam a long, looped wire into the exploratory hole, then go into the attic to look for it.

Running cable from a ceiling fixture to a wall switch means cutting access holes.
3) Running cable from a ceiling fixture to a wall switch means cutting access holes.


Wiring Complete, 3rd Edition

Excerpted from Wiring Complete, 3rd Edition (The Taunton Press, 2017) by Michael Litchfield and Michael McAlister

Available in the Taunton Store and at Amazon.com.


Previous: Running Electrical Cable Next: How to Run Non-Metallic Sheathed Electrical Cable

Guide

Wiring

Chapter

Rough-In

Sign up for eletters today and get the latest how-to from Fine Homebuilding, plus special offers.

Signing you up...

This site is protected by reCAPTCHA and the Google Privacy Policy and Terms of Service apply.
See all newsletters
See all newsletters

Log in or create an account to post a comment.

Sign up Log in

Become a member and get full access to FineHomebuilding.com

Wiring

Wiring

Trusted, code-compliant guidance from the pros for working safely on any wiring project

View Project Guide

View All Project Guides »

Become a member and get unlimited site access, including the Wiring Project Guide.

Start Free Trial

Working with Electricity
  • Basics
  • Safety
  • Troubleshooting and Upgrades
Tools and Materials
  • Electrical Tools
  • Electrical Boxes
  • Cables and Wires
Receptacles and Switches
  • Materials
  • Wiring Receptacles
  • Wiring Switches
Lights and Fans
  • Lighting Design
  • Installing Lights
  • Fans
Rough-In
  • Planning
  • Installing Electrical Boxes
  • Running Cable
  • Retrofit Work
  • Making Connections in Boxes
  • Electrical Conduit
Outdoor Wiring
  • Basics
  • Outlets
  • Installing Lighting
Panels and Subpanels
  • Understanding Panels
  • Circuits
  • Installing a Subpanel

Fine Home Building

Newsletter Sign-up

  • Fine Homebuilding

    Home building tips, offers, and expert advice in your inbox.

  • Green Building Advisor

    Building science and energy efficiency advice, plus special offers, in your inbox.

  • Old House Journal

    Repair, renovation, and restoration tips, plus special offers, in your inbox.

Signing you up...

This site is protected by reCAPTCHA and the Google Privacy Policy and Terms of Service apply.
See all newsletters

Follow

  • Fine Homebuilding

    Dig into cutting-edge approaches and decades of proven solutions with total access to our experts and tradespeople.

    Start Free Trial Now
    • Facebook
    • Instagram
    • X
    • LinkedIn
  • GBA Prime

    Get instant access to the latest developments in green building, research, and reports from the field.

    Start Free Trial Now
    • Facebook
    • YouTube
  • Old House Journal

    Learn how to restore, repair, update, and decorate your home.

    Subscribe Now
    • Facebook
    • Instagram
    • X

Membership & Magazine

  • Online Archive
  • Start Free Trial
  • Magazine Subscription
  • Magazine Renewal
  • Gift a Subscription
  • Customer Support
  • Privacy Preferences
  • About
  • Contact
  • Advertise
  • Careers
  • Terms of Use
  • Site Map
  • Do not sell or share my information
  • Privacy Policy
  • Accessibility
  • California Privacy Rights

© 2025 Active Interest Media. All rights reserved.

Fine Homebuilding receives a commission for items purchased through links on this site, including Amazon Associates and other affiliate advertising programs.

  • Home Group
  • Antique Trader
  • Arts & Crafts Homes
  • Bank Note Reporter
  • Cabin Life
  • Cuisine at Home
  • Fine Gardening
  • Fine Woodworking
  • Green Building Advisor
  • Garden Gate
  • Horticulture
  • Keep Craft Alive
  • Log Home Living
  • Military Trader/Vehicles
  • Numismatic News
  • Numismaster
  • Old Cars Weekly
  • Old House Journal
  • Period Homes
  • Popular Woodworking
  • Script
  • ShopNotes
  • Sports Collectors Digest
  • Threads
  • Timber Home Living
  • Traditional Building
  • Woodsmith
  • World Coin News
  • Writer's Digest
Active Interest Media logo
X
X
This is a dialog window which overlays the main content of the page. The modal window is a 'site map' of the most critical areas of the site. Pressing the Escape (ESC) button will close the modal and bring you back to where you were on the page.

Main Menu

  • How-To
  • Design
  • Tools & Materials
  • Video
  • Blogs
  • Forum
  • Project Guides
  • Reader Projects
  • Magazine
  • Members
  • FHB House

Podcasts

  • FHB Podcast
  • ProTalk

Webinars

  • Upcoming and On-Demand

Podcasts

  • FHB Podcast
  • ProTalk

Webinars

  • Upcoming and On-Demand

Popular Topics

  • Kitchens
  • Business
  • Bedrooms
  • Roofs
  • Architecture and Design
  • Green Building
  • Decks
  • Framing
  • Safety
  • Remodeling
  • Bathrooms
  • Windows
  • Tilework
  • Ceilings
  • HVAC

Magazine

  • Current Issue
  • Past Issues
  • Magazine Index
  • Subscribe
  • Online Archive
  • Author Guidelines

All Access

  • Member Home
  • Start Free Trial
  • Gift Membership

Online Learning

  • Courses
  • Project Guides
  • Reader Projects
  • Podcast

More

  • FHB Ambassadors
  • FHB House
  • Customer Support

Account

  • Log In
  • Join

Newsletter

Get home building tips, offers, and expert advice in your inbox

Signing you up...

This site is protected by reCAPTCHA and the Google Privacy Policy and Terms of Service apply.
See all newsletters
See all newsletters

Follow

  • X
  • YouTube
  • instagram
  • facebook
  • pinterest
  • Tiktok

Join All Access

Become a member and get instant access to thousands of videos, how-tos, tool reviews, and design features.

Start Your Free Trial

Subscribe

FHB Magazine

Start your subscription today and save up to 81%

Subscribe

You have 1 free article remaining.

Get complete site access, including thousands of videos, how-to tips, tool reviews, and design features.

Start your FREE trial

Already a member? Log in

We hope you’ve enjoyed your free articles. To keep reading, become a member today.

Get complete site access to expert advice, how-to videos, Code Check, and more, plus the print magazine.

Start your FREE trial

Already a member? Log in

Privacy Policy Update

We use cookies, pixels, script and other tracking technologies to analyze and improve our service, to improve and personalize content, and for advertising to you. We also share information about your use of our site with third-party social media, advertising and analytics partners. You can view our Privacy Policy here and our Terms of Use here.

Cookies

Analytics

These cookies help us track site metrics to improve our sites and provide a better user experience.

Advertising/Social Media

These cookies are used to serve advertisements aligned with your interests.

Essential

These cookies are required to provide basic functions like page navigation and access to secure areas of the website.

Delete My Data

Delete all cookies and associated data