
Recessed Can Lights Can Leak Air
An energy pro explains how to cut down on air leakage through recessed units.
The chief virtue of recessed can lights is that they are unobtrusive. If you look at a can light with an infrared camera, though, you’ll usually see evidence of air leaks at the perimeter of each fixture. In most cases, these innocent-looking circles are actually holes in your ceiling.
Not only do recessed can lights leak air, but warm lightbulbs also make the situation worse, turning the holes into small chimneys. The heat source accelerates the stack effect, speeding up the flow of air. Still worse: Each fixture is almost as big as a gallon of milk, and it takes up room in your ceiling that should be filled with insulation. The hot spots are located right where your insulation is thinnest. That’s why recessed cans are a major cause of ice dams.
You may be thinking, “I don’t have that problem, because I installed a fiberglass batt on top of each fixture.” Unfortunately, fiberglass batts are no solution. If you check, you’ll probably see that the batts on top of your fixtures are black. The stains are caused by the dust that the insulation has filtered out of the escaping stream of hot air.
If you insist on replacing the recessed can, install a newer fixture with an IC-AT rating. If the existing fixture is IC-rated but not airtight, it’s possible to install an airtight cap on the attic side of the fixture, as long as you have access to the attic. If you lack access from above, remove the fixture, and replace it with a surface-mounted fixture.
If the fixture has an IC-AT rating, you can leave it in place. If you have access to the attic, however, it’s worth verifying that the fixture is covered by insulation.
Another way to cut down on air leakage through a can—especially one installed in a cathedral ceiling—is with an LED conversion kit. These kits include airtight compartments that can be inserted to replace an existing fixture’s can and lamp trim. Examples of LED conversion kits include the Cree LR6 LED conversion kit (about $130) and the Cooper All Pro LED conversion kit (about $80).
If you follow the recommendations here, you can reduce air leakage through your recessed cans. Don’t forget to install a compact fluorescent (CFL) or LED lamp, not an incandescent.
Better yet, eliminate all your recessed cans. With the range of fixtures now available— surface-mounted ceiling fixtures, pendants, sconces, track lights, cove lights, and floor lamps—it’s easy to design an elegant lighting scheme without any recessed cans.
Three types of fixtures
There are at least three types of recessed can fixtures. Older fixtures had holes in them and depended on air leaking through the ceiling to stay cool enough to be safe. The manufacturers of these older fixtures warned installers that the fixtures should never be covered with insulation.
Eventually, manufacturers developed recessed cans that are labeled IC (insulation contact). These improved units are designed to operate safely even if they are covered with insulation. The fixtures include a thermal switch that turns off the fixture if a high-wattage bulb causes the unit to overheat.(Once the unit cools to a safe temperature, the light comes back on.)
However, just because a fixture is rated for insulation contact doesn’t mean that it isn’t leaky. When a house is tested with a blower door, a smoke pencil held near a recessed can fixture—even one that is IC-rated—often shows significant air leaks.
The best recessed cans are those labeled IC-AT (insulation contact, airtight) or those that are labeled as complying with ASTM E283 (an air-leakage test). Some labels may note that the fixture complies with “Washington state requirements,” which simply means that the fixture has passed the ASTM E283 test.
The design of IC-AT fixtures differs from manufacturer to manufacturer. Some units depend on a gasket included with the trim kit to seal the crack between the drywall and the fixture; needless to say, any of the included gaskets must be installed for the fixture to be airtight. If the installer forgets the gasket, the AT label won’t mean much.
Start with an inspection
The first step is to determine the type of fixture you have. You can usually tell from indoors if a recessed can is IC-rated. First, remove the trim and then remove the bulb. Look inside the fixture with a flashlight. If there are holes or slits in the side of the can, it is probably not IC-rated. Look for a label; most IC-rated fixtures include the letters “IC” in the model number.
If you know that the fixture is IC-rated but you’re not sure if it is airtight, look for the letters “IC-AT” near the model number. If you can’t find a label, climb into the attic (if you have access), and look at the fixture from the attic side. An airtight fixture has a metal shroud over the entire fixture, without any holes or slits, and has a gasketed assembly where the electrical cable enters.
An older fixture without a thermal switch should be removed and discarded. Once the fixture has been removed, the most energysmart option is to patch the drywall and install a surface-mounted fixture (for example, a pendant light or track lighting).
What the energy code requires
The two most recent versions of the International Energy Conservation Code (IECC) require that any recessed-can fixture installed in an insulated ceiling must meet the ASTM E283 airtightness standard and be labeled for insulation contact.
According to section 402.4.5 of the 2009 IECC, “Recessed luminaires installed in the building thermal envelope shall be sealed to limit air leakage between conditioned and unconditioned spaces. All recessed luminaires shall be IC-rated and labeled as meeting ASTM E283 when tested at 1.57 psf (75 Pa) pressure differential with no more than 2.0 cfm (0.944 L/s) of air movement from the conditioned space to the ceiling cavity. All recessed luminaires shall be sealed with a gasket or caulk between the housing and the interior wall or ceiling covering.”
The requirement in the 2012 IECC (in table R402.4.1.1) is more succinct: “Recessed light fixtures installed in the building thermal envelope shall be airtight, IC rated, and sealed to the drywall.”
Make or buy a can-light cap
For years, weatherization contractors have been retrofitting airtight caps on leaky recessed cans, including older fixtures that lack a thermal switch. However, some experts call this practice risky, because fixtures without a thermal safety switch might overheat. The safest approach is to remove these older fixtures and to replace them with new IC-rated fixtures or surface-mounted fixtures.
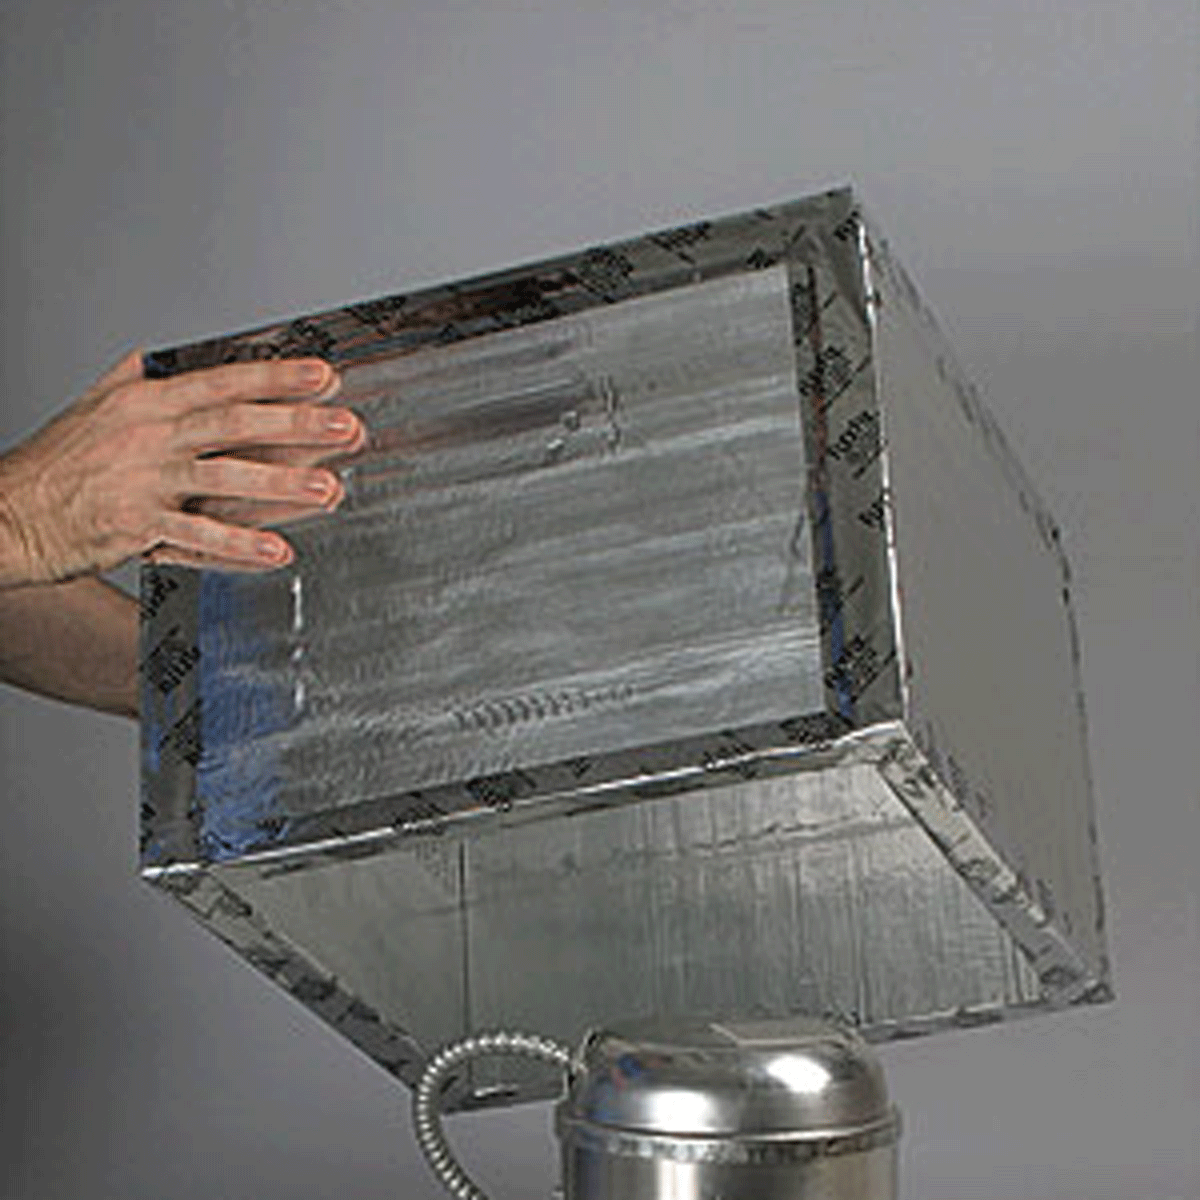
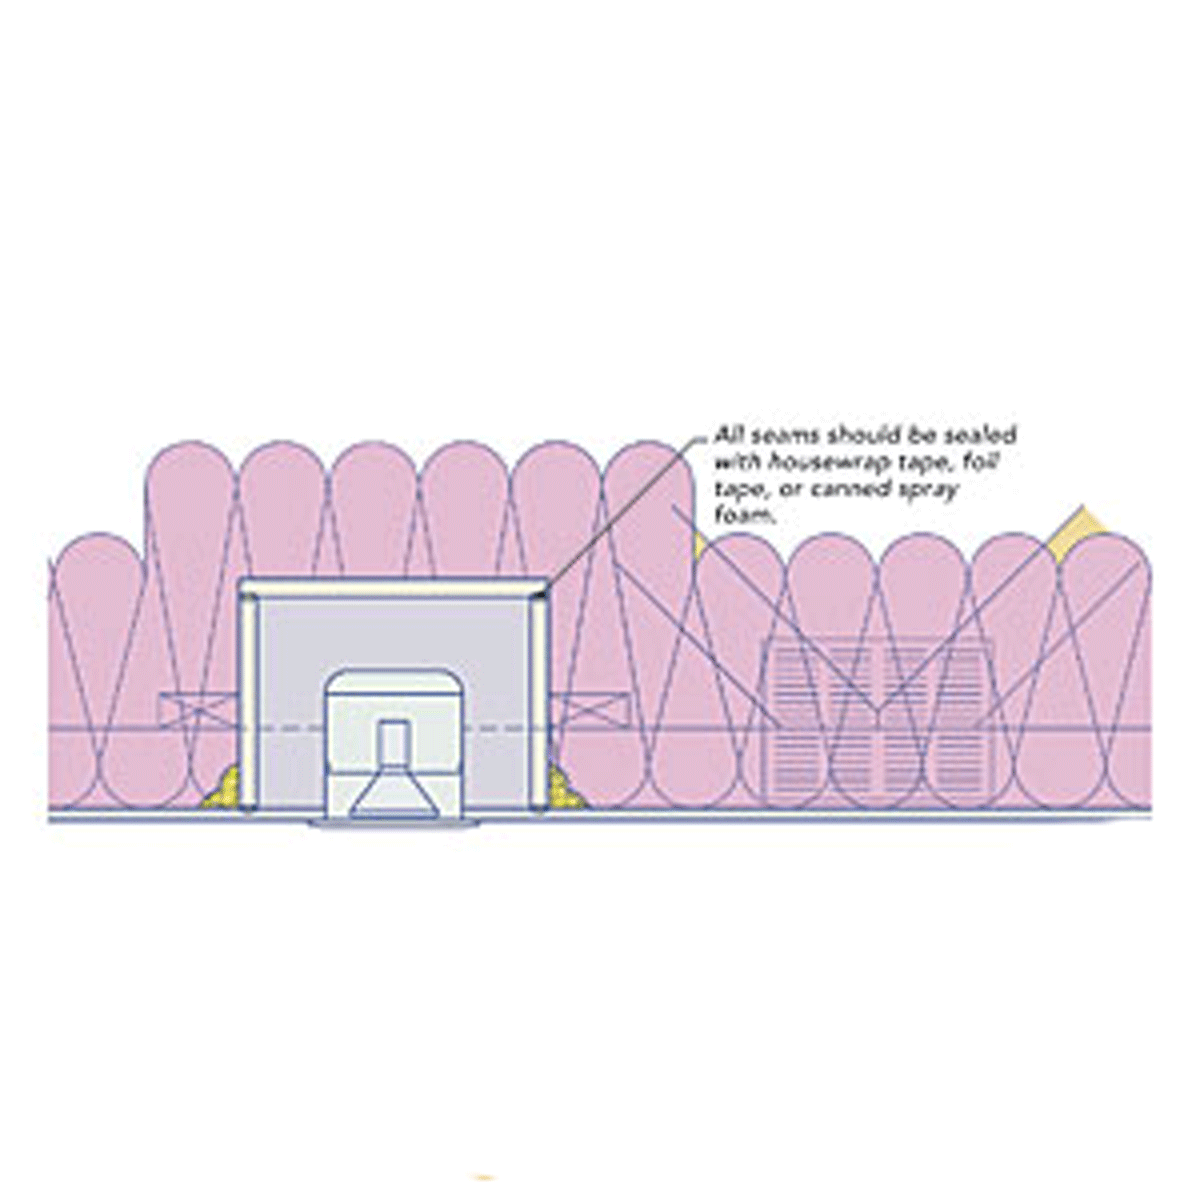
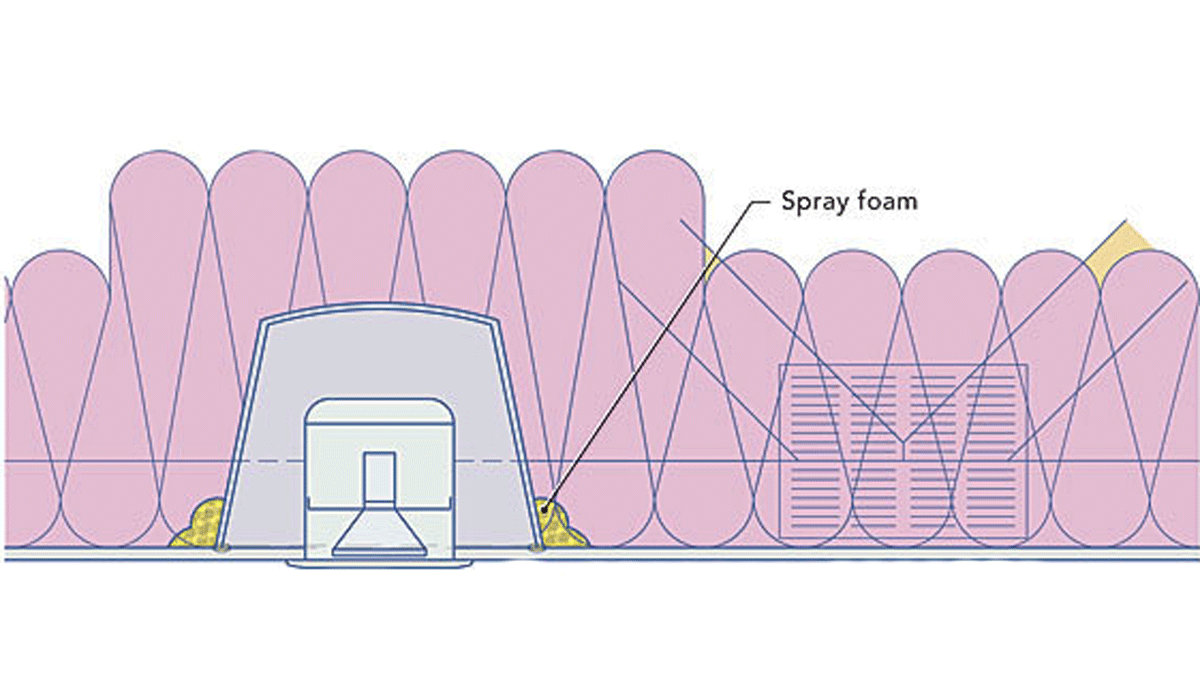
Working from the attic side, it’s safe to install an airtight cap above a leaky IC-rated fixture. You can build your own box or cap from foil-faced rigid foam or gypsum drywall. A homemade box should be large enough to leave 3 in. of clearance on the sides and top of the fixture. Seal all seams and wiring penetrations with tape or canned spray foam.
Once you’ve built the cap, make a notch for the electrical cable, then seal the cap to the drywall with canned spray foam. The installed cap should be covered by a generous layer of insulation. Finally, from the interior side, remove the fixture trim, and carefully caulk the seam between the drywall ceiling and the fixture.
At least three manufacturers sell caps for recessed cans. Tenmat makes the sturdiest covers; they are made of fire-resistant mineral wool. Tenmat covers are available from Energy Federation Inc. (efi.org) for $19.65 each.
Other choices include Seal-A-Light covers, which are available for $16 each from Shamrock Enterprises (sealalight.com), and Owens Corning Smart-Cap covers, which are available for $14 each from The Home Depot.
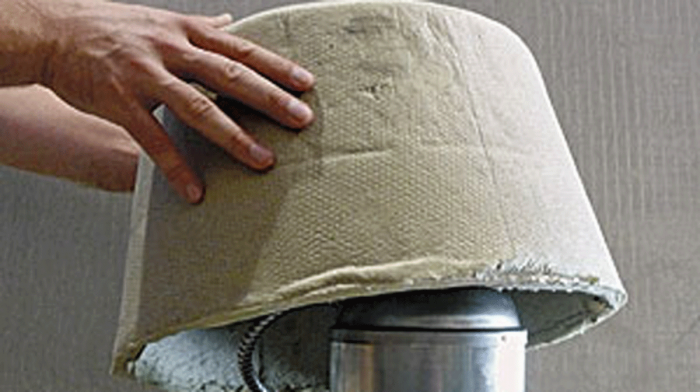
Build a box
Be cautious if you want to make your own can-light covers from scraps of foil-faced polyisocyanurate rigid-foam insulation, shown here, or drywall, because when paired with hot halogen bulbs they can be fire hazards.
 |
 |
Caps are insulation safe
Made from mineral wool, Tenmat’s can-light covers can be used to create an airtight enclosure around existing recessed lights and isolate the fixture from surrounding insulation.
 |
 |
More details online
Some of these details are new to Green Building Advisor’s energy-smart collection. GBA Pro members get full access to the detail library, which contains almost 2500 details on building better, tighter, more-energy-efficient houses. To browse through the collection, go to GreenBuildingAdvisor.com/detail-drawings.
Drawings: Steve Baczek, Architect
